Overview
Unlike other “Pro Tips” guides, I aim to give you a solid understanding of fundamental FPS skills. I’ll cover crosshair placement, sensitivity, peeker’s advantage, and a lot more.This isn’t a meme guide or something like that, so I’ll give some pretty harsh opinions on certain weapons or playstyles that are suboptimal. If I rate your favorite weapon or playstyle poorly, don’t take it personally. This is a guide for people who want to succeed and I treat the game in an impersonal way. If you have fun doing something else I can’t stop you.
Preface

This is common knowledge and maybe a bit hackneyed, but it bears repetition: Practice is the only way to improve. Reading Steam guides won’t make your aim better, your gamesense more acute, your reaction times any faster, and so on; they will only give you fundamental concepts upon which you can build through practice and application. With that in mind, let’s get started.
I. Mouse Sensitivity
The following are core skills applicable to and necessary in any multiplayer FPS game. They are transferrable and not specific to Insurgency, but nevertheless they are key and the most important thing you will read in this guide.
I. Mouse Sensitivity
If you’re reading this guide, your mouse senstivity is probably too high. I know it’s painful to acknowledge that one’s mouse settings are wrong because you have used the same ones for years and are comfortable with them; however, mouse sensitivity is not simply a subjective matter as many people believe–but instead, it encompasses a wide array of objective consequences and elements.
Before I continue, I must warn that some mice are simply not good enough for high-level FPS gameplay. Make sure your mouse has adjustable DPI that can go down to at least 800. It’s also preferable that your mouse has a good optical sensor (not laser) and suits your hand size and grip style.
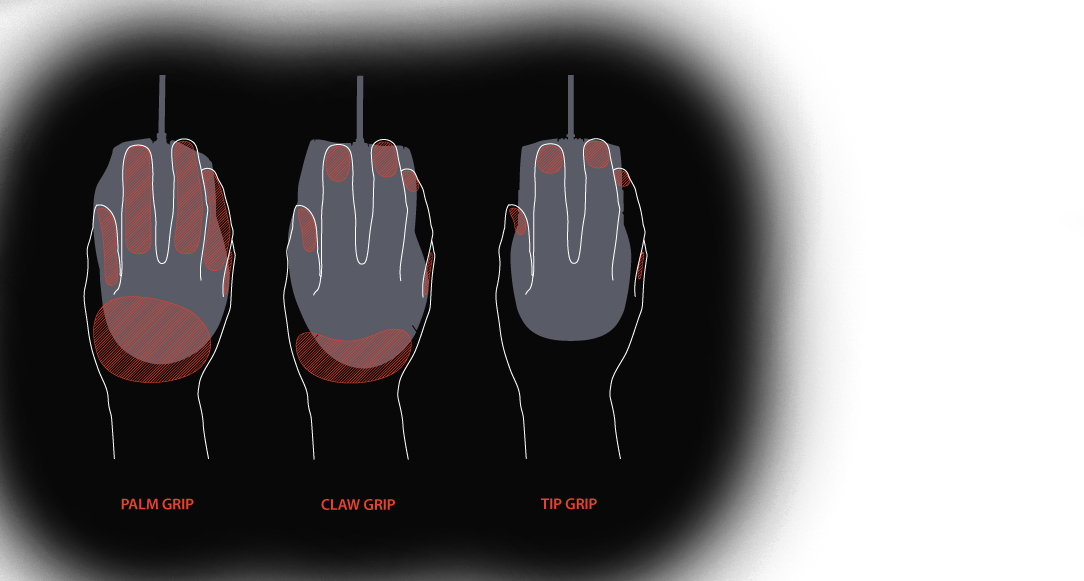
Quickly, about grip; there are four kinds of broad grip styles: Palm, Claw, Fingertip, and Hybrid. Also, there are two kinds of aim styles (they’re not mutually exclusive): Wrist aim and arm/elbow aim. The differences are as follows:
Grip Styles:
Palm: Mouse is gripped firmly in the entire hand and the fingers are mostly flat. Suitable for arm/elbow aim.
Claw: Mouse is contacted by the finger tips and base of the palm. Fingers are contracted like a claw. Most suitible for wrist aim, however it can also work for arm/elbow aimers.
Fingertip: Mouse is gripped by fingertips only. Suitable for wrist aimers.
Hybrid (Not Shown): Some mix of the palm and claw grip. Versatile and usable by either wrist or arm/elbow aimers.
Also note that some people overlap their pinky onto the mouse and off of the mouse pad to lessen drag. Having more or less drag can make a huge difference in your aim and it’s really up to you.
Aim Styles:
Wrist Aim: Most aiming actions are accomplished by pivoting the wrist. This can be very stressful on your wrist and can lead to carpal tunnel syndrome, so I reccommend against it; however some players swear by it and claim they can more easily track targets. The only objective disadvantage I have found is that wrist aim is very difficult at low sens, like 180, and you will most likely incorporate a lot of arm aim in Sandstorm.
Arm/Elbow Aim: Most aiming actions are accomplished by pivoting the elbow and moving the shoulder. Allegedly, this style of aiming is more consistent and more accurate than wrist aim by a slim margin, but there is no data to confirm that. Arm/Elbow aim is safer and reduces the risk of carpal tunnel syndrome since the elbow and shoulder joints are less complex and narrow than the wrist and thus will not impinge nerves. Arm aim will be most suited for Sandstorm because the game is best played with a low sens, and arm/elbow aimers can make wider arcs than wrist aimers which is helpful at low sensitivities.
Keep in mind that you may blend both styles of aiming depending on what is more comfortable for you. Most people will make flick shots with the wrist and make gross movements with the arm, but make fine adjustments with the wrist. That works fine and there’s not really a huge difference between aim styles, but it’s important to understand because they are more or less compatible with various grip styles and have important health consequences in the long run.
Setting your Sensitivity
First, high mouse senstivitiy is incompatible with FPS games. If your sens is too high, you will have inconsistent aim and be more error-prone. Not only that, but you will find yourself struggling against your mouse in order to make precise shots. At high sensitivities, your cursor/crosshair will skip pixels and make it impossible to land shots at long ranges, which is an objective disadvantage. Plus, it is almost impossible to flick consistently, control recoil, and transfer sprays on high sensitivities.
Of course, defining what “high” and “low” mouse sensitivties are is troublesome since it’s a relative value judgement; however, we can gain the most insight by contextualizing and comparing sensitivities. Among office workers 3400 DPI (Dots per inch, basically how sensitive the mouse sensor is to movement,) may be considered normal or average; however, among competitive FPS players, 400 – 800 DPI is by far the standard. For this reason, since you’re presumably not already good at FPS games, your evaluation of your own sensitivity is flawed. You may think 3400 DPI at 5 in-game sens is “medium,” however, it is actually far too high. Don’t get defensive about your sensitivity — this is an impersonal matter. If you want to be good at something, do what the best people do.
Make sure you have a large mouse pad. Try a Steelseries QCK+/Heavy, or get a deskpad.
For the sake of simplicity, and to make sensitivity more tangible to the reader, I will express it in terms of degrees, being 360 and 180 degrees respectively. A 360, for example, is a complete rotation from moving the mouse across the pad to the edge. Various games require different sensitivities, even among FPS games. Overwatch, for example, is both a movement-centric and aim-centric game, and so a 360 sensitivity is good; however, Insurgency is mainly aim-centric and thus a 180 degree sensitivity is better.
If you find that movement is too difficult at such a sens, you may try setting your hipfire sens and aim-down-sights (ADS) sens separately; although, if you want to build good muscle memory, it’s best to unify them with a 180 sens.
To achieve a proper sens, you must use a combination of windows settings, mouse software settings, and in-game sensitivity settings. Here’s a quick rundown on how to achieve your target sens:
Windows Settings:
1. Install Windows Mousefix.
Located at
[link]
Get the proper one for your version of windows and install it.
2. Enable “Enhance Pointer Precision” but ONLY after installing mousefix. This will disable Windows’s native mouse acceleration. It’s counter-intuitive, but the fix works only when the box is checked.
3. Set the mouse speed slider to 6/11 ticks. This ensures uniform mouse performance across Windows and games.
Mouse Software:
1. Verify the manufacturer and model of your mouse.
Ensure that your mouse supports software-level settings and DPI adjustment, go to the manufacturer’s website, and download + install the mouse software/drivers appropriate to the model you own.
2. Set your DPI
Find the DPI setting in your mouse software and adjust it. I recommend 400 DPI. If you dislike 400 DPI because it doesn’t feel smooth to you, try 800 DPI. I don’t recommend going above 1000.
If you can’t find the DPI setting, it might be called CPI (Counts per Inch;) it’s the same thing.
Insurgency Settings:
1. Enter a match.
2. Press Escape and enter the Settings menu.
3. Click the “Controls” submenu
4. MAKE SURE MOUSE SMOOTHING IS DISABLED
5. Change the look sensitivity setting, hit apply, then move your mouse across your mouse pad in-game to test whether you have achieved a 180 or not. Try both hipfire and ADS sens.
6. If your ADS sensitivity is too high or low, adjust the “Aim Down Sights Sensitivity” slider. It is a multiplier, so make very small changes.
7. Enable “Scale Sensitivity with Field of View” and “FOV Scaling Prefers Scope FOV.” These will make your sensitivity more uniform across different magnifications. If you don’t like it you can disable it, but I find that these settings are most comfortable.
For reference, I am using a Steelseries Rival 600 at 400 DPI with 0.34 look sensitivity and a 0.8 ADS multiplier.
II. Crosshair Placement
Now that your sensitivity has been properly configured, now you must learn the basic concepts of aiming.
II. Crosshair Placement
Crosshair placement consists of preemptively placing your crosshair where enemies might be. More specifically, aiming is comprised of two elements: Crosshair placement, which is the cerebral and strategic component, and raw mechanical skill, which is the physical component. Both are necessary in order to master aim, but personally I would argue that good crosshair placement minimizes the need for incredible mechanical skill, and I think it is the one most easily improvable aspect of a player’s performance.
Note that when I refer to “crosshair,” I mean the point at which the barrel of your gun is pointing. This includes hipfire soft aiming as well as the front sight post/reticle on your weapon.
First, good crosshair placement requires both map knowledge and familiarity with the game, however, there are aspects that are agnostic of the need to predict enemy movement. The best example is edgelocking. When you are moving through the map and clearing corridors and rooms, always keep your weapon trained on the edges of doorways, building edifaces, hallways, and so on. If an enemy wants to peek one of these angles, you will already have your gun pointing at it and all you have to do is ADS and fire. This eliminates or minimizes the need to actually adjust your aim, and thus your reaction time will be much faster. In addition, your aim will also be more consistent because you will not need to flick to your target. Another way to understand edgelocking is that you should not be aiming nowhere and at nothing. Always be aiming somewhere an enemy could come from, such as a door, window, etc.
If you still have trouble understanding this, or maybe want a visual example, watch this video by Josh Nissan. Yes, its a CS:GO video, but it applies to Insurgency too.
Second, keep your view at head/chest level. If an enemy appears, you don’t want to aim at their legs; you want to aim at their body since it has the second highest damage multiplier and is the largest, easiest target. This is a very simple tip, but I often nevertheless see unskilled players looking at the floor 99% of the time I spectate them. There’s nothing to shoot down there–look up!
Eventually when you become practiced enough, you will begin to learn common contact points on various maps, where players might be when an objectve suddenly becomes contested, common sniper/30-year-old boomer baiter spots, and so on. You will be able to pre-aim and prefire these places in order to score kills without exposing yourself to an aim duel. As a general rule, you want to avoid aim duels and take unfair fights that give you the advantage since you don’t have a lot of health in Sandstorm, and especially since there is a suppression mechanic that increases recoil when you’re shot at. Pre-aiming and prefiring are skills that will come in time, but keep in mind that you can fire WHILE rounding a corner if you know where an enemy is, and you don’t necessarily have to know an enemy is in a given location before you fire at it. You just need to act on educated guesses and accumulated wisdom. Prefiring, pre-aiming, and wallbanging are all characteristic of advanced-skill players and your goal should be to first conquer the funadamentals before you worry about stuff like that.
Next, I will discuss peeker’s advantage, which is absolutely crucial to understand.
III. Peeker’s Advantage and Netcode
All FPS games suffer from various latency-related ailments when played online, and Insurgency Sandstorm is especially ill. I will show you what these ailments are and how you can take advantage of them as well as avoid being harmed by them.
III. Peeker’s Advantage
Peeker’s advantage refers to the benefit conferred by in-game server latency when a player rounds a corner. That benefit takes the form of the peeker seeing and shooting around a corner before he appears on another player’s screen. This occurs because the server cannot accurately predict the direction of a player’s movement when he is moving fast and erratically, so when the player peeks, the server needs fractions of a second to catch up and transmit the peeker’s location to other players; so in simple terms, it looks like you’re teleporting around walls and shooting people.
Latency is an issue that cannot be fixed by any game developer, so every FPS game has some degree of peeker’s advantage. In CS:GO it’s negligable and confers only maybe 100 miliseconds of advantage at most; however in Sandstorm the advantage is pretty extreme, giving peekers as much as a third of a second to acquire and fire at targets before they appear on other players’ screens. The average human reaction time is somewhere around 300 ms, and if a player has about 433 ms to shoot you before you even see him and react to him, there’s nothing you can really do about it–you’re just going to die.
Since this issue is so extreme, you must learn both how to avoid it and abuse it if you want to go on long killstreaks and earn high K/D ratios. There’s no shame in it, and this is how it works for literally every multiplayer FPS in existence. This isn’t an exploit, it’s not a bug, it’s just the nature of internet connections and server-client architecture.
Generally, there are two consequences to the severity of peeker’s advantage in this game. One, passively holding angles and baiting are suicidal and ineffective ways to play the game or defend objectives. Two, playing aggressively is the most powerful and effective strategy, and having solid movement skills is crucial for survival and success.
With this in mind, it is important to understand that the core driver of peeker’s advantage is movement speed. The faster you travel around a corner, the more time you will have to target players before you appear. This means that taking corners slowly is usually a bad idea, and that sprinting around them and then firing at people is more ideal. That may seem counterintuitive since this is ostensibly a “Tactical FPS” that should incentivize slow and careful play vis-a-vis Call of Duty-style sprinting, however, nothing can really be done about this issue–you’ll just have to live with it and adapt.
To maximize speed, keep your player weight low and don’t wear armor. Armor is ineffective and unworth wearing for reasons I will explain in a later section. For now, just keep in mind that you will be more successful and will maximize peeker’s advantage without armor because you will run faster and ADS faster. If you want an in-depth red pill on armor, watch the video to the right.
Finally, I want to note an important issue with character rendering in Sandstorm that makes peeker’s advantage even worse. There seems to be a form of player occlusion implemented in the game to both increase FPS and mitigate wallhacking. The way it works is that the game stops rendering player models that are behind walls or objects, but unforunately these players are not properly rendered in some circumstances when they should be visible to the player. Sometimes when players round corners, they do not render for a few seconds and appear to teleport into a doorway, hallway, or window. This is game-breaking and prevents players from reacting to enemies. In other more egregious cases, players don’t render at all when they are down a hallway or street for a considerable amount of time even though they should be plainly visible to the player.
Pay attention if you see this, NWI, and pls fix the player occlusion issues.
The following section will end the lesson on universal FPS concepts and cover those more particular to Sandstorm itself.
IV. Recoil, Accuracy, and Damage
Like most tactical shooters, Sandstorm’s weapons have little to no bullet spread and instead rely on various recoil subsystems to introduce a randomness component to marksmanship. Recoil follows simple patterns, is broadly controllable, and a firm grasp on it will lead to greater success. Further, accuracy in Sandstorm is largely dependent upon how you fire and how well you can control recoil.
IV. Recoil
Sandstorm has two kinds of recoil: Vertical recoil and horizontal recoil. Vertical recoil is easily controllable, whereas horizontal recoil can be somewhat more difficult to rein in because it is a great deal more random in some firearms.
All weapons follow some kind of basic recoil pattern. Most weapons, like the AK, M4, MK18, and others simply recoil up and mildly leftward at intensities that vary per weapon. Other weapons, like the MP7, however, recoil up and slightly rightward. Make sure to fire your weapon at a wall in order to see which direction it recoils.
It is possible and necessary to control recoil in order to shoot accurately, and it’s quite easy and intuitive. Simply pull your mouse in the opposite direction the gun is recoiling. If it recoils up and to the left, then pull your mouse down and to the right.
Full-Auto vs. Burst vs. Tapping
Due to the outrageously intense first-shot recoil in Sandstorm, bursting and tapping are simply not viable. Full auto is the most controllable and accurate way to shoot and you should be using it exclusively for all weapons except the MK14 EBR.
Accuracy
All weapons in Sandstorm seem to have little or no bullet deviation or spread. Because of this, all weapons can hit targets at long range; however, it is obviously not viable to use all weapons at long range due to bullet drop, recoil, and damage dropoff.
Ballistics
Insurgency Sandstorm does have a ballistics system; however, the maps are so small and the weapons are all hitscan within 100 meters so that you rarely must compensate for bullet drop or travel time.
Damage
Damage in Sandstorm is determined not by the weapon, but instead by the round that it fires. There are a few broad categories, and I have included rough damage estimates for each in terms of hits to kill:
1. Full-sized rifle – 1 hit to kill, center mass within medium range
This includes weapons like the G3, Mk. 17 (Maybe), Mk. 14 EBR, and FAL.
2. Intermediate rifle – 2 hits to kill, center mass, within medium range
This includes weapons like the M4, M16, Mk. 18, AKM, AK 74, etc.
3. Pistol – 3 hits to kill, center mass, within medium range
This includes both handguns and SMGs.
4. Shotgun – One shot to kill within medium range, center mass, assuming most pellets hit.
Damage Dropoff
Over distance, damage gradually diminishes. In practical terms, this means that one more bullet will be required to kill a target than within medium range. The range at which this occurs is pretty far, so under most circumstances you will deal full damage; however, keep this in mind when you select a weapon. Full-sized rifles seem to not suffer from as much damage drop off as intermediate rifles, and pistol caliber weapons appear to be affected greatly by distance.
Generally, you won’t be choosing a particuar intermediate-cartridge rifle over another because of damage, but instead because of handling characteristics or supply cost. The more meaningful choice is between a battle rifle like the G3 or FAL and an assault rifle like the M4 or AKM.
Within these categories there are minute differences. A .45 caliber pistol like the M45 or 1911 does slightly more damage than the SIG or Tariq, for example, but the difference is negligable in my experience. Something that may be important to note is that the MP7 fires a relatively small pistol cartridge, which is 5.7x28mm, which does slightly less damage but has better penetration than 9mm. It is more effective against armor at the cost of raw damage, but armor is so ineffective that it doesn’t make a significant difference, which is a great segue to my next point:
Armor and Weight
Do not wear armor. It slows you down and doesn’t protect you from small arms within close range (See video from Section III). Not wearing armor confers upon you two benefits: 1. You run faster, which allows you to maximize peeker’s advantage. 2. You aim down the sights faster because your weight is lower, which allows you to react more quickly and accurately to enemies.
The reason armor slows you down is because it, alongside carrier rigs, dramatically increases your weight. You can see the weight bar on the loadout screen. The higher it is, the slower you move and the slower you aim down sights. If you are in an aim duel after mutually sprinting into an enemy, the player with the lower weight is going to win most of the time, so it is necessary to keep your weight as low as possible.
I will make one exception: Armor does confer a small amount of explosive protection. If you frequently die to nade spam, consider wearing light armor.
Don’t worry so much about weight if you’re playing Demolitions or Gunner, because explosives, carriers, and machine guns are very high and you don’t really have alternatives for those classes. I reccommend wearing a heavy carrier if you play Demo, and to just have a light carrier as gunner. Since Gunner is largely a stationary class, you may consider wearing armor to reduce the damage of distant riflemen and explosives.
V. Classes and Loadouts.
Such a wide array of weapons exists in Sandstorm, and they are rather poorly balanced. Some are anemic, such as the G36K, while others are borderline overpowered such as the shotguns. I will attempt to describe the characteristics of all the weapons as well as list them into categories.
V. Weapons, Classes, and Loadouts
Insurgency has many classes to choose from. Here is a list, along with descriptions of their roles:
Commander
Avoids direct combat and spots for fire support in conjunction with an Observer using a set of binoculars.
Observer
Follows the commander around, protects him, and serves as a portable radio for the commander. The commander can only call in fire support when he has an observer nearby. When the commander calls in artillery, the observer must stay alive during the entire duration of the call, even if the commander dies. As long as the observer confirms the fire support, it will come through.
Just a side note about commander and observer: I don’t actually think Insurgent fire support is even very good, and this game mechanic is pretty poorly designed. Don’t feel bad if you don’t want to play those roles.
Rifleman
Basic, versatile reserve role that has access to assault rifles, battle rifles, and hand grenades.
Breacher
Close quarters combat class that has exclusive access to shotguns and SMGs in addition to carbines. Breachers can also carry C4/IEDs, as well as incendiary grenades, flashbangs, frags, and smoke. This class is mainly picked for the shotgun/AS VAL.
Gunner
Has exclusive accesss to light machine guns. Mostly a subpar class, but has some niche uses on the Insurgent team due to the PKM’s high damage and penetration.
Demolitions
Has exclusive access to rocket launchers, underbarrel grenade launchers, and land mines. Sports a limited arsenal of assault rifles and battle rifles (BRs are incompatibile with underbarrel GLs so you won’t really be using them.) Demolitions is a fun and useful class, but it’s hard to play aggressively because rocket launchers, heavy carriers, and GLs are very heavy and slow you down. Mainly you should be targeting technicals, clustered infantry, shooting rockets at helicopters, and blowing up cache objectives.
Advisor
Similar to rifleman, but with an expanded weapon selection and a lot of supply points. This class has exclusive access to the L85 and Mk. 17 for Security, and the Alpha AK for Insurgents. If you can’t get a Breacher slot and you want to play aggressively, Advisor is a good pick. Plus, Advisor is a great class for nade spam due to its high supply count.
Marksman
Has access to the Mk. 14 EBR on Security, which is a powerful select-fire sniper rifle. Don’t use it in full auto, and instead aim carefully with it. It can wreak havoc at long range. The Insurgent Marksman’s SVD is also a very powerful rifle and is effective at long range, but has a small magazine capacity. Marksman has exclusive access to bolt action rifles, but they don’t measure up to the foregoing weapons for obvious reasons. Marksman is mostly a useless class, but it’s fun and can be situationally effective on maps with long sight lines.
V. Continued: Weapon Tier List
Weapons
The viable weapons are the following, in order of effectiveness. The letter next to the weapon indicates the tier of the weapon from S-tier down to F-tier.
- S AS VAL Ridiculously OP. High damage, blazing RoF, no recoil, integrally suppressed. Get extendo mags and maybe a light carrier because it eats ammo.
- S VHS (High RoF, rifle damage, lowish recoil. Top-tier meta AR.)
- S FAMAS Halfway between the VAL and VHS. Fires fast, strong but controllable vertical recoil, long reload. Great in CQB.
- A Shotguns Reliable 1 HK within 10 meters or so. Less good since flechettes got nerfed, but still fun and viable.
- A SVD/MK14 High pen, 1 HKs at almost any range, versatile attachments.
- A AKM/AK74 Good RoF, low recoil, cheap supply cost–solid ARs. (AKM is slightly better because it costs less supply and is just about as effective)
- A SCAR, FAL, and G3 (Good wall pen, get extended mags and an RDS.)
- A MP7 (People sleep on this one. It has a 40 round mag, fast rate of fire, good irons, and no recoil.)
- A MK18 Solid AR with a high fire rate and minimal recoil.
- B AUG Feels like the AKM but costs more supply. Low RoF, low recoil, long reload. Not bad and very fun to use.
- B G36K High rate of fire, but high horizontal recoil. Use this as a CQB weapon or on Demolitions where it’s your only good option.
- B Alpha AK (It’s an AK, but more expensive. If you want to use an AK just don’t play Advisor, but the Alpha AK isn’t a bad gun. It’s just expensive.)
Honorable Mentions:
- A MP5 (Solid SMG with good all-round stats. Not as good as MP7 or shotguns, but great on INS)
- B UZI (Very controllable and cheap with practically no recoil. It’s only hampered by its low rate of fire and low damage.)
- B PKM/M240 (Reliable 1 HKs and can mow people down coming out of spawn w/ a bipod. This is very situational though, because it has ridiculous recoil from the shoulder.)
These weapons suck and you should avoid them if possible, in order of least bad:
- B L85 Not great, not bad, but the other weapons on Advisor are superior in basically every way. Has a bit too much horizontal recoil for my liking.
- B ACE 52 Not bad, not great. It’s similar to the MK. 17 but slightly worse in various ways.
- C M4 (Costs FIVE SUPPLY. FIVE. It’s not even very controllable–just a waste of supply. Use the G36K instead on Security Demolitions.)
- C M16 (Stuck on burst/semi auto, bad for CQB and generally uncontrollable, but it’s not horrifically bad.)
- C Galil High horizontal recoil makes this gun unreliable at medium range. It’s the only lightweight weapon for the Gunner class and can be fitted with drum mags so it has a niche use, but it kind of sucks. You can always just pick rifleman instead.
- D AKS-74u (This gun is not as good as you think it should be: It has weird random recoil, seems to be very inaccurate, and isn’t any better than any Breacher weapon. Just don’t use it.)
- D SKS It has too much recoil, takes too long to reload, fires intermediate cartridges and lacks full auto. People think it’s some kind of marksman rifle for some reason, but it’s actually just a semi-automatic AKM.
- D M249 (Too much recoil, weak damage. Unlike the PKM, it can’t 1 HK people or pen most walls and is generally just awful. Its only advantage is that it fires really fast and holds a lot of ammo, but I think quality is better than quantity.)
- D M82 CQB/M99 I don’t know where this gun fits into the game’s balance, since every sniper can 1 HK and pen most walls. It’s kind of fun, and the idea of a chopped-down .50 cal is pretty funny, but probably not worth using for any other reason.
- D M24/Mosin (While fun to use, these weapons are obviously less effective than their semi-auto counterparts. Just use the MK14 EBR or SVD instead.)
- F MG3 (Trigger delay, eats ammo, too much recoil. A true meme gun.)
Pistols:
- C Makarov Costs no supply and does the same damage as every pistol. There’s no reason to not equip one on INS.
- F Welrod Manually operated suppressed pistol. LOL. Clip machine.
- D Every other pistol Eats supply points and doesn’t offer enough advantage to compensate. Swapping weapons takes forever in this game, so I advise against using anything but the Makarov. If you have a couple of points left over, it’s up to you whether you want to sacrifice a bit of weight for a pistol.
Grenades:
Use incendiaries/molotovs. They are better than smokes at blocking enemy access into objectives, they deal as much damage as frags but last for many seconds, they don’t need to be cooked, and they can easily destroy caches.
Frags are pretty good for clearing rooms or lobbing over walls, and probably better than molotovs on Push offense. They’re a good alternative.
Flashes work pretty well in CQB when you can land them, but they’re only effective in a short radius. In any situation where a flash blinds someone a frag probably would have just killed them, so it’s questionable whether they’re any good; HOWEVER, they are very cheap, so if you have leftover points picking up a flash isn’t a bad idea. They’re great for clearing rooms.
Smoke isn’t as important as you think it is. Not only does it not magically stop bullets, but it’s still pretty easy to see people through it if the smoke is in certain places. Not only that, but it prevents YOUR team from pushing. Plus, it gives away your position, disorients you, and prevents you from properly seeing and shooting enemies. If you use smoke at all, it should be used defensively to deny angles to the enemy and make it costly for them to rush through chokepoints (although, incendiaries are better for this anyway.) Don’t listen to people who direct you to throw smoke and run through mid toward the objective–just be smart and take a different route. People forget how many flanking paths are available in the maps.
Launchers are pretty awesome, and as I mentioned earlier, they can take out helicopters and technicals as well as cache objectives and clusters of enemies. HE grenades from the underbarrel launchers can be used to clear waves of enemies as well as to take out enemies behind cover. Sometimes you can even get a bunch of frags by shooting HE nades into smokes, since smokes give people a false sense of security. The RPG and MAAWS are the best launchers since they can fire multiple rockets, followed by the disposable AT-4 and Panzerfaust-3, which can be good if you’re low on supply.
Mines are situational and only relevant on maps that have vehicles. If you can drop some mines outside the enemy technical spawn you can effectively deny it, but that’s pretty hard. I suggest just using a launcher instead.
IEDs/C4 are pretty great in some situations and have a large blast radius. They can clear out objectives, be lobbed over walls, take out technicals, and can be used to lay traps for enemies at common choke points. If you’re good at flanking you can set up some impressive multi-kills outside the enemy spawn for sweet YouTube clips. They are, however, very expensive and can’t be thrown very far.
VI. Positioning, Movement, and Taking Objectives
Next to aim, positioning is the most important aspect of skill in Sandstorm, as objectives cannot be taken without it, and repeatedly placing one’s self into bad situations leads to deaths that cannot be prevented with better aim alone.
VI. Positioning and Taking Objectives
Common wisdom about “Getting on the point” and “Staying on the objective” is wrong for many reasons. Getting frags is extremely important, and if you aren’t outfragging the enemy you’re going to lose since, fundamentally, people capture points; it’s not like the points capture themselves or magically turn red. If you kill enemy players, you prevent them from reaching the point and thus from capturing it. If you sit behind an enemy objective and kill players running into it, you make it dramatically easier for your team to capture and hold it. In fact, the most common mistake I see during Sandstorm matches is that a team will contest and hold an objective, but fail to capture it because they fail to clear the surrounding area of enemy players and fail to stop reinforcements from reaching it because they are too wedded to staying inside the point itself.
One crucial problem with Sandstorm’s map design is that the objective zones themselves are far too small, and the often do not encompass the good fighting positions that surround the objective. Often, the capture zone extends only to the doorways of a small house, leaving only some number of square feet within which you may capture an objective. This means that you won’t have good sight lines outside, and also that a single enemy explosive can kill most of your team inside. To remedy this issue, you must learn to take positions at crucial choke points outside the objective and eliminate enemies from there.
Further, the interior of most objectives is usually very dangerous and open to various angles. In the final building on Farmhouse, for example, each corridor opens to the center of the embassy and at least one outer door. If you position yourself to watch one angle, you will expose yourself to at least 3 others that you cannot watch. That is a sub-optimal position to defend from; however, the courtyard and parking lot have a lot more cover and are less open than the objective itself. Plus, they both overlook various entrances into the building itself and are better locations to hold.
However, you should not stay in these fighting positions forever, and you should make sure to move locations after each wave. If the objective becomes contested and you suspect your team is about to lose it or are engaged in a brutal battle, you should enter the objective itself and help out or block capture; however, if it isn’t under attack, you should hold locations outside of it. If someone yells at you for being outside the objective, ignore them: Fragging is contribution to the team.
In short, standing on points is a good way to get killed. Ignore all the vapid losers who whine about people not being on the point — just make sure you’re in some place that is tactically important. It’s more helpful to be on the fringes of the point and at the chokepoints behind it that the enemy will filter into from their spawn than to sit inside the point, bait, and just get shot by someone with peeker’s advantage or killed by gas/explosives. Obviously if the point is contested you should get on it and clear it, but if it’s not being capped, don’t sit on it. Go somewhere the enemy won’t expect.
Attacking Objectives
Always strive to flank enemy objectives when possible. Clear the perimeter, rush inside, and make sure to clear the rooms. Anticipate enemy reinforcements and keep an eye on the wave counter to see when the next wave spawns. Set yourself up at one of the common chokepoints when they do respawn so you can frag them as they try to flood in. Due to the open nature of Insurgency’s objectives, enemies can usually come in from many angles, so don’t tunnel vision on a single entrance and keep track of footsteps.
If your team is already capping the objective, go behind it and spawncamp the enemy rather than piling into the cap zone. You’re more useful getting frags than adding redundancy to the point. Every frag you get is one more enemy who can’t contest the point.
Moreover, flanking is extremely powerful and it’s how you will get a good 60 or 70 percent of your kills and killstreaks in this game. Since you don’t have a lot of HP, you can’t afford to get into a bunch of aim duels. You need to have good movement and positioning so that you never take fire, and flanking helps you do that. Don’t be afraid to sometimes run through restricted zones too, because you can access different paths to the objective that way which are usually not guarded.
Avoid poking your head out of windows, as the enemy will be pre-aimed and watching for this. Keep moving and don’t stay totally stationary. Spam strafe when you peek angles to abuse peeker’s advantage and minimize your profile–this is called jiggle peeking.
Prone
Prone may seem like an attractive way to stay in cover, but it severely hampers your ability to quickly react and move. If a grenade lands near a prone player, if often takes him too long to get up and begin sprinting, and he will often die. Because of this lack of mobility, prone should be used only to take temporary cover behind very low objects in order to buy yourself some time.
Cover
Never run out into the open and always move from cover to cover. Move quickly and don’t stay still for too long in any given location. When using cover, try to be as far away from it as possible in order to minimize explosive damage and the chance that you will be wallbanged. Also, staying further away from windows and doorways minimizes your profile and gives you a slim advantage when peeking.
Keep in mind that not all objects are good cover. Wood fences, plastic tarps, wire fences, etc. are obviously not good cover and can be shot through easily. What is lesser known is that adobe, concrete, and brick walls can be shot through with full-sized rifle rounds. The truck-mounted DShKM can blast right through walls as well with little loss to damage.
Movement
Constantly moving will keep you alive. Make sure you sprint most of the time and move unpredictably. Avoid moving in straight lines.
If you are forced into an aim duel, try to strafe unpredictably, or at least sidestep and crouch before you fire. It’s dramatically harder to hit a moving target than a stationary one, so even a little bit of movement can throw off bad players.
Additionally, you can move faster when hipfiring than ADSing, so in close quarters combat it is sometimes more effective to hipfire since you can move more quickly and strafe spam effectively.
Never jump around corners because Insurgency disallows firing while mid-air.
Have good crosshair placement and don’t stand in doorways ever. If you encounter a doorway, the best way to tackle it is to throw some kind of explosive in and run in, peek it (slice the pie,) or rush in and prefire using sound cues. Do not in any circumstances ever stand inside the doorway.
Also, leaning is overrated. It doesn’t really give you much of an advantage and it takes away your mobility. Instead of leaning around corners you should jiggle peek them.
In the next section, I will address various miscellaneous tips that didn’t fit in any other section and aren’t developed enough for an entire paragraph.
VII. Miscellanious Tips
This section will be organized in no particular order. The following are various other tips I thought of while brainstorming. Some may be redundant and obvious, but others may be important and insightful.
VII. Miscellanious Tips
Sound is really important. Pay attention because you can hear footsteps, reloading, nade priming, the enemy calling in fire support, screams, voice commands, enemy VOIP, enemies coughing in smoke, etc. and this stuff will give you a lot of information. If you listen in conjunction with peeker’s advantage, you can kill lots of people and they will think you’re wall hacking since you literally just teleport around the corner and kill them on their screen. If you have to hold an angle, therefore, sit in cover behind the angle, wait for footsteps, then sprint out and shoot.
Gas masks muffle your character’s voice and can make it less audible to enemies. It also prevents your character from coughing inside of smoke, thus concealing your position.
Insurgency Sandstorm has worse netcode than INS 2, so peeker’s advantage and aggressivity are practically the only ways to play. Holding angles and baiting will just get you killed at worst, and you’ll only trade at best. If you want killstreaks, you have to sprint around CoD style. There are exceptions, however, because spawn camping is king in this game. If the enemy is bad, you can usually position yourself behind an objective and kill them as they rush in during Push.
This is really simple but a lot of people don’t know this: Holding right click while priming a grenade cooks it. If you want to use flashes and frags effectively, you MUST do this, otherwise people will turn away from flashes or run away from your frags. Also remember thant you can pick up grenades with F and throw them away. This can save your cache in clutch situations since most people don’t actually cook grenades. Also another very simple thing people neglect: You can wallbang people. Guns like the FAL, SCAR, G3, MK14 EBR, SVD, PKM, and the truck-mounted dshKM have very high penetration values and can kill through most walls. The dshKM in particular is extremely deadly through walls, so if you have a truck, try to wallbang people with it if you’re not too busy running people over in their spawns.
Don’t run compensator on guns. It makes recoil/accuracy really weird. Get a foregrip if you can.
RDS is necessary on some guns. The M4/M16 sights suck, FAL sights suck, shotgun sights are kind of bad for CQB, etc.
Suppressors are pretty good, and if you’re not running armor, you usually have enough supply to use them. They don’t make your gun silent, but they eliminate muzzle flash which is really intense in Sandstorm.
Flash hiders are also decent if you have a dump point left over after completing your loadout. Muzzle flashes give away your position pretty extremely.
The point of aim on the RPG seems to be just under the tip of the front sight. The rocket has a pretty large hitbox, so be careful when attempting to fire it from cover–it’s very easy to blow yourself up. Also note that helicopters only dodge rockets from the sides and front. If you position yourself behind the helicopter it cannot dodge your rockets.
While playing as commander, you can be a great deal more aggressive than your observers because your fire support will still go through as long as you finish the short voice command and the observer is still alive. Ideally, the observer stays in cover while the commander exposes himself in order to get a sight line on the target. Don’t be afraid to peek your head out to get a really good mark because of this.
Observers should be covering the commander and staying alive so that the fire support requests will complete. Make sure to watch angles that aren’t already being covered by your team mates and check behind you frequently.
Again, I want to reiterate: STOP BAITING. You have to play aggresively if you want to win due to the game’s broken netcode, but also if you play aggressively, you can actually maneuver around enemies and style on them instead of hoping that they, by chance, decide to run into you and aren’t expecting to be shot.
VIII. Field of View (FoV)
One heavily overlooked setting in FPS games is the Field of View (FoV) slider, and contrary to folk wisdom, it indeed does matter how you set it and it isn’t entirely a matter of personal preference.
FoV is measured in degrees, and indicates how wide the player’s view angle is, and thus how much peripheral vision he has. From the outset, it sounds like having the highest possible FoV is an objective advantage, since it would allow a player to see enemies on his flanks that wouldn’t otherwise be visible; however, there are several drawbacks to high levels of FoV as I will explain shortly. Similarly, low FoV players have a number of advantages that high FoV players lose out on.
Pros and Cons
High FoV (80 – 110)
Pros:
- Wider view angle/more peripheral vision
- Scopes are somewhat easier to use in CQB
- Scanning the battlefield requires fewer dramatic mouse movements
Cons:
- View is zoomed out, making it harder to identify threats at range
- Targets appear smaller, which makes them harder to hit
- Higher FoV can introduce an ugly, disorienting fisheye effect
- Sense of distance is distorted, causing objects to appear further than they actually are
Low FoV (75 – 60)
Pros:
- View is zoomed in, making it easier to see targets at range.
- Targets appear larger, making it easier to hit them
- No fisheye effect.
- Easier to judge distance accurately
Cons:
- Narrower view angle, which could potentially cause you to not see threats in CQB
- Scanning the battlefield or navigating buildings requires large, sweeping mouse movements
- Scopes become more difficult to use in CQB due to decreased view angle around the optic and lower sensitivity
- Can cause some players to feel motion-stick or have a headache because their brains can’t ignore the difference in perceived distance between their real life view angle and the in-game view angle.
To see all of this in action, watch this video. It is a Tarkov video, but it demonstrates perfectly what I’m describing here. Just ignore the parts specific to Tarkov, like the trajectory bugs etc.
Keep in mind that when you change your FoV, you also change your mouse sensitivity. Raising your FoV raises your mouse sensitivity, and lowering your FoV lowers your mouse sensitivity. Make sure to readjust your sensitivity after changing FoV.
Which setting is right for you?
Each player has different preferences and plays Sandstorm very differently, and as a result, there is no one-size-fits-all FoV. Additionally, for some, low FoV settings will cause headaches and motion sickness. Review the pros and cons of low and high FoV in order to determine which one is most suitable to you.
Different play styles are better suited for different FoVs. Static snipers or good riflers would most likely benefit from a low FoV, which enables them to identify and easily engage targets at long range. Run-and-gun CQB players would most likely benefit from a high FoV, allowing them to check corners without making wide mouse movements and identify threats better while holding close angles.
Personally, I use lower FoV settings. I have poor vision, and as a result, it is generally easier for me to detect players and aim precisely when the screen is zoomed in slightly. Additionally, I find that the mousefeel is better on low FoV, and I don’t feel like I’m constantly overshooting targets. In tactical shooters in general, I think a low FoV is almost always a better choice, because you can die so quickly if you don’t see and accurately hit distant targets fast enough. If you have good awareness and enough discipline to check your corners in close quarters, low peripheral vision isn’t a hindrance at all, because you should generally have your eyes focused on the most likely location for threats to appear anyway.
I hope this little addition helps you make a proper decision.
IX. Conclusion
This guide is not all-inclusive nor totally comprehensive, but I hope I covered the bare minimum necessary to give the reader a solid grasp on fundamental FPS concepts and some of those more unique to Insurgency.

Above all, I hope my guide was enjoyable to read, clear, concise, and ultimately that it offered something other guides didn’t. I see a lot of bad players in this game, and I want to help them out as much as possible. Hopefully you gained something from this, whether you’re new or experienced.
That’s about all I got, but there’s really not replacement for practice. Play the game every day for at least an hour, take breaks, shoot at walls and flick at stuff sometimes for aim training, learn the maps, etc. There’s no magic bullet or cargo-cult tactic out there that will make you a god, you just have to get good at FPS games.
Have fun.
Change Log
I’ve been making some changes to this guide as of late, so I’ll try to keep this page updated to inform readers what has changed. I haven’t personally been playing Sandstorm much due to a number of factors (Tarkov’s latest update and surge in popularity, low player counts, stagnant updates to the game, and performance issues mainly.) Don’t expect me to cover everything added in new patches, but the guide will apply broadly regardless of updates since it mostly covers fundamentals. If you guys want me to add a section on something you have a question about or trouble with, feel free to ask in the comment section, as I read every comment, and I will most likely write a new bit for you.
Thanks to everyone who has been reading this guide and suggesting additions, improvements, and removals. I greatly appreciate it and encourage more feedback.
2/4/2020
- Removed some epic gamer cringe and cleaned up some sections.
- Edited the weapon tier list to include the M240, MG 3, MP5, and VHS. Changed descriptions for consistency.
- Added a new section on high/low Field of View settings and their pros and cons.
- Indicated in the armor section that armor confers some explosive protection, and that there is therefore a case-based reason to wear it.
2/13/2020
- In the FoV section, changed the high/low sensitivity pro and con to larger/smaller target size for accuracy.
3/27/2020
- Updated classes section to reflect the removal of the MK. 14 and SVD from the Advisor class.
6/21/2020
- Updated weapon tier list: Added AS Val and Welrod. Section has hit the character limit.
10/21/2020
- Made some more miscellaneous changes to various parts of the guide for clarity and readability.
- Separated the weapon tier list from the classes section to bypass the character limit.
- Added all weapons up to the latest update, Breakaway.