Overview
Eastern Bloc unspec (unspecialized) is the most commonly recommended Redfor deck for inexperienced players, and is widely considered the best deck to learn on from both Redfor and Blufor. This guide is intended to help you make a flexible and easy to use deck for 1v1s and small team games.
Before you start:
This guide is intended to work in addition to Tyrnek’s
and Hon Guide[honhonhonhon.wordpress.com]. Its objective is to give you a generally flexible and viable deck, that’s also reasonably easy to use. It is the result of having repeated many of the same things to many people who are new or getting back into the game.
If you have any questions about this guide or the basics of Wargame in general, feel free to leave a comment or message me. Even better is the Wargame Bootcamp Discord[discordapp.com]. Someone will always be around to help, including myself. Additionally, it’s a really good place to find games with players of similar skill level. (Or higher, if you want to challenge yourself)
Logistic
Almost every Logistics tab should be 4 cards. 2 CVs, 2 Supply units (including FOB).
First, get a card of Command UAZ from any of the three nations. (Ex: WD-43 from Poland.) This is your cheap, fast, plentiful command unit and your primary way of capturing zones, particularly ones not in obvious danger.
Second, get a card of “survivable CVs” for capturing more dangerous zones. The most popular choice is a Czech or Polish infantry CV (Ex: Velitelsky Stab) in the Mi-17. This gives you an infantry CV, which is easily concealable in forests or towns, and a transport helicopter with excellent rocket pods that you can reroute to somewhere else after dropping off the infantry CV. The other option you have is the East German T-72(K1). This is less popular as good armored CVs are usually as cheap as possible (130-145 pts) while still retaining 2 top armor, making it resilient against artillery and bombs, the primary threat to Command units. However, while the T-72(K1) is a bit expensive, it’s your best (and cheapest) option if you want an armored CV to deal with bombardment. Downvet it, as you should any CV, if taken.
Finally, you need supply units. This will likely depend on what units you take in your Support tab. If you’re using howitzers or MLRS, take an FOB and a smaller (15-30 points) truck. If you’re going without artillery, and don’t find yourself needing to rearm helicopters too often, you can consider taking 2 cards of 40 point trucks (Ex: T815 Kolos from Czechoslovakia) instead. The bigger trucks hold more supplies for their price, but the smaller trucks can easily be ferried to a potential FOB and back instead of having to buy more.
YMMV: Some people take lightly armored wheeled CVs like the VSOT-64 in place of the UAZ. For simplicity’s sake, I recommend the UAZ.
Infantry
All Infantry should be downvetted unless specified otherwise.
Eastern Bloc is sort of…inflexible when it comes to infantry. You always start with the same four cards:
2 cards of Mot Shutzen in SPW-50PK. These are your line infantry, and the backbone of your entire deck. Keep them in front of your other units (such as tanks) to screen for them, use them to clear out enemy infantry in forests and towns, to probe the map for enemy defenses, and to defend from or delay attacks while in cover. They can do a lot of things for very cheap, and should be included in every attack you make.
LSTR-40 in SPW-80. These guys are very multirole, and very valuable to Eastern Bloc. They fill three purposes: As wheeled infantry for securing ground quickly and defending it in the first few minutes of the game, as anti-tank infantry to support your Mot Shutzen against vehicles in forests, and as additional AA to keep helicopters off your back, although it can’t defend your other units over open ground due to its short range.
Konkurs-M in the transport of your choosing. OT-64C is the most common transport, since you usually want ATGMs to be in position as quickly as possible. These guys “zone off” open ground against enemy vehicles, and are primarily defensive. While they are perfectly capable of killing tanks, their main purpose is to delay your enemy and force them to spot, bombard, or smoke off your ATGM in order to move forward. They’re quite useful on flanks you’ve decided to go light on, as they’re cheap, delay the enemy, are hard to spot, and cover quite a bit of ground.
The last card is flexible, and your most popular options are Mot Shutzen ’90/BMP-2, Mot Shutzen ’90/SPW-50PK, and Pancerovnici/OT-62 Vydra-II. There are more options out there, but for simplicity’s sake, I’ve left it at the easiest/most flexible ones to use. Mot Shutzen ’90 are primarily additional anti-tank infantry specifically for forests, as their launcher is short ranged and inaccurate. The BMP-2 gives you an autocannon as fire support against infantry and other transports both inside and outside of forests. The SPW-50PK is just if you want them cheap. Pancerovnici are even more specialized in the anti-tank role, but are cheaper and generally better at the job than Mot Shutzen ’90. The Vydra-II they come with is also a rather nice cheap autocannon. However, they can’t take a lot of fire, and need to be screened for with regular Mot Shutzen.
Support
First, let’s start with AA, which works in combinations so that they cover each other.
The most common combination is the Osa-AKM and Strela-10M. The Osa-AKM is primarily an anti-plane SAM, but also covers open ground against helicopters. The Strela-10 is a shorter range infrared SAM; its job is to cheaply cover flanks with less open ground, and to screen for the Osa-AKM by finishing off any helicopters it might have missed. Optionally upvet the Osa-AKM and Strela-10. (Note: the 9K33M3 Romb is an Osa-AKM, it’s just the Polish name for it.)
A more expensive combination is the Newa (MAZ-543 Newa-SC to be exact) and the Fla-SFL 2S6 (Better known as the Tunguska). The Newa is a heavy SAM and is specifically anti-plane, being expensive but covering a lot of airspace. On the flipside, the Tunguska is a more expensive but reliable anti-helo AA piece, more capable of covering open ground than the Strela-10 or the Osa-AKM. It is recommended that you still take the Strela-10 in this combination however, since the Tunguska is rather expensive if you just need to cover a lightly defended flank or less open ground. Upvet the Newa and the Tunguska.
The last popular combination is a bit weird. You take the Osa-AKM and the cheaper Osa-AK. The idea here is that Osa-AKMs can operate independently in less critical areas, or against helicopters. The Osa-AKs on the other hand, are used in pairs, and nearly guarantee a kill towards any plane that flies over. This is particularly effective against plane spam, or just generally people who overuse bombers. You just need to make sure you position them close to likely “hotspots” of plane activity (Behind a town or an important forest, for example.) so that they’re in range. The Strela-10 is still recommended here as well, to fill the same short range gaps as the other combos. Upvet both Osa variants.
Next, get a mortar, the PRAM-S. Mortars are critical, as they quickly provide you with the ability to use smoke. Smoke can be used on a specific enemy unit to blind them (this is how you defeat ATGMs), behind an enemy town to keep their fire support away, in front of a town if you have more and better infantry than them, or to conceal your movement in general. Most importantly, you use this to make smoke clouds for your tanks to hide in, instantly breaking line of sight and preventing things like ATGMs, AT planes, and other tanks from killing them. A good habit is to pop your tanks out of smoke to fire, and reverse back into it to reload. As a bonus, mortars can be used in groups to suppress individual targets, and kill infantry or lightly armored vehicles. Mortars can optionally be upvetted, but it’s usually recommended that you downvet them since the accuracy increase is negligible.
Optionally, you can come back and get an artillery unit. Eastern Bloc artillery isn’t anything to write home about, but the Polish or East German RM-70 is an MLRS that does a decent job at suppressing units before an attack, and the SFL-Hb 2S19 (Better known as the Msta) is an average quality howitzer for killing static units, or breaking drawn out infantry grinds. Remember, if you take either of these, you should take an FOB in the Logistics tab to easily resupply them. You usually want artillery downvetted, as they don’t get much from the slight increase in accuracy, and they’re always better when used en masse.
YMMV: Some people take the Sopel or Shilka in place of the Strela-10, and the Strop-2 or base Osa in place of the Tunguska. You’re free to experiment of course, but for simplicity’s sake, I recommend the original selection.
Tank
There’s really only two “mandatory” tanks in any deck’s Tank tab. And that’s a Medium (which are usually 75-100 pts) and a Superheavy or whatever other heaviest tank you have is. (Superheavies are 160+ pts.) Don’t take more cards of tanks to “replace your losses” if your others die; you don’t have enough income to realistically do that anyways. Instead, you take different cards of tanks for the unique role they fill; you’ll rarely come close to using up a whole card.
So first, let’s get the T-72M2 Moderna, your Superheavy. Make this the flagship of your heavily focused flank. Superheavies dominate open ground when properly supported with smoke, infantry, and AA. They’re very efficient at dispatching tanks cheaper than them when used at max range, and are generally good to have as hard to kill fire support if nothing else. The Moderna specifically is unique in that it’s the cheapest true Superheavy, you get 3 of them, and they get a nice little autocannon that’s good at supporting infantry in awkward forest engagements. It’s also autoloaded like most Redfor tanks, meaning it shoots just as fast no matter if its Calm or Panicked.
Next, let’s get your Medium, the T-72M1 Wilk. Mediums are flexible, and usually the cheapest thing that you can really call a “tank” in its actual usage. They’re excellent at providing fire support both on open ground and at close range when well screened by infantry, and will generally easily dispatch vehicles that are cheaper than them (Such as transports, light tanks, and recon vehicles), and from a safe distance at that. You can also group them up to kill heavier tanks at point blank in forests as well. These guys make up most of your real firepower throughout the game, while your infantry find targets for them. The Wilk specifically is unique in that it has a 9/RPM, making it a bit faster firing than standard Redfor tanks.
Now, the rest of this tab is completely optional, and you can take between 2-4 cards of tanks depending on how many Activation Points you have leftover.
The T-72M2 Wilk (not to be confused with the M1 Wilk, which is 85 pts) is what’s called a “Medium-Heavy”, which are between 110-140 pts. These tanks are just a bit stronger than Medium tanks, but pay a decent price for that as well. Their man purpose is to bully Medium tanks and generally any vehicle cheaper than them, without paying the price premium of a Heavy or Superheavy tank. They’re not quite as invincible as Superheavies, and don’t have the same top tier firepower either, but they can reasonably be relied upon to stop a Medium tank on open ground.
The PT-91 Twardy is the next step up the food chain. This is a Heavy, but not a Superheavy; just a step underneath that. If you don’t need the armor advantage of a superheavy, but want something close to the firepower, this’ll do it. This fills largely the same role as the M2 Wilk, so pick one as it’s kind of a waste to take both.
Lastly, is a completely different role of tank. The base T-72 is a Light tank, and is used almost soley as fire support against enemy infantry. It’s not going to have a chance against Medium or higher tanks, unless it swarms them at point blank range in a forest. However it’s cheap, autoloaded, and has 4 HE, meaning it can back up infantry pretty well against other infantry and light vehicles. (Though it takes a couple shots at least for it to kill most other vehicles.)
YMMV: Quite a few people use the T-72M1M in place of the M1 Wilk, or the T-72S in place of the M2 Wilk. This is mostly for the ATGM they provide, although these tanks fire a bit slower than the Wilks. If you wanna give it a go, try it, they’re still pretty comparable.
Recon
Recon units should be downvetted unless specified otherwise.
Keep your Recon tab at 4-5 cards for any unspec deck. It’s not only important to support other units, but it’s got a nice mix of cool fighting units.
The most critical recon unit you should have in any deck is recon infantry. This is because they’re cheap, very stealthy, survivable, and can defend themselves against minor threats. Meaning, they can get closer to the enemy than any other recon unit without being killed, so that they can spot any hidden units.
The East German Spezialaufklarer (Also known as Special Observers) are your primary recon infantry. Shock recon infantry are the most flexible recon infantry, and should be the first recon you take in most decks. (5 man recon or 2 man sniper teams are best avoided whenever possible; they can’t take fire and can’t really defend themselves either) You can take these guys in the SPW-80, SPW-40, or LKV Ural. You only need 1 card though, and you don’t gain much by getting a second one.
Specialni Jednotky ’90 (Lovingly referred to as Jedi by the community) are one of Eastern Bloc’s prides. These Elite recon infantry come with decent launchers, and are pretty good against other infantry as well. Take 1-2 cards of them to support your Special Observers and to just generally be a pain in the zadek, both in defense and in the rear or side of your enemy’s line. The first card should be in the OT-64C or Tatra 148, but you can optionally take a second card in the Mi-17 or even Mi-25.
Next, you want a cheap armored recon vehicle. These units watch flanks on the defense, passively spot on the attack, and are actually pretty good in their own right at fighting due to their stealth bonus. (A recon vehicle firing from a forest will usually require recon to spot and kill) For the Eastern Bloc, the BPzV Snezka is a great all arounder with its autocannon, that can take out infantry and other light vehicles with its autocannons, and even stop the occasional helicopter from getting by unscathed. If you have leftover room in the Recon tab and want another vehicle, you can also consider the BTR-40A, which is a dirt cheap deterrent against sleazy helicopter antics, and serves pretty good as base defense.
Lastly, you’ll usually want a recon helicopter for watching wide swathes of ground (such as on empty flanks) and for seeing over obstacles. Eastern Bloc doesn’t have much for options here, so usually the unarmed Mi-2 is the pick here. The W-3U Salamandra is also an option, but many people find it awkward due to its limited ammunition and fairly high cost for what it gets. You’re not wrong with either choice, however.
YMMV: Sometimes Pruzkumnici are taken almost purely for the Mi-17 they come with. The BRM-1 is an especially uncommon pick, but you might see support for it nonetheless. The reasoning for it is that exceptional optics can see a bit further into forests. I highly recommend avoiding it, however, due to its extreme price and low availability for what it actually offers.
Vehicle
Keep this tab as empty as you possibly can, 1 card maximum if you need to put a activation point here. It mostly contains forgotten or joke units.
Eastern Bloc has one standout unit here, the ShM Vz.82 Pram-S. (sound familiar? yup, it’s just the mortar but direct fire) It outranges traditional tank cannons, but only does HE damage (5 HE is nothing to sneeze at). Pretty useful for finishing off infantry from a safe distance. Also comes with a free Konkurs ATGM.
There’s a couple base defense units to be found here as well. The SPW-152 is a classic anti heli rush unit, and works as a super cheap tripwire that can fight helis at close range. The ZSU-57-2 also works in a similar role, but you might also find use for it as a ghetto autocannon.
YMMV: the OT-810D is a funny little fire support vehicle, and can be annoying vs. infantry in groups. The To-55 is a flamethrower tank, which sounds awesome, but flamethrowers don’t actually do much damage ingame towards units who simply…move out of the fire. Some people have found a niche for it in blocking line of sight, and for delaying enemy units on certain chokepoints. It requires a lot of attention to make work however, so it’s not practical in most games and usually it just dies instantly.
Helo
Upvet your Helo tab; you’ll rarely bring out more than 2-3 of any helicopter in a normal game.
Keep the Helo tab to 1 card as much as possible, 2 cards if you really value them/can’t find anywhere else to dump points.
The Mi-35 is your bog basic gunship. It’s got decent rockets for fire support, it’s got okay ATGMs (and quite a few of them) for catching vehicles without their AA, and it’s got a Yak-B for keeping things stunned at close range. As with any Mi-24 variant, it’s also got armor and 10 HP, so it can take some small arms fire or even a missile and live to tell about it.
Your other option is the W-3W Sokol, a nice little AA heli with some rockets to make itself useful. Don’t expect too much from it, but it’ll keep helis outside of your own territory if need be.
YMMV: The DHS Mi-24P looks like a nice multirole AA heli, but it doesn’t have enough ammunition nor the AP to be a good anti-tank heli, and doesn’t have the ammunition nor the optics to be a good AA heli. To top it off, it comes with a hefty 95 pt price tag. Both it and the KHS Mi-24P have fixed cannons as well, which makes them awkward to use and turns the KHS from what would otherwise be a decent gunship, to subpar.
Plane
The plane tab is an easy place to dump your remaining Activation Points while still being relevant. If you’re satisfied with your Support, Tank, and Recon tab, fill this up until you have 1-2 Activation Points remaining. Generally, you wanna take 3-5 cards in the Plane tab.
First, by far your most important plane in any deck is a “Workhorse” ASF (Air Superiority Fighter). These are 100-160 pts and have a purely air-air loadout (SemAct or Radar guided missiles along with Infrared missiles). Their job is twofold; to spot enemy aircraft for the rest of your AA (and for you, obviously), and to intercept aircraft that might pass over into your lines. Whereas ground AA usually only kills bombers or AT planes after they’ve already done their job, ASFs will kill them before they become a problem.
For Eastern Bloc, you have a choice between two MiG-29 variants for ASFs. There’s the Polish MiG-29 9-13S, which uses SemAct missiles, requiring the missile to hit or miss its target before firing another. However, this version has higher veterency (meaning higher accuracy), has slightly longer missile range, and is cheaper than the German variant. Then, there’s the German MiG-29 which uses F&F Radar missiles instead. It has less veterency and thus less accuracy, and is more expensive, but it can more rapidly fire its missiles and requires a bit less micro managing due to the F&F aspect.
The other important plane type is an Anti-Tank plane. You want to look for planes with anti-tank missiles that have the F&F tag on them; this means that even if they lose sight after firing, the missile will still hit, making it significantly easier to use, and more effective. Eastern Bloc only has one of these, the Polish Su-22M4 Seria 30. The Seria is a bit slow, but it’ll still be a significant threat to even Superheavy tank, and is a worthwhile trade to sacrifice for one given the chance.
The rest of these planes are all optional:
The Czechoslovakian MiG-29 9-12A is your best bet as far as bombers, and is unique in being one of the few Napalm bombers in the game that are actually worthwhile. (They’re technically Thermobaric bombs, which ingame deal both HE and Napalm damage) It’s fast and survivable as well, making it a worthwhile purchase to punish tightly packed units close to or within your own territory. Alternatively, you can try the East German MiG-25RBF, which trades the Napalm aspect for twice as many HE bombs.
The East German MiG-21Bis Lazur is extremely popular in Eastern Bloc as a “Heli Hunter”. These are planes with infrared missiles, specifically taken to dive expensive helicopters. The Lazur is unique in that it “ripple fires” 2 missiles pretty rapidly, making it well suited for this role. If you’re only taking 2 cards of AA in the Support tab, it’s a good idea to take this plane.
Lastly, we have SEAD. These planes target and outrange enemy AA pieces with the [RAD] tag on them, as long as they have their weapons turned on. The East German Su-22M4P is almost always the preferred plane here, having decent veterency, decent Antiradar missiles, and being fairly cheap.
YMMV: The MiG-21ML is a rocket plane sometimes used to kill lightly armored vehicles and stun heavier ones. The Polish version of the Su-22M4P is rarely taken for its additional Antiradar ammunition, when playing plane-spammy. Both aren’t really worth taking for an inexperienced player.
End Result
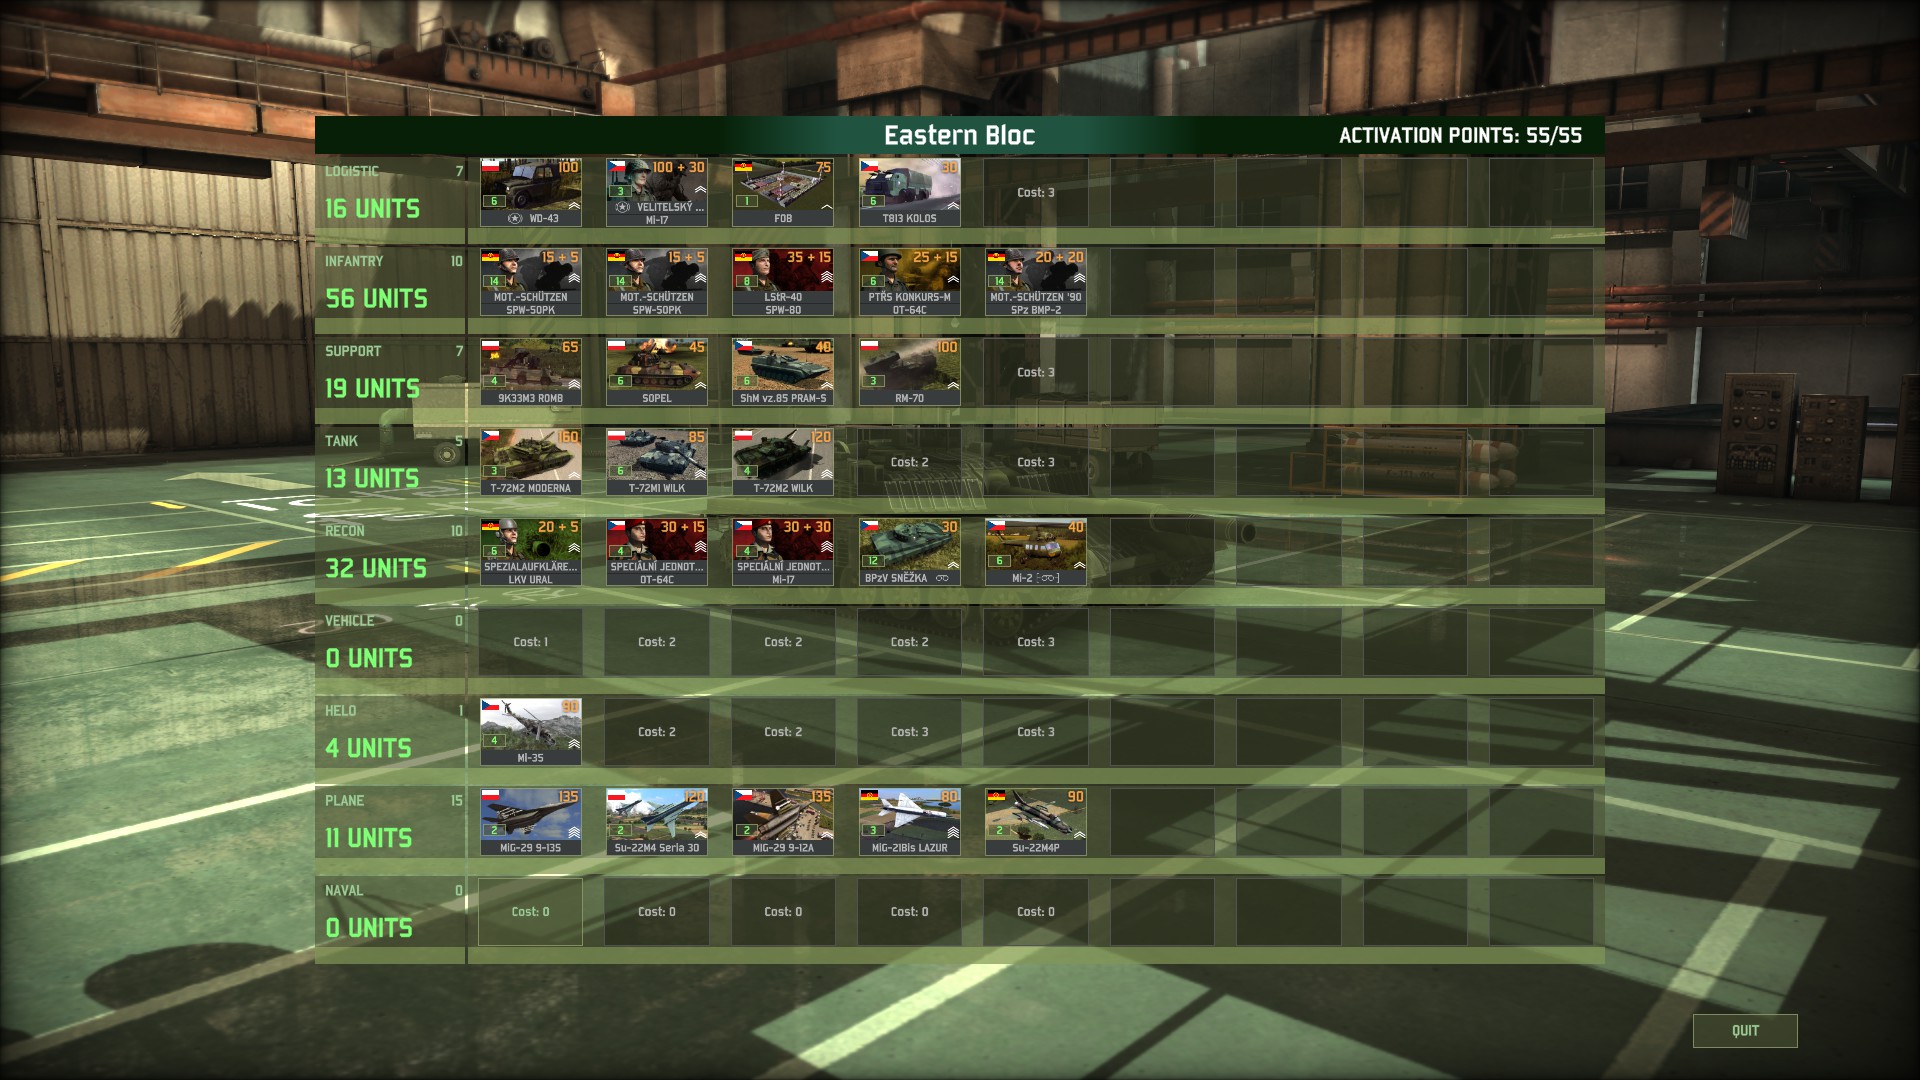
You should have 4 cards in Logistic, 5 cards in Infantry, 4-5 cards in Support, 2-4 cards in Tank, 4-5 cards in Recon, 0-2 cards in Helo, 0-1 cards in Vehicle, and 3-5 cards in Plane.
Thanks for bearing with me and this wall of text, I hope it helped and reasonably explained what each unit’s purpose is. Now give it a test in 1v1 and give the Hon Guide a read; being comfortable with the game is even more important than a good deck.