Overview
For some people Dying Light doesn’t close approriately after we Quit the game. This guide revolves around a simple hack¹ in the form of a Batch Script I ended up doing to solve the issue for me without needing to resort to Task Manager after each and every Dying Light game session.Images for clickety click included, obviously.¹ hack @ wikipedia[en.wikipedia.org]Last updated: 2017 / 01 / 10 (Guide version 0.8)
1: Introduction (Why, what, how?)
There are a just a few of us apparently – a clear minority – who have this issue where even if we quit the game and it seems to close (it disappears from the screen), the process just refuses to die. As a result Steam will think you’re still playing it and so on. It’s not hogging resources in this dormant state so it’s not a huge issue, but it’s still annoying.
It’s not how the game (or any game) is supposed to work.
Someone got it fixed by uninstalling Norton Antivirus, but as I already don’t have or use it, that wasn’t an applicable solution for me.
The only other solution I could find with forum searching and googling was to use Task Manager to kill the process after you’ve played. But that didn’t sound like fun; Depending your playing habits, you might needing to do that several times a day!
So after a while I thought “this won’t do!”, and decided to do something.
The result is a batch file that launches the game, waits for you to finish up playing and then in the end kills the process for you. Just like you’d play a normal game, only ONE additional button press required (to confirm that you’ve stopped playing), and the batch file does the rest.
This is a solution I can live with – and a solution I thought to share with the internet, in case it would be of use for someone else as well!
2: The Batch File (How to create?)
This chapter will help beginners on how to create a .bat file.
There are many ways to create a .bat file on Windows, one of the popular methods being using Notepad for it, and instead of SomeName.txt saving the file as SomeName.bat

What I usually do (see picture above) is press Windows button + R to open the “Run” window, type “cmd” there (with enter) to launch it so it’ll start a command prompt like this:

Then I just type this: (And press enter)
This will open notepad with the chosen filename already given: SomeFile.bat
Then I just type (or copy/paste) in the batch lines that I need, save, close, and it’s done!

Notice the directory in which the command prompt starts:
This will also be the folder where the batch file (SomeFile.bat) will be located.
You’ll need this information for if & when it’s time to create the Shortcut for the BatchFile.bat or what ever name you gave to your creation. (see Chapter 5)
3: The Batch File (Copy&Paste)
The batch file I used could’ve been shorter, if all the unnecessary stuff would’ve been removed from it, stripping it to bare essentials. (Launching the game, waiting for keypress, killing the process.)
So the shortest it could’ve been is this:
…But that’s not what I used. See below!
I added some delays and some visual feedback, the latter mainly because I personally like it but there are actually some logical & functional reasons for the former; These will be discussed in the next chapter.
This is what you came here for, right?
I give you the batch file I used:
Pay attention (and edit approriately) if you’ve installed Steam elsewhere, on another drive etc:
Other than that just Copy & Paste into your own batch file and you’re good to go!
There’s a little more advice(s) & explanations given later in the guide but for some this is where you will stop reading anyway, so good luck to you. Have fun!
And for those who keep on reading, let’s get to it!
4: How it works (and what it does)
This chapter will describe what the batch file does.
If this doesn’t concern you & you don’t care, skip to chapter 5 to read about the shortcut!
This part will start the Dying Light by passing the “launch this app” signal to Steam.
Will also start Steam if it isn’t running. The [choice] in the end is there merely to add a delay before changing the text output, giving the game some time to actually start…
(Yes, 13 seconds is completely arbitrary.)
So you see something like this:

After the 13 seconds the text is changed (CLS clears the “screen”, and then it just prints new text) so that the prompt is now giving the instructions for you to read when you’re back from the game, like this:
To make it wait for a keypress I used [pause], like this:

There might’ve been a way to make it check if a process associated with the game existed etc, but this approach worked for me. After all, with the game window launching on top of this, this would be hidden. And after I quit the game and it would disappear, this window would “reappear”, and I could just tap any key to make it continue…
Again a delay of 7 seconds? Well the 7 is arbitrary, but the delay is there so that just in case the game was still doing something, synchronising to Steam Cloud etc, it wouldn’t be interrupted / corrupted.
[taskkill] kills the process (of that name), and the [/f] selector forces it to be killed.
So it now looks like this:

And I like to know that all has been done (without problems), so in the end it announces having done everything and then by using another [choice] I kept the batch file paused for 3 more seconds, before it would complete itself and windows would automatically close it’s window.

And then it would be done and disappear.
This isn’t the perfect approach, this hasn’t fixed the game, but this works and gets the job done without needing to manually search & kill the process after every gaming session.
5: Creating the Shortcut (with Admin rights)
After you have the BatchFile.Bat somewhere, to make it work like a “one click wonder” aka any other normal shortcut on your desktop you first need to create a shortcut to it.
I’m assuming you know how. (If not let me know and I’ll add a chapter about that into the guide!)

As you can see it’s ugly; it has the wrong name and wrong icon.
First selecting the shortcut (by clicking it once with Left MouseButton) and then pressing F2 allows me to quickly rename it. I aptly call my shortcut “Dying Light“, as shown here:

Now to change the icon and other details (admin rights!), let’s right click the shortcut and choose Properties from the list. From there, first to change the icon, we continue like this: (See below.)
You probably get this warning as the first thing: 

And if you do,
it’s perfectly normal.
Click Ok and let’s continue?
You should see something like this appear:

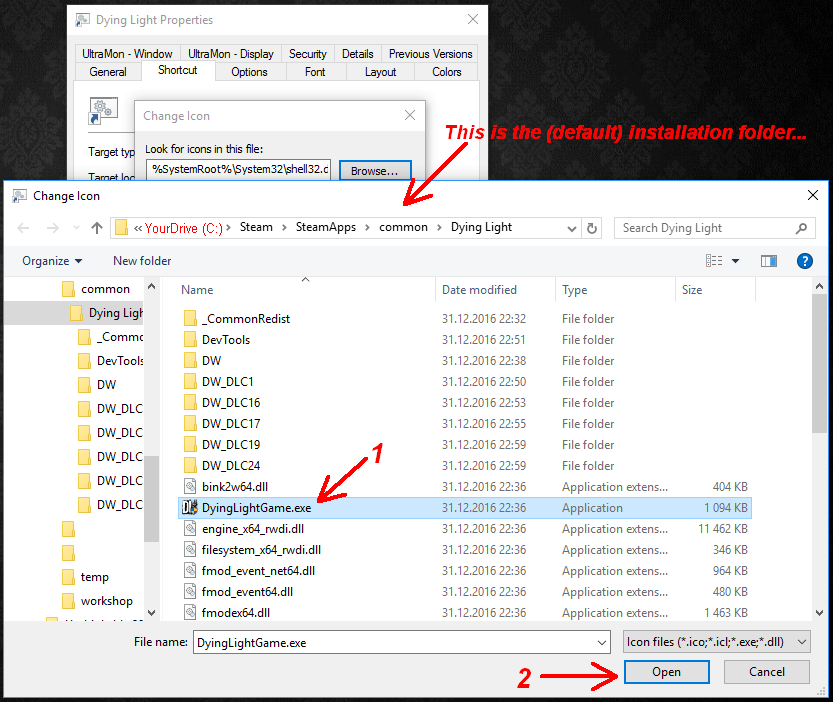
To find the best icon for Dying Light -related stuff, we of course use the original icon that came with the game. So! Here’s where you find the game installation folder and…

Why? During testing taskskill, which kills the game in the end, would sometime give an error about not having adequate rights. This is circumvented by giving the batch admin rights. Only do this if you trust the batch file.
Notice that in most cases you will not need to do this at all!
( May ellicit a UAC confirmation prompt about allowing to make changes to your computer, if you give the shortcut admin rights while UAC is enabled & configured like that. )
But if you need to do it, here’s how:


Happy clicking and gaming!
And this time Dying Light will actually DiE in the end too…
6: Afterword & thoughts (Do I need this?)
Q: Do I need this batch / guide?
A: If Dying Light works (and closes!) fine for you, then no you don’t need this.
Good for you! =)
- If the game process doesn’t die “normally” for you, then this guide & batch is for you!
- Or if you have similar problems with another game, after some minor adjustments the batch file can be used for them too, sure. Also the shortcut manipulating steps will be similar. =)
For me it’s only this one game, and on this one computer. (On my laptop for an example it works without any issues!) Yes it’s a bit strange, but what can you do I already did it! =P - Additionally if someone is learning (ugly) batch scripting (in Windows) or something similar, even if I didn’t really use any IF or GOTO or FOR, by the powers of Google perhaps someone will find some help from this wee guide for a completely unrelated matter as well, who knows.
Sharing is caring.
But! Regardless if you needed the guide or not, if you think there is some merit to it, remember to like or rate it. That’s the only way it gets more “visibility” and thus finding it (for those who might be looking for something like this!) becomes that much easier. =)
I asked both VILBO and Wild Cherry to proof-read the guide to see if it was in a human-readable and human-understandable language. Thank you for sparing the time!
7: Guide version history
Happy with how it works.
Decided to do it & make this guide.
Outlined contents & made pictures.
Struggled with pic alignment & placement.
Used given feedback to slightly improve the guide.
+ “How to create a .bat file” edited in.
(0.8 is usually the first point when something can be released?)