
Introduction
This guide is gonna help you to get all the achievements in the game.
Chapter 1 : Preparations

Climb any fences in the 7th or 8th floor then jump down.


> This one will pop up as soon as you complete the chapter.
Chapter 2 : Just another day at work

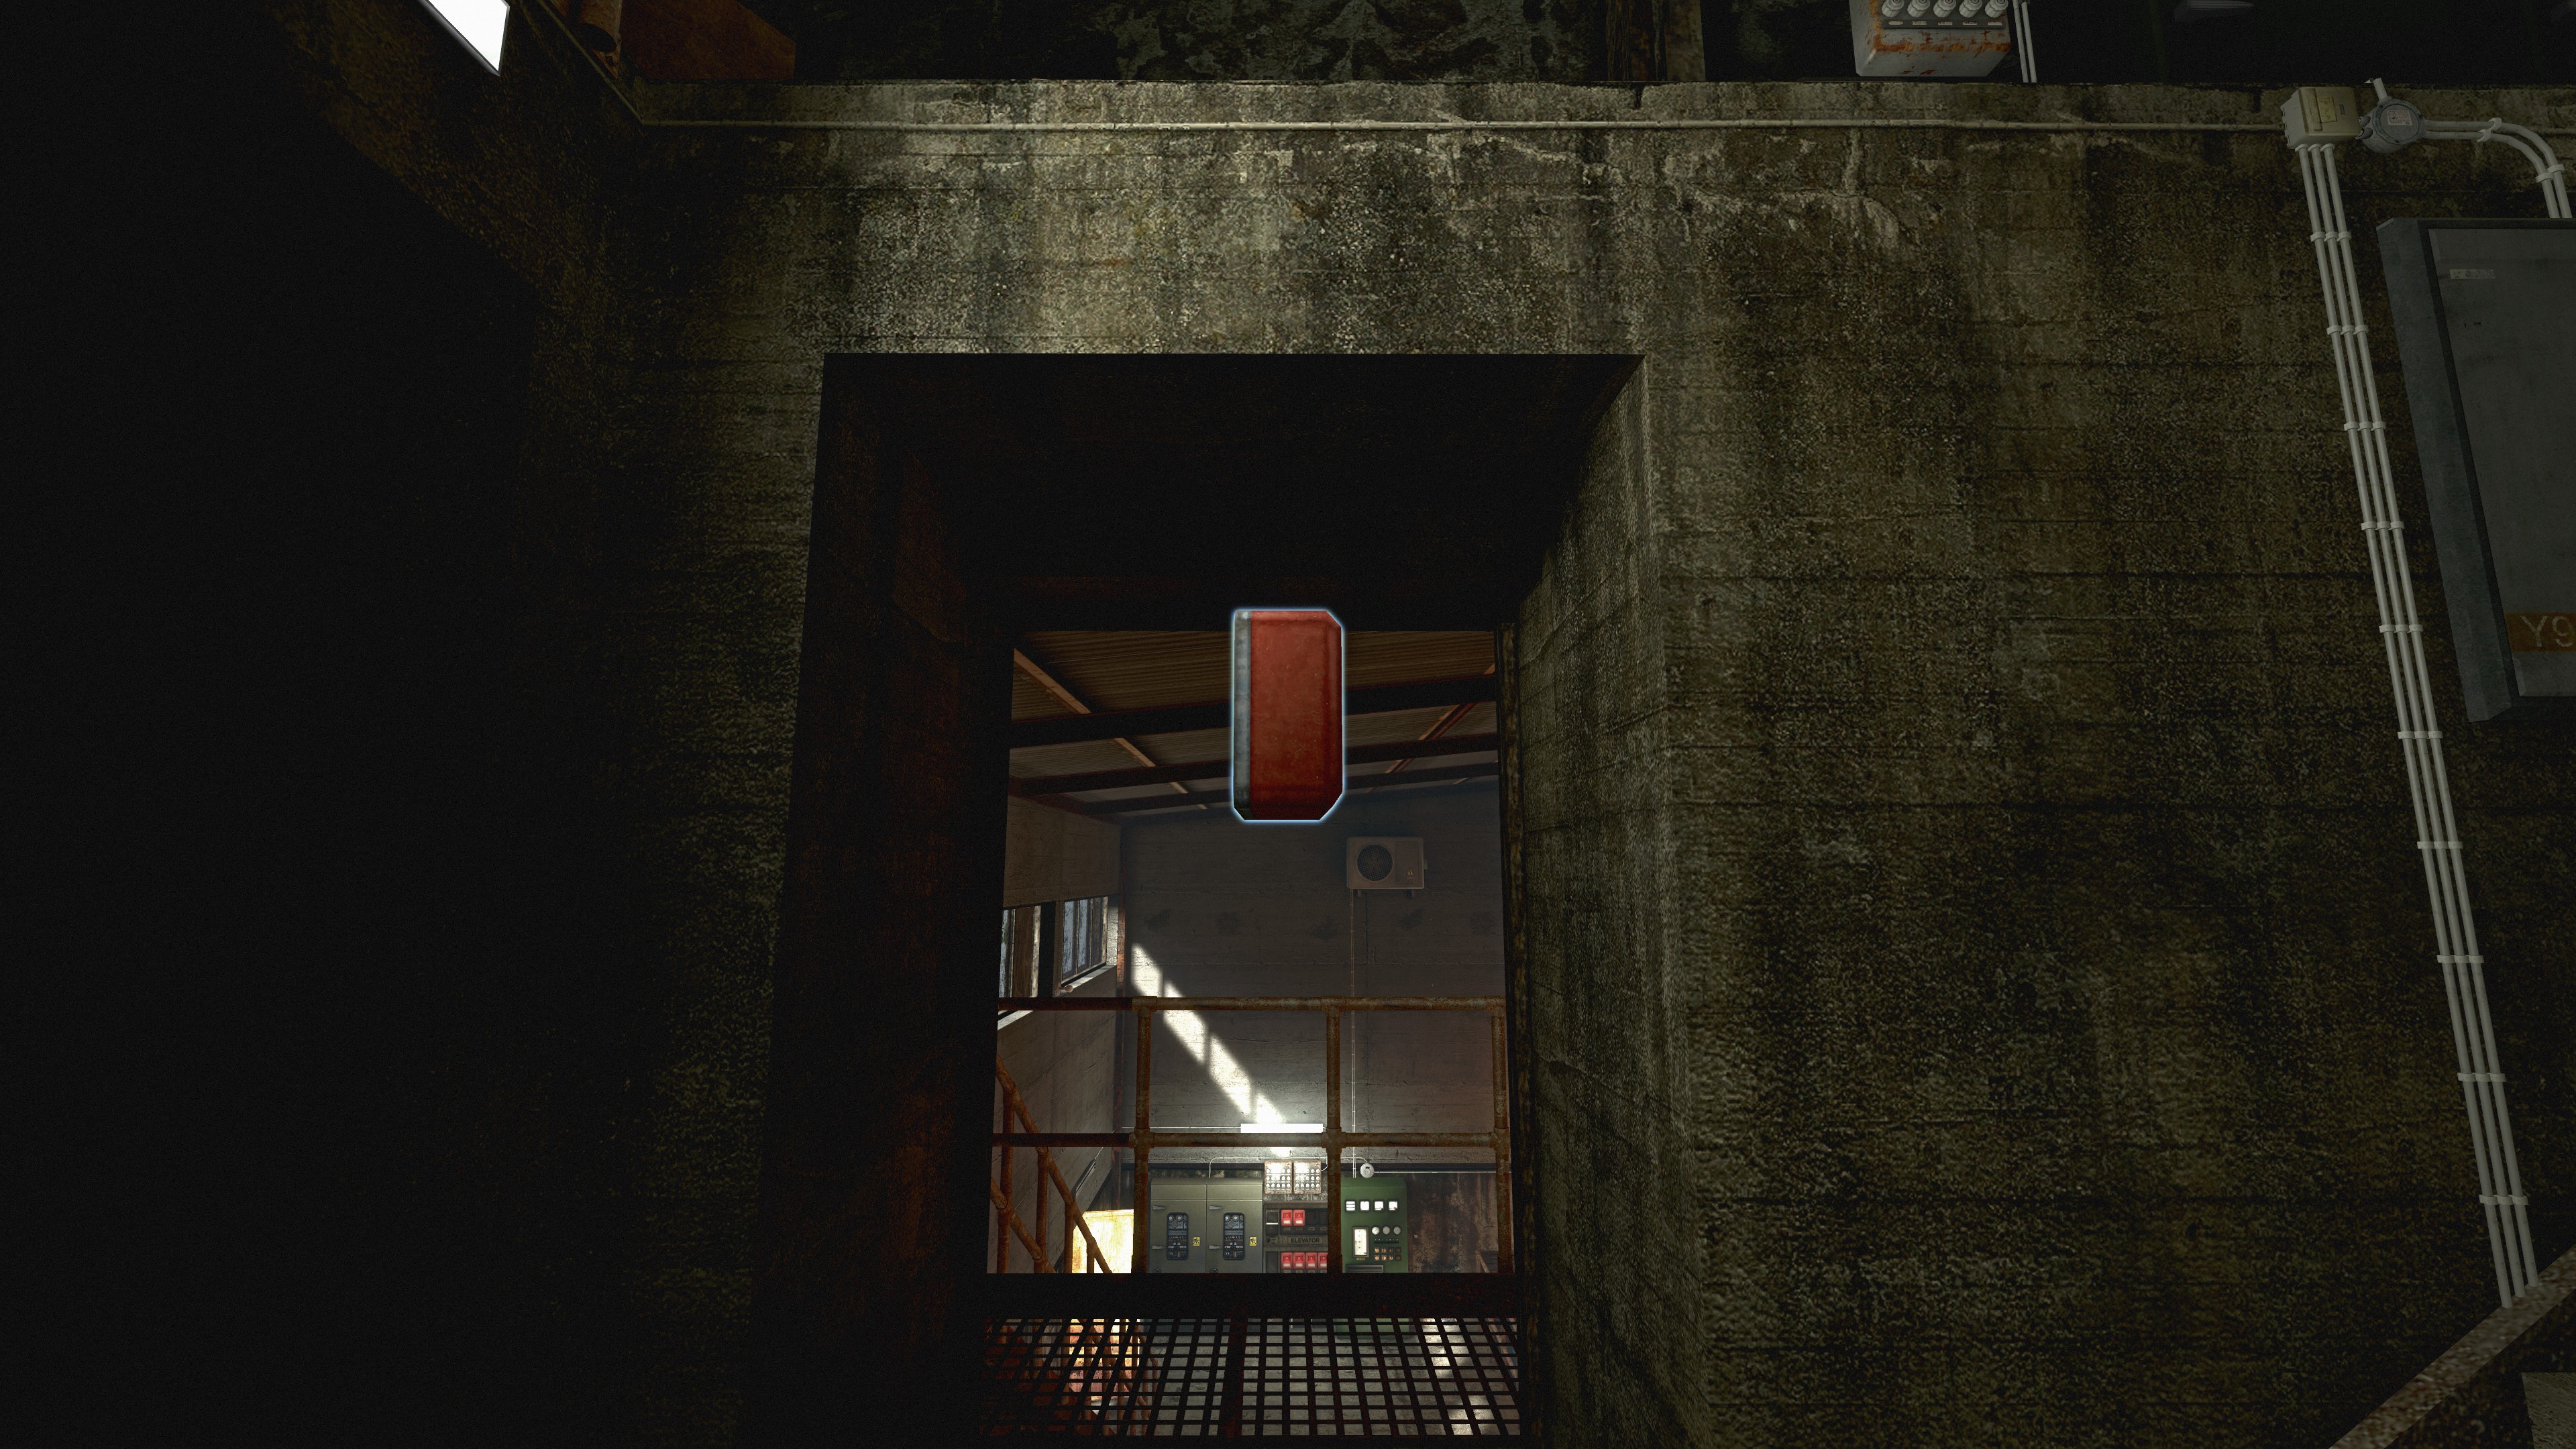
As shown on the picture below, just grab a fuse, take a run-up from here and throw away the fuse to the slot.

> Just before the Dam elevator, look on your left to see a crack in the dam. Grab a brick, take a run-up and throw it on the crack.


Just follow this path by jumping from spot to another.
1
2
3
4


Set both sluice gate generators to 3000 rpm then press the central button
Press both generator button to make them synchronized
Last step, press button 1 and 2 to connect the plant to the grid


> Hartman’s stash is located in the very last section of this chapter just before entering the Bergmann tunnel. Take a look on your left side to see a downed tree connecting both shores. Climb on the tree and make your way on the other side. A little bit further you will find the stash. The key to open it is located in the forestkeeper’s house on the TV.


> This one will pop up as soon as you complete the chapter.
Videos :
c2_m1
c2_m2
c2_m3
Chapter 3 : Forgotten world

This one is by far the trickiest achievement. First you need to find the fuse (on a shelf). Secondly, after crossing the automatic bridge you need to focus on the calendar in the small office to discover a four number code (4027). Finally you have to find a key, located in the far end of the right tunnel section behind a wood pallet. Make sure to bring key and fuse in the collapsing room where you have to open the flood door. Once escaping this room do not take the elevator but open the door on your right. Plug the fuse, dial the code and open the door…


Follow these steps:
Go upsatairs to the computer and turn on the top left corner flushing pipe
Go downstairs to fill pool 1
Open pipes A1/A2 until you see the green light
Go outside to open red valve
Go back to the computer to open red pipes 2 and close blue line
Go outside and turn off blue valve
Back downstaris to close A3/A4 until you see red light
Drain pool 4, grab the key and refill it
Open A3/A4 until you see the green light
Back outside to open blue pipe
Outside open chlorination room (key found on a desk near computer) and turn it on
Back to the computer to open blue pipe 2 and both chlorination pipes
From here all your light should be green and station is fully working
Use the key from the pool to open the door at the bottom of stairwell
Keep going until you reach broken stairs
SAVE YOUR GAME
Jump from broken floor to broken floor til the end
Achievement will pop as soon as you leave the area


Before entering the last corridor leading to the raft trip. Go down with the ladder on your left, follow the pipe til its end. You will find the special beer behind the toolbox.


Once you reached the container in the Bergmann’s tunnel you will find TNT sticks inside. Grab one stick then put it a little bit further in a tube on the rocks. Go back to the container then press the remote control. Just after that, make sure to be far away from the explosion.


> This one will pop up as soon as you complete the chapter.
Videos :
c3_m1
c3_m2
c3_m3
c3_m4
Chapter 4 : Heavy industry of the past

First you need to find the dock guy phone number. Here’s one of the spot where you can find it :
(Located on c2_m3)Then reach the phone station (c4_m3). From here dial the number found on the poster


> This one will pop up as soon as you complete the chapter.
Videos :
c4_m2
c4_m3
Chapter 5 : Fresh water

Here are the steps to follow :
Grab the blue pass (Outside, laying on a mattress)
Go to sewer pipes 01 and 02 shed, open it and turn on the valve
Enter the facility, go on your right side, open the door and turn off Steel factory pipe 01
Go the other side, open the first door and tiurn on the valve in the corner
Go upstairs, and push the Grit classifier button
Leave the facilty, go on your right side, enter the desinfection building and push the button.
Leave the building by the garage and go to the Sewer pipes building, turn on both pipes
Now take the stairs behind you and reach the control room, pick up the CD in the box and insert it in the computer. Click on repair, wait the loading then click all the red cross.
Before you leave don’t forget to pick up the red pass.
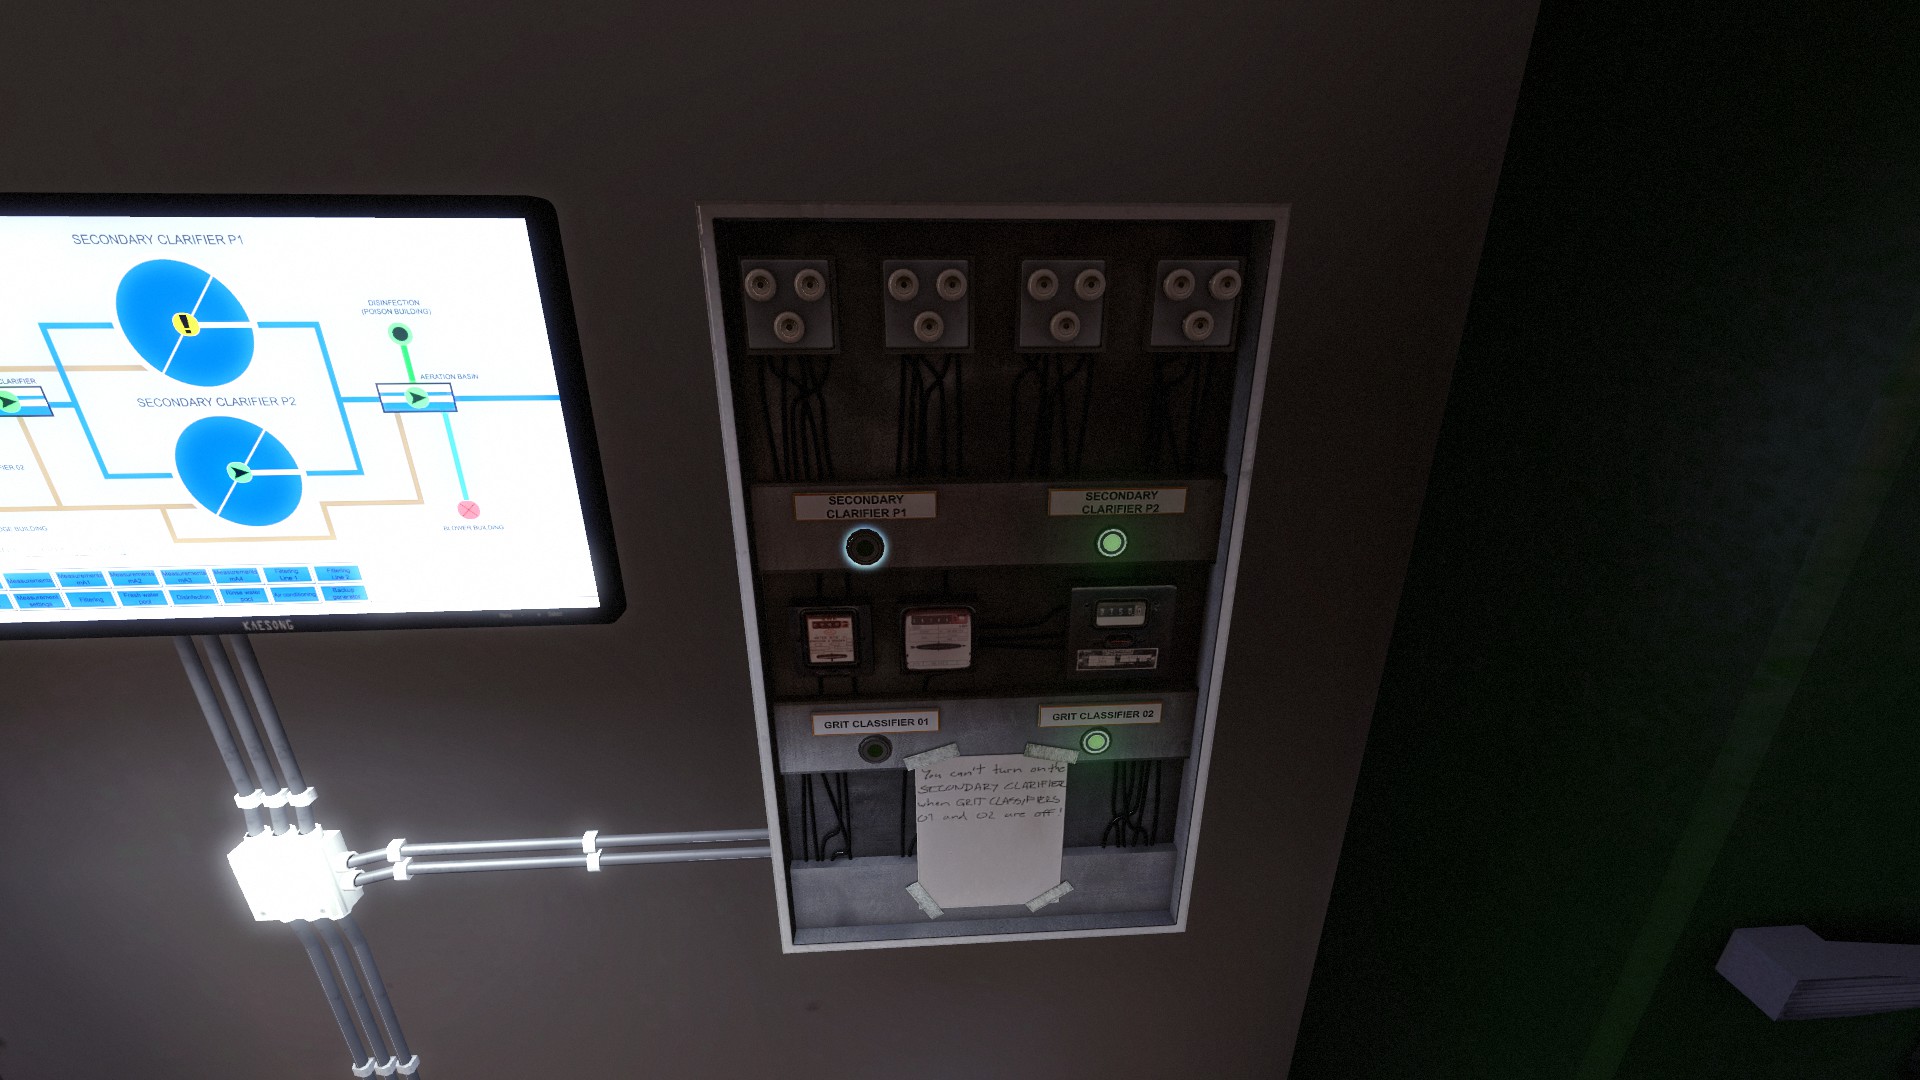
Leave this building and go to the grit classifer building, enter it and find the control panel. Now push Grit classifer 01 then 02 and finally secondary classifer P2.
Use your ed pass to leave and follow the path accross the grit classifer. Once you’re on the other side, go left, open the gate and go right. Open the last door and find the stairs leading to the Blower building, come in, turn on the red valve on your left side and push the button on your right.


Grab an empty glass in the grit control room. Put it in the water sampler machine.


Kebab is located in the laboratory on a desk, left side of the room, in a box.


> Find the coins in the first room on the left in the office. Then buy a drink at the vending machine in the hallway and bring it to the control room upstairs


> When you’re at the Hacker Den, just follow the left wall until you reach the computer to set off alarms and sensors.
Codes are :
– 6832 : Allow to unlock doors (Found in computer logfiles)
– 1970 : Allow to unlock doors (Found on a tablet)
– 1245 : Allow to turn off sensors (Found on the outside wall, building number)


> After leaving the Hacker Den, follow the stream until stairs on your left. From here, turn left under the bridge, follow the trail and enter the boss office. The USB stick is connected to the boss computer (Don’t forget to unlock the boss office from the computer in the Hacker Den)


> This one will pop up as soon as you complete the chapter.

> This one will pop up just after the previous one.
Videos :
c5_m1
c5_m2
c5_m2b
Restoring the flow

There’s 4 flow meters to repair through the game.
1. Chapter 2 (c2_m1)

2. Chapter 3 (c3_m1)

3. Chapter 3 (c3_m3)

4. Chapter 3 (c3_m4)

TFTC

There’s 16 hidden geocaches to find through the game.
[link]
Chapter 1 (1)

Chapter 2 (7)
c2_m1 (3/3)


c2_m2 (2/2)
c2_m3 (2/2)


Chapter 3 (3)
c3_m2 (2/2)


c3_m4 (1/1)

Chapter 5 (5)
c5_m1 (2/2)
c5_m2 (3/3)


The conspiracy unfolds

There’s 68 corruption tapes and documents to uncover through the game.
Chapter 1 (3)


Chapter 2 (15)
c2_m1 (4/4)
c2_m2 (7/7)


c2_m3 (4/4)
(Note : Stash count for one, document inside the stash count for another one)


Chapter 3 (24)
c3_m1 (6/6)


c3_m4 (7/7)


Chapter 4 (10)
c4_m2 (5/5)


Chapter 5 (16)
c5_m1 (4/4)

c5_m2b (3/3)


Structural analyst extraordinaire

There’s 17 repairable spots to repair through the game.
Chapter 2 (5/5)
c2_m1 (3/3)
c2_m2 (2/2)
Chapter 3 (2)
c3_m2 (1/1)
c3_m4 (1/1)


Chapter 4 ((1)
c4_m3 (1/1)
Chapter 5 (9)
c5_m1 (2/2)


Mistake targets
There’s 15 mistake targets through the game.
Chapter 2 (6/6)
c2_m1 (2/2)
Stop the working generator
Go ahead to the tree on the track to trigger the signal repair message
c2_m2 (4/4)
Plug the 4th fuse and trigger the 2nd lever, DO NOT touch lever 1 and 3
DO NOT make the power lines explode
DO NOT crush the engine through the floor
Trigger the lever and get away


Chapter 3 (4/4)
c3_m2 (3/3)
DO NOT trigger the fire alarm
There’s 2 mistake targets here : Empty the pool to find the key but DO NOT stop the pump outside
c3_m4 (1/1)
DO NOT trigger G2 generator


Chapter 5 (5/5)
c5_m1 (1/1)
DO NOT throw a brick into the broken glass
c5_m2 (4/4)
There’s 2 mistake targets here, DO NOT trigger transformers 2 and 3
DO NOT trigger the fire alarm AFTER repaired tansformer 1 but before
Set up this one the right way


Chapter 2 (All photographable spots)
There’s 45 photographable spots in Chapter 2
c2_m1 : Reserve 1 (16/16)

c2_m3 : Reserve 3 (8/8)


Chapter 3 (All photographable spots)
There’s 55 photographable spots in Chapter 3
c3_m1 : Tunnel (18/18)


c3_m4 : Tunnel 4 (23/23)


Chapter 4 (All photographable spots)
There’s 6 photographable spots in Chapter 4
c4_m2 : Furnace (3/3)
c4_m3 : Tower (3/3)


Chapter 5 (All photographable spots)
There’s 50 photographable spots in Chapter 5
c5_m1 : Watertreatment (1717)
c5_m2 : Sewer (22/22)


Ending
If you need more hints about specific locations (documents, repairable spots, geocaches and photographable spots) just let me know in the comments section. I didn’t explain everything on purpose to let you enjoy some mysteries of the game.
Some photographable spots are missing although you should be able to get the achievement.
I will keep this guide updated until I find the last one to be photographable.
Also I would like to give special thanks to Nismo. His help has been more than precious.
This guide would probably never have been born without him.
Also, I’d like to thank a new INFRA fella, Oku, who’s helping me to find last camera targets.
See you all in Part 2!!!