Overview
Dr Madge shows you around your first hospital, steering you away from the carnivorous plants and giving tips on good practice.
Welcome to the Jungle
Hello, this is Dr Madge. Welcome to your new hospital, where we will be treating a menagerie of colourful diseases.
If you like your tutorials in video form, then let me dim the lights and we’ll get right to business:
Now, let me split the class by ability. Who’s got some prior zoo hospital experience?
Ooh, fresh meat… I mean, uh, you’re in for quite the treat.
So your general, unspoken objective in Two Point Hospital is to create a profitable hospital. Your role in this is somewhat indirect. You design rooms and hire staff, but there your influence more or less ends.
From pebbles come landslides, however. If you do not design your hospital to be efficient, you definitely will notice the consequences. Fires, vomit waves, staff resignations, bodies in the corridors and, ultimately, bankruptcy. Your game ends when you are too deep in debt to dig your way out.
Two Point Hospital is a game where the fun is in learning. The Career mode is where you should start. It will guide you through the process of hiring staff, building rooms, and slowly work towards training and research. What it will not do is explicitly tell you things like how many GP rooms you need. (Hint: considerably more than one.) It gives you the tools, but the strategy you have to figure out for yourself.
With that in mind, I recommend you don’t go diving headfirst into strategy guides, because you’re actually missing out on the learning process. And learning is fun!
Ah well, you’ll likely find things a bit slow going at first. The first three hospitals in the Career are hand-holding affairs that feel rather restrictive. Anyhow-
Do not skip the Career, tedious though it may be at first. The sandbox assumes you know what you are doing in every way. It will not introduce you to how the rooms work, or what you need to research and why.
Some things have changed since you were last in the neighbourhood, friends. Rooms no longer need to be square. Sexist hiring practices are behind us. Nurses are considerably more useful than they were previously, in both diagnosis and treatment rooms. Staff training has been significantly expanded upon. Janitors must now chase after the ghosts haunting the halls, and require a specific qualification to do so. Epidemics have been overhauled and are 60% less frustrating.
One big difference is there’s now just the one fail condition – too far in debt. Your victory conditions are also more specifically laid out. Overall, your objective is to get a three star rating in every map. But don’t think that means grinding one hospital until you get three stars. That’s a rather counterproductive method. Instead, jump between hospitals frequently.
I have a bundle of in-game posters that contain gameplay tips and reminders. Newbies might find these a useful reference to have around the hospital. You’re welcome, and check it out here.
To get Workshop items into your game (posters, rugs, music tracks) all you need to do is click the “Subscribe” button.
A Patient’s Eye View
So, probably the best way to introduce you to how a hospital works, is to follow the path of a single patient. Understanding this will inform your strategy considerably.
As soon as a Patient arrives at your hospital, their health starts ticking down. We have to cure them before we are out of time. So, hurry on to Reception!
The Reception desk is found under the Items tab, right at the top of the list.
Reception has to be manned by an Assistant. Assistants play a handful of roles in your hospital, with Reception being the most important one. Click on the Hire tab and grab an Assistant.

Once the Assistant has checked the Patient in at Reception, the Patient heads to a GP office for the initial consultation.

The most important room in the hospital… The GP room is 3×3 minimum size. It also needs a desk and filing cabinet as its minimum objects.
The GP room needs, no surprise, a Doctor.
You may notice that your staff have Qualifications and Traits. Traits can be negative (e.g. Unhygenic) or positive (like Fast Learner). If you hover over the traits, a tooltip will appear that explicitly tells you their effect.
Qualifications can be necessary for staff to do certain jobs. For example, your Janitors cannot catch a wayward ghost unless they specifically have the Ghost Capture skill. Ghostbusting is not for amateurs.
The GP room does not require a qualification. Any Doctor can work here. However, there is a GP qualification that boosts a Doctor’s performance in this room. The Diagnosis qualification is more general, giving a small boost in any diagnostic room.
So, the Patient meets the Doctor in this room. If you are lucky, the Doctor will straight up diagnose your Patient here and now. Efficient! Sadly though, our example Patient is going to need a bit more diagnosis.
Which exact diagnosis room the Doctor sends the Patient to, is a bit of a mystery. It is believed that low skill Doctors will pick a diagnosis room randomly. Higher skill Doctors will choose the room that will add the most diagnosis power.
In our example, the Patient has been sent to General Diagnosis.
General Diag is run by a Nurse – preferably one with some skill in actual Diagnosis, although this isn’t required.
The EZ-Scan machine is where the action happens. Machines need maintenance from Janitors. So hire one if you didn’t already. If you click on the machine, it will show its health. Machines will catch on fire if their health is too low.
Fires are dealt with by Janitors, wielding a Fire Extinguisher. So don’t forget to actually place some extinguishers in your hospital. They are one-use items. So also don’t forget to replace the extinguisher after it has been used.

The Nurse whacks our Patient with the EZ-Scan and hey presto. That 12% more diagnosis. With that, it’s straight back to the GP.
Oh, there’s a queue. Several patients have checked into the hospital and are queuing up for the GP. Our patient joins the back of the line.
And it looks like she’s hungry. And thirsty. And bored. And needs the loo.
Our patient will gladly go wandering for several miles to find the one bookcase in the entire hospital. Or the one vending machine, or the one toilet block.
Do not build a massive toilet block in the middle of nowhere. Your patients will spend all their time walking to it, instead of getting diagnosed.
Every hospital building should have a toilet, however small. It makes a big difference. Also have food and drink machines spread out evenly. Entertainment devices, like bookcases, should be within easy walking distance as well.
So, after a brief trip to the loo, the patient is back in the queue. Looks like it’s our turn next. And… well, damn.
The Doctor is tired and is going to the staff room. Unfortunately, the only staff room is on the other side of the map. Looks like everyone is going to be queing a while longer. And all the time, their health is steadily ticking down. After a short while, our Patient needs the loo again.
This is how Patients die – wasted time. Staff rooms also need to be abundant and decked out with items, so that staff regenerate their Needs as soon as possible.
Anyway, with our Doctor and our Patient both finally refreshed, let’s get back to work. The Doctor adds a little more diagnosis, but it’s still not enough. On to the next diagnosis room…
Crap. The hospital has a lovely Psychiatry room, but no Psychiatrist.
This is a room that needs a specific qualification. It’s strictly Psychiatrists only in here.
If you look under the Hire tab, you might get lucky and see a Doctor with the Psychiatry qualification there. Or not. None to be seen here…
Well, there are two answers to that. One is Training. The other is Marketing.
Training is the reliable method. The Training room becomes available to you later on in the game. You can place any Doctor with a free qualification slot in the Training Room. Then select the Psychiatry training course, and someone to teach it. The Doctor will be trained as a Psychiatrist.
Marketing is another room that will appear later in the game. It is run by Assistants that have the Marketing qualification. For a fee, you can have them put out a recruitment campaign for Psychiatrists. This should skew your prospective applicants towards having the right qualification. However, it is not guaranteed.
So, we gained a Psychiatrist. He brings our Patient to 100% diagnosis. However, a final trip to the GP is still required.
Incidentally, Psychiatry is both a diagnosis and a treatment room, performing either function. Patients with diseases like Mock Star are cured in Psychiatry. If you want a multi-purpose room to focus on either Diagnosis or Treatment, but not both, you can toggle the room in the room’s tab. By default, the room will serve both functions.
Yup. Back again. I said the GP room is the most important room in the hospital. This is why. Patients must return to the GP after every single diagnosis room visit.
Our Patient has been diagnosed with Bed Face. That’s a disease that is cured in the Ward, so off we merrily go.
The Ward is another dual purpose room, doing diagnosis and treatment. It is run by Nurses. Several Nurses.
The Ward can be built with as many beds as you need, and staffed with as many Nurses as you like. One Nurse is adequate, but you can click on the room and add more staff slots.
No qualification is required to work in the Ward. However, the Ward Management qualification will boost efficiency.
Our Patient goes to the Ward, undresses behind the screen, and gets in the bed. After a few visits from the Nurse, they get out of bed and get changed again. They step outside the Ward and promptly die. They turn into an angry haunting spirit that terrifies the GP queue. Then, finally, the Janitor with the ghostbusting skill vacuums her up and puts an end to the chaos.
*Ahem.* Our Nurses are unqualified interns, with poor Treatment skills. As your staff work, they gain experience, and become ready for promotion. Each promotion improves their abilities in treatment and diagnosis generally. It also opens up a training slot.
Another way you can improve treatment outcomes, is to upgrade your machines. Treatment clinics like the Pharmacy can have their machines upgraded, by an appropriately qualified Janitor. A level 2 Pharmacy machine is more likely to cure, and not kill, the Patients using it. Machine upgrades will become available to you either through Research, or Career progression.
Basic Controls
The controls in Two Point Hospital are straightforward, so feel free to skip this section if you’re a more confident player.
The default camera controls are as follows:
The Space Bar pauses time.

The keys can be rebound to your liking in the main menu, under Settings > Controls.
For the mouse controls, the mouse wheel zooms the view in and out. If you hold down the right mouse button, you can pan the screen.
If you hold down left click on an item, it will pop into your cursor and you can move it. When holding an item, hold down left click to rotate it in your hand.
If you right click while holding an item in your cursor, it will be deleted.
When building a room, all you have to do, is drag out a blueprint with your mouse.
In room building view, there are a few things to take note of. The green tick to complete the room will be greyed out unless the room is valid – usually this means it must at least have a door and be minimum size. Be mindful that no objects are blocking the door.

Next to the green confirm tick are the buttons for manually expanding or shrinking a room. These are used when making a room that is non-square. Click on tiles to add to the blueprint, or remove floor spaces.
When building a room blueprint, the right mouse button can be used to cycle through cursor modes.
To return a completed room to Edit mode, you should click the Edit button from the room’s main tab. (Accessed by clicking on its door.)
Staff
Staff are important. You’re not going to get much done without them. So, here are your workers and their roles.
1) Perform diagnosis in diagnosis rooms
2) Perform treatment in treatment rooms
3) Perform research in the Research Lab
Doctors are your most expensive, most useful and most numerous staff. Having highly skilled Doctors will always be one of your priorities. If you have underperforming Doctors, you will have an inefficient hospital that works slowly and fails to cure people.
Qualifications:
Essential qualifications are Psychiatry, Genetics, Surgery, Research and Radiology. Research is necessary to work in the Research Lab. Radiology is necessary for the Mega Scan room, which being a diagnosis room, is itself optional. The others are for treatment rooms, so you will certainly be needing them.
The non-essential Doctor qualification is General Practice. You will definitely want to make use of this, given how central the GP Office is to your hospital’s running.
Preferred traits:
Best two traits for Doctors: Cheap, Positive
For Diagnosis only: Healer, Charming
For Research and Surgery: Tireless, Positive
Being Unhygienic is a particularly bad idea for a Diagnosis doctor. Being Lazy or Expensive makes your already expensive, valuable doctors less profitable.
1) Perform diagnosis in diagnosis rooms
2) Perform treatment in treatment rooms
Nurses are cheaper than Doctors, so make good use of them. General Diagnosis is a much cheaper room to operate than, say, the Mega Scanner. Wards are always useful, doing double duty in Diagnosis and Treatment, and able to take on many Patients at once.
Qualifications:
Nurses have no essential qualifications. Qualifications unique to them are Pharmacy Management, Ward Management and the Injection Room bonus. Ward Management is the most useful of these, especially if you are running a dual-purpose Ward.
Preferred traits:
Best two traits: Tireless, Positive
For Diagnosis only: Healer, Charming
Being Unhygienic is a particularly bad idea for a Diagnosis nurse. So is Nausea-Inducing.
1) Clean up litter / debris
2) Empty bins
3) Repair machines
4) Upgrade machines (with the Mechanics qualification)
5) Catch ghosts (with the Ghost Capture qualification)
7) Put out fires (provided there’s a Fire Extinguisher)
8) Clean toilets
9) Water plants
10) Restock vending machines
Janitors keep your machines running. They also keep your hospital a vaguely sanitary and functional building. If every toilet on the map is blocked, you really need to hire some more Janitors.
Qualifications:
As above, the essential qualifications are Mechanics and Ghost Capture (although, technically, you might get away without them). The non-essential qualification is Maintenance, which speeds up the rate of repair.
Preferred traits:
Best two traits: Positive, Motivated
You should be avoiding Grumpy staff anyhow, but this is a particularly lethal trait for Janitors. Unmotivated is an especially bad trait for Janitors.
1) Operate Reception
2) Staff the stalls (Newsagent, Gift Shop, Ice Cream Stand, etc)
3) Operate the Cafe
4) Work in Marketing (with the Marketing qualification)
Assistants man Reception first and foremost. They will also run stalls and perform Marketing.
Qualifications:
Assistants have the non-essential Customer Service qualification. This supposedly makes them process Patients faster, however, I cannot say I have noticed any difference. Not recommended. If you should choose to make use of Marketing, remember you need a suitably qualified person for it.
Preferred traits:
Best two traits: Charming, Positive
There’s really no reason to tolerate Gross or Nausea-Inducing Assistants. They upset Patients the moment they come in the door! You can afford to be picky with your Assistants, so stack them with traits that boost your Patients’ morale.
Note that “Boring” Assistants can actually prove to be a big advantage, if used right. Put a Gift Shop or Arcade Machine right next to Reception manned by a Boring Assistant. Patients will have their fun depleted, so immediately stop to spend money!
The semi-universal qualifications are Diagnosis and Treatment. Obviously, these qualifications are no use to Janitors or Assistants. Your Doctors and Nurses will be making good use of these two however. It’s almost always a good idea to split your staff into Diagnosis specialists and Treatment specialists.
The Teaching Masterclass qualification is useful if you want to forego external trainers and have in-house gurus. This will work out cheaper in the long run. Stack with the “Natural Mentor” trait for 240% teaching speed or upwards. The big drawback is the loss of fifth level specialisation (e.g. Psychiatry V).
Emotional Intelligence gives the staff member a nice +10 boost to their happiness. Very useful in the Rotting Hill map, by the way. Can also be used to offset the Grumpy trait. Janitors are often working in the wet and the cold, with no room bonuses, and particularly benefit from this qualification. As a side note, this also makes the “Positive” trait particularly useful for Janitors.
Bedside Manner gives a happiness boost to any Patient the staff member interacts with. This is basically wasted on anyone in Treatment, but can be useful in Diagnosis. It’s unlikely that this qualification would ever beat out an actual Diagnosis qualification in usefulness however. The “Charming” trait is essentially the free version of this qualification.
Stamina reduces a staff member’s energy decay. This one can be a double edged sword. It means fewer staff breaks, however, the staff member is still thirsty, hungry and miserable in the meantime. I prefer Emotional Intelligence for a small performance boost. The “Tireless” trait is the free version of the qualification.
Motivation increases a staff member’s walking speed. Note that staff members get slightly faster with each promotion anyway, so the weak boost from this skill isn’t really worth it. It can mean your Janitors cover more ground more quickly though. The “Motivated” trait is the free version of this qualification.
Staff happiness is often an objective goal and can be tricky to build. There are some obvious pitfalls, like your staff being too cold, not paid enough and wanting training. Once you have covered those bases, look to the environment first. Rooms with high Attractiveness and Prestige give a big mood boost to anyone inside.
Room Prestige is somewhat increased by any item, or extra floor space. There are some items in the game that significantly boost Prestige. Take a look at the item tooltips to see which ones these are. A level 4 or 5 room gives a nice mood bonus. Be warned however, that there is a cost to Prestige. Your hospital level will go up with higher level rooms, which can attract more Patients and open late tier diseases. A large influx, or fatal diseases, can be very disruptive.

Another important tip is to adjust your staff’s break policy. The default policy of half on duty and half off, is too ungenerous. I recommend allowing almost all of your staff to take time off when and as they need it. This means that instead of being trapped in their rooms with depleted Needs, they will just head off to look after themselves and restore Happiness.
Janitors have the worst job, getting no nice Prestige bonus, and having to stand outside in the cold. For them, increasing their wages until they are more than satisfied may be your only option.
Your receptionists can get a Prestige bonus if you use the Reception room, rather than the standalone desk. The Reception-as-a-Room unlocks later on in the game.
Information Views
Information is power, as they say. Two Point Hospital gives you some very useful tools to micromanage your staff and patients. Let’s have a look at the info pages.
Direct your attention to the bottom left of the screen. Look where there’s a pale green person icon. Under here is Staff, Patients and Illnesses. Let’s check out Staff.
(NB: Earlier versions of TPH had a slightly different look to these pages. Don’t let that confuse you. The same info is there.)
The staff manager has three sub-views. You can look at all staff, or narrow it down to one category of staff. Basically, just press buttons and see what happens. You can’t go wrong here.
Staff Overview:
A good place to check on your staff’s happiness and energy. You can rank them by clicking the headers. In the screenshot, I have them ranked by energy. This tells me who really needs to go on a break.

Pay Review:
This is a useful spot to silence all those whinging ninnies. Click “Satisfy pay requests” and voila. You can also manually adjust salaries.

Job assignment:
Job assignment is important! Don’t waste your highly qualified staff in rooms where they get no bonuses. You will notice in the screenshot, I have Diagnosis specialised Nurses working only in Diagnosis rooms, as it should be.

Accessed from the same tab, click on “Patients” to get a handy view of the malingerers chewing up the hospital.
This is a much simpler interface than the staff manager. As you can see in the screenshot, I have ordered my Patients by their remaining Health. This is a very handy thing to see. Patients who aren’t going to get treated in time, may as well be sent home. A large number of dying Patients also indicates something is very wrong in your hospital diagnosis pipeline.

Rarely visited, which to be honest, we should probably fix. Because it is very handy to know which are the most fatal illnesses among your patients.
As you can see in the screenshot, Lycanthropy is the big killer in my hospital. This is fairly typical of that particular disease, but that’s not to say we give up entirely. It’s cured in the Pharmacy and has a low success rate. We can boost that rate by upgrading the Pharmacy machine and training up our Nurses.

The next tab is the orange $, where we have Overview, Prices and Loans.
We’ll start with Overview, which would be better named Information Overload. There is a whole lot to digest here. I’m going to direct you straight to the most important sub-tab by far: Policy.
In particular, I want you to note that “Fast Track Treatment Decision” button. When checked, this means that Patients do not have to make a final trip to the GP. Once they have reached the Diagnosis threshold (which you also set on this page, btw) they head directly to the Treatment room. This slashes GP Office queues and is a must have.

Note that this button was not present in earlier versions of TPH. Update your game if you don’t see it!
As I said, there is a lot going on in “Overview”. Our next stop is the Staff tab. Here’s another important function you may otherwise overlook – staff break policy. The default policy is rarely to my liking. If you have three reception desks and five Receptionists, it makes sense to have two on break and three on duty at any given time. Your Doctors, Nurses and Janitors should be given a much more generous deal. Instead of half on duty and half off, let all your staff take a break pretty much whenever they want. The benefit is a lot more Staff Happiness, more of the time.

I’ll leave you to explore the depths of Overview on your own. Just one last note: if you’re chasing a Hospital Value objective, then you’ll need to come to the Finance page. This shows you exactly what the Hospital Value calculation is. Having a big monthly profit is key. Keep track of your progress here.

We’ll skip over “Prices” for now because “Loans” is really important.
Loans, the solution to just about any crisis you may face. If you really need to train a staff member, build a room, etc. just take out a loan. It is worth it.

You can only take a higher-tier loan when you’ve already taken out a lower-tier loan. No, this doesn’t really make sense, but there you are. Remember that if you’re taking out a next-tier loan, pay off the lower loan with the new money. Consolidate. I find it very useful to have the small loan as an open option, because for want of just $100, you can be denied buying a really essential room or item.
The Prices view is pretty straightforward. You can manually adjust what you charge here.
I suggest making use of that “Modify All” section. Raise all prices across the board by 10%. Just go right ahead and do it – it’s exceedingly rare that this will cause any issues and it’s an automatic 10% extra profit.

Now this is tremendously useful! The blue i has a ton of useful overlays that reveal problems in the hospital. Press buttons to your heart’s content here. There’s lots to see.
Attractiveness is often one of your main Objectives and here you can easily see what spots in your hospital are dank ‘n’ nasty. As you can see above, my hospital is a very healthy glowing green with high Attractiveness.

When you place an attractive object (e.g. a plant) the game will automatically switch the view to this mode. Here is where you can toggle stuff manually.
Likewise, try to place a radiator, and the game will helpfully switch to Heat view.
Blue and red are bad. That middle of the road yellow is what you’re looking for.
That screenshot above might look like it’s Attractive view again, but it’s not. That’s Hygiene view. My hospital is clearly a very hygienic one, which is chiefly due to me never hiring Unhygenic staff. Those people can be real troublemakers.

In the screenshot above, I’ve hunted down a Nurse who has lower Hygiene (the orange guy). He could do with either being sent on a break, or being given a Hand Sanitiser.

The good news is that Hygiene problems are rare, if you pick your staff well. The bad news is that Patients suffering from low hygiene will die off very fast. They become soiled by failing to reach the loo in time, or from your Nurse’s yucky hands. They also contaminate other Patients with their sneezes. Anyone in red Hygiene should be sent home before they can do further damage.
You can play with the other buttons on your own. Another especially useful one is the Maintenance view. This lets you spot damaged machines from a mile away, in bright red. Saves you having to tediously click around.

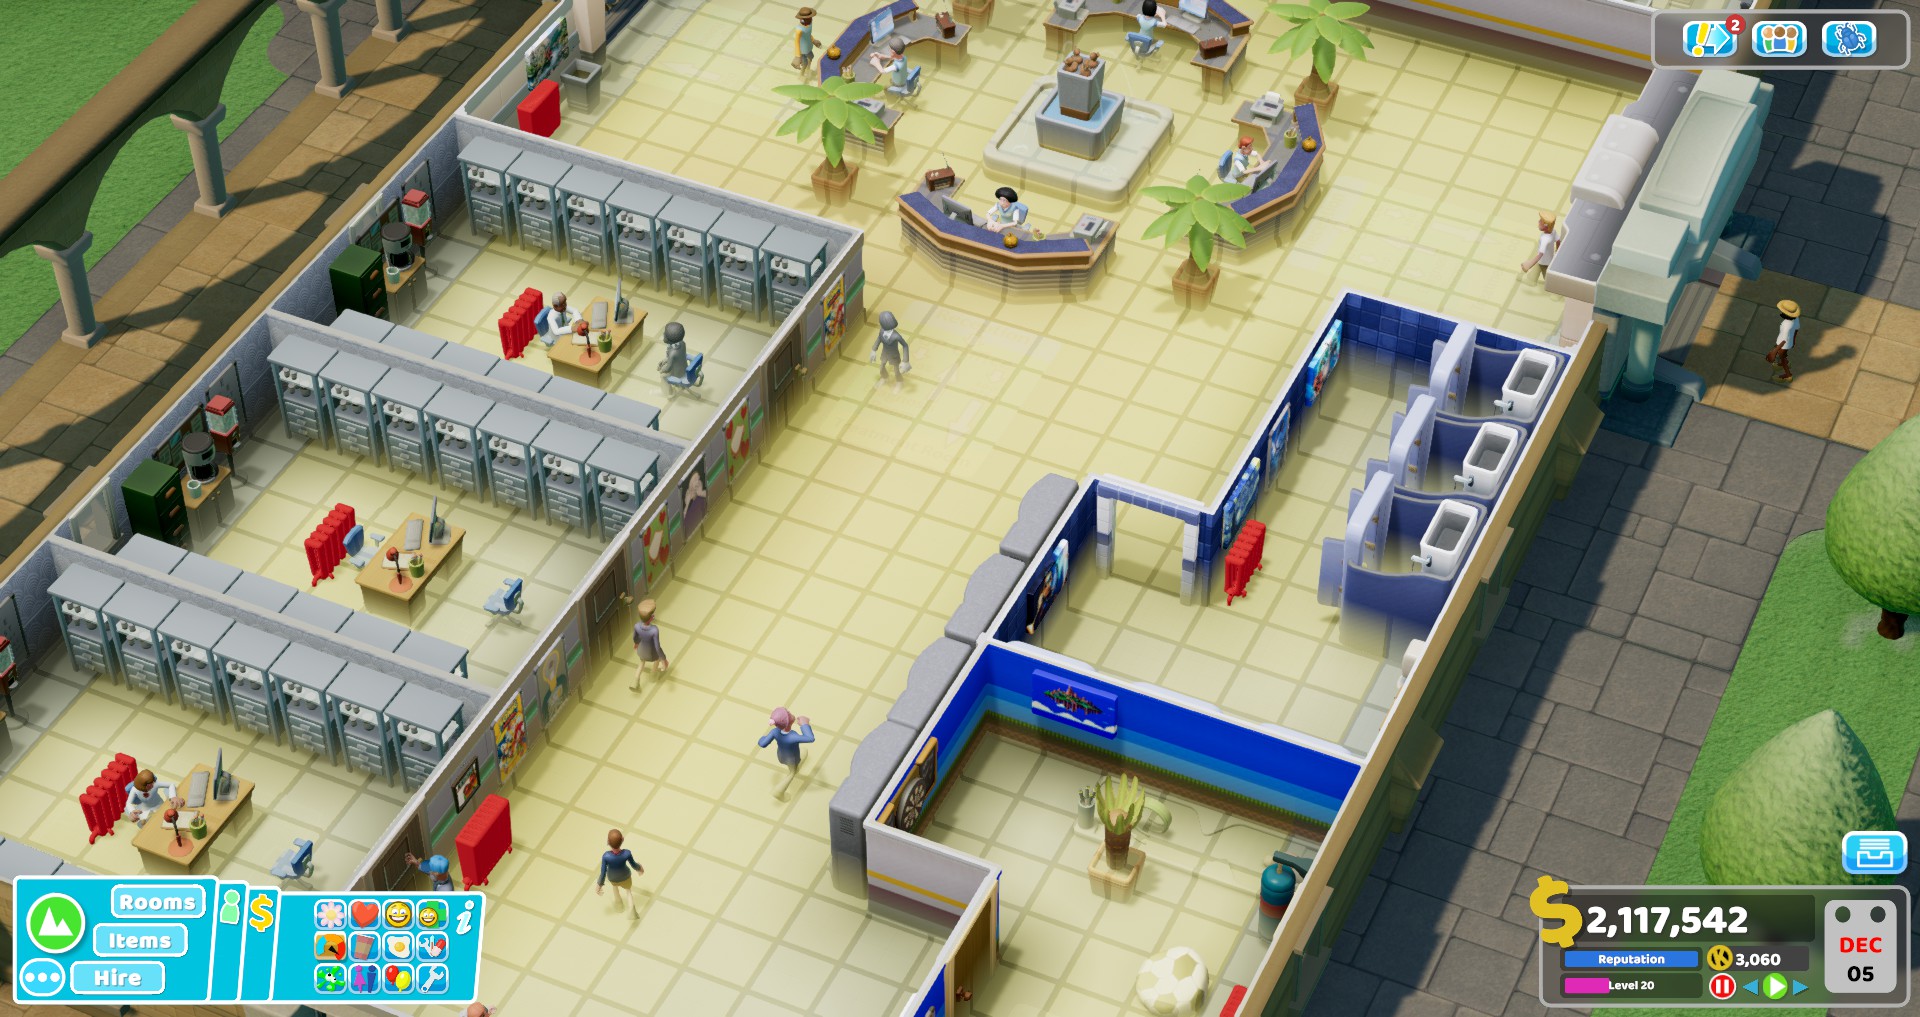
Summary of Rooms
One of the strategies every player learns early on, is to group your rooms so your staff members can move efficiently between them.
For example, a Doctor focused in Treatment should be working in your treatment clinics. Cluster these Doctor clinics together, with a toilet and staff room nearby. Your treatment focused Nurses can have their own cluster of clinics in another building. This prevents your staff from having to walk long distances while getting cold, hungry and generally wasting time.

As following the path of one patient has shown you, if your staff members are wasting time travelling or filling needs, that’s time creating big queues. Big queues equals dead patients. Staff efficiency is your number one layout priority.
The following image shows a theoretical hospital, arranged using my typical clustering method.
Toilets and staff rooms can be made very small. It’s always worth squeezing one in there. A massive training room will do you no good. Instead, you’ll want several small 3×3 ones stationed at strategic points, whenever the space permits.
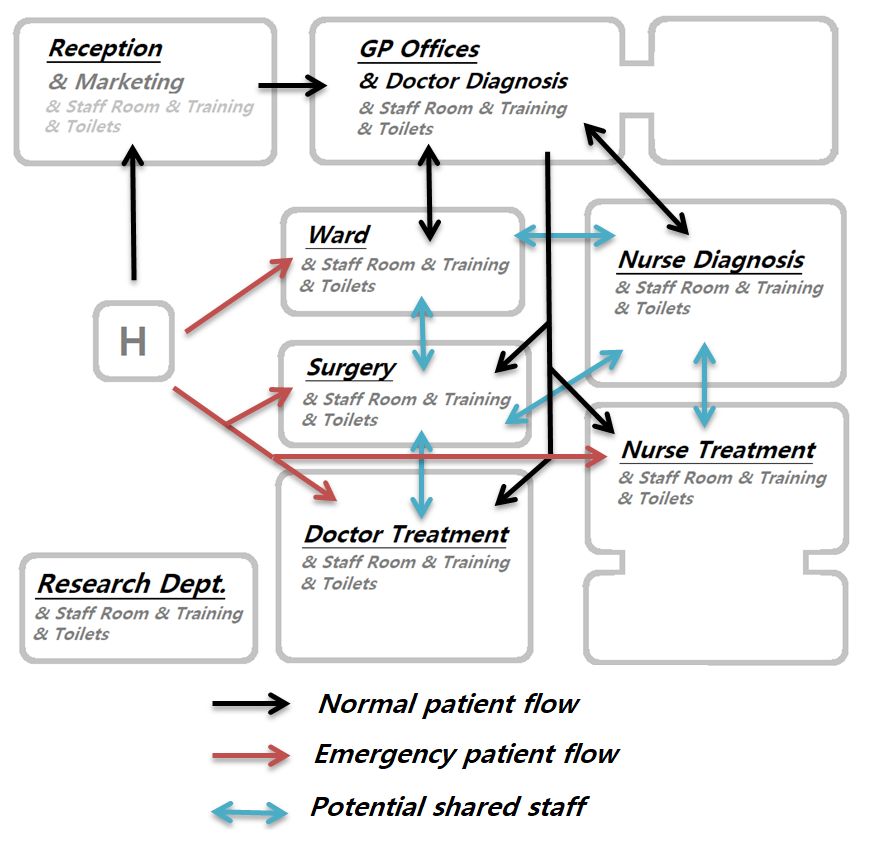
I dislike to share staff across disciplines. As you can see however, this layout does allow for multi-tasking staff. I always keep my GPs and Researchers highly specialised, hence no staff-sharing of those particular Doctors in my chosen layout. You can of course arrange your hospital however you see fit.
I give Surgery special consideration because it needs a Surgeon and any Nurse (the Nurse’s particular qualifications are not relevant and have no effect in this room). The Surgeon can potentially be a multi-tasking Treatment doctor. The Ward is on its own because the Ward nurses have their own specialisation (Ward Management). This means they can be split off from the Diagnosis nurses and the Treatment nurses. Which you will probably need to do for space reasons, as it is difficult to cram everyone in there.
While not accounted for in this particular layout, Psychiatrists – like the Ward nurses – are in their own discipline, doing diagnosis and treatment. Hence I often give them their own wing. Also like the Ward, their ideal position is next to both the GPs and the helipad. In the example above though, they will have been lumped with either the Diagnosis or Treatment doctors, depending on who has room for them, and whether they are moonlighting in the treatment clinics. At the end of day, space is limited.
An example of a completely different approach, would be to have no Ward Management nurses. Instead, have individual Diagnosis and Treatment Wards in the relevant clusters. That would let the Psychiatrists move in on the Ward’s former space. Feel free to try stuff out.
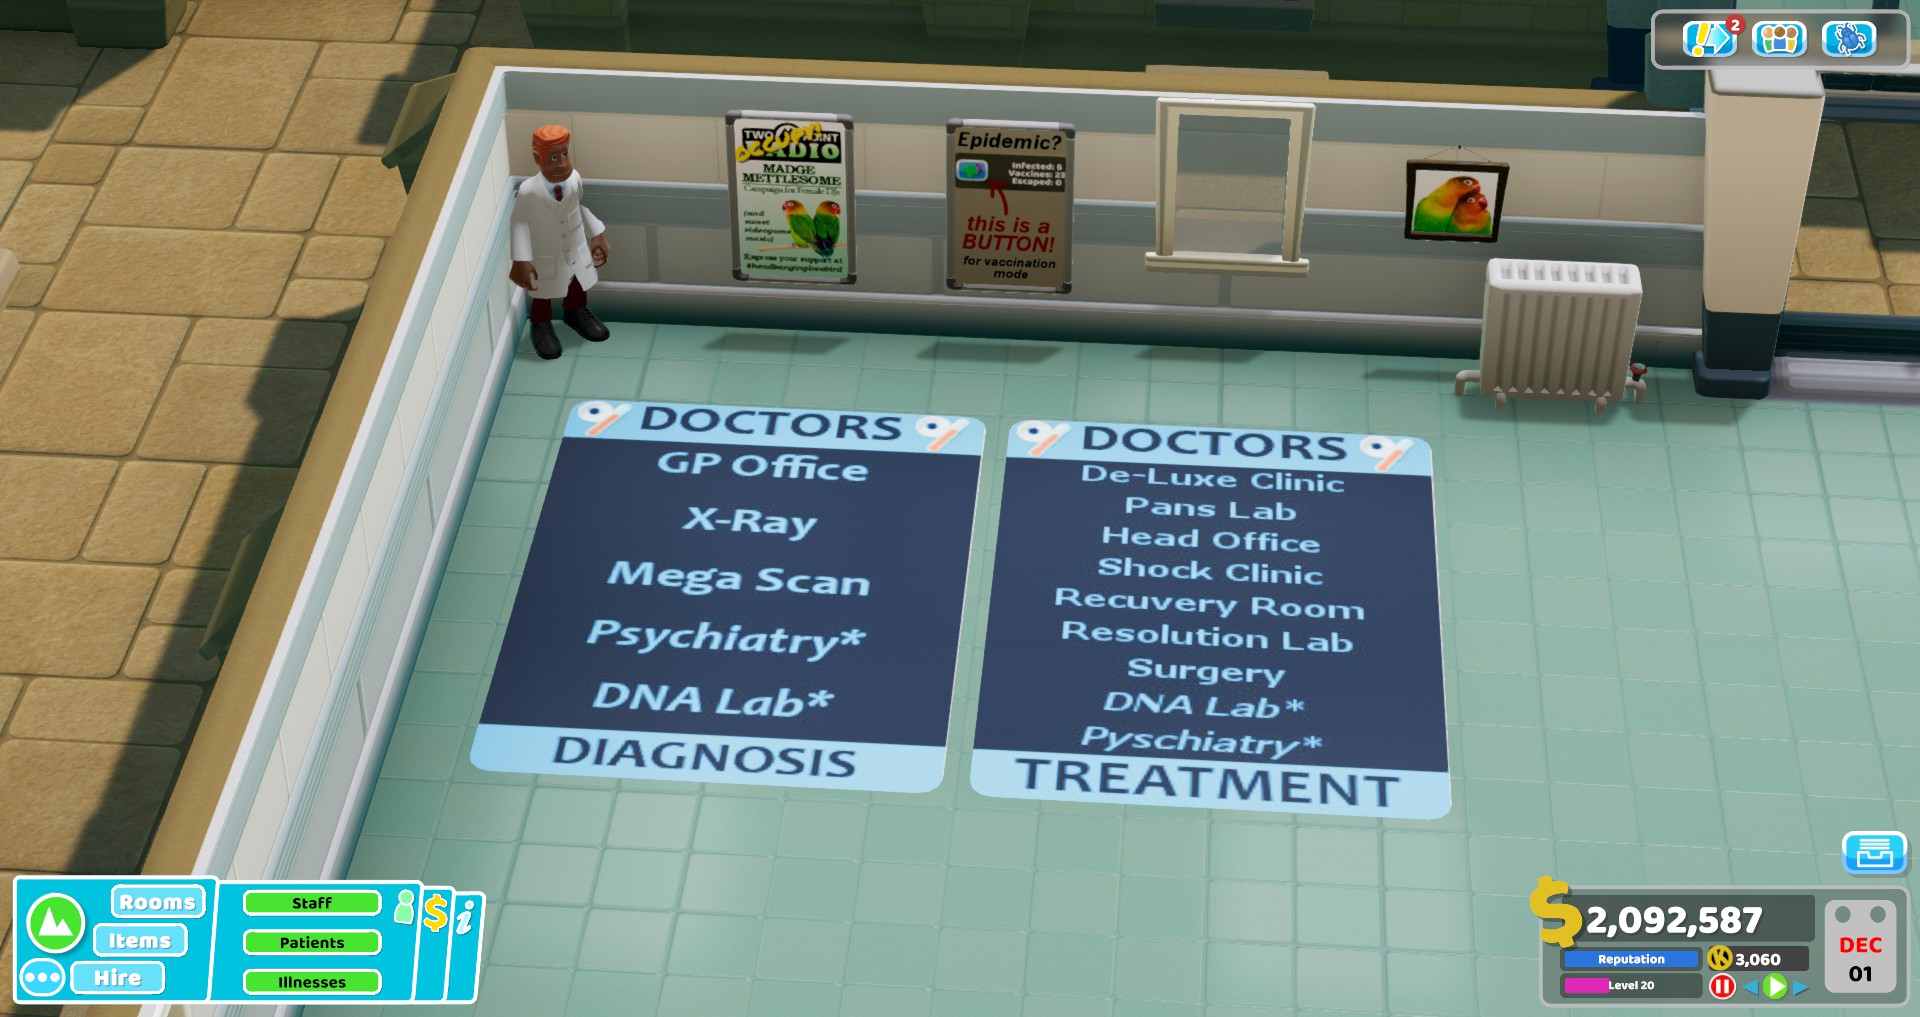
You will unlock rooms as you play through the Career. Here’s a quick room reference:
Doctors
GP Office
X-Ray
Mega Scan – Requires Radiology qualification

Nurses
General Diagnosis
Cardiology
Fluid Analysis

Doctors
Surgery – Requires Surgery qualification, and needs a Nurse as well
Nurses
Pharmacy
Injection Room
Fracture Ward
Doctors
De-Lux Clinic* (Lightheadedness)
Pans Lab (Pandemic)
Head Office (Turtle Head)
Shock Clinic (Shock Horror)
Recurvery Room (Cubism)
Resolution Lab (8-bitten)
* If you have the Pebberley Island DLC, the De-Luxe Clinic treats both Lightheadedness and Crabheadedness.
Nurses
Clown Clinic (Jest Infection)
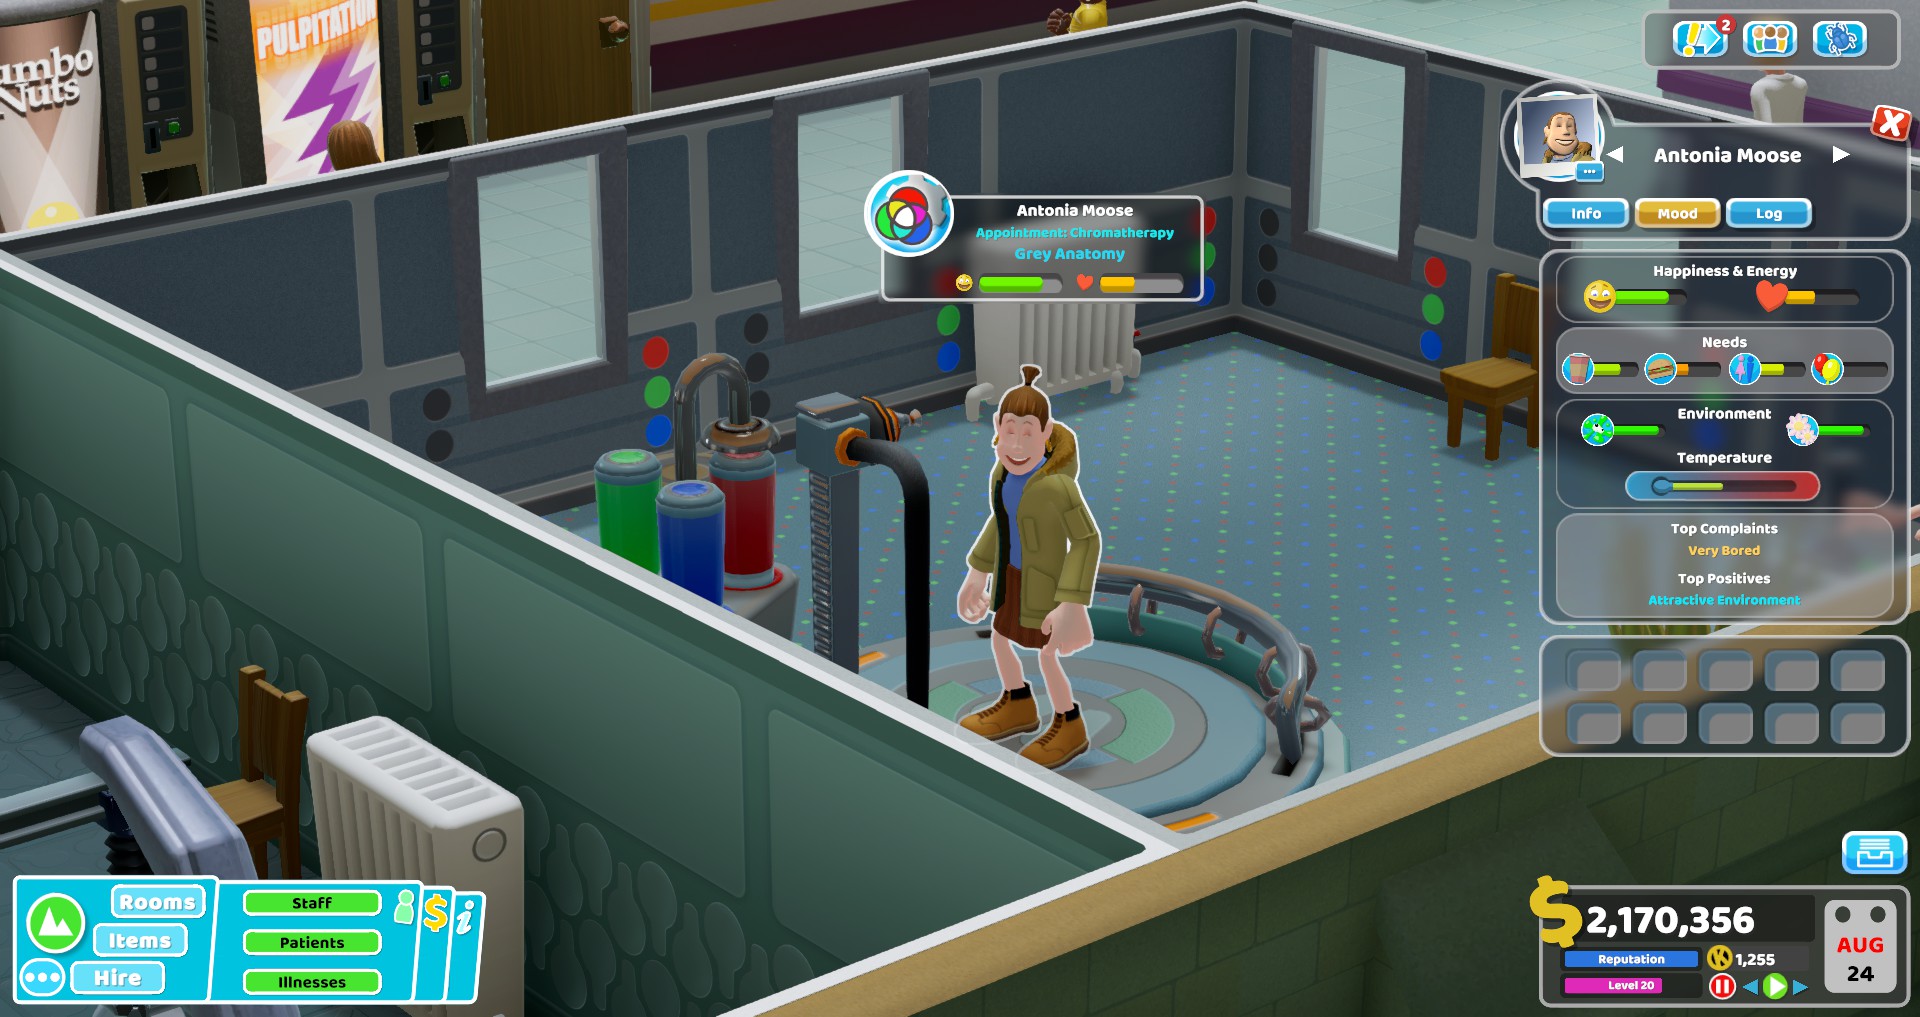
Chromatherapy (Grey Anatomy)
Pest Control (Animal Magnetism)
Cryptology (Premature Mummification)


Note: all the dual purpose rooms treat multiple diseases
Doctors
Psychiatry – Requires Psychiatry qualification
DNA Lab – Requires Genetics qualification
Nurses
Ward


There’s no definitive answer to what diagnosis rooms you prefer to use, although I would point out that Nurses are a lot cheaper than Doctors. Different maps have different diseases, so you’ll be requiring different ratios of Treatment rooms.
A fully grown hospital – one with 250 patients – should expect to have about 8 GP rooms. As a general rule, a mature hospital will need 4 (dual duty) psychiatry rooms and two pharmacies – if you have less than this, that could be your problem right there.
Psychiatry and Wards operate well as dual-duty rooms, since their respective room bonus qualifications boost both treatment and diagnosis performance. However, if you have illnesses that kill off Patients quickly, I recommend setting aside a Treatment-only room. Patients waiting to be diagnosed can swamp Patients who are ready to be cured.
Be wary of building a massive Ward. Your Nurses are pretty efficient at their jobs, however, the door is not. You can end up with people queuing just to get in or out of the room. I would recommend 6 beds and two Nurses for the average Ward. Two screens is helpful, although Patients are clearly not very bright in their choices.
Fracture Wards operate considerably better if you have two plaster caster machines. This allows one to be repaired while the other keeps working. (Players have observed the Fracture Ward descending into chaos thanks to a blocked machine, with Patients refusing to come in the room even with empty beds there.)
The most expensive rooms to operate are the DNA Lab and the Surgery. Surgery requires a Doctor and a Nurse, so it has a high staff burden. The DNA Lab is extremely slow, needs a special qualification, and hence makes a poor diagnosis room. I recommend setting it to Treatment only. By cutting out Diagnosis, you’re reducing the number of specialist trained Doctors and expensive DNA rooms.
Surgery and DNA labs are very slow and thus have long queues, meaning it is best to have at least two of both.
Training, Marketing and Research
The Training Room becomes available in Flottering. So don’t panic because you don’t have it yet.
It is minimum size 3×3, with the Lectern and desk as its minimum objects.

You can either click that inviting “Training” button, or you can initiate training from a staff member’s tab. Or indeed, just drop a staff member in the room.
There are three components to a training course. First, the subject being studied. Then, the person who will be doing the training. This can be one of your existing staff who has that qualification. Otherwise, you need to pick one of the external lecturers. Finally, of course, pick the staff member being trained.

In the above example, my Psychiatrist is being trained to level IV. There is nobody in the hospital with Psychiatry IV, so the external lecturer Herman Freud is my only option here. Note that Dr Freud cannot teach more than one class at a time! Some external lecturers teach multiple subjects and they cannot multi-task.

If you have other students who want to join the class, drop them into the room as well.
You will have to actually Research some Qualifications before they are open to you. A prime example being advanced Research qualifications themselves. Your pet Researcher will actually have to research “Research II” before they can receive further training.
When hiring, look for staff with good traits and empty slots. These are the most valuable to you, as you can tailor their skills and not waste wages on qualifications you don’t need.
The research room is open to you when you reach Mitton University.
This room is essential to advance in the game. Check early what projects are in your project list, and start them early. You will discover a lot of new rooms through Research.

There’s nothing to be intimidated about here. Just click on the Research Pod, or the room door, and enter the research project list. Select a project and press go. You’ll need to put some cash towards the initial expenses of the project.

You can assign multiple Researchers. Click on the room door and press the “+” button to add more staff slots.
Becomes available in Flemington.
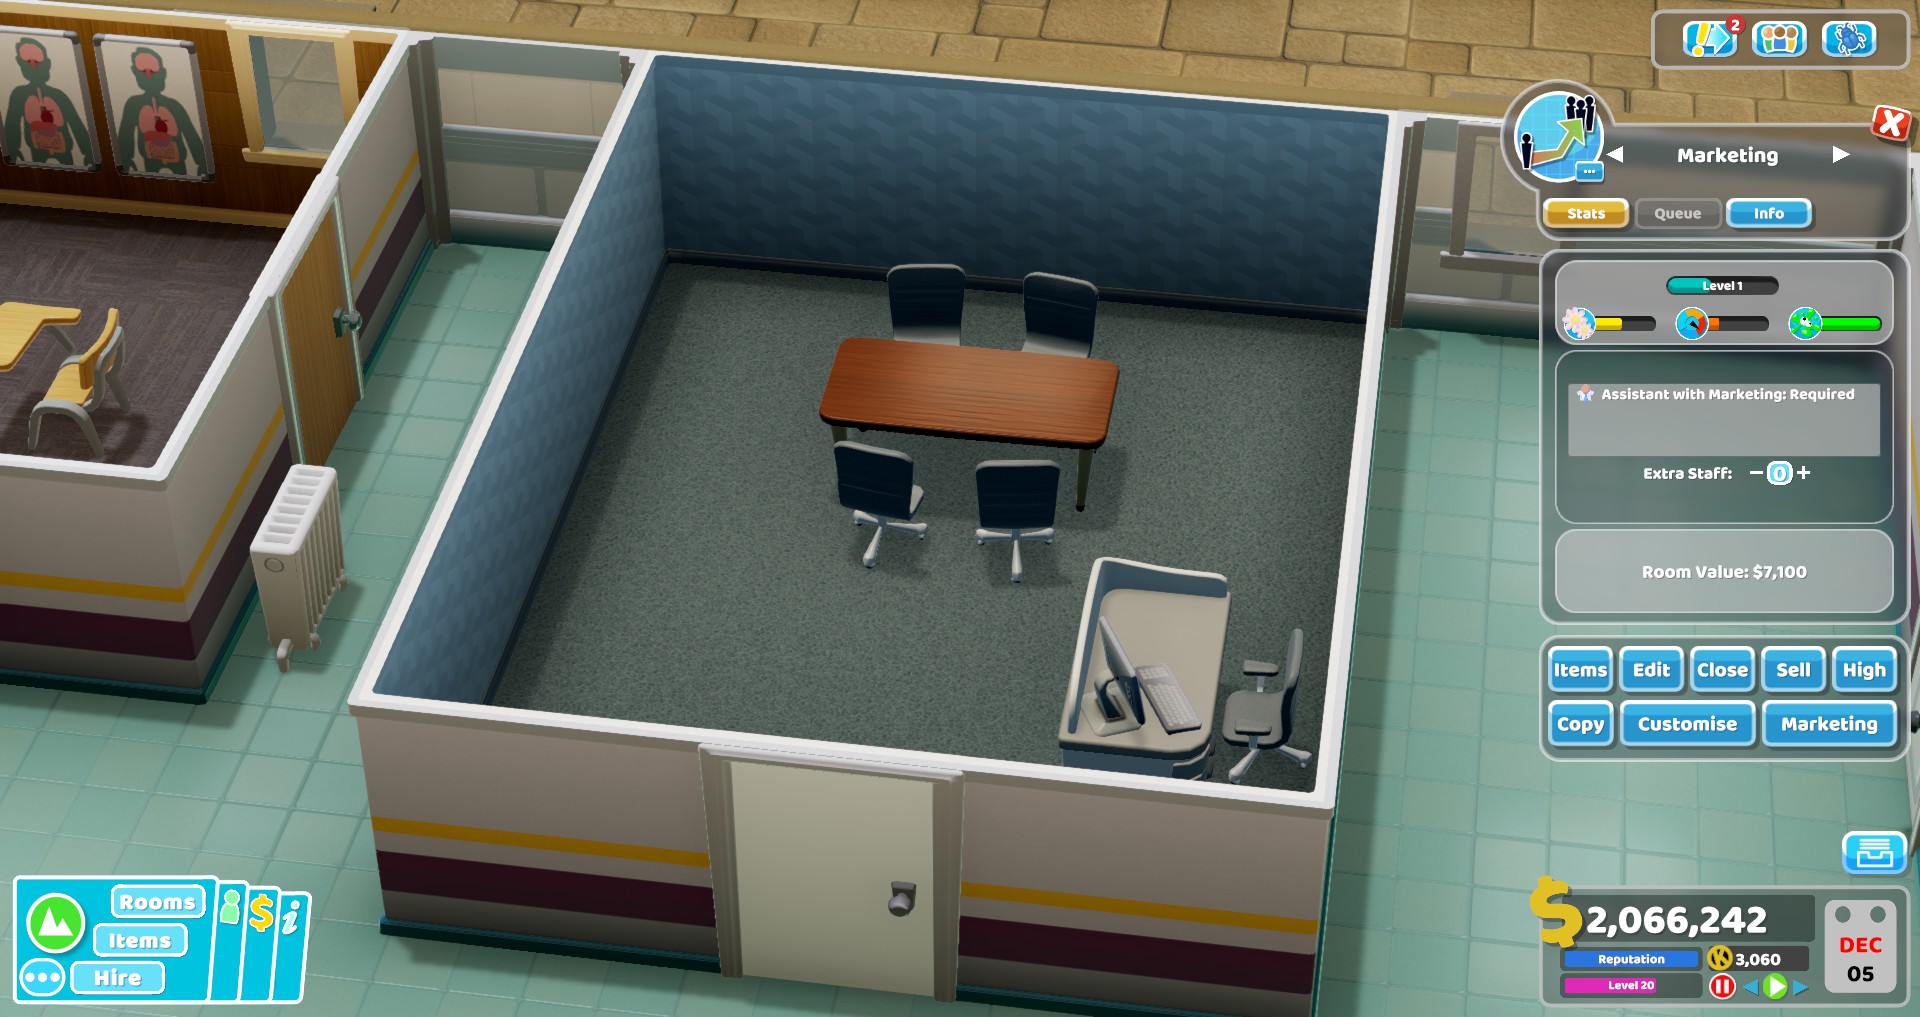
Marketing isn’t really an essential room and you can pretty much ignore it if you choose. However, it does have some tricks up its sleeve.
A “General Marketing” campaign will increase your hospital’s Reputation. Generally this is a bad thing… Higher Rep means more Patients means GP Offices get swamped. However, if you are chasing an Objective for Reputation, go ahead and just let Marketing do the heavy lifting.
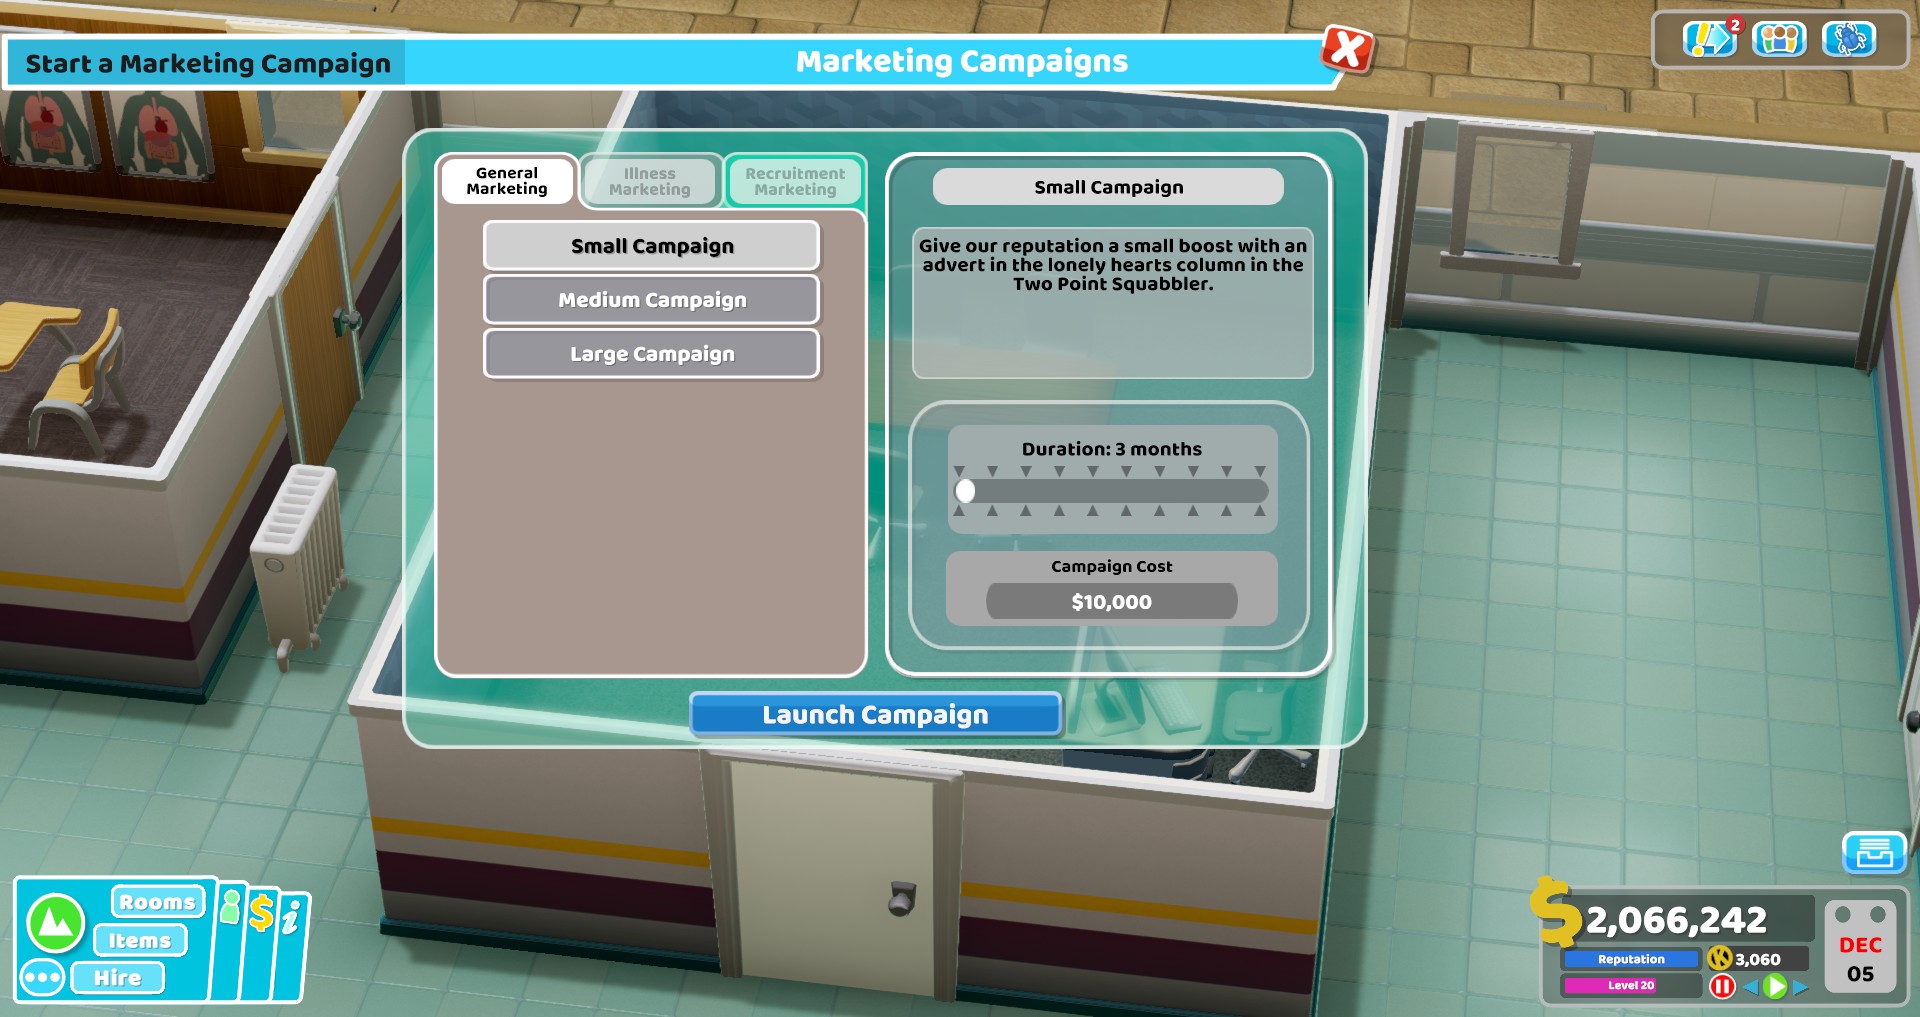
If you are requested to just launch any old Marketing campaign, I’d always recommend one for a specific disease. Instead of Lycanthropy patients who drop dead, or Surgery patients who generate enormous queues, let’s just have some nice easy Bed Face people. Put out a campaign for diseases that are profitable or easy. It helps your hospital and your profits.

Recruitment campaigns allow you to specify which qualifications you are looking for. Not as great a deal as it sounds, however. This is because home-grown staff are much cheaper. Always do in-house training when you have the option. Nevertheless, if you desperately need some Janitors with Mechanics, you may as well put out a campaign and hope for the best.

Items and Layout
I already mentioned fire extinguishers, but they deserve mentioning again. Don’t forget them.
Every hospital building needs its own fire extinguishers. Janitors will run across across to an adjacent building to fetch one, but they do an extremely poor job of it. Fire extinguishers belong in the corridor, and each section needs its own set.
You can put fire extinguishers in rooms, but the chances of a Janitor being smart enough to use the extinguisher right there in the room is, er, not very high. The game handles fires badly, assigning very distant Janitors to extinguish the fire, and then sending them to fetch a distant fire extinguisher. Bear this in mind.

Vending machines should be abundant, especially where patients are queuing. It keeps them happy and saves time. As an added bonus, more money for you, too!
Hand sanitisers are, generally speaking, not necessary. In fact, they can be a waste of time. Staff members with the Hygienic trait will be constantly using them, wandering off from their real tasks. I recommend only placing sanitisers down in levels where you have an actual hygiene problem. Usually those problems are with the patients, not the staff. Hand sanitisers therefore go in the waiting areas, not the rooms. Use the Hospital Views tab and toggle on Hygiene View if you are suspicious of a hygiene issue.
Bins are necessary, and should be paired up with objects that counter their negative effect on environment. Hang pictures up next to them. Get the Big Bin upgrade as soon as possible, as this makes a big difference for your Janitors.
Radiators, and later on, Air Conditioning Units, are essential items. Learn how to place them efficiently. If you are being stingy, keep your staff warm and let the patients shift for themselves. Keep a small radiator right next to your GP or Psychiatrist; they will appreciate it. Have radiators right next to your main entrances, for the benefit of your freezing cold Janitors. Janitors having to cross the grounds get unhappy fast because they are always too cold / hot.
Some items are purchased with the rewards currency. You earn Kudosh through doing things like staff challenges, VIP visits and other ‘bonus rounds’.
The first item you need to grab is the Medicine Cabinet. Five Medicine Cabinets in your GP rooms means +5% diagnosis power. Ten means +10%. Twenty five means +25% diagnosis. You see where I am going with this. They also have a +1% power in Treatment rooms. So much value for money here.
Luxury vending machines are recommended. More profit for you!
The Arcade Cabinet is a bookcase that charges money. Make money off boredom. Sounds like a winner to me!
The Training Skeleton, ironically, won’t be seeing much use in your Training Room. Its value is actually as a non-wilting plant. It has a high environment aura like a plant does, but without the maintenance. On that note, plants are not recommended.

For your actual Training Room needs, I recommend Anatomy Posters. They are cheap and can be lined across the walls.
The Gold Star Award is the best wall item for boosting environment. Put these in your staff rooms, toilets and bin areas. The Gold Star Award can go into any room and is small, so is a great way to level up any room.
I shall now instruct you padawans in the ancient art of Bench Management.
Here’s the first surprising fact: benches are not necessary.
The most efficient queue is actually a queue that has no benches.
Benches are therefore best used to direct patients. Use them to get patients out of the way, into a waiting area. High congestion areas can spread Epidemics. Use benches in combination with other items (plants; vending machines; skeletons) to segregate waiting patients from passing patients. This will gradually make sense to you when you realise that a sneezing patient infects everyone directly next to them.
Just lining your corridors with benches is a waste. Don’t use them unless you’re using them with a purpose.
Patients bump into each other.
If your highway is crossing streams with a queue, that’s a problem. Keep main roads clear.
Corridors should be two tiles wide minimum. Busy areas, like the GPs, should be three tiles wide.

If you can put your vending machines into alcoves, this is helpful. Recessed doors are likewise a bonus, if space permits.
Short answer: no.
Long answer: A stall must be manned by an Assistant, and the chances of you earning enough to make up for their wage, is very slim.
In the early stages of a hospital, you might have two Receptionists but not really enough patients to justify two Reception Desks. This is the time you might consider having the second Assistant man a stall instead.
Stalls tend to only be popular with patients when there are no other items around that would otherwise fill their needs. Patients are stingy, and stalls are expensive. Patients will go to the cheapest item if they have a choice.
Cafes are generally a problem rather than a solution. If your staff and patients are taking lengthy detours to visit a cafe, that’s never a good thing. Queue efficiency is the cornerstone of a well run hospital, so a cafe is like shooting a hole in the hull of your boat.

Chasing Objectives
To get star ratings in a hospital, you need to meet the specified objectives. Here are some tips if you’re struggling to make the push.
You can see the key factors of Hospital Value over on the Overview > Finance page. Having a great big pile of cash and plenty of monthly profit is a pretty good solution to just about everything in life. So-

As aforementioned, you should have raised all prices across the board by 10%. Watch your staff wages. You want to be as stingy as you can get away with. Staff with the “Cheap” trait are always nice to have.
The big hit to your profit making machine, is wasted time. Any room that has a queue but no staff member, is sitting there like a big waste of profit. If everyone and their cat is queuing for the GP Office and getting nowhere, they are not spending money. Profit problems are a sign of a choked, idle hospital. Get Patients flowing to get the cash flowing too.
You can make extra pennies by having vending machines and arcade machines everywhere.
You can avoid the expense of using external lecturers, by having your own staff doing the teaching.
Finally, your Research Department should be earning you money. Unless you have a more urgent project to do, “General Research” should be constantly on the go.
The chief factor here is lots of rooms with high Prestige.
Every thing you do essentially raises your Hospital Level by a small amount – placing a poster, hiring a staff member, etc. To raise it more efficiently, you should be using items like the Gold Star Award, which have a large Prestige bonus. Use these to get your rooms up to level 5.
A drawback to increasing your Hospital Level, is that more Patients with harder diseases will turn up. It is advisable not to inflate your level, unless you actually need to do so for an objective. A common mistake is to expand too fast, get too high a hospital level, and be swamped by late tier diseases that you are not ready to handle yet.
Use a General Marketing campaign, as detailed above. If you are killing a lot of Patients, or sending them home, consider actually curing them instead. A high Reputation brings with it a large flow of Patients, so be careful of rapidly inflating your Rep beyond your actual capacity. In normal gameplay, you don’t want a maxed Reputation. At least not until your mature hospital is ready to milk the cash out of any horde that turns up.
We already mostly covered this in the “Staff” section. If you have multiple objectives to meet, Staff Happiness ought to wait until last. It’s common that a drastic last push is needed for the final couple of percentage points. (Your staff’s happiness should always be at least 60% without any special measures taken. Otherwise you need to go back to basics.)
When making the last push, you can raise your staff’s salaries until they get a smiling face. “Good Pay” is a +20 to mood. Build the world’s most luxurious staff room. Then send everyone on a break – yes, everyone. And finally, start sacking anyone who still isn’t completely elated. Naturally, this is very disruptive to operations. As I said, you need to save Staff Happiness for last, when you’ve ticked off all other criteria.
If you’re playing on the Rotting Hill map, you’re up against a default penalty to Happiness. The Emotional Intelligence qualification will counter that. Whenever staff happiness is an objective, you’ll do yourself a big favour by avoiding “Grumpy” staff like the plague.
Hostile VIPs
Despite my best efforts, I have yet to persuade my Janitors to repel Agatha with a ten fire extinguisher salute. The majority of VIPs who come to tour your hospital are harmless. There are however three exceptions:
Augustus Lavender – Pukes on your floors and wilts your plants, adding marginally to your janitorial burden. Trivial.

Jumbo McNally – A much bigger threat. Jumbo will litter your floors, but the big issue is he will actively attack your hospital machines. If your machine health was already low, there’s a chance he will explode it or set it on fire. Make sure you send your Janitors to repair all your machines in advance of his visit.

Agatha Sphere – A pain to deal with, she will hypnotise your patients into leaving your hospital. This happens because the patient’s happiness rapidly decreases after an Agatha encounter, leading very quickly into a ragequit. Agatha will also torment your staff in the same way. Unless an affected patient is literally going to be cured in the next minute, the best advice is to discharge them from the hospital immediately. They will not survive to do anything useful and are literally just taking up space from that point. Your staff should be banished to the staff room until they can sleep it off.

If you do want to fight fire with fire, then you can attempt to place some idle, superfluous staff in Agatha’s path, in hope of diverting her from your patients. Likewise, snatch the valuable ones out of her way. Agatha will only leave the hospital after she has messed with a certain number of people. If she has stalled, throw some sacrificial staff her way.
I recommend launching a General Marketing campaign as soon as Agatha is on the scene. Losing all these patients will hammer your Rep and your intake. You’ll need to invest in some Marketing power to make up for it.
Advice for when things get tough
This is a very counterproductive strategy. Get one star and move on. It is difficult to get three stars on some maps until you have the rewards gained from beating later levels. Aim to make rapid progress through the Career, unlocking more rooms and items. Then you can use your new stuff to take your earlier hospitals to the next level.
Your fail condition is bankruptcy. Not a hospital that looks and smells like a giant morgue. Money is what makes the world go around.
Where does your money go? Chiefly, on staff wages. On harder levels, when things get tough, you must learn to see your wages bill as the number one enemy. Start firing your most expensive staff and question which ones are really valuable to you.
Assistants are first on the chopping block – they do not need to be skilled. Janitors are up next. You need to have the basic skills of Ghost Catching and Mechanics represented somewhere among the staff. Otherwise, Janitors do not need to be highly qualified.
Doctors are the most expensive staff. If you are using a lot of Doctors in a role that could be filled by much cheaper Nurses – for example, X-Ray versus Cardio – then consider changing up your rooms.
Don’t be afraid to take out a loan to cover all your costs while you are in panic mode. Just make sure you balance the books as soon as possible and all will be well.
If your hospital has fallen into a pit, just start over. You’ll be much better equipped the second time around. People get very attached to their hospitals, but getting really good at the game will require you to play around with new ideas. So don’t stress. Restart and try something new.
A healthy hospital is a steadily expanding hospital. Take a good look around the map and get a feel for which plot you will buy next. Then buy it.
It is something of a rule of Two Point Hospital that when you really need to build a new treatment clinic and really, really need a new plot of land to put it in, your bank balance will be zilch.
Happens to the best of us, and the answer is, you need to have bought that plot of land ahead of time when you comfortably had the funds to do so. If it’s urgent, take out a loan.
The higher your Hospital Level, the more Patients will flock to you, with harder diseases. This will swamp your hospital. You actually want to keep your Rep down and not open late-tier diseases until you are ready.
Health is time. Staff who are evil reduce your patients’ health. Just no. Your battle to keep queues down and keep patients moving before they hit their mortal coil is already hard enough.
And assign them to Diagnosis. These staff members increase patients’ health in an interaction. 11/10 would hire again.
Just remember that these people are completely wasted in Treatment. Make them your GPs and your diagnosis Nurses.
Your GP should not be in the Shock Clinic. Remember to assign rooms.

If you are in a level that’s burdensome for your Janitors, you can also get them to specialise. Have your high skilled Maintenance people focusing on keeping your machines running, while the low skilled staff are relegated to litter picking. Everyone should always be on fire duty, by the way.
I already said that, didn’t I? Well, let me say it again. YOUR GPs ARE THE MOST IMPORTANT PEOPLE IN THE HOSPITAL.
The absolutely ideal situation in a hospital, is that a patient goes to the GP, and is 100% diagnosed the first time. Instead of dithering about from one diagnosis room to another, they just go the treatment room and then get out.
Your GPs are where it really counts. Train them up, give them big rooms, fill those rooms to the brim with Medicine Cabinets. Just trust me.
Generally not as bad as you might think. If you have enough Janitors on the staff, they should very quickly mop up the damage. If you have weakened machines, this may indeed be the time they catch on fire or even explode.
If fires do seem to be breaking out regularly, this is a pretty certain indicator you don’t have enough Janitors and they are spread too thinly to keep your machines in good shape. Hire more people. You can also improve your existing Janitors by giving them some qualifications in Maintenance, which speeds up how fast they can repair stuff.
Some levels will favour having an army of low-skilled Janitors (typically the Disaster heavy ones) whereas other levels do better with a smaller team of well trained Janitors with good traits (like levels requiring many machine upgrades).
Well alright, not totally useless, but I would advise against them. I touched on part of the reason already – don’t hire Doctors to do diagnosis when Nurses do the job cheaper. The other reason I disfavour X-Rays and Mega Scanners is they are slow and popular. Because these rooms add a lot of diagnosis power, your GPs often ignore other options and funnel everyone here. Unfortunately, these machines are expensive, kinda slow and in the case of Mega Scan, need a qualified Doctor.
This means patients will end up queuing around the block like they are waiting on the next Batman movie. This also tends to happen with the DNA lab and Surgery, which are super slow to operate. However, with those two being treatment rooms, they aren’t optional. X-Rays are, so avoid them. I really don’t recommend using the DNA lab for diagnosis. It takes forever.
The big diagnosis power added by X-Rays and Mega Scanners doesn’t make up for their flaws, in my opinion. This is because the biggest, most powerful cog in the Diagnosis system is your GP. A level five GP eclipses any machine, by miles. Your patient will also be visiting the GP three times minimum, and your expensive X-Ray only ever the once. I’ll say it again – the GPs are the most important people in the hospital. Don’t just take my word for it though. You can and should experiment with different setups and see for yourself what works and what doesn’t.
Hospital too busy? Bring up the patient list, sort them by diagnosis, and send a bunch of the newcomers home. The hospital is not admitting new patients at this time.
Busy and everyone’s dying? Bring up the patient list, sort by health, and send a bunch of low health patients home. They aren’t going to be cured in time, so they are just clogging the system up.
Out of diagnosis rooms? Send them home.
A single surgery patient wants me to build a surgery and train a surgeon, just for them? No. Send them home.
Bear in mind though, while sending people home is an excellent short term solution, you should ultimately be looking long term. You will have to expand your operations to keep pace. Just don’t feel pressured to do so immediately.
World Map
Two Point County is a big place! Sometimes it can be difficult to find the hospital you’re looking for.
Thankfully, I am also a cartographer in my spare time.
[link]Check out the above image to see at glance where everything is. Remember you can zoom in for a better look.
More Help
Things start getting hard when you hit everyone’s favourite map, Duckworth-Upon-Bilge. Luckily for you, I have a guide specifically to get you through that level.
[link]The guide above also includes how to manage Epidemics so make sure to check it out.
If you’re struggling with the Close Encounters DLC, Dr Madge has a bunch of Alien busting tips for you.
[link]Please feel free to ask me questions in the comments. I will do my best to get you back on the right track.