Overview
Updated with Waking The Tiger. Played strategy games in the past, and want some help in making it into the world of grand strategy? Me too, now let’s fail together.
Introduction
Hi people. This guide is for people like me who have an interest in grand strategy games but have only played RTSes or similar games. So this guide is to help bridge the gap between the two genres.
I’m not that much of a noob anymore (having played quite a few rounds in single player), but I haven’t touched multi at all. So some of this stuff might not be entirely accurate. If there’s something amiss, let me know and I’ll fix it.
A couple notes on bridging that gap between RTS and grand strategy:
- The game is much slower. This isn’t an actions-per-minute clickfest.
- Yes, the game has land, sea, and air combat. For some reason not many RTSes bother with all three anymore, with exceptions being games like Supreme Commander.
- It is very hands-off in terms of combat. You build units around strengths and weaknesses, but once the setup is done, everything else is up to how the AI fights. If your setup is done properly, you’ll win more often than you lose.
- Although you can build land units like tanks, infantry equipment, and the like, you can’t command them directly.
- All guns, rifles, uniforms, ammunition, and sidearms are all bunched together under “Infantry Weapons”. You build and design tanks, ships, and planes, but not the weapons your infantry use.
- Basically, there is only one land unit: the division. The division consists of battalions which determine its stats, and its stats are (basically) an average of its composition. As mentioned in the Land Combat section below, your “tank division” should not consist only of tanks, but of motorized infantry and the like as well in order for them to be set up properly; and as mentioned in the third point, the setup is highly important.
- The specifics are different, but the concept is the same for sea and air combat.
The game can be effectively boiled down into two phases: pre-war and WW2.
Historically, WW2 (as far as Americans and Europeans are concerned) started around 1939. The pre-war era thus goes from 1935 to 1939 if history is being followed. If you are playing with other players or are taking the world in a drastically different direction, the war may occur earlier or later.
Many of the Allied nations – particularly the USA – rely on World Tension, shown at the top right, to unlock their bigger and badder tools. Once the war starts, World Tension mostly becomes a non-issue.
Pre-war – Introduction
Pre-war, players should focus on making the most out of the peace to set up the war the war is going to be fought. Choosing which researches and branches to pursue should help dictate how the war is fought once it starts.
Here’s a checklist you should follow in order to ensure you’re adequately preparing for the war:
- Make sure your factories are working.
- Have a national focus set at all times.
- All your research queues should be working on something.
- Organize and combine your groups as necessary.
- If possible, update your nation’s industry and recruitment policy if necessary.
Pre-war – Civilian Factories
Factories are the key to production, and are divided into two categories: military factories which produce equipment, and civilian factories which work on producing structures. These structures include airbases, naval dockyards, fortifications, radar installations, and other factories.
These structures are built on the state level, meaning they affect all of the provinces within them. These structures do not have any shared slot limitations when compared to the other structures, so maximize these to your heart’s content.
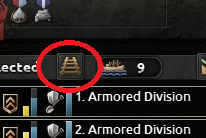
You can see what your civilian factories are doing by pressing the 
Each civilian factory produces, by default, 5 units of construction, which is altered immediately by your Trade Law and Conscription Law – and further altered by Construction research and national spirits.
Infrastructure represents how well the area is developed. A higher infrastructure level translates to more supply throughput, faster unit movement speed, faster recovery rate for your units, faster construction speed, and more resources from that state! Each infrastructure level costs 3000 units.

Airbases build and repair air units. Air superiority can be extremely powerful, with each airbase level holding 200 aircraft. Each airbase level costs 1250 units.
Antiaircraft focuses on enemy strategic bombers and other attacks on your infrastructure. It doesn’t seem to play a role in protecting your ground forces from enemy close air support; use division-level AA for that. Each level of anti-aircraft costs 2500 units.

Radar helps spot enemies, especially planes. The radar level can be improved by grabbing the appropriate research. Each radar level costs 3375 units.

The next items in the list are, like the above structures, built on the state level. However, these structures share slots with each other, so choose carefully which structures to place and where!
Military factories produce everything your army needs, except ships. Whether it is a tank, plane, infantry equipment, or artillery, military factories do it for you. Note that Military factories are cheaper to build than Civilian factories. Each military factory level costs 7200 units.

Civilian Factories produce every building on this list, including other civilian factories. Each civilian factory produces 5 units of construction unaided, but it is altered immediately from its base value by Economy Law and Trade Law, national spirits, and Construction Research. Each civilian factory level costs 10800 units.

Not to be confused with naval bases, dockyards produce ships of all kinds, including submarines. Naval Dockyards cost 6400 units.

Synthetic Refineries produce oil and rubber for your nation. While they have a considerable initial startup investment, there are two research lines for improving them – one for each resource. You can thus focus on one resource or the other (or both). Synthetic Refineries cost 13,000 units.

Rocket sites will produce rockets. Researching the rocket site and then rocket engines will have each site begin producing rockets. They can then be assigned to an air region, and rockets will begin raining down on enemy structures in that region. Rocket sites cost 6400 units.

Nuclear reactors produce atomic bombs. Atomic bombs are delivered to individual provinces and require air superiority to use, and an available strategic bomber. Nuclear reactors cost 30000 units.

Finally, the following structures are produced at the province (individual squares) level.
Naval bases provides ship repairs. Also sends and receives convoys as part of your supply chain. They cost 3000 units.

Land Forts reduce the power of enemy land attacks in that province by 15% for each level. While level 10 forts are virtually invincible to attack (150% damage reduction from attacks!), note that each level increases the construction cost – it is often more economical to have multiple smaller forts than a single large fort that can be bypassed. Additionally, fort effects can be negated by surrounding them. Forts also do nothing if the troops inside have their supply line cut.

Coastal Forts follow the same rules as Land Forts, but protect against naval invasions instead.

The cost for forts sharply increases the higher the level, with each level costing 500 units plus another 500 units times the number of existing fort levels:
A single level 10 fort is almost as expensive as a nuclear reactor!
The final button in the list allows you to convert civilian factories to military factories, and vice versa, just like any other construction project.

The cost for converting is:
Conversion costs can be altered with national spirits and political advisors.
Pre-War – Civilian Factory Construction Order
Once you have chosen a place to build, your factories will begin work on the structure, and added to their production queue, shown below.
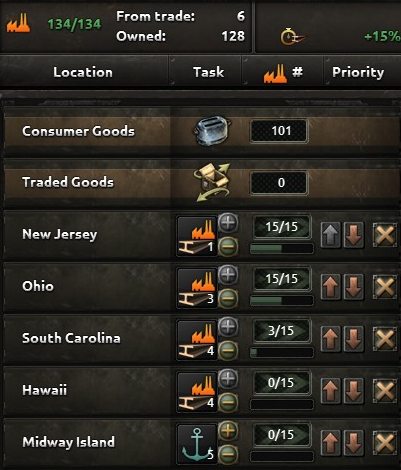
The above screenshot shows that the player has 134 factories at their disposal: 128 are owned locally, while 6 are gained from other nations who have traded away their factories away (see the trade section for more details).
The current economy law, however, states that a certain number of these civilian factories must be producing consumer goods (read: do nothing). The only way players can get more factories off of producing consumer goods is by upgrading the economy law, which can only be done at certain stages of world tension. For more information on economy law, check the wiki[www.hoi4wiki.com]. The goal is to move to a War Economy, which reduces the number of consumer goods factories to 15% of your total number of civilian factories. While Total Mobilization offers 10%, it also comes with a recruitable population penalty and thus should be avoided.
The remaining factories not producing consumer goods will work on the projects outlined by the player. Each project can have up to 15 factories working for it, with any remainder spilling over into the next queue. Having more factories, therefore, allows faster production by allowing more lines to run at the same time, but not necessarily making construction happen for a single project occur at light speed.
Pre-war – Military Factories & Naval Dockyards
Military factories function similarly to civilian factories in that up to 15 factories can be assigned to a production queue, and production will occur quicker the more factories are applied to it. However, players have full control over how military factories divide their labour.
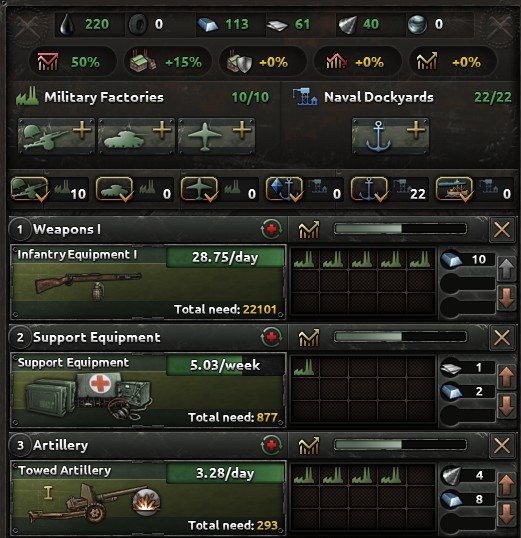
The items being produced here are moved to a player’s stockpile, where it is then used by military forces as they require it.
The bars above the factory icons show how efficient the line is at production – factories that have been producing bombers for a long time will have a significant bonus to bomber production than a factory that was previously producing guns. Production values are kept higher if switching over from things that are similar – switching a line from producing fighters to carrier fighters will lose less efficiency than if they switched from fighters to artillery.
Each individual factory requires resources in order to produce an item. In this example, the production line of five factories working on infantry equipment requires 10 units of steel – increasing the number of factories working on the line increases the production rate, but also increases the cost. This can prove problematic with more expensive and costly units, such as heavy tanks. In the event of a shortage of resources, the lines higher on the list will have first dibs on resources; in this example, a shortage of steel will influence the production of Towed Artillery first, followed by Support Equipment. The production of Infantry Equipment will not be influenced by a steel shortage unless both Towed Artillery and Support Equipment are not receiving sufficient resources.
If you assign more factories to a line than you have available, the factories in the queue will be shaded to show that there are none available. However, once more factories do become available, they will automatically fill in any shaded factories, starting from the top and going down.
This screen also shows where the equipment is going. The country’s divisions are currently waiting on 22,101 units of infantry equipment, so it may be prudent to prioritize production in that area than in an area in which demand has been filled already. However, during wartime and exercises, units will consume the equipment in a stockpile. Having a completed demand now does not mean you can freely take production off entirely.
Naval Dockyards are on the same tab, and work similarly to factories. However, they produce ships as individual units, and will appear on the map when completed. The ships will appear on the spot as indicated above the dockyard icons – in this case, Hawaii. Setting a spawn location, or a fleet for them to spawn into, is highly important in keeping your ships organized. By default this will be “auto” and will spawn at a nearby dockyard. If you are playing a nation such as America or Britain, which must control both the Pacific and the Atlantic, choosing a good spawn location is mandatory.
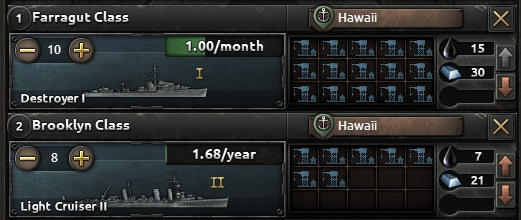
Unlike factories, dockyards always produce at full capacity and have no efficiency loss when switching between producing different ship types. Otherwise, they work identically to military factories.
Pre-war – National Focuses
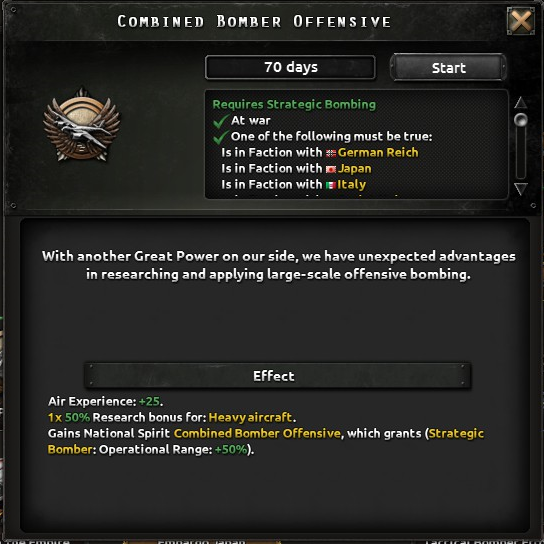
The National Focus provides powerful bonuses at the cost of 1 political power per month. Players naturally gain 2 political power, unless otherwise hindered (such as America’s Great Depression), but keeping a National Focus running at all times is generally considered a good idea. National focuses take 70 days to complete and cannot be cancelled once started.
In the example to the right, the Combined Bomber Offensive national focus grants 25 air experience, a 50% research bonus for the next Heavy aircraft you research, and a national spirit which improves the operational range of your strategic bombers.
National spirits are events and bonuses that affect your entire nation. National spirits work passively and will benefit or detriment your nation.
Not all national spirits are positive. Several of the major nations begin – or eventually receive – negative national bonuses that can hit you very hard. Some of these can be removed through a national focus, while others are eliminated over time.
Notable Negative National Focuses
Pre-war – Research
Players start with a different number of research slots at once. The number available changes depending on which nation you play as.
As it costs nothing to research something, you should always have research going. Each queue can store up to 30 days of research, just in case you’re playing on the fastest speed and do not have the reflexes of a hummingbird.
In general, avoid researching things that are too far outside the current year. While you can rush for certain technologies if you want to and get them early, you are tying up one of your research queues for a long period of time.
Another thing to consider about what to research is whether you have a company applying a bonus. Upon research completion, if a manufacturing company is present, a bonus will be applied to the new item, improving its stats (and sometimes limiting other stats). Since you can’t un-research items, however, you have just one chance to apply the bonus. Read the section on spending your political power for more info.
Research can be broken down into four main categories, with subcategories underneath.
For more information, see the Hearts of Iron 4 wiki page[www.hoi4wiki.com].
Pre-War – Organizing Forces (Land)
After selecting a large group of your land forces, click on the blank portrait at the bottom of the screen to assign the current selection to an army.
While assigning a group to an army is not necessary for them to fight, it does provide them several bonuses, including the ability to draw battle plans and receive bonuses when they execute that plan. Perhaps the largest mental hurdle you must overcome is the idea of trusting your generals (read: the AI) and not taking over the control of each division manually – this is what differentiates a game like Hearts of Iron from a game like Company of Heroes (or Hearts of Iron III, if what I heard about the game is correct).
Armies can also be organized into Theatres, but this is strictly cosmetic and a tool to help you categorize your armies.
Assigning a division to an army allows you to have them exercise. Giving an army an Exercise order reduces their organization but allows them to level up to Regular, giving them a 25% bonus to attacking. It also gives you Army Experience, used to alter your divisions’ statistics.

Upon assigning your units to an army, you can then assign them to a front. A front can be drawn with any neutral or hostile nation next to yours (it is possible to, if you’re playing as Germany, to draw a border with Italy, even if you are not at war and do not intend to go to war).
You won’t have to worry about assigning any other orders to these groups until you are actually at war with someone. For now, just keep your army organized near the front, or near a port you can use to ship them around.

Generals have specific backgrounds that provide bonuses or maluses. Some also affect experience gain; the infantry leader trait, for example, increases the amount of experience the general earns from infantry divisions. Their background cannot be changed, but by fighting under certain conditions they may earn traits in combat.
Access a general’s trait tree by clicking on the small icon on the bottom left of their portrait.
For a list of traits, see the Wiki page[hoi4.paradoxwikis.com].
Field Marshals are similar to Generals, except they lead groups of up to 5 armies. Field Marshals have their own bonuses that trickle down to the generals under their command. Both generals and field marshals have similar rank-up mechanics.
For a list of traits, refer to the above wiki link.
Pre-War – Organizing Forces (Sea)
In general, you can break up your combat groups into surface ships and submarines. Submarines should only be grouped with other submarines, as they are extremely slow and stealthy – unlike other ships.
There are three kinds of ships: screening ships (destroyers and light cruisers), capital ships (heavy cruisers, battlecruisers, battleships, super battleships, and aircraft carriers), and submarines. All are made at Naval Dockyards under the Production tab.
- Destroyers are extremely cheap in manpower and resources and have extremely powerful submarine detection. While destroyers have powerful torpedoes, the AI is strangely resistant to using them, even against capital ships. Destroyers also have an extremely limited range, limiting the movement of fleets containing them.
- Light Cruisers are overall stronger than destroyers in all respects, including their torpedoes and AA rating. They are also considerably more expensive for manpower, required resources, and work time.
- Other capital ships, from Heavy Cruisers to Battlecruisers to Battleships and finally Super-Heavy Battleships (or SHBBs) are just larger and more expensive versions of the ships before them. Notable stat changes are speed, detection range, visibility range, agility, armour, and naval firepower. Battleships are slower, easier to spot, more heavily armoured versions of heavy cruisers. These vessels also contribute to shore bombardment.
- Submarines are extremely difficult to detect and have extremely powerful torpedoes, but are the slowest ship in the game (even super heavy battleships are faster!). Submarines are thus best kept in their own fleets, away from other surface vessels.
- Aircraft carriers carry naval aircraft into battle. They may be equipped with naval fighters, close air support planes, and naval bombers. These planes must be built and researched separately from their land-based counterparts.
Surface fleets consist of capital ships: heavy cruisers, battlecruisers, battleships, and superheavy battleships; and their screens: light cruisers and destroyers. Capital ships can be identified by a blue gemstone next to their name in the Research tab.
Contrary to both history and common sense, the ideal combination of warships is battleships. . While intuition (and history) may tell you that battleships are ideally countered by destroyers and submarines using their torpedoes, this is currently not the case in Hearts of Iron 4. A line of code in the calculation of destroyers currently limits the number of torpedoes that destroyers can fire, only allowing the destroyers to fire their guns at battleships and causing very little, if any, damage.
Against a force of submarines, battleships simply use their superior speed and outrun them.
While super-heavy battleships are even more powerful and cause considerable damage to standard battleships, super-heavy battleships are only slightly more effective despite their considerable cost.
Aircraft carriers, meanwhile, are ideal at chasing down retreating fleets with their naval bombers. Aircraft carriers are even strong enough to eliminate light cruisers, assuming industrial parity.
As with land divisions, fleets will move at the speed of the slowest ship.
Like your land forces, each fleet may be assigned an Admiral who can level up and gain traits like generals and field marshals. Admirals do not have a limit to the number of ships they can command. They do have their own sets of traits[hoi4.paradoxwikis.com].
With a fleet selected, Shift+Click will set your fleet’s home port. If they are allowed to go home and repair, they’ll head here. There are three things to consider, however, when setting a port.
- Distance, obviously
- The naval port’s level determines how many ships can dock there. Overcrowding a naval port results in major repair penalties, meaning the fleet can be out of commission for a really, really long time.
- The supply chain to the port. Ships take supplies, just like everything else.
Pre-War – Organizing Forces (Air)
Your air forces begin scattered all across your territory. Pressing the L key will open your air force summary and let you find them quickly. Finally, click on one of the airfields listed to bring up its complement of aircraft.
Upon game start, select each of your airfields in turn and delete all the air wings at all your airfields, and reassign all your air wings from scratch.

Both fighters and heavy fighters are powerful tools for gaining air superiority, and have different strengths and weaknesses:
- Cheaper for resources and manpower
- Consistently higher agility
- Speed increases greatly with each upgrade
- Stronger attack value for shooting down bombers
- Greater range for covering larger non-European areas
- Consistently higher durability
These comparisons are for stock fighters with no improvements or design companies assigned.
Your aircraft carriers, meanwhile, have different numbers based on their level and never start completely full. Use mental math (or a calculator) and fill your carriers up with the necessary planes to ensure they remain at full capacity.
Until the war starts, your planes can remain on the ground without a mission assigned.
The community is unable to agree upon an adequate air wing size. Having a large air wing seems to help minimize clicking and micro while having multiple air wings seems to be more effective (having more air wings, not smaller ones, is better. Similar, but not entirely the same).
Since no one seems to have a confirmed ideal size, the following table will outline air wing sizes as suggested by other players. The parentheses have a brief summary explaining why that number.
List of community-suggested air wing sizes
- Fighters: 3 (having more air wings seems to yield better results), 50, 100 (50 and 100 you can get by ctrl-click or shift-click), 125 (take a single large group of 1000 and use Split Air Wing a few times).
- Close Air Support: 50 (ctrl-click five times), 120 (Extended explanation[forum.paradoxplaza.com])
- Naval Bomber: 50 (ctrl-click)
- Tactical Bomber: 50
- Strategic Bomber: 200
Pre-war – Spending Political Power
Your Economic, Recruitment, and Industry Policies will dictate various things about your nation, and directly influence your capacity to wage war. Along with recruiting cabinet members for bonuses, you will want to spend what political power you have on these things to remain competitive in later years.
Nowhere is this more apparent than in the case of the United States at the start of the game.
Working from left to right, under the Laws & Government tab:
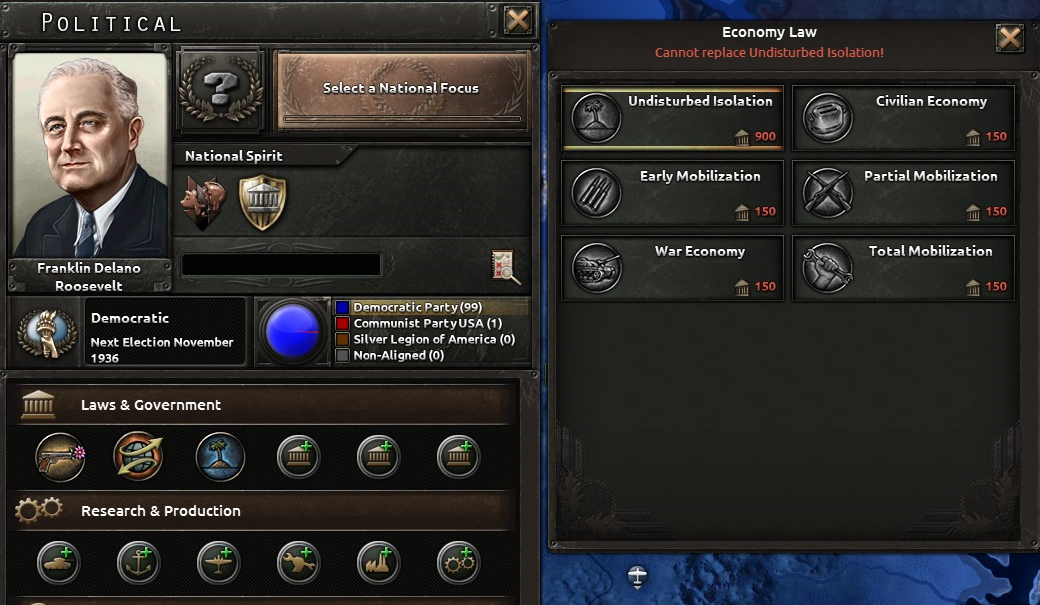
- The USA’s recruitment policy is Disarmed Nation (the gun/flower icon), reducing the amount of manpower available. Chances are the USA will be running with the Low Manpower alert until this can be improved.
- Their Economy Law is a Free Economy, which allows more of their resources to go to the market and be purchased by other nations. This provides a few passive bonuses, but does mean that other nations can buy out nearly all of America’s resources. However, as America has tons of resources anyway, this will not be an issue for the most part.
- Their Industry policy is Undisturbed Isolation, increasing the number of civilian factories working on consumer goods (read: producing nothing useful) and severely curtailing America’s growth until this is removed.
At the cost of 150 political power, each of these can be changed depending on the state of the world and completed national focuses. Ideally speaking:
- Your Recruitment Policy should be at the very best, Limited Conscription. Higher levels of conscription are available if your manpower shrinks to unacceptable levels, but this provides other penalties. Assuming you are not losing wars and are drastically short of manpower, Limited Conscription is the way to go.
- Your Economy Law can remain Free Trade (or Export Focus) unless your economy is extremely tiny, in which case you will want to hog more and more of your own resources. Playing as a fascist or communist nation is the only way to close your borders completely. Note that you will not have access to resources sold on the market even if no one buys them.
- Your Industry Policy should ideally be War Economy, with Total Mobilization giving too many penalties to be worthwhile outside of supply emergencies. Democracies will have world tension issues in getting War Economy; fascist and communist countries can get it from the start, and should do so.
The final thing you should get for your political power are research and production companies. If research of a plane, ship, or tank is completed while a production company is hired, the unit gets a bonus to its statistics.
Since you cannot un-research technologies, hold off on researching key items until you have hired a company for it to achieve its bonuses. If you have a lot of political power, you can switch research companies to get multiple bonuses.
You also can hire staff and ministers using political power. Political advisors can also change your ideology, allowing you to play as, for example, Fascist United States or Democratic Germany. A full list of advisors can be found here[www.hoi4wiki.com].
Pre-War – Trade & Resources
Resources in Hearts of Iron 4 work differently from RTS games. As stated in the section on Military Factories and Dockyards, resources are consumed based on the cost of the equipment and the number of factories working on the project. Infantry equipment, for example, requires 2 Steel to create per factory. Two factories would require 4 Steel total, and so on.
There are six resources, all of which are used by Military Factories to produce infantry equipment, tanks, artillery, etc.
- Oil: Used by pretty much everything. Exceptions include artillery, infantry equipment, and jet engines. Artillery and infantry are pretty solid early game and do not rely on oil, so it’s less important than you think – but important nonetheless.
- Steel: Used by pretty much everything, particularly infantry equipment (always in demand), artillery, ships, and tanks. The major exception is planes, which use aluminum instead.
- Rubber: Used by motorized/mechanized infantry, but especially planes. Pretty much all of this resource is concentrated in the Dutch East Indies, making them a great target for Japan.
- Aluminum: Used by Support Equipment (you’ll usually need a fair amount) and planes, which eat it up like crazy.
- Tungsten: Used by artillery, medium tanks, and jets.
- Chromium: Used by advanced tanks and large warships (battleships, aircraft carriers)
Resources that are not used up by military factories are wasted. Players do not stockpile raw resources.
Instead, the finished products are tracked and stockpiled. From the stockpile, they can then be:
- Requisitioned by an army division or air wing (ships operate differently) as reinforcements to replace losses.
- Requisitioned by an army division or air wing to upgrade the equipment currently used.
- Given away to other countries via the Lend-Lease option. This is a good way to help a country win a war without being able to participate in it yourself.
Production of a given material will continue even with insufficient resources, but depending on how many resources are missing per factory, this can result up to a total loss of production.
To begin a trade, open the Trade Window and use the tabs to select the resource to trade for. You can also reach this screen by clicking on the Insufficient Resources alert icon, if present.
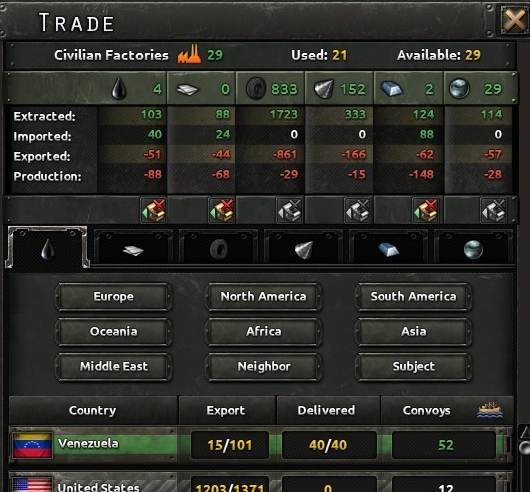
A list will appear showing how much of that resource is available to be purchased by you by each nation. In the above example, Venezuela is willing to export 101 units of oil.
Click on one of the nations (Venezuela in this case) and a slider will appear, letting you choose how many civilian factories to give away. Clicking OK on this screen will initiate the trade.
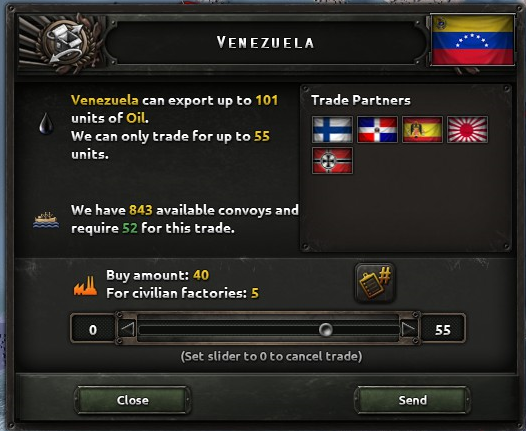
You cannot choose who gets the resources that are available for your exporting, nor can you decline trade offers. As soon as someone trades for your resources on the market, an extra civilian factory will be available for your use in the Constructions tab.
Your Trade Law determines how many of your resources are left available on the market. At Free Trade, 80% of your available resources become available for trade and are unusable. Free Trade provides other benefits instead.
War – Land Combat (Divisions)
The Division is the smallest combat unit you can manage yourself. Divisions follow a template that consists of up to five brigades (shown as columns) and battalions (shown as individual icons).
To move land units across the sea, the best way is to get the division to a port, and then have it move to another port. The other method is by using a sea invasion.

This division is composed of three tank battalions and three infantry battalions, in two brigades (columns). By altering the battalions inside the division, you can alter the division’s stats.
The arrangement of the units doesn’t appear to make a difference; having three infantry battalions in one column is just as effective, combat-wise, as having one infantry battalions in three columns. In terms of spending experience to upgrade, however, the latter is far more expensive and far more restrictive.
The brigades are restricted based on the unit at the top of the list. Infantry brigades include line infantry and towed artillery, anti tank, and anti air battalions, while mobile brigades must consist of cavalry and motorized and mechanized infantry. Armoured brigades must consist of tanks of any type and their tank destroyer, AA, and artillery variants.
The following battalions are available in Hearts of Iron IV.
- Infantry – your standard line infantry, costing pretty much only manpower. Infantry excel at defending, but have otherwise mediocre stats. They are notable for having very strong Organization – letting them stay in the fight for much longer than tanks.
- Cavalry – somewhat faster than infantry, their main call to fame is their very high suppression stat – making them effective at garrison duty and lowering resistance in captured territory.
- Mountaineers and Marines – costing more in manpower and material, these special forces excel at attacking in various environments and methods. Mountaineers gain considerable bonuses in fighting on hills and mountains, while marines excel at beach landings and cross-river assaults. Combining Mountaineers, Paratroopers, and Marines with other units lowers their bonuses, so try to keep these specialists in divisions consisting only of other Mountaineers, Paras, and Marines.
- Paratroopers can be dropped behind enemy lines, but are otherwise weak and are unable to field a lot of the heavier equipment. The parachute icon above the unit’s icon indicates whether the unit can be paradropped or not. Since paratroopers cannot be resupplied by the air, they must quickly capture a port or link up with their comrades, or be easily overwhelmed by a counterattack.
- Motorized and Mechanized infantry are infantry with trucks or halftracks to aid in their mobility. They are very similar to infantry as mentioned above, but are considerably faster and have a few differences in their attack and defence bonuses. Pair these infantry types with tanks to keep tanks mobile and compensate for tanks’ weak organization stats. Motorized infantry is as fast as light tanks, while early mechanized is quite slower.
- Tanks have weak organization stats, but their considerable hardness values force the enemy to use their hard attack against divisions more often – which, unless the enemy is using a lot of anti-tank guns, is often much lower than the enemy’s soft attack. Tanks are fast, but will be forced to move at infantry speed if paired with them.
- Artillery, AA, and Tank Destroyer variants of regular tanks add more to soft attack, anti air attack, and hard attack respectively. They are essentially equivalent to normal artillery, AA, and AT guns, but they move at tank speed, so pair these up with your tanks.
- Light, medium, and heavy tanks obviously have differing amounts of speed. Heavy tanks move slightly faster than infantry and super heavy tanks operate at infantry speed, and thus can be paired with regular infantry without penalty.
- Rocket artillery and motorized rocket artillery has similar soft attack statistics to normal artillery, but also improves breakthrough – making them effective for attacking.
The leftmost column consists of dedicated support battalions, which add extra stats and abilities for your divisions.
- Support Artillery, AT, and AA all improve the soft attack, hard attack, and air defence attributes of your division, just like if they were part of your regular lineup. Support versions, however, cost considerably less and do not contribute to reduced speed – making them effective when paired with fast attack divisions, or parachute units.
- Engineers assist the division they are attached to by improving their ability to entrench and defend against attacks. They are also useful on the offense for attacking regions locked down by forts, and for crossing making attacks across rivers.
- Artillery, Anti-tank, and Anti aircraft increases the soft attack, hard attack, and anti aircraft abilities of your divisions, making them more effective against infantry battalions, tank battalions, and aircraft respectively. Support versions differ from the standard versions in that they do not limit the speed of their division, and can be freely attached to fast light tanks without a speed penalty.
- Rocket artillery improves the breakthrough abilities of the division, allowing it to take less damage while attacking.
- Recon helps the division by making its commander make better choices for tactics in combat. When engaged, each division’s commander (that is, the AI) will choose a tactic from an available list. Adding recon improves the chances that the tactic chosen by you will counter the one chosen by the enemy.
- Military police helps by adding to the division’s suppression stat – that is, it helps reduce the buildup and effectiveness of hostile resistance movements. Most effective when combined with something fast and cheap (like cavalry) so that it can scoot around friendly territory, putting down resistance as it goes.
- Maintenance companies improve the reliability of your equipment, making that division call for supplies less often. Particularly helpful when combined with expensive tanks or equipment; replacing infantry equipment is easy – replacing a Tiger, now that’s hard!
- Logistics companies help reduce supply usage. This helps you fit more units in a single supply zone without it being overwhelmed; also useful in places with little infrastructure.
- Field Hospitals help refund manpower when a division takes damage and prevent experience loss when the division takes damage. Useful if you are running low on manpower.
- Signal companies are useful when you have large groups of divisions, or if you enjoy using the planning bonus (see the War – Battle Plans section). If you order multiple divisions to engage an enemy simultaneously, they all join the battle at the same time; however, divisions which join the battle after it’s started are sent to a Reinforcement pool and must roll dice to join the fray. By default, this is a meager 2% per hour (or an average time of 34 hours of not shooting the enemy). The Radio tech increases this to 7% (about 9.5 hrs on average). A top-tier signal company grants 56 Initiative, which the game divides by 4 and adds to the reinforce rate. The bare rate of 2% plus the Radio technology’s 5% for a total of a 21% reinforce rate per hour, or an average reinforce rate of just under 3 hours.
By adding or removing battalions, it is possible to alter a division’s stats. Combining the benefits of one type of battalion can help alleviate the issues of another.
Altering divisions costs Land Experience, which is gained in land combat and by execising your armies (see the Pre-War section).
War – Battle Plans
Once you have an army established, players can use the battle planner to automate unit actions and receive a planning bonus. It is possible to move units manually by using right clicks, and this can prove more useful in some situations.
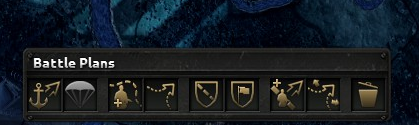
The battle planner (above) is key to using battle plans. Going from left to right:
- Naval Invasion – left click on a friendly port, then right click on an enemy coastal territory to perform an amphibious landing. Naval invasions have an unskippable planning phase that varies in length, depending on the number of divisions deployed. Naval invasions require naval superiority in the naval regions your invasion force crosses; gain this by assigning missions to your sea forces in that region (see sea combat). Try to have your naval invasion capture a port as soon as possible; they will rapidly run out of supply otherwise!
- Paradrop – left click on a friendly airbase with air transports at it, then right click on an enemy territory you intend to drop units into. Paradrops also have an unskippable planning phase that varies in length, and will require air superiority instead of sea superiority. Otherwise, the rules are pretty much the same. Paradropped divisions suffer huge penalties upon landing, so choose a landing zone that is undefended. Resupplying paras by air is impossible, so they must either secure a port or link up with the main force quickly or be overrun.
- Create Front Line – click to draw a border between a friendly nation and a neutral one. Your army will line up at this location.
- Offensive Line – click to draw a line in enemy territory. Divisions will move from their designated front line to this line, fighting enemies along the way. Once created, divisions assigned to the front line will gain a planning bonus that will help them fight (key for overcoming an enemy’s entrenchment bonus). Use the edit mode option (below) to change your attack direction (the arrow).
Note that just because a division is assigned to a front line does not mean it must be assigned to an offensive line. If it is not assigned to an offensive line, the division will move along with the line but not participate in any attacks. For example, having tanks assigned to the offensive line and the front line will have them push towards the offensive line; meanwhile, infantry assigned to the front lone alone will dig in and try to hold the territory taken by the tanks.
- Fallback Line – an army will fall back to this line when you tell it to. Similar to an offensive line, but drawn on friendly territory instead of enemy territory. Note that this will unassign the army from the front line/offensive line.
- Garrison State – click on a series of states and the army will patrol it, reacting to light enemy incursions and partisans. They will prioritize victory point locations and important ports. Note that this will unassign the army from the front line/offensive line.
- Army Assignment – you can either use this button or hold down Ctrl for the same result. This lets you assign an army to one of the orders drawn above.
- Edit Order – use this tool to change orders without needing to draw a whole new one. You can use this to shorten or lengthen an offensive, fallback, or front line. You can also use this to determine from which direction your army will move towards an offensive line; simply click on the arrow and drag it around in friendly territory.
- Delete Order – click on orders to delete them from the map.
War – Unit Status
Knowing the current status of your armies is important to making decisions. The following is shown for each division:
Going from left to right:
- Organization (green bar) – your forces’ will to fight. An overwhelming majority of battles are lost due to low organization. If your units are lacking organization, let them rest! Conversely, you can easily attempt to push around and bully enemies with low organization and try to encircle them.
- Equipment (orange bar) – how well equipped the division is. Mousing over this bar indicates what equipment they are missing, if any.
- Unit Icon
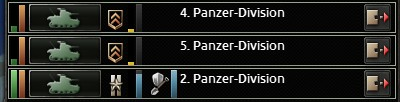
- Experience level (icon) – land units deployed before their training is complete are “green”. Units deployed when fully trained are “trained” (first and second from the top). Units in the field can exercise to “regulars” (bottom panzer division).
- Experience bar (yellow, shown on top two divisions only) – when full, the division will level up.
- Planning bonus (blue bar, bottom division only) – how much of a planning bonus the unit has accumulated.
- Icon indicating current action (movement, attacking, or in this case, entrenching)
- Entrenchment progress – how entrenched the division is.
- Name
- Remove from army
War – Division Statistics
Each division has stats that help dictate its effectiveness in combat. By combining various battalions together into divisions, you will be able to negate the shortcomings of one battalion by pairing it with another.
- Maximum speed – obviously, how fast the unit can move from province to province. Divisions travel at the speed of their slowest unit, so combining infantry with light tanks is not a good idea. All infantry, including non-motorized artillery, anti-air, are the slowest at 4km/h. Cavalry moves slightly faster at 6km/h.
- HP – obviously, how much HP the battalion can take before being destroyed. Infantry (including paras, mountaineers, and marines), motorized infantry, mechanized infantry, and cavalry all have large amounts of HP while tanks, support companies, artillery, AA, and anti tank guns offer the least.
- Organization – the will to fight. Tanks have very low organization, so they will not be able to continue an attack for very long. Infantry have very good organization, so combine motorized or mechanized infantry with tanks for best effect. Organization also limits movement speed in enemy territory. An overwhelming majority of battles are lost because of a lack of organization. If your units are low on organization, let them rest.
- Recovery Rate – how quickly the division recovers lost organization.
- Recon – granted by recon companies, this helps improve the chances of your AI commander choosing a tactic which beats the opponent’s. Improved by recon battalions.
- Suppression – how effective your division is at preventing enemy resistance forces from disabling buildings in captured territory. Useless in a battle, but having a fast and cheap noncombat unit in the back with some suppression can help prevent unnecessary equipment loss and information flowing back to the enemy. Improved by MPs.
- Weight – affects how many transports the unit needs to travel across water.
- Supply use – how many supplies the unit takes. Supply can be improved by building additional infrastructure and naval ports (in the case of overseas units). Improved by logistic battalions.
- Reliability – a bonus that Maintenance support companies provide to reliability. Each piece of equipment, from artillery to tanks to infantry equipment, has a reliability attribute. This attribute determines how often equipment in the division breaks down. This statistic represents the bonus reliability gained from having a Maintenance company, and is not representative of the reliability of each piece of equipment.
- Trickleback – how much lost manpower is added back into your manpower pool. Improved by field hospital battalions.
- Experience loss – how much experience is lost when your division takes damage. Improved by field hospital battalions.
- Soft/Hard Attack – how much damage is done to targets. An attacking division’s Soft/Hard Attack value is compared to the target’s Defence – each attack that is blocked by defence has a high chance of missing. The defending division returns fire in the same way, but is blocked by breakthrough instead. For the difference between Soft and Hard attack, see the section on Hardness below.
- Defence, Breakthrough – how much damage the division can block when defending or attacking respectively. As each point of defence and breakthrough can block one attack, it is possible to have an excessive amount of defence or breakthrough. If you are defending against an opponent with 100 Soft Attack, there is no difference between having 100 defence or having 999,999 defence. While defence and breakthrough remain extremely important, consider improving your own soft/hard attack if you have an excessive amount compared to your opponent. As Defence is only used when defending, and Breakthrough only used when attacking, it is a good idea to build divisions with low defence and high breakthrough (tank divisions) that should always be attacking and never defending. Conversely, divisions with high defence and low breakthrough (motorized and infantry divisions) should always be defending and never attacking.
- Armour, Piercing – armour helps mitigate the amount of damage taken, assuming a hit is registered (the defence/breakthrough stat was insufficient). If you have more armour than the enemy has piercing, you can half the number of soft/hard attacks done to your division. Piercing negates an armour bonus. The bonus is binary, so against an opponent with 100 armour, having 100 piercing is the same as having 999,999 piercing. This bonus is key to tanks, and is what enables tank divisions to defeat infantry divisions even though tanks have considerably less organization than infantry.
- Initiative – improves how quickly the commander can choose and execute a battle tactic (with recon companies helping choose the correct one). Divisions with high initiative will also receive reinforcements and get their reserve divisions to the fight more quickly. Improved by signal battalions.
- Entrenchment – provides a bonus to defenders when defending. The entrenchment bonus increases the longer the division has held that ground. Improved by engineer battalions.
- Combat width – a highly important and often neglected stat by novice players who wonder how two divisions held off ten. For most battlefields, the combat width is 80, and attacking the same province from multiple other provinces increases the combat width for your side by another 40 (representing encirclement). Therefore, try to produce divisions that have a combat width of 5, 10, 20, or 40. Certain commanders can improve their own combat width by 10%, in which case produce a division that has a combat width of 11, 22, or 44.
- Hardness – represented as a gauge beneath the stats, with the infantry helmet and tank icons. A division with 100% hardness will take nothing but the hard attack stat from anything that attacks it. Since the hard attack value for most infantry is relatively low, this sharply reduces the amount of damage taken. Anti tank battalions help improve the hard attack value of your divisions.
The most important combat stats are Soft/Hard Attack, Defence/Breakthrough, Armour/Piercing, and Combat Width.
War – Sea Combat
Sea combat is even less hands-on than land combat. Once you have your fleets put together (see the pre-war section), simply click on them and deploy them on a mission.
To deploy your fleet on a mission, select a fleet and then click on the buttons above the admiral portrait.
There are four missions that your navy can be deployed on:
- Patrol – has your vessels spread out and search for the enemy. This maximizes your chance of finding the enemy, but also decreases the number of vessels in the initial battle. Use with home guard fleets or if you’re hunting down remnants of an already shattered navy.
- Search & Destroy – has your vessels maintain a tight formation and be prepared for a naval slugfest. Lowers the chances of your vessels actually finding the enemy, but keeps your ships together so that everyone engages all at once. Use with advance fleets close to the front lines, or if you’re engaging an enemy fleet of equal or greater strength than yours.
- Convoy Raiding – has your vessels spread out and avoid confrontation, instead seeking to sink enemy merchant shipping and cut off supply lines. Best tasked with submarines, destroyers, or other light and fast ships.
- Convoy Defence – has your vessels stay close and attempt to intercept convoy raiders (above).
- Hold – shown by the anchor symbol, Hold will simply have your vessels act like an army on land – stay in one province and not move. There are two main purposes of having your fleet hold: firstly, in this mode, you have far more control over aircraft carrier planes, allowing you to direct them in providing ground and air support to specific sectors. Secondly, positioning a fleet with a capital ship (heavy cruiser or larger) adjacent to a province in which a battle takes place will give the enemy a “Coastal bombardment” debuff. Direct fire on enemy land positions is not possible.
Your fleets can be deployed in up to three sectors. Once deployed to a sector, the ships will perform their actions and naval battles will occur in the area.
Fleets can also be given a few other options. Repair tolerance, which is shown by the flaming wrench and green, yellow, and red bars, indicate at which point the fleet should disengage for repairs – after light, moderate, or heavy damage. To the right of these are options to repair now or to instruct the fleet to fight to the last. The final repair option tells the fleet whether or not damaged ships should attempt to retreat and repair on their own (and be vulnerable to submarine attack) or stick with the fleet, and the whole fleet goes together for repairs.
Battleships and battleship-heavy fleets benefit the most from the moderate option.
War – Air Combat
Air combat works very similar to sea combat in that it is mostly automated, and you must assign aircraft from airbases to various sectors.
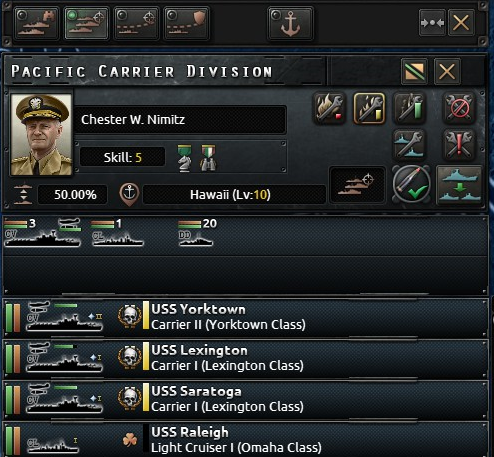
There are three main windows that players must be aware of when managing their air forces. The first is the airbase window, which lets you see each airbase’s current stock of planes.

The top left indicates the total number of aircraft at the base. Overcrowding the airbase results in efficiency penalties.
Use the rightmost button (beneath the X) to create new air wings. For more information on creating air wings, see the Organizing Your Forces section.
There are two ways to assign an air wing to a given air sector. The first is to simply left click on the air wing and then right click on the air zone it is to be assigned to. This method can however result in accidentally assigning an air wing to the wrong zone.
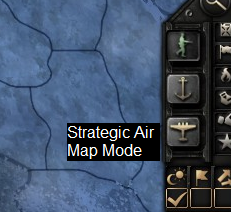
The better way is to bring up the strategic air map mode by clicking on its view at the bottom right.
Clicking on one of the air regions that appears will give details about that region, including which of your air wings are currently operating in it.
Right click into this new window to have your aircraft from the selected airbase perform missions in this region.
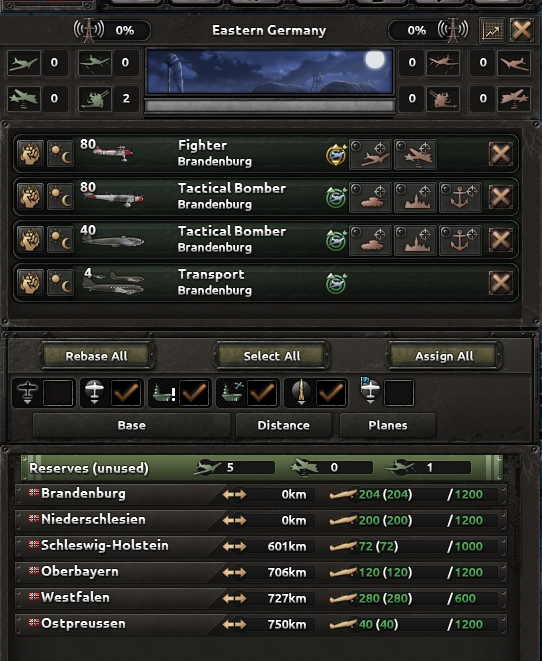
Clicking on the buttons next to the air wing descriptions will tell the wings what kinds of missions you want them to perform.
There is also the kamikaze strike, which damages enemy ships at the expense of aircraft. It must be unlocked by a national focus.
Clicking on the mission button sends the aircraft to begin performing their missions.
The distance between the airbase and the indicated region is shown at the bottom. Once you set up an air wing in a region, its effectiveness is based on the range, with effectiveness being shown as a green, yellow, or red icon. Longer ranged aircraft are thus a must in large regions with few airbases, like the Pacific.
War – Experience Points
Quick Notes – Nation Tips
Notice: This is strictly from playing single player. Do not rely on for multiplayer. I’m also assuming you’re going the historical route.
- Unless playing on Novice difficulty, you won’t be getting any political power until you get rid of the Great Depression (1940 elections, or go to war). Picking up Robert Taft (Silent Workhorse) early will help get a little bit more political power to work with, though not much.
- You’re pretty safe from Germany in Europe, so the biggest threat you’re going to face is Japan. Focus on the USN and the US naval air force.
- Marines are always a good idea, as you’ll be doing a lot of naval invasions in order to take islands from the Japanese.
- Have shore bombardment fleets to help your marines take stubborn Japanese holdouts. Areas with level 10 coastal forts are particularly tough nuts to crack, and your landing force will need all the help it can get. Aircraft carriers equipped with CAS planes will help, too.
- Conversely, coastal forts are great at helping your garrisons hold their territory.
- If you’re impatient and want to go to war right away, you can go to war with Venezuela by picking up Preemptive Intervention after Reaffirming the Monroe Doctrine. You won’t be able to pick up Issue War Bonds to get out of the Great Depression, though you can get a little army experience by fighting the Venezuelans.
- Get as much terrain as possible without fighting by picking up the national focus Rhineland to remilitarize it. The next steps will be to pursue Anschluss to annex Austria without a fight, then Sudetenland, Reassert Eastern Claims, and Demand Slovenia.
- Don’t try to pursue history as Germany. Remember, historically speaking, you lost!
- Danzig or War starts the war.
- Your limitations to picking up national focuses will be the amount of manpower you’ve spent on your army. Create an army to progress. You can check how much manpower your army’s currently using by clicking on the Army Overview at the top of the screen and then clicking on the Resource Consumption tab.
- Build lots of coastal fortresses on the northern ports, covering the Baltic Sea. The British and the Russians love counterattacking via naval invasions, and if they get a hold of one of these ports, they become extremely difficult to root out.
- The Red Army is huge, and you’ll need as much firepower as possible to deal with the Russians. Building your own Maginot Line covering the Eastern Front will help you keep the Soviets at bay while you deal with France, Britain, and potentially Republican Spain.
- Expect a LOT of enemy air power. The British have no qualms about basing their bombers in France and going straight for Berlin and your other major manufacturing sectors. Building lots of AA, heavy fighters, radar, and researching Dispersed Industry will help take the teeth out of their bite.
- Once you’re at war with the Allies, the only way you can stop the constant resistance movement sabotages is by beating Canada in North America, and potentially the entire USA if they joined the Allies already. Until then, resistance is a huge problem! Cavalry divisions (preferably 4-6 cavalry battalions for each) coupled with MPs is a good stopgap measure. Upgrade your MPs, you’ll be using them a lot!
- Avoid attacking the USSR in the winter, and keep an eye out in provinces for the Mud debuff.
- Keep the Kriegsmarine in a heavily defended AA port until you’re ready to try to secure the English channel for a landing on the British mainland. Avoid landing directly on a port; instead, land next to it and then attack from land to avoid a confrontation with Royal Navy elements docked there.
- Chances are, your first opponents will be the Chinese. Don’t underestimate them. Use tanks to improve your divisions’ hardness and mitigate their infantry’s soft attack. Direct these forces southward: westward is extremely mountainous, and is unsuitable for tanks. North is the Soviet Union; do not poke the bear if you can help it.
- While your planes can definitely help if you base them out of Mengkukko, they won’t have the range to cover all of northern or western China. Rely primarily on your army, with your air force backing you up.
- Open another front to the south – do not get bottlenecked near Beijing.
- Get divisions out and rolling early. You’ll need a lot to beat the Chinese.
- Consider equipping logistics companies for your tanks. With only 21 military factories and little room to expand, you’ll want to avoid losing them to attrition where possible.
- Chinese divisions have a lot of defence, but very little soft attack, hard attack, or piercing. Adding even one tank to your attack divisions can result in considerable armour bonuses.
Appendix – FAQs
Section for any frequently asked questions that appear in the comments.
I’m getting notifications saying my units are out of supply. What do I do?
Check out this guide here.
How do I deal with land forts?
The best way to fight forts is to encircle them. By encircling the fort, you cut off the enemy’s supply. You can then simply wait until their supply penalties cost them all their organization. Supply penalties also include attrition, which slowly whittles down the enemy’s equipment.
Paratroopers can be used to easily encircle forts via airdrops behind them.
Going through a fort, however, requires a lot of resources, time, and equipment. Some land units have a bonus to forts, however:
Engineer companies are an easy way to get a 10% bonus to fort attacks.
Artillery, anti-tank guns, super-heavy tank destroyers, heavy tanks, and both forms of rocket artillery all provide the same bonus.
The best bonus comes from Super-Heavy tanks, with a whopping +50% attack bonus to forts. Super-heavy tank destroyers have a smaller +30%.
Level 10 forts also cost a LOT of time, so opponents having a level 10 fort are most likely lacking in some other area.
Appendix – Sources
- Beginner’s Guide to Unit Templates[forum.paradoxplaza.com]
- Over 300 tips for new (and older) players
- Test results of use of fighters on air superiority / interception[forum.paradoxplaza.com]