Overview
I’ve played a lot of Borderlands 2. The more i experimented with character skill trees, the more i appreciated and enjoyed the game. I’ve created this guide to share some of these builds. Enjoy 🙂
Intro
Welcome
The guide started because I wanted to share some of the more silly builds I tried -they may not be the most powerful but perhaps more enjoyable. It’s not about min-maxing and meta. The guide is about discovering other ways to play the game with proven builds I’ve levelled myself from 1 to 72 +op levels without mods or altered files.
These builds are not designed for Over Power(OP) levels above OP2. Higher OP levels start to demand certain skills and equipment and therefore narrows your build options.
These builds (or similar) probably already exist somewhere in the community but what i’m posting in this guide is my own material, it’s not copied or adapted from anybody else’s stuff out there.
I used the Borderlands 2 Skill Calculator -http://bl2skills.com, to show how i specced my characters. I’ll give some tips for each build, some recommendations equipment and I’ll finish with some stuff about the build’s weaknesses and some suggestions about what to do to counter them.
I will include a brief gameplay footage for each build explaining how it works and showing it being used. As we all have stuff to do, I’m trying to cut the BS and keep these under 5 minutes.
The guide is pretty big so it’ll be easier to select the build you want to look at by using the guide contents bar on the right of your screen.
I hope you find something that you like or find useful.
Have fun Vault Hunters!
03/05/2019 Update:
Currently overhauling this guide as I looked at some of my older builds and thought they could be improved and presented better. I also need to add videos giving a brief rundown and some gameplay for each build.
I will add video guides when my house is quiet enough to actually record them; unless you want them to be full of 17-month-old squeals, babble, him making car noises and monster noises (oh and crying/screaming of course).
05/10/2019
Currently playing Borderlands 3 but I will finish this guide off one day for future players.
How to Make a Build
What beginners need to know about skill trees:
- It’s generally better to max out a skill than pepper a couple of points in each skill.
- The bottom skill point in each skill tree is special and usually provides a significant power boost. If you’re not sure which path to take, check out the bottom skills first then make your way to them as quickly as you can.
- You can reach the bottom of your first skill tree at level 31. You will be able to access two of these skills at level 57 but you won’t be able to reach a third by the maximum level 72.
- some skills max out at 1 point. These are generally some kind of utility skill and generally grant considerable bonuses.
- The skills with a hexagon boarder are “kill skills” -they activate for a period of time (about 8 seconds) when you kill something
- You can “Respec” your skill points at any time at Customization Station by clicking the “Refund Skill Points” option
How to make a build:
- Look at the characters entire skill tree and try to identify skills that can pair together.
- Base it on an item or a play style. Perhaps there is a particular item you want to base your build around like a sniper rifles or pistols, perhaps you want to be a tank, a glass cannon or something in between. It just takes an idea, then try to make it work.
- Look at the bottom skill in each skill tree and decide where you want to end up, then stick to that skill tree until you reach the bottom (this way you’ll only have to pick between 2 skills at a time).
- You may even find a build by accident.
- Base it around the class mods you find. Class mods in Borderlands 2 usually have a theme. You can always find a new class mod if your current build is not a good fit for you. A list of the Borderlands 2 class mods can be found here: [link]
One more thing… You can make builds that cater to multiple class mods shift the abilities provided by your class mods as needed. For example: A siren that has a mod for support abilities but can then go offensive by swapping to a mod with damaging abilities (without reallocating any skill points). This will only work if you have unlocked all of the skills needed for both class mods.
Axton – Explosives
Nukes, turrets and rocket launchers… Hell of a day.
This build is based around rocket launcher damage, grenade damage and explosive turrets. you’ll also get boosts to gun damage, reload speed, shield capacity and toughness.
Here’s the skill tree:

- Tips:
- Pick up your turrets often to refund Action Skill cool down, so you can throw them again for more explosions. Putting Skill points into Sentry will increase your turret duration so they don’t lose their refundable cool down as quickly.
- You can base this build around rocket launchers with a Sham (orange shield) and a low level Vladoff assault rifle that shoots rockets. You can use the Vladoff AR to shoot your feet while wearing the Sham to quickly replenish rocket ammo.
- Nuke can be used to cancel enemy abilities like ion loader shields.
- If you’re using a Big Boom Blaster shield, avoid putting skill points into Forbearance
- The Norfleet is the highest damage rocket launcher in the game and therefore is the strongest option for this build. The Nukem is the easiest orange rocket launcher to get (can buy from Torgue vending machines) and works fine enough.
- Suggested Items:
- This build does not require a specific weapon but does give damage boosts to rocket launchers so try to find a high damage rocket launcher such as The Nukem, Badaboom, 12 Pounder or Norfleet . Avoid the Tunguska as its explosions will kill you too often.
- high damage grenades such as singularity, Fast Ball, Bonus Package or Nasty Surprise
- This build does not require a specific class mod.
- a Sham shield is most preferable. The Big Boom Blaster shield will also generate rockets and grenades if you can get your hands on one.
Problems with this build
- The build is pretty balanced -it doesn’t have many weaknesses but it also doesn’t have many strengths.
- Nuke skill damage becomes less effective at higher levels. At higher levels I used Nuke to displace enemies, this gives you time to kill them while they were recovering from the blast.
Video Guide:
Axton – Gritty Tank/Pointman
“Like I was gonna die“
This build is about beefing up his shields and health. If that’s not enough, it also gives him a 40% chance not to die. But wait there’s more…. If he does go down he’ll gain a big boost to damage and movement speed to help him get back up. Finally, there’s some skill points to give him some extra damage so he can still kill things easy enough.
Here’s the skill tree:
Tips:

- Your health will regenerate faster while you’re dealing damage.
- The Grit skill has a 40% chance to regenerate your health instead of letting Axton go into Fight for Your Life. When it triggers it will continue to trigger as long as you are constantly taking damage. Careful though, the Grit effect wears off quickly (see timer above the exp bar) and you’ll be rolling the dice again if it does.
- Turret Phalanx Shield[/] doesn’t last very long under fire but you can overlap the shields of two turrets to make them slightly more useful. You can also summon your turrets and their shields for a moment of peace to let your own shields recharge.
- Your turrets won’t do a lot of damage but they will slag for you.
- Preparation, Willing and more points in Pressure will increase your survivability but will cost something else.
- do not give up your shields for a Rough Rider -it will not be as good at keeping you alive compared to a shield that will keep charging while you’re low health.
Suggested items
- This build is not weapon specific.
- A Neogenator or Evolution will compliment the health regeneration abilities. Otherwise an adaptive shield if you don’t have these yet.
- build is not grenade specific. I’m using a magic missile mod to slag enemies when my turrets are not available.
- This build is using the Legendary Pointman Mod. Mods that give +Grit Skill will work if you don’t have this.
- a +health relic will help keep you alive.
Problem’s with this build:
- This build was super easy to play. At OP2 i can dive groups of armed enemies and usually come out the other side without falling down.
- When betting on Grit[/] to keep you alive you will sometimes go down. With +10 points in Last Ditch Effort you should be able to get yourself back up; but your Fight for your Life[/] timer will diminish each time you go down until there is no timer left and you die.[/list]
Video Guide:
Please check later.
Axton – Legendary Soldier
“Ten years of DAHL military experience at your service“
This build is about boosting Axton’s gun damage as much as possible, he has a lot of abilities to do this plus some gun damage from his class mod and relics.
Here’s the skill tree:

Tips:
- This build doesn’t need a lot of explaining… It really is just about pointing your gun at things and shooting them. However, this build does not offer a lot of survivability so you need to be tactical about moving and shooting from cover.
- Use your turret to draw enemy fire
- Nuke is a rather ineffective skill for higher levels so I opted not to get it. Do or Die is a more useful skill but I also felt it was not needed.
- Willing[/] is a good skill to have when using the Bee shield as it reduces the shields usually long recharge delay.
- If you prefer using elemental weapons then consider moving points from Duty Calls to something else.
- This build does not offer much health recovery as it’s about avoiding damage. If you’re doing this right, the health regeneration from Preperation will be enough.
Suggested items
- Any high damage output weapon. I’m using a Proactive B|tch SMG as a primary.
- A Bee shield for additional glass cannon damage -easily farmed off Treants in the forest of Tiny Tina’s expansion or Hunter Hellquist in the Arid Nexus Boneyard.
- any grenade mod. However an implosion type grenade can be used disrupt enemies while you need to escape to let your shields recharge.
- A legendary Soldier Class Mod will offer additional gun damage, fire rate and action skill cooldown.
- A +gun damage relic depending on your preferred weapon.
Problem’s with this build:
- This build is Axton’s glass cannon. Based on damage output but not staying alive. So play safe.
Video Guide:
Please check later
Axton – Popcorn Turrets
Chew ’em up honey
This build is simple to use and doesn’t need a lot of explaining. Just beef up your turrets as much as you can and try to reach the maximum cooldown reduction for your action skill so you can deploy your turrets as often as you can.
Here’s the skill tree:
.

- Tip:
- Axton’s turrets are “like having an extra player on the field” and this means they are affected by team skills and class mods that affect other players.
- Enemies can have a harder time hitting Axton’s turrets if they are stuck to walls.
- You can pick up your turrets to refund some of the Action Skill cooldown. Do this whenever your turrets aren’t needed anymore.
- Cooldown rate can be increased above 100%. This does not mean that your skill will instantly be recharged though as it’s based of the rate of recharge not the total duration. For Axton’s Action Skill, 40% recharge rate is roughly 4 seconds faster recharge.
- Suggested Items:
- this build uses the Legendary Engineer Class Mod and a Skill Cooldown Reduction Relic
- Weapons and shield don’t really matter -whatever makes you comfortable.
- A Bee shield would be handy as enemies tend to focus your turrets when they’re deployed.
- Problems with this build:
- It’s a pretty decent build without many problems.
- Axton’s turrets scale with overpower levels but the turret damage started falling off with each over power level.
Video Guide:
Axton – Aggressive Ranger
“Voted quickest charge in the DAHL military.“
The Ranger class is based around shield strength and chaining quick kills together. Each kill will charge your shields, boost your movement speed and your damage.
Here’s the skill tree:

Tips:
- This build (when the Legendary Ranger Class Mod is equipped) is about kill skills. Kill a weaker enemy first to activate your kill skills, this will make it easier to kill everything else. As soon as your kill skills activate: 1) use your increased speed to avoid taking as much damage and close in on enemies. 2) Use the extra damage, fire rate and recoil reduction to kill chain kills. 3) Quick Charge will recharge your shields to keep you alive and it’s pretty effective with 10 points in it, but even then you may still need to take cover to let it recharge if you’re taking too much heat (even if just for 1 second or 2).
- The normal maximum of 5 points in Quick Charge gives you 5% shield regeneration per a second. 5% just isn’t enough to keep you alive so don’t bother getting Quick Charge until you have a class mod that adds 3 points or more.
- This build is about shield strength and shield recovery, not health. Avoid taking health damage as much as possible.
- Your turrets can be used to draw enemy fire or disrupt enemy from damage for a brief moment (long enough for your shields to regen).
Suggested items
- As with every build… the Unkempt Harold will destroy everything. There are lots of other options though. Just make sure you’re not spending too much time reloading.
- I’m using an Antagonist shield as it increases resistances, slags and deals some damage back to attackers (although minor). Any high capacity shield will work. Could also use the Impaler if you want to turn your shield into a weapon.
- your slagging weapon needs to have a high chance so you don’t waste valuable seconds of your kill skills trying to slag something. The fire-rate will also help to slag. I’m just using a Maliwan sniper as it reliably slags first shot, if not second will. The Slagga SMG would be a good alternative.
- This build is using the Legendary Ranger Class Mod, Shock Trooper or Rifleman class mods for lower levels.
- a Shield Strength and Shield Recharge Rate relic, these can come with +resistances as well. Otherwise use a Relic to boost your damage output.
Problem’s with this build:
- The build is based around kill skills and therefore lacks power until you can kill something. You also lose your kill skills when you enter Fight for your Life which can make it harder to get back up.
- The tankiness of this build is only moderate. It works well for solo play but struggles in multiplayer as enemies deal more damage and break your shields quicker.
- Electricity will destroy your shields
Video Guide:
Check back later
Axton – Longbow Sniper
Badass in range
This build is less common because most people who want to snipe play as Zero. Unlike Zero, this build is less reliant on critical hit damage as it uses + gun damage instead. Axton’s damage won’t scale as well as Zero’s but the turret damage helps, you’ll have a bit more survivability and it’s more comfortable sniping while your turrets are taking the flak.
Here’s the skill tree:
.

- Tips:
- it’s easier to recover your turrets if you keep one close instead of sending both away. Recall the one nearby when the other blows up to begin it’s cooldown to get it back.
- Suggested Items:
- This build doesn’t explicitly need sniper rifles. It’d be good with just about any weapon. You could also move the 5 points in Duty Calls (lower left mid tree) to somewhere else if you want to use elemental weapons.
- Invader (pref), Lyuda (but this will chew your ammo), Skull Masher, Godfinger (gives you Zero’s BOre ability) or Hawk Eye. Look for + crit damage when picking your sniper (this stat will likely pick your rifle for you).
- a Bee shield for extra damage
- A corrosive or explosive weapon like a Maliwan Caster, Hornet or Unkempt Harold to deal with hard to kill enemies,
- A slag weapon with high elemental chance
- longbow type grenades so you can throw them from a distance
- A Legendary Soldier Class Mod or A Legendary Ranger Class Mod for +gun damage
- A + sniper damage relic
Some problems with this build
I found that the damage was dropping off at higher levels and it became easier to use other weapons. Also sniper rifles don’t allow you to carry much ammo, so the drop in damage becomes a real issue as you can’t afford to waste too many bullets killing enemies. Manage this by looting ammo often and using your other weapons to give your snipers a break from time to time.
Gaige – Speedy Anarchist
When she hits them, it will hurt!
This build is based around the anarchy skill, being able to maintain strong shields and move quickly between kills. This was my most powerful Mechromancer build
Here’s the skill tree:

- Tips:
- Use the ‘With Claws’ ability to top your health up when it’s getting low and when you see an opportunity to safely do so (i.e. when the enemy you’re attacking is reloading)
- Summon Deathtrap for additional cover when you want to close in on enemies
- Avoid using discord and accumulate those anarchy stacks as quickly as you can -more anarchy means more power. You could avoid getting this ability all together, but for 1 skill point it’s handy to have up your sleeve for when you need to increase your accuracy.
- use the highest capacity shield you can find (but don’t use a hopolite or fabled tortoise!)
- If you’re in ‘Fight for Your Life’ and you’re able to get yourself back up, you will be granted full shield and a movement speed buff which will reduce your chances being knocked down again.
- be confident and charge in close enough to accurately shoot your enemy without ricocheting bullets to quickly kill your enemies. This will activate your ‘Blood Soaked Shields’ and ‘Unstoppable Force’ to top up your shield and give you a boost in movement speed to help you pounce on your next victim.
- Suggested Items:
- any high capacity shield
- an Unkempt Harold -preferably the Double Penetrating variety. Otherwise a high damage output weapon that can spend it’s ammo clip quickly and has a decent reload speed to rack up those anarchy stacks.
- a slag weapon to aid you when your anarchy stacks are low
- the Legendary Anarchist Class Mod -there is no ideal lower quality class mod
- A +resistances, +shield capacity, +pistol damage or +explosive damage relic
- An explosive fastball to take out aerial units
- Problems with this build:
- I did not counter many problems with this build. It racked up anarchy stacks quick enough and dying wasn’t a huge set back as this build offers some really good base damage. I found the Unkempt Harold maintained it’s accuracy fairly well, even with 400 anarchy stacks because the shots continued to fire in a set wide spreading pattern. The build was fairly balanced and Deathtrap can be used to distract enemies in tricky situations.
Gaige – Buzzing Catalyst
Zap and burn everything at once -the benefits of no accuracy
This build is based around Gaige’s ‘Little Big Trouble’ skill tree for electrical burn. I’ve respecced this character more than a few times and this is what i ended up with using to deal the most damage:
Here’s the skill tree:

- Tips:
- Use low clip, fast reloading weapons like a shotgun to build anarchy stacks quickly
- Weapon accuracy should still be valued to maintain “OK” accuracy, even with a ton of Anarchy.
- If you’re not loving the process of accumulating anarchy stacks you can activate Discord over and over to consume the initial 25 stacks (Rational Anarchist skill) for increased accuracy, fire rate and health regen. This will increase your survivability and give you some increased damage output but it will burn your ammo quicker and you won’t reach your damage potential. This method may be better for surviving boss fights if you don’t get it on the first try.
- Save Deathtrap for when you come up against challenging enemies. He’ll draw the enemies fire which will make it easier for you. Use Deathtrap wisely, as he takes a long time to recharge and you won’t want him on cooldown when you run into tough enemies.
- you can use the Close Enough skill (top left of the Best Friends Forever skill tree) to bounce bullets off surfaces. Use this your advantage to shoot bullets around corners so you can get kills from cover and better hold onto those stats
- It’s easy to just lazily shoot at the ground but you’ll get more damage if you can hit an enemy directly. Use opportunities to get up close to enemies to deal some serious damage.
- Try to charge Deathtrap by shooting him with an elemental w eapon as soon as he spawns (Make it Sparkle skill -bot of mid tree) as his Robot Rampage skill will apply double damage (physical value + elemental value) if he is charged when he uses his whirlwind slash attack. He tends to use this attack soon after he spawns.
- Suggested Items:
- A couple of fast fire rate electric weapons to spam so you can alternate to conserve ammo (i.e. Maliwan SMG, Caster or a TMP pistol).
- A low clip, fast reloading weapon like a Jakobs Shotgun to rack stacks up quickly
- Having a corrosive weapon like a Hornet will help take down those tough armoured units and Buzzards.
- A transfusion type grenade for health recovery -preferably slag
- A Legendary Catalyst Class Mod or Zapper Class Mod
- A + Electric damage relic
- A Sham is good for generating ammo and tanking bullets. If you have a Sham, try getting a Norfleet and a low level Vladof assault rifle that shoots rockets. You can destroy entire areas with a few fires of the Norfleet and you can shoot your feet with the Vladof assault rifle while wearing the Sham shield to generate rockets. Be sure to jump before shooting your Norfleet to avoid hitting the ground close to you.
- A Neogenator is good for tanking reflected bullets as charges from electric attacks that would otherwise eat your shields.
- or you could use an Evolution or Hoplite for additional tankiness (don’t use the Hoplite if you decide to give Deathtrap a copy of your shield with the ‘Sharing is Caring’ skill as this will slow you down)
I’ve been pretty lucky with the item drops for this champ. I have settled with a Florentine as a main, a Shock Twister shotgun, a Barking Storm and an Electric Norfleet equipped. I’d like to get a shock type Interfacer shotgun but i haven’t bothered yet as the Florentine is good enough.
Problems with this build:
- This build has no end game. The elemental burn damage just isn’t enough to kill things quickly. It was fine while levelling though. I fixed this by equipping a Bee Shield for extra damage.
- It takes awhile to warm the character up (build anarchy stacks) and dying is a real set-back as you’ll lose all of your anarchy and have to start again. However, as there’s usually no consequence to dying this aspect makes the game a bit more involving. This is issue is also countered by using a Bee shield.
- It’s other weakness is that it’s hard to hit air units when you have a ton of Anarchy. Deathtrap is also fairly useless against aerial units in Ultimate Vault Hunter Mode. Try to avoid the aerial units as they’re not worth the trouble; but If you have to face them you can activate Discord to increase your accuracy, try to take them down as quickly as possible so you can deactivate Discord and save as many stacks as possible. It’s worth keeping a corrosive weapon handy to take down buzzards.
Video Guide:
Gaige – Reliable Roboteer
These deathtrap upgrade should earn you first place
This build is based around Deathtrap, but also anarchy so you can be just as useful. The build uses a lot of cooldown reduction so that you can pop him out as often as you can
Here’s the skill tree:

- Tips:
- Keep Deathtrap charged with an element to double his damage (physical+elemental damage)
- Deathtrap counts as an extra player, so team boosts also have an effect on him but you’ll need to get these boosts (like +attack speed) from other players as Gaige doesn’t have much to offer others herself (other than +team max health or +team elemental effect damage).
- Cooldown rate can be increased above 100%. This does not mean that your skill will instantly be recharged though as it’s based of the rate of recharge not the total duration. For Gaige’s Action Skill, 40% recharge rate is roughly 6 seconds faster recharge. 6% = roughly 1 second.
- Deathtrap can activate your kill skills but he doesn’t benefit from boosts from your own stats (I tried increasing his melee damage by using a relic to increase my own, but it did not work).
- Don’t use a Hoplite shield with the ‘Sharing is Caring’ Skill (bottom left/Best Friends Forever tree) as Deathtrap will only slow you down when he’s spawns with a second Hoplite.
- Deathtrap can be healed by transfusion grenades (but at your own expense), Maya’s Restoration (shoot players to heal them) and Maya’s Elated skill (team health regeneration while using Phaselock).
- Suggested Items:
- Guns with a high number of bullets-per-a-second work better than slower fire-rate weapons. Mainly because your accuracy is going to suck and you don’t want to invest too much into landing a single bullet.
- Not weapon specific but prefers fast fire rate, small clip, fast reload weapons. As this build is fairly weak when Deathtrap is being a dumbass… You may need a powerful weapon like an Unkempt Herald to carry him when he’s not being useful.
- For shields -i’m using the Hide of Terramorphous to boost Deathtraps damage melee damage as well as provide a stable shield for myself. the Evolution is good for increasing survivability but don’t count on it healing Deathtrap as it won’t be effective enough. If you are using the evolution you may want to move some points into ‘Blood Soaked Shields’ so you can keep it topped up and benefit from it’s health regen -but if you’re too effective at killing things you may start taking more damage from Blood Soaked Shields than you are healing.
- A cooldown relic or something to boost your own damage
- A Legender Roboteer Class Mod or regular Roboteer Class Mod
- Grenades don’t really matter but can be used as an accurate source of damage (not affected by Anarchy negative accuracy stat)
- Problems with this build:
- the build is very dependant on you having a very good weapon
- Deathtrap is only effective when he is meleeing things -he’s useless against flying enemies and you can’t control which enemies he attacks, if he attacks at all. If he starts attacking an air unit he won’t stop until it’s destroyed, so if he does, help him take it out so he can start slashing things again. But if he’s attacking a Stinging Cactus, there’s nothing you can do.
- There’s no way to return Deathrap when he’s no longer needed and his cooldown only begins after he dies or despawns. This means there will be a period of time where you’ll be on your own and you won’t be benefitting from all of the points you’ve invested into him.
- You might have difficulty hitting flying units yourself. Try to avoid fighting flying things or summoning Deathtrap around them. I you have to fight them, use guns that spray lots of bullets. You don’t need accuracy, you just need more bullets. However accuracy helps, so activate Discord to increase your chances to hit them.
- Dying is a real set-back when using Anarchy as you’ll lose all of your stacks and have to start accumulating them again. the only “sound advice” i can give her, is “start dying less”. Nah seriously, hide behind Deathtrap when you see something scary and maintain good weapons so you can handle yourself.
- The Mechromancer is a class that really doesn’t have skills to increase her damage output (sure, she has skills to increase her elemental damage but you’ll find this ineffective at higher levels). This means you will need equipment to boost her damage -unfortunately you’re not going to have a lot of option here but to default to using an over powered weapon like an Unkempt Herald. I’d still avoid using a Bee Shield with this build (potential source of gun damage) as I want Deathtrap to have bonus roid damage or at least something to keep him alive.
Krieg, The Grenade Psycho (Elemental)
I COOKED THE LITTLE RED ROCK AND THREW IT AT YOUR DEATH!
With this build, I leveIed from 1-72 using grenades as my primary weapon. I rarely had to use weapons other than to slag things. I had a bit of fun with this build too, but heads up, the elemental grenade psycho ends really is the same as the Hellborn Krieg build -it just points out how to maximise grenade damage. With this build you’ll be running through mobs of creatures lobbing grenade after grenade with each kill giving you more grenades to throw until you’re heart is content. You can do this 2 different ways -based around explosive grenades or elemental grenades. This build uses the left tree for grenade skills, then the right tree for extra elemental damage.
Here’s the skill tree:

- Tips:
- Any elemental weapon will do but weapons that have a combination of fire rate and good elemental chance will ignite you more often, thus giving you more power. I tended to focus more on slagging things and let my grenades and Raving Retribution (last kill of the right/Hellborn tree) take care of the rest. Try to keep weapons that have a variety of elemental types and that differ from the elemental used by your grenade mod.
- getting kills with Raving Retribution (bottom right/Hellborn tree) will count as killing enemies with an explosion and cause them to drop grenades
- Avoid shields that have immunity to burn damage. They will stop you from being able to immolate yourself so you won’t be able to get the bonus “on fire” stats
- Suggested Items:
- Chemical sprayer grenades are easy to use -preferably electricity as you can enter it’s radius without spraying yourself which makes it easier to draw enemies into it. It also kills enemies shields so you can deal damage with your fire and corrosive weapons. The Quasar or Storm Front grenades work well. Sprayers will be effective up until ~level 55.
- at level 57 I swapped to an elemental Fast Ball. The Fast Ball will 1 hit most slagged enemies and trigger a greater Bloodsplosion effect than a sprayer grenade. The bloodsplosion will then likely 1 hit everything else nearby and chain until that area is done.
- You could use a Fire Bee which is a powerful powerful grenade mod but you run the risk of hurting yourself with it. I also enjoyed using the Breath of Terramorphius at one stage.
- Alternatively, you could use a Pandemic or Leech (but these grenades have a low chance to trigger elemental effects).
- for weapons you could use something like the Hellfire, Good/Bad Touch, Slow Hand, Norfleet, Interfacer, Conference Call, Hornet, Grog Nozzel or just a good ol’ Purple Caster. Keep something like an Unkempt Harold for those enemies that are resistant to everything (i.e Ghost King, Constructors).
- this is one of the few builds where Logan’s Gun or the Thunderball Fist could be useful. The explosions caused by these guns will cause enemies to drop grenades. Shoot the enemies feet with these weapons to get the most damage out of them.
- + elemental damage relic With this one i’m actually using a relic
- A Legendary Torch Mod or Diesel Blister Class Mod.
- Flame of the Firehawk or Rough Rider Shield. the Flame of the Firehawk’s damage will drop off end game -at that point you may be better off with a Rough Rider.
- Problems with this build
- The build works best when playing solo as enemy health increases when more players join so you start needing more grenades to kill things. Also, other players will become excited when they see how many grenades are on the ground and start throwing them themselves which further drains your resources. But don’t threat too much, This build still gives you some very good elemental weapon damage which will prove handy when you have no more grenades to throw.
- Sprayer grenade damage dropped off around level 55. After that, I swapped to a Fast Ball for additional damage.
- You will receive fewer grenades with this build compared to the explosive Psycho because the elemental guns won’t cause enemies to drop grenades; but Raving Retribution does.
- You will occasionally die from self-immolation. Fortunately, Borderlands 2 is a game where dying doesn’t really matter. I’ve learnt to enjoy the psycho’s self destructive behaviours but if it does annoy you, you could swap the +elemental damage relic with on that gives you +fire resistance.
- Krieg’s Elemental Empathy is not very effective against slag resistant/immune enemies -so be more cautious around these enemies; especially if they slag you.
- It goes without saying but Krieg’s damage is significantly lower against fire resistant enemies. Keep another high damage weapon handy to deal with these enemies and don’t over invest into fire damage weapons/grenades (i.e. Ghost Kings).
- If you come up against a red dragon, you’re going to have a bad day -don’t fight them unless you’re well equipped.
Video Guide:
Krieg – The Grenade Psycho (Explosive)
BOOM, BOOM, BOOM, EXPLODE!!!
Most people will go melee or hellborn Krieg. I’ve tried builds around Bandit Guns, Fire Rate, Assault Rifles… You name it and i’ve tried it. But the most enjoyable build i’ve played was grenade psycho. With this build you’ll be running through mobs of creatures lobbing grenade after grenade with each kill giving you more grenades to throw until you’re heart is content. You can do this 2 different ways -based around explosive grenades or elemental grenades. This build uses the left tree for grenade skills, then middle for extra explosive damage -you will also get some bonus melee damage.
Here’s the skill tree:

Tips:
- When using homing type grenades, they tend to lock onto the first thing you’re aiming at (if not the closest enemy). If you’re using homing grenades you should throw them in different directions (left and right) so that they can home into the hordes from different sides and hit different targets.
- getting a kill with a melee attack will increase your grenade damage
- You don’t really need to place many points into ‘Thrill of the Kill’ because you’ll be dealing massive damage and fully healing from most kills anyway.
- ‘Blood Filled Magazines’ will further boost the damage of Tediore weapon throws
- You can put fewer points into Blood Bath (to reach grenade drop chance of 100%) if you have a class mod that boosting the skill level. A percentage higher than 100% gives you a chance of dropping 2 grenades instead of 1.
- Suggested Items:
- Any explosive weapon will do, guns with large clips that reload like a grenades are great.
- the Unkempt Harold is very handy to have because of it’s high damage output
- A high damage rocket launcher such as the Nukem or Badaboom will work well.
- To slag, i usually use a sniper rifle as snipers have the highest elemental chance (mine has 84.8%); otherwise a spray and pray weapon like a SMG or TMP pistol are also fine.
- Any explosive grenade will do but try to avoid the bouncing betties as the bullets they spew do not count as a grenade kill and therefore won’t cause enemies to drop grenades. I mainly used mirv and singularity grenades until I swapped to the Fast Ball for end game damage. When picking grenades i tend to avoid the bouncing type (as opposed to Longbow) as they can easily bounce off course and not hit anything, or you’d be putting yourself in danger to throw them from a close range. The homing grenades can be nice as they take away the need to aim.
- For orange grenade mods use a Bonus Package, or Explosive Fast Ball (which makes a satisfying noise when you hit an enemy with it). I probably prefer the Fast Ball more as it’s deals more concentrated damage and this results in better Bloodsplosion damage.
- i used an explosive nova shield -the Deadly Boom is a good one
- I use a + explosive damage relic
- the Flesh Crunch Mod gives you the most relevant skill boosts
Problems with this build:
The build works best when playing solo as enemy health starts increasing when more players join -which will then cost you more grenades to kill things. Also, other players will become excited when they see how many grenades are on the ground and start throwing them themselves which will reduces your ability to keep throwing them. But don’t threat too much, this build still gives you some good boosts to melee damage and explosive weapons. Kills with explosive weapons will also help replenish your grenade count (unlike the elemental version of the grenade psycho which relies on Raving Retribution to do this).
Krieg – Standard Hellborn
I’M ON FIRE!!!
Typical Hellborn build that focuses on elemental burn damage.
Here’s the skill tree:

- Tips:
- Focus on slagging things. your Raving Retribution will take care of the rest
- Tag as many enemies as you can at the same time to deal the most damage and sustain health.
- I didn’t go for Pain is Power as I did not feel like it gave much power at the cost of critical hit damage. You might want it if you feel it’s easier to simply go for a body shot rather than a critical hit.
- Avoid shields that have immunity to burn damage. They will stop you from being able to immolate yourself so you won’t be able to get the bonus “on fire” stats
- Suggested items:
- Any elemental weapon will work: Maliwan/Elemental weapons – Casters are good, Hellfire, Logan’s Gun, Florentine, Hornet, Infinty, Conference Call, Interfacer, Hail or Kitten.
- Grog Nozzle, Slow Hand, Moxxi’s Good Touch (or Bad if you can get it) for additional healing
- Flame of the Fire shield
- +elemental damage or +max life relic
- Legendary Torch Class Mod. If you don’t have this, a Toast or Torch Class Mod will work.
- Any elemental grenade
- Problems with this build:
- occasionally you will die from self-immolation (after combat finishes) and there’s nothing you can do about it but bite your nails and hope you live it. You can increase your chances of survival by: A) Maxing out Numbed Nerves for damage reduction, B) equip a damage resistance relic, C) use a damage reduction shield, and D) letting status effects kill your enemies so that you can steal some last minute health from the Elemental Empathy skill
- The build is not as good against enemies that are resistant to fire (as you lose damage from Raving Retribution and Flame of the Firehawk). Don’t over invest into fire damage and keep some other elemental weapons handy.
Video Guide:
Krieg – Melee Psycho (Bloodlust/Damage)
meat… meat… MEAT! CARVE THE MEAT! WHERE’S MY SALT!?
So you want to hack and slash things to pieces. Well here’s a way to do it. The build focuses on Kriegs devastating melee damage to 1-3 hit pretty much everything (other than bosses)
Here’s the skill tree:

- Tips:
- avoid putting points into Krieg’s kill skills other than Fuel the Blood, which will increase the damage of your thrown axe after you get a melee kill. You won’t gain any benefit from the other skills while you’re rampaging.
- Practice your axe throwing skills, you’re going to need to master your axe throwing skills to take down flying enemies like buzzards and get kills to stay upright. Some enemies like to run away, hitting them with your thrown buzz axe will make them stumble so you can catch them.
- Your Buzz Axe Rampage damage isn’t boosted by your guns melee damage (if it has a blade attached) but it is by other items. Your melee damage can be boosted by guns when you’re not rampaging.
- Don’t discount your weapons, you will still need them to get yourself back up when you go down which will happen occasionally -usually when you miss the timing of Release the Beast.
- You’re better off going down than prematurely using Buzz Axe Rampage (due to the reasonably long cooldown that will start if you use it too early). Wait until you’re sure it’s ready. There are 3 ways to tell if Release the Beast is ready: listen for Krieg to tell you when it’s ready, there should be a red exclamation mark on the right-hand side of the health bar and the health icon on the left-hand side of the bar should be shaking like crazy.
- When Krieg has Release the Best unlocked, the first attack that puts you into critical health can’t kill you -this is a mechanic designed to give players an opportunity to activate his Release the Beast skill. The next attack however will put you down and this can happen quickly.
- When you lose your last hit point and while you’re still entering Fight For Your Life you can still swing your axe to deal damage before you pull your guns out and are actually in Fight For Your Life. So keep swinging!
- I don’t worry about lighting myself on fire for the max %100 ‘Pain is Power’ damage, %50 is good enough. If you wanted the %100 you could move 5 points from Fuel is Fire to ‘Burn, Baby, Burn’ and keep a fire weapon handy.
- Avoid things that heal you. You don’t want to miss out on Release the Best because you accidentally healed right before you activated Buzz Axe Rampage.
- Suggested items:
- I’m using a roid shield and a +melee damage relic. Just use whatever shield offers you the most roid damage and don’t worry about any of the other stats. A good purple can give you more damage than the Seraph -Pun-chee.
- I’m not recommending the Love Thumper. I admit, the Love Thumper is ok for solo play at lower levels but it’s no good for higher levels as the enemies will recover health quicker than the blasts can hurt them. Also, it’s no good for co-op play as the explosion will hurt your team mates (unless this is what you want to do, then troll away).
- You could use a Rough Rider shield and +health relic for increased tankiness
- an Unkempt Harold works well with this build (tired of recommending it but it is a good gun). If you’re tired of the Unkempt Harold and want to use something else, look for weapons with good burst damage (I don’t mean DAHL, I mean something that’ll get you a quick kill to get you back on your feet).
- I also use Tediore guns as you can afford to burn ammo quickly when you’re up as you spend more time in your ult than shooting things with your gun -also it’s good practice for axe throwing.
- you’ll still need something to slag, doesn’t matter what.
- I’m using a Legendary Sickle Class Mod which is why I’ve gone into the bloodborn tree for the extra 50% damage. If you don’t have this you can use the blue/purple Sickle Class Mod
- use a high damage explosive grenade like the Fast Ball.
- Problems with this build:
- Krieg’s biggest threat is himself. His biggest weakness is when he starts bashing himself in the head (negative impact of silence the voices). His self harming behaviour hurts him, cancels his attack and leaves him open to enemy attacks. It also may prevent you from getting a kill that would heal you and keep you going. However, the damage bonus from Silence the Voices is just too good to pass up. There’s no skill called Counselling, so you’re just going to have to accept Krieg the way he is if you the massive damage this skill offers… mental health issues and all.
- Miss timing on Release the Beast will place you in a very vulnerable position -on one hand it could place your Buzz Axe Rampage on cooldown (so you can’t tap into your main strength) and it’ll likely put you into fight for your life.
- It will become harder to time your Release the Beast and survive as you start to progress through the Over Power levels and enemies chunk more health. To deal with this you can either max out your damage as much as you can so you can kill things as quickly as they’re killing you; or you can increase your survivability (i.e. use the roughrider and +health relic) so you can live longer.
Video Guide:
Krieg – Melee Psycho (Hellborn/Tank)
YOU’LL NEVER KILL MEEEEEE!!!
This is a melee build for Krieg that focuses on his tankiness. He’ll still have decent power behind him, not as much as he could but he’ll benefit from a lot more damage reduction. He won’t mind hitting himself in the face and will surely outlast his opponent
Here’s the skill tree:

- Tips:
- Hellfire Helitosis is a fairly useless skill, you’d be better off without it (and will be able to melee whenever you want without having to activate it first. I just like the gimmick. But it does give you a chance to ignite yourself and therefore grant your skills ‘on fire’ bonuses.
- I haven’t extended the duration of Buzz Axe Rampage as there isn’t much risk involved in trying to time Unlease the Beast because the damage reduction will slow how quickly you lose your health. It also means that you can trigger Unleash the Beast often to keep topping up your health and gain a moment of invulnerability.
- Avoid healing skills (like Elemental Empathy) as skills like these may cause you to miss out on Unleash the Beast as your health is no longer low enough. Getting a kill with Krieg’s action skill will heal him to full. 1 or 2 points in Thrill of the Kill will give you an alternative healing source when not rampaging.
- If your health is dropping quicker than the duration of Buzz Axe Rampage, then you may want to be so reckless about how much damage your taking until the duration runs out (run, dodge, find cover). Once it runs out, you can reactivate Unleash the Beast to fill your health bar and go savage for another round.
- There is a point where your damage reduction maxes out. I haven’t experimented enough to find out when that point is… so I’ve piled on more damage reduction than i need.
- Suggested items:
- Maliwan/Elemental weapons – Casters are good, Tediore Weapons (as you can afford to burn ammo your ammo, but pick one with elemental damage), Hellfire, Florentine, Hornet, Infinity Pistol, Conference Call, Interfacer, Hail or Kitten.
- for shield I’m using a Rough Rider for the extra 20% damage reduction
- a +max health or +resistances relic
- any grenade but avoid transfusion
- Sickle, Toast or Legendary Sickle Class Mod
- Problems with this build:
- You’ll be more vulnerable while your Buzz Axe Rampage is on cooldown.
- Your damage will not be as good as it could be so fights will last longer (safer, but longer).
- I haven’t played OP 8 with this character so I don’t know how well he tanks at the highest levels
- You better get good at throwing your axe, because you’re going to using it to blow up buzzards and other things.
Video Guide:
Maya – Bind and Reap
What goes up, must come down but it might not get back up again
This build allows you to pick up enemies (6 second cooldown) and melt their faces with boosts to fire rate and gun damage.
Here’s the skill tree
‘

- Tips:
- when using your Phaselock ability, don’t kill the trapped enemy too quickly so you can continue to benefit from Wreck (fire rate and gun damage) and Chain Reaction (40% chance for bullets that hit an enemy to rebound towards another) while Phaselock is active. Instead, shoot at other enemies then finish off the Phaselocked enemy just before it’s released.
- Weapons with larger magazine sizes tend to take longer to reload but you can reload them while your Phaselock ability is cooling down so your guns are prepped for the next time you use your ability.
- Res is only useful if you’re playing co-op.
- Suggested items:
- Weapons with larger clips work better with this build as you don’t loose damage output reloading while Phaselock is active. Avoid using snipers as this build consumes ammo like a badass midget consumes drinks at a bar.
- I pretty much used the Miss Moxi’s Good Touch the whole way through -I’ve settled with one that has an extended magazine.
- The Lyuda works well enough but be careful as you can’t carry much sniper ammo and you’ll spend this very quickly.
- The Gub, the Tattler, even the Caranage (because of it’s AoE radius) work well enough (these are guns that are usually lacking damage in any other build).
- You will want a Legendary Binder Class Mod, but a Binder, Cat or Fox Mod will work if you’re still levelling up.
- the shield you choose doesn’t really matter. I’m using an Evolution. A Bee shield will grant you extra damage, which is it’s purpose as an amp shield.
- It doesn’t really matter what grenade you use -i’m barely using a Pandemic, i just haven’t found anything better yet.
- Problems with this build
- The build will consume a lot of ammo but as long as you have a slag weapon and 3 offensive guns, you should be fine.
- Your Phaselock can’t pick up larger enemies so you won’t be able to gain the large increase to damage and fire rate bonus when versing larger units like constructors or buzzards unless there are smaller enemies around. Another point to this, is that i’m recommending guns that don’t usually deal much damage but work because of the Phaselock bonuses; so you may want to consider having a more powerful weapon (like the Lyuda, Invader or Unkempt Harold) to deal with these enemies.
Video Guide:
Maya – Fierce Cat
“Oh my god, she’s armed with some kind of SMG. She’s a siren warrior.”
I always wondered what the Sandhawk build was about… This is it. This build uses the Cat class mods which increase your sub-machine gun damage, boosts +damage skills but reduces your SMG accuracy.
Here’s the skill tree:

Tips:
- There’s 5 points in my proposed skill tree (which I put into Inertia) which could go anywhere. I picked Inertia to minimise wasted time reloading while I have someone Phaselocked.
- Kinetic Reflection is not needed if you’re using a Bee shield as you’re trying to avoid all damage, therefore you don’t need +50% damage reduction to tank damage.
- Wreck provides a big boost to damage because of the combined +fire rate and +gun damage but is only active while you have an enemy Phaselocked. Target things other than the Phaselocked baddie to make the damage boost last longer. Ruin can group baddies up under your Phaselocked target to make this more efficient (‘clear what’s below then pop the bubble’).
- It goes without saying, but aim for critical hits.
Suggested items
- The build is based around SMG’s. I levelled up using the Emperor SMG. It melted most things (with the Bee shield). The Sandhawk is a stronger pick when using the bee shield because it fires 24 projectiles per a burst (18 more than the Emperor) and the Bee Shield’s amp damage applies to each one.
- as this is a DPS build, the Bee shield is the best choice.
- Choice of grenade doesn’t matter. I’m using a Magic Missile to slag things.
- Use a +SMG damage relic
- Any Cat class mod. Legendary Cat Class mod for end game.
Problem’s with this build:
- This is a a fairly good all round build but is less effective in situations where you can’t channel Phaselock.
- The Sandhawk will chew through ammo a bit quicker than other SMG varieties. Loot containers to top up your ammo and carry a spare weapon.
Video Guide:
Check back later
Maya – Fleet/Banshee
“No time to waste. Let’s get moving quickly”
This build is designed around the Banshee Class Mod and Rough Rider Shield to make the Siren run as fast as she can (The Fleet skill increases movement speed while Maya’s shields are down and the Rough Rider’s shields are always down). It’s a good build for speed runs and farming
Here’s the skill tree:
This build really only needs Fleet. The other points can be placed anywhere you like

Tips:
- Consider using another Siren build and switching to a Banshee class mod and Rough Rider shield when you want to gain the Fleet Siren’s speed boost.
- Phaselock an enemy and kill it as quickly as possible to trigger Sweet Release for healing. Keep moving if you don’t need healing to make the “life orbs” chase you. Stop moving when you need the life orbs to catch you.
- Phaselock will deal more damage (from multiple Helios and Ruin explosions) and generate more health orbs if you can keep killing sub-sequenced targets before your Action Ability runs out. This may mean weakening targets before your phaselock grabs them.
- Throw a transfusion grenade when your Action Ability runs out to keep the life orbs coming while phaselock recharges. It won’t take long to recharge before you can use it again.
- Run away if you get slagged or start to take too much damage while your Phaselock is cooling down but be careful not to do this while you’re ignited or corroded. You don’t want to enter Fight for your Life after you’ve moved too far from everything you need to kill to get back up.
- Skorn is not a good ability for Fleet Sirens as you run faster than Skorn’s slag orb and you can slag yourself with the orb it if cast Skorn while running forward.
- You can use ‘True Vault Hunter Mode’ to farm level 50 mods. A level 50 Banshee Mod is better than a level 72 Banshee Mod as higher level mods subtract more maximum health and the build doesn’t benefit from +shield recharge rate.
- I tried this build with 11 points in Backdraft and a Love Thumper Shield -it does not deal enough damage to work (but could be fun for early levels).
Suggested items
- Any weapon that can burst a high amount of damage in a short amount of time and doesn’t have a big reload. Don’t invest too much into fire weapons as they will make Helios and Immolate redundant.
- This build needs a Rough Rider shield. Easily farmed off the Bulwark (Sir Hammerlock DLC)
- A transfusion type grenade mod to sustain healing between your action skill cooldown.
- a +max health relic (you will die too quickly without this)
Problem’s with this build:
- This build works for guerrilla tactic fights and not as good for boss fights.
- Fire elemental damage is good against flesh – that’s you without shield protection. Prioritise eliminating enemies dishing out fire damage (after getting rid of the slagging enemies of course)
- This build only heals through combat (and Dr Zed Vendors). It’s risky trying to recover health when you’re already low. I was initially using Sustenance to counter this but then got rid of it because it wasn’t have a big impact. Try to finish your final enemy with a Phaselock of transfusion grenade or leave any health pack pick-ups for after the fight.
Video Guide:
Check back later
Maya – Elating Nurse [Co-Op]
If looks could heal
How the build works
Your friends will be happy to have you in their team looking after them with this build. The build is all about support, your ults will mind control things that then taunt and tank enemy damage, you and your team will regenerate %10 of your max health per a second while you have an enemy Phaselocked, you can shoot team mates to heal them, you focus on slagging things so they don’t have to, and you can revive from distances with your action ability.
Here’s the skill tree:

- Tips:
- Weapons with a fast fire rate, a little bit of spread, or cause area effect damage will make it easier to hit your team mates to heal them when they’re running around erratically.
- Enemies will focus their attention on targets under the influence of Thoughtlock (bottom skill in the left/Motion tree).
- This build is good for players who want to support inexperienced players, or for inexperienced players to feel like they are contributing (you are!).
- Recommended items:
- a couple of items to slag with -doesn’t matter what as long as it has a good chance to slag and you can sustain the ammo
- The build is not weapon specific but probably works better with larger clips and/or higher fire rate weapons.
- I found the Invader with +crit damage was handy for dealing damage when i was playing on my own. I’ve also used the The Hellfire and Hornet which were effective enough.
- The Legendary Nurse Mod will give you the best stats. If you don’t have this you could use a Matriarch, Cleric or Nurse(basic) Class Mod. If levelling up solo, you may even want to consider using a Cat class mod to increase your damage.
- Transfusion or slag grenades will give you more support utility. I’m using the Magic Missile.
- Your shield doesn’t matter but you could use a Bee Shield to boost your damage if you’re good at staying out of the combat, any form of the adaptive shield to increase your survivability (i.e. Evolution), or Antagonist to compliment your Kinetic Reflection ability.
- Problems with this build:
- The builds damage was good enough to solo level to 72 and pull your weight in multiplayer but this build’s damage was not fantastic.
- It can be annoying when a mind controlled enemies reset because there’s nothing for them to fight.
- It’s harder to drill damage into a mind controlled enemy that’s moving around than one that’s being held still
- If this is your only character and you can’t be bothered levelling another up, you could find yourself quitting Borderlands 2 when your friends do (or you could simply respec it to try something else you can do on your own).
Video Guide:
Maya – Vampire
“While others wither, I grow stronger”
There’s some seemingly useless skills in Borderlands 2, but even those skills can become useful when paired with another. Recompense and Blight Pheonix are pretty bad skills on their own, but when you pair them with Life Tap you get a Vampiric Siren. Just kill something to activate Life Tap and then hurt your enemies to heal.
Here’s the skill tree:

Tips:
- You should use class modsthat increase Life Tap to get the most out of this build.
- Alternate between Phaselock and Skorn to slag without needing to switch to slag weapon or use grenades.
- Avoid weapons with long reload times or that need to be reloaded too frequently as this is when you’re most vulnerable of getting knocked down.
- Blight Pheonix will be useless if you’re not getting up close to your target. Some points in Fleet will help with this.
- Be very careful when recovering from Fight for your Life as you will revive with no shields and low health. You will recover with your kill skills active so you can be aggressive to steal health or seek cover until you have a plan/opportunity to engage.
- If you’re not able to chain a kill before your kill skills deactivate, you may need to consider upgrading your weapons or using something to sustain your health until you can get your next kill (i.e. Elated or transfusion grenades).
- The pulsing noise Life Tap emits was annoying at first, but you get used to it. It’s far less annoying when you consider it a useful audial way to tell when your kill skills end (when it stops emitting noise). You’re safer when it’s pulsing.
- Trickster class mods can increase your Life Tap and Kinetic Reflection. If you can boost your Kinetic Reflection to 10 points you will gain 100% damage reduction and bullet reflection -making you bullet proof until the kill skill wears off.
Suggested items
- This build even works well with less popular guns like Sledges Shotgun and the Infinity Pistol. You can use just about anything, however I’ve found the Moxxi weapons don’t add much to the already decent life steal.
- A Rough Rider Shield for the damage reduction and extra health.
- a transfusion type grenade (to top up health when Life Tap isn’t active (i.e. start of a fight, against constructors or something else you can’t kill within 7 seconds)
- A +max health relic as this gives more room for your health to fluctuate. You may find you’re going down too often without this.
- A class mod that increases your Life Tap skill. I preferred the Trickster variant but a matriarch or cleric(Tiny Tina DLC) can also work.
Problem’s with this build:
- Not good against bosses (that don’t have minions)
- No other serious concerns.
Video Guide:
To be added soon
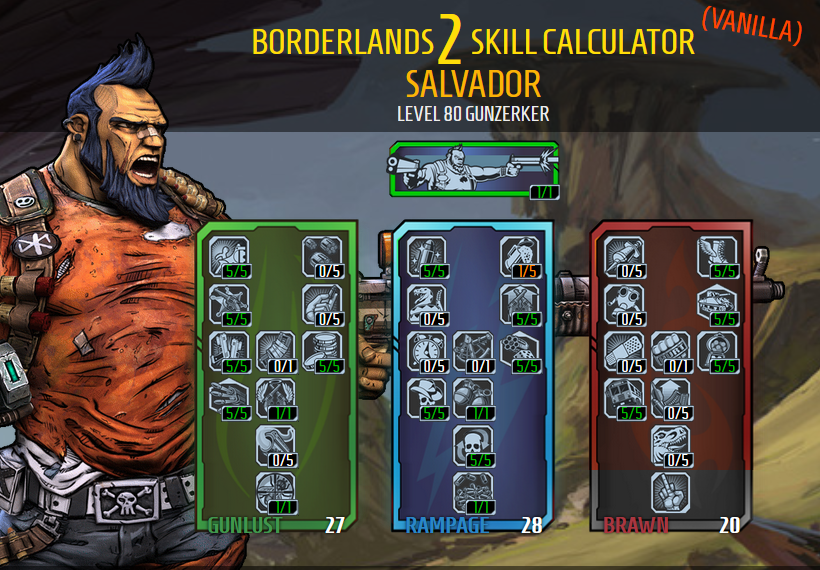
Salvador – Solo OP10 Gunzerker (My Main)
True love is a Lady Fist
This one became my favourite build. It’s what i used to solo OP10, farm all my high level gear and rush other people through Digistruct Keep. This build was based around the Lady Fist and the No Kill Like Overkill skill. I used a non-elemental Lady Fist in one hand and a slag Lady Fist in the other. Just aim for the crit zones which will be easy enough to hit with these beauties. Once you get a kill the excess damage will be added to the gun and further multiplied by the Lady Fists +800 Crit damage causing your damage to sky rocket. Your damage will continue to increase with each kill but it’ll only take 1-2 kills before you start one hitting stuff (as long as you don’t kill things with body shots).
Here’s the skill tree:
Up to Level 72:
Level 80:

- Tips
- Hyperion weapons are good for Gunzerking as they increase accuracy while holding down the trigger. This makes them accurate when shooting from the hip.
- If you want to use Sub Machine Guns, just move the 5 points from I’m Your Huckleberry to something else -perhaps to All in the Reflexes for increased reload speed.
- you can use a Grog Nozzle instead of a slag Lady Fist for crazy health sustain and blinding particle effects. If you didn’t get a Grog Nozzle drop from the Loot Hunt event you will only be able to get one through mods or other players. If you want to have one legit, you can have one as a mission item but only while the ‘The Beard Makes the Man’ mission is active. However, this means you will lose access to the gun if you join other players who do not have the mission active.
- When using the Lady Fist, focus on killing a weaker enemy to gain bonus damage from No Kill Like Overkill then turn the bonus damage onto something bigger. Chain this enough times and you’ll be one-shooting enemies.
- When playing in groups you will need I’m Ready Already as the other players will be killing enemies preventing you from extending your gunzerking duration.
- Suggested Items:
- Guns like the Unkempt Harold, Grog Nozzle (for healing), Lady Fist and eridium rocket launchers that have a chance to consumer reduced ammo. I’ve also tried duel wielding B|tches SMG (i didn’t name the gun this)-it works OK but it’s not nearly as powerful and drains more ammo.
- with the new DLC, I’d reccommend using a lightning type grenade to help break shields. Implosion grenades are good for grouping and nuking enemies, so the Quaser grenade is perfect as it does both.
- the build works with a Legendary Hoarder Class mod. I’ve kept a point in Filled to the Brim for the mod.
- Look for relics that will give bonus damage or survivability.
- an Adaptive shield will give you more survivability. I’m using an Antagonist. A Bee shield will give your more damage and compliment the Lady Fist.
Problems with this Build
The Lady Fists only work well against enemies with crit zones; so use the Unkempt Harolds or something else on the creatures that don’t have weak spots. Also, getting the right Lady Fists can be annoying. Here’s how you can do it. If you have some friends that are willing to give you their Lady Fist, you can do it together to try and get both in one hit (friends could even make fresh characters just to complete the quest and gain a reward). If you’re doing it solo you’ll have to reset your play through after you get the first one to do the mission again. This means you’ll have to work your way through the pretty much all of the story missions again -*sigh*. The next bit can make it easier but it’s an exploit -so if you don’t want to do this then i suggest you finish reading this section here. Here’s how it works: if you don’t like the element on the reward you’ve received you can Alt+F4 out of the game (after accepting the reward but before your game saves) to lose progress so you can try turning it in again for a different roll on it’s stats.
Videos
Build:
[link]
OP10 Gameplay Footage:
[link]
Lady Fists taking down Tinder Snowflake on OP10:
[link]
Salvador – Zippy Beserker
This Gunzerker has had too much coffee
This build was based around the gunzerker’s ability to move quickly. It’s quite satisfying leaving your friends in the dust with Salvador’s athletic ability -watch his little legs go! but wait, there’s more! The build also hypes up his attack speed which allows you to melt enemies with an almost endless barrage of bullets.
Here’s the skill tree:

- Tips:
- When levelling up, you may want to invest into the gunzerker’s health regen abilities (Ain’t Got Time to Bleed and Sexual Tyrranosaurus). You can take these points from All Out of Bubblegum and Just Got Real as your damage is less important at earlier levels. You won’t need the health regen when you have the Grog Nozzle
- You won’t loose the attack speed bonus from Keep Firing if you choose to manually reload your guns as long as you keep holding the trigger down while you push your reload key.
- Suggested items:
- Lyuda/Lydmila -comes with %125 crit chance but can be found with %145.
- Grog Nozzle (to get this, you need to have Tiny Tina’s DLC or have participated in the Loot Hunt community event)
- Unkempt Harold or other gun with a high base damage output for enemies without crit zones
- The build can utilise rocket launchers with high clips well enough. look for a consumes reduced ammo eridium rocket launcher or Badaboom.
- this build can also use the Lady Fist
- I’m using a +health relic
- Legendary Berserker Class Mod, Beast Class Mod or Renegade Class Mod (Renegade is for pistols).
- Rough Rider Shield -this keeps All Out of Bubblegum active.
- I’m using an Explosive Fast Ball grenade -works well with Double Your Fun. Also works well for killing those annoying rabid stalkers quickly.
- Problem’s with this build:
- I have no problems with this build’s damage when i’m using the Lyuda but i have struggled to deal damage with most other guns so i’d say the build is pretty weapon based. The Lyuda works well because of it’s large base damage and crit damage; but it’s the large ammo clip that makes the gun work for this build as you can fire it for a very long time without reloading (because of the Inconceivable and 5 Shots or 6 skills). This is also a problem because the Lyuda has a very low chance to drop from Gettle in the Dust.
- The build probably struggles more when coming up against opponents without crit zones. I’ve been using an Unkempt Harold and the double thrown Fast Ball to manage these.
- This spec will let you pretty much stay in your ult as long as you’re shooting things; but going down during your ult will cancel it and put it on cooldown which will leave you vulnerable until it resets.
- Sometimes your weapon might glitch so that they don’t automatically reload and you’ll have to manually reload. This happens when you let go of the trigger after spending the guns last bullet because the game was waiting to see if you won the chance to add an extra bullet to the clip (5 Shots or 6) but you had to be holding the trigger to be successful. To avoid this glitch, don’t burst fire your weapons -hold your trigger down as much as possible.
- Farming the Lyuda can be a pain in the butt as Gettle doesn’t have a very good drop rate and sometimes drops it through the ground; but least you can try and score some tubby spiderants on the way. If you can’t get it, or can’t be bothered getting it you can use some other high damage weapon like an unkempt harold which is easier to farm.
Video Guide:
Zero – Contract Killer
“So many contracts / With automatic weapons / This will be a breeze“
This build uses the Cunning skill tree and the Sniping skill tree, but not for sniping -which makes things a lot easier.
Here’s the skill tree:

Tips:
- Rising Sh0t is considered useless by the wider community but it’s not with this build. Rising Sh0t is very effective with automatic weapons when you’re holding the trigger and consistently hitting your enemy.
- Use Decepti0n often, while active use Death Bl0ss0m to apply Death Mark to multiple enemies, recharge your shields, regen health and reload your gun.
- Ambush is not as useful when playing solo, you will get an increase in damage while Decepti0n is active but that boost will end as soon as you’re revealed. It’s more useful in co-operative play when enemies are attacking other players.
- Zero is a hero that’s based on skill. His damage comes from consistently getting critical hits.
- Use Death Mark on things you can’t slag
- In co-op games, use Decepti0n to trick enemies into targeting another player.
- Look for opportunities to use B0re. If you can get a kill just before you use Decepti0n you will gain movement speed from F0ll0w Thr0ugh (kill skill) and Innervate (augmentation for Decepti0n) which can help you reposition to line a couple of baddies up.
Suggested items
- Automatic Weapons. The B|tch SMG and Lady Fist work well because of their bonus critical hit damage.
- A Bee shield to maximise damage -will also compliment weapons like the B|tch and Lady Fist.
- A slag grenade can be handy to slag things while using Decepti0n or so you don’t have to swap weapons to slag -the Magic Missile is a good option for this. A transfusion grenade can also be helpful to replenish your health when needed -I’m using a Slag O-Negative.
- This build uses a Legendary Killer class mod. a Blue stalker class mod that has Rising Shot and Follow through is also a good option. I levelled up using ‘Spy’ class mods. I wasn’t fussed about the non-legendary killer class mods.
- A Cooldown reduction relic or a +gun damage relic. I’m using a Cooldown Reduction Relic.
Problem’s with this build:
- This is a strong build for Zero, the only weakness is Zero himself -his character is designed to dish out damage but not take it. Part of this, is Zero’s inability to heal himself if he takes damage.
P.S. I know a lot of you reading this will argue that zero can heal himself with a Grog Nozzle and tank just fine when using a melee build with Law and Order. I’d argue that’s the gun healing, not Zero
Video Guide:
To be added later
Zero – Killer Sniper
I have destroyed you / A deadly shot from nowhere / From my best sniper
This build is about using sniper rifles to hit crit zones to deal massive damage. The BOre Skill will help you locate the crit zones
Here’s the skill tree:

- Tips:
- Sniper Zero is a glass cannon build, The damage is worth it if you’re prepared for the trade backs. The build is simply better for Co-Op play so you have a friend who distract your enemies while you snipe them.
- Snipers with +crit damage generally deal more damage.
- Suggested Items:
- a good Jakobs sniper rifle with +crit will be good enough.
- The Lyuda (automatic snimper) is good for killing bosses and tougher units like constructors but will burn your ammo reserves.
- The Skullmasher’s pellet spread can help you hit your target consistently if you find you’re always a little bit off your target.
- The Hawkeye has amazing +crit damage but lower base damage so it’s only good against enemies with crit spots
- I’d highly recommend keeping a corrosive weapon handy to kill tougher/non crit enemies like Ultimate Badass Loaders. A Hornet is good for this.
- The build works with other weapons like the Striker shotgun, Maggie pistol and B|tch SMG (yes, that’s what’s it’s called). I would use these weapons when i became tired of sniping or was versing enemies that close in too quickly.
- As this build has no healing abilities, i used transfusion grenades to sustain health. A Leech is a good choice as it has a longer lasting effect.
- I’m using a Legendary Killer Class Mod on this guy but you could use a Sniper Class Mod if you don’t have one.
- A Bee shield and a +sniper damage relic will further increase your damage
- Some problems with this build:
- I gave up on this character as i felt his health was too weak and it was frustrating versing enemies that didn’t have crit spots or had crit spots that glitched out so you couldn’t hit them anymore (like the Badass Bikers). I managed the enemies without crit spots well enough by using weapons like the Hornet to take down some of the tougher enemies. There are some enemies that have crit spots but you can’t hit them when the enemy is facing you (which is nearly all of the time when playing solo). This build is easier to use in Co-op play where you have a team mate that can turn the enemies away from you so you can pick them off.
- This build does not have any health recovery abilities and he does not have a lot of toughness so you end up going down a lot. To manage this i used transfusion grenades to heal. Also, don’t panic when you go down, take your time and use ‘Fight for Your Life’ to your advantage.
- This build struggled in Tiny Tina’s DLC because there are a large number of enemies that close in on you quickly like charging orcs and flying skulls. You can deal with these enemies better by sniping from the hip or using other weapons like a SMG or shotgun.
Video Guide:
Zero – Skewing Ninja
“My sword is sharpened / I remain invisible / A true assassin”
This build was based around the assassin’s melee attack. I found it challenging levelling this guy up but it all became so much easier after you get to level 62 and can put points in both Death BL0ss0m (bottom mid/Cunning tree) and Many Must Fall (bottom right/Bloodshed tree). It’s a good build to try as it offers a very unique play style and there’s more thought involved -so you feel smarter 😛
Here’s the skill tree:

- Tips:
- Boost your melee damage as much as you can so that you can one-hit enemies with your Action Skill. Each successful kill will extend how long you can stay in your action ability but a failed attempt to assassinate a target will end your action skill.
- You can use your kunai (Death BL0ss0me) to weaken their health, apply Death Mark and try to slag your targets to make it easier to kill them with a melee attack. If you successfully kill a target with a melee attack while Decepti0n is active you’ll be able to use your kunai again. Try to use kunai as much as possible as it’s a good damage dealer, but try not to kill your targets with kunai as this won’t extend your action skill.
- You can damage yourself with kunai so time your attacks so you’re not striking the enemy when your kunai is exploding.
- Try to get critical hits with your melee attacks, you’ll be able to do this more consistently with practice.
- Throwing grenades does not break Decepti0n so you can use grenades to slag enemies while Decepti0n is active.
- Suggested items
- When i was levelling up i was using a Torgue shotgun with + melee damage
- higher level you’ll want a Captain Blades Rapier as it gives a massive +200% melee damage or Law pistol as it gives +100% melee damage.
- the ‘Law’ and ‘Order’ combination is for healing/tanking but a Grog Nozzle with +melee damage on is better for healing.
- you could use either a Legendary Ninja Class Mod (preferred) or a Legendary Hunter Class Mod would work if you altered the spec. If you don’t have one of these, you could use a Ninja Class Mod or an Infiltrator Class Mod.
- I’m using a relic that boosts my melee damage. A reduce cooldown relic would also work.
- A slag grenade is handy (as per tip above). slag: Transfusion, Bouncing betty or Homing Missile.
- You may want to keep a weapon handy to manage things you don’t want to get too close to (like constructors). a Lyuda, Maliwan Caster or a thrown-like-a-grenade Tediore will do the trick.
- Problem’s with this build:
- Levelling the character up wasn’t a fun experience but it was worth it in the end.
- Decepti0n seems to manage pretty much everything but some enemies will need a couple of attempts so you may spend a bit of time hiding and waiting for Decepti0n to cool down so you can have another go at the target. I didn’t mind this -the cooldown doesn’t take very long and the hiding and waiting just made the character play more like an assassin.
- Sometimes it was difficult to melee flying enemies -but my friends thought it was funny watching an assassin using Dashing Strike to chase them through the air. You will become better at timing your attacks against aerial units with practice.
- Last thing -for some reason i had difficulty versing Badass Psychos. I struggled to land kunai on them and dodge their attacks, but maybe this was just me not playing the character very well.
Video Guide:
Builds I Haven’t Finished Yet
other builds i’d like to try -but I may never finish these.
Character
Theme of build + (actual level of character)
- Axton
- done
- Gaige
- since Gaige is only good with bee shield. I’m making a build based around Fancy Mathematics (11 points) which gives the bee shield a very good charge. (level 61).
- Kreig
- elemental assault rifles as a primary weapon (Level 72 op2) will write guide
- RYE BREAD the Hybrid Melee Psycho (Level 36)
- Based on elemental shotguns
- Could do one based on the Slayer of Terramorphous Class Mod
- Maya
- Siren Base on Legendary Siren Class mod and Bee shield.
- Salvador
- Tediore weapons using the Legendary Hoarder class mod (level 61)
- build without gunzerking – I expect it to be crap but I will try it anyway (level 12)
- Health Tank using the Legendary Titan class mod
- Zero
- Sniper/Melee Combo -perhaps with the Legendary Hunter Class Mod with a focus on survivability (level 72 op2)
- based on Unf0rseen and Ambush (level 25)
Need Loot?
Here’s a list of farming locations to help you find equipment (non boss specific):
- Want more golden keys?: This is the website I use to find codes for golden keys for Borderlands 2 and Borderlands: The Pre-Sequel – [link]
- Loot midget farming in the Wildlife Exploitation Preserve: You have a gaurentted chance to find 4 loot midgets as long as you do not pick up a single echo recording when you have accepted the Doctor’s Orders mission (each echo recroding you pick up will reduce how many midgets you find by 1). You’ll find the midgets at the third echo location when you start to open some boxes in a small room (where they were keeping bloodwing captive before they moved her). Farming the loot midgets works better if you have the Natural Selection Annex DLC as you can enter this area and leave it again to create a save checkpoint further into the Wildlife Exploitation Preserve (so you don’t have to run the whole thing). Also, you can keep the Animal Rights mission active to reduce the number of enemies you fight on the way to the midgets.
- Loot midget farming in Sawtooth Cauldron: I’ve spent a lot of time farming loot midgets in Sawtooth Cauldron and usually find at least 2 loot midgets (sometimes 4-6). Just open every container you see. There are lots of containers so lots of chances to find midgets. I usually go straight ahead and clear the camp at the end, then i jump in the pit to the right and look around there. I usually find 1-2 at the camp at the end and 2-3 in the pit. I believe that there is a maximum number of loot midgets you can find in a map (as you start opening boxes with nothing in them -not even ammo) so stop looking and reset if you find 6. I did a run right before i wrote this. It took about 5 minutes on OP2. I found 1 midget up top and 3 down the bottom. 2 skins of the ancients and 2 orange weapons.
- Tubby farming: there is a small chance to find tubby creatures -fatter looking versions of their kind. Tubby’s have a good chance to drop valuable items. To farm tubby creatures you want to go somewhere where there are lots of beasts spawns (i.e. skags, spiderants, stalkers), scout the area out and hope you’re lucky. There are other tubby creatures (i.e. skeletons, rakks) but these are harder to find. When farming tubby varkids, there is a chance that a varkid will evolve into a tubby version but i didn’t see this happen very often when i was trying to spawn Vermivorous the invincible.
- Marcus Mercenary Day -Gifts [Requires DLC]: You can repeatedly kill the abominable snowman -Tinder Snowflake (His Abominableness Mr Tinder Snowflake, Esquire) then go back to town, wait for the train to come in and pull the level on the second carriage to open the presents sent by Marcus. You’ll get lots of random loot this way and some eridium, some purples and hopefully an orange.
- BNK3R: In the early days i farmed the BNK3R using a sniper Zero to kill it quickly using a sniper to get stacks while critting the eye. I later learnt about the bore glitch (this happened occasionally but at the time i didn’t know why it was happening -I later found the sweet spot with a shotgun) but i didn’t need bore to kill it quickly. The BNK3R is an easy boss to kill and it’ll drop a few purples each go with the additional (but low) chance to drop the Sham and B|tch SMG. After you kill the BNK3R, be sure to go up the stairs to open the hyperion box, then jump off to the level below to grab a red chest -I’ve got quite a few orange weapons out of this chest.
- Farming the Treasure of the Sands [Requires DLC] (Exploit): The final mission of Captain Scarlet and her Pirate Booty DLC, you will be able to kill a boss called the Leviathan and enter a vault with lots of treasure chests (and some of these have an increased chance to give high quality stuff). After you loot the treasre room, you’ll be able to accept another mission to repeat the last 2 missions of the DLC and loot it again. Here’s the kicker: if you don’t hand in the Treasure of the Sands mission, you’ll be able to keep accessing the Lair of the Leviathan, where you can do some shifty stuff to glitch your way back into the room so you can keep looting the chests inside. Here’s a video by BroCo Gaming showing you how to make this work:
- Farming the Rough Rider shield/Bulwark [Requires DLC]: a lot of builds are based around the Rough Rider shield. you can get this in Sir Hammerlock’s Big Game Hunt DLC in Hunter’s Grotto. As you play the DLC you’ll get a quest to hunt the Bulwark. You don’t need the quest to kill it again. You can find it here:
–
- Farming the Unkempt Harold/Savage Lee: Savage Lee can be found in several locations within Three Horns Divide. He has a chance to spawn around bullymongs. once killed he has a decent chance to drop an Unkempt Harold -a pistol with great damage.
this video by Aindo will show you how to speed farm it:
Other Notes
Soldier:
Duty Calls give damage benefits to Cannon Assault Rifles but not Tediore reloads
Grenade Damage bonuses affect Cannon Assault Rifles and Tediore reloads
Hyperion Snipers: Even with the gunzerker’s firing rate, Hyperion snipers did not do enough damage past level 60 (started to struggle to deal damage at level 50).
Template
“quote”
Here’s the skill tree:
Tips:
Suggested items
Problem’s with this build:
Video Guide: