
Overview
This guide lists all bosses including the secret ones, describing their attacks and a way to beat them. It also details Boss Rushes.
Introduction
This guide is intended to help players who might struggle with one of the many bosses of Iconoclasts. For the sake of consistency I decided to write strategies for all of them even if the strategy is obvious or the boss is easy to beat.
The Attacks section of each boss has the following structure:
Attack #
Move: What the attack does.
Signalling: How can you tell the attack is coming.
Evade: How to avoid getting hit.
The attacks are numbered and referred in Strategy section as A1 for Attack 1 etc. Strategy section describes how to defeat the boss. Since the controls are configurable, I refer to actions rather than buttons.

At some point of the game, you gain the ability to generate galvanized bombs/missiles, which you may be tempted to use instead of regular ones when fighting a boss. This is a bad idea against most bosses, either because they are not much more effective, less effective, or completley useless.
Any feedback or improvement suggestions are welcome, both for content and for language (since English is not my first language).
Boss 1 – Controller
Attacks
Attack 1 (phase 1)
Move: The boss rotates and bounces on a downward slope.
Signalling: The spines tremor on one side of the screen.
Evade: Run under the boss. Its first bounce is too low so wait for second or third.

Attack 2 (phase 1)
Move: The boss jumps up above the screen, then falls down.
Signalling: The spines tremor in the middle of the screen for jump up, then a warning sign for a fall down.
Evade: Run to the side then run away from the warning sign.
Attack 3 (phase 2)
Move: The boss rolls from one side to another. On Harder and Challenge Mode, it creates a flame shot upon hitting a wall.
Signalling: The boss spins in place.
Evade: Jump over the boss.
Strategy
Not much to it, dodge the attacks by jumping or ducking and shoot with your stun gun (or use any weapon in Boss Rush) until dead. Once you take about 45% of its health, the boss finishes its attack and begins phase 2.
Boss 2 – Kerthunk
Attacks
Attack 1 (phase 1)
Move: The boss shoots two flame shots from one of its cannons (only one in Relaxed and Standard Mode).
Signalling: The boss raises the cannon which will fire and lowers the other.
Evade: Run under the shots or stay on opposite side than they are firing (right cannon fires left and vice versa). You can also find a safe spot between the stinger and the opposite cannon, as in the screenshot above (crouching helps).

Attack 2 (phase 1)
Move: The boss fires its stinger upwards. Two arcing flame shots come from the point where the stinger hits the ceiling.
Signalling: The stinger flashes.
Evade: Run to side, but not too far from the stinger.
Attack 3 (phase 1)
Move: The boss spawns several controllers.
Signalling: The boss crouches a bit.
Evade: Destroy them all at once with stun gun charged shot. Mina also destroys some on her own.
Attack 4 (phase 2)
Move: The boss throws the platform you are standing on upwards, sending you on the spikes above.
Signalling: The boss crouches and warning sign appears.
Evade: Crouch when going upwards.
Attack 5 (phase 3)
Move: The boss spawns one controller.
Signalling: None.
Evade: Destroy it with stun gun. Mina might also destroy it.
Attack 6 (phase 3, only in Harder and Challenge Mode)
Move: The boss shoots a flame shot from one of its cannons.
Signalling: None.
Evade: Run under the shot or stay in a place safe from flame shots.
Strategy
During the first phase, wait until the boss does thrusting attack (A2), then twist the bolt on it. This reveals a weak point which is automatically shot by Mina. You need to do it three times, which depletes its first health bar.
In second phase, you don’t basically need to do anything except crouch since Mina shoots the boss everytime the platform falls down. You can speed up the process by shooting the head. It lasts until its third health bar is depleted.
In last phase, the “brain” is exposed. You can hurt it by shooting either horizontally or vertically, as long as it is roughly in your firing line. Mina hints at using the charged shot, but normal shot works as well.
Boss 3 – Kibuka
Attacks
Attack 1 (phase 1)
Move: The boss fires a bomb from its yellow cannon. The bomb explodes and creates two damaging waves.
Signalling: The boss puts yellow cannon forward and it flashes.
Evade: Jump over the waves or hit the boss with bomb before he fires.

Attack 2 (phase 1)
Move: The boss fires a missile from its red cannon. The missile fires a flame shot.
Signalling: The boss puts red cannon forward and it flashes with parry signal.
Evade: Parry the missile.
Attack 3 (phase 1)
Move: The boss fires three missiles from its red cannon. The missiles fire flame shots.
Signalling: Red cannon appears from underground.
Evade: Parry the missiles with wrench.
Attack 4 (phase 2)
Move: The boss fires two missiles from its red cannon. The missiles fire flame shots which last longer. On Harder and Challenge Mode, missiles also fire fireballs.
Signalling: The boss puts red cannon forward.
Evade: Parry the missiles with wrench.
Attack 5 (phase 2)
Move: The boss fires a bomb from its yellow cannon. The bomb quickly explodes and creates two damaging waves.
Signalling: The boss puts yellow cannon forward.
Evade: Jump over the waves.
Strategy
In the first phase, you need to direct the machine towards Royal’s blasts. It can be pushed back by parrying missiles it is shooting (A2) or by hitting it with bombs. Once the machine is hit by Royal’s blast, an exhaustion port is exposed so shoot a bomb into it. Repeat three times ; it will take around 5/6 of its first health bar, which it has four.
In the second phase, the machine stays on the ground, so just dodge the attacks and shoot it. Royal also helps with damaging it.
Boss 4 – 10-H Helicopter
Attacks
Attack 1 (phase 1)
Move: Tolo throws a bomb at you.
Signalling: Tolo raises his hand and parry signal appears.
Evade: Parry the bomb.

Attack 2 (phase 1)
Move: The helicopter does a strafing run.
Signalling: The helicopter leaves the screen and Tolo hides under one of the platform with a warning sign above his head.
Evade: Crouch under either platform.
Attack 3 (phase 2)
Move: The helicopter charges you with its blades. In Harder and Challenge Mode, it triggers flame shots.
Signalling: The helicopter lowers its nose.
Evade: Run to the right while dodging flame shots.
Attack 4 (phase 2)
Move: The helicopter fires a laser.
Signalling: An orb appears in front of the heli’s cannon.
Evade: Crouch in the niche between the cars.
Attack 5 (phase 2)
Move: The helicopter fires three bombs at you.
Signalling: Warning sign appears above the helicopter.
Evade: Stay to the right or jump above each bomb.
Strategy
During the first phase you face both the helicopter and Tolo. The heli cannot be damaged by any of your tools, only by Tolo’s bombs (A1), so parry them with wrench and they will be bounced up. When the heli leaves the screen, hide under one of the platforms to avoid a strafing run (A2).
In second phase, the helicopter either charges you or shoots at you. Crucial for defeating it is the small niche on the train. When the heli shoots bombs, you can stay to the right of the niche so the bombs fall into it. When the heli uses a laser, crouch into the niche to avoid it. In between attacks shoot the helicopter, which also pushes it back. The heli does not seem to charge all the way right, so except for the laser (A4) and the flame shots (A3) the right-hand end is a safe spot.
Boss 5 – Inti
Attacks
Attack 1 (phase 1)
Move: A fist smashes to the ground, creating two upward flame shots.
Signalling: The hand does several gestures then clenches into a fist, warning sign appears.
Evade: Stay to the side for the smash, then in the middle for the flame shots.

Attack 2 (phase 1)
Move: A lightning strikes towards you from the hand.
Signalling: The hand does several gestures then aims with two fingers, warning sign appears.
Evade: Avoid the spot where the fingers are pointing to.
Attack 3 (phase 1 and 2)
Move: The boss spawns several controllers.
Signalling: None.
Evade: Shoot the controllers.
Strategy
This is a tag-team fight where you control either Robin or Mina. Switch by going to the middle and press Interact. Mina controls a bit differently: to shoot, press Shoot and aiming line appears. Aim with arrow keys then press Shoot again to bring out the fireworks. If you hold Up before pressing Shoot, Mina will start aiming upwards. Instead of the wrench she has a melee attack (no spin, no aerian attack).
There is a sequence of tasks you need to do to damage the machine. First, with Mina, melee the switch with lightning symbol to the right. Light above it as well as on the wheel below the boss head will turn blue. Now, with Robin, twist the bolt as you did before the cutscene. This stuns the head. Lastly, with either of the characters, jump to the glowing red switch in either upper corner of the screen and melee it, which opens mouth of the boss. Switch again and shoot the weak point (mouth) with the shotgun or a bomb to do damage. You need to repeat all of this once more, depleting its first health bar. On second time the red switch you used is disabled, so use the other character. You will need to move the green platform in the middle, which can be done with the shotgun or a bomb.
The second part is simple dodge and shoot. Switch characters based on where the head is.
Boss 6 – Agent White
Attacks
Attack 1
Move: White quickly moves towards you with his hand raised, leaving red afterimages behind.
Signalling: White raises his hand, and white shockwave appears around him.
Evade: Jump over him as he approaches.

Attack 2
Move: White shoots lasers from his eyes then sweeps the ray, either upwards or downwards.
Signalling: White raises his hand, and several yellow explosion-like effects appear around him.
Evade: The sweep does not cover whole arc, so crouch during downward sweep and time a jump during upward sweep.
Strategy
This fight is simple, dodge and shoot. Once the agent has low health, he will begin to heal, but Mina feeds him her seeds. After several repeats, he is done.
Boss 7 – Hazard Armor
Attacks
Attack 1
Move: The boss shoots a laser, causing great damage.
Signalling: Small clouds appear around the gun the boss is holding, and you can hear a hissing sound.
Evade: Jump up or down to different level to lose the boss.

Strategy
Here you don’t damage the boss, but instead the glass cube Pontus is trapped in. It needs to be hit from sides with wrench and from above with stomp. Each of the three sides covers one third of the health bar, i.e. you have to damage all sides to win.
When the boss sees you, he will shoot with almost unavoidable laser shot. To prevent that, jump to the lower level and hide in one of the niches. If the boss didn’t manage to jump after you and see you hide, he will lose you and you can return to upper level (when his back is turned) and continue the demolition. Alternatively, when dropping down catch on the ledge and hang, which also causes the boss to lose track of Robin.
Boss 8 – Controller, Round 2
Attacks
Attack 1 (phase 1)
Move: The boss rolls on the ceiling, shooting down flame shots.
Signalling: Small clouds appear on the ground and the spines tremble, then the boss jumps to the ceiling.
Evade: Run to side, then avoid flame shots.

Attack 2 (phase 1)
Move: The boss jumps up then hangs on the ceiling.
Signalling: The spines tremble and create a small hill underneath you.
Evade: Run to side.
Attack 3 (phase 1)
Move: The boss jumps up then falls down.
Signalling: The spines form two waves going against each other.
Evade: Run to side.
Attack 4 (phase 1)
Move: The boss rolls towards you on upwards slope.
Signalling: The spines form a wave which corners you on one side.
Evade: Jump over the approaching boss. The boss will give out sparks right before ascending the slope, so delay the jump until this happens or you might get hit.
Attack 5 (phase 2)
Move: The boss creates a large explosion.
Signalling: One of the spines flashes red and a growing explosion area is shown.
Evade: Melee the flashing spine.
Strategy
This time, Mina deals with the wheel boss (see Inti strategy for her controls). First part is simple dodge and shoot and lasts until you take at least three shots on his second health bar. In the second phase, there is a tricky attack which is signalled by red flashing column and spreading explosion area. You need to melee the red column, which exposes the boss to your shotgun. Repeat and it will be defeated in no time.
Boss 9 – Carver
Attacks
Attack 1 (phase 1)
Move: The boss pushes its front towards you, then the back, then front again.
Signalling: The mining wheel flashes red and a warning sign appears.
Evade: Run away from the part that approaches you.

Attack 2 (phase 1)
Move: The boss circles around the arena quickly, spinning the mining wheel.
Signalling: Train horn is sounded and the bolts show lightning icon.
Evade: Charge yourself then ride the zipline.
Attack 3 (phase 1)
Move: The rear of the boss drops a controller which circles the arena floor/ceiling until destroyed.
Signalling: Warning sign appears above the rear.
Evade: Jump over the controller or destroy it.
Attack 4 (phase 1)
Move: The boss circles the arena slowly.
Signalling: None.
Evade: Move away counter-clockwise. When you have to go up, ride the zipline uncharged.
Attack 5 (phase 2)
Move: The boss grinds the mining wheel on the ground, creating flame shots.
Signalling: Warning sign appears above the boss.
Evade: Stay to the left since almost no shots go there.
Strategy
The weak point of this boss is the missing tooth on the mining wheel. If it is not exposed, you need to shoot the wheel (which rotates it) until it is.
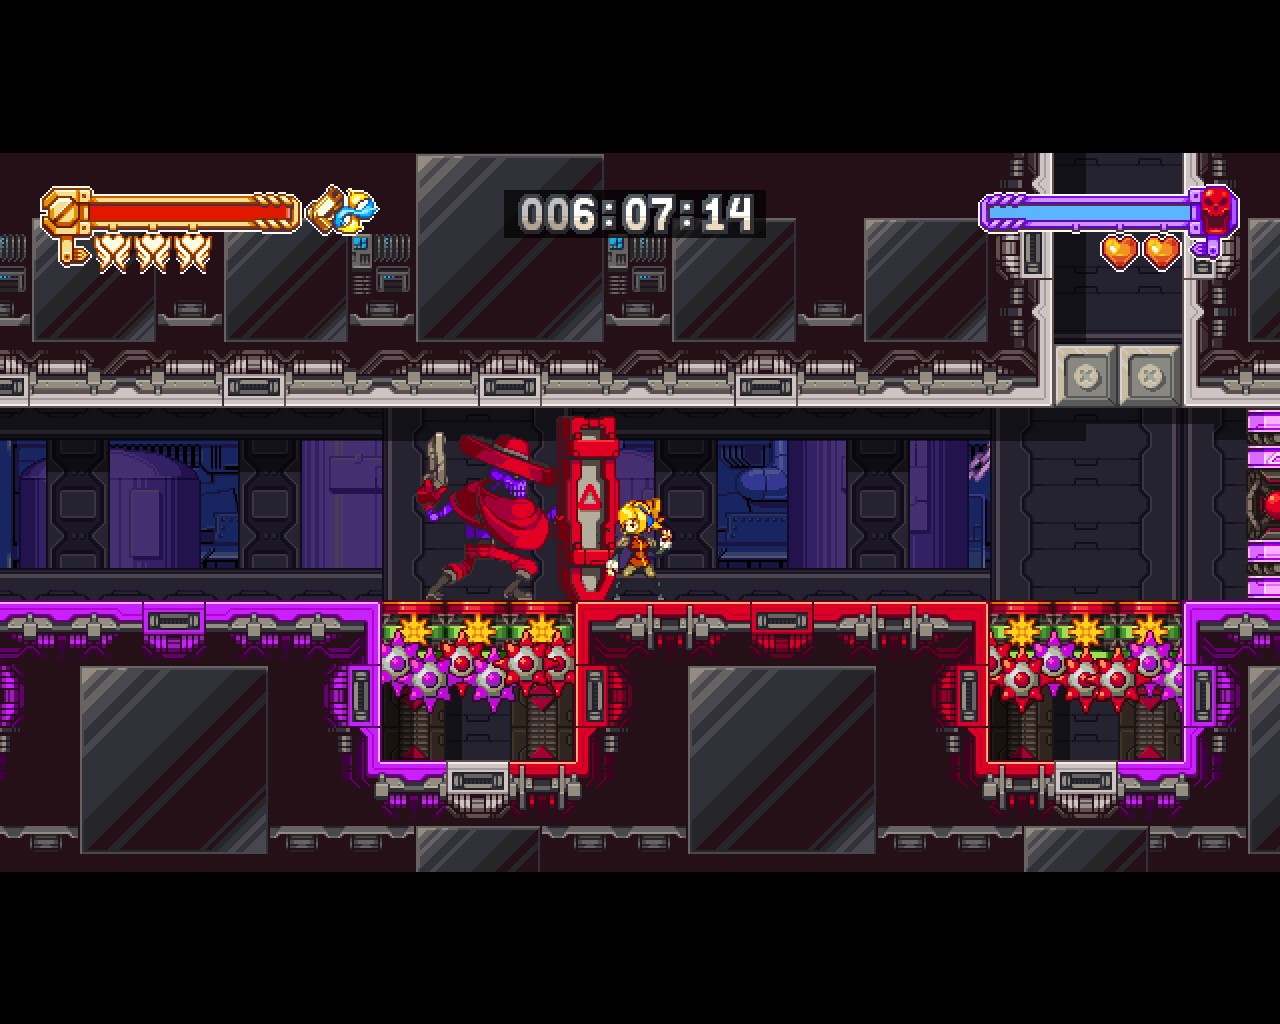
When the main body is destroyed, you still need to deal with the head. Elro can block the wheel with his sword. Once he does that, charge and ride the power line, which pushes the boss backwards. Sometimes the sword gets stuck in the ceiling after being dislodged from the wheel, so wrench it back down so Elro can use it again. Push the boss back enough times and it falls into a hole and crashes.
Boss 10 – Silver Watchman
Attacks
Attack 1 (round 1 and 2)
Move: The boss teleports in front of you, then slashes at you.
Signalling: None before the teleport, then warning sign and parry sign.
Evade: Parry the slash.

Attack 2 (round 1 and 2)
Move: The boss teleports behind you, then slashes at you.
Signalling: The boss raises his sword and warning sign appears.
Evade: Parry the slash. Stay next to the wall to have him teleport in front of you instead of behind.
Attack 3 (round 2)
Move: The boss slams his sword into the ground, creating fireballs (Harder and Challenge Mode) and damage waves.
Signalling: Warning sign appears (the boss usually does this one right after being hurt in round 2).
Evade: Jump over or run under the fireballs, jump over the damage waves.
Attack 4 (round 2)
Move: The boss slams his sword into the ground, creating fireballs (Harder and Challenge Mode) and triggering an explosion at your location.
Signalling: Warning sign appears, small pink waves appear under your feet.
Evade: Jump over or run under the fireballs, go to side to avoid explosion.
Attack 5 (round 3)
Move: The boss slams his sword into the elevator roof, creating two flame shots.
Signalling: The boss jumps up in the middle, Mina and Elro crouch.
Evade: Crouch.
Attack 6 (round 3)
Move: The boss slams his sword into the elevator roof on one side, creating one downward flame shot.
Signalling: The boss raises his sword, Mina and Elro run to the opposite side.
Evade: Run to the same side as Mina and Elro as close to wall as possible.
Strategy
Phases of this fight are separated. Generally, in the first two phases you need to parry the samurai’s attacks which flash green (A1 and A2), then attack with wrench to cause damage before the boss recovers the sword.
Note by an.awsome.person.99: Silver Watchman gets 3HKO’d by roller bomb shots in his second phase, but only if they hit his back. You can lure him next to a corner, then shoot a roller bomb on the wall and make sure you are on his opposite side when it hits him (don’t hit him with your wrench in the meanwhile).
In the third phase, you fight the samurai in an elevator. What you need to do is follow Elro and Mina who hide on one of the sides (A5) or duck down (A6). This way you dodge the attacks. Between them, shoot the samurai.
Boss 11 – Possessed Thunk
Attacks
Attack 1 (phase 1)
Move: Silver slashes at you repeatedly.
Signalling: None.
Evade: Run or jump over.

Attack 2 (phase 1)
Move: Silver jumps up and down diagonally towards you while rotating and slashing. In Harder and Challenge Mode, he creates fireballs at landing.
Signalling: Warning sign appears and Silver rises into the air and starts to rotate.
Evade: Run under Silver when he is at peak.
Attack 3 (phase 1)
Move: Silver creates a ball of energy and fires it at you.
Signalling: Warning sign, Silver focuses energy in front of him, then parry sign.
Evade: Parry the orb. Silver also parries it so you need to return it to him three times. Run as far as possible from Silver to improve your chances.
Attack 4 (phase 1)
Move: Silver creates damage waves. In Harder and Challenge Mode, he also shoots fireballs.
Signalling: Warning sign appears, Silver raises his sword and small pink waves appear under his feet.
Evade: Jump over the waves, jump over or run under the fireballs.
Attack 5 (phase 2)
Move: Possessed Thunk charges at you.
Signalling: Thunk, hanging on the ceiling, leaves the screen in the direction where he will arrive from.
Evade: Jump over or activate the generator in the middle to stun the boss with a lamp.
Strategy
In the beginning, the monster controls the samurai boss which slashes at you. Dodge and counterattack until the little white health bar above Silver is empty. Then, the robot exposes its brain to revive Silver: shoot the brain, preferably with a missile, which will affect the actual boss health bar. Repeat until you take three health bars from the boss.
In second phase, the samurai is discarded and the robot charges at you directly. Watch the ceiling to determine the direction. Now, the electricity generator in the middle comes into play. Activate it with wrench or a galvanized bomb and the lamps will light, which stuns the robot when he comes below. Hit it with bombs or preferably a missile. Avoid the robot by jumping and repeat the pattern, or just keep him stunned by re-charging the lights after you put a few shots on him.
Note by an.awsome.person.99: The second phase of the boss can be OHKO’d by a non-galvanized missile
Boss 12 – Omega Controller
Attacks
Attack 1
Move: The boss drops flame shots.
Signalling: None.
Evade: Avoid the flame shots.
Strategy
Before the actual fight, you just have to delay the boss with bombs while running away until you reach a dead end.
Then, try to avoid the boss’s attacks on the tricky ground and shoot it with any gun.
Note by an.awsome.person.99: Omega Controller gets OHKO’d by a galvanized missile.
Boss 13 – Ash
Attacks
Attack 1
Move: Ash grabs you, gives you a piece of advice then throws you to the ground.
Signalling: Alert sound, then sounds of quick footsteps.
Evade: Try to quickly hide.

Strategy
Now for something slightly different. Controlling both Mina and Robin, you need to use stealth to avoid detection from Ash. Mina is unable to hide in bushes (due to her smell), only in water ponds. Robin can hide even in bushes by crouching. If you are in the open too long, Ash will rush you and damage you. He is invisible, but you can see leaves rising and falling where he walks. When further away, there is also indication of his footsteps in the direction where he is walking. When you notice (based on the leaves) that his back is turned, shoot him which makes him change places. At the last bit of health, you need to cooperate between both characters. Ash always blocks the first hit now, but his back is exposed after that so have second character hidden nearby and finish him.
Note by an.awsome.person.99: Ash gets 2HKO’d by missiles. Each one takes a little more than half his health, so using 2 of them skips his shielding range.
Boss 14 – Blocker
Attacks
Attack 1
Move: The boss fires a volley of shots at you.
Signalling: The boss aims his weapon and warning sign appears.
Evade: Crouch or swap with the boss using Usurper charged shot.
Attack 2
Move: The boss fires a flame shot.
Signalling: The boss aims his weapon and parry sign appears.
Evade: Run away then parry the shot, or swap with the boss using Usurper charged shot.
Attack 3
Move: The boss fires a bomb.
Signalling: The boss aims his weapon.
Evade: Swap with the boss using Usurper charged shot.
Attack 4 (only in Harder and Challenge Mode)
Move: The boss fires two flame shots.
Signalling: The boss falls in some spikes.
Evade: Run to side.
Strategy
The Usurper and its charged shot is key to this fight. The boss keeps blocking all frontal attacks with a shield so you need to find a way to damage him from behind (or below). Before the boss starts using A3, simply swap with him using Usurper, turn around and hit him with wrench or shoot him before he turns around. Once he has less than one health bar and a half left, the boss turns too fast so you can’t hit him this way, but you can use his bombs and the spikes below to hurt him. Once the bomb lands on the green platform, stand next to it and swap with the boss. When the bomb blows up, it drops the boss on the spikes.
Note by an.awsome.person.99: Blocker is the easiest boss in the game because its hitbox is above the spikes when the fight starts. All you have to do is immediatly face left, crouch, and start spamming roller bomb shots.
Boss 15 – Agent Black
Attacks
Attack 1 (only in Standard and Harder Mode, and not in Boss Rush)
Move: Black grabs you and repeatedly smashes you to the ground, then summons several controllers.
Signalling: The screen flashes red.
Evade: The smash is impossible to evade, but never kills you. Shoot the controllers with Usurper.

Attack 2
Move: Black throws a punch at you.
Signalling: Black runs towards you then leans back.
Evade: Jump over the attack.
Attack 3
Move: Black smashes to the ground, creating two damage waves.
Signalling: Warning sign and grey clouds appear around Black who then jumps into air.
Evade: Jump over the waves or run away.
Attack 4
Move: Black throws a energy orb which goes straight then splits into several shots.
Signalling: Black raises her hand and warning sign appears.
Evade: Dodge the orb then stay out of the way of the shots.
Attack 5
Move: Black throws two shots which after a while create flame shots.
Signalling: Black runs to one side.
Evade: Dodge the flame shots.
Strategy
Agent Black has an attack which cannot be evaded (only present in Standard and Harder Mode, and not in Boss Rushes). Right after it, several Penance wheels are summoned so be sure to destroy them and collect hearts to refill your health. The Agent is very agile so try to match the speed and shoot the boss with Usurper standard fire (Note by Charly: Or bombs, which are easier to aim, though less effective).
Boss 16 – Mother
Attacks
Attack 1
Move: The cat jumps at you.
Signalling: The cat shakes its head, body and tail. Warning sign appears.
Evade: Run under the jump.

Attack 2
Move: The cat smashes its tail into the ground.
Signalling: The cat turns its back towards you and raises tail. Warning sign appears.
Evade: Run away.
Attack 3
Move: The cat fires flame shots at you.
Signalling: The cat moves its head back and forth then open its mouth. Warning sign appears.
Evade: Hang by one of the bolts in the arena or jump over each flame shot (tricky).
Attack 4
Move: The cat charges at you.
Signalling: Train horn is heard.
Evade: Hang by one of the bolts in the arena, then time a jump over the cat.
Attack 5
Move: Mother summons a small or medium rock then throws it at you.
Signalling: A blue flashing rock rises from the ground.
Evade: Avoid or shoot the rock (medium rocks are twice as resistant). Mina might also destroy it.
Attack 6
Move: Mother summons a big rock then throws it at you.
Signalling: A big rock rises from the ground.
Evade: Shoot the rock, preferably with stun gun charged shot.
Attack 7
Move: The cat smashes into the ground, creating two fireballs and two damage waves.
Signalling: The cat jumps up.
Evade: Jump over the waves, run under the fireballs.
Attack 8
Move: Mother reshapes the cat into a ball which rolls at you.
Signalling: The cat disassembles.
Evade: Shoot the ball with stun gun to keep it away.
Mother has animated concrete, stones and other stuff into a giant cat and is riding it. The cat’s head can be destroyed during A3 by 3 or 4 shots from Usurper. Don’t fire them too fast or you will overheat the weapon and won’t be able to use it for the next step, which is shooting a swapping charged Usurper shot at Mother. This throws Mother on the ground, where she is fed seeds by Mina. Avoid the cat’s attacks and do this pattern three times to win the fight.
Boss 17 – Mendeleev
Attacks
Attack 1
Move: The boss leaps across the screen, then bounces off the wall down to a platform.
Signalling: The boss jumps and hangs on a wall.
Evade: Stay on the level where the boss does not leap.

Attack 2
Move: The boss create two fire columns which move toward each other.
Signalling: The boss jumps above the screen.
Evade: Go to side and try not to get caught between the columns. If you do, stay in the middle of the columns. They do not touch, so you’re safe there.
Attack 3
Move: The boss slams you to the ground.
Signalling: The boss grabs you.
Evade: If you keep your distance, Mendeleev won’t use this attack; if you get grabbed, hit repeatedly the direction buttons.
Attack 4
Move: The boss throws two big white orbs.
Signalling: The boss jumps into air, hanging on the side of the screen.
Evade: Stay under the platform farther from the boss.
Attack 5
Move: The boss flies over the screen and drops flames.
Signalling: The boss jumps into air, hanging on the side of the screen.
Evade: Stay under either platform or stand on edge of one of the upper platforms.
Attack 6
Move: The boss jumps from one lower platform to the other, describing half a circle.
Signalling: None.
Evade: Jump.
Strategy
In control of Mina again. Mendeleev does not lose many hitpoints when on fire, but once she “puts herself out” (usually after finishing two of her attacks), Mina’s shots hurt her more and also knock her back. Use this to drop her into the electric currents for extra damage. The platforms move towards the center and vice versa periodically, so watch out or else you might be the one receiving electric shock.
Boss 18 – Nobel
Attacks
Attack 1
Move: The boss creates an orb which drags you towards its center.
Signalling: None.
Evade: Run away from the orb.

Attack 2
Move: The boss drops a bomb in a vent which creates electricity colums.
Signalling: None.
Evade: Avoid the columns.
Attack 3
Move: Drops orbs which stun you.
Signalling: None.
Evade: Run away from the orb.
Strategy
This fight is timed since the room is filled with gas. You have about 1 minute and 40 seconds before you suffocate. Nobel is invisible but you can see her shape or just follow her attacks. The attacks do not damage you but they slow you down or stop in place to prevent you from defeating Nobel. Your best shot to defeat this boss is bomb-activating one of the green platforms while Nobel is in its path which takes a large chunk of the boss’s health but also stuns her, allowing you to follow up with inflicting more damage using your gun.
Boss 19 – Lawrence
Attacks
Attack 1
Move: The boss throws a straight going knife with his left hand.
Signalling: Warning sign, the boss raises hand with knife (facing front).
Evade: Parry the knife.
Attack 2
Move: The boss throws a low knife with his right hand.
Signalling: Warning sign, the boss raises hand with knife (back turned).
Evade: Jump over the knife.
Attack 3
Move: The boss throws a slow going knife with his left hand.
Signalling: Warning sign, the boss raises hand with knife (facing front).
Evade: Parry the knife. If you are too early, try again immediately.
Attack 4
Move: The boss fires a volley of shots.
Signalling: Warning sign and the boss raises hand with gun.
Evade: Crouch.
Strategy
Elro has two attacks: swing (wrench button) and stab (fire button). Swing allows you to parry, whereas Lawrence is damaged only by stab. Walk towards him while avoiding the attacks. After hurting the boss, he punches you and returns you back to the left, so rinse and repeat. When he has only a little health left, a blizzard comes which slows you down.
Boss 20 – Agent Black, Round 2 and 3
Attacks
Attack 1
Move: Black fires missiles all around her.
Signalling: Brown shockwave appears around Black.
Evade: Dodge or parry the missiles.

Attack 2
Move: Black throws a punch at you
Signalling: Red star-shaped shockwave appears around Black.
Evade: Jump over.
Attack 3
Move: Black creates a horizontal column of electricity.
Signalling: Warning sign appears, screen flashes blue.
Evade: Jump at the right time or if possible, use a ladder.
Attack 4 (round 2)
Move: Black tears off a floor tile, damaging you if you are underneath.
Signalling: Brown grabs a floor tile.
Evade: Crawl to side.
Attack 5 (round 3)
Move: Black fires a missile diagonally.
Signalling: Black jumps into the air.
Evade: Dodge or parry the missile.
Strategy
During round 2, Black always heals so mostly focus on activating the elevator and damage the boss only to buy time. To turn on the power you first need to reveal the bolts by charging yourself and standing close to the power switch until the yellow platforms retract into the wall. Do this on all three floors. Now you need to quickly activate all the bolts, so lure Black away, switch floors and twist the bolt (Note by Charly: Or send an electric bomb). The switches deactivate after a while so be quick. Once all three lights in the background are green, run back to the elevator.
Round 3 is standard dodge and shoot, only when Black is down and prepares to heal, you need to feed her seeds by interacting with her. After a while she loses the ability to heal so finish her up.
Boss 21 – Agent Black, Round 4 and 5
Attacks
Attack 1 (round 4)
Move: The boss smashes its body against you.
Signalling: The boss shakes its hands.
Evade: Run all the way to the left to avoid damage. Jump before impact to avoid being stunned.
Attack 2 (round 4)
Move: The boss spawns seeds which slowly fall.
Signalling: The boss leans back, opens its mouth and throws up the seeds.
Evade: Shoot the seeds.
Attack 3 (round 4)
Move: The boss charges against you.
Signalling: The boss shakes its head.
Evade: Run all the way to the left to avoid damage.
Attack 4 (round 4)
Move: The boss spawns 4 nuts which either spawn plant enemies or explode.
Signalling: The boss shakes and seeds fall from its back. Nuts which bounce off the ground will explode on second bounce, the rest will spawn the plants.
Evade: Shoot the enemies, jump to avoid the explosions.
Attack 5 (round 4)
Move: The boss shoots pincers vertically from below the screen.
Signalling: The pincers appear below the arena.
Evade: There is always one pincer missing either on the right or left end. Run to the empty space.
Attack 6 (round 4)
Move: The boss shoots pincers horizontally from right to left.
Signalling: The pincers appear on the back of the boss. The first to shoot flashes red, the other two shake before shooting.
Evade: Jump over the lowest pincer. The topmost and middle pincers do not need to be dodged if you stand on the ground.
Attack 7 (round 5)
Move: The boss shoots one pincer vertically from below the elevator.
Signalling: The pincers appear below the elevator.
Evade: Run from where the pincer is.
Strategy
In round 4, the weakpoints on the boss are the purple blobs. The lowest one is easy to hit and accounts for around 2 health bars and a third, the middle (1 health bar) appears only during A3 and the highest (and also smallest, around 2/3 of a health bar) can be hit only during A1. Keep to the left and shoot the plants (A4) for health pickups.
Finally, when riding the elevator, avoid the seeds which drop from above and pincers (A7) from below. You have to shoot the boss at the head or the torso, so when it climbs higher than the elevator it requires you to jump and/or shoot diagonally.
Boss 22 – Starworm
Attacks
Attack 1
Move: The boss smashes one of His hands to the ground on a side then sweeps it across the screen.
Signalling: The boss raises one hand on a side.
Evade: Stay in the middle, then jump over the sweeping hand.

Attack 2
Move: The boss shoots several spines from the ground.
Signalling: The boss follows you with one hand. White bubbles rise from the ground.
Evade: Keep running, preferably first to one side then the next.
Attack 3
Move: The boss smashes His hands to the ground several times.
Signalling: The boss raises His hands on the sides.
Evade: Run under the hands when they are raised to avoid the smashes.
Attack 4
Move: The boss shoots blue orbs at you.
Signalling: The boss raises His right hand (left from your perspective) and blue orb appears in it.
Evade: Parry or avoid the orbs.
Attack 5
Move: The boss spawns a blue goo which jumps across the arena.
Signalling: The boss shakes His hands in front of His head.
Evade: Run under the goo.
Attack 6
Move: The boss spawns a possessed controller which rolls at you.
Signalling: Blue goo particles appears on the ground.
Evade: Shoot the controller.
Strategy
First phase takes place inside Robin’s head. You need to activate sunflowers while avoiding attacks to progress. In first part hit and repeatedly twist the bolt that is moving around. In second, charge yourself and stay close to the coils (doing one and then the other is easier). In third part, spin the two wheels. In the last part, just shoot the enemy or let it die. The dangerousness of the three first parts depend on your dialogue choices through the story (regarding respectively Elro, Mina and Royal).
In second phase you face the Starworm Himself. The weakpoint is the spot on His head. After you take almost three of His health bars, He put His hands on the weakpoint and a bolt appears on the right one (from your perspective) while He performs A4. Swing on the bolt three times, which will remove one of His hands and expose His weakpoint again.
Boss 23 – Bird
Attacks
Attack 1
Move: The boss stomps his foot, creating a flame shot.
Signalling: The boss raises a foot. Sometimes he taps the ground once before stomping.
Evade: Jump over the flameshot.

Attack 2
Move: The boss drops from above.
Signalling: The boss jumps above the screen.
Evade: Keep running and before the boss impact, jump to avoid being stunned.
Attack 3
Move: The boss smashes his wrench into the ground.
Signalling: The boss raises his wrench, warning sign appears.
Evade: Run away from the boss.
Attack 4
Move: The boss fires three blue flames.
Signalling: The boss is flashing blue and performs one of the three previous attacks.
Evade: Shoot the flames.
Attack 5
Move: The boss jumps at you.
Signalling: None.
Evade: Run under the jump.
Attack 6
Move: The boss summons a standard enemy to aid him (Rupto, Buckle, Croaktus or Ghosmo).
Signalling: The boss uses a remote control.
Evade: Defeat the enemy (use preferably usurper gun on Rupto and Ghosmo, bombs on Buckle and Croaktus).
Strategy
This is it: the final boss of Iconoclasts. Unfortunately, it is not that challenging. When the boss jumps above the screen, jump too before he drops back so you don’t get stunned. When the boss creates blue flames, shoot them because sometimes they drop health pickups.
Once you take almost two health bars from him, Bird uses his remote control to summon a ring of rocks. You need to destroy all of them before hurting him again. All rocks belong to the same type: either bright with yellow veins (to destroy with charged stun gun shot), or dark with a red net (to destroy with explosives). Boss Rushes feature dark-type rocks; in adventure mode, running away from Polro in the dream sequence (Starworm fight) will get you dark-type rocks too, contrary to hugging him.
When Bird goes has only one health bar left, he uses his remote control one last time, reviving Starworm. Starworm uses attacks A1 and A4 from previous section and can’t be hit anymore, while Bird keeps attacking. Brace yourself, dodge as well as you can, shoot Bird, and soon you will be done.
Also, in adventure mode you can get help from Mina, depending on the dialogue choices you made through the story. In that case, she shoots Bird on her own and is able to destroy dark-type rocks (although she’s rather bad at aiming at them). She seems to be only affected by Bird’s A1 (which she usually evades) and A3; when hit, she kneels down for a few seconds. Also, be careful not to have her on the way of your bombs: it might explode at her instead of your target, which will affect her the same way.
Secret Boss 1 – Fitzroy
Attacks
Attack 1 (phase 0, 1 and 2)
Move: The boss summons a hand from below.
Signalling: The boss focuses and bubbles appear on the ground, following you.
Evade: Run away from the bubbles.

Attack 2 (phase 0, 1 and 2)
Move: The boss throws one or two stones at you.
Signalling: The stones appear above the boss, flashing blue, then red right before throwing.
Evade: Jump or run away.
Attack 3 (phase 1 and 2)
Move: The boss shoots two or four thorns at you.
Signalling: The thorns appear above the boss, flashing red.
Evade: Jump over.
Attack 4 (phase 1 and 2)
Move: The boss throws spinning thorns which hurt you upon touching the ground.
Signalling: The thorns fly away from the boss.
Evade: Don’t touch the ground where the thorns fall.
Attack 5 (phase 1 and 2)
Move: The boss shoots lasers at you.
Signalling: Two crosses fly from the boss.
Evade: Try to estimate where the crosses are aiming and avoid these spots.
Attack 6 (phase 2 and 3)
Move: A sphere circles the boss somewhat horizontally.
Signalling: The sphere comes to you from the background.
Evade: Don’t get caught in the air while the sphere is coming.
Strategy
This boss is unlocked by doing the Leticia sidequest and can be found at the bottom of Glass Strait. He isn’t as hard as he seems to be but the swimming back to him upon death can get annoying. You also need at least one Breathless tweak to make it there (two in Challenge mode).
Before the actual fight starts, you have to shoot Fitzroy to which he responds with A1 and A2.
Once he summons a big Ivory face, the battle’s on. Key to winning is focusing on avoiding his attacks and attacking only when safe. The part that can be damaged is the big face, but in the first phase only with bombs and missiles.
When the second health bar is depleted, the outer shell breaks and you can swap to Usurper (this is also where the boss starts with A6). Good opportunity to strike is during A5 (make sure to stay out of the lasers’ way).
Once you take around 20% of the last health bar, only brain remains. Watch out for sped up A6 and destroy the brain to finish the fight (Note by Charly: You can safely stand under the brain in the final phase).
Secret Boss 2 – Mother’s Corners
Attacks
Attack 1
Move: The boss slashes at you with her sword (both same attack).
Signalling: The boss runs towards you.
Evade: Jump over the boss.

Attack 2
Move: The boss jumps into air, then diagonally slashes toward you (both same attack).
Signalling: The boss does two smaller jumps before the highest one.
Evade: Jump up right before the boss hits or run under them before he slashes towards the ground.
Attack 3
Move: The boss hangs in the air, then smashes to the ground (blue stays, red follows with rolling slash sideways).
Signalling: The boss jumps up.
Evade: Run to side.
Attack 4
Move: The boss does a magic attack (blue shoots a ray, red shoots a slow moving blue orb).
Signalling: The boss focuses and warning sign appears above their head.
Evade: Jump over the orb. The ray needs to be parried with wrench (Alternative by Charly: crouch and the boss will shoot the ground instead).
Attack 5
Move: The boss throws her sword (sword of blue spins and bounces back to her, sword of red goes straight and gets stuck on the side).
Signalling: Warning sign above the boss’s head.
Evade: Jump over the sword.
Attack 6
Move: The boss jumps into the air then smashes into the ground which creates damage waves (blue can stun you but creates waves with shorter reach, red creates waves with long reach).
Signalling: The boss runs to the side and does one small jump, bouncing off a wall. She may also perform this attack from the middle of the arena, bouncing vertically.
Evade: Jump up before the smash so you don’t get stunned and open for slash (blue). Jump over the waves.
Attack 7 (phase 2)
Move: Both of the Corners team up for a large explosion attack.
Signalling: Both red and blue enter the arena and start jumping from a side.
Evade: Run to the opposite side. Jump up before the explosion so you don’t get stunned. Shoot flames that appear after the explosion.
Strategy
This boss is accessible after returning from Midway. The arena is found in Ferrier Shockwood. There are four notes on bodies of dead pupils which hint at its exact location.
There are two bosses: one with red attacks and one with blue. They have attacks that are very similar but not completely the same so be careful. For the first phase, you face only one of them while the other rests. When they switch, the new boss just stands for a while and strikes a pose so use this opportunity to get a few shots in. Watch out for blue boss’ A6 so you don’t get stunned and open to damage.
About 60% through the second health bar, the bosses enter phase 2. During A7 they join for a large explosion attack so run to opposite side, but before that you can shoot them a few times. Once you take around 20% of the last health bar, both of the bosses enter the arena so try to finish the battle as soon as possible.
Strategy by phantom_warrior:
If someone is interested in beating Corners super easy and quick, here’s what to do:
1. Equip 3 Tool Assist.
2. Start the battle and just get close to the Corners when they stay on the ground and SMASH THEIR SKULL WITH THE WRENCH FAST!
You will drain them so fast that even if they hit you the trade is more than worth it !
With a bit of good timing, the bosses will be left with less than half of their last bar while you can still be over 1/2.
Finish them up with the laser.
Boss Rush
Boss Rush is a mode where you fight bosses one after another in Harder Mode. You have access to all the weapons. In all modes except Lethal Rush you have three Iron Heart tweaks which repair as usual by damaging the bosses but if you lose health you cannot recover. In Lethal rush, you don’t have the tweaks. There are several lineups:
Light rush
Controller, Kerthunk, Chrome/Helicopter, Inti, Hazard Armor, Silver Round 2, Agent Black, Ivory Beast (Agent Black Rounds 4 and 5)
Heavy rush
Kibuka, Controller – Round 2, Possessed Thunk, Blocker, Carver, Mendeleev, Agent Black – Round 2, Mother, Starworm, Bird
Full rush
Controller, Kerthunk, Kibuka, Chrome/Helicopter, Inti, Hazard Armor, Controller – Round 2, Carver, Silver Round 2, Possessed Thunk, Blocker, Agent Black, Mother, Mendeleev, Agent Black – Round 2, Ivory Beast (Agent Black Rounds 4 and 5), Starworm, Bird (Lineup provided by Charly)
Lethal rush
Same as Full Rush (confirmed by Charly).
Glitch
In Heavy rush, Full rush and Lethal rush, there is a glitch that allows you to change the difficulty (v1.15). If you are in Full rush or Lethal rush, you have first to beat Controller and Kerthunk normally. Before Kibuka’s screen appears, start pressing left. You will leave the area and find the nearest statue from story mode. If you get back to Kibuka’s area at any point, the rush is resumed and you can’t evade it anymore.
If you use the statue to save and quit the game, you will be able to reload your rush at this point and set it to any difficulty mode. However, finishing it this way gets you the congratulations for finishing Light Rush.
You can also explore the map; a couple zones further you have to blow up some tricky rocks above you as shown in this video:The key to blow the first tricky set of rocks is to swap positions with the rooted Croaktus (Usurper charged shot) the closest possible to the rocks, and then bomb it. You can put a bomb on the upper left-hand corner of the second set of rocks (you can even jump there).
The map is more or less as in the end of the game and you can collect most chests and tweak schematics. There are a few obstacles though:
- entering lower part of the Dark Cave locks you, unless you first destroy all red blocks on the ladder leading to upper part
- entering Inti’s area locks you
- entering level 6B of the Tower leads you inside Silver’s second room; as a result, using West elevator above level 5B or upper elevator locks you
- entering Mother’s Corners hideout resumes the rush
- Leticia will only be found in the desert
Therefore, the tweaks you can’t get are Wavey beam (wall-crossing usurper shot), Featherweight (double jump) and Roulette (random effects). Unless you are in Lethal rush, you can pick 3 among the other ones and use them in the rush, but Mina is only affected by Iron Heart.
Acknowledgements
I unlocked the Mother’s Corner’s boss by following Tetracube‘s map.
Charly contributed to this guide by providing strategies or correcting the info about multiple bosses and providing Boss Rush lineups.
The glitch in Boss Rush was described
by Ktássio.
thEXP described how to escape from Mendeleev after she grabs you.
an.awsome.person.99 provided tips for several bosses. The credit for these tips should also go to the website [link]
iriyap recommended phantom_warrior‘s strategy for Mother’s Corners
Version history
1.0 (02/08/2018): Initial version
1.1 (08/10/2019): Added screenshots, corrected information about Mother’s Corners.
1.11 (10/10/2019): Added information about Boss Rush.
1.15 (16/10/2019): Added various corrections to the boss fight descriptions.
1.16 (23/10/2019): Added a few corrections to the boss fight descriptions.
1.17 (25/10/2019): Added information about difficulty modes and the Boss Rush glitch.
1.18 (29/10/2019): Added information about map exploration in the Boss Rush glitch.
1.19 (07/12/2019): Corrected information about Mendeleev.
1.20 (05/07/2020): Added tips from commenters.
1.21 (26/07/2020): Added some info about fight phases and health bars.
1.22 (29/07/2020): Added some info about fight phases and health bars for most regular bosses.
1.23 (01/08/2020): Completed the introduction with some info about health bars and precised information about secret bosses.
Future work
- Add info about boss lifebars