
Overview
3x and 6x excellent smiley car setup suggestion.Not sure where to beginning setting up your car? Look no further.Please note:Car setups will change from driver to driver and car to car. This includes the fitting of better designed partsThese 3x excellent smiley setups suggestions are offered as a good starting point for you to configure your own car setup.
Introduction
This guide only covers ideal track setups and how to achieve those excellent smiley faces.
If you’re looking for a help with anything else, I’d recommend giving this guide a read.
[link]
There are 3 main areas to your car’s setup. These are…
Downforce – Wing Angles
Front wing – Used for slow corners. The more front wing you have the faster your car will go around slow corners.
Rear Wing – Used for fast corners. The more rear wing you have the faster you can go around fast corners.
Pro tip: You car should always have a higher angle on the rear wing than the front wing. Personally I always keep the default gap of 10 degrees between the two.
Handling – Suspension
Understeer – Turns your car slower because your front wheels loose grip and slide around the corner. More understeer will give better speed, it’s better for fast corners.
Oversteer – Turns your car faster as your rear wheels loose grip, your back end drifts around the corner. More oversteer will give a better acceleration, it’s better for slower corners.
Pro tip: Your suspension is used to determine how fast you can go around medium speed corners. A good setup would be stiff for slow coners, loose for fast corners.
Speed Balance – Gears
Top speed – Used if the track has long straights or medium to fast corners.
Acceleration – Used if the track has lots of slow corners.
Other Pro Tips:
Mighty Twix commented…
“It doesn’t matter if there’s more wing on the front than the back to hit the sweet spot.”
~ I haven’t tested this myself, comment below with your results, if you do.
Got a pro tip of your own?
Leave it in the comments section below and we may add it here.
European Series
Setups found during the Predator Racing Team Challenge – Season 1
Setups will change slightly from season to season, driver to driver, car to car and team to team.
Use this guide to initially set your car up. Then fine tune your car to optimise your setup.
Please refer to the ‘Tuning’ section of this guide for more information on fine tuning your initial setup.
European Series – Black Sea Circuit
[link]
[link]
– Thanks to Maksiu for this setup
[link]
European Series – Munich Circuit
European Series – Milan Circuit
[link]
– Thanks to Maksiu for this setup – Milan Track B
[link]
European Series – Tondela Circuit
[link]
– Thanks to Otterly & Tivec for this setup
[link]
European Series – Ardennes Circuit
– Thanks to Ekze for this setup
[link]
European Series – Guildford Circuit
[link]European Series – Beijing Circuit
– Thanks to Folkmann for this setup
European Championship – Beijing – Track A
[link]
European Championship – Beijing – Track B
[link]
– Thanks to levathan for this setup
European Championship – Beijing – Track C
[link]
European Series – Phoenix Circuit
– Thanks to ProcrastinatingStudent for this setup
[link]
– Thanks to Essfa for this setup
European Series – Phoenix A
[link]
European Series – Cape Town
– Thanks to ProcrastinatingStudent for this setup.
[link]
European Series – Dubai
– Thanks to Samuel_Vimes for this setup
European Series – Dubai C
[link]
European Series – Yokohama
– Thanks to bob bubble for this setup
European Series – Yokohama – Track C
[link]
European Series – Doha
– Thanks to Felon for this setup
European Series – Doha – Track C
[link]
European Series – Vancouver
– Thanks to wpl_xs8 for this setup
European Series – Vancouver – Track A
[link]
Asia Championship
I haven’t raced any of the Asia Pacific Championship races yet, so it’s a big thanks to everyone in the community that submitted their setups for this section of the guide.
Setups will change slightly from season to season, driver to driver, car to car and team to team.
Use this guide to initially set your car up. Then fine tune your car to optimise your setup.
Please refer to the ‘Tuning’ section of this guide for more information on fine tuning your initial setup.
Asia Championship – Yokohama
– Thanks to DERZKIY for this setup
[link]
Asia Championship – Dubai
– Thanks to DERZKIY for this setup
[link]
– Thanks to Silv3rTr1ck7 for this setup
[link]
Asia Championship – Brazil
– Thanks to DERZKIY for this setup
[link]
Asia Championship – Australia
– Thanks to DERZKIY for this setup
[link]
Asia Championship – Tondela
– Thanks to Fikiiii for this setup.
[link]
Asia Championship – Singapore
– Thanks to Ezz0o for this setup.
Asia Championship – Singapore – Track A
[link]
Asia Championship – Ardennes
– Thanks to Fikiiii for this setup
[link]
Asia Championship – Beijing
– Thanks to Ghost Simulator for this setup
Beijing Track A
[link]
– Thanks to Resolute for this temp setup
Here are some other Asia ones for those that want to refine and then submit:
Note: not all were perfect 3 purple smiles, though all were 94%+
Beijing D
16.5/26.5
21/-2
56/56
Asia Championship – Doha
– Thanks to Daikhan for this setup
Asia Champoinship – Doha – Track D
[link]
– Thanks to Robert for this setup
Asia Championship – Doha – Track C
[link]
Asia Championship – Phoenix
– Thanks to Daikhan for this setup
Asia Champoinship – Phoenix – Track A
[link]
– Thanks to Daikhan for this setup
Asia Champoinship – Phoenix – Track B
[link]
– Thanks to Robert for this setup
European Series – Phoenix – Track C
[link]
– Thanks to Resolute for these temp setups
Here are some other Asia ones for those that want to refine and then submit:
Note: not all were perfect 3 purple smiles, though all were 94%+
Phoenix B
16.5/26.5
21/-2
88 or 69 / 81 or 75 (both gave me smiledy with different drivers – shows how different 100% setups can be between drivers – btw parts were identical as was driver skill)
Asia Championship – Vancouver
– Thanks to Ghost Simulator for this setup
Asia Championship – Vancouver – Track B
[link]
– Thanks to Lord English for this setup
Asia Championship – Vancouver – Track D
[link]
Asia Championship – Canada
– Thanks to DERZKIY;♥ for this setup.
[link]
Asia Championship – Guildford
Asia Championship – Guilford – Track A
– Thanks to Felon for this setup.
[link]
World Championship
I haven’t raced any of the World Championship races yet, so it’s another big thanks to everyone in the community that submitted their setups for this section of the guide.
Setups will change slightly from season to season, driver to driver, car to car and team to team.
Use this guide to initially set your car up. Then fine tune your car to optimise your setup.
Please refer to the ‘Tuning’ section of this guide for more information on fine tuning your initial setup.
World Championship – Black Sea
– Thanks to harlequin565 for this setup.
Black Sea – Track B
[link]
World Championship – Vancouver
– Thanks to harlequin565 for this setup.
Vancouver A
[link]
-Thanks to Tyler for this setup.
Vancouver B
[link]
World Championship – Rio
– Thanks to harlequin565 for this setup.
Rio A
[link]
World Championship – Beijing
– Thanks to Silv3rTr1ck7 for this setup
World Championship – Beijing – Track B
[link]
– Thanks to Robert for this setup
World Championship – Beijing – Track C
[link]
– Thanks to Fikiiii for this setup
World Championship – Beijing – Track D
[link]
World Championship – Yokohama
– Thanks to Skywenli for this setup
World champianship – Yokohama Track A
[link]
World Championship – Munich
– Thanks to LoLCoW Commando1180 for this setup
World Championship – Munich Layout A
[link]
– Thanks to Daikhan for this setup
World Champoinship – Munich – Track C
[link]
World Championship – Doha
Thanks to Daikhan for this setup.
World Championship – Doha – Track A
[link]
World Championship – Cape Town
– Thanks to Daikhan for this setup
World Championship – Cape Town – Track A
[link]
World Championship – Milan
– Thanks to skywenli for this setup
Milan A
[link]
-Thanks to Tyler for this setup
Milan C
[link]
World Championship – Guildford
– Thanks to Mr Jo for this setup
World Championship 2016 – Guildford – Track A
[link]
World Championship – USA
– Thanks to skywenli for this setup
World Champion – USA – Track C
[link]
World Championship – Sydney
– Thanks to skywenli for this setup
World Championship – Sydney – Track A
[link]
World Championship – Black Sea
– Thanks to skywenli for this setup
World Championship – Black Sea – Track A
[link]
World Championship – Ardennes
– Thanks to skywenli for this setup
World Championship – Ardennes – Track A
[link]
Fine Tuning Your Setup
Once you’ve configured your car’s setup, using one of the setups shown above, you’ll probably want to make some fine tuning adjustments. Have no fear, help is here.
One of the main drawbacks of using a setup found in this guide is that your drivers will stop giving you useful radio feedback.
You’ll get radio messages like ‘The handling is bang on’ but the smiley face for handling might only be good, or great.
This means you’ll have to make an educated guess as to which way to adjust the handling, and by how much, to achieve that coveted excellent smiley face.
I’m just about to do European Series – Milan – Track A, so I’ll configure my car with that setup from this guide and I’ll do a single lap to test how it performs.
Initial Setup
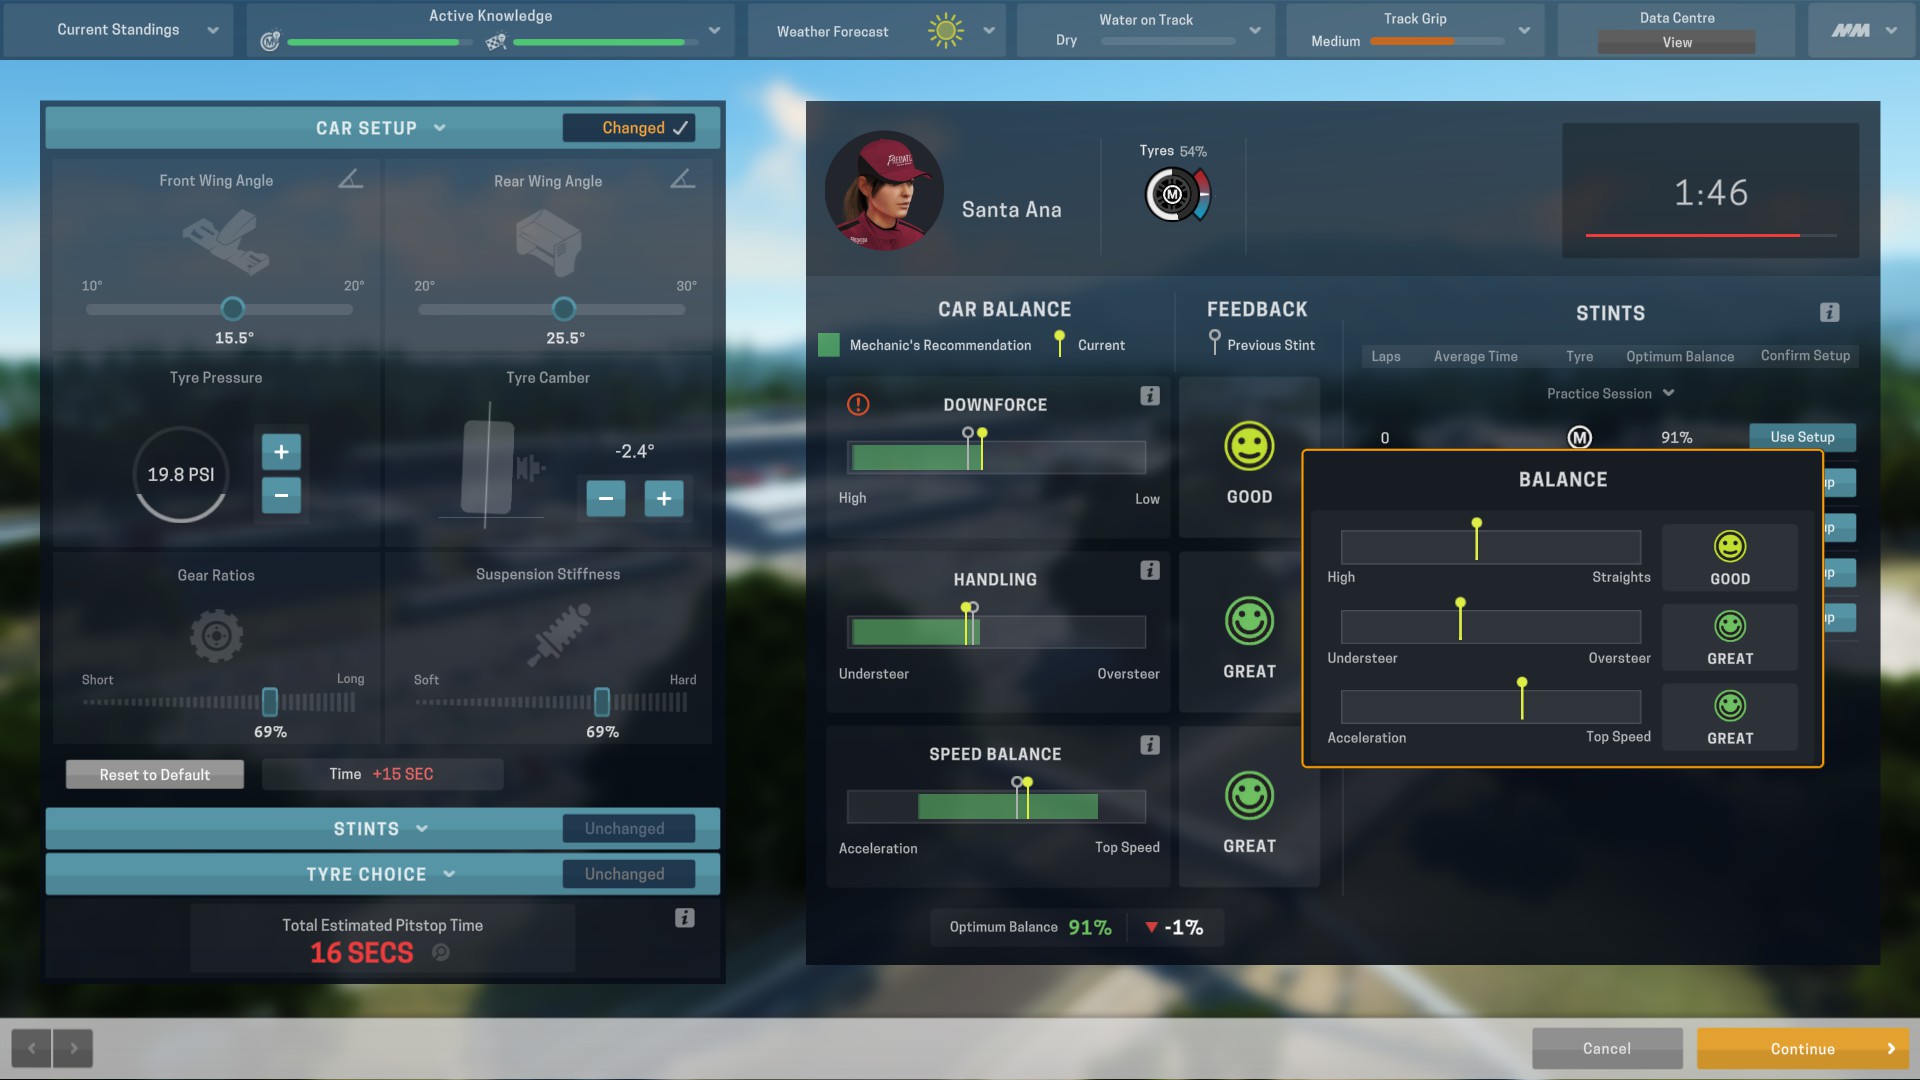
So this is what my initial setup came out like after a single lap.
The yellow markers shows this setup, which is 91%
The grey markers show my final setup, which is 99%
91% isn’t bad, I could easily run with that, but for the purposes of this guide I’ll run through how I fine tune the setup.
The first thing I always do is get the excellent smiley face on the downforce. This is because adjusting the other settings doesn’t adjust the wing angles.
I can already see, thanks to the ! mark in the downforce window, I’m not quite in the green recommended zone. So it’s an easy choice to add more down force.
I’ll usually adjust the front and rear wings in pairs, by around 0.5′ at a time.
The size of the gap between the grey and yellow markers gives you a good idea of the distance you’ll need to move any of markers in future, in order to jump from a good to an excellent smiley face. (the gap can also be slightly larger than this example)
Because I like to move the wings in 0.5′ increments and in pairs, I’ll add 0.5′ to each wing and test the car again with a single lap.
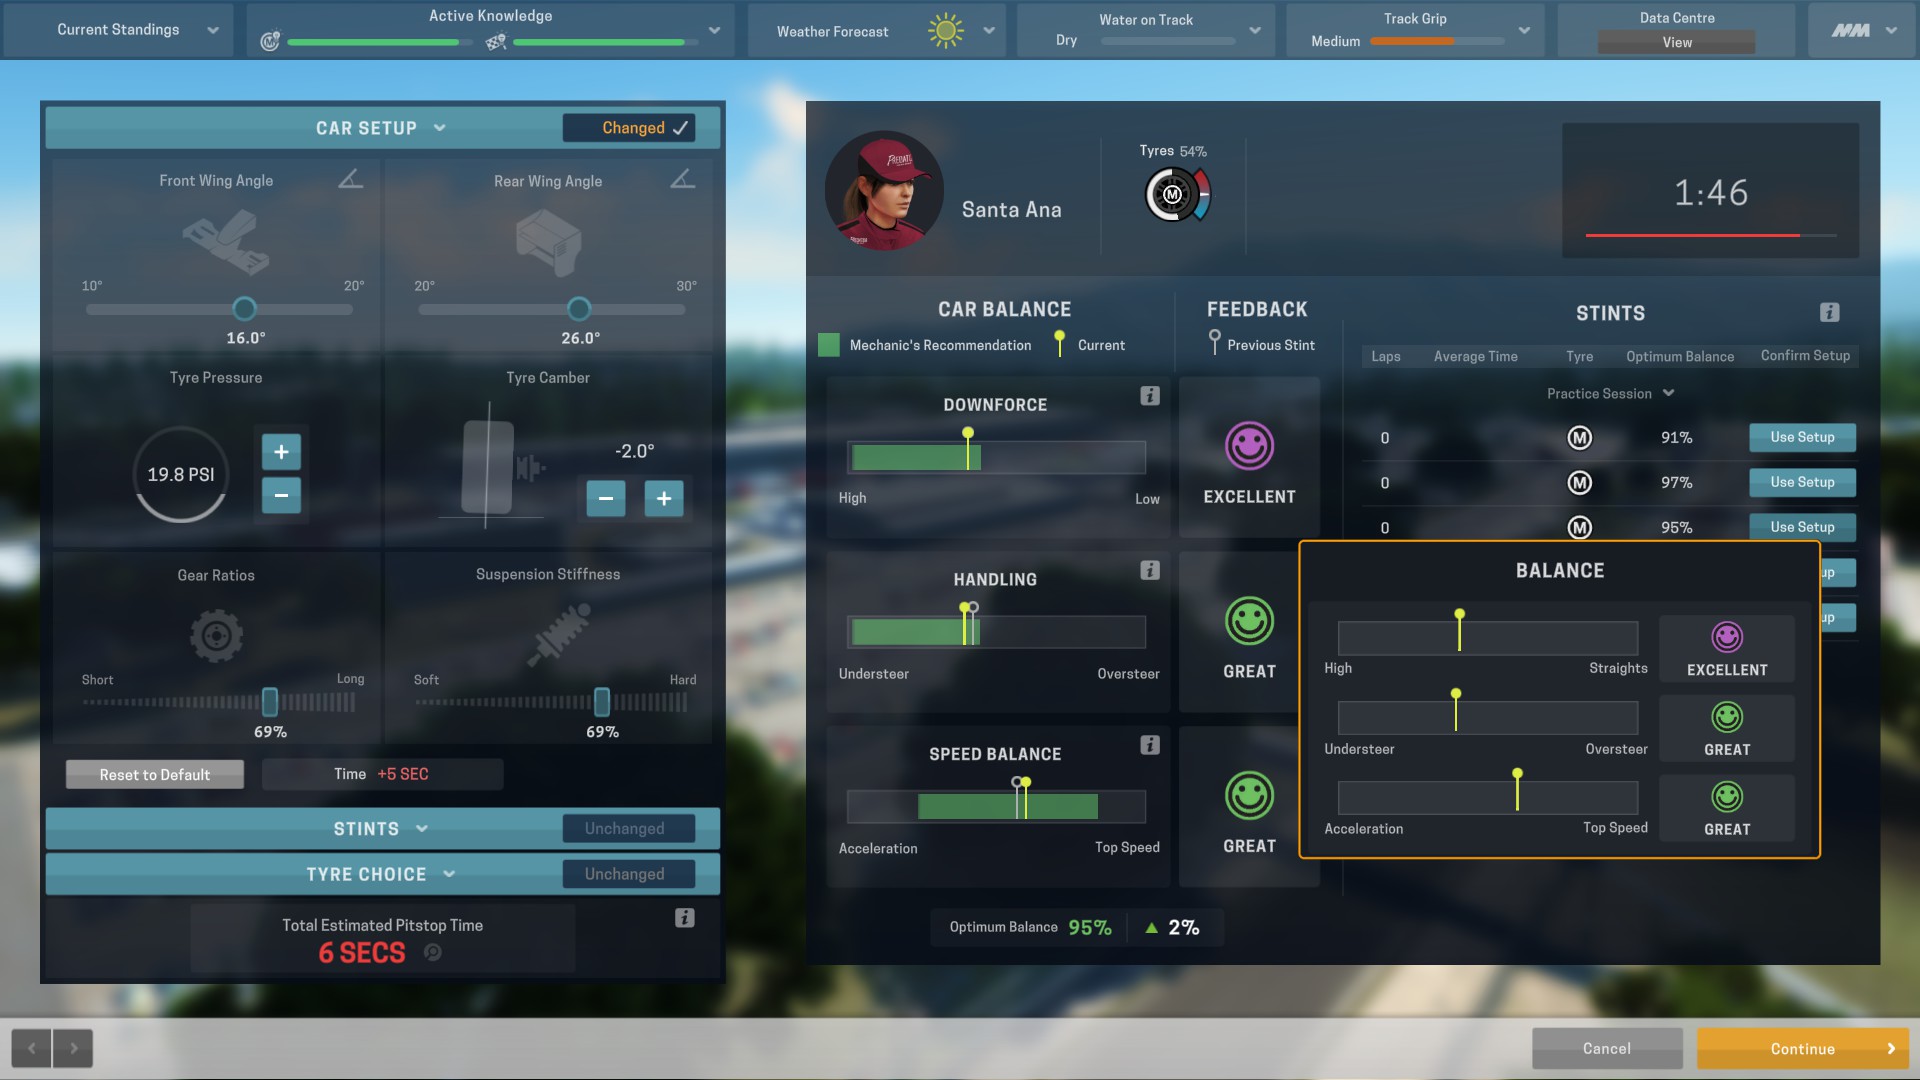
1st Adjustment

My first adjustment to the wing looks to be bang on the money.
You’ll also notice when adding more downforce the handling and speed balance changes slightly.
Adding more downforce will move your handling by a small amount to an oversteer position and your speed balance by a small amount to an acceleration position.
My handling and speed balance are still showing great smiley faces, so I’m going to use the tyre chamber to adjust them back to their original position.
I’ll increase the tyre chamber, from -2.4 to -2.0 and test the car again with a single lap.
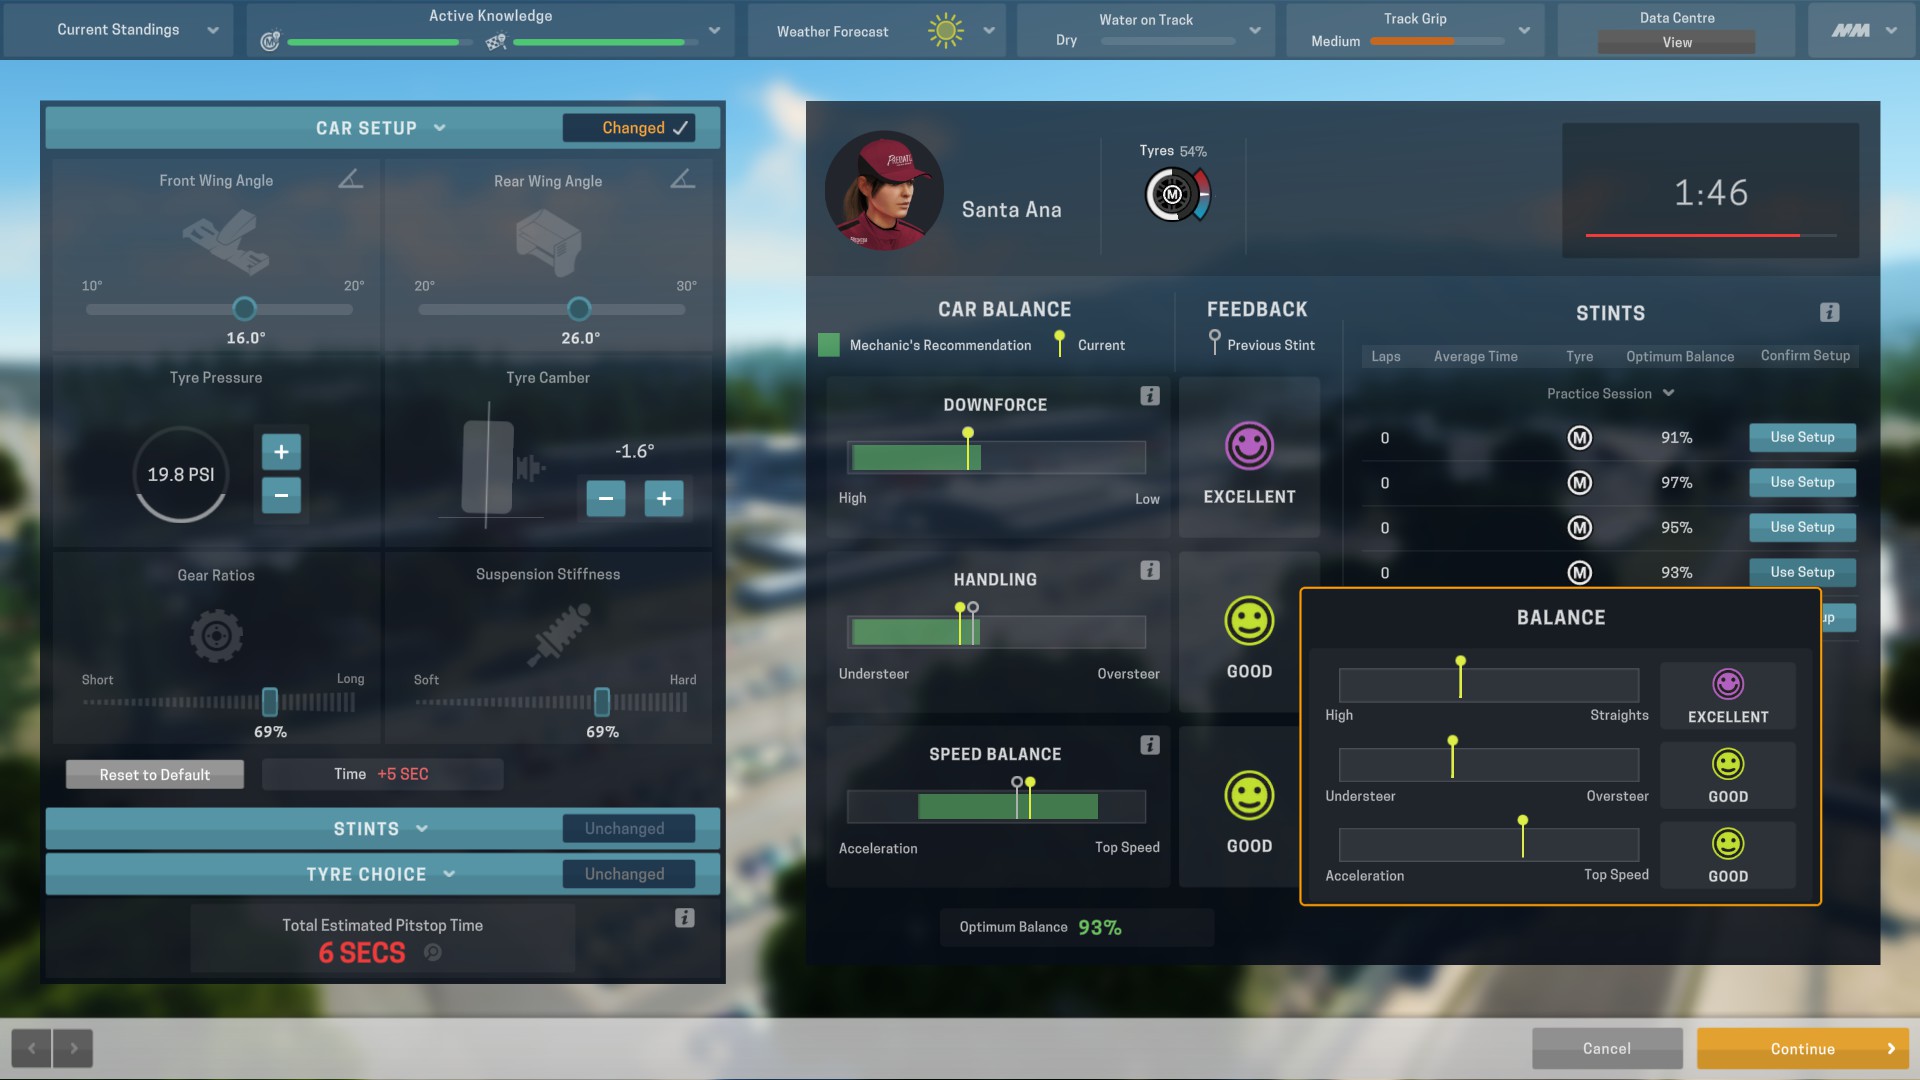
2nd Adjustment
I still have an excellent smiley face in the downforce and my handling and speed balance are back to their original position.
I already know that if I decrease the tyre chamber back to -2.4 (adding oversteer and acceleration) I’ll still be showing great smiley faces still. So I’ll increase it once more to add understeers and top speed.
I’ll increase the tyre chamber to -1.6 and test the car again with a single lap.
3rd Adjustment
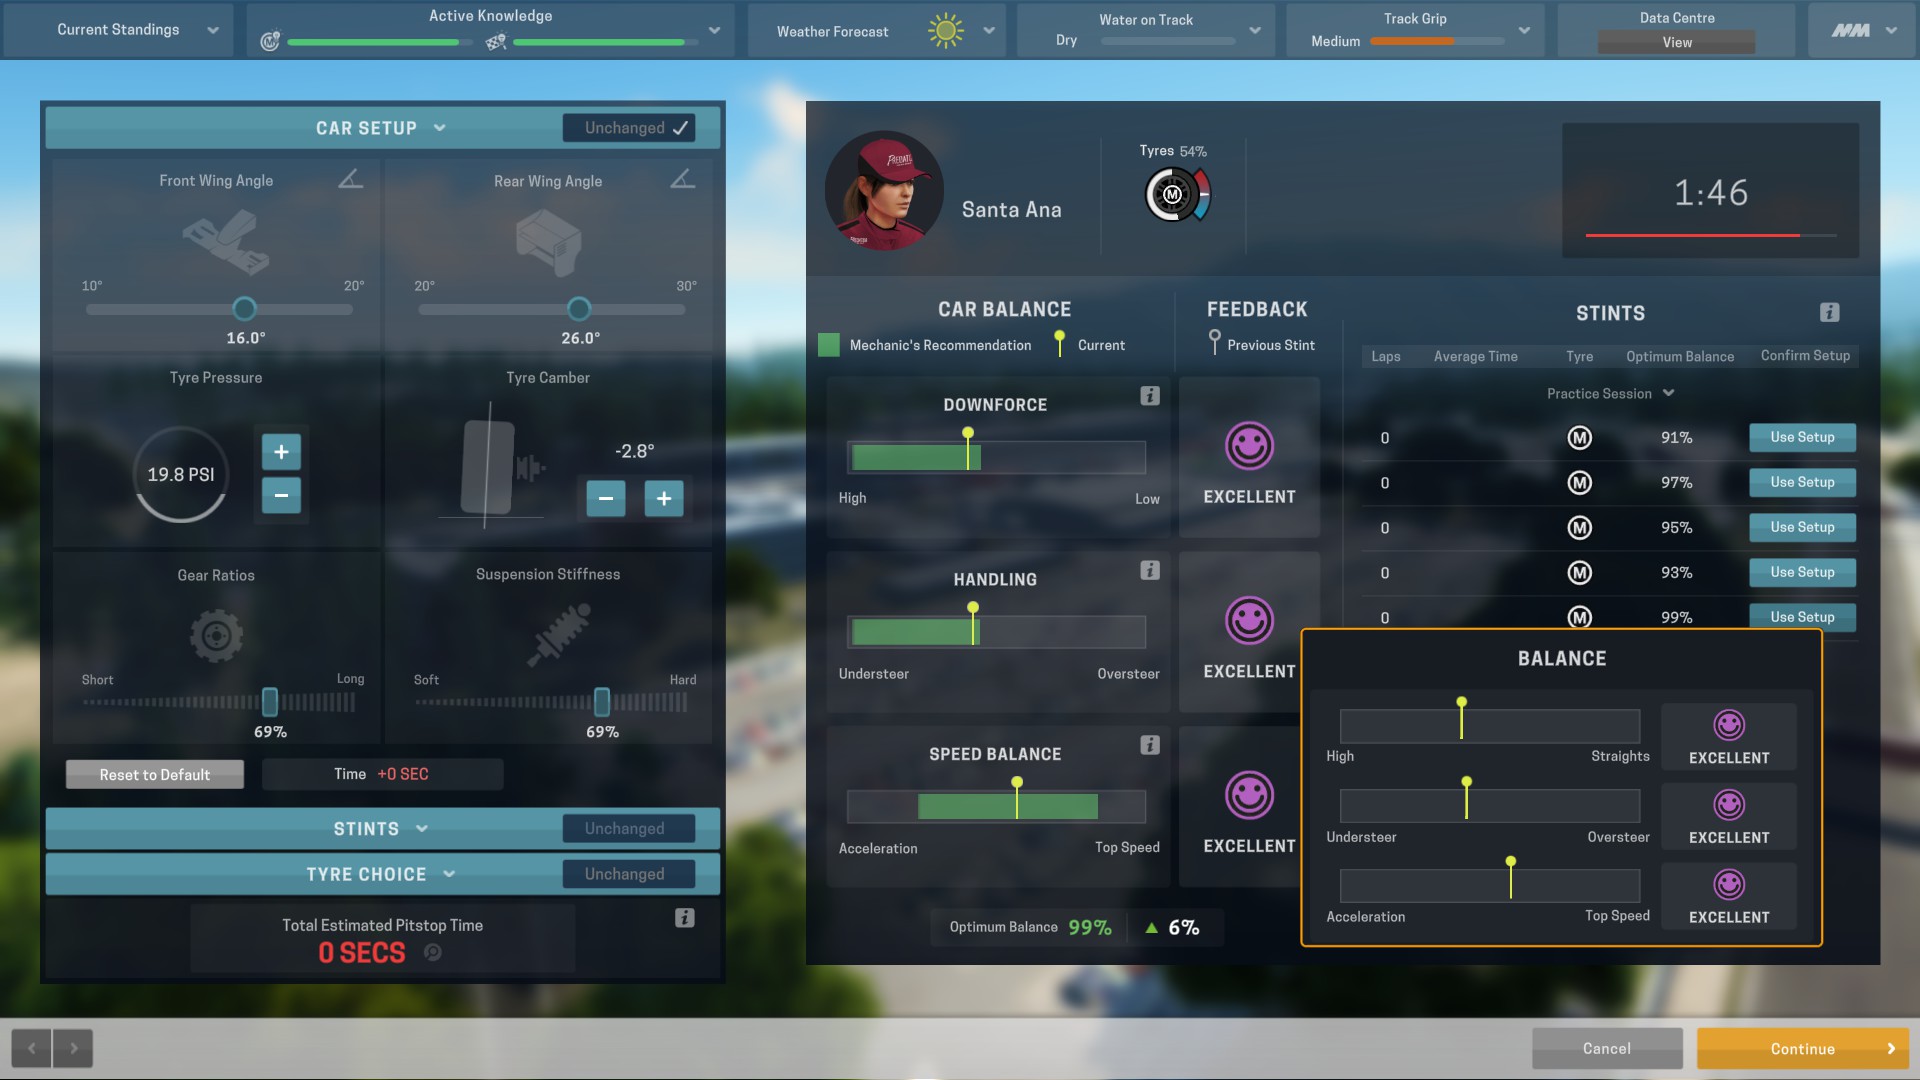
Oops, it looks like I’ve made a mistake. My handling and speed balance have dropped to good smiley faces.
So now I know that my tyre chamber at -1.6 is good, at -2.0 it’s great, at -2.4 it’s also great. Can you guess where I’m going to adjust the tyre chamber to next?
That’s right, -2.8
Let’s decrease the type chamber to -2.8 and test again with a single lap.
4th Adjustment
BOOM!
We’ve hit our 3 smiley faces. You’re now a level 10 smiley face finder. Congratulations.
How you can help complete this guide
Found a 3 excellent smiley face setup of your own? One that hasn’t been listed yet?
Take a screenshot using Steam, by hitting the F12 key. (unless you’ve changed from default)
Upload the screenshot with the caption “Which Series – Track Name – Which Layout”
Example:
Europimple Series – Munchies – Track X
Leave a comment below, with the track name, layout and confirm it’s in your Steam screenshots. I’ll look at them and grab the link, or you can get the link yourself and paste it in the comments.
To find your screenshot link, click file (top left) of Steam, click ‘screenshots’, click ‘view online library’ click on the screenshot in your library.
Highlight the link at the top of the screenshot, right click and copy, then paste in the comments.
The link should look something like…
steamcommunity.com/sharedfiles/filedetails/?id=XXXXXXX
I can then copy and paste your screenshot to the guide.
If you just leave numbers, I’ll have to use the setup and do the screenshot myself. You’ll still recieve credit for the find but I’ll get the likes on my screenshot. That would be a shame 🙂
Big thanks to Gervaz for added this guide at the official subreddit sidebar. We appreciated it 🙂
https://www.reddit.com/r/MotorsportManagerPC/
I’d like to thank everyone for leaving their setups in the comments.
There is a mod out that will give you 100% setup for each car, it can be found here:
[link]