
Overview
A good variety of crosshairs that you could try with freely on HL2DM
Explanation & Concepts
One of the main elements of competitive FPS gameplay is crosshair.Crosshair is the game pointer which indicates where are you gonna to shoot.There are many types of crosshairs,a good one for your personal preference can improve your enemy focusing,targetting and visualization resulting on a better average accuracy.Here i will post some crosshairs so users can choose an appropiate one and ensure his performance in game.
HL2DM crosshairs works by a Font called on his format .ttf(Truetype Font),the file Halflife2.ttf has the default crosshair that we can edit with any personal font editor,and thats the one i used for my job.
Outline:is the second color which is over the crosshair,normally is black and it gives you the advantage to see in bright zones,you can enable or disable by your own likes.There are 2 ways that i know to make outline works “Clientscheme.res” and “HUDlayout.res”.
Color:is determided by a code RGB(red,green,blue),for example | White:(255 255 255)=white + 255 (transparency mask) this is how it works.Its important to get a good color on crosshair because it will retain your focus ,feel free to experiment with colors to choose the one who adapts better to your eye-sight.
*I personally recomend green one as its the most rare color found in regular maps so in the most of the times will overpass the walls colors from the game .
*You can disable the side bars beetwen the main crosshairs with the command hud_quickinfo 0 if you think more comfortable.
Installation & Contents + Download link
-All .ttf Font files go into X:Program Files (x86)SteamsteamappscommonHalf-Life 2 Deathmatchhl2mpcustommy_custom_stuffresource
-They need to be renamed to halflife2.ttf for working properly.
*After update it isnt needed to check read-only box at file properties.
*Crosshair size varie with the screen resolution,if you wanna see it smaller,detailed and less blurry set higher resolutions.
MINO Outlined Green-Crosshairs 1024 Thumbnails
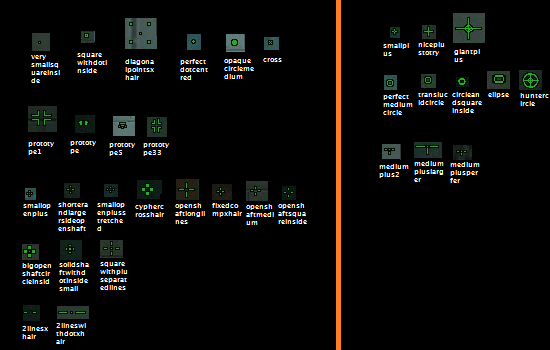
Other crosshairs included

DL:https://drive.google.com/file/d/0B9r4hxlxL-tbZm5DbW12eExiLVk/edit?usp=sharing
DL2:http://www.2shared.com/file/3Ew8ZVi8/MinoCrosshairscollection2014.html
Removed
[link] *Checkout downloads in page for individual charges.
You can download the entire archive—-<File<Download.
Fonts.Building crosshairs on Default Huds
What you need?
·Original Halflife2.ttf,you can get one from:
/hl2/resource dir (Updated Font)
Downloading it [link] (Outdated Font circa 2004,but usable)
Extracting it from hl2mp_pak_dir.vpk with GCFscape tool
·Font Editor,High-logic provides great professional tools for Font management and editing,I find it very suitable tool for editing Source games fonts.
[link] (Shareware Font Editor)
[link]
[link] (Freeware Font Editor)
Editing
Open Halflife2.ttf with a font editor.The Editor should show you the list of glyphs that represent each character in-game.
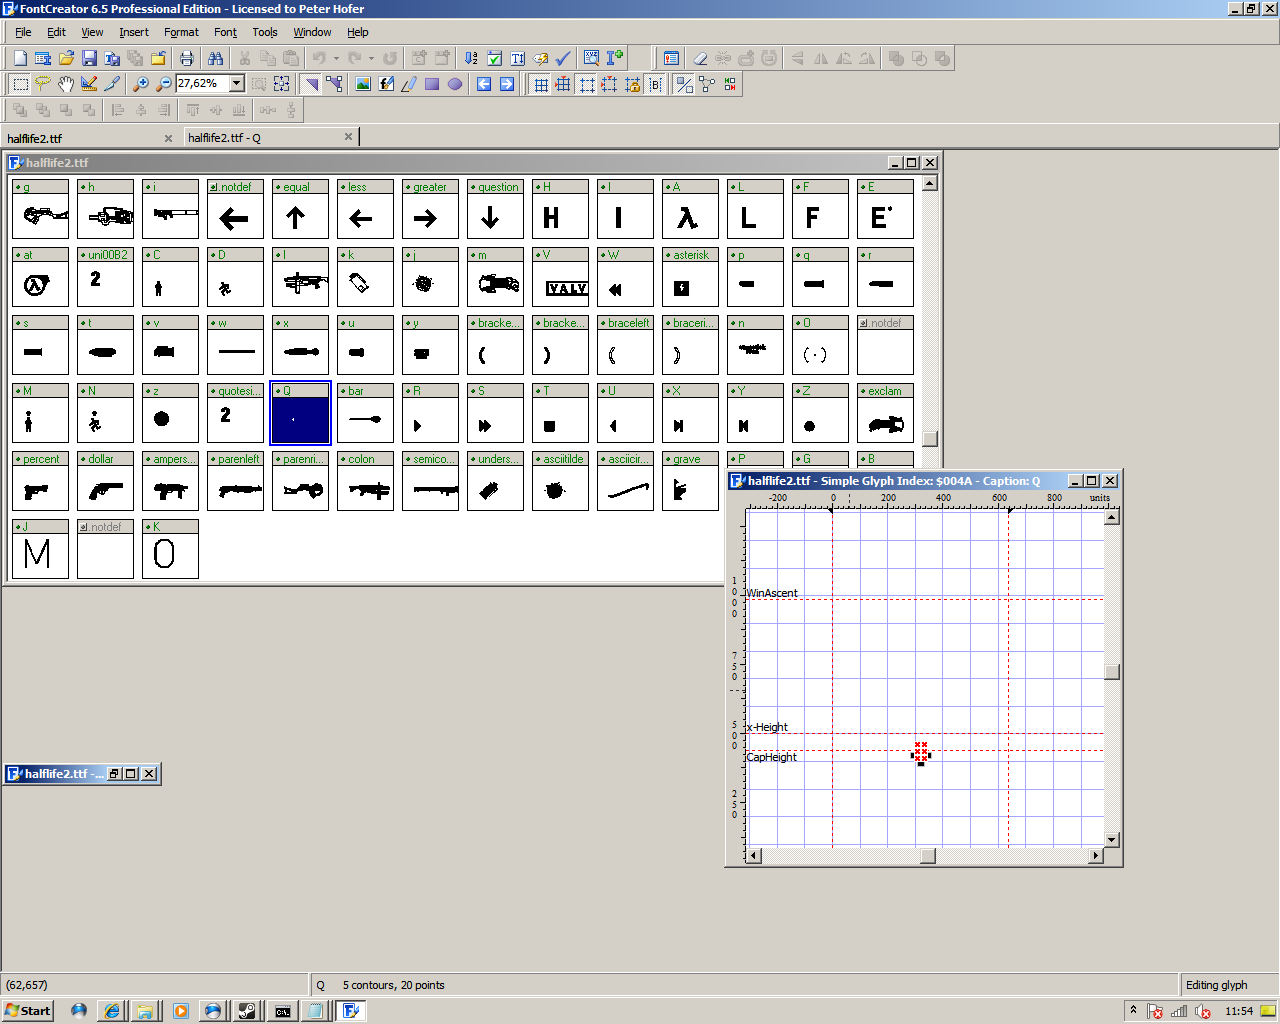
The default crosshair glyph is labeled at “Q”
Open it a new window will show up,where you can edit with freedom in the selected area the font.
*I find useful Importing images Or vector graphics into glyphs,feature that provides us exclusively a professional font editor.For doing that Right click on editing area<Import image<,recommending to set a picture with a white/black background color over the graphic object to represent.

https://www.youtube.com/watch?v=fXuNZbEKDiw
Will recommend to use “antialias” “1”(clientscheme.res<Halflife2 Header) for crosshairs based on detailed shapes,with a non-linear structure
Use the displacement tool to center your crosshair,you can use the the previous crosshair to center it and remove it when the job is done.Highlogic provides various tools for setting Metrics and scripts for centering that u can find useful.
Save As<X:Program Files (x86)SteamSteamAppscommonHalf-Life 2 Deathmatchhl2mpcustommy_custom_stuffresource as TrueTypeFont .ttf
Outline+Color & Centering & Transparency/Opacity
Outline is the second color over the crosshair normally black its used by players for avoiding the crosshair to blend or fade in bright maps,textures.
*Anyway , i think outline is more useful if you use White colors for crosshair,as using others colors blending can be fixed by switching off “additive” “0” in clientscheme.res ,with the CON of removing a bit of bright on the crosshair.
For getting Black borders in your crosshair(outlining),you will need to call a function that add this to your crosshair font in clientscheme.res(outline “1”),finally you will need to add a element in HUdlayout.res specifying our same crosshair font used in Clientscheme.res,
Its better manipulating it by hudlayout.res because we can focus our editing in xhair ,with the main improvement of taking many coding variables,improving the flexibility when its the hour of developing,the main problem for using xhair fonts developed with hudlayout.res was to get centered position,users were used to use “ypos,xpos,zpos” variables to get it the most centered possible but getting it centered it depends on much factors as resolutions,pixels quantity..etc,the last year a hl2dm player named k3z discovered how to do it.OK,lets see the steps.
1) Edit clientscheme.res with text editor ,located at X:Program Files (x86)SteamsteamappscommonHalf-Life 2 Deathmatchhl2mpcustommy_custom_stuffresource,
you will need to add a entry that controls the font containing the crossshair.
“HalfLife2”
{
“1”
{
“name” “HalfLife2”
“tall” “40”
“weight” “0”
}
}
add a outline parameter line(“outline” “1”) so it looks like:
“HalfLife2”
{
“1”
{
“name” “HalfLife2”
“tall” “40”
“weight” “0”
“outline” “1”
}
}
*Dont make the mistake of editing “HL2Crosshairs” Box .It wont have any effect on your font crosshair.Worked on previous game versions.
2) The next step is to add a crosshair element in hudlayout.res located at X:Program Files (x86)SteamsteamappscommonHalf-Life 2 Deathmatchhl2mpcustommy_custom_stuffscripts as said before.
Open it with text editor and add this lines at the beginning,K3z method(Centering):
HalfLife2
{
“controlName” “Label”
“fieldName” “HalfLife2”
“visible” “1”
“enabled” “1” ///set to 0 both to disabling it
“font” “HalfLife2” ///font used
“labelText” “Q” ///the default Character tag where is located the xhair font
“textAlignment” “center” ///align the chosen character
“xpos” “c-320” ///positions in X /Y axes
“ypos” “0”
“wide” “640” ///k3z used the maximum values allowed to tall and wide
“tall” “480”
“fgcolor_override” “0 255 255 255” //CROSSHAIR COLOR=COLOR+ALPHA MASK(last 3 digit series)
}
Thats enough for getting outline.
Edit “fgcolor_override” for changing the color ,for understanding crosshair color just get know that it work under RGB code(red.green,blue+alpha[4th 3 digit serie[/i])+Transparency mask or ALPHA.
Here is a complete color chart RGBCHART.com
RGB
255 0 0 = Red
0 255 0 = Green
0 0 255 = Blue
Basics ones
255 255 255 = white
255 255 0 = Yellow
0 255 255 = Cyan
If you are in the need to visualize crosshair color changes or any other related component hud modifications without the need to restart in the game ,you can use hud_reloadscheme for that pursuit ,it will reload the all of the hud interface components.
hud_reloadscheme will be useful to diagnose coding errors, typos,etc..
For example::
If you edit erroneously your hud, the engine wont able to read your code ,so it will throw a parsing error and output it to the game console :
Couldn’t parse script sequence ‘Ammo2Increased’: expected <anim command>, found ’10
Adding/Changing Font Settings and Values
In Clientscheme.res we can edit and add many Game-Fonts settings that can be useful just for editing any game element, it can be from the HUD,from the menu,etc.
Well,in our case we want to edit the crosshair font Halflife2.ttf,so we just open it with a text editor Clientscheme.res and we search for crosshair Font(default font is Halflife2(“.ttf”),so we will begin our search by this word,but on custom huds this can be diffferent,they can use a separated font specifically for crosshairs, I just press Ctrl+F and look for “halflife2” ,finding the Block with some of the parameters above .
List of Font parameters
<——————————————————————————-
“tall” (the height in pixels at 640×480 of the font,by my experience i recommend to leave it on default “40”)
“weight” ///The font boldness
“additive” ///it adds a Bright layer over the font making it brighter and more visible ,but on bright textures can cause your xhair/font to blend,take note that any color will blend with it,and Black colors will not show up
“yres” ///minimum and maximum height among which apply the value of “tall” with pixel accuracy .
“outline” ///it highlights your font with black color borders,many players use it for avoiding blending on bright zones.
“antialias” //it smooths the font,its like in graphics settings games,but apllied to fonts ,its useful for making detailed fonts ,this command will give them a clean look,also in crosshair developing can help to make non-pixelizated shapes ,activate if your crosshair will have many details or you want it to have a very similar look as in game as it haves in your font editor.
“blur” ///it will give a blur effect into yor font,you can aplly a value to 1-5 for stronger effect,if you want it to not blend on bright textures just enable together with this “outline” to 1.
“scanlines” ///it will add to your font something like Scanning effect beetwen the pixel that composes the font,depending to the amount apllied also from 0-5 ,using high values like 4-5 on crosshairs can darken them.https://developer.valvesoftware.com/w/images/3/3c/HUD_Scanlines.jpg
“dropshadow” ///its a shading effect visible of the font,its a alternative to “outline” ,on xhairs can help you to see on bright textures.
“custom”
—————–
“size” ///The font height in pixels
“overline” ///Add an overline to the font
“underline” //Add an underline to the font
“italic” //make the font italyc
“rotary” ///adds a line in the center of each font character
“shadow” ///Add shadow casting to the font
“strikeout” ///Add a strike through
“symbol” ///Enables the use of symbolic fonts such as Webdings
“bitmap” ///enable the use of bitmap fonts?
“blursize” ///The strength of the font blurring
———————————————————————————->
**Note: that you cant use additive,outline at the same time,you need to disable one of them,after doing it you can combine it with others parameters
[link]How to make Dynamic Crosshair (Fonts)
Note: Coordinates of hud’s blocks tested well on 1920×1080 resolution. Correct work on another resolutions are not guaranteed.
1) Add these lines to HudAnimations.txt to event called as AmmoDecreased:
Animate CHudDynamicCrosshairOutline_1 Position “c-18 c-18” Deaccel 0.1 0.2
Animate CHudDynamicCrosshairOutline_2 Position “c-19 c-17” Linear 0.0 0.1
Animate CHudDynamicCrosshairOutline_2 Position “c-19 c-11” Deaccel 0.1 0.2
Animate CHudDynamicCrosshairOutline_3 Position “c-13 c-18” Linear 0.0 0.1
Animate CHudDynamicCrosshairOutline_3 Position “c-19 c-18” Deaccel 0.1 0.2
Animate CHudDynamicCrosshairOutline_4 Position “c-19 c-6” Linear 0.0 0.1
Animate CHudDynamicCrosshairOutline_4 Position “c-19 c-12” Deaccel 0.1 0.2
2) Open your HudLayout.res file and add these blocks:
{
“controlName” “Label”
“fieldName” “CHudDynamicCrosshairOutline_1”
“visible” “1”
“enabled” “1”
“font” “DynamicCrosshair”
“labelText” “j”
“textAlignment” “center”
“xpos” “c-18”
“zpos” “902”
“ypos” “c-18”
“tall” “38”
“wide” “37” // 37
“fgcolor_override” “255 255 255 255”
}
CHudDynamicCrosshairOutline_2
{
“controlName” “Label”
“fieldName” “CHudDynamicCrosshairOutline_2”
“visible” “1”
“enabled” “1”
“font” “DynamicCrosshair”
“labelText” “k”
“textAlignment” “center”
“xpos” “c-19”
“zpos” “902”
“ypos” “c-11”
“wide” “38” // 37
“fgcolor_override” “255 255 255 255”
}
CHudDynamicCrosshairOutline_3
{
“controlName” “Label”
“fieldName” “CHudDynamicCrosshairOutline_3”
“visible” “1”
“enabled” “1”
“font” “DynamicCrosshair”
“labelText” “l”
“textAlignment” “center”
“xpos” “c-19”
“zpos” “902”
“ypos” “c-18”
“tall” “38”
“wide” “38” // 37
“fgcolor_override” “255 255 255 255”
}
CHudDynamicCrosshairOutline_4
{
“controlName” “Label”
“fieldName” “CHudDynamicCrosshairOutline_4”
“visible” “1”
“enabled” “1”
“font” “DynamicCrosshair”
“labelText” “m”
“textAlignment” “center”
“xpos” “c-19”
“zpos” “902”
“ypos” “c-12”
“wide” “38” // 37
“fgcolor_override” “255 255 255 255”
}
3) Open your ClientScheme.res file and add this block:
{
“1”
{
“name” “Crysis Outline”
“tall” “40”
“weight” “1”
“antialias” “0”
“additive” “0”
“custom” “1”
“yres” “1 10000”
“outline” “1”
}
}
4) Final Part. Download and install font from: [link]
Content by TSMC 2012
k3z sample :
https://www.dropbox.com/sh/2uy76k1pinvrt7h/AAAZVbeUP0u4mcLwSISW-2n6a/Learning/Dynamic%20Crosshair.txt
-You can use those samples as a reference to make dynamics HUD elemements for code undernstanding.
Multiple XHAIR Use
For making a multiple crosshairs usage for different weapons you can use the method below:
1.You need to edit every Weapon_”x”.txt files located at scripts folder(C:Program Files (x86)SteamsteamappscommonHalf-Life 2 Deathmatchhl2mpcustommy_custom_stuffscripts)
,if you havent those files you can get it from X:Program Files (x86)SteamSteamAppscommonHalf-Life 2 Deathmatchhl2scripts Or downloading a custom HUD who have them,for example mine [link]
2.After extracting the scripts folder in your my_custom_stuff folder get inside it and look for one of your weapon_X.txt scripts,open it with text editor and search for “crosshair” below this word you will find some parameters like “font”,“Character” if you using a font,or “file”,“x”,“y” if you using a sprite as a crossshair,Well i will explain the method for fonts being the most populars and trusted.
3.Just edit the “Character” value for any other existing in our Font,be careful when putting a character,setting a character to “J” for example doesnt mean you will have a J letter as xhair,is just a TAG or LABEL that gives a a name to the Font Sheet,use a font viewer or editor to see them and setting it correctly [link] , [link] , as well you can use separated fonts instead of Halflife2 for different xhairs,just edit “font” value to any other one registered at clientscheme.res,like seen on k3z,philos0ph…Huds
*If you want to get a fast look on how it works you can download philos0ph hud v5 here philosoph hud V5[doc-0o-30-docs.googleusercontent.com]
Crosshair Troubleshooting
Much players notice problems when installing new fonts that interfere with other fonts located at other directories.
Common problems & solutions
1.Most common is to have a Half-life 2 regular font installed in our “X:/Windows(or other operating system)/Fonts” directory ,this causes the game to call this system font instead of the custom one installed at the game directory,the solution is simple;go to start menu ,find your “Run” utility and write %Fonts% OR you can do it manually by going to X:/Windows/Fonts path,finally inside we look for fonts related to halflife2 (or other custom fonts related to the game)and remove them.
2.Another way to solve this trouble is to right click your custom Halflife2.ttf and click install ,this will replace the actual halflife2.ttf located at Windows/fonts folder,fixing the problem.
3. Issues encountered by customs or edited HUdlayout.res or clientscheme.res making bad fonts callings ,be sure to have those files untouched or to recovery the default ones.
4.Also people can have problems with the old directories
Before HL2DM updated to “VPK format” the directory for custom fonts was C:Program FilesSteamSteamappscommonhalf-life 2 deathmatchhl2mpresource check if there is any font ,remove it.Also if nothing works you can look in the new directories X:Program Files (x86)SteamsteamappscommonHalf-Life 2 Deathmatchhl2mpresource AND X:Program Files (x86)SteamsteamappscommonHalf-Life 2 Deathmatchhl2mpcustommy_custom_stuffresource and remove everything
5.Do a verification of the integrity of game cache.
Library<Right click Half-life 2 Deathmatch<click on properties<and click on “verify integrity of game cache” this will fix any corrupted file,and recover the missing ones,will check CRC´S Checksums ,It will take some mins after it, try launching the game.
*Be sure when installing Custom HUDS to install everything containing it,small details can provoke troubles and incompability,”if it isnt caused by some bad HUD coding made by the author“.
6.Last solution is to reinstall the game,but if the fonts Which are overriding your custom ones are somewhere in your Hard Disk connecting with the game, you will keep getting this problem.If you feel the thing impossible just Format or install a new OS but its normally to have always have a solution .
XHAIRS requested by players
1.Doomed xhair-small dot with side lines,vertical lines are 2x longer than horizontals ones
DL:http://www.2shared.com/file/bajQidAX/doomedxhairwork.html
2.Viking lord Emorog xhair-Large Hollow Circle,works good without outline option.
DL:http://www.2shared.com/file/u3Mk1DHC/vikinglordemorogxhair.html
3.Dirsta Default Hud + 3x scaled “mediumpluslarger” Xhair DL:http://www.2shared.com/file/HPTMBZf2/dirtstaHUDdefaultoutlineredfix.html?
Sprites XHAIRS
This will link to a guide that i published about Sprites xhair in [link] :
[link]*Sprites usage can be used for HUD developing.
Sample with custom death marks by Jora:
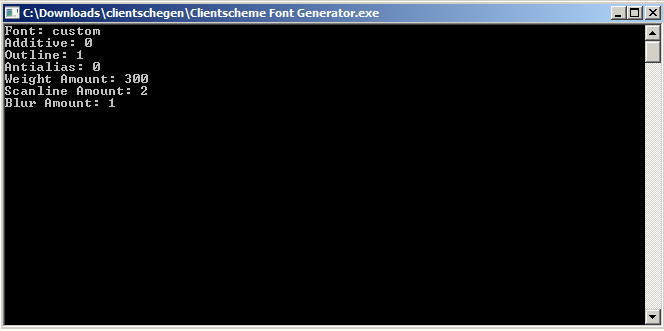
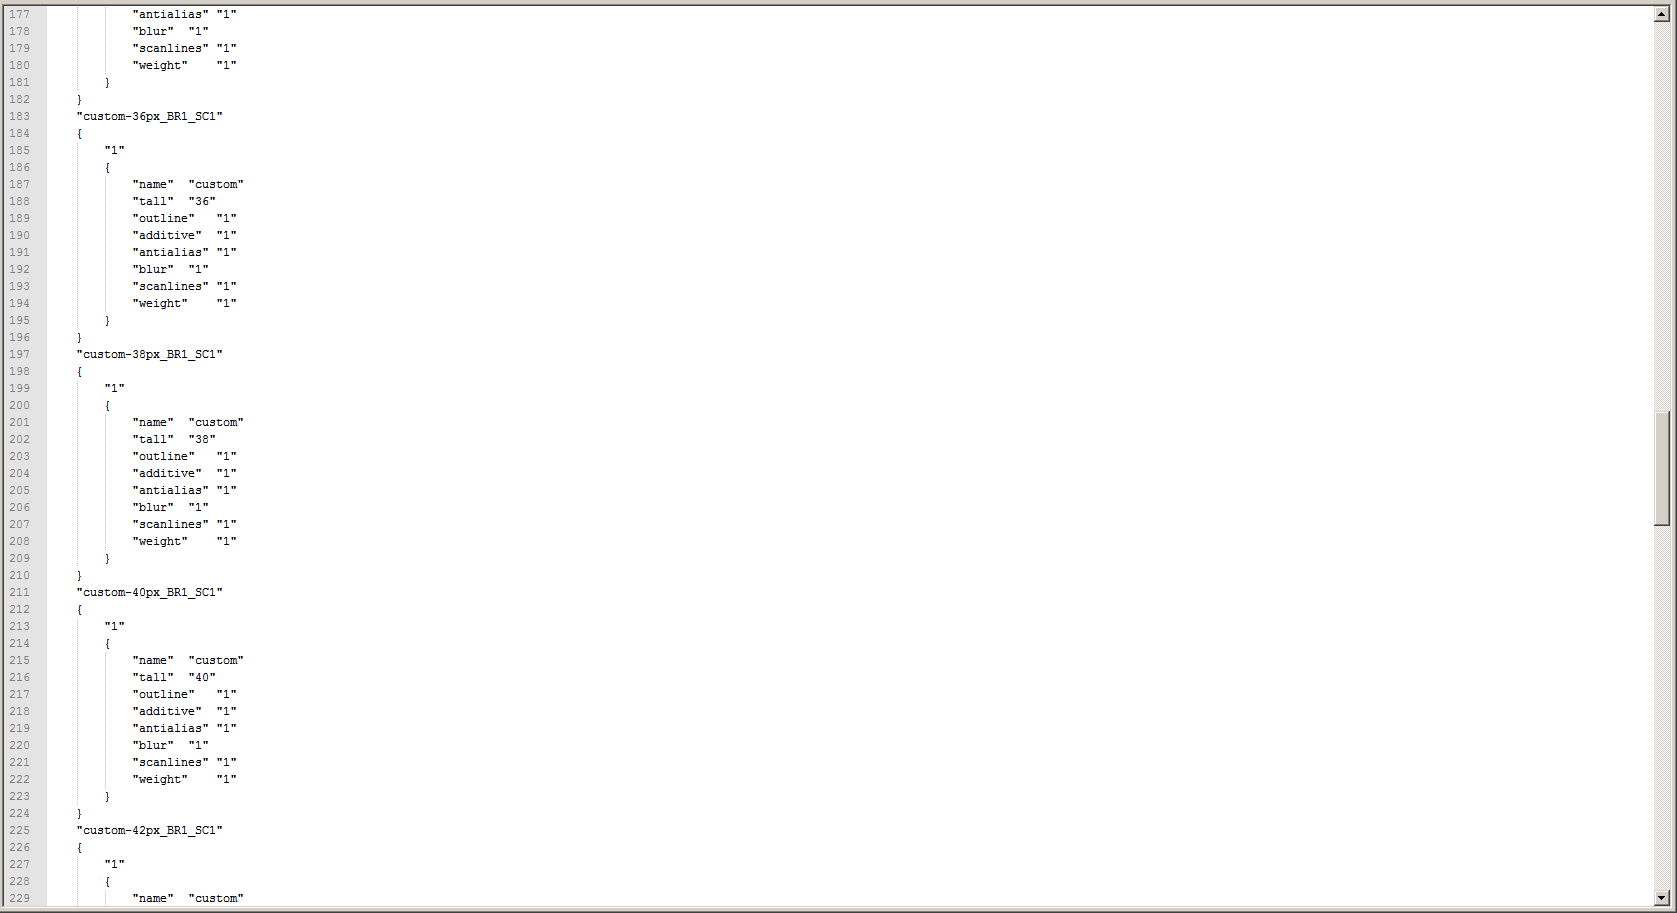
[link]Clientscheme Font Generator Source Engine
Tool that allows to generate Font Blocks for ClientScheme.res given to a specific name & properties by the user,27 blocks will generated based on incremental “Tall” values from 10-64.
Lightweight,It runs based on a Command Prompt Box.
DL:https://www.dropbox.com/s/ffbesju0nwntcqy/Clientscheme%20Font%20Generator.exe
Parameters set at “0” wont appear in the block
Don´t set incoherent values.
Outpout file will be created at the same directory where the tool is as “font.txt”
Source : [link]
Tool by TSMC 2014
Double Layered Crosshairs
Will come.
D3D Injected Overlay Crosshair
Will come
Additive crosshairs without blending issues Method
Will come..
Using Sine(color timer)-Sprites
Will come..
Multi-Frame Sprite Crosshair (Proxies)
Will come..
TargetID Crosshair
Will come…
Crosshair Rotation
Will come…
Alternatives/Other Resources
1.Web based Dynamic Crosshair Setup
[link]
You can install a great amount of non-outlined crosshair types .
*remove .t k brackets,since steam doesnt allow my to share links with .t k
2.Software based automated crosshair and custom config installator
[link] by Turanic
Conclusion
My objective is to help players , share my knowledge and to give quality game based material & knowledge,Hope it helps to any! If any doubt you can contact my at [link] MINO
I can add any crosshair if someone request it to my,so anyone can contribute to it,I will try to update it with time.