![[GUIDE] SE MiniMap (RADAR) for Space Engineers](https://steamsolo.com/wp-content/uploads/2021/07/guide-se-minimap-radar-space-engineers.jpg)
Overview
This is the guide for the SE MiniMap mod. Please let me know if you find anything unclear or if you believe something should be added.Mod Workshop Page: https://steamcommunity.com/sharedfiles/filedetails/?id=1939217705Planned Features A Targeting System A Universe Map – Done! Enable placement on an LCD – Done! Other suggestions welcome 🙂
How does this work?
For starters, you’ll need to snag Draygo’s Text HUD API mod, which is what this mod uses to draw the map on screen. The link to that can be found under the Required Items section on the workshop page. Then, simply add this mod to your mod list, and you’re good to go! There are some settings you can configure to your liking, which are discussed in the Mod Menu Settings section. For server admins and single player games, there are also some admin settings that can be changed, which are discussed in the Admin Menu and Admin Commands section.
Detection Rules
As this is a “free” radar for all intents and purposes, I’ve implemented a few limitations so it’s not too cheaty. The maximum range for the map is 5000m, which should be plenty for a general purpose I&W system. Whether or not something gets displayed on the map depends on two criteria. The first being that if they have a beacon or antenna broadcasting, and you can see it on the HUD, then you can see it on the map. If they do NOT have a beacon or antenna, or if the block isn’t actively broadcasting, then you will only see the pin on the map if you have direct Line of Sight (LoS) with the object. This means that someone can still sneak up on you if they approach from the opposite side of an asteroid with their broadcasters turned off – keep your head on a swivel!
Asteroid Clusters
In order to avoid cluttering the map display more than it needs to be, asteroids in close proximity to other asteroids are considered a single entity as far as the map is concerned, and will be shown as a single pin.
Map Zoom (In/Out)
The MiniMap comes with a zoom feature! Press and hold SHIFT, then scroll the mouse wheel up or down to zoom out or in, respectively. The map range can be anywhere between 0 and 5000 meters. The auto-zoom feature zooms in/out in 100m increments, but you can always enter a more precise value via the mod menu or chat command.
The MiniMap HUD Display

- Range
- Displayed Entities
- Map Backplate
- Map Surface
- Map Rings (33.3%, 66.7%, and 100% of Range)
- Distance Markers
- Entity Pins
Which pins are what?
For the HUD Map
The meaning of the pin shapes and colors are as follows for the HUD map:

For the Nav Map
The Nav Map comes with its own set of object icons, as well as a ship classification mechanism. The icons are based on ship size (in m³) and whether they are a small or large grid. The classification is based on the number of weapon systems found on board. See the picture below for details.

TSS MiniMap (LCD Script Mode)
Don’t like viewing the map on the HUD while sitting in a cockpit? Want it to have a more natural feel to it? Fear not! TSS MiniMap (aka Script Mode) may be just the thing for you. As noted in the picture above, you can have the map displayed on ANY text surface via the built-in script system! There are just a couple of caveats to consider, listed below

- When Script Mode is activated, the HUD MiniMap will automatically be hidden
- All scripts will show objects from their LCD’s perspective, however they will only show objects that the player would be able to see if using the HUD map
- If the block is a standalone LCD, you must be within 10m of the LCD for it to update
- If the block is a ship controller, you must be seated in the ship controller for it to update
If neither of the above update rules are met, Script Mode will be turned off. This means that the mod will automatically transition between Script Mode and HUD Mode simply by you coming into range of an LCD or sitting down in a ship controller, unless you’ve already disabled the HUD map in the settings.
The Navigation Map (Nav Map)
The MiniMap mod also adds a full-scale universe map to the game! As with the MiniMap, you can add a keybind to open/close the Nav Map.

Features
- The Nav Map surface is broken up into a 10×10 grid. The Sector Distance shown in the upper-left tells you how far apart each grid line is from the next.
- The Nav Map comes with its own set of object icons as well as a ship classification mechanism. Refer to the picture in the Which pins are what? section for details
- As you move the mouse cursor around, the cursor World Position will update on the left info pane.
- The Map Range is shown in the upper left. This range = half of the map surface width.
- Scroll up / down with the mouse wheel will zoom in / out on the map in 1km increments (Min = 5km, Max = 1,000km)
- Hold SHIFT to scroll in / out at 10x
- Hold CTRL to scroll in / out at 100x
- Hold SHIFT + CTRL to scroll in / out at 1000x (will zoom to min / max immediately)
- Zooming OUT again while at max zoom will display a static Universe Map showing the location of all planets along with your current location
- Zooming IN while at max zoom will pull you out of the Universe Map view
- Left-Click-and-Drag will move the map around
- Left-Click-and-Release will select an object on the map, or if no object is under the cursor, it will select that point in space
- The Object Info pane on the right provides some information about the selected object
- Right-Click-and-Drag to start drawing a box. Releasing the mouse button will gather the first 20 objects found within the box and display them in a list as seen in the below video. You may then select an object from the list instead of clicking on its icon
Buttons and stuff
- Add to GPS: will add a GPS marker at the location of the selected object or point in space
- Get Jump Point: will create a “safe” jump point for you to use
- This will create the closest point to you that is 1000m outside of the object’s radius (atmosphere radius for planets)
- If the selection is a point in space, there is no reason to use Get Jump Point
- You still need to press Add to GPS once the map calculates a jump point
- Show on HUD: will, of course, show the markers on your screen
- Save GPS: will save the created GPS point, allowing it to persist through game reloads
- Center on Player / Center on Origin: do as their names suggest
- The View button
- By default, the map is shown in a Top-Down view (you’ll note the axis markers for X and Z at the top and left sides of the map)
- By clicking the View button, the map will switch to a Side-View, showing instead the X and Y axes
- The toggles
- Below the buttons on the left info pane there are five toggle boxes for Station, Ship, Planet, Asteroid, Character, and GPS Waypoints
- Each of them may be toggled on or off at your leisure to change which item types are displayed on the Nav Map. Note that the player character will always be displayed, even if Character is toggled off
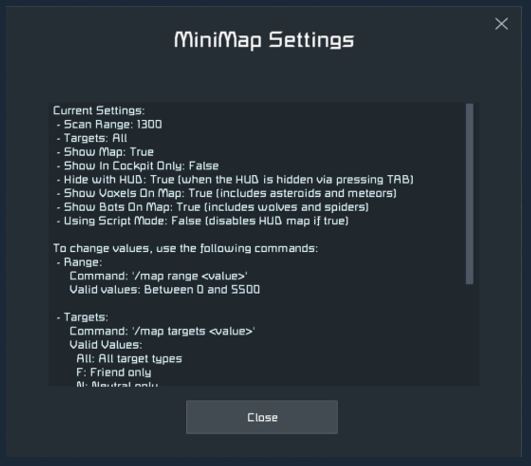
Mod Menu Settings
Many settings are configurabe through use of the Text HUD API Mod Menu. To get to this menu, ensure that the game HUD is visible (toolbar, etc) by pressing TAB if it isn’t, then press ENTER to bring up the chat box, then F2 to bring up the Mod Menu. There should be a chat message visible letting you know that the “Mod menu is enabled.” If you don’t see the message, you either don’t have the HUD visible, or you don’t have the Text HUD API mod added to your mod list. If it is enabled, you should be greeted with a clickable item title “Mod Settings”. Once you click on it, select MiniMap from the Mod list.

Click-to-Change Values
You’ll notice there are several values shown in the mod menu with a value beside them. The items showing a True or False value can be clicked to toggle the item on or off. Clicking on “Range” will allow you to enter a range manually (there is also an auto feature discussed in the How does this work? section). Clicking on “Targets” item will cycle through the options for displayed entities.
Color Scheme
From the mod menu, select “Color Settings” to get to the settings shown below. Click on one of the items and you’ll be prompted to provide RGBA (Red, Green, Blue, Alpha) values for the given item. Alpha refers to how transparent the item becomes. All values are between 0-255. Click “Confirm” to save the setting.

Key Bindings
From the mod menu, select “Key Bindings” to get to the settings shown below. Click on one of the items and you’ll be prompted to enter a key combination for the selected binding. All keybinds can utilize CTRL and/or ALT and/or SHIFT plus a Key. The Key is required, the modifiers are not.

The Chat Menu and Chat Commands
Chat Menu
There are also chat commands, should you wish to use them. To check the current settings or view the list of chat commands, Open the chat box and type “/map” then press ENTER. The list of commands is given below.
- 0 – Max Range Setting
- All – All objects
- F – Friendly only
- N – Neutral only
- NE – Neutral / Enemy
- E – Enemy only
- N/A
- N/A
- N/A
- N/A
- N/A
- N/A
- N/A
- N/A
The Admin Menu and Admin Commands
Should you desire to play in a more constrained manner, you can make use of the admin commands listed below. There are Hud Map specific commands that will not affect the Nav Map, and vice versa; each are listed separately for your convenience. Note that no matter which settings are toggled off, the local player’s “owned” objects will always be displayed for them. Use the command /map admin to display the current admin settings.

HUD Map Admin Commands:
- 1000 – 15000
- N/A
- N/A
Nav Map Admin Commands:
- N/A
- N/A
- N/A
- N/A
- N/A
- N/A
You may also take advantage of the Admin Mod Menu (Alt+F10) which only works if you have Admin Privileges.


How do I report an issue?
Inevitably there will be bugs as new features are added, despite all of the testing that I do – testing in a vacuum never catches them all. If you do find a bug, please comment either here or on the workshop page, and provide the error details found in the mod log. The log can be found at the following location:
%appdata%SpaceEngineersStorage1939217705.sbm_MiniMapJTurp.log
For server logs, it will be in the storage folder within the install directory for the dedicated server.
Special thanks
A big thanks goes out to Draygo for the awesome Text HUD API that made this possible, as well as Digi, DarkStar, Thraxus, and the rest of the crew in the modding channel for helping me put together my first mod!
As well, a hearty thank you to all of those who choose to use the mod. You are the reason we modders do what we do, and appreciate your patience while we iron out the kinks 🙂