
Overview
Tips and tricks that i use for making ships. I will periodically update this guide with its various sections.
Planning
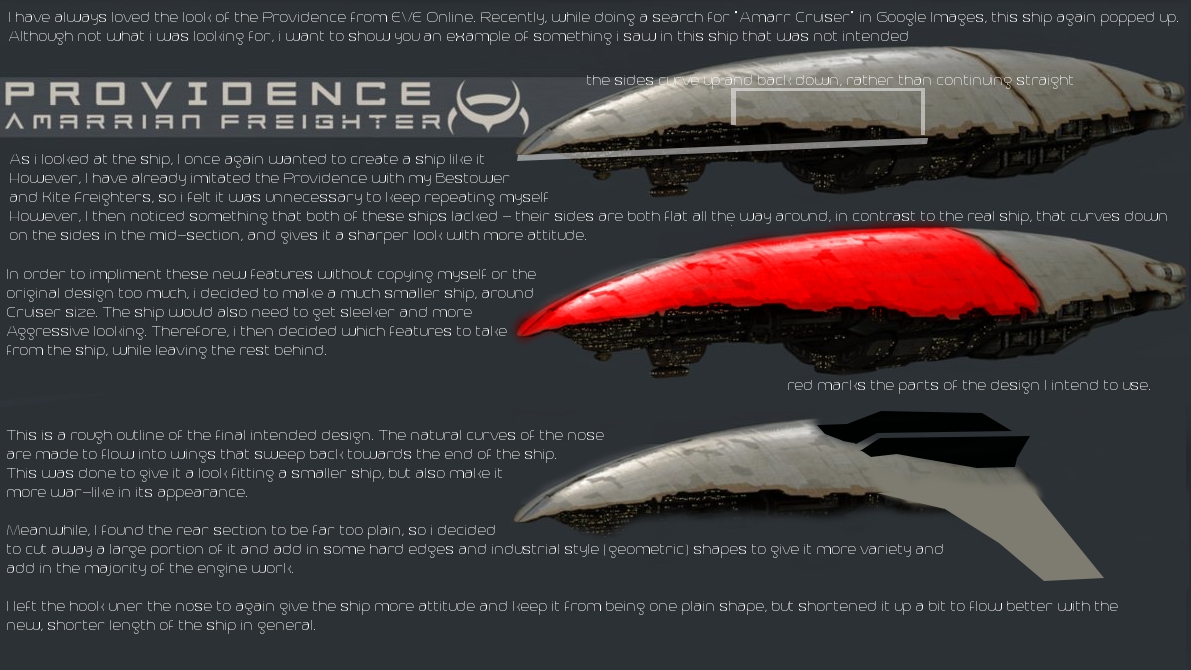
to me, this is the most important part of building your ship. I spend more time brainstorming a ship than i ever do building it. I know that some people are backwards on this, but for my own self, i find this stage to be of the highest importance when building.
Step 1) Ask yourself: What kind of ship do you want to build? do you want this based on role? are you wanting a missile boat? a gunboat? a fighter? a tank? a interceptor? what kind of design features would go with what you want?
are you instead starting with a look? have you found some elements that you want to incorporate into an overall design? do you know what you are going to do with the whole design, and not just the nose of your ship, but the rear as well? what about bottom and top?
Step 2) Research.
Google is your friend, search images of what you want. find designs you like, and for ones you dont like, see if there are smaller parts you do like, and find a way to work them into something you find more pleasing.
building around a role? do some research on what goes into that role. Want a missile boat? Search for Space Missile Cruiser, even search for normal Missile Cruiser if you want. Look at Wikipedia and find out what classifies as a Missile Boat. what kind of systems would such a ship have? what makes sense to be there? what doesnt make sense to be on your ship?
Step 3) Choose a look
Combine the elements you want and find ways to make them flow. does your ship look natural? do your engines look like they belong, or are you forcing them into the design? what about your weapons? do they look forced? if i were to fly this ship could I tell what purpose you meant it for?
How do you want your ship to feel?
Do you want it to feel aggressive? think about sharp points, jagged edges, something that simply looks like it could grab you with its claws and tear you to shreds.
Examples: Klingon or Dominion from Star Trek, Chaos or Dark Eldar from 40k , Generic Pirate ship designs
Do you want it to feel stealthy? think about angled surfaces, a fitting black or camo paint job, a lack of windows and exposed engine exhausts (not internal engines, but proper coverage to hide blue flames to all but the most direct onlookers)
Examples: Mordu’s Legion (EVE), the latest modern fighters and naval ships
Do you want it to look sleek? find ways to make things curvy, and make sure everything flows well. make sure that engines and turrets look like they belong. sink engines into your hull and put turrets in your more bulky looking areas, or areas where they wont be sticking out against the profile like bad acne.
Examples: Amarr or Gallente from EVE, Romulan or Dominion from Star Trek
Do you want it to feel powerful? combine luxury with your military feel. use impressive wings or vertical shapes to make your enemy feel small in comparison. make sure they know who killed them.
Examples: Amarr (EVE), Romulan (Star Trek), Imperial ships (Star Wars)
Do you want it to feel industrial or realistic? think about unfinished blocks, hard edges, lots of simple geometric shapes being thrown together into an overall coherence.
Examples: Caldari, ORE, or Minmatar from EVE, Some Rebel ships from Star Wars, Human ships from Stargate, or other similar sci-fi
Want a middle ground between sleek and industrial?
Examples: Caldari from EVE, and most Star Wars ships
Step 4) Begin planning
whatever works best for you – this is probably the most relative stage
for me, it’s sitting around staring at the floor until the pieces come into place
for others, try drawing it out, or even go into space engineers and begin building with a vague idea to get a better idea of the actual scale of things and where you are actually going to put stuff.
Curves and Slants
In this section, I want to demonstrate a few tools and tricks I use to build basic shapes. It is important that, as you are planning your design, you also plan on how you are going to actually build it. It may be helpful to go ahead and draw out your design at this point so you know what you are going for.
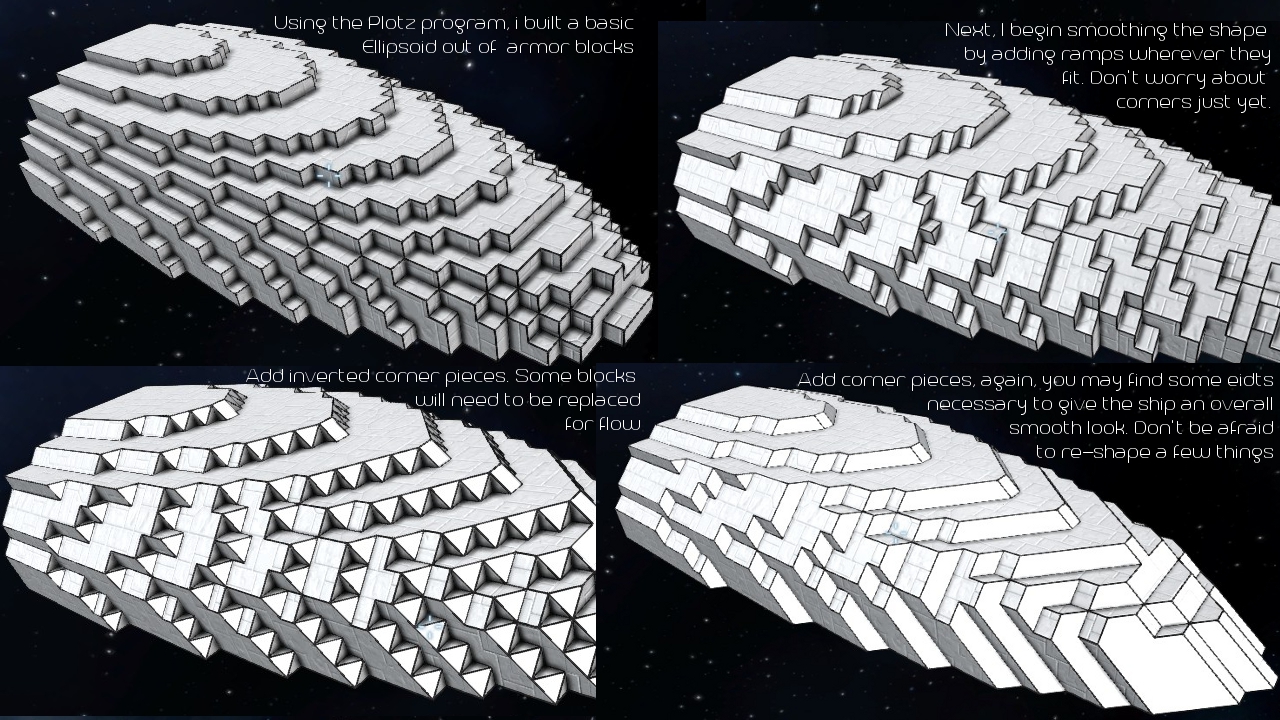
One tool I commonly use to get started is the minecraft plotz editor
you can find it here: [link]
This tool can help you to quickly build 3d shapes, such as ellipsoids, which i often use for the main nose or fuselage of my ships. Going ahead and getting an ellipsoid constructed can often help you improvise from the basic shape and work on other parts of the ship from there.
After the Ellipsoid is constructed, you can see in the next image how bringing in the rest of the ship can be a simple matter of shaving away parts you do not want.
For wings or other parts that vary at both a horizontal and vertical degree at the same time, i often work with one dimension at a time. This makes it much easier to perform complex shapes than trying to do everything at once. it can also help you to map out the area of your wing or other part without having to put hard work into it that may simply get deleted when you find out your wings are too small or too large.
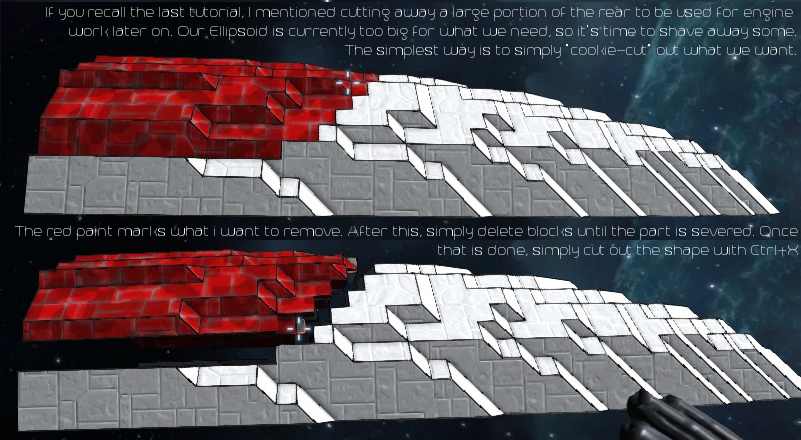
as you can see in the above image, i simply cut away the part of the ellipsoid i want. i do a similar thing with wings, which i often refer to as a “cookie-cutting” method. it is always a good idea to make your wings much larger than you want, because obviously it is easier to shave parts away than have to add them later.
below is an example of the cookie-cutting method that i used on the wings of the same ship.
you can see that i tried one curve, and found that it did not line up well with the curve of the main body, so i created a second, steeper curve which became the wing’s slant. again, it can be a good idea to go ahead and overestimate things the first time so you can simply cut more away and you aren’t having to rebuild later.

when i cut blocks away, i don’t try to do all the in-between blocks, but instead just mark a few points that i think would follow into a smooth slant. after these points are mapped, it is then that i follow with deleting all the in-between blocks in a way that i believe best follows the curve that i had envisioned.
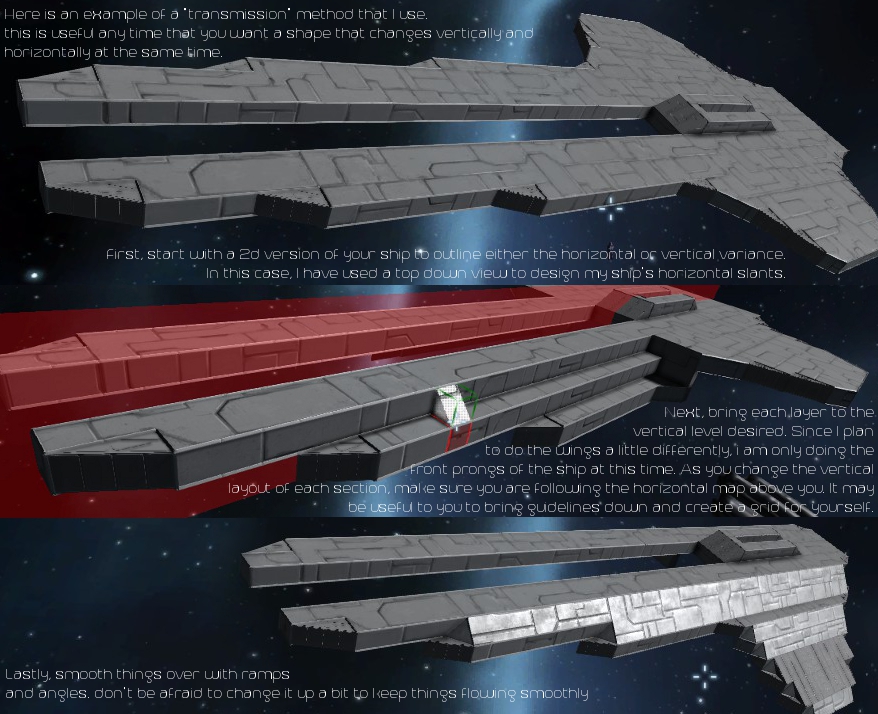
a final method that i use when building comes into play on many of my ships that do not involve plotz. since i do not have my 3d model generated for me, i of course have to find a way to make a smooth one myself. Again, i suggest working with one dimension at a time, and i use a method that i call “Transmitting” where i map out the ship in 2d, and then bring it down on a vertical map to form a 3d model.
it is important to constantly zoom out and view your ship from top, side, forward, and rear views to make sure that everything flows in a reasonable way, and that all sections look like they belong.
the image below shows how i started out my latest ship, the Naga, by first mapping it out in 2d with a top-down view, and then i brought parts of it down on a vertical map and smoothed things over. for those curious, this design was based on the hiigaran interceptor from homeworld.
Interiors I
This is probably the section i get asked about the most, as well as something that i don’t claim to be the best at. However, I will continue to show you the process that i take for making a interior.
I will start by saying that this is probably one of the most relative parts of aesthetics. It entirely depends on the kind of ship you make and the sort of architecture that suits your style. Industrials typically make use of tight spaces, Combat ships do well with simplified interiors for easy navigation, Civilian ships enjoy large, elaborate spaces. KSH ships are tight and use elaborate hallways that twist their way around the ship. I prefer interiors that are more open and easy to navigate and memorize. I do this for 2 reasons:
1) Combat and maintenance efficiency – it’s easier to repair a key component or get to a gunnery station when the path to get there is simple and easy to remember. Admittedly, this also has a drawback of making things easier for boarders as well.
2) personal preference – as a huge fan of gothic architecture and other architectures that incorporate large, open spaces, i personally enjoy the feeling of feeling small compared to a room.
Now to the real stuff:
In short, the steps i recommend to building an interior are these:
1) Simplify your interior
2) Make your room boundaries & walls
3) Create a flow between walls, roofs, etc.
4) Furnish
5) Paint and light it up
1) Simplify Your Interior —————————————-
This goes off the assumption, first off, that you build your exterior before the interior. I suggest this because often an overly ambitious interior can force a very boxy and ugly ship on the outside. If instead you build your exterior first, you can create a more efficient and detailed ship exterior. Then, your interior is simply a process of adaptation. Obviously, while building the exterior, you also want to have an idea of where you are going to put things, so leave some space where appropriate.
After the Exterior is finished, we are left with a room with many gaps in walls and lots of hard edges. 
1) You are creating a more efficient ship design, where your interior adapts to the systems, not the other way around. This is especially important because many of the components are rather large (which is why i suggest doing engines before anything else)
2) This will limit your interior space, and will often make large, overwhelming spaces easier to work with and adapt to.
2) Make Room Boundaries & Walls —————————————-

3) Create a Flow Between Walls, Roofs, etc. —————————————-
This is where most people seem to have trouble, as it is also the most complex step. The main key is to not do everything at once. Take things at a time and be willing to let it be ugly for a bit while you sort things out. You can always delete blocks later.


Interiors II
4) Furnish —————————————-

5) Paint and Lighting —————————————-

1) This keeps you from having to delete your lights due to the block placement system
2) You can adjust your lights to the color of the room to match, and make sure that things are not too intense.
For paint, A good contrast is always nice. I prefer white and black, though obviously many prefer other things. It is most important to create contrast somewhere in your room so it is not all the same color. I prefer to make the floor the contrast, as it seems the most natural. With my aesthetic style, the floor also stands out better this way, since it is the only part of the room’s shape that does not flow with the rest of the room, like the roof flowing into the walls.


Like paint, it is important for lighting to also contrast. I like to create a contrast between the lower and upper parts of the room, which works especially well when you have larger, more open spaces. Complementary colors are great for this, and are fairly instinctual. However, if you want a more objective reference, look here.[en.wikipedia.org]