
Overview
Welcome to The Forest Guide: Everything You Need to Know!This is a guide about the ins and outs of the recently released survival horror game called The Forest. This guide will contain information about the different kinds of enemies in the game, the items and craftables available to you in the game, locations of the caves and more! If you feel I missed anything about the game feel free to let me know. I will try to add it as soon as possible as this is currently a work in progress.Enjoy!BIG SPOILER WARNING:IF YOU HAVEN’T PLAYED THE FOREST AND DON’T WANT TO BE SPOILED TURN AWAY NOW!———————————————————————————————————————–v0.8.5 The Quality of Life Update
Intro

Story
The Story or Plot is the background of the game. It is more or less complete currently, though the game developers will probably still add to it. The game has a finite ending now, upon which creative mode is unlocked, and the player can go back to playing the same file. In the to do list the first task listed is ‘Find Timmy’, which prompts the player to begin exploring the peninsula and developing the story. Many lore items can be found that add to the story, some of which can be added to the survival guide in the notes section. This page attempts to place all of the assorted story pieces in chronological order, and it contains many spoilers.
Much of the story is optional, and in many cases, can be completely ignored while still beating the game, such as in the case of a speed run.

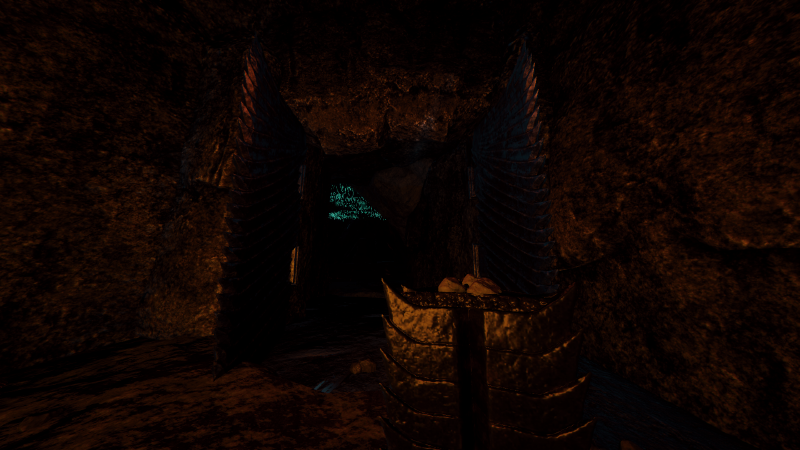
It is assumed that the caves suffer regular cave-ins, due to both the sounds the player can hear while in the caves (rocks tumbling) and the fact that several bodies (such as the Christian Missionaries below) are in an area only accessible by the rebreather yet come from a time period without such technology.

Due to the presence of the Latin Paper, it can be assumed that the group of missionaries were Roman Catholics or similar, including someone with decent knowledge of church Latin. They left many Crucifixes scattered around the place, along with crosses projected on to walls sometimes near their heavily decayed and mummified corpses. Bibles too are a frequent find near their old camps and inside the caves next to the corpses. Their corpses are often left alone and mummified, which suggests a sudden catastrophic event which led to their death. According to the Latin Paper, the Missionaries encountered a four legged woman, most likely referring to Virginia. This would mean that mutants at least were already on the peninsula at this point, further pointing towards the artifacts as the cause of the mutants.

The Jarius Project was probably first marketed as a program, whose aim was to heal terminally ill children. These initial test subjects may have been sick children whose parents had volunteered them for participation in clinical trials at the facility where they were relocated to and continued receiving medical treatment. It’s possible that Dr. Matthew Cross began experimenting with the artifact by using a living child to revive one that had died. However, this would in turn result in the death of the submitted child, who themselves would subsequently need to be revived at the cost of another, thus creating a cycle of child sacrifice and resurrection.
After the process, they were placed in observation rooms where they began to develop genetic mutations ranging from grotesque physical deformities to highly exponential growth rates. These genetic mutations were isolated and studied for their possible applications in other fields, such as cloning and adult longevity. At some point, something went terribly wrong in the lab, as shown on one of the camcorder tapes; an Armsy escaped from its containment, which possibly led to a cannibal/mutant uprising that left the facility overrun. Almost all of the human inhabitants are gone, leaving behind decaying corpses, bloody body parts, and a few live mutants and cannibals. It is suggested that this has happened fairly recently, as the head scientist Dr. Cross can be found at the end of the game, dead. Presumably killed by his daughter who stuck crayons into him.

- Cave Divers. Diving camps can be found deep in the caves, in sections only accessible by using the rebreather.
- Cave climbers/explorers. They have tents inside the caves as well in the non-water portions, along with some tents on the inside wall of the cenote.
- Hikers/explorers. Their sleeping bags and tents can be found all over the forest topside.
- Film Crew. They have a larger established camp with modern tents and film equipment scattered about, with scripts for a “Survivor” type program to be found on the ground nearby.
These groups appear to have come at assorted times, and all appear to have been cannibalised with no survivors.

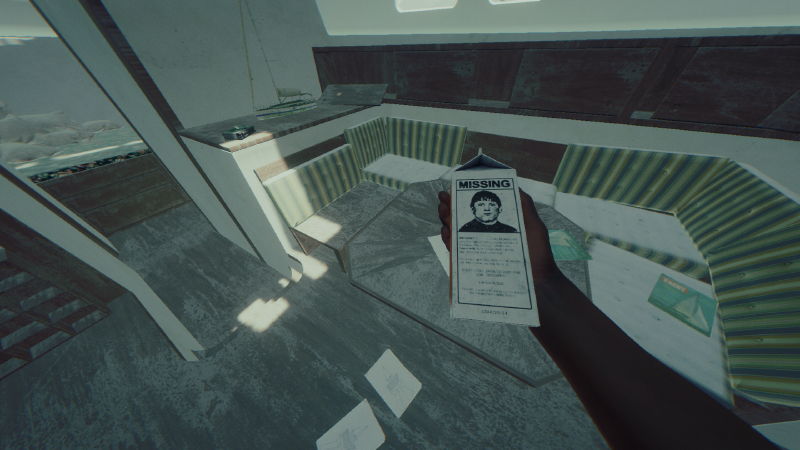
This yacht seems to have arrived in 1984 or later. Supporting evidence includes the yacht magazine dated to 1984. On rare occasions Matthew Cross can be seen walking around on the yacht, so he may have a connection to it, or perhaps he uses it as a temporary shelter. Several drawings made by his daughter Megan Cross can also be found.
Story 2

He had a wife called Jessica, who divorced him at some point, along with a restraining order filed against him. It is unknown whether this was before or after their daughter Megan’s death, and whether she was aware of the full nature of his work at Sahara Therapeutics. Megan appears in a Camcorder video showing her alive and in a wheelchair in what appears to be the Sahara Lab’s Cafeteria with many other people present. Another video shows Megan, again in a wheelchair, present during the escape of an Armsy. An autopsy report can be found and picked up which shows that Jessica was murdered in a homicide by multiple stab wounds and head trauma.
Matthew eventually gets fired from the lab for unethical and inappropriate use of company equipment, presumably tinkering with the resurrection obelisk. Matthew is on the peninsula alone (except for the cannibals), and he decides to use the power obelisk to bring down an airplane to steal a living child (Timmy) to revive his daughter. He is the red man which is seen by the player after the plane crash. The red paint acts like a protection from the cannibals.
- The protagonist who you play as is Eric LeBlanc. He appears to have adept survival skills, as he can build shelters and go hunting within a short amount of time after the plane crash, with nothing but a handheld axe and an outdoor survival book.
- He appears to be a reality TV star, as found from a magazine cover. This magazine also suggests his wife is dead.
- He is most likely a TV survivalist, similar to Bear Grylls.
- He has one son, Timmy.
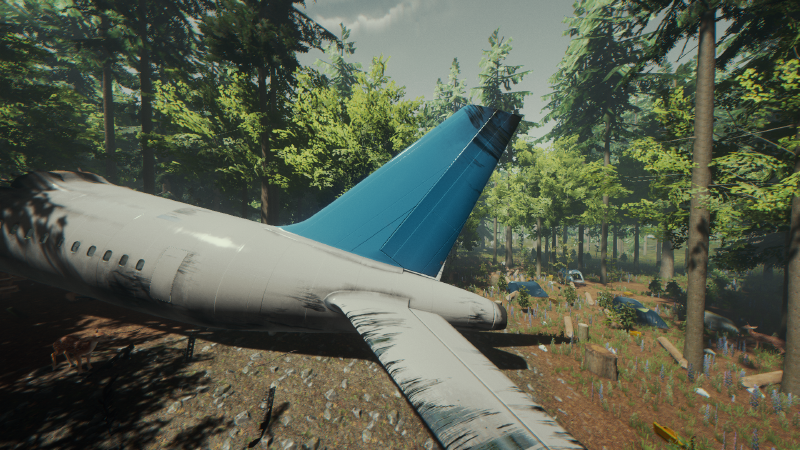
- The plane may have originated from New York, as certain passengers are wearing “I ♥ NY” shirts and suitcases contain statue of liberty figurines.
- It is assumed that the plane is predestined to arrive in Germany, because the label on the plane resembles logo for the German airline “Lufthansa”.
- The plane was carrying many tennis players, who had balls and rackets in their suitcases.
- The plane crashes after experiencing sudden storm-like turbulence and engine failure.
- Some indeterminate time after the crash, a man in red paint (Dr. Matthew Cross) takes Timmy away while the player futilely crawls towards him.
- Only Timmy, the dead stewardess, the red man (Dr. Cross), and the player(s) are present on the plane when the player wakes after the crash, suggesting any dead had already been taken by the cannibals.
- The mostly-intact condition of the rear section of the plane make it possible that many other passengers could have survived, but that they had already fled the area, possibly upon the death of the stewardess. Their scattered locations across the peninsula suggest that some may have survived as long as several days before falling prey to the cannibals.
- The player explores the peninsula to great extent, gearing up to head to the bottom of the sinkhole.
- The Vault, found at the bottom of the sinkhole, can be opened with the keycard. It leads to the research lab.
- After exploring much of the lab, the player finds the Resurrection Obelisk, with the dead Timmy inside. The obelisk/machine prompts him for a sacrifice when Timmy is hooked to an operating table.
- The player then realizes that Matthew had kidnapped Timmy to use as a sacrifice to bring Megan back to life.
- The player goes on a hunt for Megan, finding many of her childish drawings that are just like Timmy’s.
- He encounters a dead Matthew Cross, with crayons shoved inside his eyes and mouth. A Megan Drawing suggests that Megan saw her father as a scary red monster, possibly giving motive for Megan killing her father.
- Megan is finally found, surrounded by drawings and toys. She flies a toy plane through the air before crashing it to the floor and pointing at the player, suggesting she knows who he is.
- Megan then suffers a seizure and transforms into a boss mutant that behaves and looks similar to a Virginia, including the spider legs and mutant babies.
- After defeating Megan, the player takes her corpse back to the artifact, only to find out that a live sacrifice is required.
- The player then uses a new keycard found on Megan’s body to go to a second artifact. This one has the power to crash planes, seemingly by using an EMP. The player can then choose to use this power to bring down a plane, or shut down the device and let the plane pass safely.
After taking down the plane, the screen cuts to black with the text “One Year Later”. The player and his son are being hosted on a talk show, where the player competes in a friendly tree chopping contest with the host, known as Doran. It is assumed that the player did the same thing that Matthew did, kidnapping a child, and resurrecting his son. During the cutscene, Timmy is shown to be having small tremors and shakes. The happy music turns to horror as Timmy begins to have a violent seizure on the ground, implying that he will undergo a mutation just as Megan did. The character rushes over to comfort Timmy. Timmy’s spasms suddenly stop and he looks up at his father, the player, and smiles. It immediately cuts to black and the credits begin to roll, The next scene appear within Timmy’s perspective as he is now a young adult, in his small apartment, he looks over his pinboard with a map of an unknown island (with a possibility that said island has a link to future plot). Scene ends in another cliffhanger as Timmy goes into seizure again. He walks to his window, overlooking a city.
If the player chose to shut down the device, he will leave Timmy behind (even more signified as he burns his remaining photo of Timmy) and return back to the the island with the possibility of being rescued (albeit without Timmy with him). Game will return to normal with pacification and horde mode unlocked via secret artifact, and a 5 new craftable decoration.
Achievements

Share a food or drink item in MP
How to obtain: (Multiplayer Only) Combine your metal tin tray with any item on the crafting mat and equip it, then have another player collect the item from the tray.

Share a weapon in MP
How to obtain: (Multiplayer Only) Combine your metal tin tray with any weapon such as a crafted club on the crafting mat and equip it, then have another player collect the item from the tray.

Revive one co-op player
How to obtain: (Multiplayer Only) Revive one player in multiplayer mode, must be done before they die. Players who die to sharks or drowning cannot be revived.

Revive ten players in co-op
How to obtain: (Multiplayer Only) Revive ten players in multiplayer mode, must be done before they die. Players who die to sharks or drowning cannot be revived.

Sleep with another player (group sleep)
How to obtain: (Multiplayer Only) You need to sleep in the same shelter as at least one other player to get this achievement.

Eat an enemy
How to obtain: Requires you to eat 2 arms and 2 legs. Can be cooked on a fire, dried on a drying rack, or stewed. Cutting limbs will reduce sanity by 1 per limb and eating limbs will reduce it 3 per limb.

Eat an entire family
How to obtain: Requires you to eat 12 arms and 12 legs. Can be cooked on a fire, dried on a drying rack, or stewed. Cutting limbs will reduce sanity by 1 per limb and eating limbs will reduce it 3 per limb.

Kill all animal types and display heads
How to obtain: Requires you craft all animal head displays and place them.

Killed downed enemy with rock
How to obtain: Must use a plain rock, not the Upgraded Rock.

Chop up 50 bodies
How to obtain: For each body, you need to remove all their limbs. I.e. both arms and both legs.

Kill 6 or more fish with a stick of dynamite
How to obtain: The small ponds in the game only contain 3-4 fish at a time. To complete this achievement, you have to find fish spawns either in the large rivers (Geese Lake) or on the coastline. When you find a big enough group of fish, light a stick of dynamite and toss it near the water, as close to the group as possible. Careful, however, to not chuck it into the water, as it will extinguish the dynamite. Alternatively, you can use bombs, as you can throw them into water.

Kill 100 cannibals
How to obtain: While most people will naturally complete this achievement by playing a longer single player or multiplayer game, the quickest way to complete it is by setting up some traps in a high traffic area and lighting a bonfire to attract large groups of cannibals.

Kill a shark
How to obtain: Kill a shark. One sticky bomb will stick to the shark and kill it. Ranged weapons are also recommended. A shark will kill a player in 2-3 bites. They cannot be attacked under water. They are only found in select areas of the sea.

Kill a bunny
How to obtain: Currently, this achievement can only be successfully done in single player mode. The quickest way to complete this achievement is to start a normal game, once you find a bunny, they can be killed easiest by using a bow, slingshot or throw able rock, but you can also catch them with the Katana or other methods. Animal Traps can make this easier.

Kill bird with arrow
How to obtain: As the description states – simply kill any bird with any arrow using either the crafted bow or modern bow in single player mode and you will obtain this achievement. It’s easier if the bird is on the ground.

Catch fish with a trap
How to obtain: Build a animal trap in water where fish are. Allow the trap to catch a fish. Must be the water based trap version.

Grow all plant types
How to obtain: Grow blueberries, cone flower, and aloe. Blueberries will only grow in a garden, not a wall planter. Mushrooms in caves aren’t required.

Craft 10 medicine items
How to obtain: Requires herbal medicine and herbal medicine+, not energy mix or energy mix+

Collect all cassette tapes
How to obtain: See Cassette Player or Cassette Tape

Make and wear stealth armor
How to obtain: Chop down several bushes until you have 15 leaves, kill a lizard or crocodile and skin it, combine 15 leaves and one lizard skin then equip the stealth armor

Build a super long wall
How to obtain: All you need to do is place the “blueprints” for your wall. The player must make sure to make a custom wall as the defensive wall does not work towards this achievement.

Set off 20 bombs
How to obtain: Go into your inventory and equip your bombs, and simply throw one to set it off. Dynamite, Sticky Bombs, and Head Bombs seem to count towards it.

Use the compass
How to obtain: Go into your inventory and equip it.

Repair a shelter
How to obtain: Build a Hunting Shelter, hit it with a low-damage weapon (e.g. an upgraded stick) and then use your repair tool on it. Sap may also work.

Cut down 100 trees
How to obtain: Cut down 100 trees using axes, the chainsaw or explosives. Stick trees don’t count.

Cut down 1,000 trees
How to obtain: Similar process to Climate Change, just more trees.

Craft 26 specific items
How to obtain: Must craft all base craft able items in the game.
Achievements 2

Collect all robot pieces
How to obtain: Once you have all the pieces, go into your inventory and combine each piece to create the entire robot to trigger achievement. Works in single player and multiplayer.

Play through entire game without killing or eating animals
How to obtain: Well just as the description says, you have to beat the entire game without killing or eating a single animal.

Sleep on the yacht
How to obtain: Sleep in the bed on the Yacht; it is located off of the southern coast of the peninsula. Beware of the shark nearby.

Survive 1 night
How to obtain: Survive the first night all the way through. You can sleep if you want to.

Eat all mushroom types
How to obtain: As the description says eat all mushroom types, possible to obtain achievement by eating the same type of mushroom in some cases.

Survive 5 nights
How to obtain: Self explanatory, survive 5 nights in game.

Don’t kill any cannibals for more than 10 days in a row
How to obtain: Playing on vegan mode works. It seems that playing in Multiplayer mode makes this success easier to get, as you are not playing in Single player you are not killing any cannibals in this mode. This glitch needs to be confirmed

Explore all caves
How to obtain: One of the most difficult achievements in the game, time consuming and difficult. Exploring different caves on different game saves will not combine for progress.

Find all missing passengers
How to obtain: Self explanatory, find all the passengers in a single game.

Pass 50,000 steps
How to obtain: Must obtain the pedometer and walk around. Steps only count after you get the pedometer.

Finish Game
How to obtain: Self explanatory, beat the game.
Secret Achievments

Survive 100 days
How to obtain: Self explanatory, survive 100 days

Set off sprinklers in end game
How to obtain: This can be done with a fire arrow or the flare gun, particularly in the armsy hallway in the end game section. Simply shoot him with either weapons to set him alight and the sprinklers will set off. This can also be done by shooting a fire arrow at a sprinkler directly.

Drink water from the water cooler that has the human head inside it
How to obtain: The cooler is found in Sahara Laboratory, in one of the rooms on the right side of the hallway leading to the second artifact.

Build a gazebo
How to obtain: Build a gazebo. If it’s lower to the ground it will save a lot of logs and sticks.

Drink from the coffee machine
How to obtain: Drink coffee from a coffee machine located in the Sahara Laboratory Cafeteria.

Buy a soda and candy from vending machine
How to obtain: The vending machines are in the lab’s cafeteria – use each of them.
Animals

Bats are passive animals that appear in the cave system of The Forest. They cannot really be interacted with and serve only for immersion purposes. It is possible to kill bats by hitting them with a weapon of choice, but they do not drop anything.
Bats are used often to “spook” players by appearing suddenly and squeaking as they fly past. They flee from certain cave entrances upon approach, but they also fly by in certain designated spots inside the caves, as well as roosting in clusters on the ceiling. Because of their fleeing from cave entrances, they are a very useful indicator when searching for new caves. Their sound can be confused with that of a distant Virginia or other cannibals. When they are attached to the cave ceilings they can be lit on fire with the hairspray and serve as a temporary light source.

Types of Birds
- Bluebird – Pretty much all around the peninsula.
- Cardinal – Pretty much all around the peninsula.
- Canada Goose – Close to lakes, particularly the goose lake.
- Crow – Appears more frequently in wooded areas. Typically seen around corpses.
- Robin – Pretty much all around the peninsula.
- Seagull – On the shores or near lakes.

Deer can be found in the wooded areas though also in open fields, such as the Fertile Lands. When killed, they can be skinned for one deer skin, then butchered for four meat and finally drop a deer head. Deer are especially skittish and fast and can easily outrun the player, making hunting them quite a challenge if unprepared.

Types of Fish
- Reef Surgeon
- Pacific Cod
- Rock Beauty Angelfish
- Bluecheek Butterflyfish
- Paracanthurus
- Brocaded Carp
- Normal Carp
- Pacific Cod
- Temp Cod

They are technically an animal though they have no properties of an animal in the game. They can be found in certain locations in the ocean can be picked up and stored in the inventory. Once picked up, oysters appear in the player’s inventory. From here they can be directly eaten without further cooking or preparation. They can be used in stews as extras, though they do not count as an ingredient.

Rabbits can be found almost everywhere in The Forest, and can usually be killed with one hit using any type of weapon. Once dead, the rabbit can be harvested for one rabbit fur, one raw rabbit, and one rabbit head. The meat can then be cooked on a fire or stored on a drying rack and eaten.

Lizards can be found almost everywhere on the surface of the peninsula, apart from the coasts and deep snowy regions. When killed, the player can obtain a lizard skin and a raw lizard as well as a lizard head from them.

Raccoons are some of the rarest animals in the game. When killed and skinned, they drop 1 meat, 1 raccoon skin and 1 raccoon head. As with most small animals in The Forest, raccoons can be killed with a single hit from any weapon. It is noted that they are nocturnal only in patchnotes for v0.31, however they can be spotted during the day. Raccoons are well sought after v1.0 implemented the warmsuit, this is the only current use for raccoon skin in the game.

When killed, they give the player one small meat and one Squirrel Head. As with most small animals, squirrels can be killed with a single hit by any weapon in the game. Squirrels can be caught in animal traps though they are often not wanted by most players. Consider killing them before triggering the trap, a crafted bow or a modern bow is often the most effective. Squirrels cannot climb trees

Tortoises are passive animals that spawn in specific areas around water, especially in the swamp lands. They move very slowly and will hide inside their shell if you try to attack them. Similar to turtles, the tortoise will drop a turtle shell and a piece of meat after death. Furthermore, its head can be collected. The tortoise will die from a single hit to its head, but take reasonably longer to kill if hit on the shell.

Sea Turtles are passive animals that spawn along beaches, and can be seen emerging from the ocean or dragging themselves along close to shore. Being aquatic turtles, they move slowly across land and are easy prey. As of v0.25, they have no animations other than crawling, and seem to have no real goal after coming ashore. They drop one turtle shell, which can be used to craft the water collector, or as a sled as of v0.67, and two meats, which can be cooked or dried and eaten.

Similar to the crocodile, the boar is an aggressive animal capable of attacking and damaging the player. If the player stays in the vicinity of a boar for too long, it will make a squealing sound and start to charge towards the player. If the boar hits the player with its charge, it deals a moderate amount of damage to the player’s health. After a charge (regardless of whether it successfully hits the player), the animal retreats a small distance before attacking again or wandering off.

Crocodiles can be found scattered around the northern parts of the river that flows through the peninsula, though they will almost never be found in the water. They drop 4 lizard skin and 4 meat if killed, along with their head that can be used for decoration. Crocodiles have one of the rarest spawn rates of all huntable animals.

Sharks can typically be seen swimming long before the player is in any danger due to their tell-tale dark shape in the water. If the player gets too close, a shark will turn and charge towards them. A hit from the shark will destroy half of the player’s health regardless of armor worn, but long as some distance is kept, they ignore the player. The player has to be rather close to the shark in order to provoke a bite, and bites can be dodged by jerking to the left as it tries to bite you. It will not immediately try to bite again, but will instead swim off for a bit. Sharks can be killed from the shore or any platform out of the water with 2-3 arrows (spears do not work). The shark will flail with each hit and, when dead, the body will sink to the bottom. Tip: set your ocean quality to flat to easily see sharks and other creatures/objects underwater.
These animals serve no purpose other than to add immersion to the game. They cannot be killed or otherwise interacted with – apart from spiders, which sometimes appear when rocks are picked up and can be killed by stabbing them with a spear or other weapon.
- Flies
- Frogs
- Spiders
- Starfish
- Ants
Enemies
Enemies are divided into two groups, Mutants and Creepy Mutants.

Most patrols of mutants consist of 2-4 regular mutants and 1 Mutant Leader. They are the most human looking and common variety of all the mutants. They are the main “group” of mutants, from which the skinny mutants seem to have split off. The males may be decorated with human skulls, masks, bones, feathers, etc., sometimes wearing necklaces made out of CDs or makeshift lamps over their heads attached to poles on their backs.

Skinny mutants are the second main faction of mutants, the other being the Regular Mutants. They are more aggressive and more hostile than Regular Mutants, and will immediately attack the player unprovoked as they are hostile from the beginning of the game. Skinny Mutants are distinguishable from Regular Mutants as they are much skinnier, smaller, are covered in blood and dirt, do not wear clothes of any sort, and will move on both arms and legs. They are faster than Regular Mutants, but are weaker in both health and attack damage. The patch notes for v0.54 indicate they can only carry sticks, rather than actual weapons.

Pale mutants will often be found traveling together with skinny pale mutants or found in caves together. Pale mutants stand tall, and move in a very human like manner. They, along side skinny pale mutants, are the only kind of mutants found in the caves. Pale mutants have the same complexion as skinny pale mutants and are slightly larger than them.

Skinny pale mutants will often be found traveling together with pale mutants or found in caves together. Skinny pale mutants stand hunched over, and move in a more primitive, skittering fashion. They, along side pale mutants, are the only kind of mutants found in the caves. Skinny pale mutants have the same complexion as pale mutants.

Painted mutants are their own distinct group. Painted mutants come in male and female forms. Regardless of gender, they will have small black crosses all over their body. They are noticeably stronger and faster than their counterparts, the regular mutants. Painted mutants have been observed traveling with fire mutants. Like the regular mutants, painted mutants usually follow a leader. They can also be backed up via intimidation, like regular mutants.

The Masked Mutants are a late-game tribe of mutants, added in patch v0.55. They resemble pale from the neck down, but they have the faces of plane passengers and other victims stitched into a mask that they wear on their head. Some of the pale mutants in the lab have been replaced with masked mutants. They are similar to masked skinny mutants though are much smaller, they always travel together though have very different stats and behaviors.

Masked skinny mutants are similar to masked mutants, though are much smaller, they almost always travel together though have very different stats and behaviors. Masked skinny mutants are almost exactly the same as skinny mutants and pale skinny mutants, they are however the strongest of all the skinny mutant types. They are faster than masked mutants, though they are physically weaker.

They are usually sent to attack the player’s base. They can however occasionally be part of day and night Patrols, if the player has highly raised hostility. The fire mutant carries a fire torch with several tennis balls hanged on his belt. They will attempt to throw the lit tennis ball at the player if he is a certain distance away from him, inducing burning damage. If the player is in immediate striking distance, the Fire thrower will attack with its torch instead.

Dynamite mutants were easy to spot; they are very orange in color and carry a stick of dynamite and a flaming stick. They have on decorative shoulder pieces, a loincloth, eyeliner, and sometimes warpaint. Dynamite mutants are bald and barefoot (like any other mutant). This enemy was removed in update v0.28d

They are taller than the player and normal mutants, along with being significantly stronger than them. They will bellow angrily intermittently, so the player can usually hear an Armsy before it is seen. As with all creepy mutants, it is best to kill it from a distance with fire and explosives, so that it does not get a chance to hit.

Like the Armsy, it appears to be formed by two (possibly three) bodies that are struggling and writhing against each other. The Virginia has 6 legs, claw-like feet, breasts, and 6 malformed arms (four of which appears to have been split in half). The Virginia is also the only creepy mutant with visible genitalia, as the vulva of the front female body appears to be extended along the underside to connect to the vulva of the rear female body. The Virginia has no facial features. However, the front side of the Virginia appears to be the side with the two least malformed arms with functional hands.

Unlike other Creepy Mutants such as Virginias or Armsies, Cowmen have facial features and don’t appear to be formed by multiple bodies though they are also taller, wider, and stronger than Mutants. Cowmen can be said to resemble a grotesquely obese human or an early human fetus as evidenced by the distorted, smoothed out facial features with tiny arms, a protruding stomach, the lack of genitalia, and the space between the legs.

Mutant babies can be found in caves, though will appear above ground on or after day 7 in the company of a Virginia. They can sometimes go wandering away from the Virginia seeking the player though will generally stay with her. Mutant babies have one leg, with a stump where the other should be, as well as only one normal arm, having a smaller and clawed one as the other. They screech like angry birds, and they will crawl towards distractions, such as the player moving or a lit flare. They can be often heard before seen, due to the squelching wet sounds they make as they drag themselves across the ground. They sometimes give an almost human-like cry when killed, creating a very unsettling feeling in the player.

Very rarely, a blue skinned Armsy may be encountered. They have more health, and it may be faster or do more damage, though this would require confirmation. The player is advised to take extra caution against a Blue Armsy. They can be found on the surface traveling with pale mutants and even another blue Armsy beginning around Day 18. Although called “Blue Armsy” they appear more gray like the pale mutants in direct sunlight.

Very rarely, a blue skinned Virginia may be encountered. They have more health and are both stronger and faster. The player is advised to take extra caution with blue Virginias. A blue Virginia can be found in the large wet cave room near the modern bow location. Around Day 20, they will begin spawning on the surface and may often travel with a regular Virginia, a Cowman, and two Armsys, one of which could be blue.

The Worm Creature appears to be made up of multiple (over a dozen) smaller entities that look like slugs with teeth on one end. These smaller creatures do not possess much power on their own, but they seem to have an incredible hive mind attacking behavior. There seems to be a number of ways the worms can spawn: a large number all at once, only a few, and a single one. If all the worms spawn at once, they do so with great force.

The End Boss is an enemy with several appendages, created from a small child named Megan Cross, using the Resurrection Obelisk. It can be found in the research lab and as a late-game enemy. It is the final boss of the game.
Tools
Tools are items used to assist the player in certain tasks. Many of them are found scattered around the Peninsula (with some being crucial to plot-progression), while others can be crafted at any stage of the game. Most tools that can be held double as a weapon of varying strength and speed. These items can be used to fend off the cannibals and other enemies the player encounters.
Currently no tools are needed to construct buildings or to craft other items. However, specific tools, specifically axes, may be required to cut down trees to get the materials needed for a building. The first tool you obtainable in the game is the plane axe, which is can be found right after the introduction sequence.
- Plane Axe – The plane axe is one of the first items the player picks up. After the plane crash, the axe can be found at the end of the aisle, embedded in a dead stewardess’ corpse. It can be picked up by simply walking over it, it will automatically pick up. This is a unique instance, it doesn’t happen with other items after leaving the plane.
- Crafted Axe – Like the rusty axe, the crafted axe will chop down trees in 13 hits (9 for the modern axe, 17 for the plane axe). It can also be used to dismember dead corpses.
- Rusty Axe – This axe is slower and deals less damage than the modern axe, but has higher knockdown power and the highest block level for a weapon, similar to the club and the turtle shell. This can be used to prevent all damage from cannibals and mutants when blocking. The rusty axe, like the crafted axe, will chop down a tree in 13 hits (9 for the modern axe, 17 for the plane axe). It can also be upgraded and combined with cloth to add extra burning damage. Like all other axes and the katana, it can be used to dismember dead corpses.
- Modern Axe – The modern axe has a carbon steel head with a fiberglass shaft. It is the best available real axe for tree cutting in the game. When used as a weapon, it deals five bars of damage. The modern axe swings slower than the plane axe, but knocks down cannibals more often than its weaker counterparts. Possessing nine bars of block, equivalent to the crafted axe and Crafted Club, it blocks almost all damage. The rusty axe, turtle shell, and club will block 100% of damage however.
- Chainsaw – The chainsaw is a unique tool and weapon in that it does not require stamina to use and only requires holding down the attack button to operate. It is powered by fuel, which can be found in various locations around the Peninsula. In single player, fuel does now respawn once you reload or reenter a cave. The chainsaw is currently the best tool for cutting down trees and removing tree stumps. Cutting down trees with the chainsaw does not raise your strength and athleticism as much as using an Axe.
- Upgraded Stick – The main purpose of the Upgraded Stick is to be used as a fire torch. It can be set on fire with the lighter to create a useful light source. A burning torch will also negate the cold and wet status. Once crafted, it will become a separate tool from regular sticks.
- Crafted Club – Just as the cannibal Club, the Crafted Club is a slow weapon but deals significant damage to enemies, and is very efficient to block, it has the same block as the modern axe and the crafted axe. This weapon can also be upgraded, just like (as recently) the enemy’s club. Rarely, tougher cannibals like painted cannibals can be seen wielding a Crafted Club that can be looted upon death.
- Flashlight – The flashlight emits a bright source of light when turned on, and it lasts for about 10 minutes. Unlike the lighter, its beam of light is brighter, white, and faces only the direction in which it is pointed. It can be found in caves. Before the tactical flashlight runs out of battery it will begin to flicker. If the tactical flashlight gets blood on it while fighting an enemy, its beam will become red and its brightness significantly increases, illuminating a wider area.
- Flare – Flares are a very useful in the caves, as they emit more light than the lighter and can be thrown away to distract cannibals. They don’t work underwater and thrown flares can’t be picked up again.
- Flare Gun – When shot, a flare shoots out of the gun towards the direction the player is looking. The projectile flare can set plants on fire, granting the burning status effect, as well as cannibals, mutants, and animals. It is a very effective way of killing mutants, as it can set them on fire, although a single shot doesn’t deal the same amount as a thrown molotov.
- Lighter – The lighter emits a small amount of light and is used to start fires and ignite effigies, molotovs or weapons that have been crafted with cloth. The player starts with the lighter, and it will never run out of uses. By default, the lighter can be equipped by pressing L. When held, the lighter may flicker on and off, showing the player to switch it back on (which is done automatically when it goes off). This can lead to some unpleasant situations, especially when the player is really in need of a light source.
- Climbing Axe – It can be used to climb various rocky cliffs on the peninsula and specific walls in the caves. As a weapon, the climbing axe deals less damage than the plane axe, but swings fast like the Katana. It can be a useful weapon against fast and weak enemies, like starving cannibals. However, it cannot be upgraded. It can be used to chop limbs on cannibals corpses, but cannot be used to chop down trees.
- Compass – The compass cannot be equipped with a lighter or flashlight. However, the letters on the compass glow in the dark, removing the need for a light source to illuminate it.
- Map – It can be brought up by pressing the map key, M by default. Like the survival guide, it sports a clip-on reading light. The player’s current position is indicated with a red thumbtack. As of 0.65b, the game’s exploration objectives and achievements are tied to map completion rather than physical checkpoints, and players cannot make progress on these before they’ve obtained the map. Therefore, it is advisable to visit Cave 2 as soon as possible to minimize unnecessary backtracking.
- Pedometer – When held, the pedometer will display your current number of steps. It doesn’t need to be held permanently since it is counting your steps even while in your inventory.
- Rebreather – The rebreather allows the player to dive underwater for extended periods of time by providing the ability use air canisters for breathing. There is currently only one hidden on the peninsula. When equipped, the player’s HUD changes and the field of vision is slightly impaired. The rebreather uses air canisters to be “charged”, which can be collected near many dive spots, for instance in the cave system and on the yacht. There are also two canisters directly next to the rebreather when you first find it. Right clicking the air canister will automatically equip it.
- Repair Tool – The repair tool is a tool is used for repairing buildings and was a replacement for using sap. It is also very useful as a tool for clearing bush and collecting sticks from small trees as it swings very quickly, requires no stamina, and can be used while sprinting.
- Waterskin – The Waterskin is a craftable portable water source, very handy if you are away from drinkable water. The waterskin can be used to collect either polluted or clean water, it can then be used from the inventory to quench thirst. When looking at your inventory, you will see what percentage the water skin is filled. Even if it is partially or completely filled, you can now equip the water skin using the left click button (it is no longer required to right click it onto the crafting mat first).


Tools 2
- Pot – Pots have multiple purposes and are one of the most sought after tool items in The Forest. Pots can be used to collect, carry, and drink clear water and can also be used for Sap Collectors. It works in a very similar way to the waterskin but also allows you to collect rain water and boil polluted water. In order to collect clean water the player must have built a water collector first and it must have some water already collected from rain. The player then must press the ‘C’ key to fill the pot from the water collector. This functions exactly the same way as Waterskins do. The pot is also required to create stews, more information on stews below.

Stews
Stews are a cooking system that was added to the game in v0.69. Stews provide extra fullness, health, energy, calories, and hydration, dependent on the recipe. To make a stew, you require a pot. Place the pot on a lit fire, you can then start adding ingredients. It will start a 30s cooking period after which stew will be ready to eat, providing hydration, fullness, and other benefits depending on the recipe. Can remain on the fire up to 10 minutes, after which time the pot will fall off the fire, and can be collected by the player.
The recipes for stews are extremely complex. If one ingredient is wrong, the recipe can fail and you won’t get the benefits of the stew. You will still get the benefits of the ingredients individually, but you will lose the bonus.
These are basic recipes, in their most simple form.
- Realistic =
1 +
2 +
2
- Balanced =
1
- Mushroom Sauce =
- BBQ =
- Ointment =
- Tisane
Stew Mechanics
- Spoiled meats can safely be added to stews with no negative effects. So you no longer have to throw your spoiled meat away
- There is no difference between adding fresh, edible, or spoiled meat to a stew. They all have the same effect
- All meats, no matter their listed calorie count will provide 600 calories per meat. This is a great way to get more calories out of meats, including small meat, fish meat, and large meat
- Hard survival mode causes food to provide fewer benefits. This makes stews more viable in hard survival mode (they are highly recommended!)
- Jack and Amanita Mushrooms WON’T injure or make the player sick if they are used in a stew
- Blueberries will provide some hydration when used as an extra in a stew
- Arms, Legs, and Heads will reduce sanity by 3 no matter how many you add to a stew
- Every herb has a different value benefit in a stew
- Aloe in stews WILL NOT cure sickness or infection, save these for crafting or curing
- Oysters are NOT classed as meat
- For making Tisane for healing, use Coneflower instead of Aloe, as it has the same benefit and aloe can be used for infections and sickness
- All herbs give 5 calories in a stew ONLY IF meat is added to the recipe, otherwise they give 0 calories in stews
- All mushrooms give 10 calories in a stew ONLY IF meat is added to the recipe, otherwise they give 0 calories in stews
- Head has 600 calories, but its energy, health and fullness values are VERY LOW. It’s essentially useless for values, but good for calories
- In the Tisane recipe, you get 0.2 (or 20%) more Health for every herb added. That means, 5 aloes or coneflowers without water will give you 50 health, but in water (tisane) will give you 100 health. 4 aloes or coneflowers without water provide 40 health, but in tisane it provides 72 health
- If water is used in a recipe, it will always provide 100% hydration.
Note: For more in depth information of stews and there benefits go to Open As App, and download The Forest App by Zebulon that has a Stew Calculator, were it will give you calorie, fullness, energy, etc. data based on what you say your going to put in your stew.
[link]