Overview
This guide will help with the hardware diagram placement process and assignment for the manufacturing of consoles, phones, and the like…
Development Software, Hardware Features…
In the Development Software,

Type: Operating System,
Category: Console
Just like any other software creation, you need to select the features you want to be added; keeping in mind the size of your team and specializations they have training in.
Now pay attention to the new Manufacturing icon that appears when you selected a console or phone later on when available…
Brings up the
Manufacturing (MFG)
Icon so you can click on it and see the diagram for the MFG process for said Category
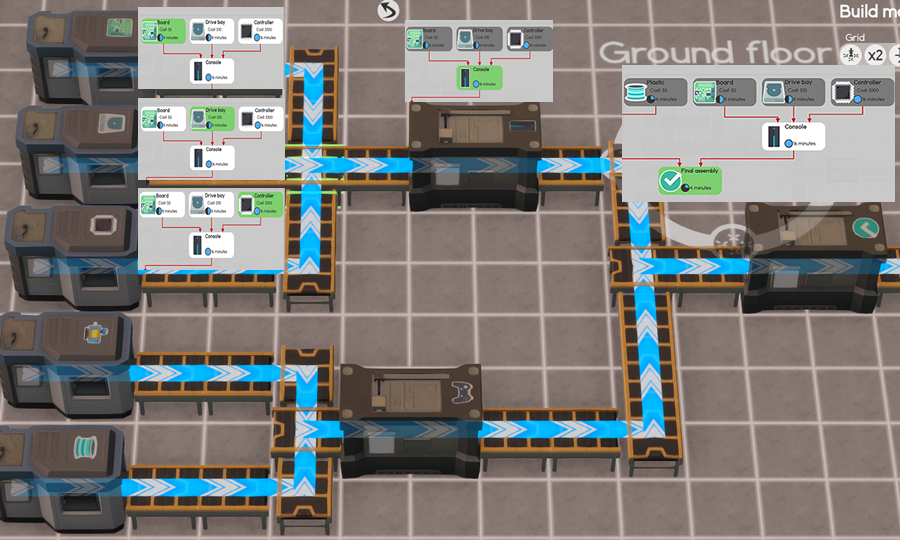
Console’s Basic Diagram :
this is the basic layout before you select any Hardware (HW) features.
Board to Console
Controller to Console
Console to Final Assembly✔
The above is the basic diagram layout before you select any features for the said console in the Hardware features…
Hardware Features:

- Vibration adds the Rumble Unit next to Plastic in the Diagram
- External Drive adds the Drive Bay next to the Board in Diagram
- Motion Detection adds the Gyroscrope next to the Rumble Unit in the Diagram
As you can see the features selected under HW will add the specific HW that represents said feature to the diagram; pay attention to the location as this will come into play in the next placement process…
We will take what we have learned in the above and move on with this knowledge to placement and MFG strategy…
✨
Component Printers & Assemblers Placement
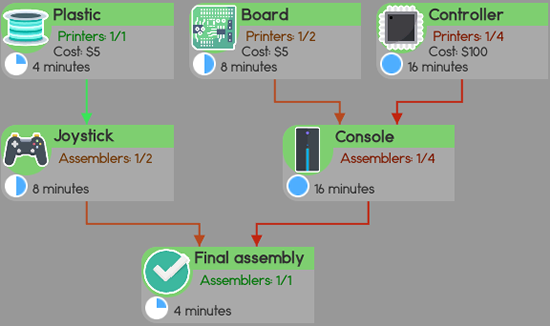
In reviewing the Diagram we need to now start the process of placing the component printers and assemblers in the proper place for the Manufacturing (MFG) to take place.
Review the diagram and put printers in their correct place as follows…
Let’s first go to Custom Map and just click OK for the default…
♞TIP: It costs you nothing to build on a custom map. You do need to be aware of the final cost so you are sure you can afford to place it and the land you purchase and place it on.
Here you want to build a basic layout for a Console with six printers, three for Joystick, and three for Console components. We do this so we always have what we need regardless of what we want to build for. You can always edit and save blueprints for specific builds if you want.

12 X 18 layout.
Printers, Assemblers Placement…
Place the first three printers one space from the back and two spaces from the sidewall.
Place the next three printers two spaces to the right or left of the first placement depend on what side you started from.
Next is the placement of the assemblers for the joystick and for the console…
Place them one space away from the center printer on each side meaning there is one space between printer and assembler; see the image…
Conveyor Belts Placement…
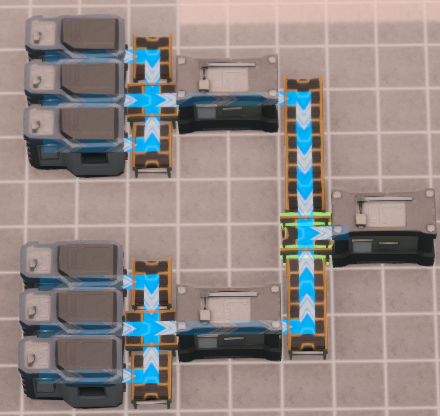
Place the first belt in front of the two middle printers facing out to the assemblers.
Next place a belt from the other four printers facing toward the middle belt like in the image…
Lastly, placement of the shipping assembler which should be placed to receive the console and joystick to prepare the shipping package!
Next, we will take the knowledge learned here and assign printers and assemblers with the components and assemble jobs to complete the cycle correctly…
✨✨
Printer & Assembler’s Assignments
We have our basic layout in place and are getting comfortable with the process and layout of all the components and how they interact with each other…
Now we need to assign each printer with what component they will be printing and the assemblers with their assignment also; so first…

Right click on a printer and select the Set Output icon
That will open the actual diagram with the printer and assemblers you have to assign depending on the features you have selected for the console you are developing and want to MFG.
Follow the diagram and click on the desired assignment…
Once you have selected all printer assignments, review them, and check that the icon on each printer corresponds to the proper assignment for the said printer.

Assembler Assignments…
Follow the same process and assign the assembler output for each

Make sure the icons on each are correct and that is it; you are all set to complete your MFG layout…
Next are the finishing touches and things you should know and keep in mind for success in MFG.
✨✨✨
Ramp & Ceiling Conveyor, Recycler & Garage Port
Conveyor Ramp:
The conveyor ramp is placed to elevate the movement process off the floor to allow for passage and movement within the MFG layout to be able to reach all components for maintenance, repair, and feed with raw materials needed to create said components.
You can see how they are placed in the final image of the completed view below…


Used in combination with the conveyor ramp to move the product along with it to their final destination above the floor for the same reasons stated above…

Each printer and assembler have materials (**White Boxes) that do not get used in the MFG and need to be collected so there is no waste and save you money in having to re-MFG them or just waste them.
The recycler is a cost-saving process of your operation and
should be placed at the end of all Final Assemblers…

The final destination is the garage port where the couriers can come to pick up and continue on with them to their final destination or storage in the case when they have not been sold.
Finished Layout:
Please note you can place multiple delivery bays in any build provided you have space for them.

♞TIP: If you see **White Boxes moving to the delivery bay; there is a problem in the layout as only brown boxes from the final assembler should be delivered to the delivery bay.
The Recycler is in place to capture all **White Boxes and only allow brown shipping boxes to the delivery bay
✨✨✨✨
Layout, Strategies, things you should know…
In the final image above you will notice these pallets are strategically placed along with the layout… They have what are called drops and pickup mechanics which you can place to drop packages that are backed up along the belts and the pickup/lifts which will put the package back on the belts when there is room on it to do so; to continue to the delivery bays.
Pallets, Drop, Pickup Points


Pallets will continue to collect shipping packages until they get filled. Once a pallet has filled the packages that cannot continue down the line will start to fill another pallet until they are all filled up and the whole operation stops.

♞Tip: If you look closely I have put three bays in this build and three pallets. each pallet has a drop and pick-up point on the other side to feed the other belt. So if one belt is backed up it will drop and be picked up on the other belt leading to the other delivery bay.

Why build the MFG process when you can order prints?
These are not software prints they are hardware components and are very costly to order so it is not cost-effective to do so. A console order can be as much or more than the actual console depending on its features.
♞Tip: So never developed a console without the MFG process in place to deliver it to your customers/fans as you will go broke doing it! See the image; 500 order cost $120,000.00
MFG is usually done once you have your own building or money to build off the blueprints now being built and in the workshop.
♞Tip: As I always say learn the menus’ and what they do as it will improve your game immensely!
Pay attention to the information on the diagram, times, 1/1, and 1/2 as these are key to putting together the most efficient MFG.

Please be aware/know this is not the most efficient MFG process layout; it is only build to show placement and process with tips and strategies in place.
I am in the middle of building a rental property with a delivery area and as always free server space; so look out for that release soon or it may be released already depending on when you are reading this.
So as always if you have gained any knowledge or been helped by this guide or any other guide on steam. Like, share and comment and show your appreciation as it does take time in laying it out, testing to ensure we get it right! Making the images and writing proofreading them until we can actually deliver something we Hope will help you!
Remember everything can be improved on so let’s see how you can improve on it!
Here are a few other items to incorporate into your layout to help improve the efficiency…


For a visual walkthrough catch my videos on https://www.youtube.com/channel/UCeBriWwQ_eo8UAXwNTajEFQ…
LatN Out!
LatN’s Strategy
Strategy = Rewards👍
Support the Creator by Donating!🎁[www.paypal.com]
✨✨✨✨✨
Copyright © by LatN’s ♞Strategy 2021
This guide is written for Steam Guides Only! It should not be copied, shown/reproduced outside of the Steam website especially not monetized or reproduced without the author’s authorization.