Overview
Learn how to create your own skyboxes (miniature scenery) as well as using the “large scale only” layer and the region system
Getting started
Have you ever noticed the extended scenery that you can see on the “top of the south” layout? (the original New Zealand main layout).
When you are in certain areas you can see things like mountains and sea off in the distance in miniature scale, even though the edge of the table is all that is there in large scale.

Up until now this feature has only existed on the old “Top of the south” layout, and this is because that layout was made using entirely different tools than what modern player-made layouts use.
Well you can finally make this same effect yourself!
The purpose of the new “skybox regions” system is so that you can choose to have certain props only show up when in miniature, as well as make props only show up in large scale.
“large scale only” props are useful for:
– walls and room details that you only want to see when looking at the layout in large scale, but you want to be hidden when driving trains in miniature.

“miniature scale only” props are useful for:
– scenery that extends beyond the sides of the table, like backdrops and landscapes that surround your layout. These are hidden in large scale but you can see them when driving trains in miniature.

Things get more complicated when you want to start making use of multiple skyboxes (these are called “skybox regions”).
By using “skybox regions” you can have certain props only show up when the player is in one area of your map, then have different props show up when they are in a different area.
These layers of scenery can overlap, and can be edited individually.
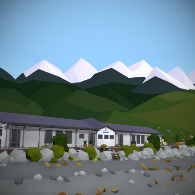
Here is a visual example of this, where one side of the map contains a desert skybox, while the other side a forest skybox. Both of these overlap but only one of them can be seen at a time:

You can download and edit this example map yourself:
[link]All of these features are completely optional, and are not at all required to make a map, but if you choose to learn how to use these new (though a bit complex) features then you can add even more variety and polish to your layouts.
Large scale only
Lets start with the simplest part of the skybox system:
Being able to put certain props on a layer that is only visible in large scale.
For this example we will be using a simple map which has some desert scenery on one side, and a city scene on the other:

You can download a copy of this map to edit for yourself on the Steam Workshop with all of the regions and skyboxes included:
[link]Our first goal is to add a dividing wall to separate the two sides of the layout.
To start with, go over to the wall (by the table options and drawers) and click the button that enables the advanced editing features.

Once you click this button all of the skybox options will be available.
Now that you can see all the skybox options, our goal is switch editing over on to the “large scale editing” layer.
to do this simply click “Allow edit” under the “large scale only” panel.

Make sure to always check the status text at the top of the panel.
it will tell you what layer you are currently editing:

Once you are sure that you are editing the large scale layer, grab a wall piece from the drawers:

Place some wall segments on the layout to create a divider wall between the two scenes.
Any props you place will be added to the layer you are currently editing (which in this case is “large scale only”)

Once you have placed these, make sure to apply edits on the edit tool!

Next you can go back to the skybox editing panel and disable editing on the large scale only layer.
Notice that the status text up the top will change to “currently editing: everything”
this means that any props you place will be on the default normal layer (always visible)

Now if you look at your layout again, you can see a divider wall blocking your view between the two scenes:

But now if you go in to miniature mode, the wall will disappear!
and you can see the city in the distance.

Congratulations! you have now made use of the “large scale only” layer, and you can go back and edit the props on that layer (or remove/add more) at any time using the editing options on the wall.
Miniature only scenery
The next kind of layer you can use is “miniature scale only”
By default there is already a “global” region which you can use to place props in.
Any props placed in “global” will be visible everywhere.
For this example we are going to be using multiple skybox regions, one for the desert section of the layout and one for the city.
If you dont need multiple regions then this process is much simpler!
Just follow the same steps as the previous section (adding props to the “large scale only” layer) but instead of using the large scale layer, use the miniature layer.
your props will only be visible when the player is in miniature and will not be visible when they are in large scale.
But if you want to use multiple custom skybox regions, follow these steps:
The first step you want to do is create a new region.
Click on the “Edit regions” button on the skybox editing panel:

Next click “add new” and give your new region a name.
For this example we are going to use the name “desert” since we are making some extended scenery for the desert section of the layout:

Click on the newly created region in the list and you will see a new window.
This window is where things start to get a bit more complicated.
In order to make a region work we need to define where that region should be visible.
For this example, we want the player to see the extended desert scenery when they are on the desert side of the layout.
So that means we want to set the regions “bounds” to contain all of the desert area.
The way we are going to do this is by using “bounds boxes” which are simply cubes that you can place just like any other prop in the game (you can scale them to be bigger too).
Click the “add bounds box” button to spawn a box for you to place.

Once you have a “bounds box” in your hand, you can place it down on the map just like a normal prop:

Keep placing them until you cover the whole desert side of the layout:

That’s all you need to do to set up a basic skybox region, since now the game knows where to show this region (and to hide it everywhere else).
Simply click “done” and then “done” again to get back to the skybox editing view.

Now that you are back to the skybox editing panel the next step is to enable editing for your new skybox layer.
Click “Allow edit” on the “miniature only” layer and then click on the “region” option to switch over to your newly created region:

Click on your newly created “desert” region to set it as the currently editing region:

Excellent!
Now make sure to check the status text up the top of the panel again to make sure everything is set up correctly.
It should say “Currently editing: miniature only (desert)”

Once you are sure that you are editing the correct layer and region, you can start placing props!
Start by placing some extra tables, terrain, plants etc around the outside of the map.
(everything you place here will be hidden in large scale, so dont worry about overlapping the sides of the table and room)

Once you have finished making some extended scenery, use the “apply edits” option on the edit tool.

Now go over to the skybox options and reset everything back to default, which means disabling editing on the miniature layer (so the status says “currently editing: everything”) and setting the miniature layer so it is not visible.

Now try going in to miniature and you will see all of your extended scenery!
It will be hidden in large scale, but visible in miniature.

Notice that if you go over in to the city section of the layout it will disappear too! this is because the scenery you have added to the “desert” layer will only be visible when you are inside the “bounds” you set previously. If the player is outside those bounds then the scenery will be hidden.
You can make as many of these skybox regions as you like, and you can put unique scenery in to each of them.
But you have probably noticed that the city buildings are still visible when you are in the desert… how about if we wanted to hide those buildings when you are in the desert? Well thats the next step!
Excluding from regions
The last feature use can use in this new skybox system is the ability to hide scenery from within certain regions.
This means that:
When you are inside a region (e.g. the desert) you can make it so that everything inside another area is hidden (like the city buildings).
Using this system you can make skyboxes that are not interrupted by any surrounding parts of your layout!
Trains are also hidden if they enter these “excluded regions”.
To get started, open the region edit view for the “desert” region again:
Then this time click on the “add exclusion box” button.
This will give you a red box (much like the “bounds boxes” from before) which you can place on the map.

Any scenery, track and trains that are inside these “exclusion boxes” will be hidden when you are inside the regions bounds.
IMPORTANT:
One major limitation of this system is that these “exclusion boxes” are very limited in where you can place them. They cannot be scaled, and are locked to a strict grid.
This is for technical reasons.
Basically all of the scenery in the game is broken up into “chunks” and this skybox system only works if whole chunks are excluded, not smaller divisions of chunks.
Hence why these “exclusion boxes” are locked to a grid, its because they are lined up to chunks.
Anyway, you don’t need to worry about that.
just keep in mind that the location of these exclusion boxes is very limited, and i would recommend planning ahead before trying to use them.
For this example, cover the city area with a few exclusion boxes:

Excellent, now click “done” on the region edit menu again and return to the skybox editing view:
make sure that all of your settings are reset to default, and that you have applied all edits.
If all of these steps have been completed correctly, you should now be able to go in to miniature in the desert and not be able to see the buildings in the distance!

Now that you have made the city buildings hidden, you can actually extend the desert skybox over the city and cover that area!
To do this, make sure you are editing the “miniature only” layer and “desert” region, just like before:
Now you can start placing more scenery over the city area!
Don’t worry about overlapping, since the city props will be hidden in miniature anyway.
You can make things easier by hiding the “default” layer (just like hiding the “large scale” and “miniature” layers).
Simply click the “visible” toggle under the “everything” layer:

This will hide everything except the skybox that you are editing.
You can now easily fill in the remaining scenery:

Now that that’s done, simply apply edits and return all of the view & edit settings on the wall back to normal:
Now when you go in to miniature the city should be hidden, and the desert scenery should extend in all directions!
And that’s everything!
With these features you can repeat the same process for as many different skybox regions as you like.
For example, you could do the same for the city area and give it an extended skybox, and hide the desert area in the process.
Hopefully these skybox features aren’t too tricky to understand, but keep in mind these are quite advanced editing features and once you get your head around the idea of how they work you can make some pretty amazing stuff with them!