
Overview
Looking for missing items for the achievement, or want to know the earliest point you can get an item? Missing a treasure and unsure how to get it? This guide aims to be put together all information available in the game.
Introduction
I’ve created this guide because finishing up 100% achievements near the end of the game can drive you nuts trying to find items or treasures among other things, and finding the information online in English is a rabbit hole, so i’ve spent 30+ hours compiling information.
Note: Some sections are still under construction at this time, since the game has a lot of information to compile. Also note that if the format seems strange, it’s due to limitations on steam’s guides. There can only be so many characters per section, and the line width is incredibly slim.
Note 2: This guide was created for Steam/Steam.com, it is not authorized for 3rd party websites such as steamlists.com which blatantly disregard the hard work of guide creators so they can rake in free ad revenue.
- A list of all items in the game
- A guide of treasure chest locations and what is in them
- Miscellaneous Information including shop lists, rewards, side quests, etc
While this guide does not directly spoil the plot, there is indirect spoilers based on Item Context, Quest names, and Locations, and item sources. The treasure chest guide is pretty heavily covered with spoiler brackets because it’s sort of an indirect walkthrough.
You can always NG+ to pick them up, but that easily add ~10 hours to your gametime. Here’s a list of things to keep in mind:
- Make sure to check the Billboard often. If a quest shows Short make sure you complete it immediately.
- Near the end of the game you’ll have a a choice to make M/F rare armor. You get 3 choices of these total, make sure there is at least 1 M and 1 F armor to avoid missing Item Collector.
- There are points in the story where your weapons are automatically reforged for you. Make sure you reforge all characters weapons whenever possible to avoid missing both Craftsman Supreme and Item Collector achievement.
This is a few personal tips to help make your experience better.
- During a skill, incoming damage is about 1/5th of normal
- Flash Guarding makes all your attacks crit 100% of the time, and will last at least until the end of the current skill
- Flash Dodging Slows down time, but this isn’t always a good thing, especially if your target isn’t in reach to attack.
- Flash Guard crit works for EXTRA attacks too
- You can guard during Flash Dodge to set up a Flash Guard, and also the opposite way.
- After dodge rolling, if you jump it’ll give you a slight speed boost. You can do a cycle of dodge->jump->dodge->jump to speed through areas
- Some characters are faster than others, the last character you get is by far the fastest. Mid Chapter 2 Spoiler: Adol & Laxia are the fastest until chapter 5
- You can dodge through the air multiple times from high places to get to some ledges you shouldn’t be able to until much later, and this is required for one chest
- Post Mid Chapter 2 Spoiler Tip: Laxia’s Blitz Charge Skill lets you get to places you definitely shouldn’t extra early.
- Prioritize status resist/immunity items. The status effects are really dangerous, getting hit by any status effect move will nearly instantly apply the debuff. This is incredibly dangerous for debuffs like Burn & Bleed since they will destroy your health before you can react.
- Breaking/Stunning enemies takes significantly more effort
- Enemies have insane amounts of health
- Even at level 99 after a few times through the game, and ~6000/900/900~ stats for your chars, it’s still a bit problematic at times. Make sure to have potions readily available & restock as you get later in the game.
- Because of all of the above, starting on Nightmare is not recommended. This would have a very high skill cap that most players wouldn’t have on their first play through the game.
- If it’s not your first playthrough, you can dodge-run through most enemies to significantly speed the run up
- Build Spoiler 1: If you are doing this post your first game, you’ll most likely have an earth orb. It’s better to have 3 if you’re looking to make this easy, but that is a minimum of 3 playthroughs. The Nature Talisman can sub in but it’s not nearly the same efficiency
- Build Spoiler 2: Because of the status effect problem, Savage wristband will still slowly build up poison debuff, making it dangerous to wear compared to other accessories
If there’s some information you want to contribute to the guide, feel free to send me a message.
Items – Materials
Items – Medicine, Fruit, Meals, Foodstuff/Ingredients, Fish
Items – Adventuring Gear, Weapons, Armor, Armlets
Items – Accessories
Dina
Items – Costumes, Attachments, Books, Key Items
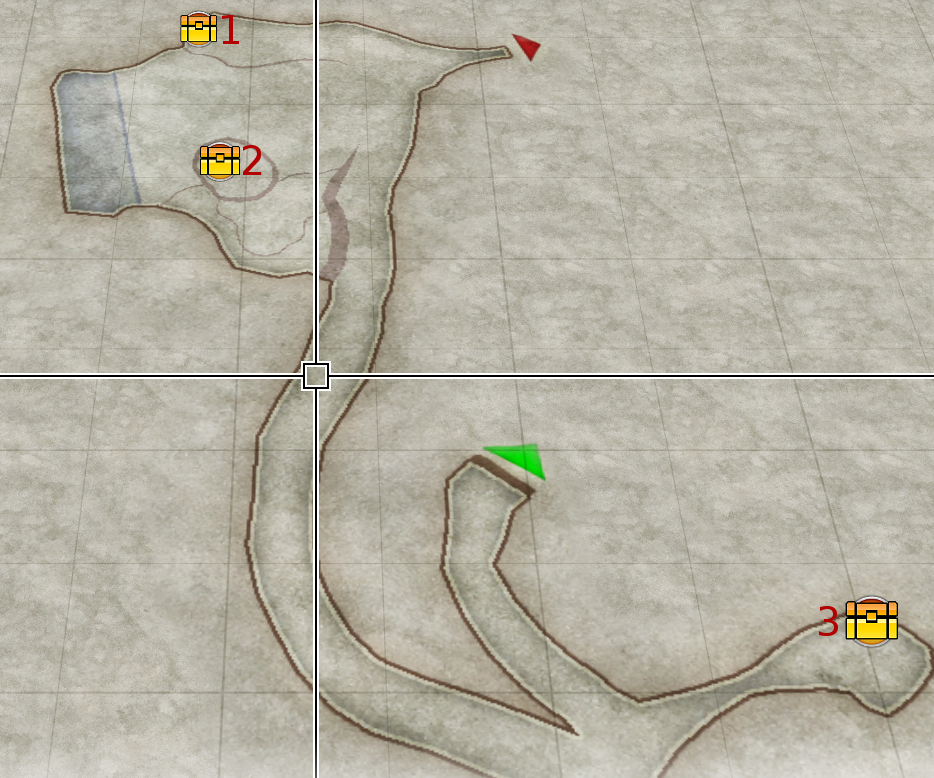
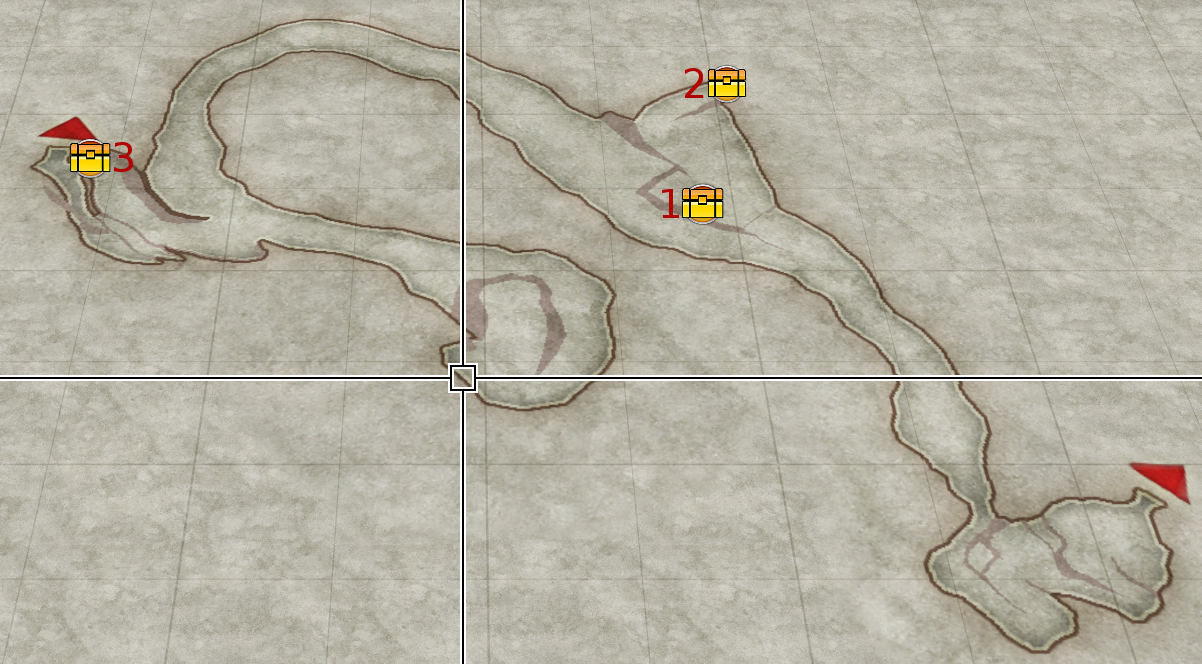
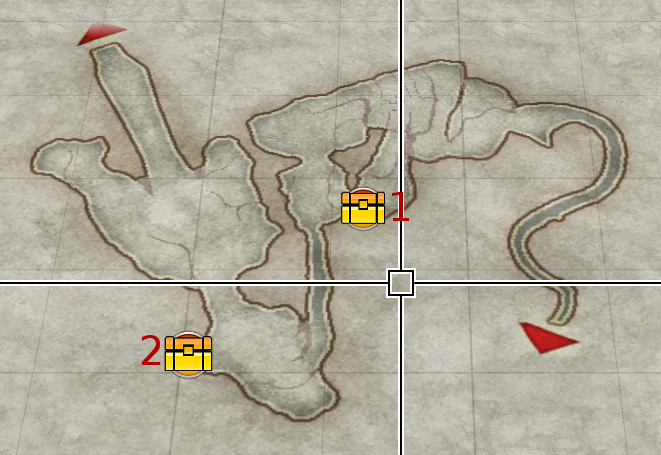
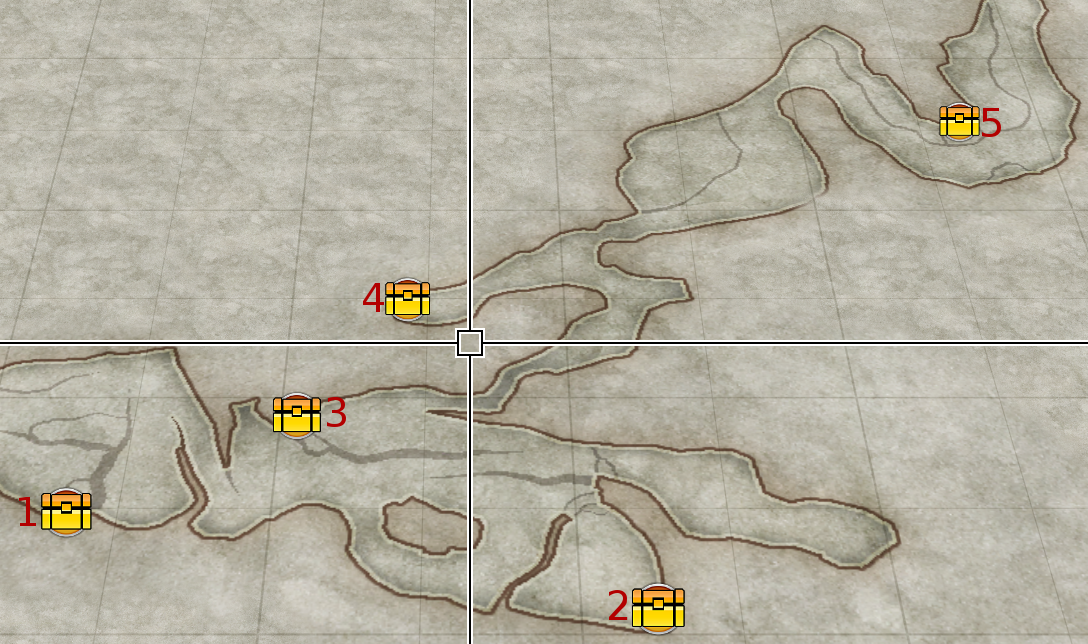
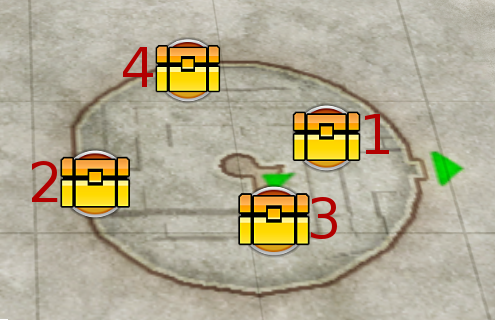
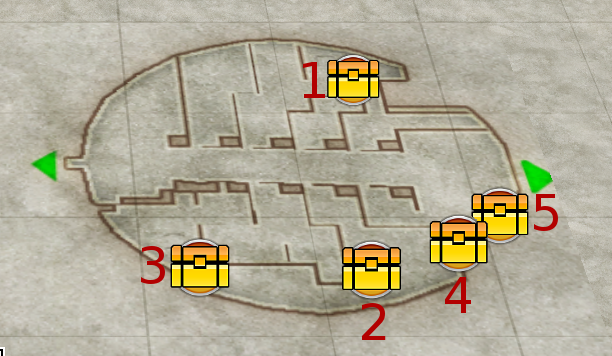
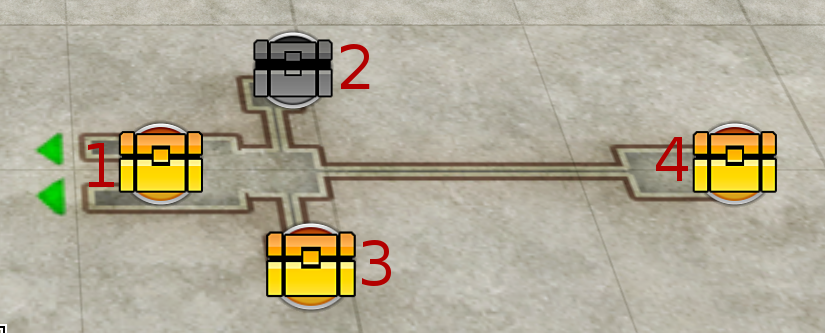
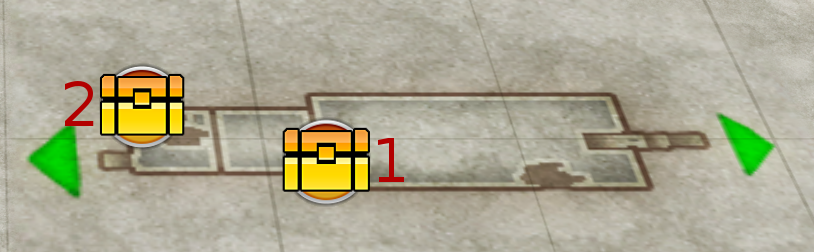
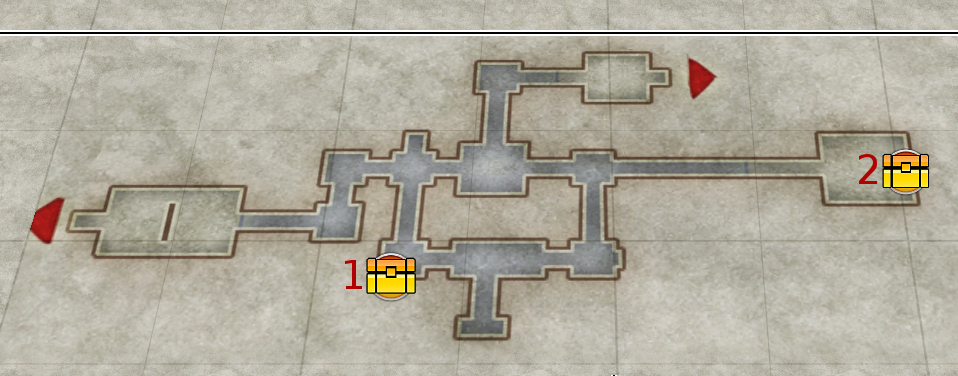
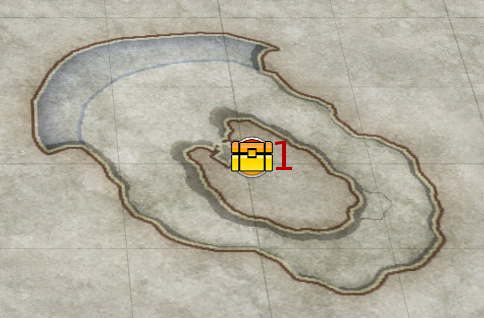
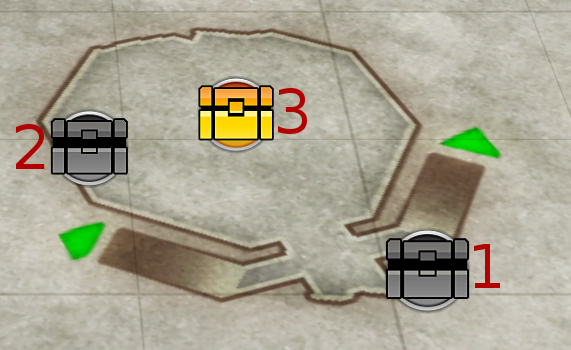
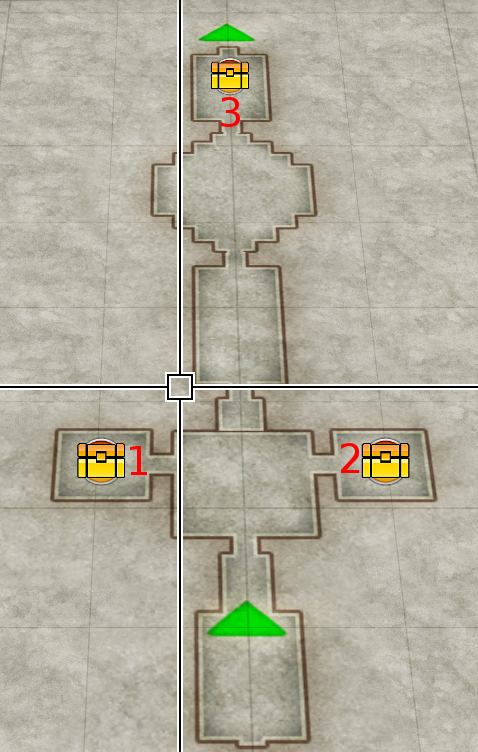
Treasure – Chapter 1 Locations
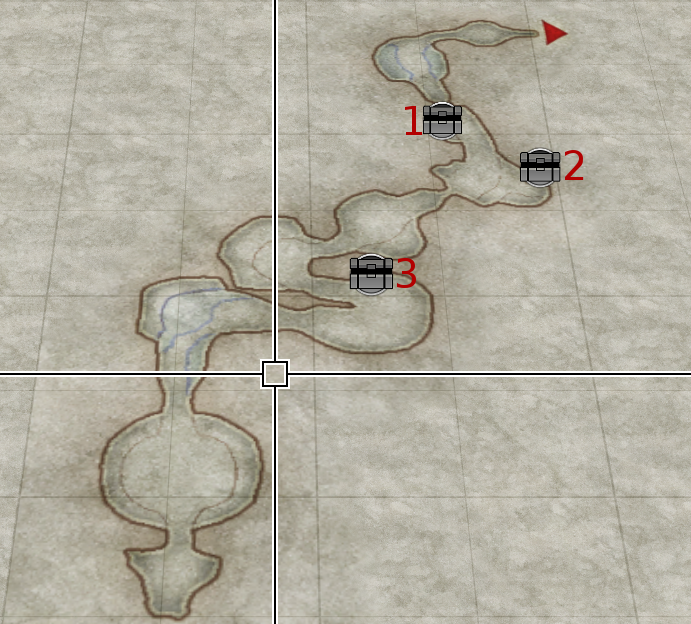
- Heal Potion*
- Leather Armor x2*
- Coconut x2
* Required to Progress
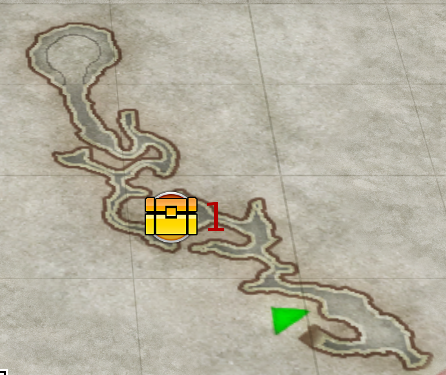
A Revive Medicine is on a Skeleton near the Warp Crystal
- Iron Ore x3
- Mango x2
- Digitalis Leaf x3
- Bone Necklace
- Ripe Cruberry*
- Iron Ore x3*
- Blade Ring*
- Beast Claw x3*
- Bait x10**
- Warrior Seal***
* Accessible in Chapter 2 after recovering Alison from White Sand Cape and moving the boulders blocking the way forward
** Accessible Early if you use Laxia’s Blitz Charge from the nearby hill to the north, otherwise requires Grip Gloves, post Towering Coral Forest mid-boss
*** Accessible after recovering Kathleen post Towering Coral Forest throug the Great River Valley map
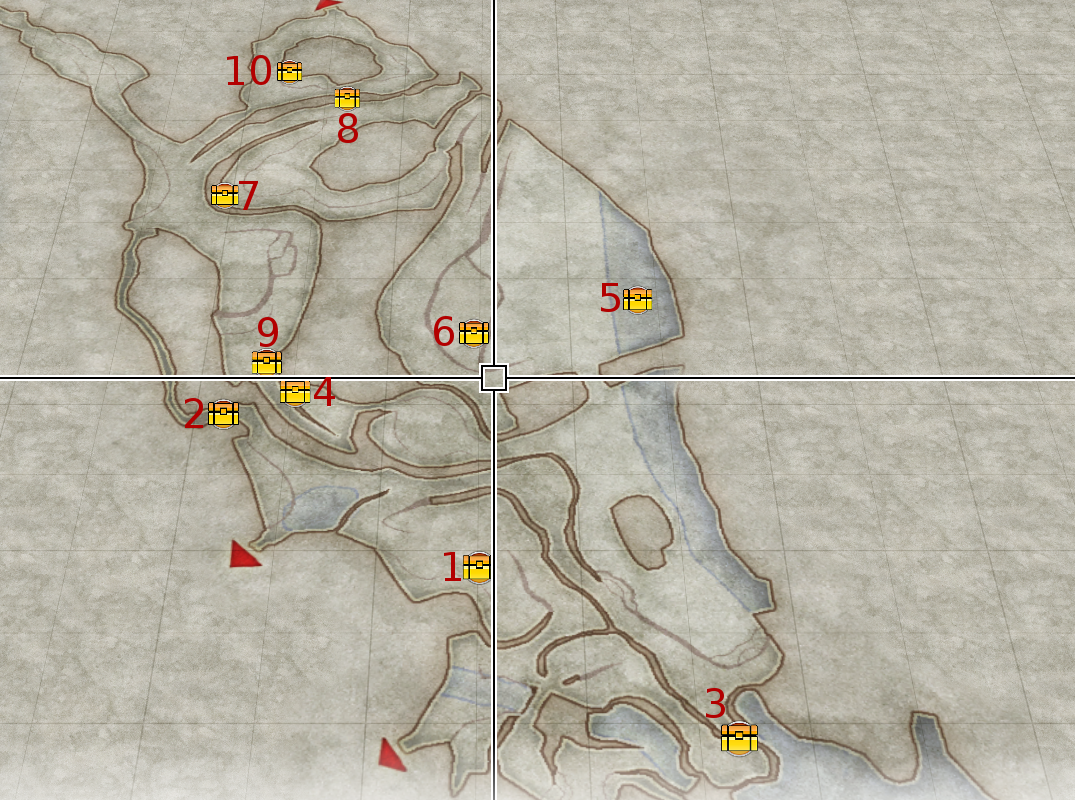
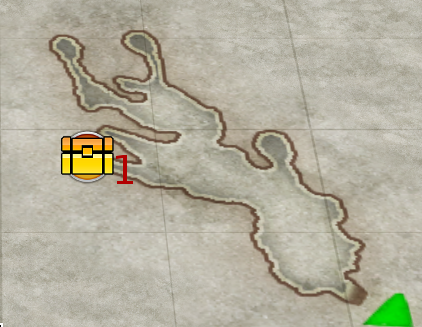
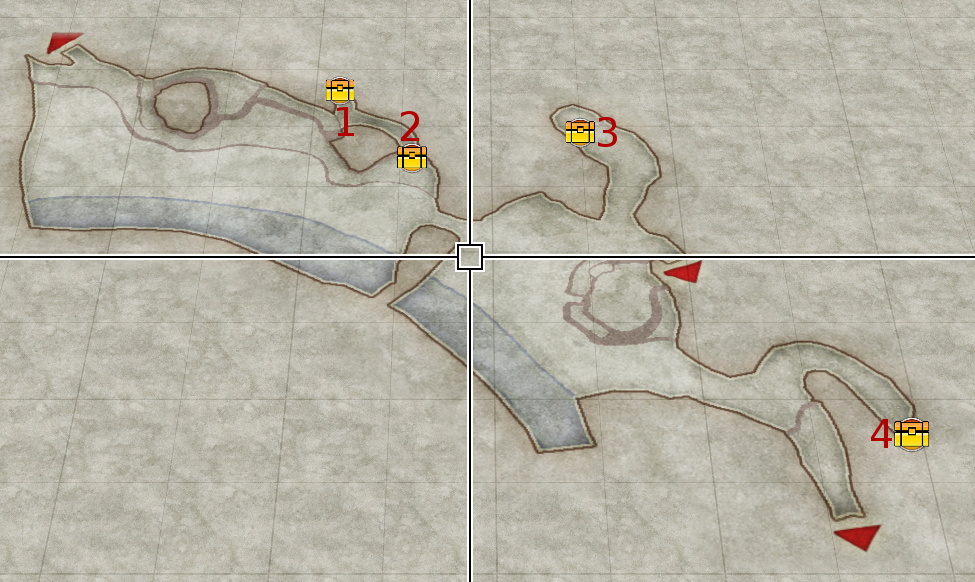
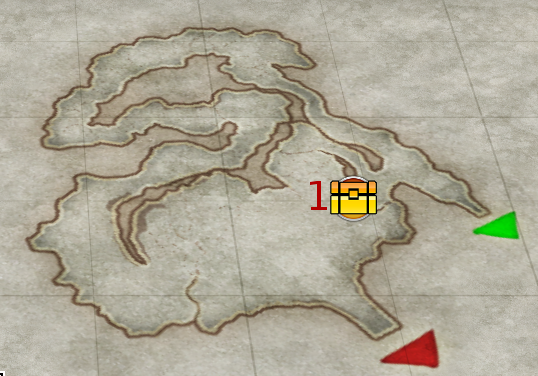
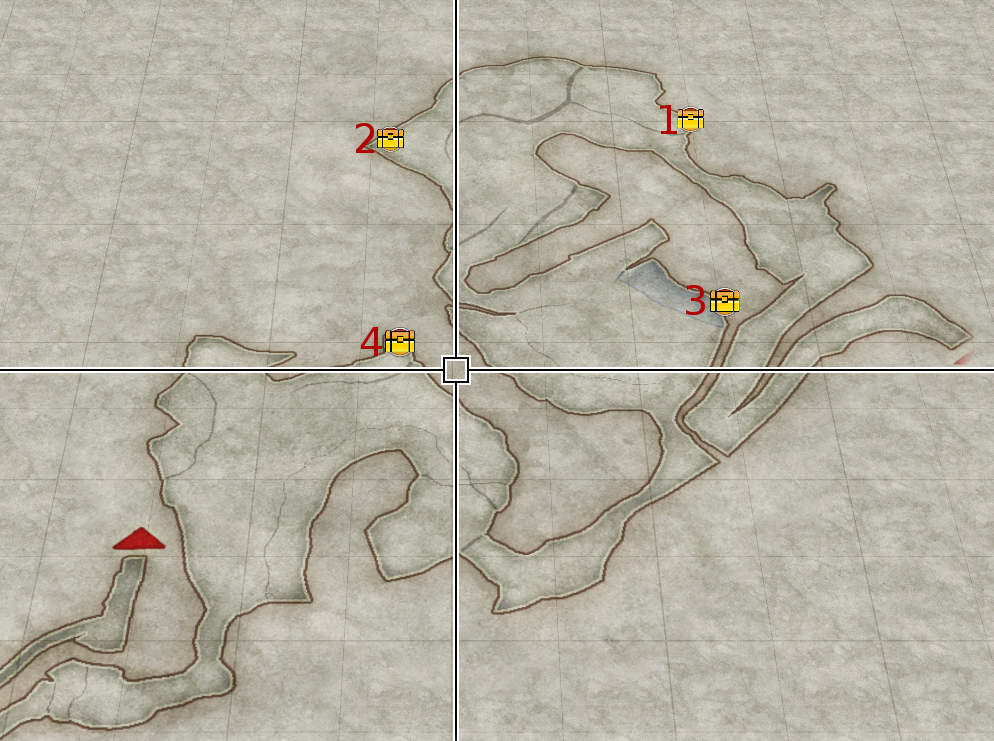
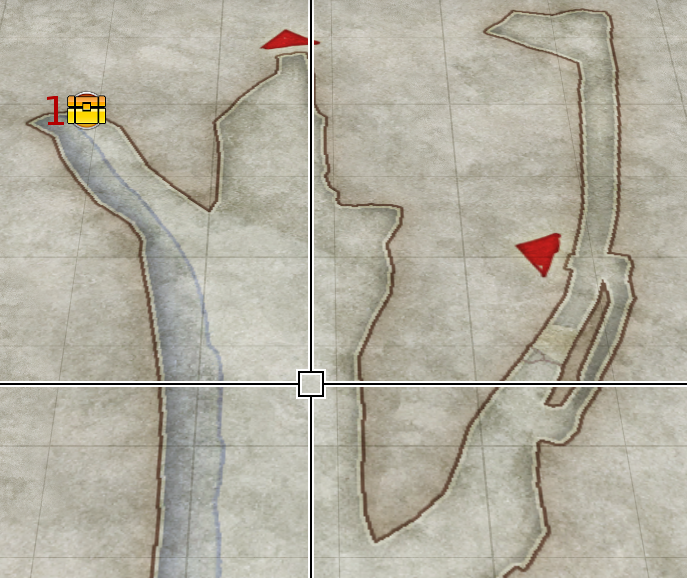
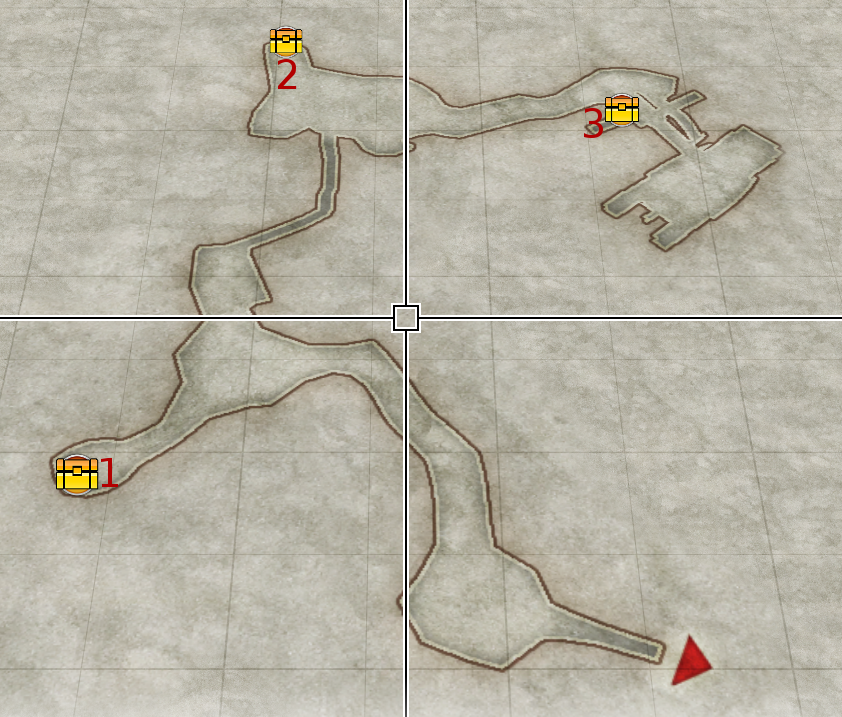
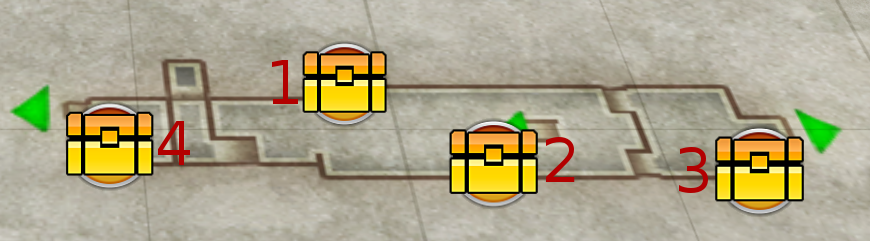
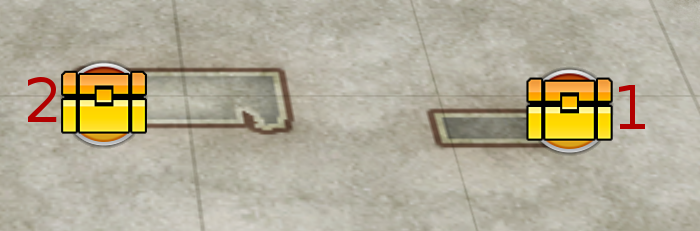
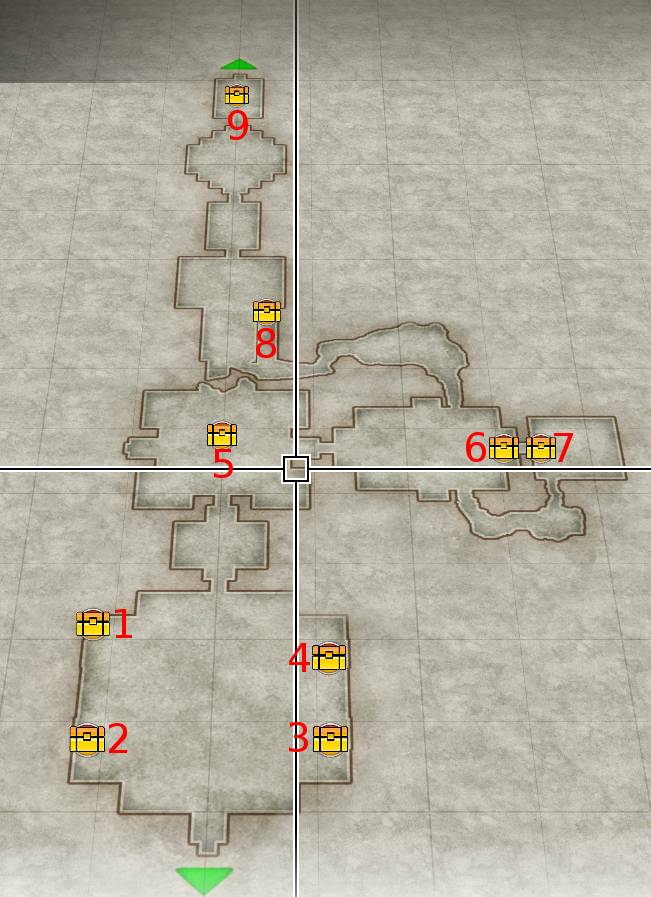
Treasure – Chapter 2 Locations
- Sturdy Lumber x3
- Life Elixir*
- Bait x5
- Digitalis Leaf x3
- T’s Note 1
- Dark Gloves
- Blue Bracelet**
* There’s a rock you can jump on to get up to this chest, but it make take a few tries. You can always come back later after you get the Acheopteryx Wing in Chapter 4
** Only Accessible After Gather 20 people to move the Mudslide. Chapter 5 after getting Katthew

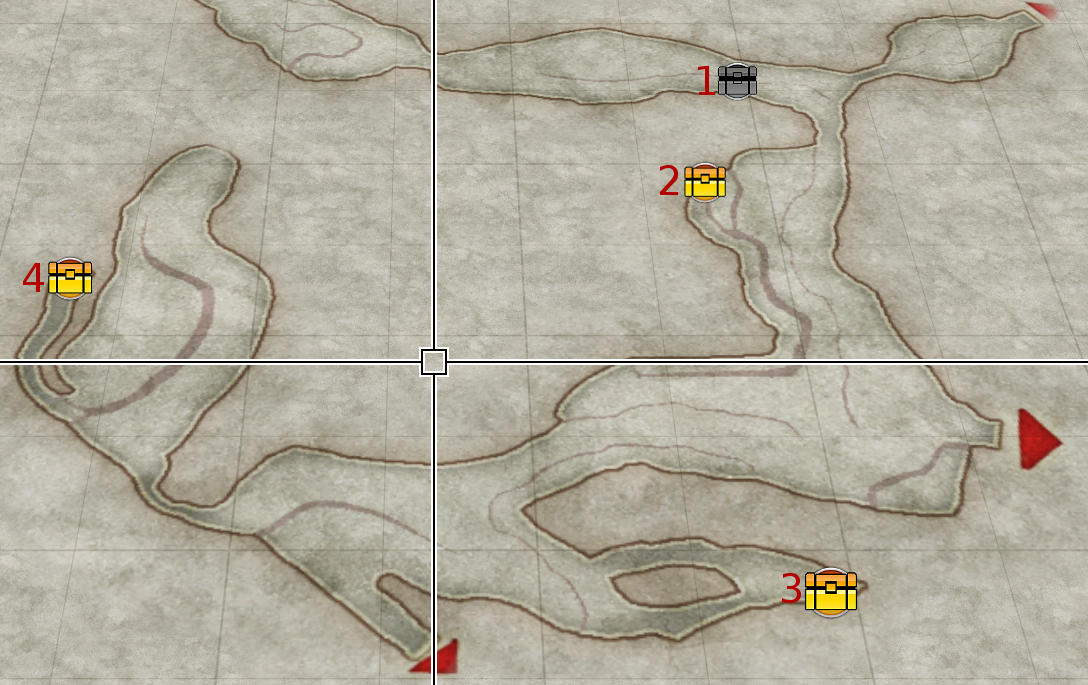
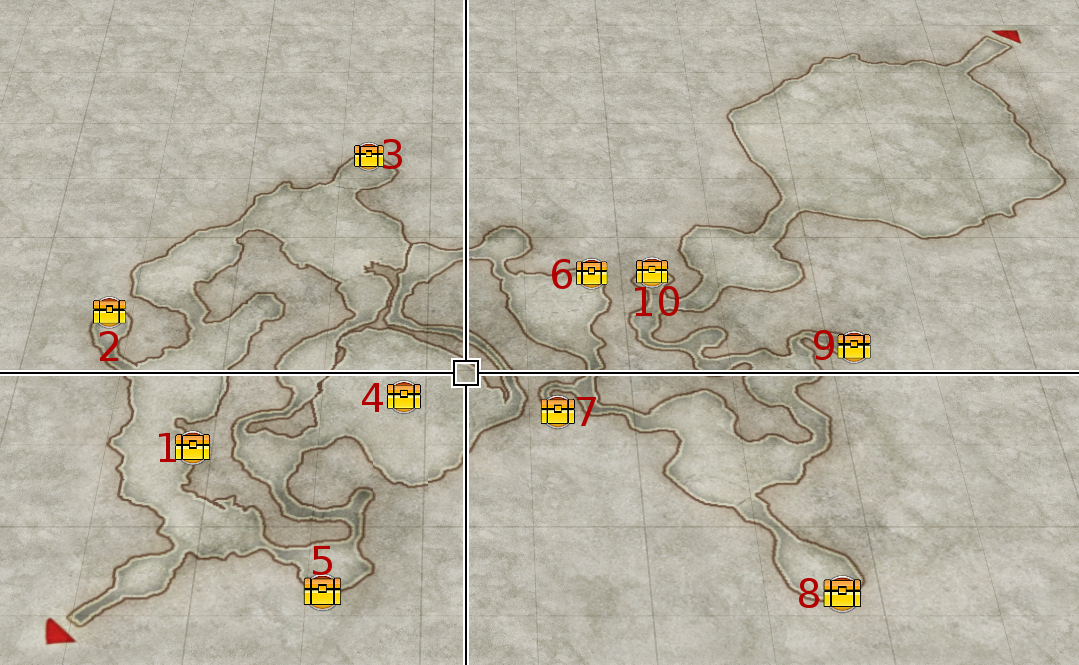
- Sweet Remedy x3
- Antidote x5
- Spiral Manual
- Iron Ore x5
- Ripe Coconut
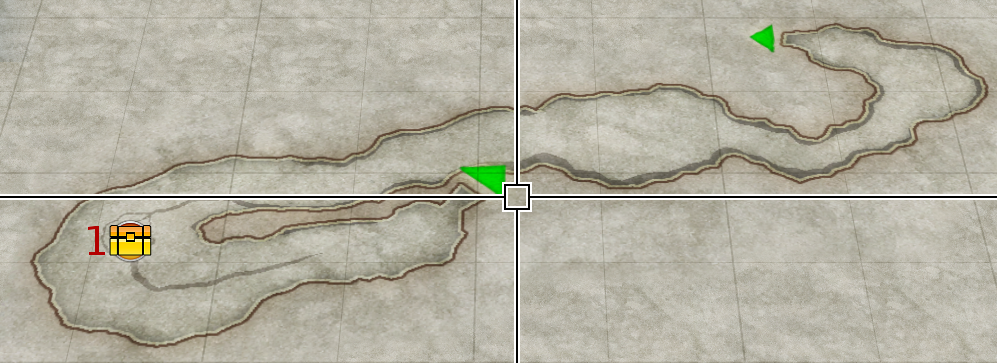
- Revive Medicine
- Iron Ore x3*
- Bandit Gloves
- Remex x5
- Snake Amulet
- Antidote x3
- Omelet Recipe
- Ripe Coconut
* You can navigate to this chest before you fast travel away to deal with the Raid. Also maybe run back to the entrance to push over the log real fast before you fast travel.
Grip Gloves are automatically acquired after Killing Serpentis, the mid-boss
- Ripe Cruberry
- Defense Elixer*
- Red Cape**
- Strength Elixer ***
* Dodge Roll through the air from chest 10 on the upper level to save yourself a trip back up
** Fall down from chest 11 on the upper level to get to this area
*** Fall down from chest 12 on the upper level to get to this area
- T’s Note 2
- Ripe Mango
- Revive Medicine *
* Only accessible after gathering 14 villagers to clear the rockslide In Chapter 3?
- Stone Gloves *
* Also only accessible after gathering 14 villagers
- Ripe Cruberry x3
- Defense Elixir*
- Sweet Pepper x3
- Lightning Amulet
- Bestiary Potion
- Sweet Remedy x3
- Spirit Elixir**
- Blue Gloves***
- Bait x5****
- Tiger Claw****
- Hero Belt****
* Jump dash through the fog from the back side to grab this chest before the dino chomps you
** Accessible after picking up Hummel from Beast Hills & moving the boulder
*** Accessible from the Plateau, requires Insect Repellent
**** Requires Floating Shoes to access
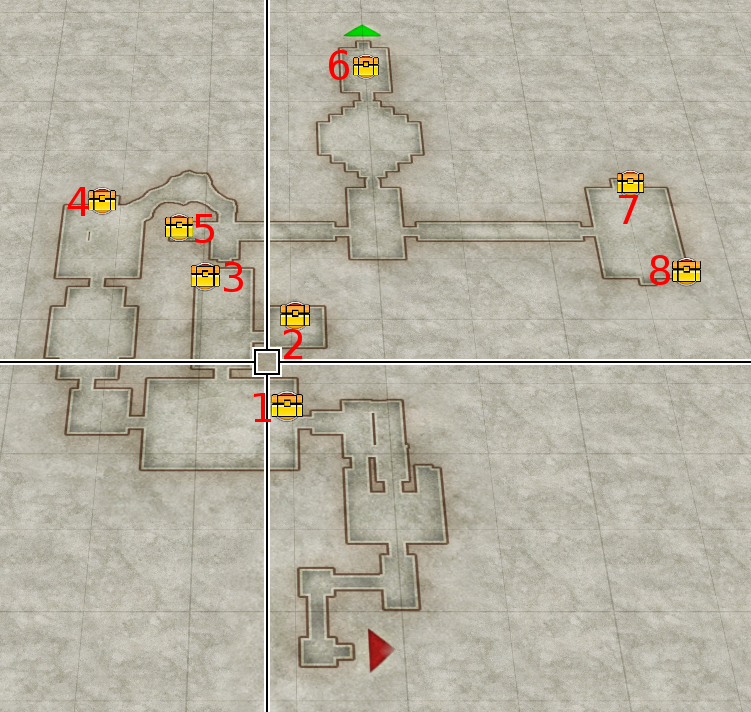
- Eyedrop x3
- Heal Potion
- Blue Cape
- Ripe Mango
- Ripe Mango*
- Gwaranga Pincer x2*
- Spirit Elixir**
* Requires Insect Repellent to get to the southern half of the map
** Requires 15 Villagers to clear landslide
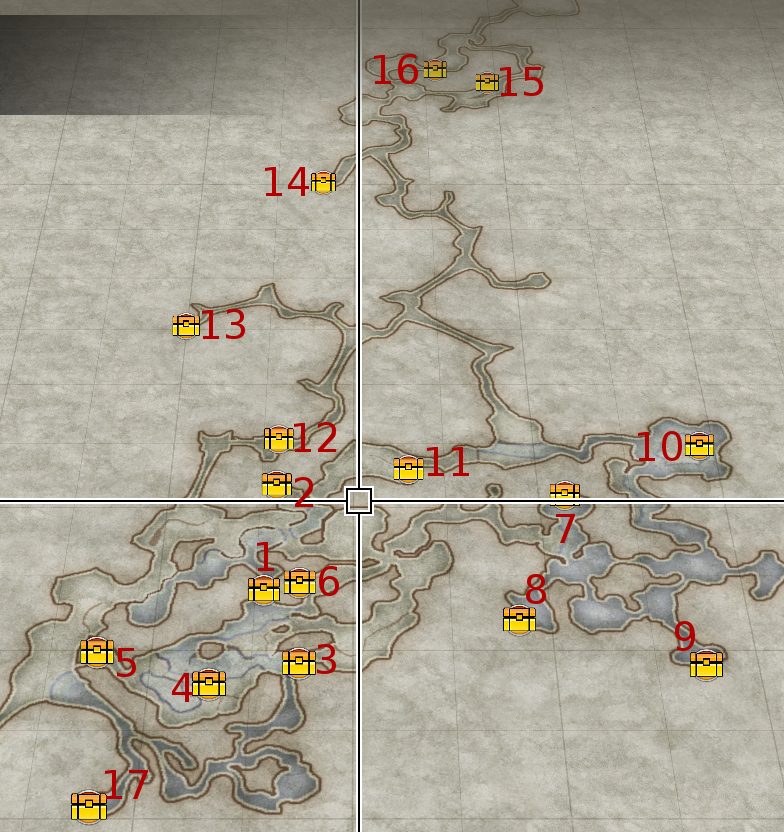
- Eyedrop x3
- Crow Amulet
- Strength Elixir*
- Antidote x5
- Eyedrop Formula**
- Ripe Mango
- Stalactite x3
- Antidote x3
- Heal Potion***
- Glow Stone
- Hermit’s Remedy
- Iron Ore x3
- Wild Manual
- Hunter Hat
- Antiparalytic x3
- Blade Ring II
- Tempest Elixir****
* Don’t Attack the frog next to the chest, it’s a bad time
** Remember to push the log down before turning around
*** Between two frogs, don’t attack them. Near one of them is a rock you can run over to get around it.
**** You have to kill the frog to get this chest, come back later.
There is a Skeleton near chest 2 on the upper layer on the way to chest 3 with Pirate’s Note 1 on it.
There is a Skeleton to the NE of chest 9 with Pirate’s Note 2 on it.
There is a Skeleton North of Chest 16 with Pirate’s Note 3 on it nexto the save crystal
Area accessible after obtaining the Grip Gloves and having 11 villagers through the Nameless Coast map
- T’s Note 3
- Revive Medicine
- Blood Fang
- Warrior Seal II
- Lustrous Scale x3*
- Accursed Shell x3*
- Razor Feather x3*
- Sword Tip Fang x3*
* Requires Insect Repellent to access these 4 chests
Accessible after clearing the south set of hives in Beast Hills. Make sure you stop to rest at the Camp through the east set of hives first. This Triggers Reja to appear in this area.
- Bitter Remedy x3
- Iron Ore x5
- Ripe Coconut
- Needle Wristband
There is a Skeleton with Pirate’s Note 5 south of Chest 3
You collect Eggpland Seed when you find the Pikkard to recruit Reja
While technically accessible in chapter 2 after clearing the insect hives south of the Schlamm Jungle entrance, this area is extremely dangerous until chapter 4, and even then still not easy. The Athlete belt isn’t really worth it to grab early, however there is an area to clear that has Mirelda behind it that is worth it.

- Athlete Belt
- Saurian Scale x2*
- Bolt Bracelet* **
* Requires Archaeopteryx Wing to double-jump to the area where these chests are. This is after Baja Tower in Chapter 4.
** The second chest requires you to run up a pillar and climb various sets of vines to a fairly high location
- Shield Earring II*
- Meuniere Recipe
- Antiparalytic x5
- Floating Shoes
- Salamandine Hide x3
- Ripe Coconut
- Bone Necklace II
- Fairy Manual**
- Forest Guide
- Defense Elixir
* Use Blitz Charge or wait for the Floating Shoes
** Requires Insect Repellent
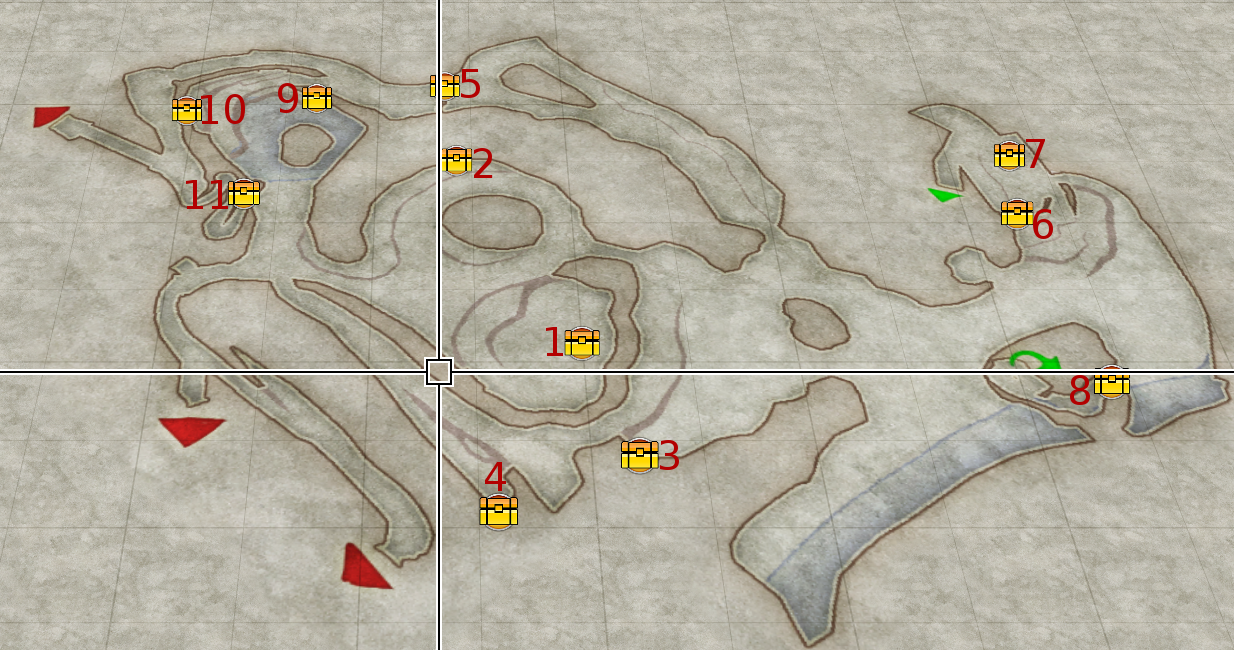
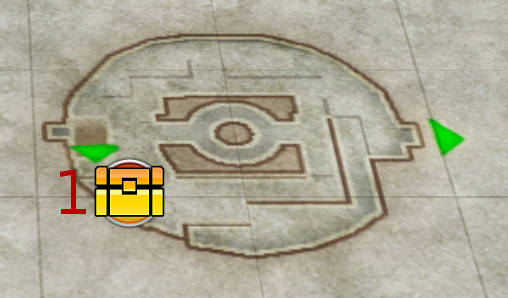
Treasure – Chapter 3 Locations
- Big Seed
- Hemostatic x3
- Sweet Pepper Seeds

- T’s Note 4
- Antiparalytic x3
- Iron Shield
- Beast Hide x2
- Blood Formula
- Ripe Mango
- Seiren Wheat x5
- Life Elixer

- Rainbow Pigment
- Tectite Ore x2
- Ripe Mango

- Sparkling Mucus x2
- Pyrios Talisman
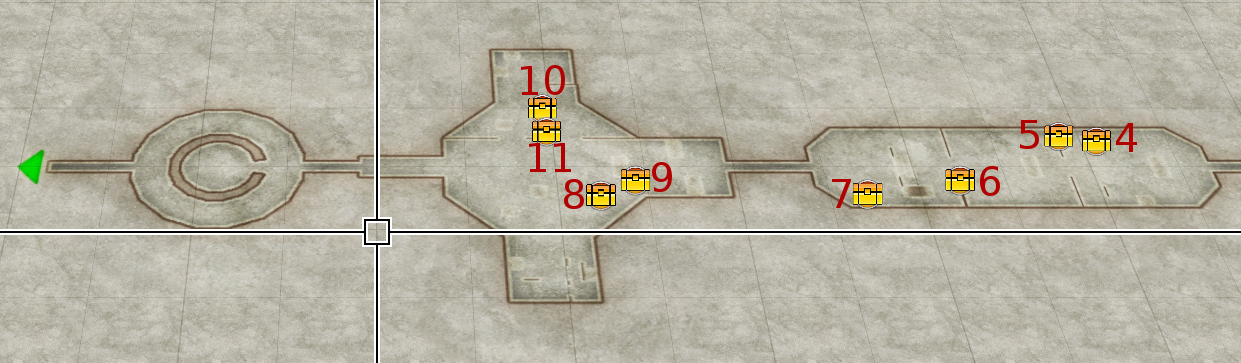
Treasure – Chapter 4 Locations

- Tectite Ore x2
- Bait x5

- Tectite Ore x2
- Antidote x5
- Red Gloves
- Defense Elixer*
- Corn x5
* Dodge roll or Blitz Charge across the gap
- Delight Formula*
- Black Bracelet**
- Hemostatic x3
- Tectite Ore x3
- Bone Necklace III
* Dodge Roll from nearby ledge
** Not accessible until after completing Dana Sidequest – Forgotten Waterway
- Hemostatic x3
- Warrior Seal III
- Antiparalytic x5
- Shield Earring III
- Windy Vestment*
- Snowflake Soap
- Big Pearl**
- Hope Stone**
- Tectite Ore x2***
- Heavy Gauntlets***
- Vivine Bitters***
* Requires Dana Sidequest to unlock
** Requires Insect Repellent
*** Requires Dana Sidequest – Sunken Key to unlock
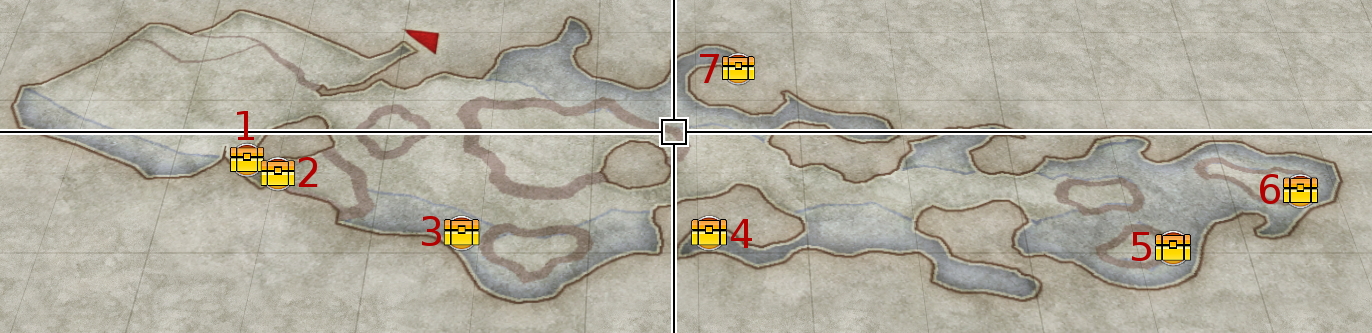
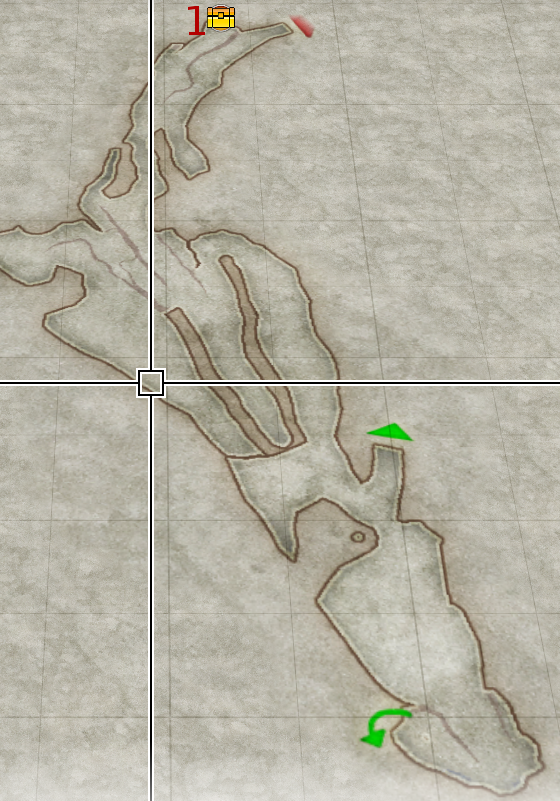
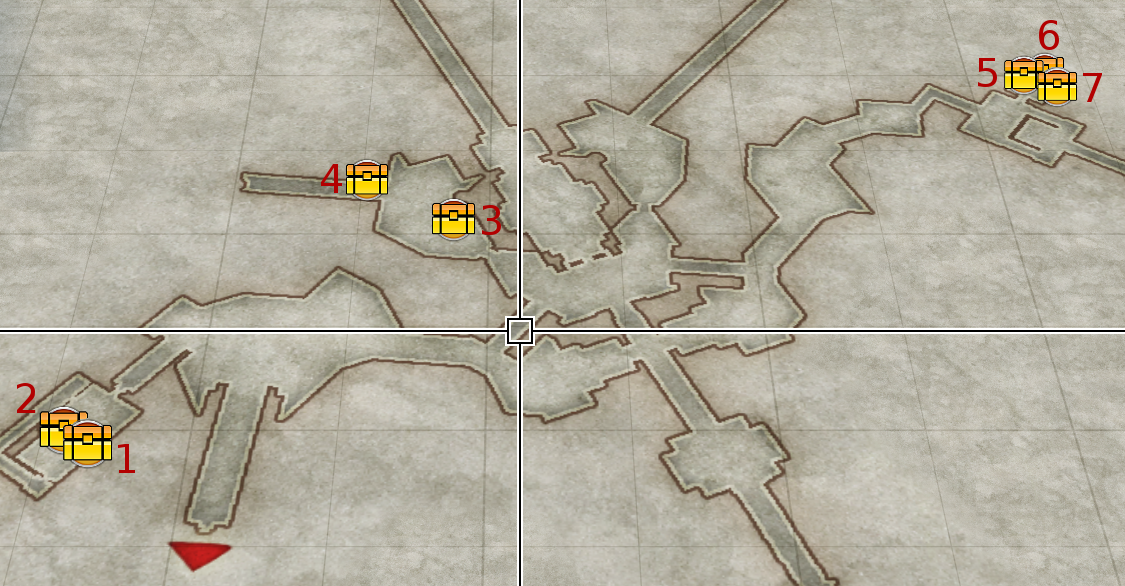
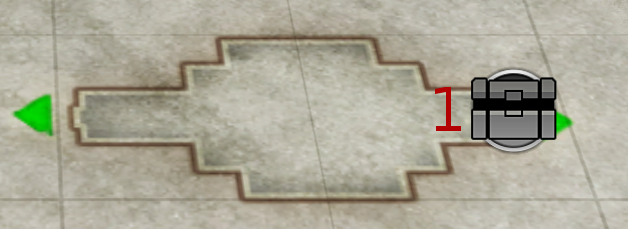
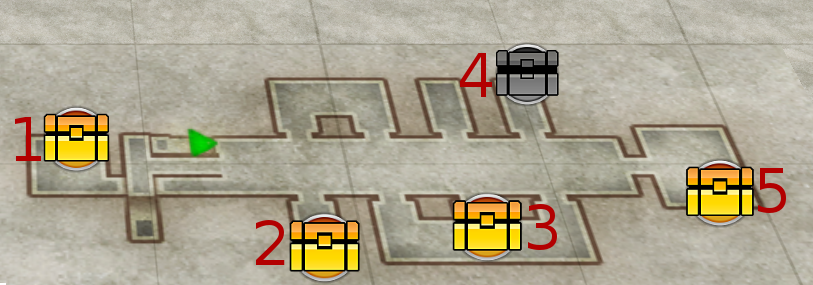
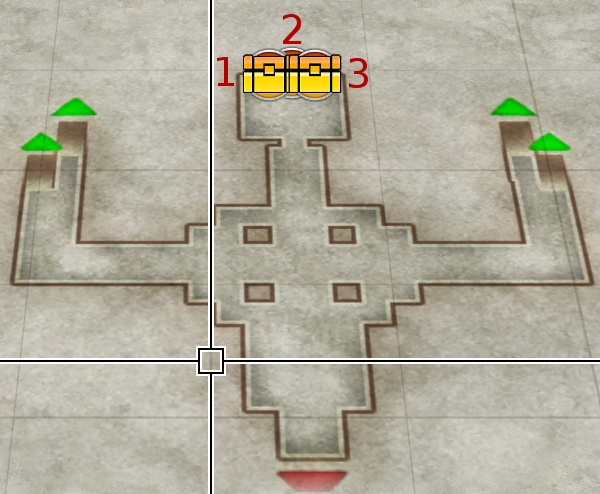
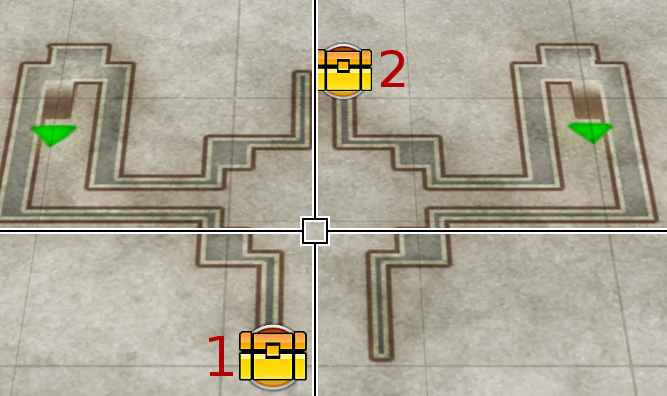
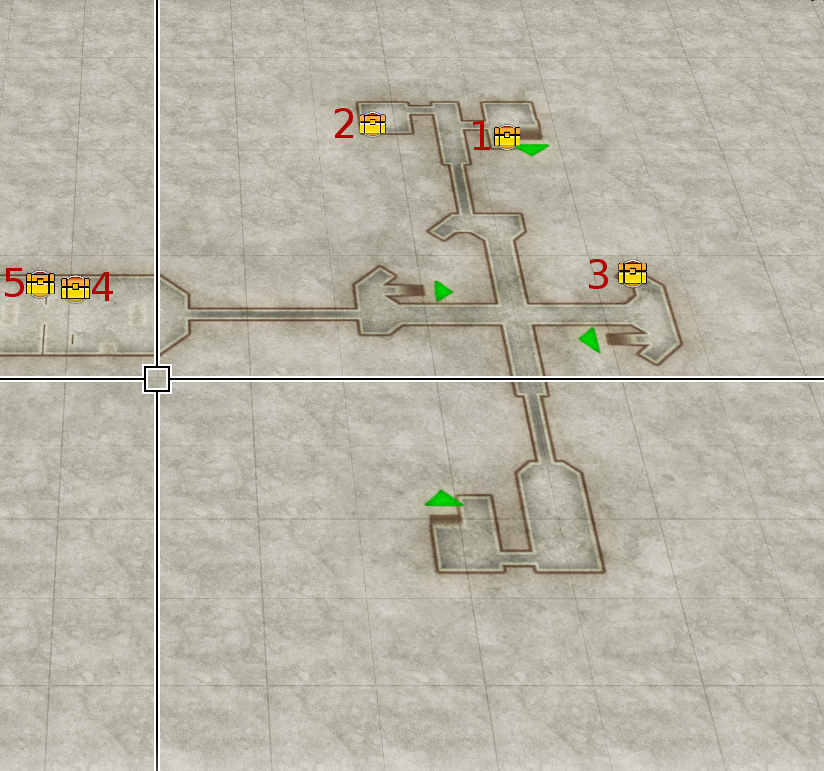
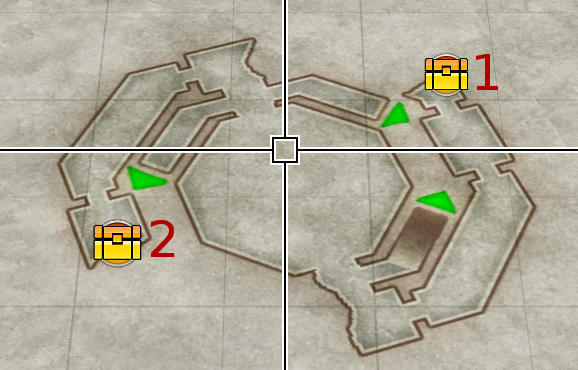
Treasure – Chapter 5 Locations (1)

- Corn Seeds
- Tectite ore x5
- Ancient Coin
- Defrost Medication x5
- Blade Ring III
- Fenrir Talisman
- Tectite Ore x3
- Tremor Manual
- Saurian Scale x2*
* Requires Archaeopteryx Wing to double jump up to the chest platform
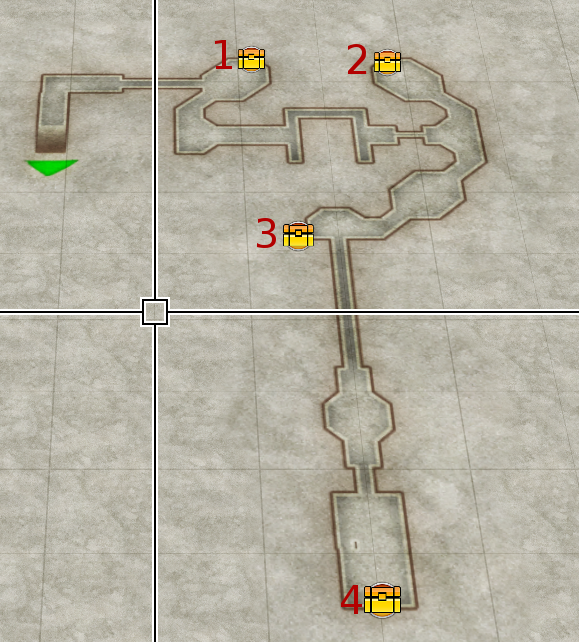
- Archaeopteryx Wing
- Defrost Medicine x3
- Full Potion
The map image has it showing off to the right but it’s actually in the loop section.
- Hard Fiber x2
- Rim Flower x2
- Tectite Ore x3
- Dragon Tree Treasure
- Barbaric Bracelet

- Hermit’s Remedy
- Fry Recipe
- Ripe Mango
- Defense Elixer
- Saint Ring*
* This chest is easily accessible from chest 4 by dodge rolling through the air over and over
- Bait x5
There is a Romun Badge on the ground next to the Ship Graveyard to the South
- Tectite Shield
- Ripe Mango
- Ship’s Log 1*
* Required to Progress
- Ancient Bone
- Ripe Coconut x2
- Tectite Ore x2
- Ship’s Log 2*
- Pumpkin x2
* Required to Progress
- Tectite Ore x2
- Ship’s Log 3*
- Ancient Hide
- Pirate’s Recipe
* Required to Progress
- Hard Fiber x2
- Tectite Ore x2
- Tomato Seeds
- Bandit’s Gauntlets*
* This chest is only accessible after obtaining Hermit’s Scale and traversing Hold 2 & 3
There is a Skeleton next to Chest 3 with an Iron Knuckle gift
- Ripe Mango x2
The chest is on the bottom to the NE

- Ship’s Log 4*
- Pumpkin x2
- Essence Stone
* Required to Progress
There is a skeleton next to the save crystal with Pirate’s Note 6
- Ship’s Log 5*
* Required to Progress
This Area requires the Hermit’s Scale
- Sweet Remedy*
- Hermit’s Remedy**
* Found by jumping over the second hole
** Found after going down through the second hole and back up again
This Area requires the Hermit’s Scale
- Dragon Tree Treasure*
- Bitter Remedy**
* First hole in the floor in hold 2
** Second hole in the floor in hold 2
Treasure – Chapter 5 Locations (2)
Note: The area is only accessible after completing Dana Sidequest: Gloom – Old Gate of Happiness
- Bitter Remedy*
- Life Formula*
- Dragon Tree Treasure*
*All 3 chests are only accessible after hitting the two switches on 2F and one switch on B1F
- Blue Feather x3
- Diamond Shell x3
- Thunder Claw x3
- Hard Fiber x3
- Dragon Crest Stone*
- Life Elixer*
- Great Lumber x2*
* 3-5 only accessible through Submerged Sanctuary Exit
The chest area for 3-5 is behind a gate two switches, one on each side. If entering for the first time from the Submerged Sanctuary you won’t be able to enter the rest of the Monastery.
Only Available after Dana’s Gloom Flashback is complete
- Antiparalytic x3
- Defense Formula*
* Must have 23 people in the Village to clear the Stone Pillar Rubble for this chest. Chapter 6 after recovering either Sir Carlan or Griselda.

- Saurian Scale*
- Rim Flower**
- Thorn Manual**
- Hermit’s Scale
- Lunar Wings x2
- Essence Stone x2
- Sunlight Fang x2
- Bless Formula
- Starry Shell x2
- Gold essence Crystal
- Dragon Tree Treasure
- Hermit’s Remedy
* Accessible from the Mid Level near the start down a staircase
** Easier After getting the Hermit’s Scale
Area is accessible after obtaining the Hermit’s Scale and traveling through the Headwater Falls map
- Essence Stone x3
- Coleslaw Recipe
Next to chest 2 there is a Tough Pikkard you can capture for Reja.
Next to the exit to Headwater Falls there is an Old Stethoscope shining on the ground.

- Abyssal Gauntlets*
* After Chest 2 in the Upper Lvl, to the South of the Lapis Mineral Vein, there is a watery pit you can fall in to get to this chest. Watch out for Sharks.

- Essence Stone x2*
- Strength Elixer*
* Both chests only accessible after creating a rope ladder with 21 people in the village. You’ll have enough after you recover Dana from Lodinia Mashland, post Beneath the Sullen Clouds
- Bait x5
- Blue Moon Charm
- Essence Stone x2
- Hermit’s Remedy
- Essence Stone x2
- Dandale Horn*
- Essence Stone x2
- Prickly Band**
- Warrior Seal IV
- Lunar Wings x2**
- Starry Shell x2***
* Take off float shoes and put on Mermaid Scale. This is dangerous due to the Hydroskelo below the water. Fighting it under water will restrict your movement but is easier to damage it than fighting on the surface.
** More Underwater Chests with a Hydroskelo
*** Underwater Chest with 2 Hydroskelo’s.
- Acidic Liquid
- Hide Formula

- Empty Bottle*
* Requires an Insect Repellent
- Essence Stone x2
- Freeze Manual
- Essence Stone x2
- Dragon Crest Stone
- Ripe Mango
- Great Tree Lumber
- Wind Guide
- Burn Medicine x5
- Warrior Wrist
- Hermits Remedy
- Sun Talisman
- Essence Stone x2
- Burn Medicine x3
- Pyrios Stone
- Purifying Bell

- Hermit’s Remedy
- Dragon Tree Treasure
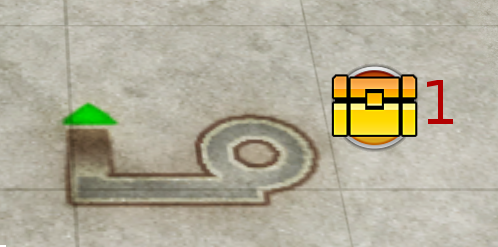
Treasure – Chapter 6 Locations
Accessible ater finding the boat on Nameless Coast
- Monolith Fragment
There is also an Engraved Pen on the south side of the shore
Accessible after completing A Painful Decision – Blessing in the Withered Land by moving the fallen star as Dana.
- Legend Belt
Accessible after recovering Sir Carlan from the Solitude Island and Griselda from Eternal Hill. This puts the village at 24 people, enough to clear the rubble in Wood and Wind Hills
- Great Tree Lumber x2
- Pure Orichalcum
- Aura Grass x2

- Dragon Crest Stone x2
- Tempest Elixir
- Saurian Carapace
- Sky Crown*
* Only spawns after Killing Mephorash
- Bait x10
- Pure Orichalcum
- Dragon Tree Treasure
- Blizzard Guantlets
- Hermit’s Remedy
- Violet Bookmark
- Dragon Tree Treasure
- Pumpkin Seeds
- Hermit’s Remedy
- Pure Orichalcum
- Dragon Tree Treasure
- Strength Elixir
- Defense Elixir
- Life Elixir
Treasure Extra – Night Maps
- Big Pearl
- Prismatic Jewel
- Hemostatic x5
Treasure Extra – Former Sanctuary Crypt
- Remedy x3
- Essence Key Stone
- Empty Bottle
- Aura Grass
- Moonlight Grass
- Hope Stone
- Dragon Tree Fruit*
- Empty Bottle*
* Requires Essence Key Stone from 2F
The room where 7 & 8 are is one of the highest XP rooms in the game, so make sure to mop those mobs up, since they don’t respawn
- Eyedrop x3
- Essence Key Stone
- Essence Key Stone
- Antiparalytic
- Essence Key Stone
- Devil Fang
Requires Insect Repellent to get past the stair area
- Hemostatic
- Aura Grass
- Hermit’s Remedy*
- Nature Talisman**
- Essence Key Stone
- Spirit Necklace**
- Hawk Wing*
- Prismatic Jewel
* Requires Insect Repellent
** Requires Essence Key Stone
- Essence Key Stone
- Essence Key Stone
- Luminous Ring
- Burn Medicine x3*
- Dragon Tree Treasure
- Essence Key Stone
- Rivera’s Undying Flower x3
- Defense Elixir**
- Aura Grass x2
- Essence Key Stone***
- Prismatic Jewel
- Wings of Heavenly Flight
* Chest is underwater, kill Hydroskelos first, take off Float Shoes and equip Hermit’s Scale to get to it.
** Chest is underwater, take off Float Shoes and equip Hermit’s Scale to get to it
*** You need to take off Float Shoes and equip Hermit’s Scale, walk through a tunnel full of Hydroskelos, float up to the top of the next room, and sneak behind an Eldebronto to get it. Avoid fighting underwater if possible.
- Strength Elixir x3*
- Life Elixir x3*
- Aura Grass
- Prismatic Jewel
- Wanderer Cloak**
- Defense Elixir x3*
- Aura Grass x3***
- Prominent Cloak***
- Ripe Coconut x3
- Remedy x3
- Garmet of Many Tongues
* Requires Essence Key Stone
** Equip Feather Shoes on Dana & Gale Feather
*** Kill as many artillery enemies as possible before attempting these chests, then equip Feather Shoes on Dana
Room for Chest 6 is another XP room, not quite as good though.
- Prismatic Jewel x5
- Aura Grass x3
- Aura Grass x3
- Eternal Gauntlets
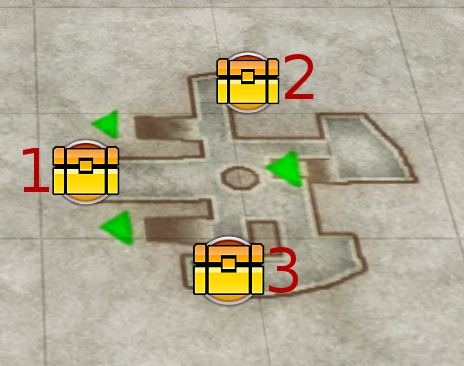
After the Boss of this area, another chest with Slash Medal, Pierce medal, and Strike Medal are available.
Appendix A – Shops (1)
Liquid Med.
Solid Med.
Accessories
Rim Flower x4, Saurian Fang x4
Rivera’s Undying Flower x3, Prismatic Jewel x1
Rivera’s Undying Flower x1, Big Pearl x2
Armor
Appendix A – Shops (2)
Accessories
Armor
Apparel
Appendix A – Shops (3)
Appendix B – Raid Rewards
Still working on this section
Soft Fiber x2
Digitalis Leaf x5
Remex x2
Strange mass x20
Beast Claw x2
Flexible Branch x20
Strong Shell x2
Small Leaf x20
First Time Bonus:
S Life Elixir
A Bitter Remedy
B Gwaranga Pincer x2
C Iron Ore x2
Soft Fiber x4
Strange Mass x30
Beast Claw x4
Flexible Branch x30
Remex x4
Small Leaf x30
Strong Shell x4
Sweet Remedy x1
First Time Bonus:
S Spirit Elixir
A Defense Elixir
B Bullfrodon Mucus x2
C Iron Ore x5
First Time Bonus:
S
A
B
C
Salamandine Hide x2
Lateka Resin x2
Bullfrodon Mucus x2
Stalactite x2
Gwaranga Pincer x2
Digitalis Leaf x2
Iron Ore x5
Bait x5
First Time Bonus:
S Power Wrist
A Strength Elixir
B Red meat x10
C White Meat x10
Razor Feather x2
Tectite Ore x3
Sword Tip Fang x2
Warm Lumber x3
Lustrous Scale x3
Sparkling Leaf x3
Accursed Shell x2
Bitter Remedy x1
First Time Bonus:
S Spirit Elixir
A Life Elixir
B Zaspion Tail x2
C Tectite Ore x2
Razor Feather x3
Tectite Ore x5
Sword Tip Fang x3
Warm Lumber x5
Lustrous Scale x3
Sparkling Leaf x5
Accursed Shell x3
Bait x5
First Time Bonus:
S Wanderers Cloak x1
A Defense Elixir
B Rim Flower x3
C Tectite Ore x3
(A)
Hard Fiber x2
Blue Feather x2
Essence Stone x2
Thunder Claw x2
Ancient Lumber x2
Diamond Shell x2
Ancient Flower x2
First Time Bonus:
S Spirit Elixir
A Life Elixir
B Essence Panzer x2
C Essence Stone x2
Acidic Liquid x2
Saurian Scale x3
Lunar Wings x2
Essence Stone x5
Sunlight Fang x2
Ancient Lumber x5
Starry Shell x2
Ancient Flower x5
First Time Bonus:
S Savage Wristband
A Hermit’s Remedy x2
B Dandale Horn x2
C Essence Stone x5
Acidic Liquid x3
Saurian Scale x5
Lunar Wings x3
Essence Stone x7
Sunlight Fang x3
Ancient Lumber x7
Starry Shell x3
Ancient Flower x7
First Time Bonus:
S Prominent Cloak
A Golden Emblem
B Dragon Crest Stone
C Great Tree Lumber
Appendix C – Hunt Rewards
B Rank village rewards
Razor Feather x2
Cabbage x5
Sword Tip Fang x2
Sparkling Leaf x3
Iron Ore x5
Bait x5
S Rank individual rewards
S Soft Gloves
A Honey x10
B Seiren Wheat x10
C Pheasant Egg x5
S Rank village rewards
Sturdy Lumber x20
Hard Fiber x3
Iron Ore x20
Insect Repellent x1
Ancient Lumber x3
Eggplant x3
Sweet Remedy x5
A Rank individual rewards
S
A Life Elixir
B Pumpkin x5
C White Mushroom x5
S Rank village rewards
Saurian Scale x5
Starry Shell x2
Ancient Bone x5
Sunlight Fang x2
Essence Stone x5
Acidic Liquid x1
Sparkling Leaf x10
A Rank individual Rewards
S
A Defense Elixir
B Dragon Crest Stone
C Ancient Mucus x5
Appendix D – Sidequests
Appendix E – Shoebill, Mishy, Map, Location Rewards
- Heal Potion
- Gauntlets
- Athlete Ring
- Spirit Elixir
- Gale Feather
- Mountain Guide
- Full Potion
- Spirit Elixir
- Spirit Necklace
- Ares Seal
- 12 locations/50% – Eagle Eye Orb
- 24 locations/100% – Power Formula
Appendix F – Help Requests, Spirit Elixirs
Tree – Nameless Coast: Requires 5 People (Chapter 2)
Sandstone – Nameless Coast: Requires 6 People (Chapter 2)
Mudslide – White Sand Cape: Requires 20 People (Chapter 5)
Gravel – Nameless Coast: Requires 8 People (Chapter 2)*
Rockslide – Roaring Seashore: Requires 14 People (Chapter 2)
Rockslide – Nameless Coast: Requires 11 People (Chapter 2)
Boulder – Great River Valley: Requires 10 People (Chapter 2)
Collapsed Cliff – Beast Hills: Requires 15 People (Chapter 3)
Tree – Water and Wood Hills: Requires 12 People (Chapter 2)
Collapsed Bridge – Great River Valley: Requires 11 people (Chapter 3)
Stone Pillar – Pangaia Plains: Requires 18 people (Chapter 4)
Cliff – Vista Ridge: Requires 21 People (Chapter 5)
Gravel – Lodinia Marshlands: Requires 22 People (Chapter 5)
Stone Pillar – Archeozoic Chasm: Requires 23 People (Chapter 6)
* Sir Carlan doesn’t count towards this total and a special cutscene will play showing him not helping
1. Great River Valley – Beach: Chest 7
2. Beast Hills: Chest 4
3. Raid – Agents of the Sea: S Rank
4. Raid – Agents of the Deep Sea: S Rank
5. Raid – Primordial Stampede: S Rank
6. Shoebill – 8 Fish
7. Map Rewards: 4th reward
8. Map Rewards: 8th reward
9. Dina – Deals
Appendix G – Skill Manuals, Guides, and Recipes
To be filled in later