Overview
This guide aims to expain the various functions and objects in the game that may not be entirely obvious to the average modder. This guide will be updated constantly as I both experiment and discover these functions and figure out how to explain them.
Pylons
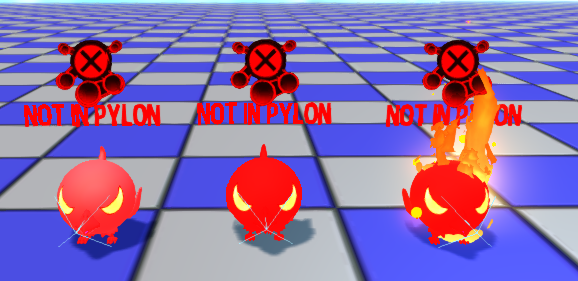
When you place most enemies in a level, most likely it will show an error saying “Not In Pylon.” This is because most enemies require the area that they interact or wander in specified. This can be done in some cases by target noding, or by specifing the area with a special actor called a “Pylon.” Pylons create an enclosed box where entities within are given limitations that their AI requires to perform most of its functions.
When you spawn in a pylon, it will come with a box similar to a volume. However, this volume will only show when the pylon is selected. This is the radius where the pylon takes effect. Enemies within this pylon will be unable to leave it, even when you attempt to push it outside of the pylon. Enemies that target the player will also not be able to target the player when the player is outside of the pylon.

You can modify the size of pylons in two ways: By normal scaling, or by setting the value of “Expansion Radius” under Mesh Generation in the Pylon’s properties. Whenever you move or scale the pylon, however, you must build pathing in order to update the new volume’s properties to any enemies within it.

Vanessa required a pylon like most enemies to define the area in which her AI will chase the player. However, Vanessa also requires to be within a Room Volume. Room Volumes allow Vanessa’s AI to “see” the player within an eyesight range, and also defines where walls may be, as otherwise she can detect the player through walls.

Ziplines
Ziplines (Or Splines, as they are called within the editor) consist of 2 actors: Spline actors and SandTravelNodes. Spline actors consist of the actual zipline, providing the path that Hat Kid will take when hooking on to it. To hook onto it and specify direction, however, teh Sand Travel Nodes are needed. Setting up a proper zipline can be tricky at times, as one of the biggest limitations is that if your Spline is far longer than the distance between the two travel nodes, it’ll skip the whole spline overall and “teleport” between travel nodes.
I will be using the Hat_SplineActor_Alps variant of the zipline, which displays the colored flags seen in alphine skyline. The default variant will just be a clean rope, for when you want a more realistic zipline. Once you place down the actor you will see two dots at the end of your flag. You will be dragging these to expand and shape your zipline. Simply click on the dot to select it and translate or rotate it as you would move or rotate anything else.

If you want to create a new bend or shape added onto your existing zipline, simply right-click on the end of your zipline and click “New Spline Here.” This will add another Spline onto your existing one, which will become merged with the main zipline. After some testing, I found out that splines in the main game are in fact just single spline objects all along and not extended using the New Spline Here button. Using said button causes problems with teleporting and jumping around between segments of the spline. Please refrain using this button in the future. The ends of the zipline are simply the Alp_Tree_Zipline_Final static meshes alligned manually.

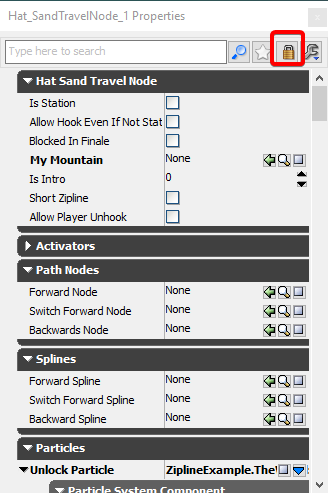

To start, each of the travel nodes must have their Forward Spline property under the Spline tab set to the spline actor that the nodes will be connected to. You will also want to check the box “Is Station” under teh Hat Sand Travel Node tab. The Forward Spline sets the spline to be used and the Is Station box tells the node that it will be the entrance and exit to the zipline.
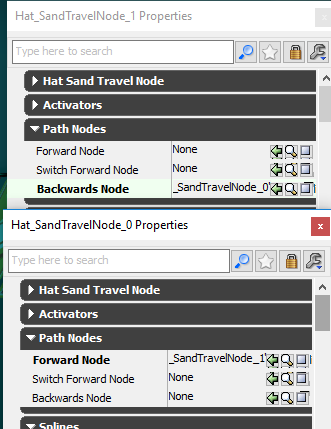
Finally, we want to set one of our nodes’ “Forward Node” property under Path Nodes to be the other node, and we want to set the “Backwards Node” property for the other node to be the first node.
To finish up the zipline, we need to allign the travel nodes to be as close to the edge of the zipline as possible. This will put our hookshot marker to hook the edge of the zipline instead of the ground. With some additional adjustments to pathing you should have a smooth zipline in no time at all.


Hidden Volumes and Purple Rifts
The creation of “Purple rifts,” better known as “Cave Rifts,” involve creating “floors” that the player progresses through in order to reach the bottom, where the time piece is held. But really, these rifts are set up in a grid, with the areas outside of the player’s reach invisible until the player’s camera enters the respected Hidden Volume. For an example of this, we can look at the Mafia of Cooks Purple Rift.
Here we can see a grid of segments, each within a blue volume. This is the hidden volume. The hidden volume, when configured to do so, will hide its contents when the player is not present within it. Every Purple rift involves traversing this grid through Rift Gate actors (Hat_TimeRiftGate). These gates can require a set amount of rift pons (Hat_Collectible_TreasureBit) to be opened. These pons can be collected off the ground like normal pons or by killing enemies.


IMPORTANT: Make sure to tick the Apply to Content box before you tick the Only Visible in Volume box. Otherwise funky mayhem will happen!
Enemies holding rift pons must be configured to do so by setting the variable “Treasure Amount” under the Enemies tab to whatever number of rift pons you want the enemy to drop. Every enemy in the game can be given a seemingly unlimited amount of rift pons to drop.

The rift gates themselves are simple in function as well. The two values that you want to pay attention to are both under the Data tab: Treasure Requirement and Travel To Checkpoint. The Treasure Requirement is the amount of rift pons that the player will require to open the gate. Setting this to 0 will open the gate automatically, which is recommended to be done for the first gate when you enter the level, as the main game does.

Travel To Checkpoint specifies what checkpoint the rift gate will send you to when you enter it. This way if you were to fall off of a rift it would spawn you back to what floor of the rift you were on, as well as acting as a teleport between floors. You will set up checkpoints to create a linear path from one gate to the next, until the final checkpoint which will lead to the Time Piece.
The last “floor” of every Purple rift features a platform with the Time Piece in the form of a purple portal (Hat_Enemy_TimeRiftBall) that the player must smack in order to break open. The area is also, in this case, surrounded by a circle of Blocking Volumes that prevent the player from falling off the map.


And with that, you now know all the basics to making a Purple Time rift.
Packages and Importing Custom Content
This section will not cover creating custom objects and models or implementing this custom content to function. These must be done in one of the variety of programs available for content creation. This will cover importing your own creations into the editor.
Adding new content in the game depends on what you wish to import. Most content will be created by importing the file into the editor. Others will have to be created with the new button and use content imported along with configuration. This section will briefly cover how to import custom content of varying types.


You will be adding your custom content into your own package. Packages are simply directories that will be holding all of your imported content, much like folders. When creating a new file, you will be prompted a dialog box containing the information as shown. Simply enter the package name you wish to create or use in the Package text box.
It is also important to note that the save button you used for saving levels and autosaving will not save your packages. You have to manually save your package by right-clicking on your package and clicking the save button as shown. If it is a new package, you will be prompted the Save as menu, in which you will select where to save your package to. In order for your package to be cooked, you must put it in your mod’s folder under a folder titled “Content.”

Textures are simply importing an image file with the import file. To keep opacity data for model textures, I recommend using .png image files.
Materials are created using textures oriented onto a 3D space. The simplest way to do this is to click new, create a new material with the name of your choice, and open your new material in the material editor. To add your texture as a material, simply drag your texture from the content browser into the material editor. Then connect the diffuse node with the black colored node of your texture to make the material of your texture.

Models and any animations must be imported as an .fbx file. You can export your models as this file type through the export option if .fbx is not the file type your modeling software saves in by default. Most modeling softwares should support exporting to .fbx.
Creating A Custom Music Tree
While In-Game Music tracks may be enough for your purpose, sometimes you need to use several tracks that change based on various conditions. This logic is handled by objects known as Music Trees. For this example we will be making a music tree that will be playing a different song depending on which platform the player stands on.
To start, we will be adding volumes that will provide the condition in which the music will change. These volumes are called music volumes. Once we have added these in we have finished the work we will be doing related to in-game objects.


Next, we need to create the custom music tree. To do so, we will be creating or using our existing package.
Once you create your music tree, double-click on it to open the Music Tree editor. This window will look and behave very similarly to Kismet, but will only handle music instances. When you open the editor the only node present within it should be a Root node. This will be the start instance of the music tree.


Upon right-clicking anywhere in the editor, you will see the following drop-down menu. This menu lists all the different conditions and nodes we can create in the editor. For our case, we will need two Blend by InVolume, A single Music Track, and a single Music Track Group. For the Music Track node, under the Hat Music Node Track group, we will set the Music property to the Cave_Rave Sound Cue, and the Music Track Group node’s same properties to the Ice_Cave_Theme SoundCue. You will now have the following nodes:

As you can see, the Volume nodes are boolean true/false tests, the music track is a single node, and the music track group node has two nodes that can be hooked to. Some Sound Cues have several variations or layers of music available to them, allowing for variation within the same file. We will now connect the nodes as so:

Once the root is connected to the tree, an orange path will be highlighted. This will display the path leading to the music track that will be played based on the current conditions. You can also click the play button at the top-left of the music editor window to listen to the music that you have set. As you are playing this music, you can drag the sliders under the conditions to change which song is played.

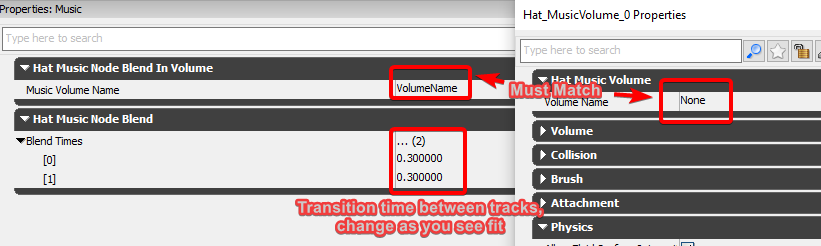
In order to link the volumes to the music tree, we must give each of them a matching name to reference to. You can also change the time between transitions between songs in the node’s properties. Once you have set each volume to match the music tree’s nodes, you may close the music tree editor. Make sure to save the package you put your music tree in by right-clicking on the package and clicking the save button.


Once you have saved your package, all that’s left to do is to set your music tree as the music tree to be used by the level.
Now when you enter the level, you should hear the music that you have set to play, and when you hop on the different platforms, the music will change! You are free to experiment with other nodes and conditions to achieve your desired results. And if you’re looking to speed up your music in the same way that Train Rush does, consider experimenting with the “Pitch by Parameter” node.
Fire Spirits and Fire Barriers

Creating a functioning bonfire requires 4 components: A Hat_Bonfire actor (any color you want, but make sure the painting color matches), Hat_BonefireBarrier to block an area until the bonfire is satisfied, Hat_SubconPainting (make sure the color matches), and a single camera actor (CameraActor) to show the barrier being removed (yes, the game requires this for the barrier to disappear upon bonfire completion, oddly.)
Bonfire barriers are Spline actors (just like zip lines) that define an area where the player cannot pass through or over (however, you can go under without issue, so make sure there’s no clearance to crawl under!). Unlike zip lines, these splines won’t bend or shape to rotation. Instead, they only create a straight barrier from one point to another. You can move your barrier by moving these points to set positions, and can afterwards extend from them in the same way you can extend from ziplines (see that section for more info on adding onto splines).
We will not have to configure the wall in any way to get the bonfire set up, so just create, adjust to lengths, and you’re good to go.
The paintings as you know are the keys to removing bonfire barriers. These objects can be set up in the same way as all collectibles, but you may need to specify the burning sound manually as it is not provided by default. The burning sound of paintings is {SoundCue’HatinTime_SFX_Subcon.SubconBonfirePictureBurn_cue’}.
The bonfire itself is what links everything together in all of this. The paintings themselves do not require any input as they are automatically linked to the bonfire by color. With the 4 colors available (Blue, Green, Yellow, and Purple), you can have up to 4 different bonfires in a single level.

Under the Barriers drop-down below the Hat Bonfire Base tab is where you will insert and select every barrier that you want removed by the bonfire when completed.
Under the On Complete Camera Actor is where you will specify the camera to be used when showing the bonfire disappearing. You can simple drag a camera actor into the level and aim it at a segment of your barrier wall like it is done in Subcon to get this effect.
Now you have everything to make your bonfire function, but you may also need to fill in the following sounds that are missing by default:
Fire Grow Sound: SoundCue’HatinTime_SFX_Subcon.Subcon_Bonfire_Ambient_cue’
Complete Sound: SoundCue’HatinTime_SFX_Subcon.SubconBonfirePictureComplete_cue’
Now when you enter your level and complete the bonfire, the barrier should disappear and allow you to collect what hides behind it! If you complete the bonfire and play the level again, you will notice that the barrier is still gone. This is because the barrier is persistent and to reset it you will have to use the “Reset Level Bits” function under the Editor tabs A Hat In Time > Act / Level Bits > Reset Bits.
Terrain

Creating custom terrain is not something you should use in every case of needing land, but are useful in creating smooth land masses within your levels. To start, you must first create a Terrain Actor.
Before beginning work on the terrain, you should have the size of the terrain in mind and a basis on how it will look. You can change the size through changing the amount of patches on each axis and modifying the Draw Scale Property under the Display Tab (not shown). If you are working with large terrains, you can turn down the draw scale while you are carving the terrain to your specifications, and then when you finish you can turn the scale back to normal to create large landscapes far faster than slowly moving around to each corner of the terrain.


When an object is far away, the game saves on resource use by down-grading it’s texture resolution to a more basic texture. This is called tesselation and scales with distance. You can see this tesselation in action by changing the tesselation settings in the terrain options. The base settings is what you will see in-game however.
Now that you have your terrain set up, you can start by opening the Terrain Edit Mode. This button is found on the left-panel of the editor towards the top, represented by a mountain icon. Clicking this button will disable the ability to translate, rotate, or scale objects until you exit the window that is created. Instead, your cursor will be able to rise and drop terrain.


Within this tool you can set your settings to what you need. Once you have set your strength and radius or have selected a preset brush, simply hold ctrl and left-click and hold to bring terrain up. To push terrain down, hold ctrl and hold down right-click. This also applies to other modes such as smoothening or flatening terrain. Feel free to experiment with the tools to create the terrain you wish for.
To apply a material to your terrain, under your heightmap right-click with your desired material selected in the content browser, and select “New Terrain Setup Layer from material (auto-create).” This will create a new layer and apply your material to the heightmap of your terrain.

You can have multiple materials applied to the same terrain as well. If you want to overlay one material layer over another in a specific area, select the texture layer that you want to bring up under the heightmap layer and use the paint tool and use it like you would increasing and decreasing the terrain size. Instead of modifying the height of each of the terrain’s vectors, it will add more weight to the texture under the primary texture layer, making it show up above the main layer. You can use this to transition from sandy beaches to grassy plains.

Ladders
Currently, ladders are very unstable to use and tend to crash the editor. However, this can be avoided with precaution in a silly list I made for some reason that I call, “Mr. Precarious’ Laws of Ladders.”
While it’s alright to select the volume itself without issue, moving or modifying the volume in any way will most likely end with your editor giving you the boot. When it comes to Moving or rotating your ladders in any way, you have to select the ladder object itself, which is invisible and therefore can only be found by using the Scene tab of the Content Browser to select it, where you can then move all of the ladder’s components.

Although the ladder actor itself has a place within its properties to specify a mesh to use, this will never be accurate. If you do specify a ladder mesh, it will either be rotated by 90 degrees sideways, or will be completely offset from where your ladder is. For this reason, you have to assemble the ladder yourself, using one or several static mesh ladders aligned within your ladder actor.
When stacking ladders within each other, you can avoid flickering of the meshes by offsetting them by 0.1 on their X or Y axis. This can be set by changing the mesh’s Location property to fine-tune it’s location and offset. One thing to note about this is that the lighting may seem off between the two meshes. This is normal and likely won’t be seen during normal gameplay. Building lighting will help blend it better, although this may vary by mesh.

Another important thing to note is that Hat Kid will seem to hover in front of the ladder when climbing it. To fix this set the collision of your ladder meshes to have No Collision, which will allow you to have Hat Kid seem to actually climb the ladder. Since the blocking volume that comes with ladders will keep the player from going through the ladder, you shouldn’t have to worry about it’s collision.
Ropes
Ropes are strings that span between 2 positions that Hat Kid can balance on. Creating them is simple. We will be spanning this gap with a rope that HK can balance on.

To make ropes, start by adding in two Hat_Rope actors. These will appear as flags in the level, and will determine where the rope starts and stops. To connect the two points, set the End Point property under the Rope tab of one of the nodes to the other. This will create a simple white rope that will behave as they do in-game.
From here, you can change the rope in many ways. You can give the rope more slack, make the rope wider, give the rope a rope material to give it a real rope look, and many other properties. Experiment for youself to see the possibilities!

Custom Conversations
Sometimes you want to add people who talk. This section will go over how to create custom conversations, including choices and input questions.
To start, you need to create a new asset called a Conversation tree. This will handle the conversation and any choice paths that the player chooses. This will go in your package for that level. Double-click on the new file to open the ConversationTree Editor.

Within the ConversationTree editor you can right-click to bring up this menu to create new conversation nodes. Each node has a different purpose and function.

Each node shares several properties. The Message Property under the Node tab is where you put what you want to say in your message. The Voice Acting property is what vocals you want to play in that node. For base-game NPCs you want to give them their mumble lines if they have one. The Conversation Type property determines the textbox background and color. For example, using Gloom will make the textbox look like the ones Snatcher uses. Give them all a try and see which one fits your line of text!


One difference that the ConversationNode editor has compared to other editors is that linking nodes gives several options. We will use the first and most basic link, Hat_ConversationLink.
To assign a Conversation Tree to an NPC, simply select your Conversation Tree in the content menu, select the NPC you want to assign your conversation to, and select it as the Conversation Tree property under the Conversations tab.

Adding in choices to conversations uses the Hat_ConversationNodeChoice node. These nodes differ from normal nodes in that they support having several paths to split from it based on the player’s choice. You can make several choices by connecting the node to the messages that will be said when using each choice.

If you check your convo now, you may notice that your choices don’t say what you want them to. This is because the name of the choices are determined by the links and not the nodes that they connect to. To name the choices properly, simply right-click on the output of the choice node and select the option you want to name. Then, replace the Fine Name property with what you want your choices to say.


Hat_ConversationNodeInputText nodes have a few extra properties that can be found above the normal properties. Under this new tab are properties named “Variable Name” and “Text Length.” The Variable name is the name of the text to be inputed when you call it up in a later conversation node. The Text Length is the maximum amount of characters allowed to be entered by the player.
To call this variable to display the text the player inputed, you must specify when the variable name starts as [name] and ends with [/name]. Then inbeween these nodes, insert another set of square brackets containing the name of the variable you specified under the variable name property.

To make a conversation only occur once, you must make the conversation that you want to make one-time only linked to the Root node by an ExaustiveLink. Then, simply set the Priority Group of this link to two. This will only make the conversation happen once, and will loop between other nodes linked to the Root node afterwards, never repeating the exaustive-linked node.
If you want the NPC to speak without having to interact with the NPC, you can tick the property “Trigger on Approach,” found under the Convesation tree you selected. You will need to expand the tab to find it.
For information on text formatting within conversation trees and nodes, see:
[link]
Routes and how to make actors Patrol

Oh no! Smug child is trying to steal Mafia’s treasure! Mafia cannot let this happen! Fortunately for Mafia, Mafia has already called CAW Agency for extra security. Now Mafia will show you how to boss crows around.

To start off, you need to specify the locations where your Agents will make turns with the PathNode actor. You will also need a Route actor, which will be used to assemble the nodes into a path, and a pylon to provide the data needed for moving enemies.
To build the route, under the route tab in the route actor’s properties, click the green plus next to Route list for every node in your path. Set each of the list’s Actor properties of the newly created nodes to each node in order of where you want them to go. Here I have them going in a counter-clockwise movement.

There are 3 Route Types to Choose from:
- Linear – Forward and back, best used when walking in a line
- Loop – Repeats the sequence of nodes
- Circle – Moves in a circle with the nodes (Unconfirmed)
Now that we have our route set up, it’s time to add the CAW agent(s). Place down a Hat_Enemy_SecurityGuard_Crow actor anywhere in the pylon (The crow will walk to the nearest node and begin following if misalligned). To attach the Crow to the route, set the crow’s Patrol Route under AI to the route actor. You can add as many crows to this route as you like.
Doors

When creating multi-room interiors, you need a way of traversing between each room. This is done using doors. Doors may seem like they connect rooms together, but in actuality this is rarely the case. We will be connecting these rooms together using the Hat_DoorTrain actors. You can use whatever door you like, however. Choices include:
- Hat_Door (note: This is a blank template, meant for custom doors. Use with experience.)
- Hat_DoorManor
- Hat_DoorTrain
- Hat_DoorFreezer
- Hat_DoorTrainLab
- Hat_DoorTwilight
- Hat_DoorSpaceship (Experienced use only, does not share common properties used in this section)
Once you have placed your door down, there are several things you can do, depending on how the rooms are set up. If you place a door down without additional configuration, it will simply act as a normal door that you step through, which can be used to partition large rooms into smaller sub-portions of the room.


If your door happens to bring you to the outside of the room (which is most likely black space), flip the door around. Every door you spawn will face the same direction when you place it, and whichever direction the door faces is where it will place the player upon teleporting. Unfortunately, doors do not have direction arrows like most actors relying on direction do, so you may need to use trial and error to figure out which direction your door is facing.
In the case you want to lock your doors to require a key, then you simply tick the Requires Ticket property under the Lock tab. This will require the player to use a key to access the door. You cannot link a specific key to a specific door however; all keys will open any locked door.

If your door is missing the lock when you enable Requires Ticket, you will have to set the mesh used yourself. This can be done by clicking the drop-down next to Lock Mesh under the Lock tab, opening the drop-down titled Static Mesh Component, and under this tab, set the property Static Mesh to the following mesh:

StaticMesh’HatInTime_Levels_Manor_Habboi.models.manor_door_lock_padlock’
This will add the default padlock to the door when it is locked. Some doors have special lock meshes used exclusively for them. You can even try to make your own locks!
Water and Fluids
Water is the result of two seperate actors: A Fluid Surface actor for graphics and a Hat_WaterVolume to handle the physics of swimming in the water. While the fluid surface reacts with the player, it does not tell the game that the player is swimming, which is handled by the volume.
The Volume can be created in the exact same way you create other volumes, which is covered in the First Level guide. Making the Water Volume too thin will fail to detect the player and not allow swimming, so make sure it’s deep enough! The top of the Volume will have to be alligned with the Fluid Surface actor.

The Fluid Surface actor, when placed down will show up as a missing texture on a flat plane. Simply drag a material over it such as water_standard and it’ll show up on the surface.
Water is not always equal, however. Within the Water Volume’s properties, you can change how the water behaves, such as whether you can drown in it or not. These settings can be found under the Hat Water Volume Tab.

Not all water looks the same, either. While standard may be what you need, there are several other options, such as:
Standard: water_standard
Cave rift water: water_timerift
– Alternate rift water: water_clear
Opaque water: water_opaque
Unlit water: water_unlit
Performance-cheap water: water_cheap
You can also make lava the same way as you make water, but instead of a Water Volume, use a Lava Volume.
Attachment: Extending possibilities

While you can group objects together and apply movement to the entire group, it will move each object individually and not as if they were all one object. Attachment allows you to bypass this while also allowing you to do more with your objects.
Attachment in the game works similar to how modeling programs handle bones in their model: Every bone is connected in a tree from a central “trunk” that branches out. For example, if the center of the object is the chest of the character, then that can branch out to attach to the shoulders, arms, and then the fingers, similar to how a tree grows out its branches.

The most important thing to note about attachment is that you can only attach Movers. Static meshes will not be able to move without being converted to movers from the right click menu (Explained in the “Creating Moving Objects” section of the First Level guide, linked at the bottom of the guide if you missed it). This is only the case with static meshes, however, as any movable actors can be attached to other objects. Many objects may have movable versions, and some might be movable themselves. However, some objects like balloons aren’t movable without creating your own custom coded balloon.
Each Object in the editor can only be attached to one object at a time. However, you can attach as many objects as you want to a single object, whether this acts as a chain or a network of branches. To attach an object to another, go into the actor or object’s properties, and look under the “Attachment” tab. This tab will only be present in Movers and Actors, as explained in the bolded paragraph above. Under this tab, you will see some properties, but the only one we’ll have to worry about is the Base property. All you have to do is set this property to the object you want your currently selected property to be “connected” to. You can make setting this property to a specific object easier by clicking the lock in the top-right of the properties window to lock your selection so that when you select another object, it won’t update the properties window to show the properties of the other object. This way you can just select the base and click on the green arrow to the right of the Base property to set it.

Now if you move around the object that you have set as the base, you’ll see that the other object moves with it as well! You’ll also notice that if you move the other object, the base object won’t move. It acts as one-way, so you can move the object without moving the base, while moving the base also moves the object with it. You can extend this as much as you’d like to create complex mechanical contraptions.


A cool hidden tool you can use to view and modifiy attachments is also available. You can find it under the editor’s view tab if you hover over Browser Windows and select “Attachments.” This will open up a window where you can add actors selected in the viewport and any attachments they may have. You can also add in new actors to be attached as seen fit. This allows you to see your objects “branch out” and help isolate problems with your attachments, and fix them as needed.
Level Streaming

Level streaming is useful for optimizing large levels by dividing them into smaller segments or maps. Level streaming is how levels like Alpine Skyline and the Cruise were optimized to work despite their size. In fact, Alpine Skyline is actually 18 different maps in total.
Level Streaming can be done by going into the Levels tab in the Content browser. In here you will see a single instance with a button to enter its kismet, toggle visibility, and save the level. From here, if you click on the level tab in the very top-left, and then click on “Add Existing Level.” This will allow you to select a map to load alongside your current map. You will want to choose to stream it using the Kismet method, which is set by default when you get the pop-up window. Simply click ok to insert your level.


You also have two additional options: “New Level” and “New Level from Selected Actors…” New Level will create and stream a blank level alongside your current level. New Level from Selected actors will create a new level and automatically move any models or objects you have selected from any level currently loaded to the new map.
As you add new Levels into your map, you will gain more instances under your level tab. You can double-click on a level to select it (it will become bold when selected) and any new objects you create, add, or paste into the Viewport will become a part of your currently selected level. You can select objects from other levels and copy them and paste them into the current level. Each level will have their own Kismet tree, with the main level (shown as “persistent level”) holding the level stream Kismet. You can also save each level individually, as well as save every level being streamed at once using the “save all levels” button next to the normal save button at the top-left of the editor (with a small planet image next to the floppy disks). You can also toggle the visibility of each level stream individually, so you can stop showing portions of the level, whether to try to reduce editor lag or to ensure that you have the right models in the correct maps. You can also choose to lock a level by clicking on the lock icon, which will prevent you from selecting objects from that map. This is useful if you want to prevent editing something from a different map on accident.

Do keep in mind that many Actors will not be able to interact with each other across maps. An example of this would be ziplines. You can’t use sandTravel points in level A with a spline actor from level B.
Matinee in Detail (WIP)
Warning: Mess incoming
Although Matinee was briefly covered when making a basic moving object, this segment will go into further detail about Matinee.
The loop selection sliders (green arrows) also double as a selection tool for certain actions within the Matinee Editor
At the bottom-left of the Matinee window is a set of numbers showing the current time your cursor is selecting, as well as the total length of the entire Matinee track. The total length can be modified in a few ways.
One way is by simply dragging the red arrows along the bottom of the track to the length you’d like. If you want to snap to a precise time, you can toggle the snapping mode on the toolbar of the Matinee window, which will snap by half-second increments.
Alternatively, under the Edit tab at the top-left of the window, you have several options to modify the length.
- Insert Space At Current will insert the amount of seconds you enter into the prompted dialog box from where your cursor is located
- Stretch Section will stretch the selected area of the track by the amount you enter into the prompted dialog box
- Stretch Selected Keyframes
- Delete Section will delete the segment of the time sheet you have selected
An empty group is a group that can be used for just about anything such as moveable meshes
Camera Groups allow for the selection of cameras by directors
Director Groups are used to control which camera is being utilized while a matinee is playing
You can set the specific time a keyframe is located at by right-clicking on the keyframe and selecting Set Time.
All tracks have the ability to let you set a specific value using Set Value. However, some tracks have other ways to modify information as well. For instance, Movement tracks can be modified by selecting a keyframe, and then moving or rotating an object within the Viewport to set its position and rotation for that frame visually.
Each Keyframe has the option of 5 Interpolation modes. These are:
- Curve interpolation will smoothly transition from one value to the other using a curve that can be modified in the curves editor. 3 variants exist for finer control within the curves editor, which will be covered later on.
- Linear interpolation will move from point A to point B at a constant rate.
- Constant interpolation will hold its set value until the next keyframe without change
In order to see a curve in the curves editor, you need to click on the small button on the left side of the track label. This button looks like a small pixel graph, and by clicking it, your curves for that track will appear in the curves editor.

Pan mode allows you to translate the curves editor space to find a specific curve point to modify
In Zoom mode, left clicking and dragging will scale the Vertical Axis, while right clicking and dragging will scale the Horizontal axis. This is important in order to reach or see curves using large values.
Whenever you select either Auto mode, the curve will set itselt to smooth out the curve by default.
Curves can be modified by clicking and dragging the white square handles on each keyframe within the curves editor. These allow you to modify the shape of the curve to change the rate at which a value changes over time.


Suggestions And Other Guides
Do you want a function or mechanic explained in this guide? Put your suggestions in the comments and I’ll answer back when I can on whether they can be added or not!
How to make your First Level: [link]
Advanced Editor Features: [link]
Guide to Kismet: [link]
Importing and Implementing Custom Hat Flairs: [link]
Creating Chapters: [link]
INI (Mod Data) Files and Configuration: [link]
Creating your own Death Wish Contracts: [link]