
Overview
Anyone and I mean Anyone can beat Legendary or any difficulty as a dwarf. Easy ready step by step guide, with Screen shots of battles. We also focus on strategy with no auto resolve cheese, but its ok if you do. No judging here.
Updates
5/30 – Battle screenshots
6/1 – Alliance screenshot for borders
6/2 – Expansion Example (early mid game), and Mid/late game manual battles
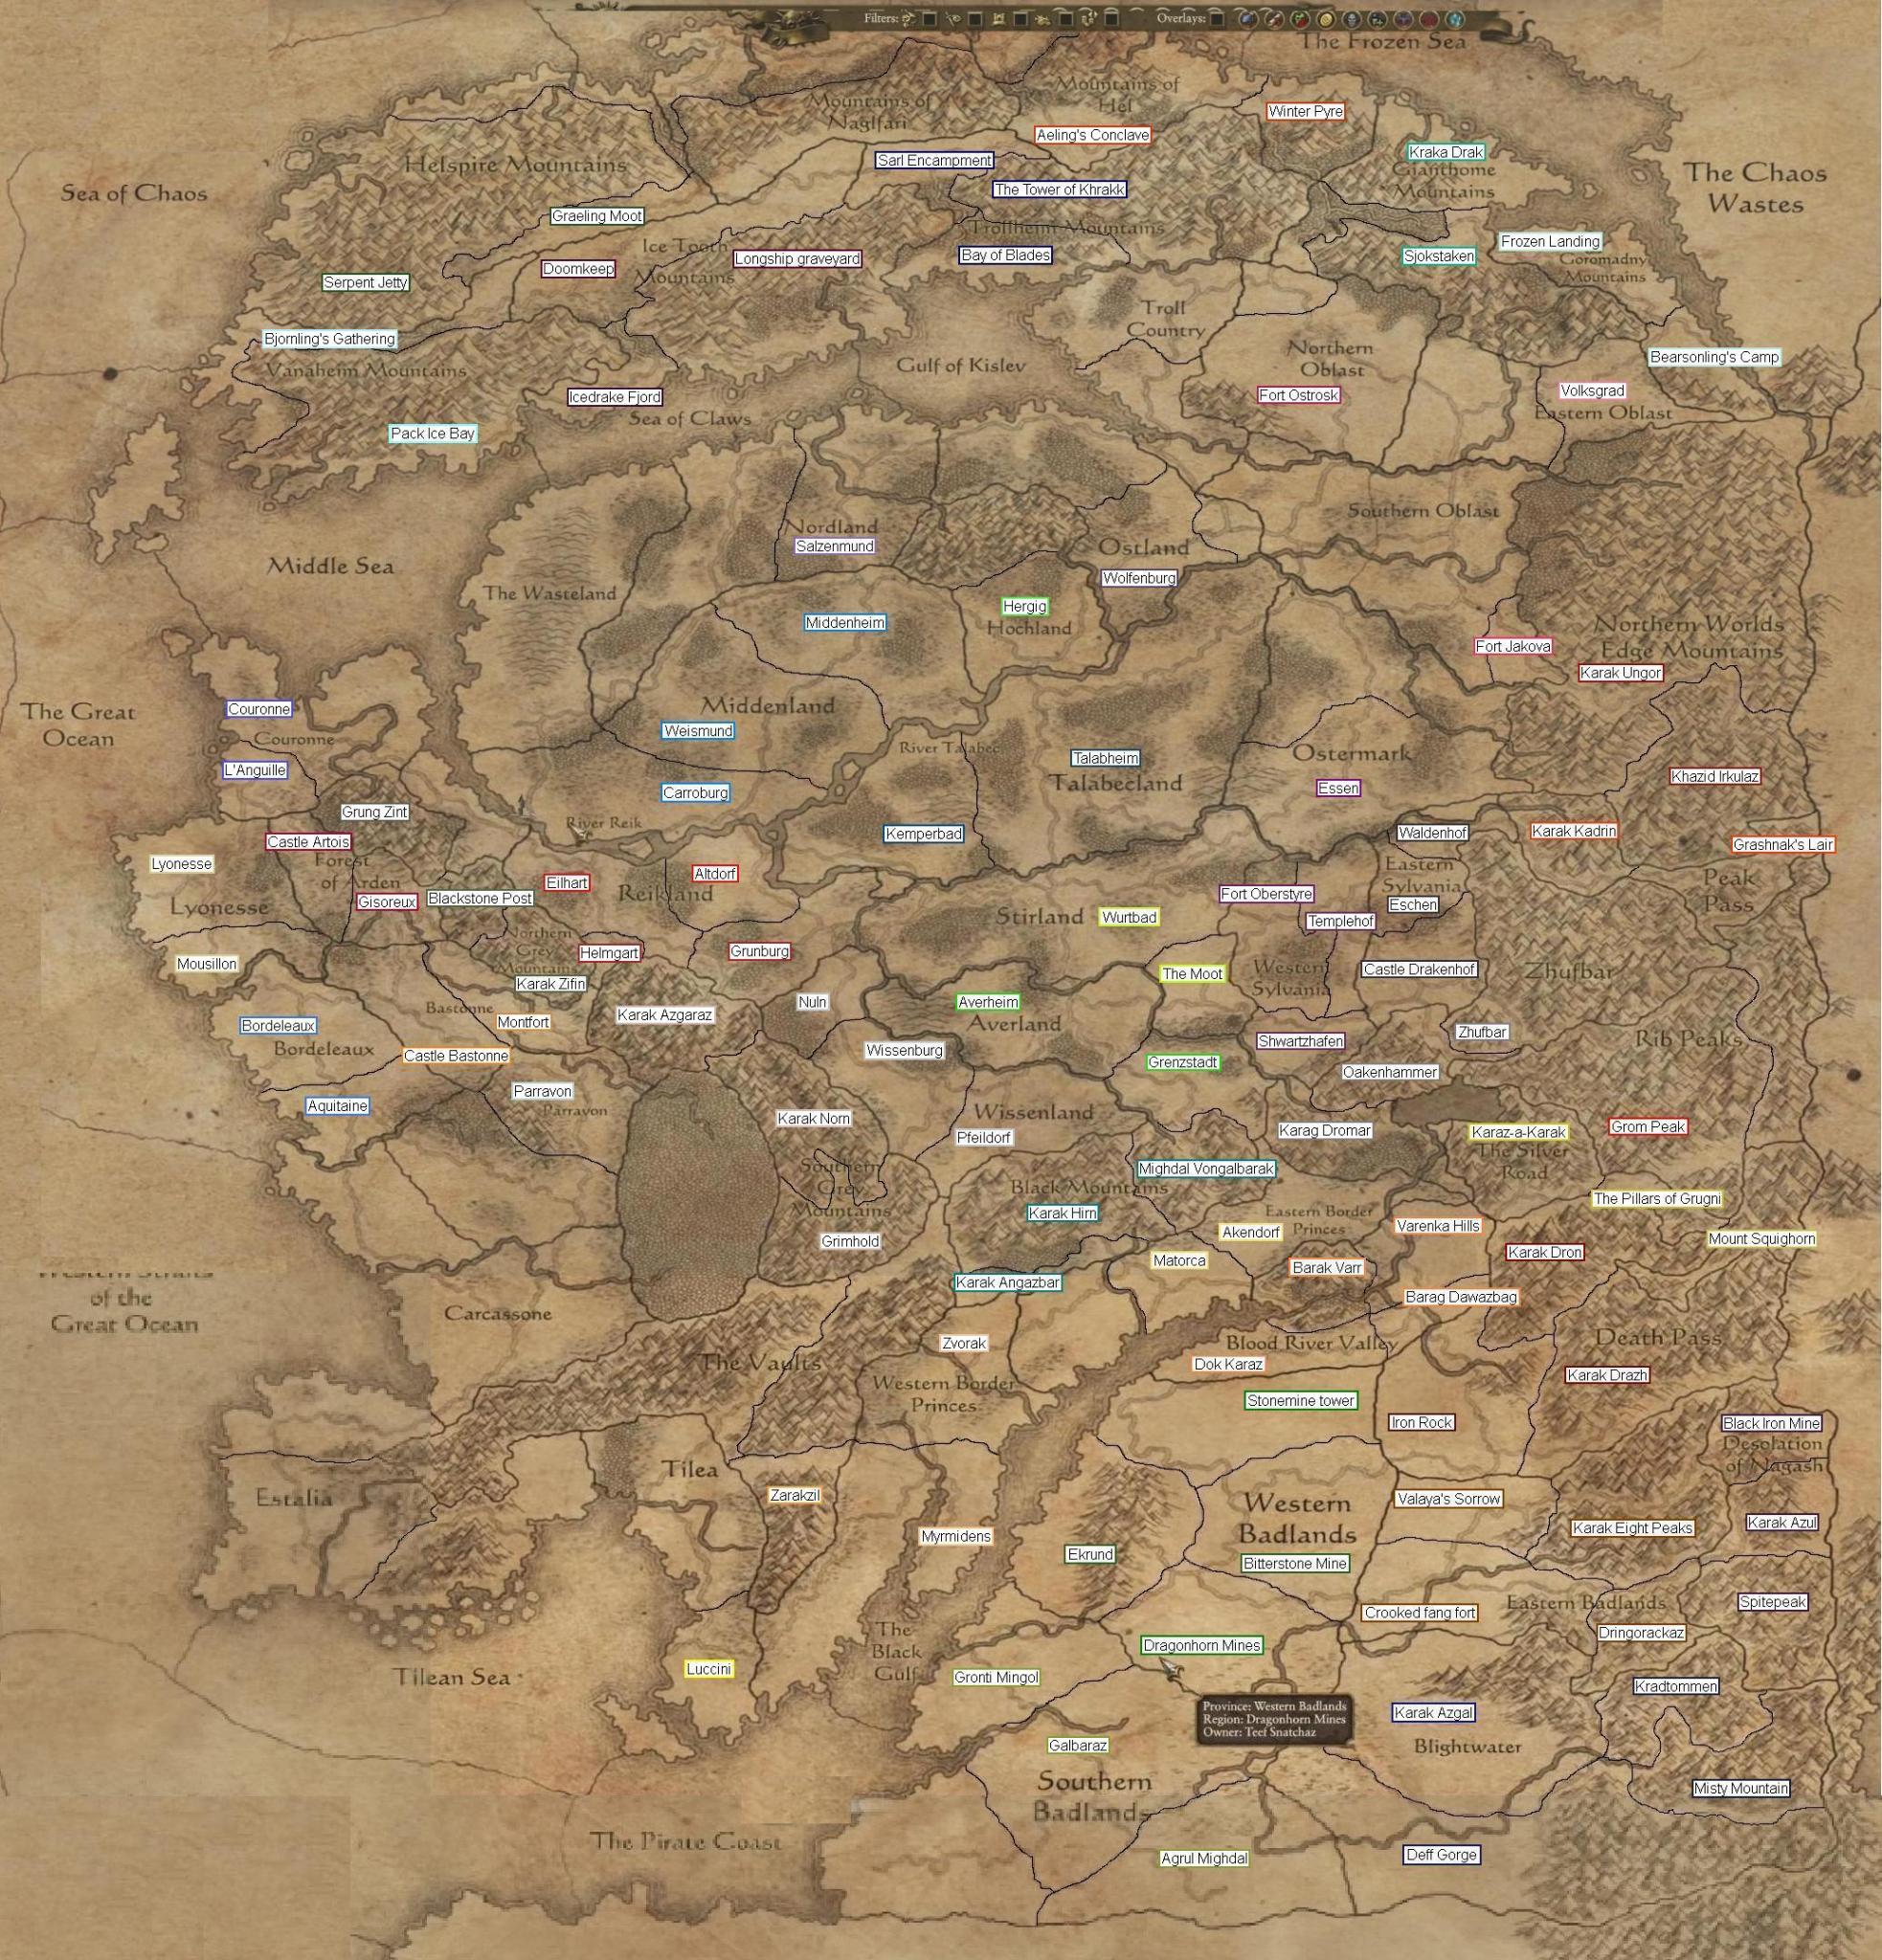
6/3 – Added Warhammer Map
6/3 – I started a Guide for Greenskins, Check it out!
[link]
6/4 – Alliance Strategy
6/5 – Added Miners (Blasting Charge)
6/10 – Updated turn guide
6/23 – Patched fix demolish a Military Building and allowing to recruit the same turn.
Auto Resolve
I want to emphasize this guide is designed to not use auto resolve for high difficulties. The reason why is the AI does not give any bonuses to enemy armies when you auto resolve. Meaning you can prove this to yourself by playing on easy and auto resolve your first fight and then switching to legendary and doing the same. You will notice the same % win rates. So if you choose to play on legendary and auto resolve most of your fights you are really playing on normal. I am not against anyone using auto resolve to save time but you will almost always lose more casualties fighting the battles yourself then auto resolve. My hope is they will fix this in the future.
What this Guide will do for you
It will give you a smooth solid beginning of expansion, alliances, threats and being able to advance your armies in a way to not only expand but defend your borders. You must play a difficulty on either Legendary or a higher difficulty you can not beat for this guide to be effective to you. The reason why is the hardest part of playing warhammer on a high difficulty is not the late game but the early/mid game.
Early turns 1-2
This guide can be use for the lower difficulties especially if you enjoy pausing on the battlefield. It is also explained for players who can’t finish the game on hard or lower difficulties. You don’t need to be the fastest clicker to win your battles.
Dwarves are by far the easiest race to beat on legendary due to their extremely high armor on both range and melee units.
The turn guide below will only work if the task below is complete on the turn. Meaning if there is even a 1 turn delay you will most likely not have a favorable experience.
I. Picking your Legendary Lord
Thorgrim is by far the best choice because you start out with grudge thrower (catapult) that forces your enemy to come to you. The only weakness of the dwarf race is their speed. Having one long range siege unit is key to winning every manual fight.
II. Picking your 1st lord turn 1
Click on your main city, click on recruit lord and reload the game until you find a lord with a trait you want. I would suggest Handsome for the +1 public order. This gives you the perfect 2nd Army leader without RNG of bad traits.
III. Early Turns
*Warning, the turn by turn is for Legendary Difficulty* Playing on other modes will have different outcomes such as bonus public order, less agressive AI and chaos invading later, but it will still work with outcomes progressing faster.
Turn 1
Build a gem mineshaft, Move Thorgrim into your city, recruit 3 dwarf warriors, pick khazid subsidies as your tech, then end your turn. This allows you to gain public order while building your army. You are also focuing on early gold generation with your tech.
Turn 2
Move Thorgrim as close as possible to the enemy orc army east of you. Then move your Lord beside Thorgrim. This allows you to fight with your newly bought lord for extra experience. Attack with thorgrim and you will notice your lord will come in as reinforcements. You should have a total of 10 units on Thorgrim and 1 reinforcement in your battle.
Dwarf battle tactics (first battle)
The great thing about dwarfs is you can be really slow at moving your units and dwarves are the most forgiving in battle due to their high armor and low charge. Meaning standing your ground because you’re to slow to click on a unit is completely fine since there is no real bonus to their charge on most units.


Put your dwarf warriors middle up front 4 or 5 rows deep. Put your quarrellers to the left or right of your front line. Squeeze Thorgrim a little in front between your quarrellers. Your grudge thrower will be behind your dwarf warriors. Put your hammerers and miners behind your dwarf warriors wings.
This tactic is your basic layout for just about all fights Units with shields are always up front (ie dwarf warriors) and non shield units (hammers and miners) will be behind for flanking or reinforcing your front line vs enemy lords or large units charging your front line or engaging your left or right wing range unit if Thorgrim can not engage them.
Now move this entire army setup by holding shift and push it way back. This allows the enemy to not engage you due to your thrower until your lord reinforcement arrives. Now move your extra lord on the side of your quarrellers. Fast forward to speed this part up.
Now slowly move your army up so your thrower is in min range of their army. This will trigger them to attack you.
I’ll start with 4 areas of focus, Your left and right flanks,back units and reinforcement We setup where one of your flanks is just range and the other is melee.
Reinforcement:
If you move you army back where your siege unit is not in range of the enemy, you can gain an extra lord for the battle.
Range Flank:
Your quarrellers and your primary focus, They do so much damage to orc armies due to their lack of armor which is why they are your wing front liners. When an enemy unit gets close to your quarrelers move Thorgrim to intercept. The reason why Lords are better than other units is because they are just 1 unit, allowing your range units to still shoot into enemy front line units. If you need additional help move your hammer or miners to support. You will notice the enemy units will route on the side of your quarrellers, Make sure to keep one forward because at some point they will stop running turn back into the fight. Keeping 1 quarrellers forward will force them to run again once they are in range. Tilt to your 2nd quarrellers towards the middle and they will auto shoot enemy archers or whatever. Thorgrim can now engage the flank of the enemy front line or enemy lord.
Melee Flank
Once the enemy units engages you can rotate one of your back units hammer or miner (not both) to circle your melee flank and engage from the side or behind.
Back units:
You only have 1 left, and if they are not engaging one of the flanks then charge them into where the enemy lord is attacking.
This sounds like a lot but its pretty easy once you do it. Again this guide are for those can not complete on hard or lower difficulty, which means less micro managing armies is always the best tactic.
You will now start to win the fight. As the enemy starts to run, make sure to use your range unit to kill their archers, because your infantry will have a hard to engaging them. Instead surround the enemy units, especially their enemy lord. You will get a pop that you won the fight but dont end. Instead keep fighting because your range units will continue to gain exp as they pick of their enemy unit and more important their enemy lord will slowly die because they are trap within all your melee units. This is the most important part of playing the battles out vs enemy lords.
This tactic is the basic fight for every battle and ill note slightly differnet tactics below.
After the battle, I always free the capture units for extra gold.
Now move Thorgrim and siege the city but hit encircle. Them move your lord behind Thorgrim and repeat the process as you attack the city. The enemy army you just fought will come and help the city. This fight will be easier then the first. Just use the same tactics.
Build a trinket maker in your new city. Thorgrim should be inside the settlement you just took. If not put him in it to reduce public order. Recruit 3 more dwarf warriors with Thogrim.
Level up route marcher on both your lords. Orc armies are so fast on the campaign map and they can dig tunnels past your armies so this skill helps a lot. Choose pure-beard on Thorgrim because he should be level 2. This is for the long turn game when chaos becomes a problem.
Click on Karaz-a-Karak and demolish Sparring Chamber. Don’t worry you will get another one in Squighorn and this wont hurt your recruitment this turn.
Turns 3 – 17ish
Turn 3
You will notice 1 or more armies move to your west border. This is ok because they dont have many units. Click on your lord and right click on Thorgrim and pick 3 armies that are not full strength but not your range or siege units and transfer them to your lord. Move Thorgrim and attack the se settlement mount squighorn.
Do not move your lord to help, instead move him inside the pillars of grungni (the city you just took). Recruit 3 more dwarf fighters with your lord. You will notice a Sparring Chamber is already built and you will be able to fully upgrade it you choose at this settlement.
Build a refectory in Karaz-a-Karak because public order is your main problem on Legendary.
Choose venerate the ancestors as your province bonus that helpls with your public order.
You should have 4 units inside Pillars, and 10 units on Thorgrim inside Mount Squighorn.
Follower and loot:
If you are lucky you have a few things. Be sure to equip them on whatever lord you want. If you got a follower and it does NOT show up its because it can only be equip by a hero.
Turn 4
Most of the times the enemy army to the west runs away, if not they just sit there becuase your lord scares them. Now disband your miner and hammer. You can have two dwarf warriors for 1 hammer and miners just suck. Recruit 3 more dwarf warriors with your Lord.
Pick dwarf treasures as your tech. Dont move your armies. We cant move because of public order.
Turn 5
Depending on how luck you are in gold you can upgrade mount squighorn or not. If you can do it, if not then just end your turn again. I’m going to assume you didnt the guide will refelect upgrading on turn 6.
You should have 8 units on your Lord and 10 units on Thorgrim.
Turn 6
Look around the map each turn. See if there are any small armies near your border that may try and raid you. There may be one so the se of mount squighorn. The army may appear now or later in turns but you will be able to intercept them in 2 turns with Thorgrim, however you also need to recruit dwarf warriors with your lord during this time. This will reinforce your settlement to repeal the larger orc army to your west.
Finally pubilc order is + !!! You still cant move. Upgrade mount squighorn. End turn.
Turn 7
Pick include related familes as your tech. end turn
Turn 8
Build trinket maker at mount squighorn if you are one turn ahead if not do it on turn 9.
end turn
Turn 9
Upgrade the pillars to level 2. Build trinket maker, and upgrade barrecks in mount squighorn.
Turn 10
At some point a bigger army will show up to the west. When this happens move Thorgrim inside pillars. Move your lord outside pillars and transfer all units to Thorgrim. Upgrade trinket maker in mount squighorn.
You wil now be picking techs to get High King Authority for the pubilc order bonues.
Turn 11
Most likely the enemy army will run away. If not they will just sit there scared of Thorgrim new big army. Upgrade trinket marker in pillars. if you have enough money build another refectory in pillars or build it on turn 12.
Turn 12 and 13 and 14.
Once your refectory is 1 turn from behind built, destroy the refectory in your main city. This feels like a waste but it isnt because public order was so bad in the early turns. Then build a siege workshop in your main city. We need this for the thrower.
Turn 15 or 16
Now we start building our army. Built quarrllers to fill out your army. You should have 6 or 7 quarrllers, 1 thrower and rest dwarf warriors. You will now move Thougrim to the entrace of your west border. Move your lord back Pillars and build 2 dwarf warriors and 1 thrower.
Turn 17+
Depending on your game things will be different on each game.
There will be at least 1 big enemy army west and/or south of you.
If there is an enemy army west of you try and engage it in 1 turn only. If you dont he will run around you and attack your settlements because he is so fast on the campaign map. Your lord army at pillars needs to have at least 6 to 9 dwarf warriors, 1 thrower before you do this.
If there are no west armies then move your main army south toward karag dron even if there is an enemy army there.
If there is a large enemy army west and south then wait until you have 12 dwarf warriors, 1 thrower on your lord before you move and attack the west army. This will allow you to defend your settlements by recruiting 3 quarrellers when the south army tunnels or moves toward your settlements. With 16 units you can repeal any attacker. You can not move you lord away from your settlements because orcs at mount gunbad to your NE will invade down. If you are lucky your dwarfs from grom peak might take it over but its unlikely.
Regardless of the setup up top, the key is to move thougrim sacking varenka, barag, and iron rock if they are orc and move toward the enemy south army. Once the 1 or 2 enemy armies are gone you need take karag drom.
You can now move you lord toward mount gunbad with the same setup army as Thorgrim. Besure to finish the quest ambush at thundering falls. You need to see if zhufbar is taking mount gunbad or if he lost. If he lost then you will be able to siege (by waiting for many turns) and take mount gunbad. If Zhufbar is sieging then move your lord to assist attacking the west and south.
Now the key is getting Zhufbar to cover your north, Barrak Varr to cover your west while you just focus on the south and southwest. Be sure to setup trade agreements and any other agreements you can get with those two. They will be your key allies for along time.
Warhammer Map
Map for Planning
Units, Tech, Leveling and Buildings
IV Heroes:
Easy leveling: When you get a hero move then to an enemy settlement or army depending on their skill. Example runesmith damages settlements easy. Do not assassinate heroes for leveling. Each turn you can attack a city with your hero’s ability. At early levels you will gain a level for each success or 2 levels for each 3 fails.
Runesmith: most likely your first hero you will get. He is your population guy. I’ll explain. He gets a skill called Stalwart Rune. At level 5 he will bring 36 Growth to any providence. This is key to taking over settlements and upgrading them quickly so you can stabilize public order and build gold income buildings. Once he is level 5 stop leveling and move to help with growth in your providence. He doesnt really need to level anymore in the early game.
Master Engineer: After leveling him he helps your main attack army. I like maxing Triangulation, 1 in requisition, ballistics calibration and rest in karak blood. Again Karak blood is for the chaos problem once mid game start.
Thane: He is so important in just about everything. Max out Patrol Ambusher, 1 in Insirational, then max out Exemplar. This gives you the ability recruit level 3 experience troops and you have the option to Assult units to soften them up before you fight an enemy Army. Very useful in mid to late game. He is also your best hero to kill other annoying heroes.
V. Lord’s leveling:
After you pick up level 3 pure beard, max out tactician, 1 in axe lord, Rally, level up grimnair heirs unless you can make thwoppa. You will be maxing out both anyway. Dont level up stand your ground until both thwoppa and grimnair are max unless you cant make thwoppa yet.
I know its fun to have a one man kill unit but for legendary you need to focus on providence and group buffs first.
VI. Tech
Once you finish High King Authority, swich to get Valaya Protection. Again your biggest problem is public order more then enemy armies. Grand Throne is next.
After that is done you have a choice. You can focus on income or unit quality. If you have lots of settlements (10 to 12) then focus on income but my guess you wont.
Focus on interlocking shields. This help all your core units. Even your range because they have shields too. Get Vollyfire next. These are the core tech you need. The rest is your choice.
VII. Units
Dwarf warriors
The best damage soakers for the upkeep. I love these guys. You forget about a flank and come back tho these guys and they will most likely still be fighting. There is no reason to even look at the other units because the upkeep is so high.
Longbeards
Only once you army is fill to 20 you will start switching dwarf warriors to longbeards.
Quarrellers vs Thunderers
For all of the early game you will only use Quarrellers. (Not greatswords) Why? Because 99% of the time you will be fighting orcs. They have little to no armor which means Quarrellers will do more damage because of their range, easier line of sight and cheaper upkeep. I always have a min of 6 of these in the army.
The only time you start slowly switching to Thunderers is when you start fighting chaos or Empire because of their armor.
Canon vs Grudge Thrower (long range)
Cannons are best. Their accuracy and ability to destroy enemy siege is a lot more useful than the thrower killing a few extra enemy units. I only have 1 of these in the army.
Organ Gun vs Flame Cannon
Flame cannon sucks, dont use it. Organ guns are far superior in range and cost. You get 3 Organs vs 2 flame cannons for the upkeep. Because of their range you can get 2+ extra volley on the enemy before flame cannons even shoot. i have 2 of these in the army.
Irondrakes and irondrake torpedo
Flamers are really bad, even though it is so much fun to watch them burn. They die very easy because of their low hp, and their LOS is terriable. Meaning if they are behind under unit they wont shoot.
Torpedos are far better. This is a great unit before using gyros. Having a few of these is a great option to be behind your dwarf fighters/longbeards. But switch these out for gyros once you can build them.
Gyrobomber vs Gyrocopter (Brimstone gun)
See below for screens of the Gyrocopter in play. The Gyrocopter is far better then the bomber. The bombs are difficult to use however there is a nice trick you can use that you can see in the next section. Always have 3 or 4 copter units in your main army. They can destroy enemy siege, while taking little to no damage and make it back to your main battle before it really begins.
Hammersers and Slayer.
They suck dont use them. The high upkeep for damage dealing is far better use on gyros and organ guns.
Ironbreakers
They are better than longbeards but the upkeep is so high unless you are rolling in money dont use them. However at some point you will start replacing your front line with these guys.
Miners (blasting charges)
Theses unit are very fun. They have a heavy aoe range attack with limited ammo. Setup a front line of Miners with blasting charges and a backline of Quarrellers. You will be very surprise at how many enemy units will route before they reach your Miners.
IX. Special settlements to take and build around
Iron Rock. This just a little south of you and it has a building called Arsenal. It gives +3 exp to dwarf warriors, longbeards and +2 to ironbreakers. Combine this with your Thane you can make +6 exp units.
Dok Karaz. Has a similar building called Powder Hall. -20% cost and +3 for your black powder units.
There are others but these are key for the early game to manage your buildings.
X. Settlement buildings
Gold generation and public order buildings are the most important buildings. I can not stress this enough. Also whenever you get to V in your main city build Throne of the high king first.
You will also need a slayer shrine in each of your provinces to help counter corruption.
XI. Chaos
These guys take a while to get to your borders. They start way up north and have to fight the undead, your dwarf allies before they get to you. This is why you form that buffer early game and only focus on southern areas. The only problem with Chaos is the chaos corruption but since you tech,lord skill and buildings all game for it you should be fine.
Alliances, Expansion and Mid/Late game Manual battles
Alliances:
Always be friendly to dwarfs. They are your Buffer to your flanks. Mid to late game you can easily get them to merge into your empire. Be warn this will cause huge public order problems so be sure you are ready. Also do not merge them into your empire until you are 100% ready to protect that side of your empire. Always be friendly to Empire until the greenskins are gone.

Here is an example of Barak Varr being razed by the greenskins. Empire yellow flag (Border Princes) is at war with the greenskins. So instead of taking a free capital, let it stay razed to allow Empire to freely attack greenskins since its unlikly you have a military treaty with Empire.


The key to expanding isn’t the amount of territories you have but being able to focus your armies into one area. The Blue is me, Dark Green, Purple and Black are friendly dwarfs. Yellow is Empire and the light green to the west are greenskins. You will also notice raze areas in the Blood River Valley. As i touch on above I leave this open to allow Empire to freely attack greenskins. My goal in this situation is to allow the greenscale to take over iron rock while defending Dwarf ally at Barag. This allows me to slowly expand and gain my next providence bonus for death pass.
Purple or the Barak Varr’s may need your help early game to survive. Be sure to try and keep every dwarf neighbor alive even if it is just one territory as shown in the screenshot above. The trade and their army defense is well worth it. Soon all of the south will be taken and you can finally focus on the west or north.
Mid to Late game Manual Battle setup
The goal for this guide is to use as little movement to win the battle because this guide is for everyone. No matter if your are fast at clicking or not. The key is Not.
This is a custom battle because i finish my dwarf campaigin but notice the range setup. You have a weak side (no range units) and a strong side (range units with organ gun).

i want you to note the Gyrocopters being right in front of your front line. This allows you to drop your special gyrocopter bombs easily when the enemy engages. Orcs always have some type of calvery and you can see they are flanking you from both angels.

As you can see you destroy their flanking. Because you are using missile units when they recover from being broken they will be shot again by your missile units. This way you can focus your gyros killing their larger units.

Now watch them flee

Cheese Start **Don’t Read if you don’t want broken start**
I put this section down at the bottom and since are reading this you probably read everything so I’ll reward you with an option to cheese the start. Personally I think this start is broken but I’ll let you judge it.
Turn 1:
Do everything I said above but this time make sure you have 2 lords you with the traits you want.
Turn 2:
Train only route marcher on both lords, but this time on your main pick Full Plate Armour.
Turn 3:
Recruit your 3rd lord. Transfer all but 3 dwarf warriors, 2 quarrellers and your thrower to the 3rd lord. Move Thorgrim and your 2nd lord to Mount Squighorn. After you attack the settlement, Sack it. Level up Thorgrim in the Full Plate Tree but level up your 2nd lord normally as above. Build dwarf warriors with your 3rd lord.
Turn 4:
Attack Mount Squighorn again. You will be gaining xp for both lords and gaining a ton of items. You will notice an enemy army approaching to the west but that is what your 3rd lord is for. Keep building dwarf warriors but don’t go below your upkeep.
Turn +:
Just keep doing it. Keep an eye on your public order. Once you have enough dwarf warriors demolish your barracks in Karaz a Karak and you will soon start to stabilize your public order.
Please don’t hate me for telling you this cheese! I Warned You!! Also Please take a moment to rate the guide <3