
Overview
Hexigals (or Hexibots) have a specific setup for where the wires need to go. This is randomised through each playthrough. This means that each individual user will have a different layout to how the robot needs to be wired up. Here you can learn how to do it correctly.
Finding out how your Hexigal is wired
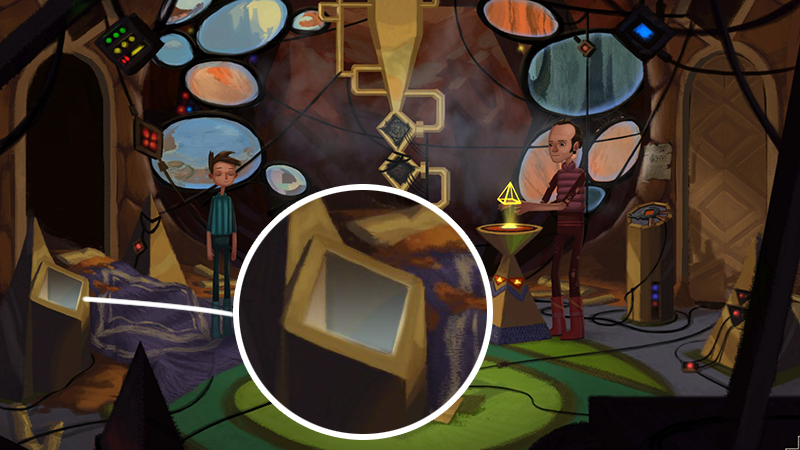
Now to the important part…figuring out how your Hexigal is set up! Here is the location where you can stick the Hexigal in to test the wiring.
NOTE: This is on Shay’s side and you will need to give Shay’s dad the stuff to fix the hull in order to access this part.
NOTE: With each playthrough your Hexigal is wired up differently. This means for each individual player their setup would be different. This part explains how to figure out the setup.
Now take a look at your Hexigal. For this part grab some paper and a pen/pencil (or use MS Paint) as you’ll need to note this down.
Draw the six points of a hexagon

Then label it
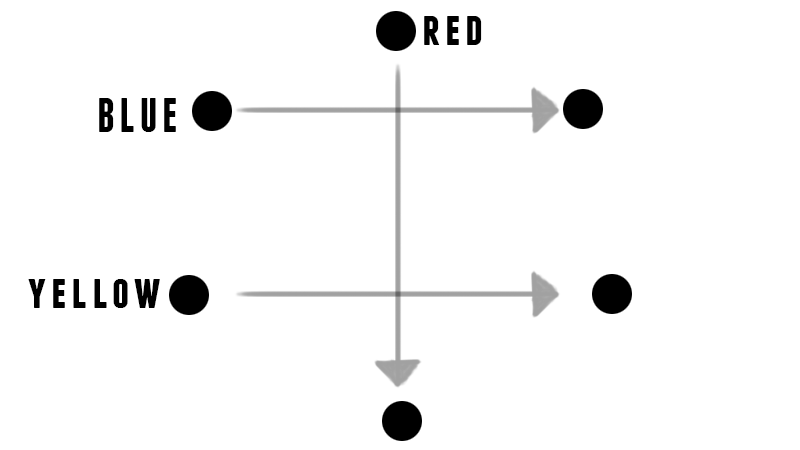
Now stick the wires like in the diagram above

Now stick it in the place to test the wire. You should see something like this pop up
These symbols represent how your Hexigal is wired up, and where the points are touching

- The first wire goes from POINT 6 to connect with POINT 2
- The second wire goes from POINT 5 to connect with POINT 3
- The third wire goes from POINT 1 down to connect with POINT 4
Meaning this is the order in which the Hexigal is wired up (The one specific to my gameplay, yours will be different)
Note down the symbols to the points of the hexagon you mapped out on the paper (or in MS Paint)
Vella’s Side
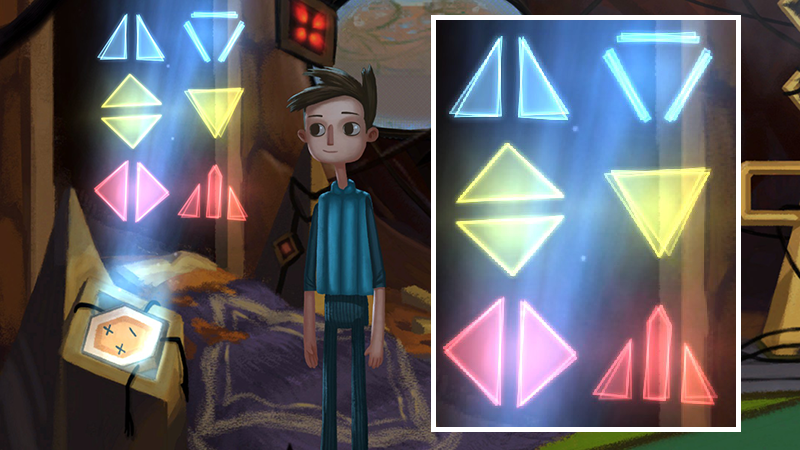
Here you need to advance in the story until you reach the point in the control room with Mom. There you will see a family photo on the desk. Click on it.

Note down the symbols you see there or take a screenshot. You need these symbols for Shay’s side.
With the wire that you have gained from Marekai’s computer as well as the broken Hexigal. Again you can look at walkthroughs etc for that as that is not what I am helping with. You can then re-wire your Hexigal so that it swings the torch.
When you examine the Hexigal it should look like this…
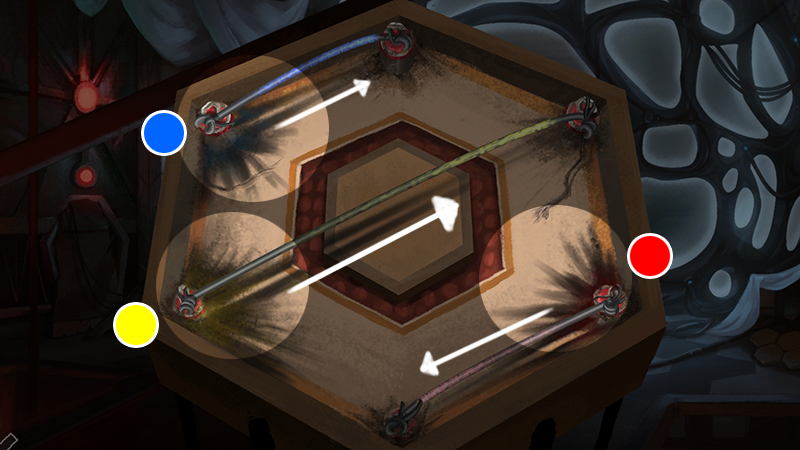
You may notice that the scorch marks are sort of colour coded.
- Bottom right is RED
- Bottom left is YELLOW
- Top left is BLUE
The scorch marks also give you the direction the wire needs to be placed in, as indicated by the arrows in the picture.
After you’ve done that you can set the little Hexigal down and she should start swinging the torch.
If you haven’t done the wiring correctly, then the Hexigal will just flash back and forth between normal eyes and X eyes.
Here is the important part…
You NEED to note down the wire pattern as it is needed for Shay’s side to get the Hexigal banging on the drum.
Use your paper layout as a guide
NOTE: The wires in the above image are NOT how the wires are for the swinging. The layout for that is show by the scorch marks and colours earlier on in this guide, and is shown in “The Swinging of the Drum” section of my guide.
Shay’s Side
For this you need to advance the story to the point in which you have the wire from Car’l and the broken Hexigal. You also need Shay’s dad to have made the hull patch formula and to have gone down to start fixing the hull. If you haven’t got to this point yet there are plenty of guides/walkthroughs for that.
Go down into the first room where Shay’s dad is fixing the hull. You will notice a book in the bottom left hand corner.
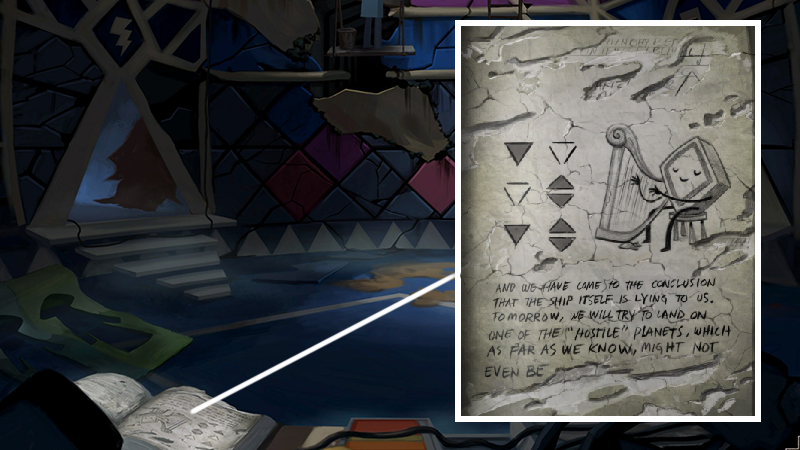
Again screenshot or take note of these symbols, as this is the pattern needed to make the Hexigal play the harp.
Now back to getting the Hexigal working again! You’ll need the symbols/pattern again from the family photo
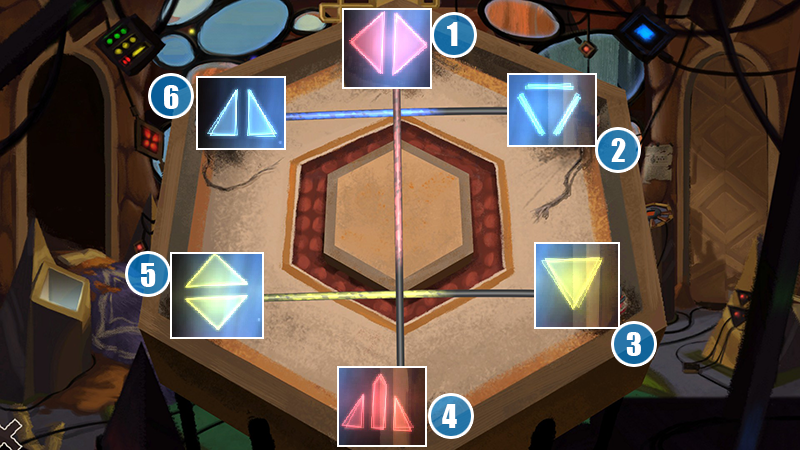
Now just hook the wires in the order the three symbols go.
NOTE: There are TWO DIFFERENT triangles there. One is a FULLY CLOSED triangle, the other is an OPEN TRIANGLE. Make sure you don’t mix the two.
Here is how my specific Hexigal is wired up to be working

Then you just need to put it for testing. You should see something like this if you have wired it correctly

If you haven’t wired it correctly, you’ll just see the symbols of the BLUE/YELLOW/RED wires. So you just need to go back through this guide and follow it more carefully.
If you have done it correctly you’ll be greeted with this…

The Harp and Tickling Weaver
In this section I will show you how to wire your specific Hexigal to play the harp and bang the drum.
NOTE: You need to have done both things from the Vella and Shay part of the guide first.
Now…you need this image again (or use the symbols/pattern you have noted from it)
This is the pattern to set up the Hexigal to play the harp on Shay’s side. Again use your reference to help wire the Hexigal correctly
This same pattern is what you use on Vella’s side so that the Hexigal can “play” the harp on the Weaver’s stitching.
The Swinging of the Drum
Here is where I will show you how to get Shay’s hexigal to swing.
You should’ve noted down the wire positions (or taken a screenshot with the scorch marks and colours) for the swinging torch Hexigal on Vella’s side. If not here is the picture again
You need to wire Shay’s Hexigal like it is in the above picture.
You can then give the Hexigal the mallet and then place it near the drum to draw the attraction of Alex down from the control room.
Get your Hexigal to dance!
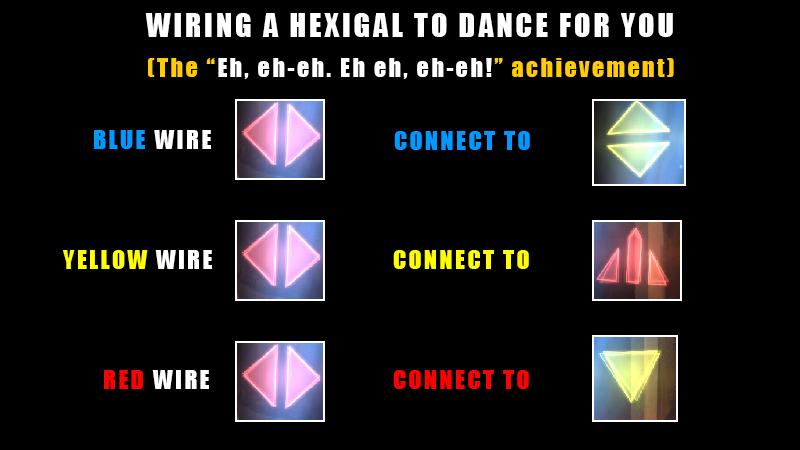
There is a hidden achievement entitled…
Eh, eh-eh. Eh eh, eh-eh!
You can get this by wiring up your Hexigal to a specific pattern.
NOTE: I am NOT the person who found the correct wiring pattern for this. I am merely displaying the information in my guide.
Credits go to:
lieutenantkirtar first found the correct pattern through the information that DoomsDay1990 posted.
Now for the wiring pattern. You should have found out how your specific Hexigal is wired up through the earlier parts of this guide, meaning you know which symbol represents each of the six points within your Hexigal.
Again just to note I was NOT the person who found the correct solution.