Overview
You start up Source Filmmaker for the first time. Where do you go from there? Through this guide, you will understand the user interface and basic functionality of the program, with over 50 reference images! This project has expanded in scope and scale, and we’re especially grateful for the feedback and praise received. Thank you!Comments are switched off. Please refer to the Source Filmmaker Forum for further assistance!
Who is this guide for?
Novices who are not fully familiar with the program, its tools, environments and editing workflow. More specifically, the user who has just installed SFM from the Steam Store page, and may be overwhelmed with all the options available. Some tips and tricks are available for experienced users, as well.
Think of this as a sort of crash course: what this button or mode does, how to do a specific thing, and so on. Please note that, due to size and research limits, this guide doesn’t account for absolutely everything the program has to offer. While designed to get a beginner started and on their way, it does not exhaustively tackle either animation or poster making – but does contain some general advice on performing functions related to them.
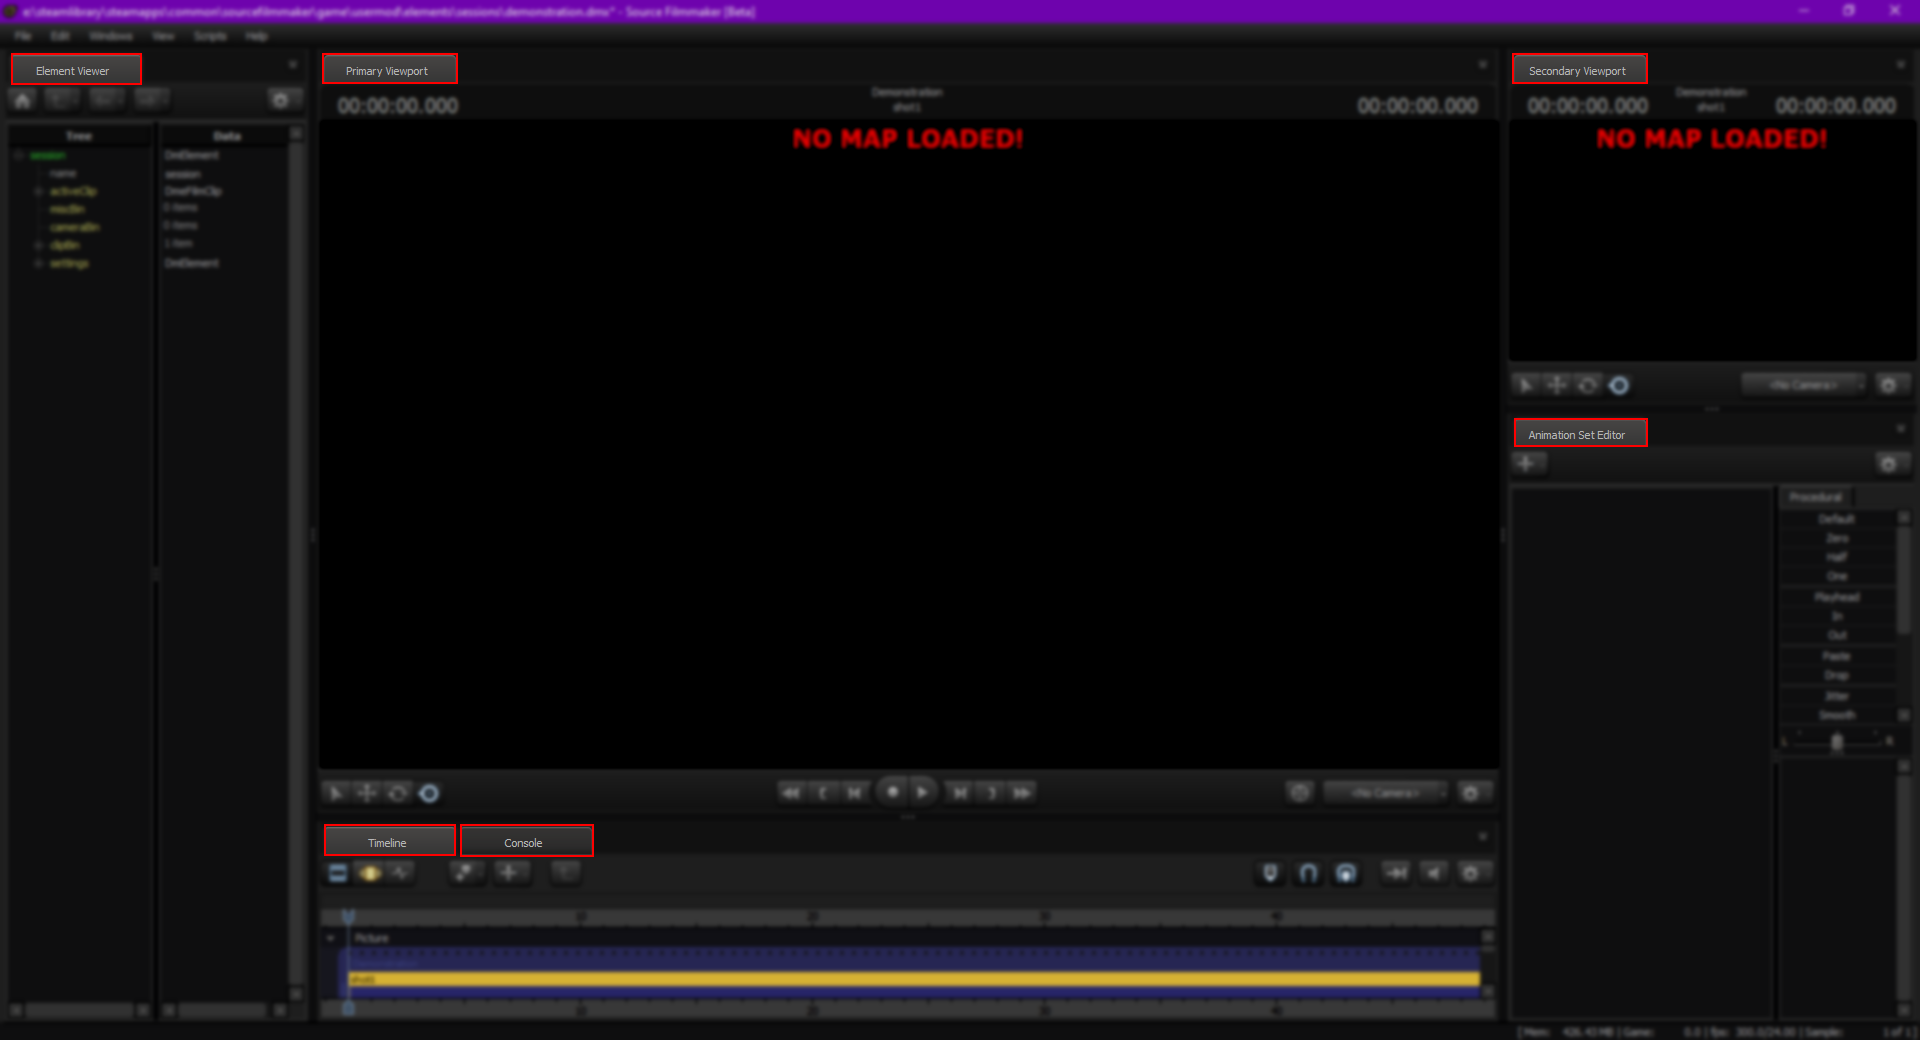
Below is a reference of the default SFM layout, in the event that, throughout the guide, you get lost or confused. Click the image to expand to full size.
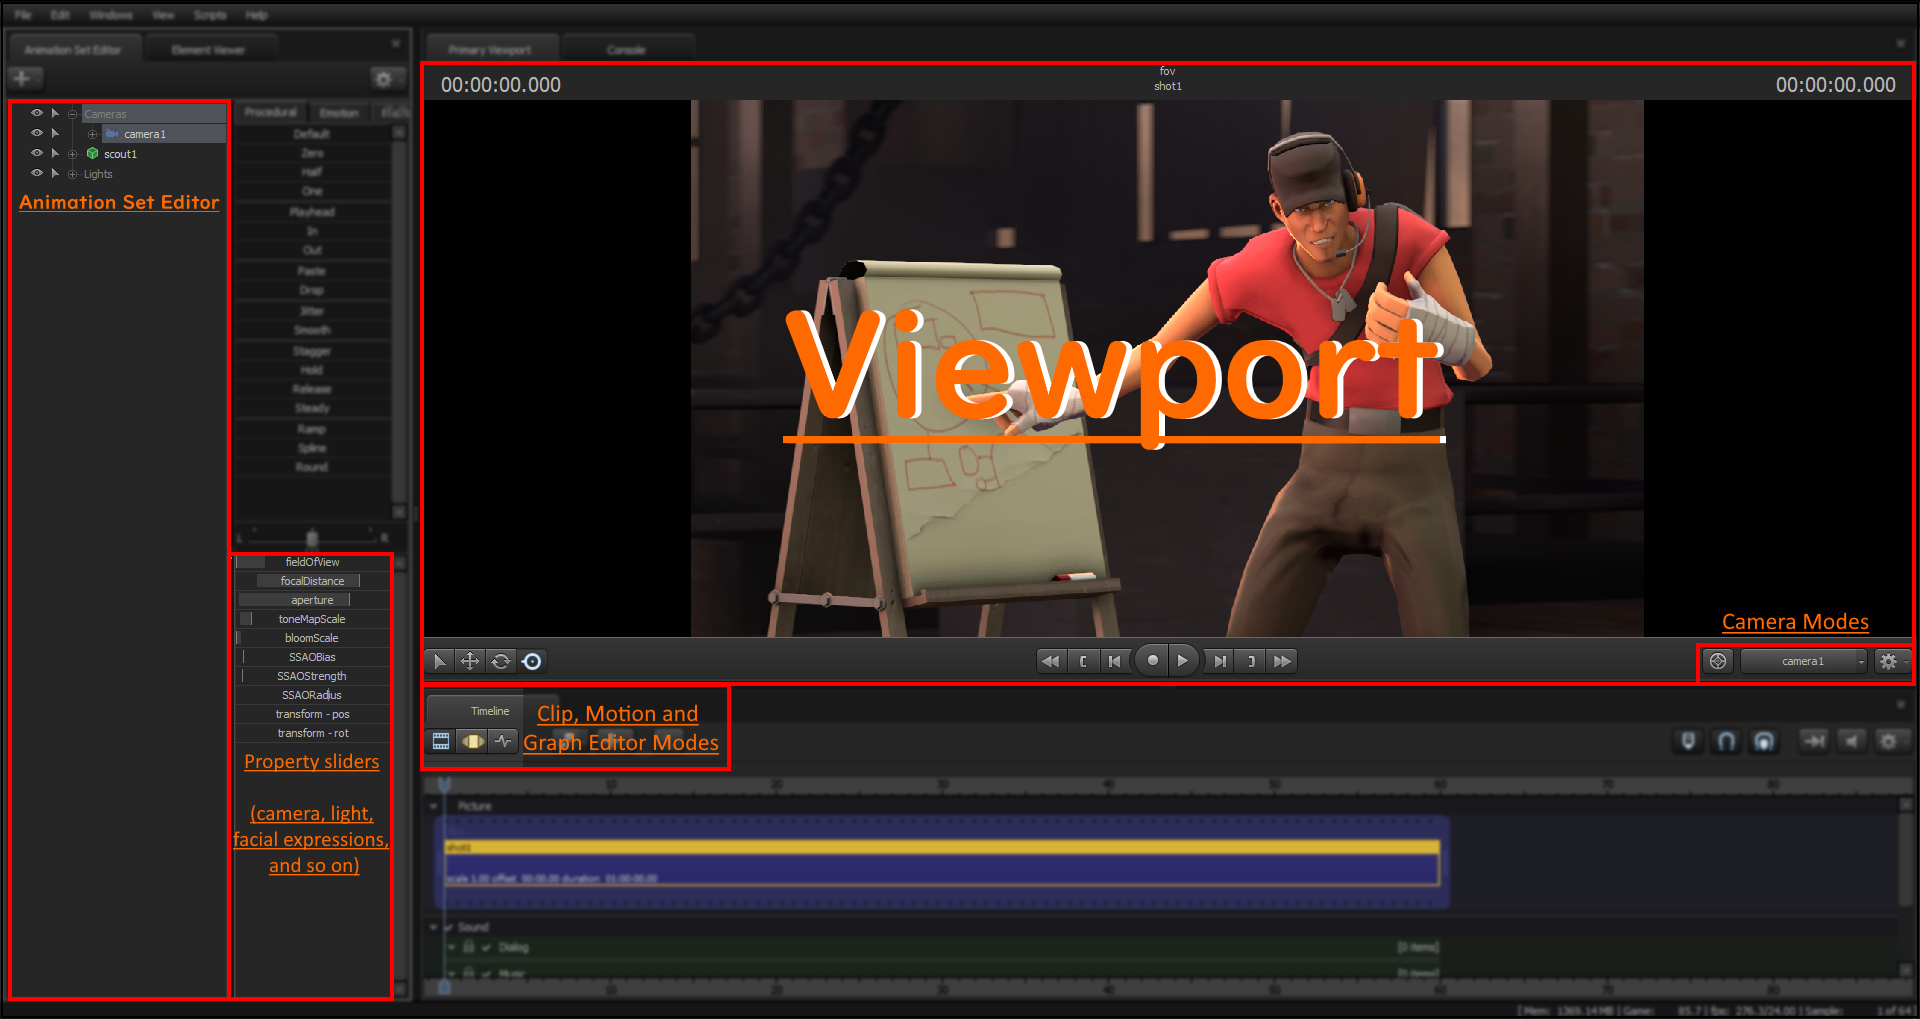
- The Viewport lets you see how your project will look like from various camera angles.
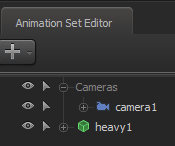
- The Animation Set Editor is from where you create, manage or delete entities like characters, objects, cameras, lights and particle systems.
- The Property Sliders allow you to modify an entity’s settings by dragging the respective sliders to the left or right.
- The Timeline allows you to work on your project in several editing modes (namely Clip Editor, Motion Editor, and Graph Editor) – generally for animation, though still remains useful in poster making.
- The Camera mode buttons allow you to create, manage and switch between the main project camera(s) and a temporary “work camera”, used purely for editing.
Onwards!
1. Creating Session & Loading a Map
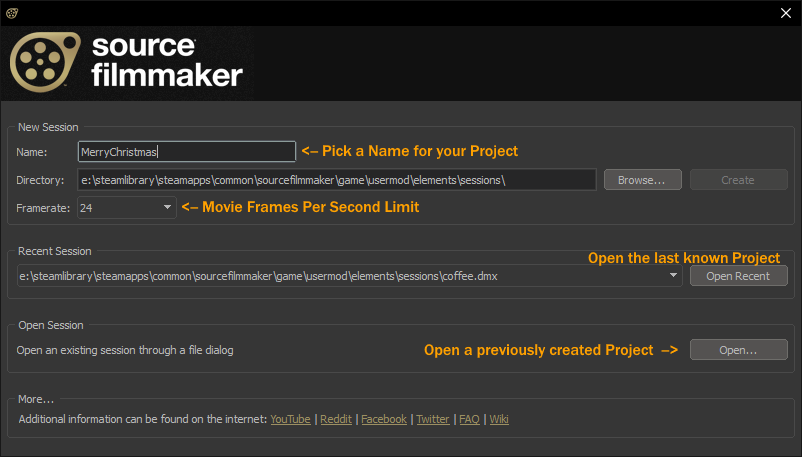
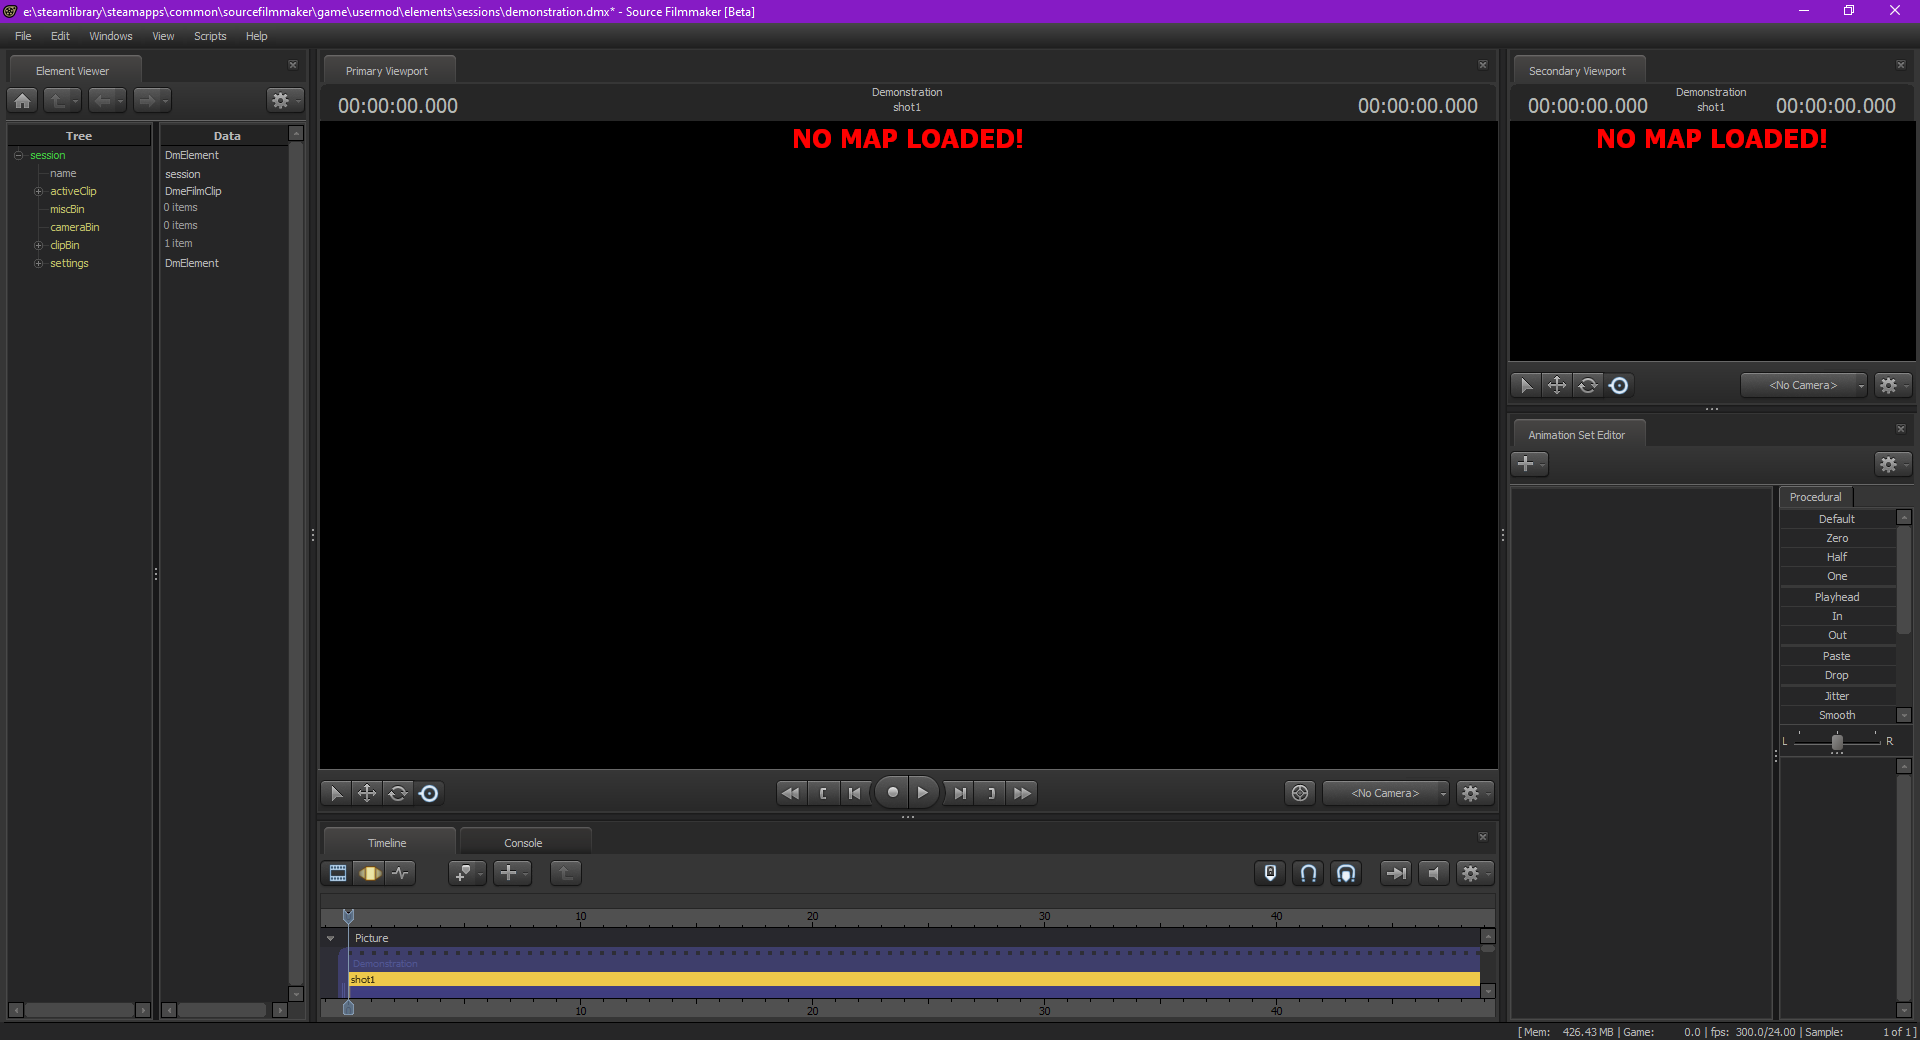
First thing’s first, we need a project to work on. Let’s begin by starting SFM up.
This is the window you’ll be greeted with once SFM is loaded. By default, projects (or Sessions as they are properly known by in this program) will save in SFM’s file directory, but we recommend choosing a custom destination for backup purposes. Make sure to avoid using special characters like
and so on. This is because SFM cannot save projects with special characters in them – accessing them next time will give an error. Stick to just letters, numbers and underscores, and you’ll be fine.
Framerate shouldn’t be worried about unless you plan to animate your scene. This setting can be modified later on, should the need arise.
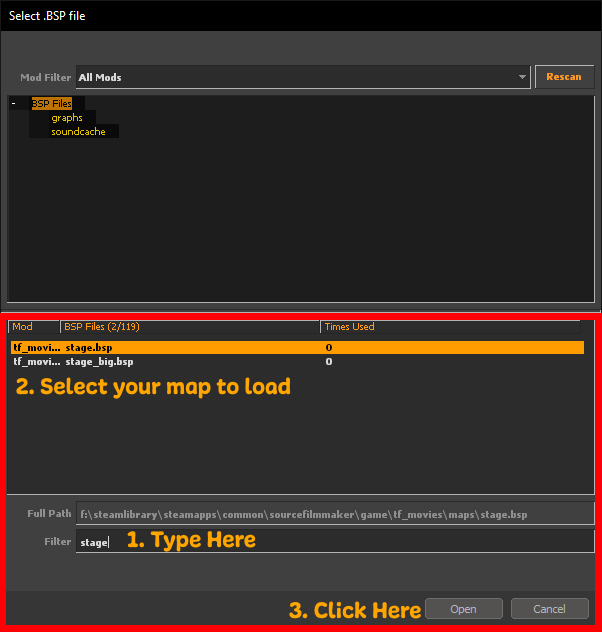
To load a map, right click the Viewport (the big black window with nothing on it) and at the bottom of the drop-down menu, click Load Map… From there, another window will pop up.
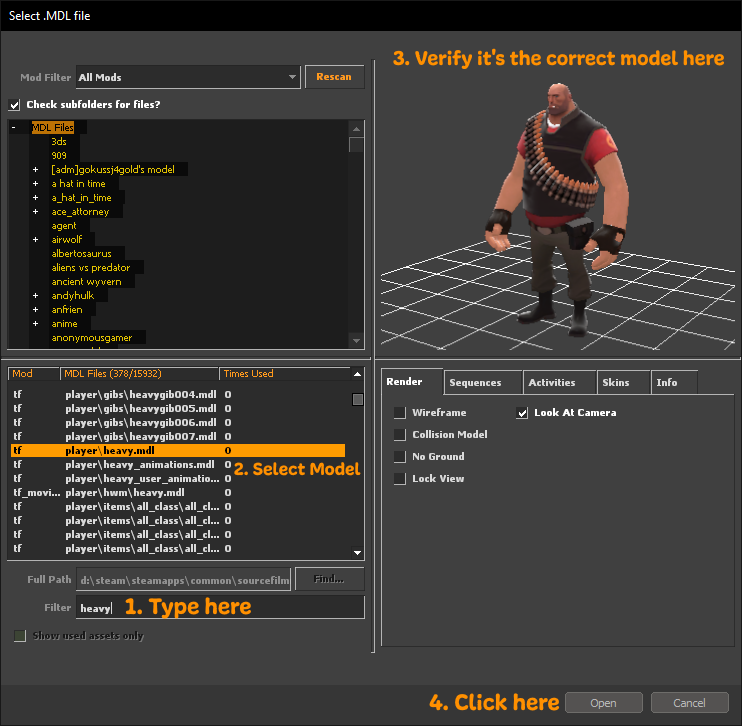
For now, we want the stage map. Type “stage” in the Filter Box at the bottom of the window and select the first thing that is already highlighted. Click Open. For reference, consult the image to the side.
2. Loading your first Model
Once your map has loaded, you’ll be greeted with an empty room. Let’s make things look a bit more interesting and learn how to load your first model into the scene!
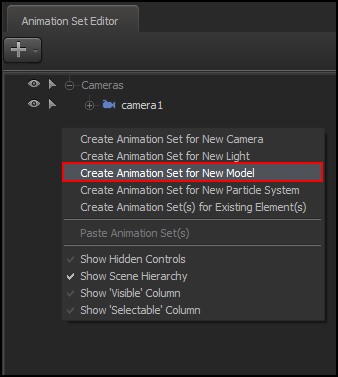
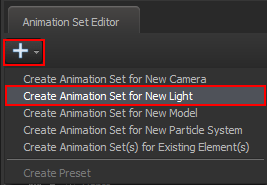
An alternate method is to select the Cross up the top of the Animation Set Editor window and choose the option to create a model from there:

If you have done everything correctly, you should be seeing your model successfully loaded right now.
Suggestions:
3. Using the Viewport & Timeline
The Viewport is your primary display. Everything you do and whatever settings you make will be shown on this screen.
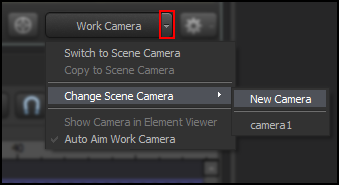
Located in the bottom right hand corner, you can toggle camera modes by left clicking the box labelled Camera1 or WorkCamera. What do these mean though?
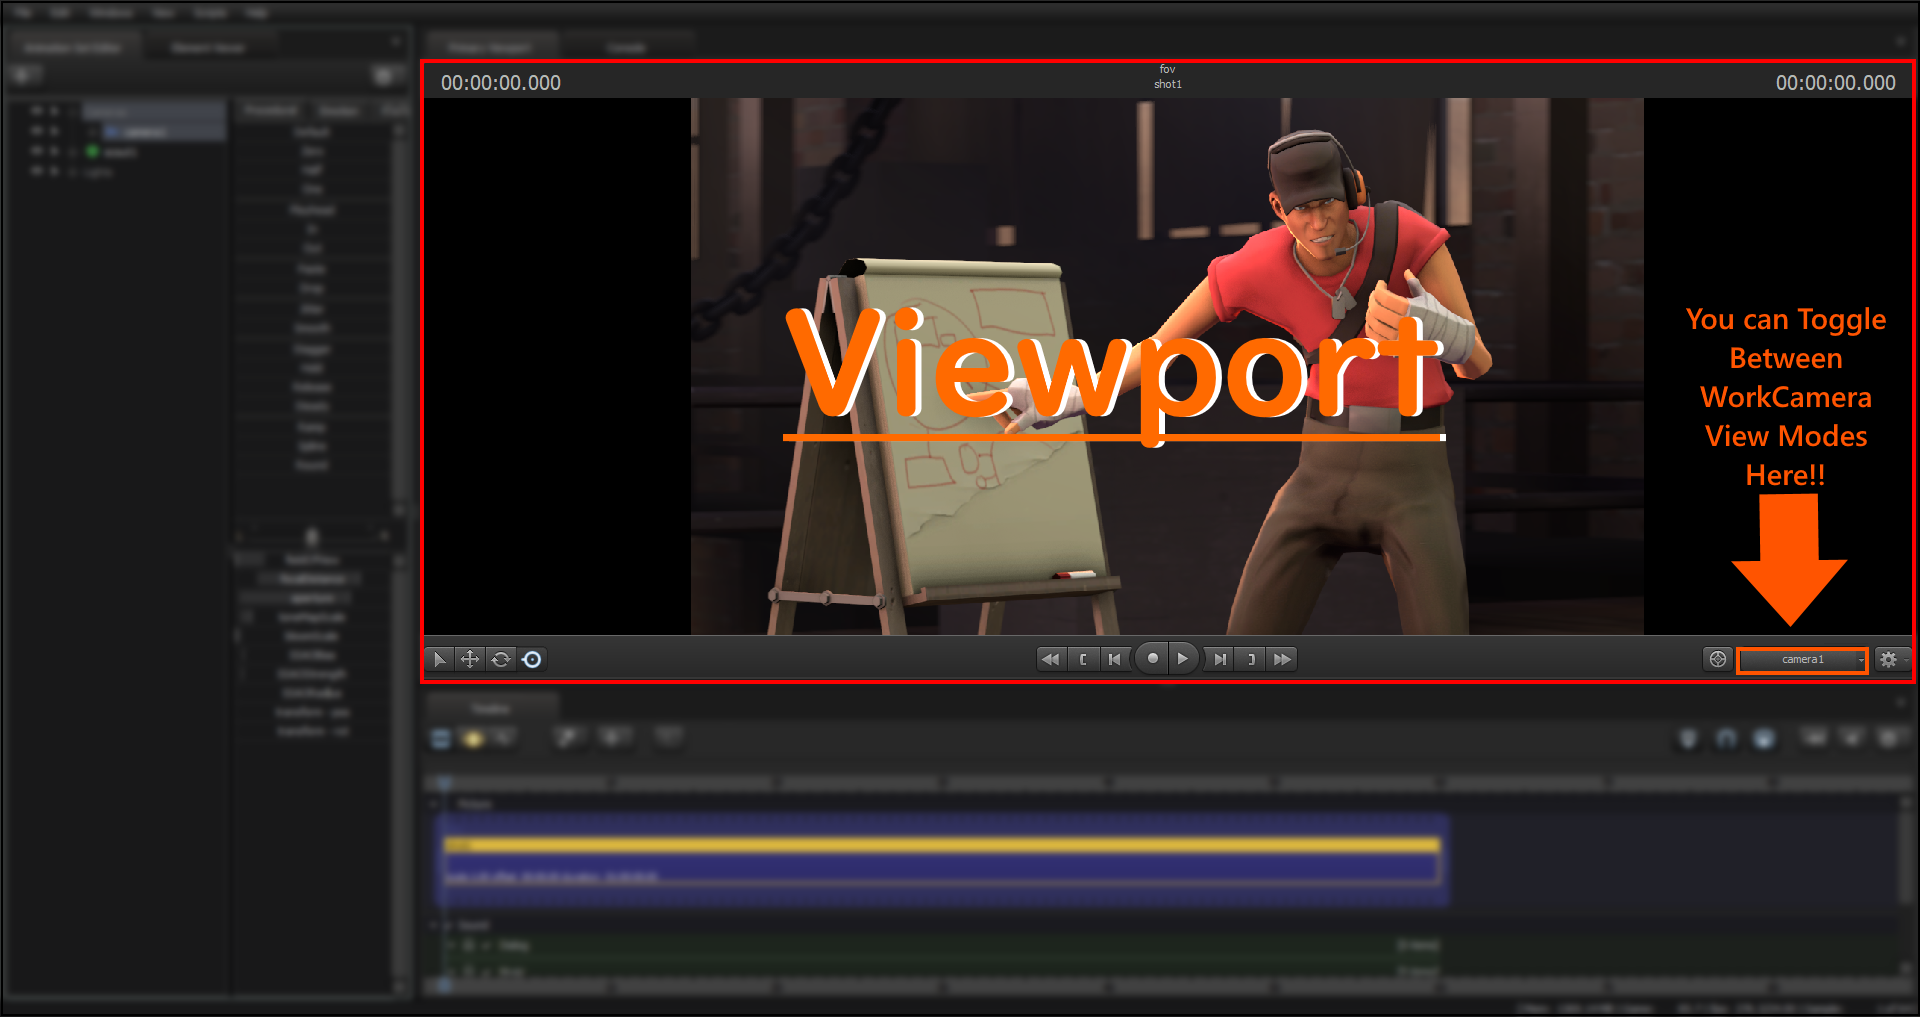
- WorkCamera
The work camera is a “temporary” camera. In this mode, you are free to move the camera however you wish, as it will not affect the settings of your main camera. As the name implies, it’s used to adjust your scene elements freely. Creating a new scene camera (ie. camera1 if it hasn’t been made yet) will spawn it either from the work camera’s position, or near a spawned object. - Camera1
This is the camera you’ll be using to export your image or animation with. Wherever this camera is facing will be what you’ll be looking at when the final render is complete. This is why you should use the Work Camera to navigate your scene. You can have as many of these as you would like, but only one scene camera can be active at a time. You can not edit its settings or move it while in Clip Editor mode – you’ll be notified with a dialog box stating that.
To move, left click and hold the viewport. You can now drag the mouse to look around your surroundings, and hold down keys on your keyboard to move the camera itself. Keep in mind, you must have the left mouse button held down to move the viewport at any time. Here’s a list of all the movement commands:
W, S, A, D = Allows you to move forward, back, left or right.
Z, X = Pans you up/down.
R = Modifier key that allows rolling the camera side to side, as you move the mouse left or right.
Mouse Wheel = Zoom in/out.
Ctrl, Shift = Slows down or speeds up the camera movement.
Alt + Left Mouse = Orbits around wherever the viewport is facing.
Alt + Middle Mouse = Pans the viewport.
Alt + Right Mouse = Dolly in/out.
Click the video below (go to 2:08) for a visual demonstration of the viewport navigation!
The Timeline is almost the same as how you would use it from any video editing program. It has multiple modes for editing your basic scene elements, clips, etc. The Graph Editor is heavily used for animation and unlocks most of the tools you’ll need for such a task. For single frame sequence artworks, you’ll mostly be utilising Clip and Motion editor modes.
- Clip Editor
Previews your render by applying depth of field and motion blur samples, and for animation it allows you to insert sounds, splice clips depending on your additional cameras, and more.
Hotkey = F2 - Motion Editor
Allows you to change the actual scene elements. You can move bones, spawn models, lights, particles and move and manipulate them however you wish. For animation, it is used to apply additional effects to a given range of animation, such as smoothing or jitter. One of the two modes where you can move a scene camera.
Hotkey = F3 - Graph Editor
Advanced keyframe-based editor mode, specifically for animation. Allows intricate adjustment of an entity’s base properties via a coordinate/value system, and applies basic movement between two separate keyframes. The second mode that allows moving a scene camera
Hotkey = F4
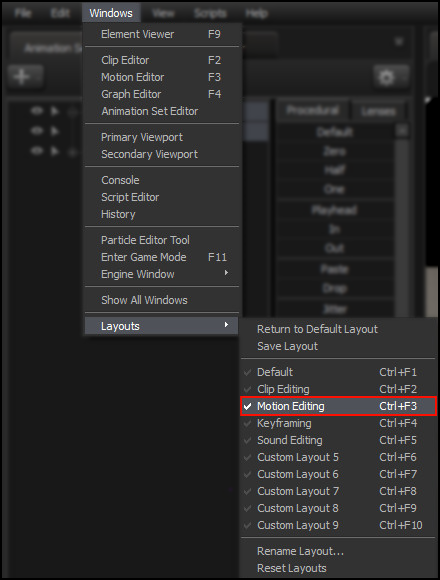
Go to: Windows on the ribbon bar > Layouts > Motion Editing. You can also enter this layout by simply pressing Ctrl+F3.
Now you should have 2 Viewports, allowing you to see your changes in real time, without fiddling back and forth between cameras. How you set up these two viewports is up to personal preference.
For more info on the subject, visit the Customising UI Layout section of this guide.
4. An Introduction to Camera Settings
There are a few ways of creating a camera:
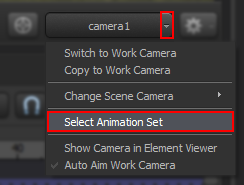
Return to the drop down menu once your viewport is in camera1 mode and Select Animation Set to have it show up in the Animation Set Editor.
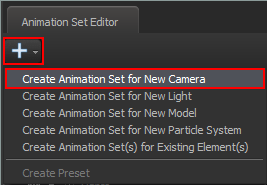
You’ll notice a blue camera has spawned in the Animation Set Editor. This is where all the magic happens. Having a camera is a must-have for any artwork being created.
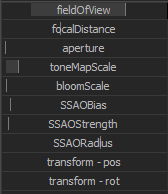
SSAO settings will be covered in a future Guide
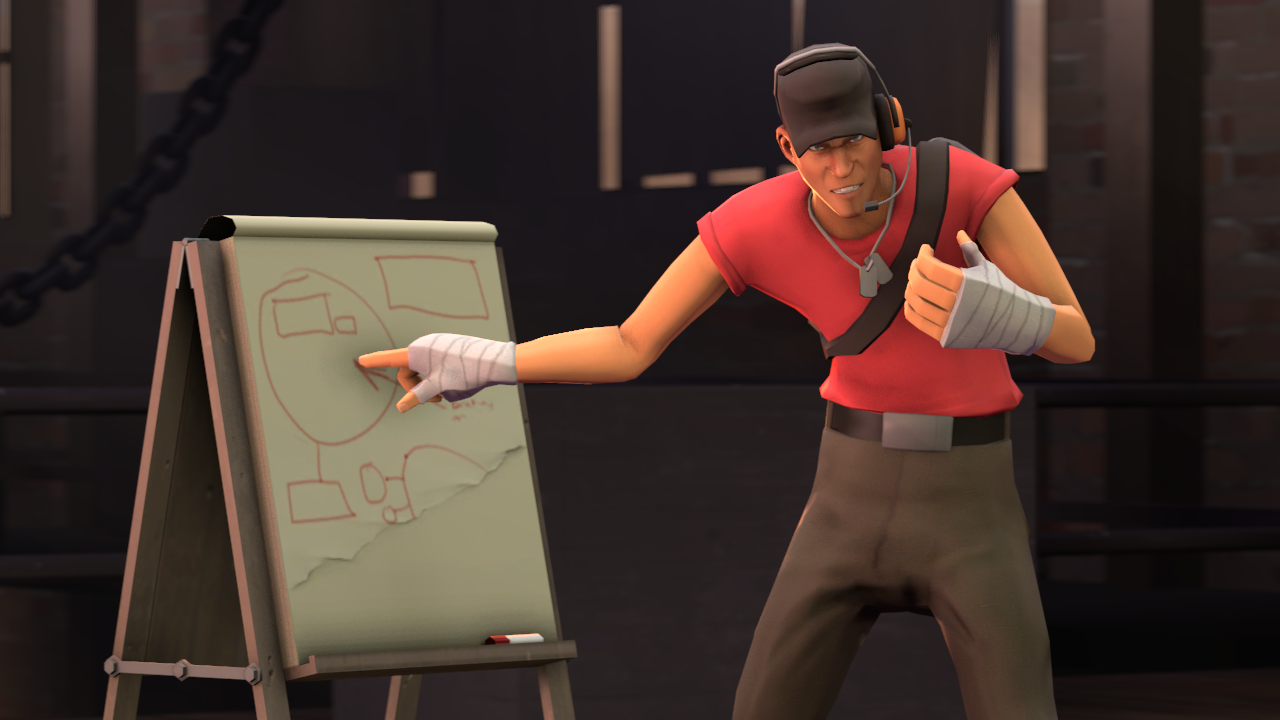
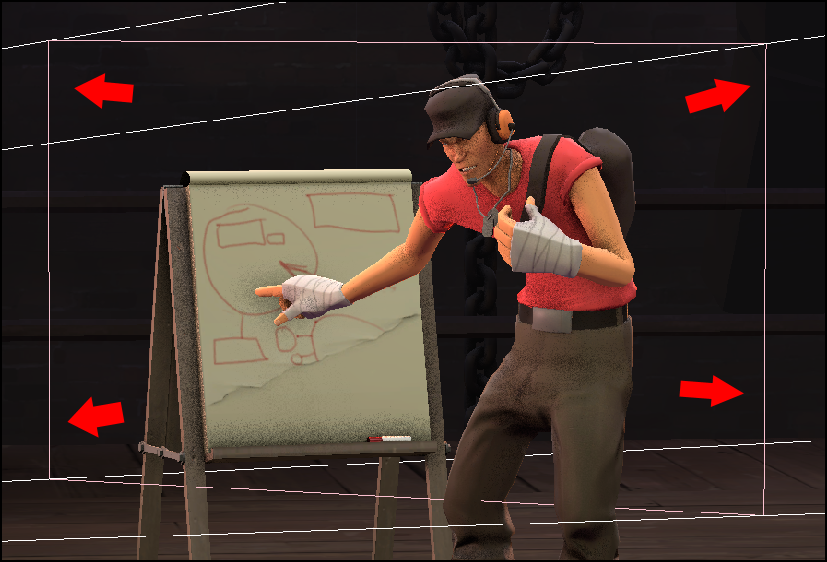
Otherwise known as zoom level. Drag the slider to the right and you get a wider Field of view, drag it to the left and the view gets narrower. FoV is important to set up correctly: generally speaking, scenes showing a landscape use a wider FoV, while those where the focus is on either a small number of characters, expressions or actions do best with a narrower FoV.
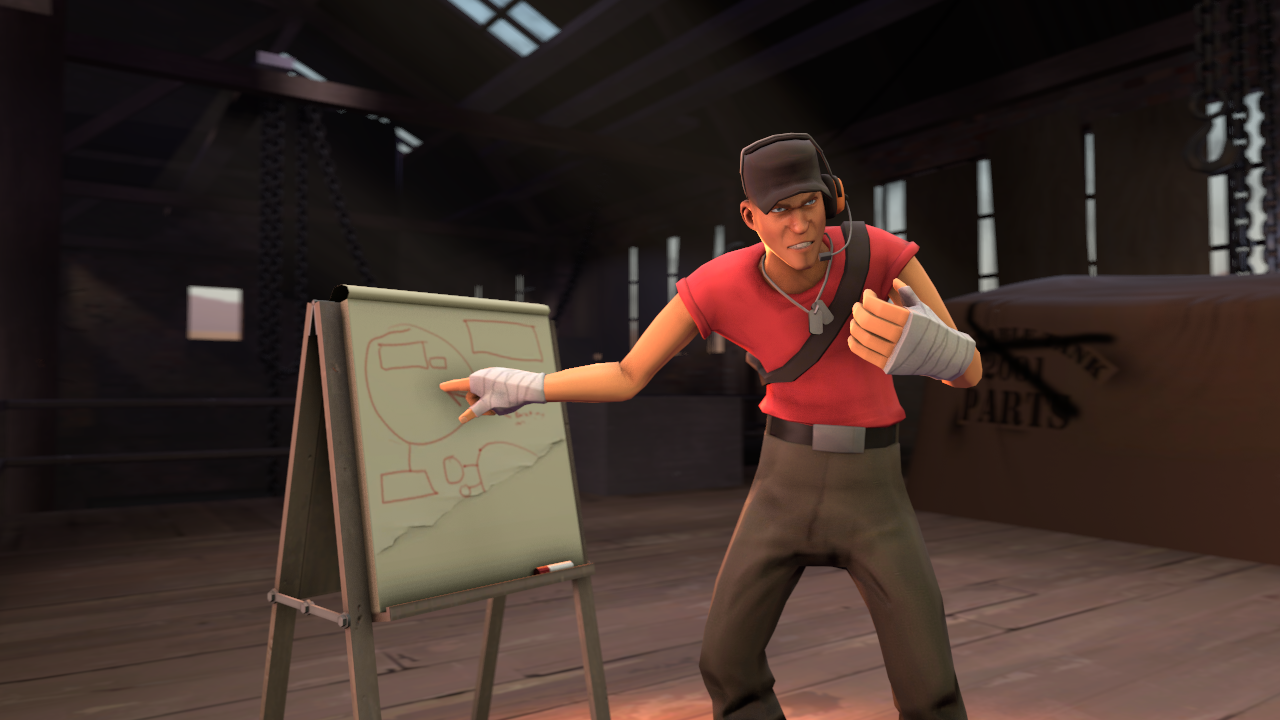
Here we bring the camera farther from the Scout, and drag the FoV slider to the left to reduce how much empty space there will be. The scene now looks much nicer, with the character in focus having good proportions, and there’s less empty, useless space.
Practice using a lower FoV than you’d think at first. Don’t be afraid to experiment with not just the slider itself, but with the position of the camera: closer, farther, higher, lower, and so on. You can also try to recall scenes from other movies, shows, games and so on, and apply ideas for camera angles here without much risk. Extremely wide FoV is generally reserved for things that intentionally look alien or weird.
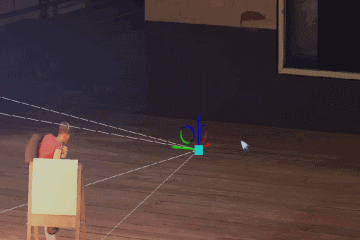
This is the first part of creating a depth of field effect, followed by the Aperture slider discussed below. SFM simulates the mechanism of a real life camera rather well, and focalDistance represents, well, the distance at which an object is in focus – meaning it looks clear while the rest of the scene blurs out the farther one goes from the focalDistance plane.
When you adjust it, a pink plane shows up on Camera1. This shows where the focal point is, thus what will be in focus when you decide to render the piece. It’s usually easier to hop into Workcamera mode to get a better idea on its location – it is represented by a pink rectangle. To get an object in focus, drag the slider until the purple plane clips into it.
——————-Camera1 View——————————Workcamera view——————-
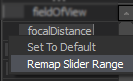
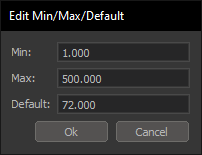
You can, via remapping the slider range. Most sliders have a minimum value (represented by the leftmost part of the slider), a maximum value (same as minimum, but for the rightmost part), and a default (where the slider starts and where the lighter grey tends to when you adjust it). First, right click on the slider itself and from a drop down menu, click on Remap Slider Range where a new window will pop up.
Again, you can do this with basically any setting. Go and experiment with a variety of sliders!
The second part of the depth of field simulation. This controls how much the camera blurs things that are not clipping into the focal plane.
You need to use the focalDistance slider to have any effect here. If you have nothing in focus, adjusting this setting won’t be useful.
Example:
[link]
The main focal point here is the blossom tree. When Aperture is applied, the background and foreground is blurred to give a sense of depth.
Some neat trivia:
Basically a general exposure slider: dragging this to the left will make the scene look darker, while dragging it to the right makes it brighter.
Sounds useful, right?
The truth is, it both is and isn’t. This darkens and brightens everything the camera sees, including stuff that’s harder to adjust the light levels for, like the sky or particles. Be mindful of changing this setting, as it can denature your scene if mishandled; however, once you gather experience, you’re free to use it in conjunction with different scene elements to adjust the brightness and mood of your project.
Bloom is a post processing effect that adds a soft haze around bright objects, similar to many games since 2005. SFM’s bloom is… not very good. It looks blocky and barely soft at all. Our recommendation to beginners is to either slide it all the way to the left, or leave it veeeery slightly above the minimum – to do this easier, remember you can remap the slider’s range and reduce the maximum value to something closer to the default.
5. How to Move Objects & Characters
We’re not the kind of people to question the genius of aspiring artists who express themselves via overlapping, t-posing models… but we also assume the readers of this guide want to know how to move things around in the scene, so let’s talk about that.
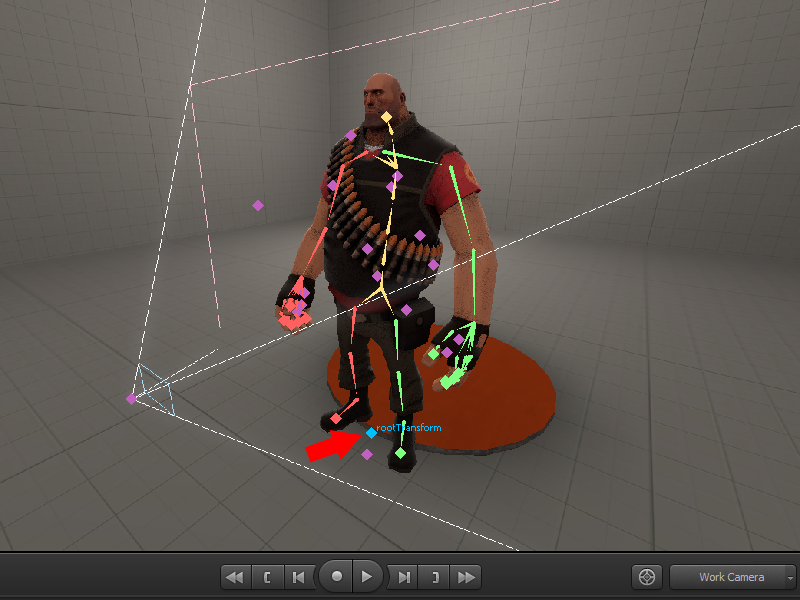
You’ll see your model’s bone structure. Down the bottom should be a bone labeled rootTransform. Click it!
To speed up this process, in case you want to move the entire model at once, clicking its name in the Animation Set Editor does the same job.
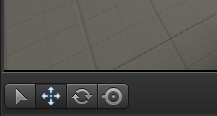
- The select tool is for selecting things. It’s a thing.
Hotkey = Q - The move tool is for moving the selected entity or bone along the XYZ axis.
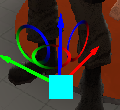
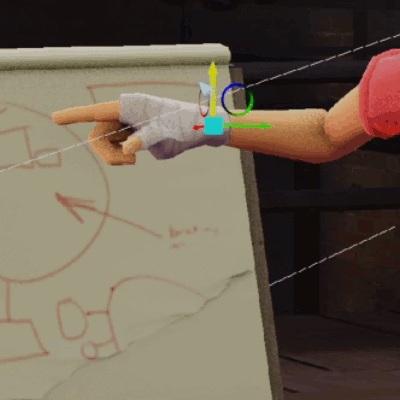
Hotkey = W - The rotate tool brings up a different control interface, allowing you to rotate your selection on specific axis. The cyan axis is a view-dependent combination of the three axis. Dragging imbetween the axis will allow combined axis rotation up to the edges of the circle.
Hotkey = E - The screen tool‘s function is the same as the rotate button, but you’re no longer bound by the edges of the circle, and you can drag it by the knob to the side to change the orbit point of the model, if you need to.
Hotkey = R
Just as a reminder, you can not do any of this in Clip Editor mode. You must be in either the Motion Editor or Graph Editor mode to make any changes to the scene. Refer to Using the Viewport & Timeline if you forgot how to change between the different modes.
6. Posing your Character
There are two ways to pose your character. We’ll look at both and see which you might prefer.
Once more for clarity:
This route can take longer, but is potentially more rewarding in the end.
This method takes longer to pose, especially for users unfamiliar with the workflow; however, it can potentially reap great benefits as it allows complete control over your character’s posing, regardless of physical limitations like joints.
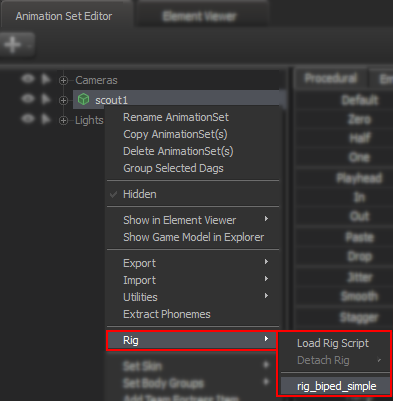
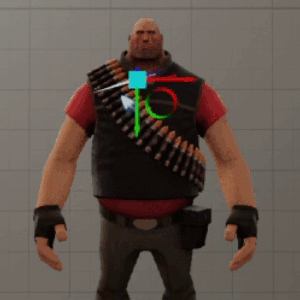
In this sub-menu, you’ll find the options to either apply or disable a Rig-Biped to your model. As you use SFM, you’re likely to increase your library of available rigs to use, and some of them won’t even necessarily be for posing humans, but for now, use rig_biped_simple.
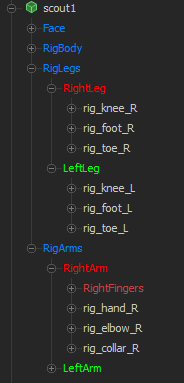
After applying this, you’ll see in the Animation Set Editor that the bone structure has changed. Now when you move the feet and hands, the joints connected will now follow along and update as you move them. As a demonstration, when I move the hand, the elbow moves as well.
Great, now you know how to move your character’s bones… Now start posing!
These are pre-made sequence shot animations Valve created themselves. Usually it’s advisable to not resort to sequences for posing primary characters in a scene, but like with all options in SFM it’s merely another tool. Sequences are good for large numbers of background characters (as long as you either have a variety of sequences to pose with, or alter them somewhat so they’re not all similar), or for posing smaller parts like the face or especially hands and fingers.
That being said, sequence posing will not be elaborated on in this guide.
7. Baking Jiggle Bones
Jigglebones are physics-active bones which wiggle, twist and bounce around freely, depending on how your character (or object) moves during animation. These give a more lifelike appearance to the entity in question, and are usually found in clothes or hair.
Be mindful that, in doing so, you remove the jigglebone’s… jiggle properties, meaning it won’t move on its own. Among other things, this puts extra work load for manual animation, and should preferably be used for extra control when making an artwork.
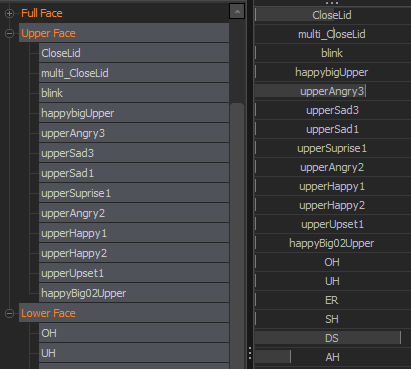
8. Eyes & Facial Expression
You might have a cool looking pose that already tells a story, but a matching facial expression really seals the deal and fleshes out the character. So how do you go about doing this?
Eyes are pretty useful for looking at things. Citation needed Most models don’t spawn with eyes looking right: either they’re closed, cross-eyed, or otherwise all over the place.
Note:
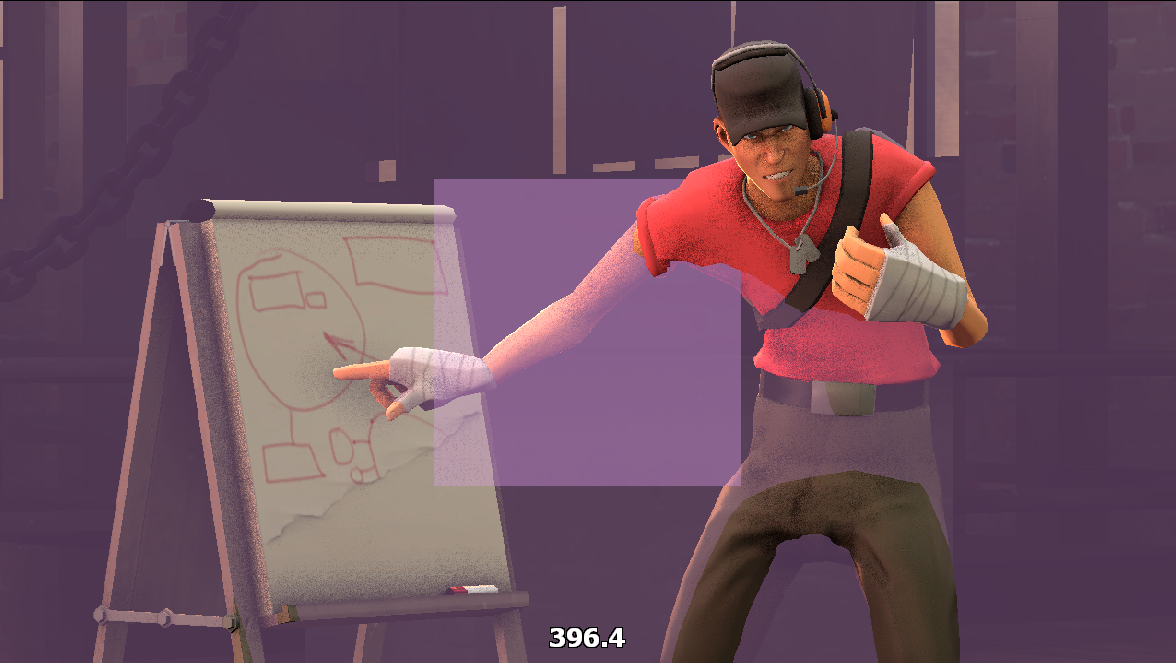
Here are Prof. Purble’s settings.
Can’t find the settings?

9. Changing Bodygroups and Skins
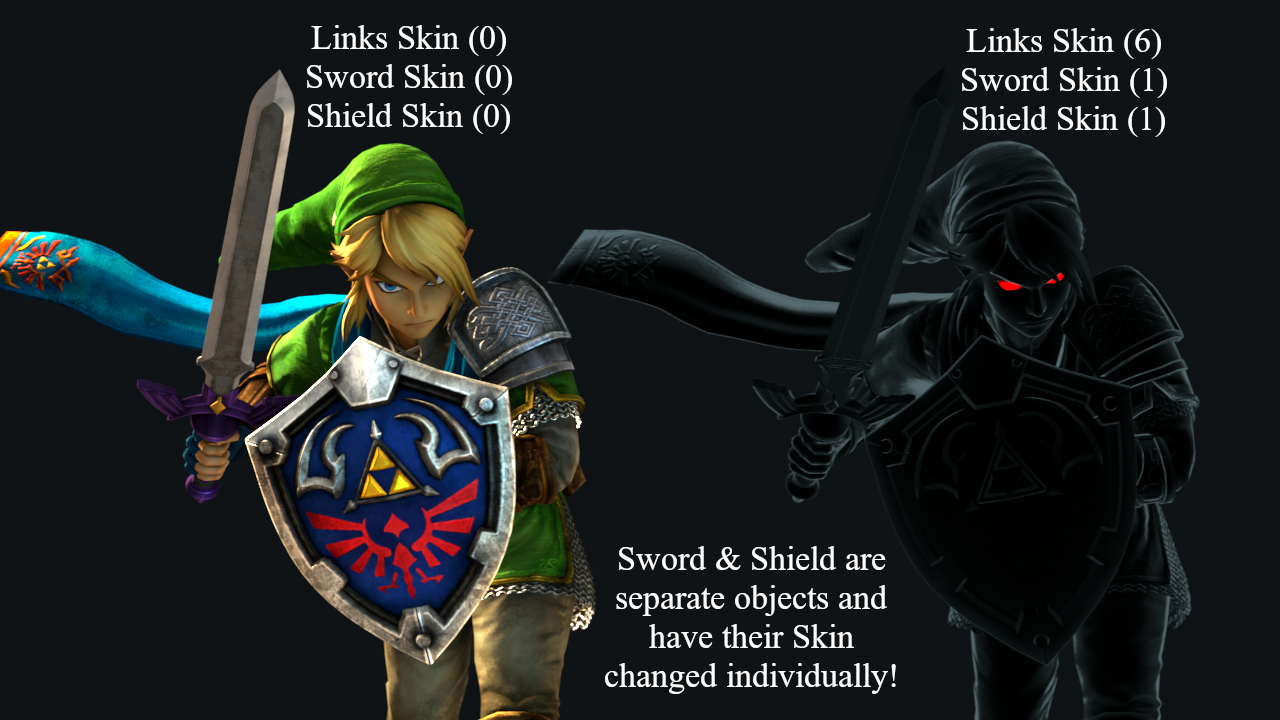
Hold up, how did that guy get a blue soldier in his SFM? Why does that character have a different kind of clothing item and how did he get it? If the creator had uploaded the character with multiple visual options, SFM allows you to change to different skins and turn certain bodygroups on or off, usually for characters who have multiple cosmetic elements.
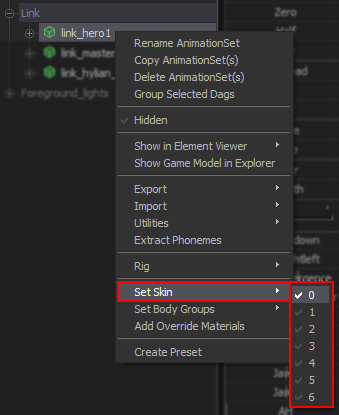
To access this option, right click the character you would like to change in the Animation Set Editor, navigate down to Set Skins and you should see multiple options. These are the different colour options, with 0 being the default look. Some characters have a lot of options, others do not. Skydomes (large dome props with a sky texture painted on them) particularly take advantage of this to show many different sky textures packed into a single loaded model.
Note that changing the skin of a character does not change the skin of any item you had loaded separately into the scene: here, Link’s Sword and Shield look like they don’t belong. You can right click those items (again, via the Animation Set Editor) and change their skins individually through the same method.
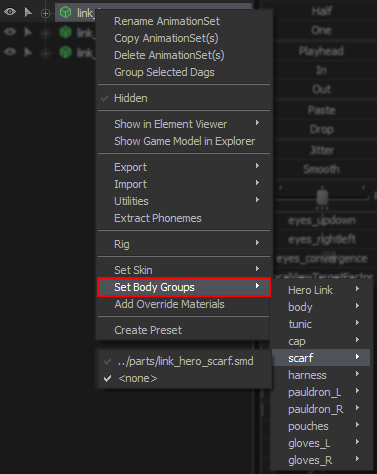
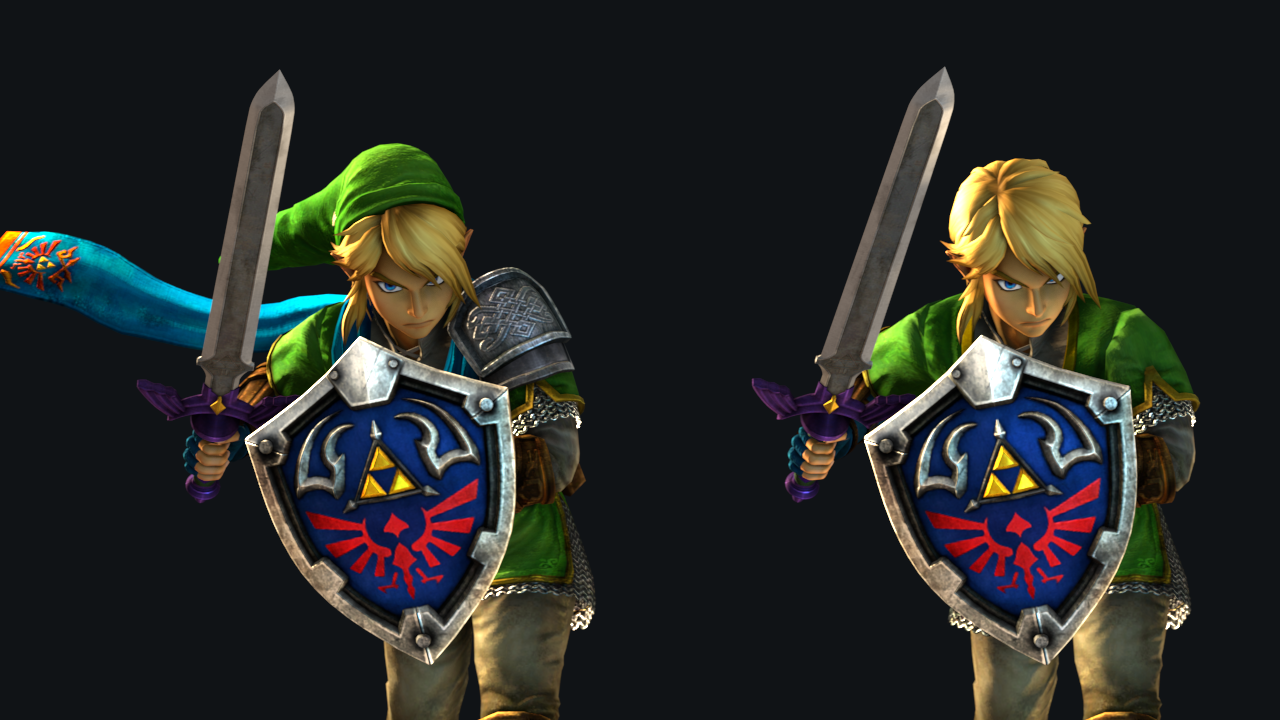
If you were observant before, you may have noticed that, under Set Skins, there is the option: Set Body Groups. Not every model has this option so it’s not always guaranteed that this will be present. Here, the Hyrule Warriors Link model is being used as an example. You can tell by looking at him, compared to the left, that his clothing items have been disabled via the Body Group Menu. If you want the items back then go back into the menu and choose the appropriately named options to have them appear again.
Not every character has the ability to change skins or bodygroups, but for those that do allow for that little bit of extra customisation, this gives you the option to have some visual variance here and there. Go and experiment with the TF2 characters!
10. Scaling Objects and Bones
Changing the scale of an object is handy for altering their perspective, or simply to make items that appear too large or too small when first spawned in, more usable. This is moderately more tricky for animations: different scales and positions may only look good from one camera angle, but not from others.
To access Scaling for an object, right click the model or bone in the Animation Set Editor, and select Utilities -> Add Scale Control for Models. Once you have done so, a new controller will appear for that object within its slider controls: rootTransfrom_Scale. Sliding left will make the object smaller, right is larger. You can even right click the slider and edit the Max value, allowing you to make really disproportionate eldrich creations.
But I wanted to resize a part of the character, not the whole thing!
11. Object & Zero Locking
In animation, characters hold objects in their hands or equivalent appendages without dropping them mid-motion, unless they desire or are forced by circumstances. This is achieved via Object locking: a model can be locked to a different bone, and the movement of the parent bone will allow the locked object to move simultaneously with it.
First, have your character set up within your scene. Spawn the object you want them to hold onto. The tedious part is manually dragging the object to wherever you want it locked; let’s say, they’re holding it in their hand. Once you’re happy with the object’s placement, we can move on.
Drag the hand bone over to the root bone of that object. If you were successful, a lock icon will appear next to the locked object. Wherever you move the hand, it should now follow along with it.
The order in which you do this does matter! If you drag the object onto the hand, for instance, moving the hand won’t affect the object, but moving the object will drag the hand with it.
This is a unique feature that allows you to quickly bind any weapon or cosmetic object to a models bone position. This is useful for when applying custom outfits to your TF2 characters, eliminating the tedium task of manually dragging the object yourself! It just works!
Tip…
To do this, you’ll need to have the weapon/cosmetic in question already locked to the character model. See above for how to do just that! Next, divert your attention to the Procedural tab within the same window as the Animation Set Editor. You’ll see a setting that says “Zero.” Everything else around it is irrelevant for now. Refer to the picture below if you get lost:
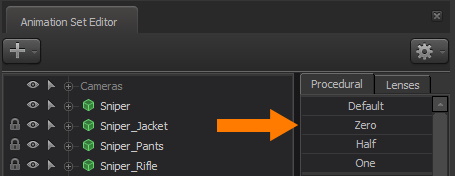
Despite the lack of no indicated slider, you can still left click hold and drag this like any other slider setting. Once your object has been locked, you need to highlight it within the Animation Set and then drag the Zero slider as far to the right as possible! If done correctly, your cosmetic or weapon should have homed in on the characters model position and will stay in place as you animate/pose them.
Note: Zero Locking can not be undone except with Ctrl+Z
12. An Introduction to Lights
To use our lights effectively, it’s best to load a map that is marked as a dark map. The stage map is not one of these, because we can actually see things in it. Right click the viewport and select Unload Map. Don’t panic, your stuff is still there, it just needs a new map to become visible again. Right click again and select Load Map… It’s the same process outlined in Creating Session & Loading a Map, only this time you are searching for black_void, and not stage.
Once it loads, you’ll see that it’s quite dark. If a map called black_void weren’t a black void, I’d ask for my money back as well. This is a map that is nearly* entirely black, allowing you to apply lights as you desire.
Why do such a thing in the first place?
Each light has a ton of sliders, and most of them do something neat. Let’s look at the settings marked in red and see what they do. The rest you can ignore for now.
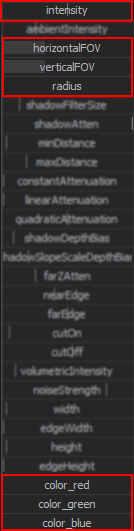
This slider controls the brightness of your light. If your character looks too bright, slide this to the left. Too dark? Go right. Also, try bringing your light further back if the slider isn’t doing much. It does matter how close a light source is to an object, funny enough! The closer it is, the brighter things become.
HorizontalFOV/VerticalFOV
You may think that adjusting these sliders will make the light more oval, but you’d be wrong and a bag of chips. In practice, the light takes the FOV value of the highest of these sliders; if verticalFOV is higher than horizontalFOV, horizontalFOV is largely ignored. The only time they’re not is when controlling the light through the viewport, so our advice is to set them to roughly the same value.
Same deal as for cameras, otherwise: drag to the right to widen the light’s FOV. Experiment with wider light FOV than you may think is needed.
Radius
Default light properties in SFM lead to sharp shadows, regardless of distance, which is not believable. In real life, on a sunny day for example, shadows from low hanging objects are sharp, while shadows from tall tree leaves are softer and fuzzier. Radius applies a more realistic softening of the light, to simulate a higher surface area of the light casting object; in other words, it means that shadows farther from where they get cast are softer.
Colors
Ah, the RGB sliders. These are the most fun, but also a little confusing if you’re not familiar with mixing them to get a desired color. How can you go from a pure white light to a red light?
You don’t touch the red slider; you instead reduce the green and blue sliders. To make orange, you bring red and green close to each other, and reduce blue. So on and so forth. Color theory!
Our advice is to keep at least one color slider maxed out, and work with the remainder. If the light is too bright or too dim, refer to Intensity. Don’t make the RGB sliders do the work of Intensity, this will complicate your workflow.
Having dynamic lighting can significantly improve your work, and you should definitely practice! Dark maps help quite a bit with the learning process. and can make a huge impact on the quality of your work by using your own lights, using different techniques and remembering that all spawned lights have their own slider settings, which should be used no matter how insignificant that light may be to you, because it could very well change the outcome of your final render to be 10 times better.
Experiment and Practice!
13. Export Settings
Phew, almost there. Here we’ll find out how to export at various quality settings, resolutions, sample rates, and how to get rid of this stupid ugly grain on everything.
Just a bit further, you’re doing great!
To access the Export menus, go to the Ribbon Bar at the top: File > Export.
Clipboard Export
This is not a normal exporting function. This just takes a snapshot of your Primary Viewport’s contents at this moment in time. Would be useful for sharing work in progress pictures…
if not for the Windows Snipping tool. (it’s on mostly every Windows device by default: Win + Shift + S)
Image Export
You may think this is what you should select to export still pictures, but you’d be double wrong and a can of soda. The image quality will be overall poor. Avoid.
Poster Export
This seems like a better alternative than Image Export, and it is – better quality exports, and you can set your custom resolution. However, exporting takes absolute ages (regardless of system performance… believe us, we tried), the resulting file will be massive for no good reason, some visual effects can bug out, and there’s a chance of the end result being corrupted anyway. Exercise caution.
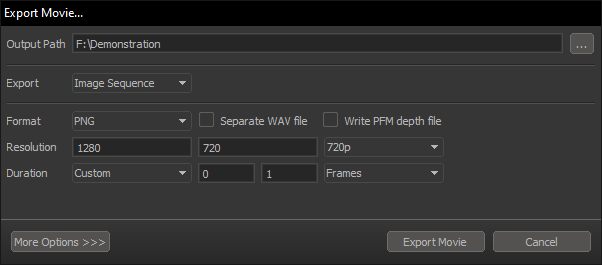
Movie Export
Because from the Movie Export window, you can change the dropdown from Movie to Image Sequence, and then export the desired single frame.
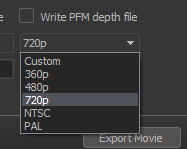
Ah yes, this is the stuff. It’s the most advanced way to export, but it’s the most rewarding. It doesn’t take long, it has the maximum image quality, it allows you to export in more file types, and can go up to 4K UHD resolution (3840 x 2160) with launch commands.
Recommended settings for single frame exports, except for resolution:
You can now re-launch SFM, navigate back to Export > Movie and the option to render up to that resolution should now be available! However, you generally only want these on when you are ready to render the finished project. You do not want them on, especially the 4K resolution option, when still editing your project, as this will have a significant impact on performance and will cause SFM to run at low framerates.
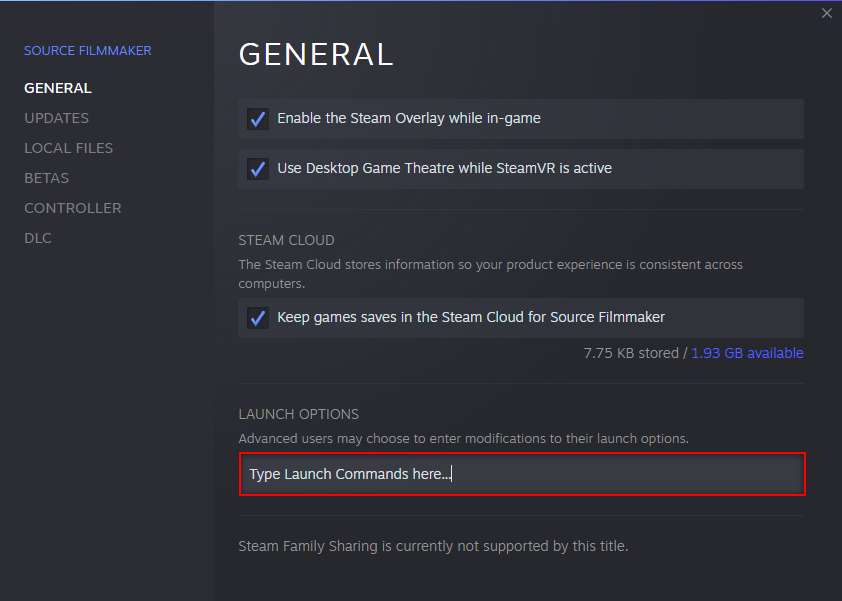
To disable them, go back to Properties and delete the commands. Restart SFM.
One of the first things your artwork will come under fire for is whether you have removed the ugly black grain in your render. Here’s an example of what we mean.
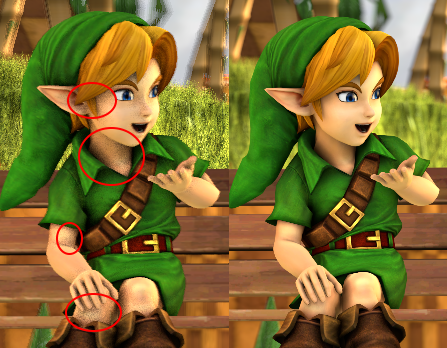
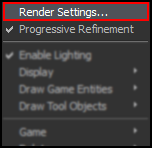
To get rid of this, there is this nifty menu called Progressive Refinement, which can be accessed by right clicking the Viewport. It should be the top option from the drop down menu.
Here, you can change your sampling rate to override the default. Depth of Field is the main one you want to adjust, but if you have a moving object moving within your scene, you may want to also adjust Motion Blur sampling to be increased as well. All of these changes can only be seen while in the Clip Editor, and only while your Viewport is set to a scene camera.
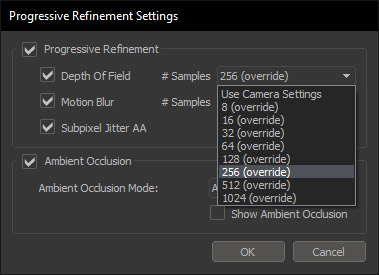
Unless your computer is really struggling at running SFM, you don’t need to use these at all. 8 samples are the default from the Use Camera Settings option, and 16 is barely an improvement.
32 – 128 Samples
Good for previewing your scene while in the Clip Editor mode, but still has a lot of grain.
256 Samples
A fair compromise for exporting an animation without waiting too much. Grain is low enough that animation isn’t too negatively affected – picture exports still deserve better.
512 Samples
Decent for single frame exports that are not animations. Grain is much less visible in most conditions.
1024 Samples
Takes the longest rendering time but grants the best yields: almost zero grain.
psst..
But what about Use Camera Settings?

’nuff said.
We recommend leaving Ambient Occlusion enabled, so don’t untick the option for now.
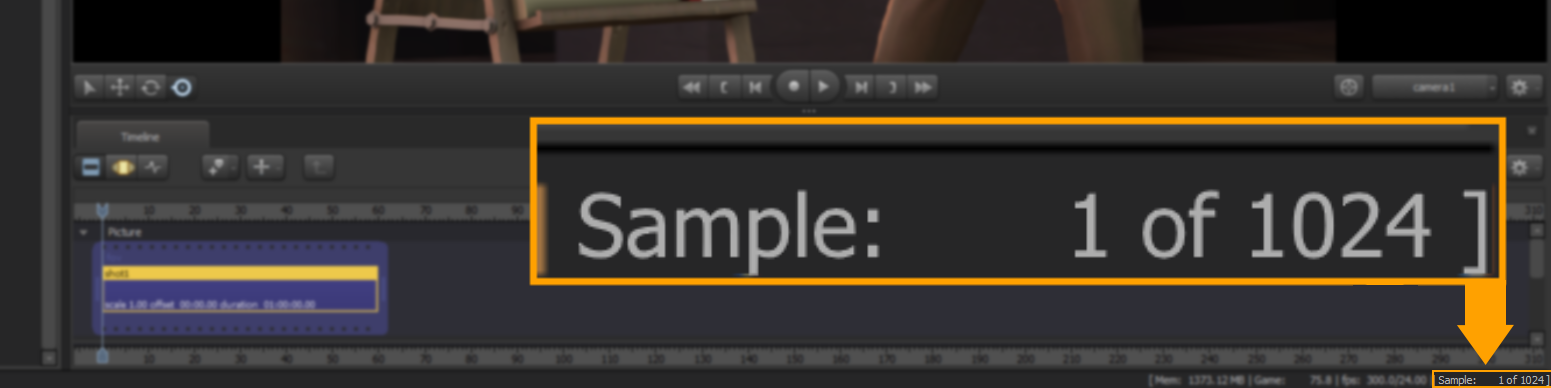
Make sure to fully preview your scene before exporting: check the counter at the bottom right corner. While SFM is constructing the preview, the counter increases, and the image itself may shift and shimmer. It is complete when it shows as “1 of 64” (or 8, 16, 32, 128, etc…) and both it and the image remain static.
If you did as follows, you hopefully now should be rid of the pesky grain curse! Remember to do this for every time you want to render because whether you like it or not, you will be critiqued for it! So try to get used to it… If there is still some grain, either you didn’t quite follow the instructions correctly or you need to make adjustments to your Camera’s SSAO Settings, which are not covered in this guide…
14. How to Install Non-Workshop Assets
You might have noticed that, occasionally, some models in artworks/videos are not readily available on the Workshop. This is because of any of these reasons:
- The uploader decided to keep his/her workshop upload set to private, so only they can use it.
- The model is not available on the SFM Workshop.
In the case of the 2nd option, this means that you can visit other websites to download models for SFM without the Workshop being your only option. As long as the model has been converted to work with Source, it’ll work. This is super handy for those who wish to share and contribute their work, but uploading to the Workshop might prove to be a bit difficult, either due to size restrictions, or because certain… features of the model are not appropriate for Steam.
This process is a little more involved than clicking “Subscribe” and letting Steam download it for you. Instead, you download the files and install them manually. Before you go, “But I’m no good with computers,” it’s actually really easy – and besides, you made it this far into the guide, you surely understand some computer-y things!
First, download your model from wherever. It’ll probably come in a Zipped folder. Inside, you’ll see two folders labelled “Models” and “Materials” that you need to extract. Our preference is for 7-Zip[www.7-zip.org] but anything that opens .rar and .zip files and extracts them will work.
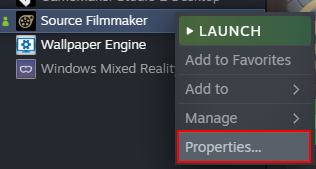
Access your game folder here:
Note: The Steam UI for Game Properties has since updated, but the process is still the same.

Create a new folder and name it something (that isn’t already there) and give it the following sub-folders inside that:
- models
- materials
- maps
- sounds
- particles
Next, open the SDK and check off your new folder:
Get your “model” and “materials” folders of the model you wish to add and place them inside that new folder! Do not place them in any of the created sub-folders as your model will sort itself out.

Congrats, you can now use the model(s) inside SFM! You might need to restart if the program is already running, and make sure you save a backup because if you reinstall SFM, they will be deleted as well.
It’s unconfirmed, but some people say that putting stuff in Usermod may corrupt your SFM install. There’s no way to prove that, but it’s still better to create new directories to store custom assets. Also, multiple folder directories with custom assets can prevent Source from loading everything at once and eating all its available memory. This way, you need only enable the ones you’ll need via the SDK.
Searching for your custom assets in SFM
Remember how, back in Loading your first Model, we mentioned that having “All Mods” set as the filter is important? That’s because this shows ALL your models, not just the ones you subscribed to from the Workshop! This lets you type the name of any model you have downloaded or installed, and it will show up. Alternatively, you can change the filter to whatever name you called your custom asset folders to, if you know the model you’re looking for.
15. Game Mode
Source Filmmaker is not just a film making program, it is also partly a game. The program is a unique hybrid of 3D animation and a barebones TF2 version, unlike everything else available at the time of writing. The Game Mode takes you into the Game world portion of the software, having controls and movement like in TF2.
To enter the game world (or exit it), simply press F11.
Congratulations, you’re in! You can shoot, run, bonk or do anything that you can otherwise do in early TF2. If you want a different map to run around in, you have to exit the game world and load a new .BSP file from the viewport. But what do you do from here?
Game Mode is intended to record actions and movement of one or multiple characters at once, in order to create believable TF2 “gameplay” with advanced camera, light, particle etc. systems from within SFM.
Keep note:
Switching views with Alt + Tab does not give you mouse control in Movie Mode, you’re still technically in Game Mode and thus need to exit via F11 to properly regain control of Movie Mode.
Finally, let’s get down to how you can actually record Gameplay!
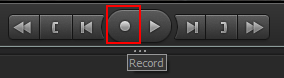
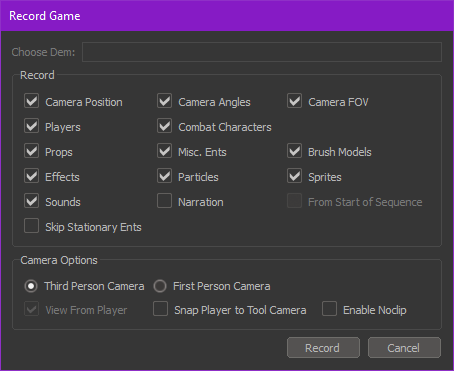
Four beeps will start after confirming and you’ll be in Game Mode. On the final beep, you are free to move about however you wish within the shot. Once done, press Esc to finish the recording and you’ll automatically return back to Movie mode.
You can now edit the recording however you wish, though do note that once you are done recording, any characters or entities that were used in Game mode can not be adjusted in Movie mode.
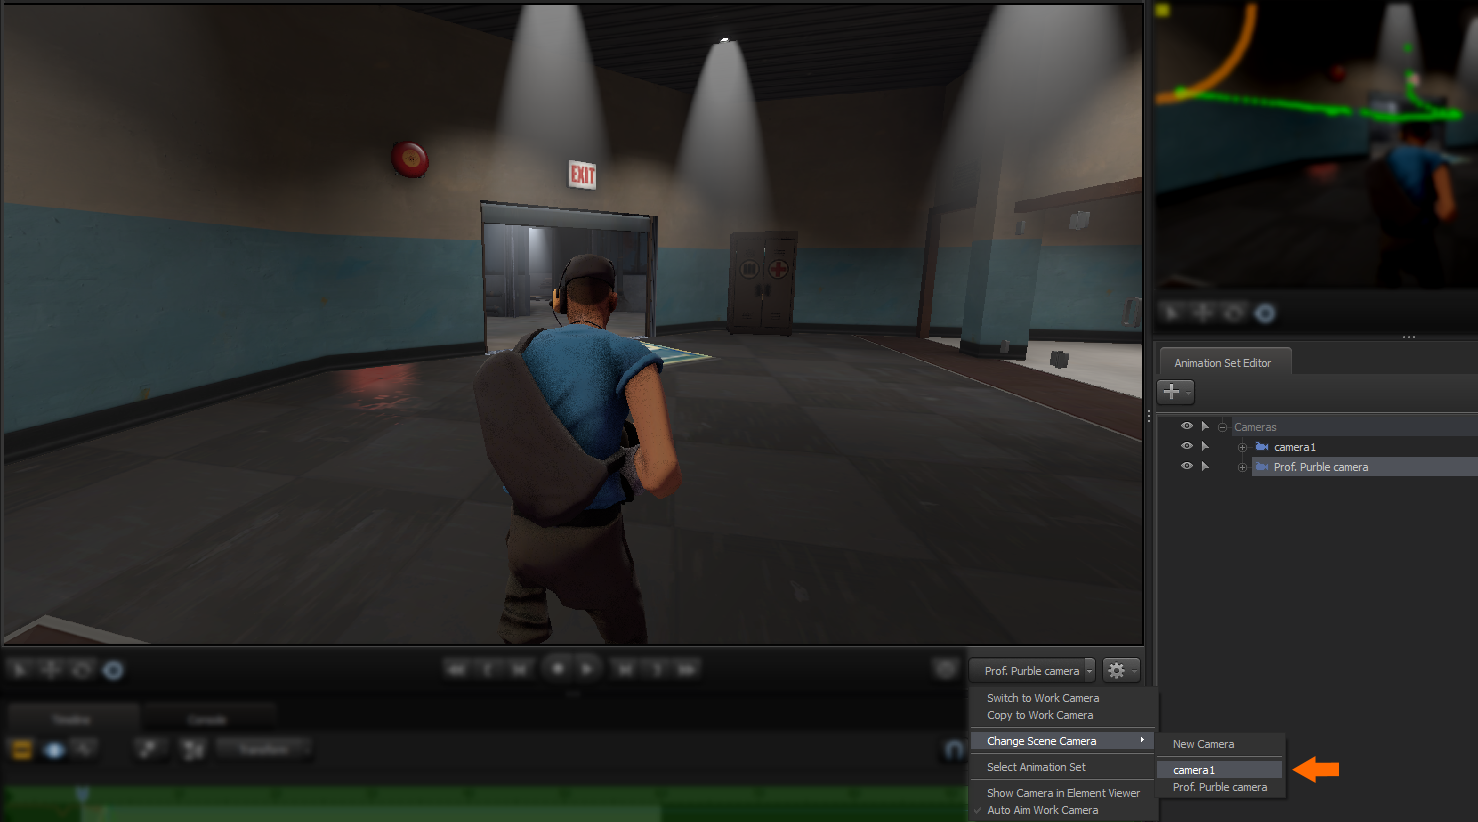
If you had already set up a camera in Movie mode, you can go back to it through the camera options menu, here:
You’re done! To preview the animation, simply hit the play button!
For further reading:
[link]
[link]
16. Customising UI Layout
The Default UI layout is what appears upon starting up Source Filmmaker either for the first time, or is how it was left from the last time you used the program. There are multiple layout styles to choose from, and you can customize them to your liking.
Up in the ribbon bar, select Windows -> Layouts and you’ll see some options to pick from.
Return to Default Layout resets you to the Default Layout.
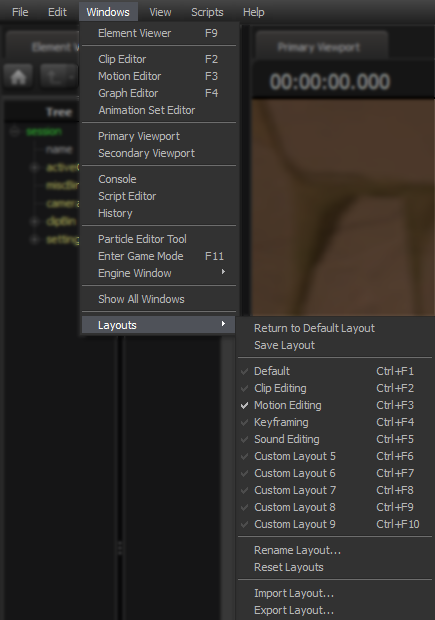
Save Layout enables you to save the current layout.
Next section is a list of pre-made layouts and slots for custom layouts that all serve their own purpose.
Rename Layout allows you to rename the current layout you are currently using.
Reset Layouts deletes all the current custom layouts and resets them back to how they were from the beginning.
Import Layout lets you load .INI files and set’s SFM to use the Custom Layout from that file.
Export Layout saves your current layout as a .INI file you can store for backup.
Once you start getting comfortable with SFM, you’ll want to be working within a workspace where you can reach everything you use. This will depend on what you use SFM for, whether it be purely animation, still images, or a mix.
Prof. Purble’s custom layout:
“My preference revolves around suiting my needs as an artist. I use the Element Viewer almost as often as the Animation Set and wanted both windows open simultaneously. There is also a second Viewport window in the top right hand corner, although it’s set up in a way that still keeps the main viewport a priority. I have also moved the Console tab down to sit next door to the Timeline Tab for easier access.”
What do tabs look like and where are they?

Also, if you release the left mouse button without dropping over any squares, that tab will become its own window. If this wasn’t desired, don’t worry – you can easily snap it back to where it was. Simply drag and drop it onto one of the available squares on the main window.
But wait, I lost a tab. How do I get it back?
From the ribbon bar, select Windows and click on any of the options that are missing currently from your layout. This will open it as a separate window which you can then clip into the main window through the same process as before: drag and drop into the white squares.
If you somehow messed things up so much that you can’t figure out where anything is, go to the ribbon bar and click Windows -> Layouts -> Return to Default Layout.
Feel free to experiment and make an SFM layout you’re comfortable with. Once you’re satisfied, try and save an .INI file of it, then load it up. If it showed up exactly as how you saved it, then it was successful!
17. How to Export a Movie
So you’re finally done crafting your masterpiece, you are ready to hit export and show it off to the world to see! But wait, before you do so, make sure you give your work the best treatment it deserves while exporting.
In the Export window, we’re going to select Image Sequence. The other options take way too much time to render, look like a washed out soap opera when finished, and have absurd file sizes. Furthermore, one option requires you to install QuickTime, which is deprecated and poses a security hazard.
Image Sequence allows you to render the film frame by frame at high quality with your preferred image format. This method renders a lot faster and there is a much lower chance of corruption, as you’re rendering multiple images instead of a single larger file. Make sure you set a folder destination for all the exported images and not your desktop, unless you’re fine with clogging it with images. We won’t judge…
When you’re done, hit Export Movie. This will take a while, but take our word for it, it’s a lot faster than the other options. Make sure the option for Separate WAV file is enabled if you want audio to also be exported. Once done, we shall move to the next exciting step!
That’s right, Blender supports Image Sequences! It’s usually the free option if you have no other video editing software available that supports it.
Now we know some of you might feel like you probably won’t be able to progress beyond this point because “Blender, aaaaaaaaaa!! Nothing makes sense in this program!” which is why Prof. Purble has taken the liberty of taking as many screen shots as possible to help guide you through the process. Shall we begin?
Note: The following screenshots were taken in version 2.8, however this method still applies in 2.9
- If you haven’t already, go and download Blender. It’s free! Like free beer! Start the program and you’ll be greeted with this splash screen. Click on the Video Editing option.
- Once you’re in Video Editing mode, go down to the Timeline options and click Add -> Image Sequence. Navigate to your image sequence export location, Ctrl + A to select all the images and then Import. You may want to also add the Sound file as well from the same drop down menu if your export came with a .WAV file.
- Over to the far right, change the Output File Format to FFmpeg Video. You may also want to set a destination folder where you want the final MP4 export to go.
- Change the Encoding “Container” to MPEG-4.
- Make sure your render settings are set to the correct frame rate and resolution, as well as the total amount of Frames. If you forgot how many frames there was in your render, the image sequence in your timeline will have a number at the very end of its name showing the amount of frames loaded.
Additionally, every SFM export comes with a .txt telling how many images were exported.
- Finally, let’s have a look at your Video codec settings. This usually falls down to personal preference, but here is what I like to set it as. You can change it up however you wish. If you have Audio loaded, go down to the Audio tab and pick out the audio codec.
- With that out of the way, go to the top ribbon bar and select Render -> Render Animation, and I kid you not, this will take literally around 2 minutes* to render the whole thing.
Note: It took 2 minutes to render for Prof. Purble, your rendering times may vary depending on your hardware.


And there you have it! You’ll find the MP4 file Blender exported has a more reasonable file size. If we chose to export this with SFM’s AVI option, this would be way inflated and wouldn’t look half as good.
Now you can do this with all your future animations and not have to worry about absurd file sizes. And the best part about it is that you don’t need a $300 video editing program to do this. (But it’s still nice to have, let’s be honest.)
Extra tips
Miscellaneous tips and tricks to improve your SFM experience.

This allows you to sort your stuff into groups. Comes in handy, especially when you are working with a lot of props, lights, cameras and particles. The cog icon will have this option.
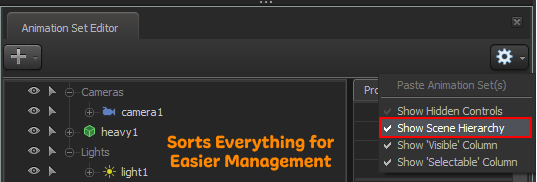
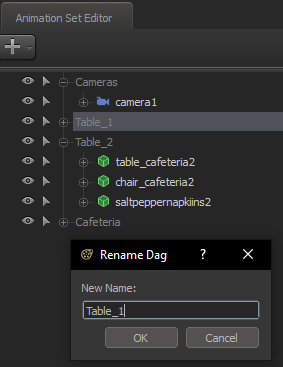
Renaming Dags allows you to sort and categorize the many different things you have loaded into your scene. Highlight a set of props you want grouped into a sub-folder, right click and then Group Selected Dags. After that, right click the created Group1 folder and then Rename Dag.
Different from the slider range remapping, when you double click a slider, you can type in a number between 0 and 1 to take it to a precise percentage of the slider. For instance, 0.1 corresponds to 10% on the slider; 0.65 corresponds to 65% on the slider, and so on. Useful for quickly setting up a desired value on multiple elements, such as lights.
If you’ve previously set your Depth of Field sample rate to a high amount, changing it down to 64 or less will allow you to render previews faster. Remember to set this back to a much higher, or even maximum amount, before rendering.
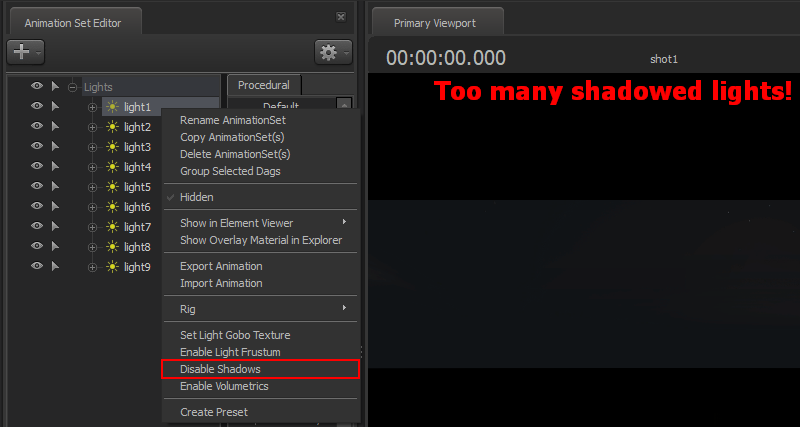
If you’re using a fairly large amount of lights with shadows enabled, disabling shadows on the lights that don’t see a significant benefit can bring you back some frames per second as well.
Ambient Occlusion can also be disabled if your PC is having significant difficulties running the program.
Our SFM Guides (Shameless Plug-in)
Written in collaboration with “A Tomato” This guide hosts an archives worth of dedication into solving some of SFM’s most common to somewhat less-common issues that you’ll probably encounter more than a few times over the years.
[link]
Interested in checking out S2FM? You’re in luck, throughout this guide, you’ll be taken on a bit of a ride to learning how to port your own custom assets over into the Source 2 Engine!
[link]
Helpful Guides Spotlight!
As a final send-off note, here are some additional guides that the authors of this here guide found especially useful. Some of them are a little less known, and we wanted to give them some time in the spotlight. Thank you to all those who contributed to sharing their valuable knowledge with the SFM community!
This one goes in depth to explain more things you can do in SFM! A lot of things are in fact not covered in this guide.
[link]
Cool secrets just waiting to be uncovered.
[link]
A proper tutorial on creating cell-shaded artworks or just cartoony looks in general.
[link]
An excellent place to visit if you need help creating animated images such as GIFs!
[link]
Particles are complex and may seem overwhelming to new users. This is how you can change some basic settings within them and make them more versatile.
[link]
Perhaps you’re using an older or newer variant of Blender and want to understand more on how to export videos from image sequences?
[link]
There are, like, five hundred and a half light settings to alter in SFM. What do they do? Check out this guide for some explanation, theories and practical use.
[link]
Excellent lecture on how to properly deliver critique to other works.
[link]
Another useful guide for applying certain material properties and altering them.
[link]
3D skyboxes are a neat concept, and so is this guide.
[link]
Helpful Guides Spotlight! Part 2
How to give your poster some lovely high dynamic range!
[link]
The Graph Editor, and how to love it even more.
[link]
A useful guide outlining the principles of posing, emphasis on using rigs and finger posing.
[link]
How to achieve better bloom results using Photopea!
[link]
Disclaimer!
Let’s get this out of the way: we’re no experts at SFM, and in no way claim to be either experts or Valve employees. We’re just amateurs in using this program, hoping to have helped with this guide.
While a lot of things seem like very basic stuff in this guide, our knowledge of SFM goes beyond what’s shared here. There’s a great deal more to reveal about the program, but decided to cover just the fundamentals. We still don’t know everything there is to know about the program, nor what’s useful for beginners. This guide’s also been through multiple iterations and revisions, leading us to the next point: You should seek help and advice beyond what this guide can provide. While it gives an introduction to the program, you can learn a great deal more from other sources!
- YouTube
A nice place you can go. Many users will do tutorials and such on how to do different technical things, and can give more knowledge and “how-to” advice for the more advanced stuff. Valve even released their own albeit outdated, but still useful!Recently, Valve released their new improved course on teaching the Fundamentals that effectively replaces the old series. It goes far more in depth than what this guide provides and we highly recommend visiting it for a better understanding from the actual
- The Forums
The heart and soul of the SFM community, a great deal of users who use the program can be found here! There is even a Pinned discussion thread to get you started on the more advanced stuff. - Steam Guides
Go to “Top Rated All Time” and have a look at the first and second pages. There are some super duper helpful stuff that have been published.Additionally, there is a Helpful Guides Spotlight part in this here guide, showcasing the guides we personally found really useful and may also be helpful to a beginner artist!
- Your Friends
Oh yeah, didn’t expect that one, did ya? If you have fellow friends that also use SFM and share a passion for it, then getting someone you know and trust to help out can help tremendously. - Discord Servers
Let’s start off by saying: There is no Official SFM Discord server. However, there are many community fan created ones, namely the r/SFM one gets brought up quite a lot, mostly because it’s been hosted by a lot of well respected artist found within the community, whom of which you can learn a great deal from!
The Past, Future and Now
“Due to life events and certain circumstances, I’ve decided NOT to task myself with undergoing writing another guide as monumental as this one turned out to be due to all the stress and anxiety it came with writing and maintaining it. I was not expecting it to receive the amount of positive reception it had gained over the past few months it had first been published. Back then, it was around half the size it is today, but despite it’s lacking qualities in the early run, it still did better than I ever expected and I just want to extend my gratitude to the community for their input, as well as my friends who played a vital role in the early days of my SFM career.
For all the years I’ve studied in this field and have now ventured onward to new horizons, this guide, which has become the embodiment of all those years of combined experience and support is not just a “thank you” to the SFM Community, but to all my friends and those who stuck by me, through it all! Thank you, for allowing me to show my creativity in a form that I could only dream of as a kid and may this guide help you on your quest to great success, as well. Godspeed with you!!”
~Prof. Purble
At the time of writing this, Fundamentals just turned 1 year old. During this time, it’s received praise and popularity we could never have imagined. As for the Future of this guide, it’s not yet known what lies ahead. “A Tomato” has contributed greatly since joining the author team, and while there is always room for improvement, we hope this guide will continue to aid any aspiring filmmakers – animators and otherwise. This iteration of SFM may be all but abandoned by Valve, but we intend to keep its legacy going.
Far from it! You have just taken the first steps into something truly wonderful. Source Filmmaker, in spite of its age and limitations, is an excellent program. We only hope you’ll stick around and develop a liking for it, as we have.
Remember:
- Everyone has their Humble Beginnings.
- Don’t be afraid to receive feedback!
- Make whatever you want!
Credits
Author – Prof. Purble
Co-writer – A Tomato
Special Thanks
Marco Skoll
Pte Jack
Hunter in the Green Vest
EmperorFaiz
Ori
Den
Source Filmmaker is developed and owned by Valve.
I’d like to take a few seconds to thank “A Tomato”. It was him who put the effort into proof reading and editing these guides, making them fun to read and even rewrote a fair chunk of the guide itself to better explain a lot of things, as well as some additional content was included by him. He added a lot of cheek and tongue in places, giving the guide a bit of flair and even integrated he’s own personality into it.
There is no reason why he should not be receiving the credits he deserves for all his hard work! It should go without saying: without his assistance, these guides may not of received the amount of reception that it had gained over the past year or so and I was truly grateful for that, during this time.
He was the big up most reason I began working in SFM to begin with since the very beginning of my career in 2016.
Thank you, mate. I couldn’t of done this without you.