Overview
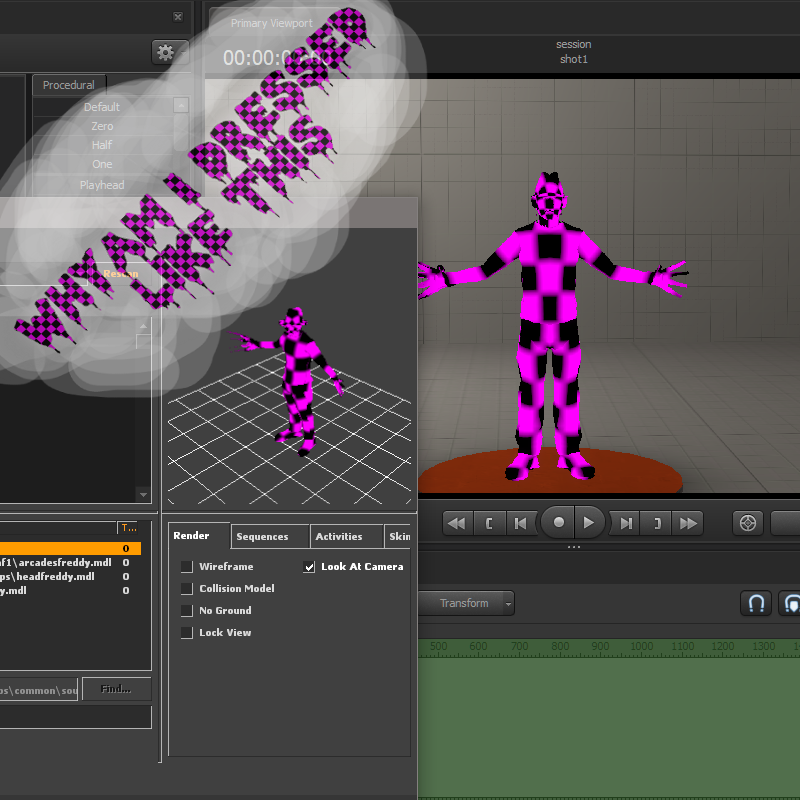
The most common problem is the Black and Purple Checkerboard, but there are others as well. Some of them are very subtle and hardly visible but the model just doesn’t look right. In this guide I’ll show you how to identify some of the different Texture problems and how to fix them.
How Valve Models, Materials and Textures work in SFM
A basic understanding of how these things all work togther will help you not only in Problem solving, but model building as well. So here’s a quick lesson on the construct of a model.
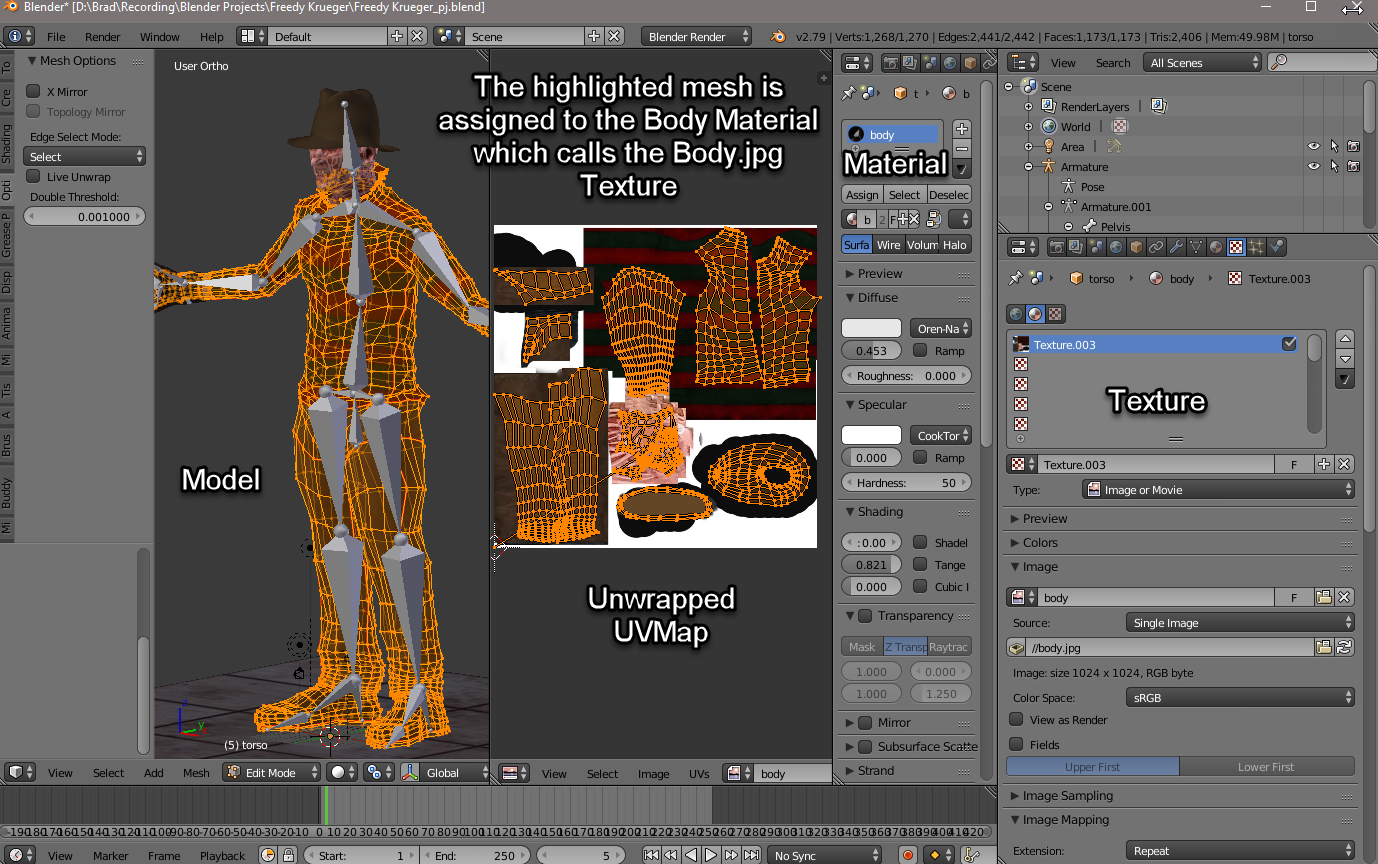
Models are created in a 3D Editing program. As I am partial to Blender, my examples will be Blender Based, but the same rule applies to Maya, 3DSMax, and any other 3D Editor that produces SMD or DMX files.
When we create models, we have to first unwrap a model’s mesh. This is also known as a UVMap which will tell a model where mesh is located in a 2D space so it can be painted.
Once the UVMap is established, we have to give the mesh a material. This tells the model to display the assigned material on assigned mesh and and how to display it.
Once a material is assigned, we give it a texture to display.
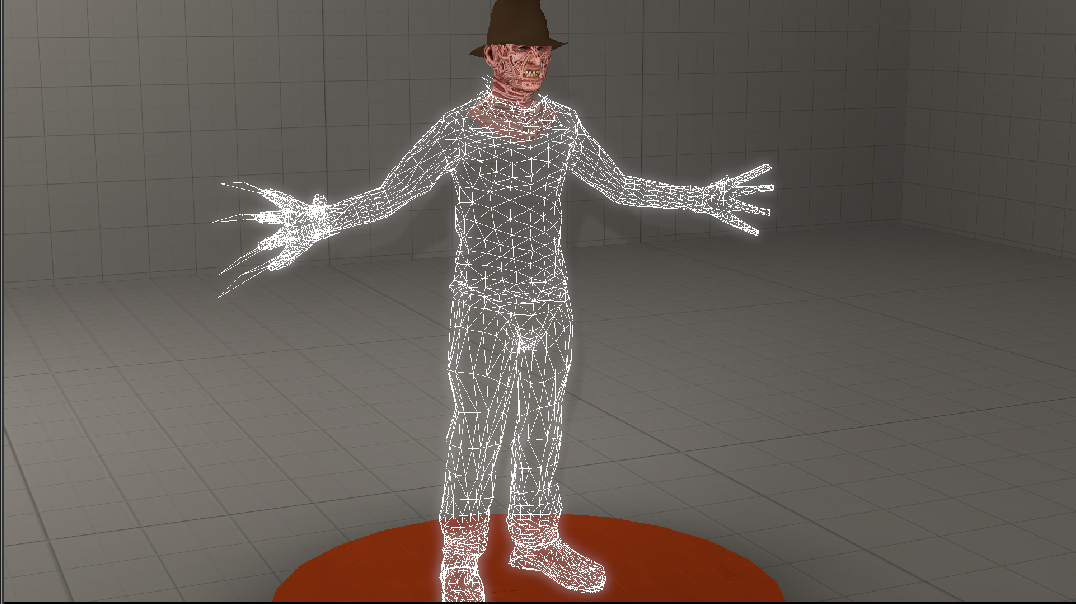
So this is what Freddy here looks like in Blender.
Valve Models and their Materials and Textures work pretty much the same.
Valve Models use 3 model files types to build the model in SFM, the VVD, DX90.VTX and the .MDL file. These are Binary model files that contain the Material paths, the Material names and are compiled from the Valve model source SMD/DMX files exported from the 3D Editor using the Valve studiomdl program.
Basic Valve Materials and Textures use 2 file types, VMTs (material) and VTFs (texture).
The Model files call Materials (VMT) from their folders by the paths and names written into them and then the Materials (VMT) files call the Textures (VTF) from their folders and tell the game engine how to display them (is cloakable, paintable, has bump material, enviro masks, animation frame rate for animated textures, etc.)
When we export the model to Valve Source SMD or DMX files from the 3D Editor, the Material names used in Blender are written to the model source files. This means that we have to use the Blender Material names to name the Valve VMT Material files the model will use. The VMT filename has to be exactly the same as names used for the materials in Blender or it will fail. For example, if I have materials in Blender called body and body.001 then I must have VMTs named body.vmt and body.001.vmt in order for the model to find them.
The folder path the materials (VMTs) will use (not textures VTFs) is determeined in the QC using the $CDMaterials Command. This information is also written to the model files when the model is compiled.
So, if the $CDmaterials command states,
$cdmaterials modelsfreddyK
then the VMTs must be in a file path such as Modfolder the SFM knows about (like usermod, TF, hl2 or a custom folder that we create and tell SFM about using the Edit Search Path of Existing Mod function of the SFM SDK. Note: To get the SFM SDK, SFM must be launched from the Steam Client.)
materials
models
freddyK.
And that is how and why Materials and Textures must be in correct folders and be properly named. When a material (VMT) or a texture (VTF) can’t be found, the model will be displayed in game using the Valve Default material which just happens to be this Black and Purple texture seen here.
If there wasn’t a default material for it to display, the model would be invisible.

Setting SFM Up For Trouble Shooting
Ok, we’re going to use SFM to help find out what’s missing and where it belongs…
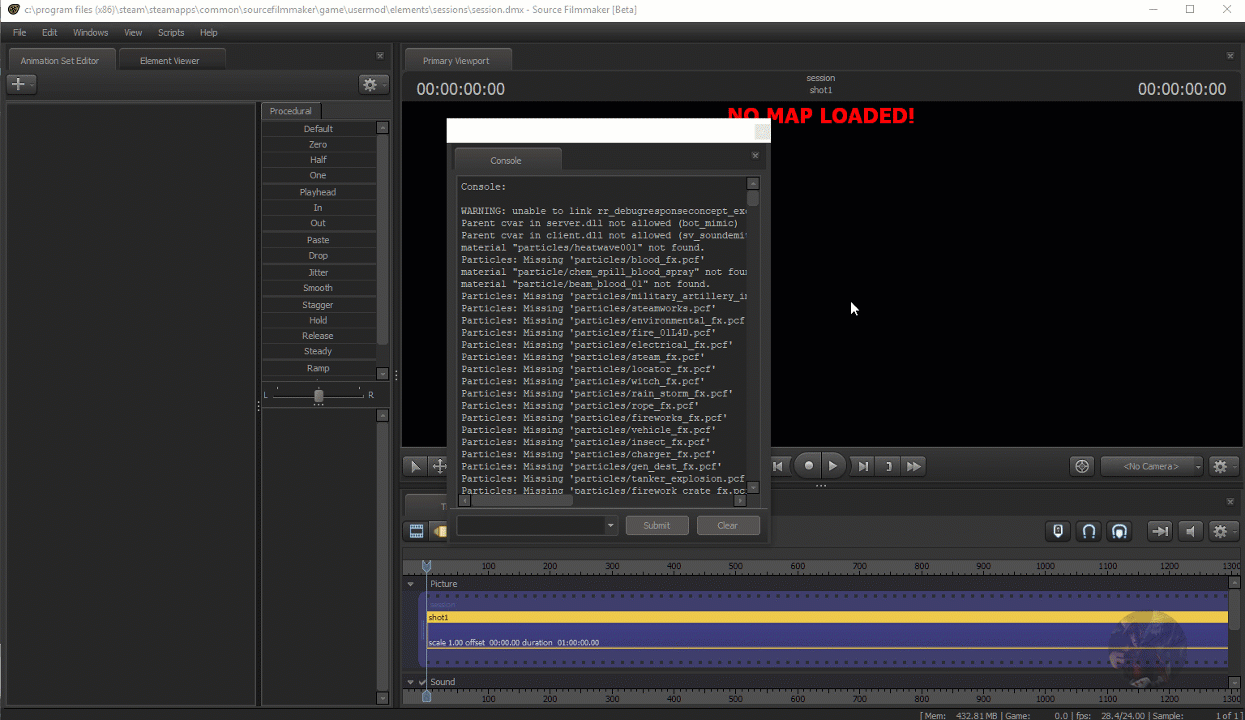
In order to do this, I suggest you have the Console window visible. This is where any error is going to be printed and the tools we’ll use to investigate problems. So, before moving on to let’s set up the SFM layout to a design that is better for trouble shooting.
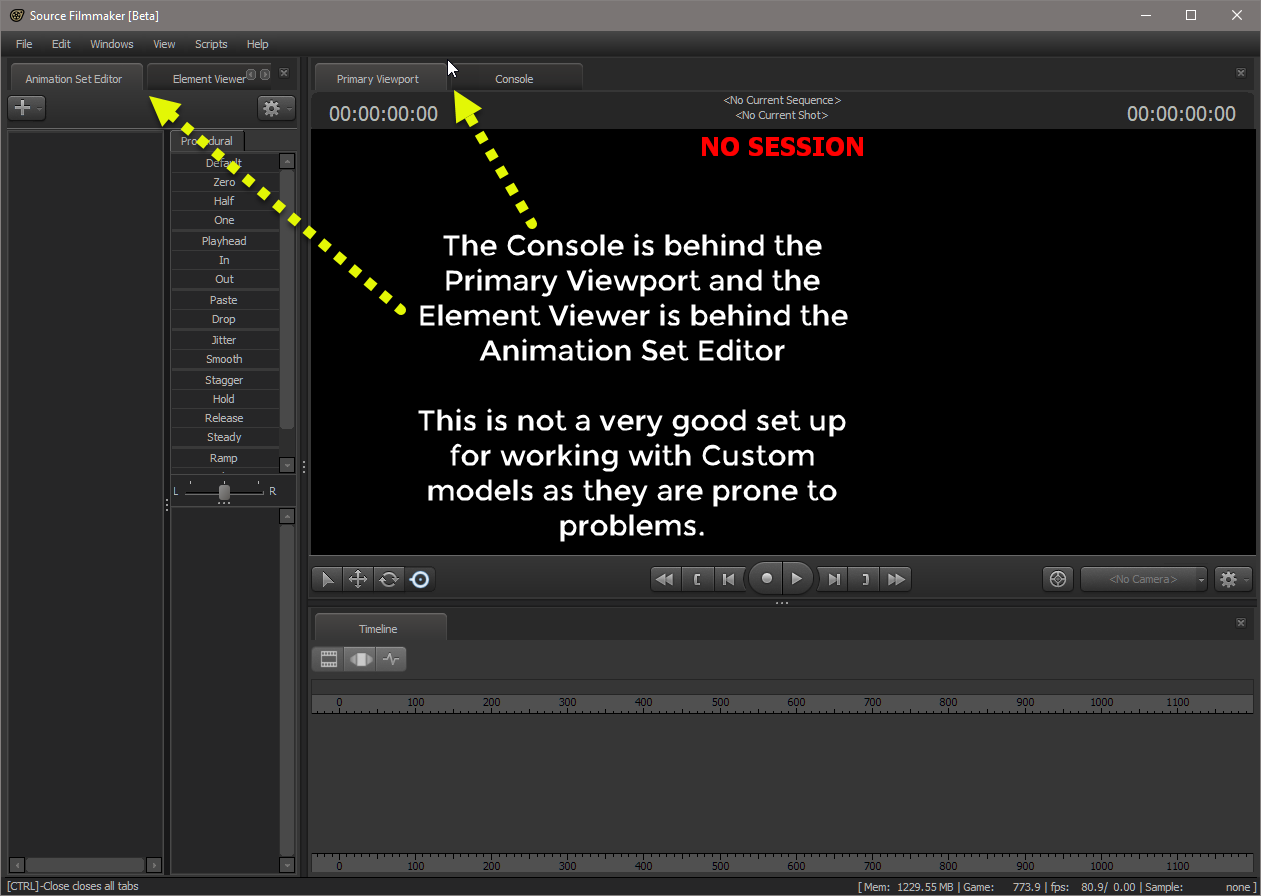
This is the normal Default Layout for SFM, the Console window is behind the Primary Viewport and is hidden.
I prefer a work enviroment more like this where I can access the windows immediately and be able to resize them as required…
If you’ve closed the console window and don’t know how to get it back, go to Windows and click Console… It will open in its own window.

The tabs of the individual windows that make up SFM can be dragged around the workspace and strategically placed for better access like this. Experiment and find a setting that’s right for you. Once you have it, make sure to go into Windows – Layouts and save your layout to a User slot so you won’t have to reset it everytime you start SFM.

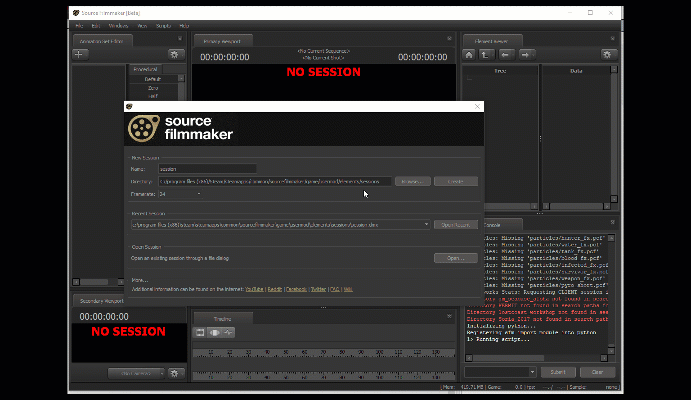
This is how I set my environment up…

Trouble Shooting the Problem
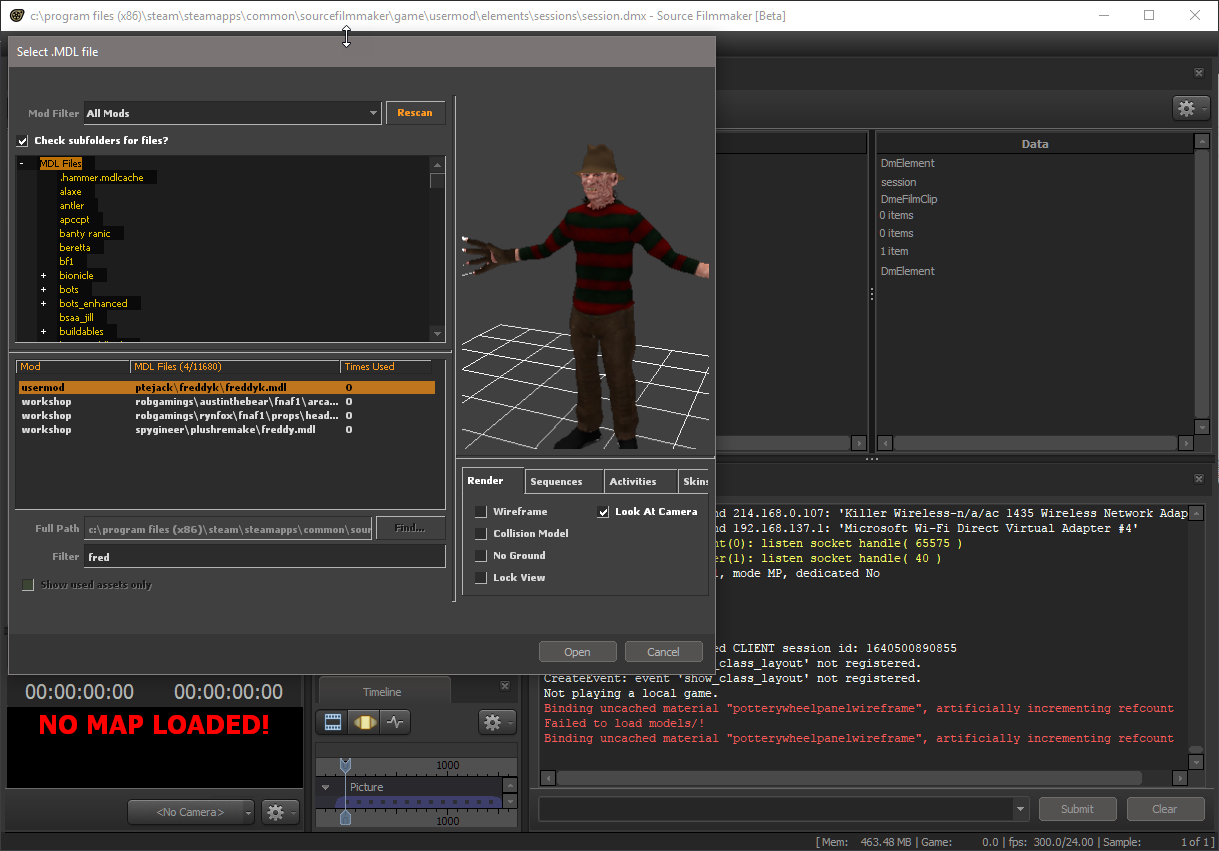
The Fastest and Easiest way to trouble shoot a broken texture or material is to look at the console window when you touch the broken model in the Model Browser as you load it. If the materials or textures are broken the material errors are going to be visible in the console before it is brought into SFM.
If you miss the Error(s) in the console and continue to spawn the model, the errors may be hard to find. They may become lost in the Console window clutter. Especially if you load more assets after loading the broken one.
If you get into a situation like this, it is best to save your session, write down the name of the model with the errors, exit SFM and follow these steps.
The reason for the restart is because SFM caches information about assets and any error they throw. If you try to reload the asset in the current session, you’ll get nothing more that a “Failed to Load Materials” error. The error has already been thrown once and has been cached for the session. The only way to get it to be thrown again is with a shutdown so the cache is cleared.
1) Restart SFM
2) Create a Session but DON’T load a map. (This will cut down Console Clutter)
Note: Some ppl like to actually clear the console window before going on to the next step. This can be done by typing CLEAR in the Console command line.
3) Right click the Animation Set Editor and select Animation Set for New Model
4) When the Model browser opens, start typeing the name of the model into the Browser Filter
5) When the name of yur model is visible in the browser, select it BUT DO NOT SPAWN IT
6) Look immediately at the console window for material or texture errors for the model.
7) Press cancel in the browser window and expand the console so you can see all the errors.
8) Highlight the errors in the console and press Ctrl+C to copy them
9) Paste the errors into a text edit so you can view them easier.

10) now that we have the errors (and there will be more so I can point them out later) we can investigate and find out why the model isn’t finding what it needs.
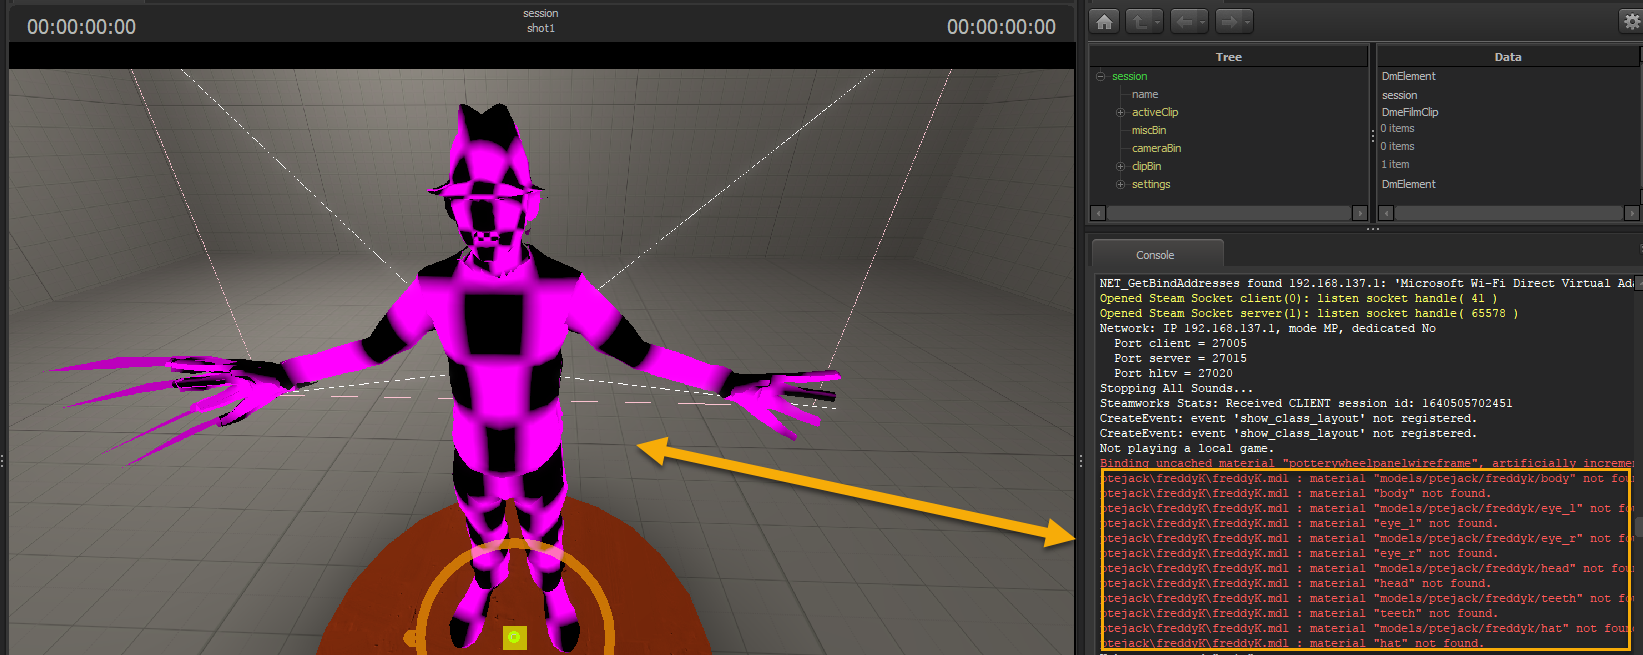
In this case, the errors are pointed at Materials and Materials = VMT files. The error is showing exactly where the files should be located and what their filenames must be.
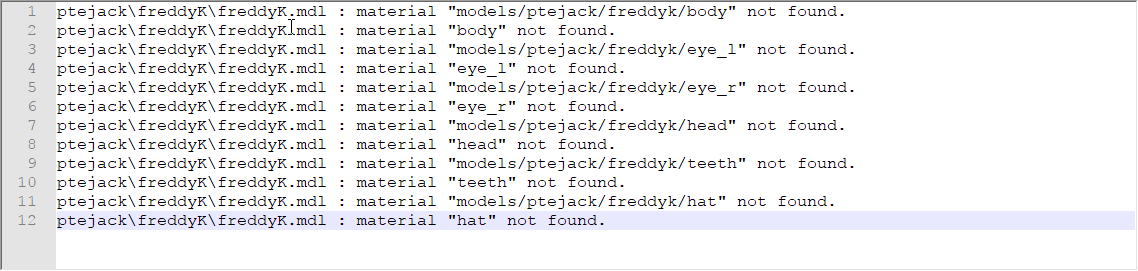
Remember, VMTs (the materials) are being called directly from the model. These files HAVE to be where the error indicates and named EXACTLY what the name indicates in relation to a SFM Known Mod Folder’s Materials folder. Most times a material will be buried a folder level too shallow or one too deep.
10) Now you have to track down where you put the materials for the model or determine if you forgot to actually port them.
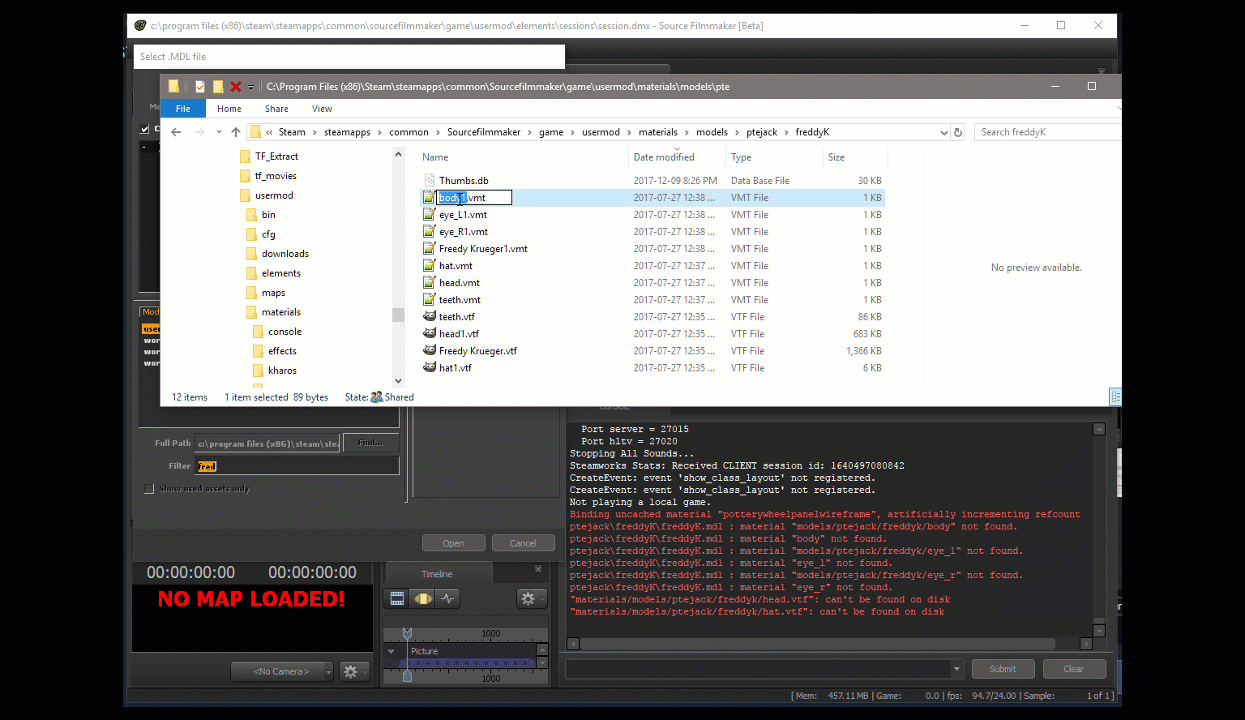
In my case I found the material files in my {modfolder(usermod)}{MaterialsModelsPtejack}(which is correct){FreddyK1}(which is NOT correct) Folder
I also found that some of the VMT are incorrectly named.
Let’s see what happens when I move the files to the correct folder path, but don’t fix the file names.

The materals and textures are now in the correct folder, but the model (except for the teeth) are still black and purple checkerboard, why?

The teeth are ok now because the model found the VMT and the VMT found the correct VTFs.
If you look at the errors, you’ll see they have changed.
The model still can’t find the body, eye_L, eye_R VMTs (because we didn’t rename them to to what they needed to be.)
But, now there are 2 new errors, “materials/models/ptejack/freddyk/head.vtf”: and “materials/models/ptejack/freddyk/hat.vtf”: can’t be found on disk
These 2 new error are saying that the model found the VMTs for the head and the hat, but now the VMTs can’t find the VTF files required to paint the model. Again these new errors are telling EXACTLY where and what the VTFs need to be named.
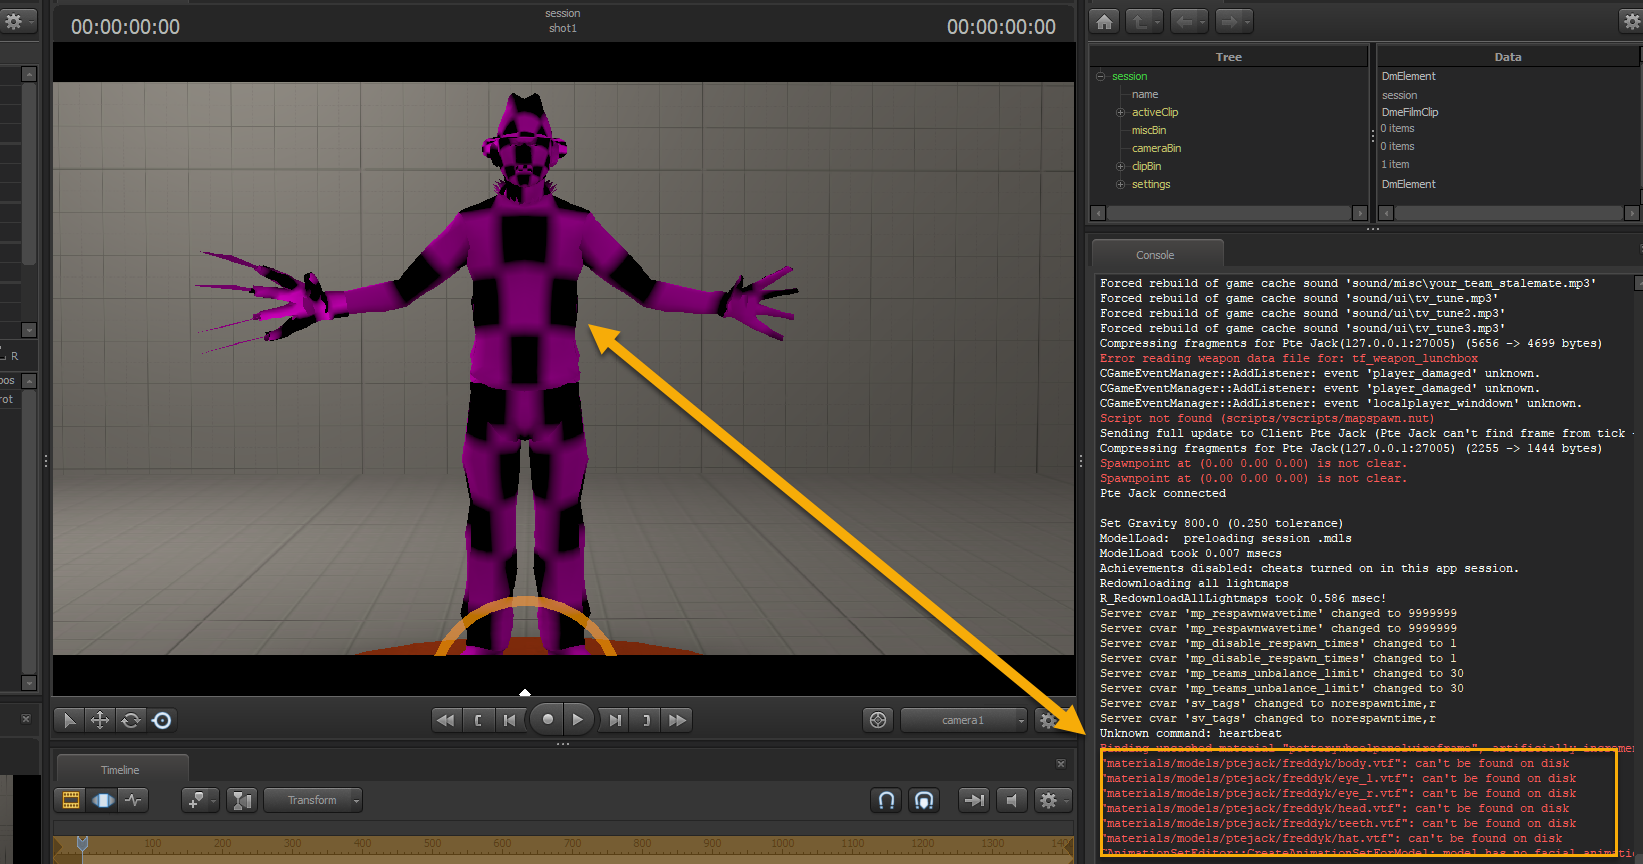
So, what we have to do now is rename the 3 VMTs that are misnamed, and move and/or rename the missing VTF files.
Let’s do that…
Because the model is cached, remember I told you that models are Cached until SFM is restarted?
We didn’t restart SFM after the last edit!
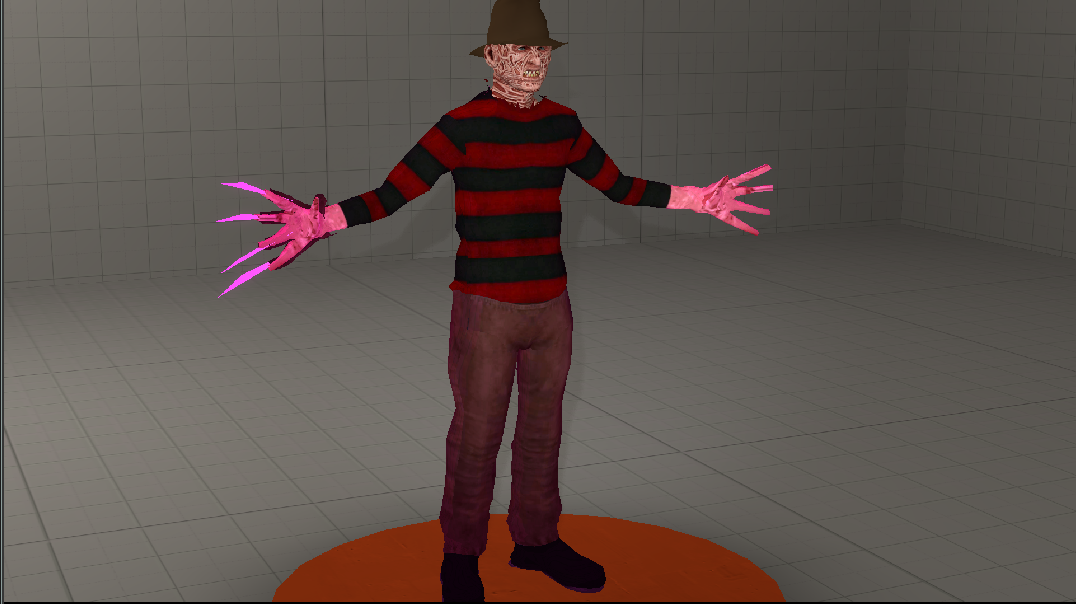
This is what the model looks like after SFM is restarted. Fully textured and no material errors.
Different Types Of Checkerboards (and a couple of other probs)
As I said in the opening, there are different types of Checkerboards and each has a different root cause.
Black and Purple – Bright
Usual cause is that the model cannot find the VMT Materials
————————————————————————————–
Black and Purple – Dull
Model cannot find the VTF Textures
————————————————————————————–
Blotchy Checkerboard
Missing Bumpmap VTF Texture
————————————————————————————–
Tight Black Squares with Pinkish Textures

Missing Detail VTF Texture
————————————————————————————–
Weird Pinkish Sheen

Missing Lightwarp VTF Texture
————————————————————————————–
Weird Glow
This is a Shader problem. The Shader a material uses is the first line in in a VMT. This particual shader is the CustomHero shader that was used on the old Dota2 Character before they went to the Source2 engine. To fix a shader error you have to edit the VMT itself and change it to a shader that SFM an use, like Vertexlitgeneric.
————————————————————————————–
The Dreaded White Mesh Effect

Again usually a shader error. In this particular case the model is using the map Lightedmapgeneric shader. Again, the shader in the vmt has to be changed to one that SFM uses.
————————————————————————————–
The Old and Bothersome Seethrough Texture
This is usually a modeling error. Sometimes it can be corrected by adding various commands to the materials (the VMTs) that are see through. As I say Sometimes. Sometime the commands work, sometimes they don’t, so I’m not going to go into those type of fixes.

The usual cause of this problem is that when the model was compile, the modeller did not add a vital command that SFM requires for translucent materials. That command is $mostlyopaque.
The $mostlyopaque command cause the model to do multiple passes before it is displayed. It searches out opaque textures in one pass and translucent material in another then the model is displayed and usually correctly. When the $mostopaque command is omitted, the model only does one pass and the model itself becomes translucent.
The actual fix for this condition is to decompile the bad model, add the $mostlyopaque command to the QC and recompile the model.
————————————————————————————–
There are other Material and texture problems, (especially in the Community Paintable items category where the item is black or coloured and can’t be painted) but I think you get the idea as to why your models go checkerboarded now. If the model’s textures don’t look quite right and you notice these blocky textures, look in the Console for material error messages for the model. Determine what VMT or VTF is missing and where it needs to live, find them and fix them.