
Overview
Shows SFM Users how to properly and most easily export their SFM Animation. This is (by far) the easiest and most effective way to be exporting your SFM Animations.
Installing Quicktime
WARNING: Quicktime released a warning regarding potential security concerns. This guide requires Quicktime so if you’re not comfortable downloading it, you should look elsewhere.
First of all, if you’re new to Source Filmmaker one of the most important things you do right now is install Quicktime. Quicktime in simplistic terms is a video player. But with SFM it allows you to export / render out your animations in multiple ways and resolutions (along with other misc. options).
Download Quicktime for Windows (Direct Download):
Quicktime Direct Download[secure-appldnld.apple.com]
Note that you will need to restart your computer after installing for it to properly work.
Rendering out your Video
Now we move on to the actual rendering of the video!
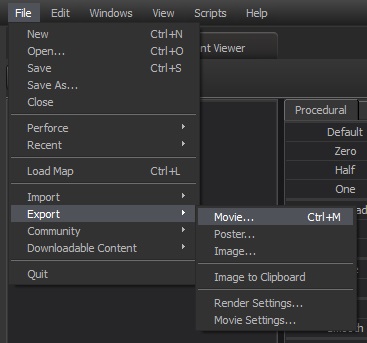
First of all, the easiest part is finding the export button (Of course!):
This is found at the top left under File > Export > Movie
Now that was easy.
Now here comes the most “complicated” section of rendering.
First of all, you should see this window pop up:
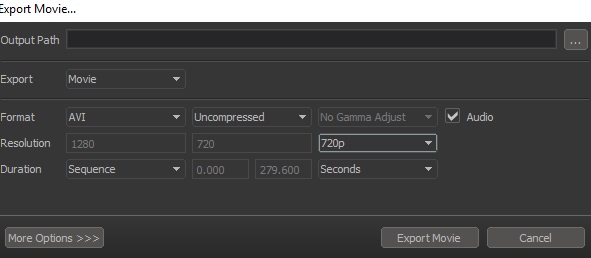
And now a little configuration.
First of all you want to turn up your video quality, this of course is not necessary and it will actually be a faster render if you lower the quality. But for the purpose of this guide we want to act like we’re trying to get the best out of our video!
You then at the top want to change the Output path to wherever you want your video to be rendered / exported to. (Wherever you want the final file to end up).
Now here is the part that everyone messes up on:
You do NOT want to export this video as an .avi extension. This will cause your video to look dark, play weird, and just all sorts of bugs and glitches that we want to avoid.
You want to set the “format” section to MP4. This will make the video render as an MPEG.

Now where it says “MPEG4” you want to change to “H.264”. This will make so the video renders with correct lighting. The rest of the options are well… Optional!

But once that is all said and done you are ready to press that export button and on your way to previewing / uploading your new fancy SFM Animation!
(Advanced) Rendering Extras
Now, in case your wondering why your video doesn’t look as HD as the next fellows, it’s because there are some advanced options you can do to make your video look better.
First of all, you have been rendering your video in 720p. You can actually tell SFM to allow you to render in full 1080p! This can be done by going to your Software section of your Steam Library (This is how you launch SFM in the first place) and right clicking Source Filmmaker. Then go properties:

Next you want to click “Set Launch Options”

And finally you want to enter this:
-sfm_resolution 1080 -w 1920 -h 108

Congrats, you can now render your video in 1080p!
Note: Rendering in 1080p can be weird and because the window is so big it may make so you cannot see the render estimate / bottom of the render preview
Now the second thing you can do is force-adjust the Render Settings of all cameras in the scene.
You can access the render settings (for all cameras) by Right clicking in your viewport and then clicking “Render Settings”:

First of all, make sure that “Progressive Refinement” is checked, then make sure that all the other boxes are checked:

Now where it says “Use Camera Settings” you can turn those up / down however much you please! Just note that turning those up (while making your video look fabulous) will cause you to take a LOT longer to render the video out! Personally I recommend rendering in 720 or 1080p for preview, and then messing with render settings when your ready for the final version.
Thank you all for reading this guide, it took me a bit to write (the most annoying part being the images of course) but it frustrated me that so many people were rendering their videos out so needlessly complicatedly (If that is a proper sentence).
Hope you guys see how much better your renders will turn out this way, and how easy it was to do!
Other Methods
The way I’ve taught you to render out is the simplest and easiest way, but it is not the only correct way to do it. There are a few more “advanced” methods you can do if you’re looking to take your rendering to the next step.
Image Sequencing
Image sequencing renders each frame of the video out as an image, though this step is more complicated, it is actually the preferred choice of the majority of the SFM Community.
I may write up completely how to do image sequencing with images and such, but I don’t have the time right now – I just added this section because someone in the comments made a valid point that the way I phrased this guide made it sound as if the way I suggested was the only correct way, when in fact there are other correct methods.
Common Problems
1) You forgot to install Quicktime
I put this at the top of the Guide for a reason, please do not ignore it! You will not be able to render as an MP4 (It won’t even give you the option) or even let you customize the render if you haven’t installed Quicktime. And for the love of god, remember to restart your computer after you do!
2) You rendered to the default location
Wherever it tells you to render, Don’t. Just render to your desktop or documents or videos folder. But don’t render where it first says you should render.
*More “Common problems” will be added here when thought of / Or discovered