
Overview
a lot of guides make this seem hard so I am taking up the challenge. this is a simple one so don’t expect it to be really amazing this just is the quick way.
What you will need
Mmd models are pretty complex and they are a different file type, PMX/PMD, so we will have to convert them to a file type sfm can use/or convert, Smd/DMX, here is what you will need to do so.
blender 2.79b or any 2.79(I recommend getting the zip file so you can just open it with out the whole installation process): [link]
Cats blender plugin: Make sure it is the one before update 0.17.0 [link]
Blender Source Tools(get 2.10.2): [link]
crowbar: [link]
vtfedit(for the model’s textures): [link]
an mmd model(ask before you port unless it says you can edit it) most are found here: [link]
*note I do NOT own any of these models. all models go to respective owners.*
and finally: Source filmmaker.
OPTIONAL:
I recomend getting the groups from half5life’s undertale models for this it makes all bones easier to find and will move some expressions to the face section get the groups here:
[link]
Author’s Note:any thing circled or pointed at is what you need to do anything in a square is optional
Models to blender
Before we go to blender go to usermod in you SFM folder. go to the materials folder then click models make a new folder and name it something you will want to use later on.
Now open blender with the link I gave you.
assuming you have blender installed you then want to go to file-prefrences-addons-install addon. find the zip files for both cats blender plugin and the blender source tools and install them, click the check mark on them and click save user settings.

now find the cats tab and click the three lines button then click mmd.

Now that you have the model make sure you find which pieces of the model you want as bodygroups.
to do this click the button that says materials 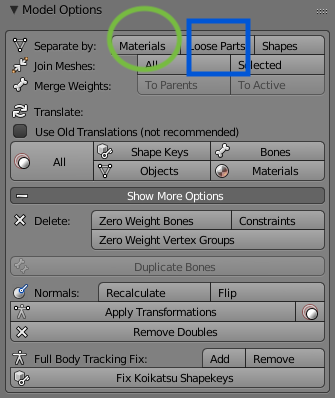


Materials
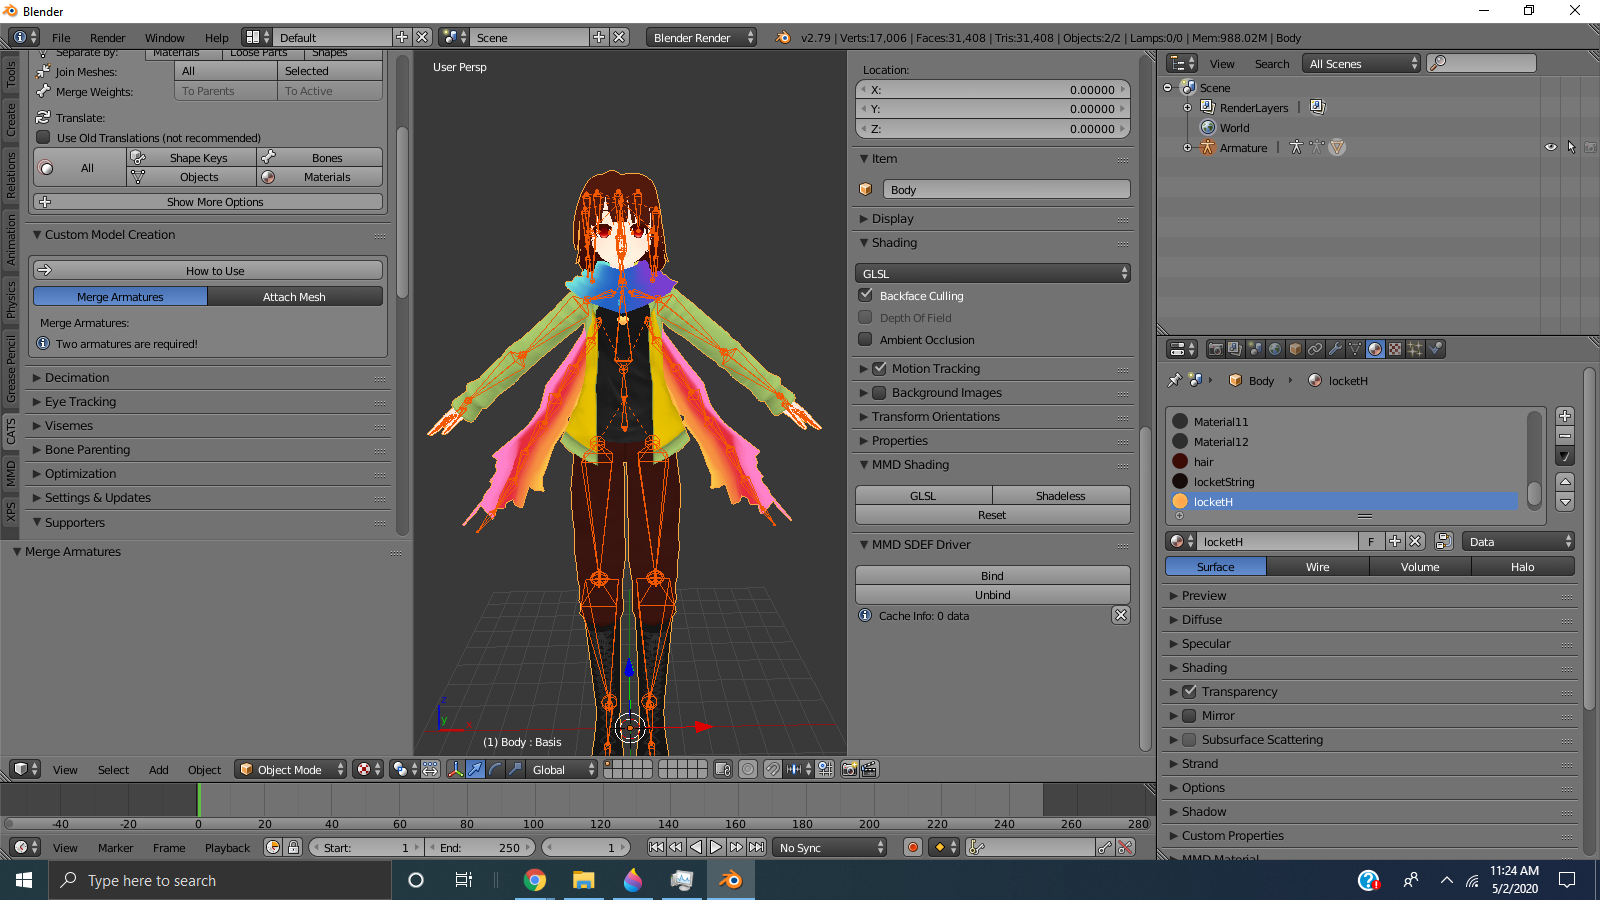
Now that you have your model fixed you will want to click the mesh. hit the sphere icon below the window of you model
VTFedit
once that is done open VTFedit and look at each material CAREFULLY. the reason is if you don’t then you won’t get the texture right. press Ctrl-I to import the image and the press Ctrl-Shift-S or click save as, find the material folder for you model. and name it after the material the model has(note: you can rename the model’s material if you want also know that it won’t allow foreign language, but you should have had them translated.) do this for all materials until done. like this

VMT’s
Now we need VMT files. what for you ask? Vmt files are files for the vtf that you made. these files tell sfm hey this is a material you need and they need to be named to the EXACT name of the blender material. click the tools and hit create VMT file, then go to options and hit the arrow with the box that says lightmapgeneric. change it to vertexlight generic, this is a vmt type sfm knows to use for models
check no cull and finally if there are any parts that are transparent like for a pupil of an eye check alpha test this makes sure you don’t have any strange black parts on the model making it more blocky.


Skins for character
Skins are textures that replace the main one with a new one. EX: scout’s shirt from red to blue
first pick your material you want and then make sure you know the material that you want to replace, next make both of them VTF’s and VMT’s. after that you want to go to the next part of the guide
Exporting and making a qc
Exporting
Now that you have your materials all set up go to the scene tab and click weight cull link threshold put that at .5 this will make sure your bones don’t have more than one vertex attached to the bone I think. it is still a good Idea to use. now choose the location of export make sure to click the mesh then click export <name of model> mesh. once that is done it is time to make a qc.
Making a QC
this is the part where you become a coder. now I hear you all groaning But Driscoll I don’t do coding well that is why I am here I didn’t know coding until I took a look at some of the other tutorials. if you need to look at this part in more deapth check out Pte. Jack’s guide for this type of thing here
but this is a simple code that will allow you to convert this to sfm.
here is my qc for Ink Chara
$Cd “C:userswhitedesktop”
$modelname “Ink CharaInk Chara.mld”
$body “Ink Chara” “Ink Chara.dmx”
$mostly opaque
$cdmaterials “modelsInk Chara”
$sequence “idle” “Ink Chara.dmx”
$bodygroup “scarf”
{
studio “scarf.dmx”
blank
}
What do they do?
$cd= the location of you DMX file.
$modelname=where the compiled model will go
$body=what is the main part of the model
$mostly opaque= lets SFM know that some materials have transparent parts
$sequence “idle”= gives the model it’s rest position.
$bodygroup= “a part of the model that can be turned on and off
(ex: tf2 scouts hat).
to allow the body group to be active type studio and put it on top.
if you want the model to start without it type blank on top instead of studio.”
Skin code:
to make the skin code you have to put this under you cd materials command
$cdmaterials””
$texturegroup “skinfamilies”
{
{ “<name of file1>.vmt }
{ “<name of file2”.vmt }
}
you can also use this to make many materials change just have the starting ones in the same line and the ones to change in the second line.
bug: if the textures don’t change make sure you
A: put a space between the curly braces and quotations
B: you have the second $cdmaterials with quotations after it for some reason SFM thinks it should be in a different folder,but if you put just quotes it thinks the other one is for both locations
C: you don’t have the material.
Converting to sfm
Now that you have a QC it is time to convert it to Source Filmmaker. Open Crowbar and go to compile now follow this video to do the rest. A thing about Crowbar is it makes a folder for your model when you compile it and it even has the name you did in your QC file.
check you model to make sure all textures are in if you see this.

go to console and check for any code that is like models/<name>/<texturename>.vtf is missing
this means check to see if you vtf is still the correct name.
*there is one problem with sfm if you have textures in the models folder and compile sfm your error will think that the computers entire location for that is the material folder for it so you would have to make the folders all the way to the models folder from the materials like this for me /materials/users/white/my folder/steam/Steam/steamapps/common/sourcefilmmaker/game/usermod/models
Yes you have to do all of that the first four are the location I put steam the rest is steam’s folder materials is the materials folder in usermod
Additional things.
combining model parts
cats blender plugin has many unique features. one for instance is the ability to join armatures/models to do this get the models you want, then fix both of them, then go to the custom model creation menu under the CATS tab and check merge bones and if it is just a part of another model apply transforms.
but hey you did it you got an mmd model to sfm this could also work with gmod models you just ported to sfm decompile the model put it in blender edit it and follow the guide again though jack has a whole video on it watch it for youself.
it is really helpful.
Other formats to sfm
MMD, XNALara, Mixamo, Source Engine, Unreal Engine, DAZ/Poser, Blender Rigify, Sims 2, Motion Builder, 3DS Max and potentially more you will have to rename bones for models that don’t have the right naming. (EX: bone name is numbers)
Model problems
P: BodyGroup is away from the model instead of where it should be.
A: click the mesh and press ctrl-A then hit location when you see the check boxes check the ones for rotation and scale too.
P: my model looks like this:

A: simple move the bone to it’s correct location in the photo the neck is in the chest not the neck area.
P: Slider is not working.
A: look in you body groups and see if the sliders are labeled the same, if so then delete them(besides the basis key).
Check the model?
If you don’t want to wait for sfm to start up you can use the Half-life model viewer. simply click Launch SDK and then click model viewer, once there you should be greeted by this-

Don’t freak out this is very simple stuff just go to file and click load model.

Next find the location of where your model would be and click the mld file if you got it correct you should see your model.

now we click the model tab and behold!

this still is simple bear with me here. now click on the arrow for submodel and find the body group you want to test if it works correctly you got it correct congrats!
Editing a Model- Editing Existing model.
editing models
now that you know how to combine models you can make you own model to lets say put a different hair piece on the character you will want to separate the models by material and in one delete the hair the other delete all but the hair and fix them. now move the hair by clicking it’s mesh and moving it to the spot you want it to be in.(don’t worry the model’s will merge bones when you combine). now lets say you think you want the model a different color for the shirt. well you in luck blender does that as well go to the materials and find the mmd material info menu this will show the material and it’s location click the file icon and choose the image you want it will even work with images you made though some models will bend and warp the image to wrap around them.
My Models has parts that are purple.
if your model has pieces that are a purple ish color you have some toons textures and sfm doesn’t like those go to the texture’s tab/the one in the picture and find the texture named toon. uncheck the texture and you model is as good as new.

For this next image Ignore all the yellow boxes.
My model won’t allow me to change texture/there is no texture for it.
well if there is no texture and it is a color just make a new image of just that color.
if it won’t allow you to change textures go to the place where we changed the toon and find the textures click on each of them and press the X then click new, then press open and find you image this will also allow only that material to change
end product:
You can get something good like this

Editing a Model-Textures
Say you wanted to change this picture

to make the character(in my case papyrus) look like this

I have already finished model’s bodygroups and now I should work on the textures. just open up the image editing app, whichever one you have, and look at this

Now after all that we get this.

Now simple change the material of the model in blender and boom you did it.
That should work. You won’t get it first try but it will work eventually it is more of a trial and error thing I suggest leaving one mark on a spot and finding it on a model. that is where that mark will be.
Editing A Model – making a new type of model from existing parts.
Ok here is the tricky stuff be prepared here is a model I want to make it is done right now.

here is what I was making.

You are probably wondering how I made the mask. Well I made it by doing a few things with the model a few we will get to later.
first find the part you want you may have to select the vertecies. simple just right click one and hold Shift or is you can press B and drag so the item you want is entirely in the box let go of the B and you should have something like this.

Now press shift-D and drag it to where you want it and you should have two of the same part. Or in my case Three.

Editing A Model- Merging two Armatures
Ok here is the two models I have.

what I want is to give Chara the scarf to wear AND be a bodygroup that can be turned off, but they aren’t connected plus I can’t just join them the normal way otherwise the bones won’t appear. what you need to do is first fix them then do what the picture says. Choices May vary.

Once done with that click combine armatures and Ta Da! now all bones have been merged and added ones that aren’t you now should see the skeleton of the scarf and chara’s bones highlighted instead of one or the other.
And boom you have merge the armatures and made a new model all at once.
Before you go- Tips and Rules of adding onto Workshop.
Alot of SFM artists like MMD models because of the sliders. if you put it on the workshop FIRST AND MOST IMPORTANTLY. IF THE RULES SAY ASK TO EDIT ASK THEM IF YOU CAN PORT TO SFM. Also If you can A credit B post their rules for it AND C! make sure the model works before you stick it on there. Add screenshots and artwork you made for the models pictures when you create them the better an image the more attractive it may be and more people will come.
Credits
Vtf Vmt Interface: The_Gl!tch.exe
original guide:Pte. Jack
Image of files: bloatgoatasriel