Overview
Simply as it says this guide will show you how to change the colour of medic’s uber charge. Make sure to read the odd notes at the top as this guide isn’t entirly accurate in the sense of this guide showing a different approch as appose to doing it professionally. There are pictures too, if my instructions aren’t all that clear you can always click on the images just think about what my instructions say and follow them on the pictures. If you still can’t make sense of my instruction then I have no idea how I can help you any further.
Overview
Before we begin bare in mind this guide is how to change the colour of the uber charge don’t ask me how to apply the uber charge to a model as I don’t know at this point, this guide is for models that already have it applied.
Also bare in mind that some models might not be possible to fully cover in the sense that some parts for say the medic’s backpack may not be able to be affected.
Also this trick will brighten the uber effect with the plain texture we’re going to use.
With that all being said let’s crack on.
First off you’ll need this from the workshop:
[link]
Or make a blank white texture(If you know how to make one. I will not cover how to do that in this guide) in the SFM material files, somewhere you know where to find it.
Step1:
Choose your class, I mostly go for HWM models. Next you either have your blank texture file path ready to copy the file path
(When copying the file path don’t do the whole thing just highlight after where it says material example: modelsdasmatzegreenscreenpanelswhitescreen)
otherwise spawn the Greenscreen model in SFM, the mod filter should be “workshop” type “screen” or “Green screen” it don’t matter what size you pic just pic one. With both models spawned one by one right-click and click the “Add overrride materials”.

Step2:
Change the skin of your chosen class to either skin 2 or skin 3 it don’t matter.
Right-click your class model in the “animation set editor” go to “show in element viewer” and click on “model”
In the element viewer it should have “materials” at the bottom click the + next to it.

Step3:
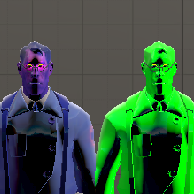
In the materials list all the names you see are the materials for the different segments of the models. In my case I chose the blue uber charge, so I’m looking for any that have: “_blue_invun” on the end, If you chose red it will obviously have “_red_invun” on the end. ignore the ones that say: “invulnfx_blue” or “invulnfx_red” they don’t appear to do anything for me. Click on the + next to them, one by one right-click on the name, go to “Add attribute” and click on “string” when the little window comes up type: $basetexture and click okay. It should result in a part of the model having the checker patten. Once you done the same thing to all the materials go back to the “animation set editor”.

Step4:
This time right-click the screen model in the “animation set editor” go to “show in element viewer” and click on “model”

In the element viewer go to “materials” click the + next to it. I highly recommend going into the material named “whitescreen” click the + then to the right of mtlname there should be a file path and Copy it.

Go back to the “Animation set editor” right-click medic go to his element viewer, back to the materials, open up the materterial names from earlier and paste the file path into the basetexture’s data and there you go it should have gone white.

Step5:
One by one right-click on the material names, go to “Add attribute” and click on “color” and in the little window type “$color” then ok. The model should have blackened with the uber still flashing but from the color you can now alter it to any colour you want.


I hope this guide was clear enough. Any questions about this guide write in the comment section and I’ll try my best to answer, don’t expect me to have an answer to every odd issue you may encounter.