Overview
Max Payne 1 Fix Pack, v1.2021.1The purpose of this Fix Pack is to try and and correct the many known issues with this game in a single install. Compiled by Darkje, 06-April-2021This pack contains a number of fixes for the game that can be installed selectively.•High resolution textures and executable with fix for addressing 4GB of memory, needed by high res textures. v1.3 by Gaiver74, https://www.moddb.com/games/max-payne/addons/max-payne-remastered•Startup fix v1.01 by UCyborg, https://community.pcgamingwiki.com/files/file/838-max-payne-series-startup-hang-patch/•Dx8to9 v1.11.0.0 wrapper by Crosire, https://github.com/crosire/d3d8to9/releases•dgVoodoo v2.73 by Dege, http://dege.freeweb.hu/dgVoodoo2/dgVoodoo2/•Directsound3d v0.20 by J.P. Ownby, https://www.indirectsound.com/•Ultimate Soundpatch v1.12 by me, Darkje, https://steamcommunity.com/sharedfiles/filedetails/?id=945164243•Widescreenfix v16-05-2020 by ThirteenAG, https://thirteenag.github.io/wfp#maxpayne•AMD Ryzen3 fix by luigoalma, https://steamcommunity.com/app/12140/discussions/0/1640919737479023003•DXwebsetup by Microsoft, https://www.microsoft.com/en-us/download/details.aspx?id=35•VCredist2010 by Microsoft, https://www.microsoft.com/en-us/download/details.aspx?id=5555Credits to everyone that made this fix possible for their effords to keep Max Payne alive.Some fixes might depend on an other fix being installed or might exclude eachother. This installer is organized in a way that makes this visible and will take care of these dependencies/exclusions.
Introduction
Warning: This installer is in unofficial, if you find a problem please report! If you mess up your game, don’t blame me 😉 just start over fresh and follow the instructions carefully.
I made a complete installer for all the previous fixes and included the option of installing the high-res textures. All fixes have been updated to latest version as of 06-April-2021
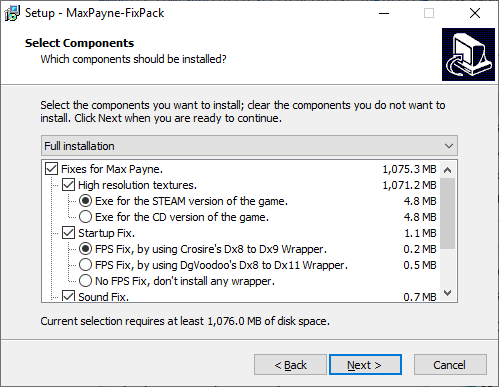
The installer will let you pick from the following patches:
- [1] High Resolution textures.
- [1a] With either a fixed executable for the STEAM game.
- [1b] Or a fixed executable for the CD game.
- [2] Startup Fix.
- [2a] With Crosire’s Directx8to9 Wrapper to fix FPS (Windows 10).
- [2b] With Dege’s dgVoodoo Dx8 to Dx11 Wrapper to fix FPS (Windows 10).
- [2c] With no wrapper at all (Windows 7).
- [3] Sound Fix.
- [3a] Either by using IndirectSound wrapper.
- [3b] Or by using Ultimate Soundpatch to convert the audio.
- [4] WideScreen Fix.
- [5] AMD Ryzen3 Fix.
- [6] support files
- [6a] DirectX setup files (installs directx 9 and previous on newer systems).
- [6b] VCredist 2010. (installs Visual C++ support files)
Download and install
Download from google drive: MP1-Fixpack v1.2021.1 (576.7 MB)[drive.google.com]
Download from mega.co.nz: MP1-Fixpack v1.2021.1 (576.7 MB)[darkje.page.link]
Install:
Install is best done on a clean version of the game. In that case uninstall will fully restore the game back to clean. On windows 7 you probably don’t need the FPS fix.
If you have already modified your game, it is advised to make a copy of your game directory – just in case something gets overwritten or removed.
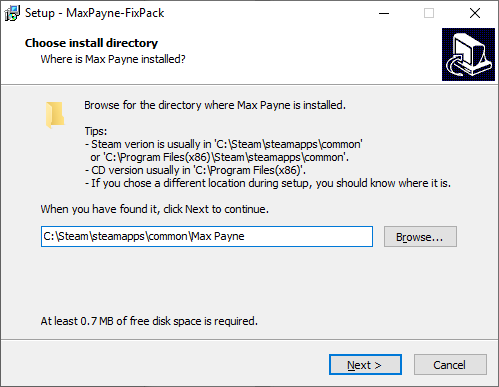
For steam game you should be installing in ‘SteamsteamappscommonMax Payne‘
If you use the cd version the above goes too, but then the right directory usually is ‘Program files(x86)Max Payne‘.
The Important note below was fixed in the 2021 version, you can now select the target directory yourself, no more installing it too deep, or not working if you had an alternative directory name, just select the folder you want it to go. I’ll leave the note for the old version for now just in case you were using that one:
IMPORTANT NOTE for the OLDER 2020.1 and 2020.2 versions
A common mistake is that the fix gets installed in the wrong directory.
For steam game you should be installing in ‘Steamsteamappscommon‘ the target ‘Max Payne‘ will be added automatically and will be shown in the Browse input field. If you select the actual Max Payne directory itself, fix files will land one directory too deep, for example:
-> ‘SteamsteamappscommonMax PayneMax Payne‘ – and things don’t work then.
If you use the cd version the above goes too, but then the right directory usually is ‘Program files(x86)’.
In any case take care you don’t get that double ‘…Max PayneMax Payne’ as the install location, then you should be fine.
Some pictures of the installer v1.2021.1
-e-
-e-
-e-
Trying other options:
Uninstall first, then run installer again with the options of your choice. Uninstaller should appear in your startmenu in MaxPayne-FixPack and in settings/add remove apps section.
What are all these options for?
All the options are for… ha right, giving you options on what to install or not while still keeping all possible fixes in a single download. Usually it’s best to first try everything with the default selection of fixes, this is the most common setting that works for most systems. In case it doesn’t perform as expected, you can uninstall the fix and then reinstall it with a different selection of options.
I’ll go over them one by one:
Option 1 will add textures made by ESRGAN (AI based up-scaling) combined with some hand-made textures.
* Few thousand (~95%) of game textures have been replaced;
* New textures have increased resolution from 2x to 8x;
* Includes the replacement of decals / blood / clothing and part of the interface textures.
To use this option you will need a dedicated GPU preferably with 2gb or more of graphics memory and a modified executable that will allow the game to use up to 4gb of system memory. Of Course these executables are included, you just have to select the proper one for the game you own. Default is textures selected, steam executable selected, if you want the textures on the cd version of the game, be sure to select the right file for that. If you don’t want the textures, just untick the box. Be aware the enhanced textures can lead to longer loading times. Don’t be alarmed if you are met by a loading-screen taking longer than expected, just give it a minute and it will load.
Option 2 will apply the startup fix, this fix is for fast machines, if the machine was much faster than expected in game release year (2001) it would sometimes not initialize right and not start at all. Added bonus is that by using the fix it’s also possible to use a directX wrapper, this will convert all aged directX 8 calls to a newer version and obey the windows vsync settings. Windows10 completely ignores vsync settings for directx8, this would result in the game running too fast and some of the game’s events would trigger wrong or not at all. The wrappers will take care of that by limiting fps to whatever was set in your graphics card control panel, usually 60fps. (if you don’t want the wrappers or the startup fix, you can limit fps in any other way you like, for example by using nvidiaInspector or msi-afterburner + rtss). Default is startupfix+dx8to9 wrapper, this is the most simple one, nothing needs to be configured. The dx8to11 wrapper can be useful in the scenario where you need to be able to select the graphicscard you want the game to use, or need other options. It comes with a control panel that can be found in your game directory, see the special chapter below.
Option 3 will let you pick 1 of the 2 possible soundfixes. The first (and default selected) one converts the game’s sound calls while playing without modifying the actual sound files, the second one does modify the soundfiles before you play to a format that plays right without the need of a wrapper. My advice, try the 1st option, if that doesn’t work for you maybe the second one will. Some machines don’t seem to like the 1st one, in that case just switch.
Option 4, when the game was released 4:3 screens were the normal screen used, nowadays everyone is using wider screens, this fix will allow the game to scale for that, without stretching max to a fat blob.
Option 5, in 2019 a small problem surfaced on AMD Ryzen3 cpu’s the makers of the game could never have anticipated back in 2001, a check for certain cpu capability returned a number that was too high and could not be interpreted as a valid result, some code failed and then followed a lot of errors ending in a crash. By circumventing this check the game now will work again on those new cpu’s. Older cpu’s don’t seem to mind this check is missing now, so it’s selected by default. Maybe you need to deselect it if you’re trying to run on 2001 hardware, but on anything less than 10 years old it should be fine.
The following support files are included to prevent some errors that users experienced sometimes when running the game (directx8 required error and msvcrt100.dll missing)
Option 6a, The install of this file insures all proper directX files are on the system, preventing possible faulty conditions. If already available it will be skipped automatically.
Option 6b, The install of this file insures all proper Visual C++ files are on the system, preventing possible faulty conditions. If already available it will be skipped automatically.
Version History
v1.2021.1 target directory is no longer fixed to “Max Payne” and can be chosen yourself, updated directX wrappers and widesceen files to latest as per 6-4-2021
v1.2020.2 fixed a small bug: the file-size of the AMD fix was not shown. Added DirectX and VCredist support files. 06-january-2020
v1.2020.1 added AMD Ryzen Fix and updated all the fixes to latest versions as per 29-december-2019
v1.01 added dgVoodoo dx8 to dx11 wrapper, 29-january-2019
v1.0 Initial release, 23-january-2019
Remarks
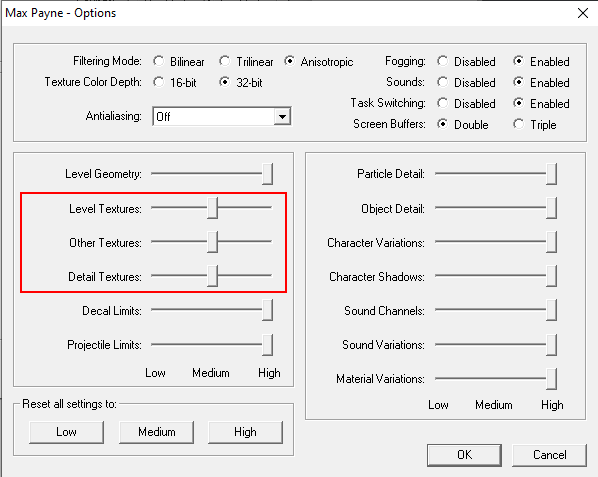
The installer will set the following settings to medium automatically, so don’t be alarmed if you set them to high before. They should be at medium setting when using the Highres Textures, otherwise the game might run out of memory at some point. It was found that with a dedicated GPU and more than 2gb of graphics memory, you can usually set the sliders to maximum, but if you do run out of memory just remember to set them back to medium and try again.
-e-
About DgVoodoo’s DX11 wrapper
You can use the “dgVoodooCpl.exe” found in your game directory to set up various options, for example what graphics card you want to use. Sometimes it’s needed to select the actual card there instead of the default option. As for the other options, play with them as you please.
dgVoodoo2 watermark.
Just a heads up to anyone who applies the dx11 wrapper: it slaps a “dgVoodoo2” watermark in the corner of everything. But don’t panic! Go into your “Max Payne” folder and a file called “dgVoodooCpl.exe” is there now. Open that up, click on the “DirectX” tab, and un-tick the “dgVoodoo Watermark” box. Hit “Apply” and you still have the fixes without having to look at that watermark!
*) in 1.2020.2 i’ve disabled the watermark by default, if you would want it follow the instruction above in reverse.
When using high resolutions like 4K, you may get the error:
“There is insufficient video memory to start with the selected display settings. Please set a lower resolution from startup dialog”
Then you have to open the dgVoodoo control panel, go to the “DirectX” tab, and increase VRAM to 1024MB (found by Lethal Placebo)
An other option is to use Cosire’s dx8to9 wrapper, that one won’t error it seems.
*) in 1.2020.2 i’ve set 1024MB as a default.
Ryzen JPEG errors
Ryzen CPU’s can have a small issue, when you start the game a lot of JPEG errors come up and when you click them away the game crashes. This is due to an unforseen result in the check of the CPU’s capabilties, and then the game assumes the CPU doesn’t have the requested capablity, while in fact it does have it.
luigoalma came up with this find and was able to find a fix for it! You can read all details about it at: -e-
The actual fix concists of a small 3 byte change to one of the game dll’s, rlmfc.dll. You can implement this yourself with a hex editor or download a dll I changed for you here:
-e-
This dll is supposed to go in your game directory, replacing the one already there and fixes those JPEG errors.
All creds for this fix are to be directed at luigoalma, “Provided to help allow your entertainment again, have fun!”
*) This is already included in the Fixpack, but i will leave the separate download here for people that need/want it this way.
Uninstalling
Normally you can uninstall the fix either from the start menu/Max Payne FixPack/Uninstall Max Payne FixPack or from add/remove programs in the windows/settings/apps section.
If this doesn’t work for some reason you can remove it from the registry by manually removing the key “HKEY_LOCAL_MACHINESOFTWAREWOW6432NodeMicrosoftWindowsCurrentVersionUninstall{98913A55-F0D5-4EB9-979E-76273089BD6F}_is1” or by downloading a reg file I prepared that does this for you here: -e-
The above is also useful if the installer won’t let you pick a location to install,
Getting the best possible Image Quality from the game.
To get the best image quality from the game, follow the steps below:
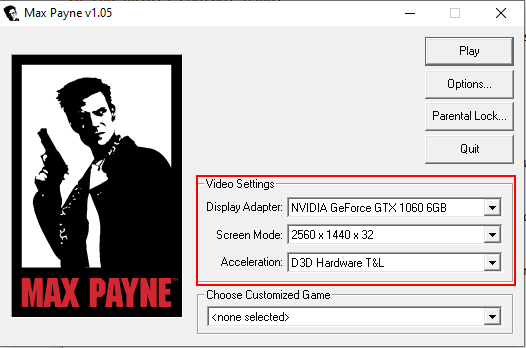
In the game Launcher
1) Set up your ‘Display Adapter’ and ‘Screen Mode’ with ‘D3D Hardware T&L’ Acceleration.
-e-
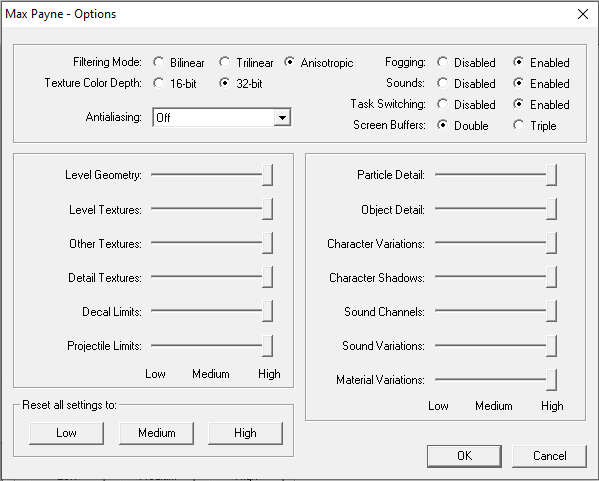
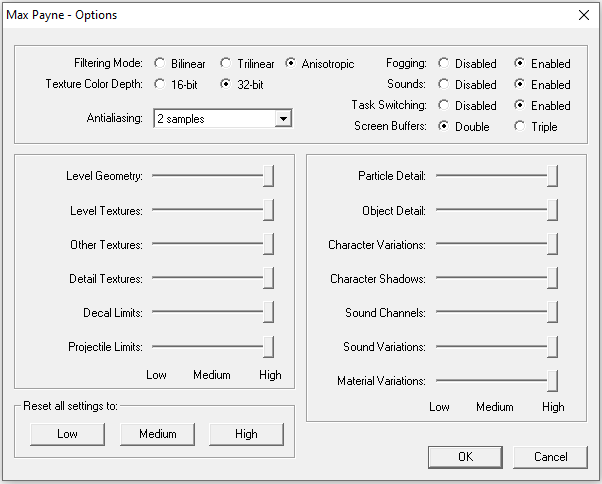
2) In the Launcher hit the ‘Options…’ button and set ‘Filtering Mode’ to ‘Anisotropic’, ‘Texture Color Depth’ to ’32bit’, ‘Fogging’, ‘Sounds’ and ‘Task Switching’ to ‘Enabled’, ‘Screen Buffers’ to ‘Double’, ‘Anti Aliasing’ to ‘Off’(*) and all sliders to ‘High’(**). Press the ‘OK’ button to confirm.
(*) if you want anti aliasing look at the AA section
(**) When using the enhanced textures, start with the three texture sliders on medium. You can crank them up later if you have more than 2GB of graphics memory.
-e-
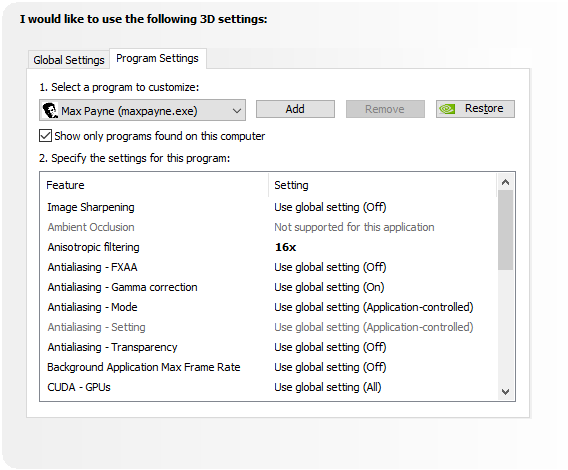
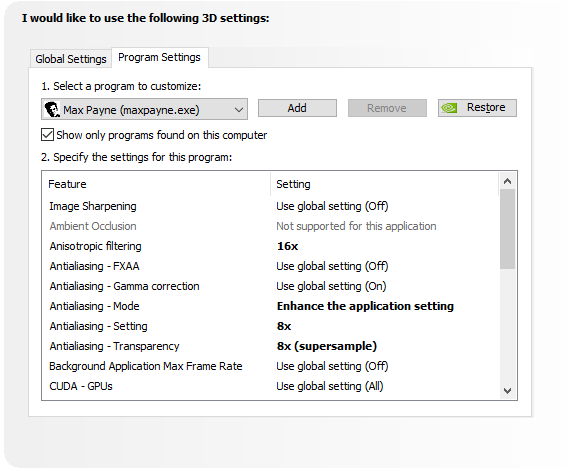
In the nvidia control panel
1) Launch your video card settings program: Nvidia Control Panel.
2) Head to Manage 3D settings, then go to Program Settings, find or add MaxPayne.exe there.
3) Then you’ll see the settings for this application.
Apply following settings:
Anisotropic Filtering: 16x
-e-
Texture Filtering Quality: High Quality.
-e-
4) Press Apply to confirm the settings
Now you are ready to launch the game, so press the Play button in the launcher.
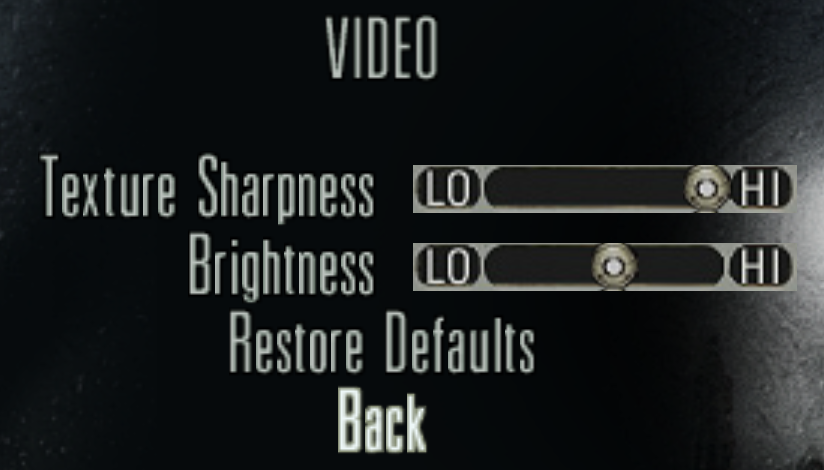
In game settings
1) Once you get to the game menu, hit options and then video
2) Set Texture Sharpness to maximum
3) Set Brightness to your liking, the best setting depends on your preference and screen, I like it two notches up from default.
-e-
4) Press back and back again to return to the main menu and play.
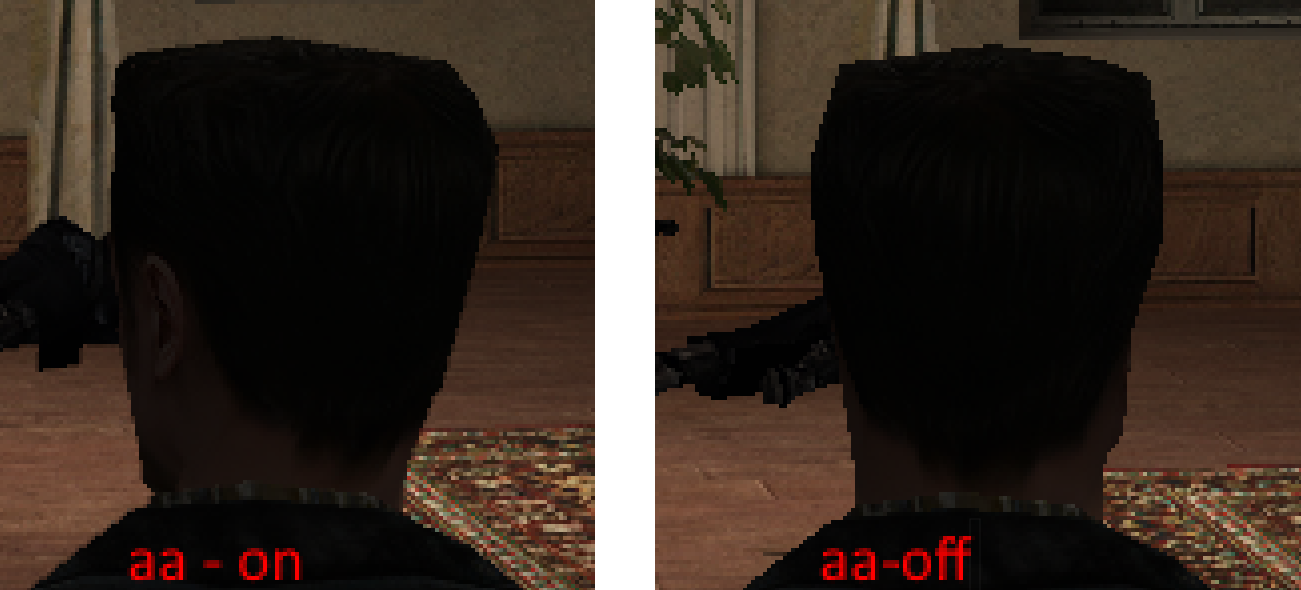
The game’s anti aliasing works bad when set from the game launcher options, sometimes it does nothing at all or sometimes white lines appear on edges or dark places, but there is a solution, by using Nvidia Profile Inspector (NPI) -e-
1) Make sure you applied all the settings from the previous chapter
In the game Launcher
2) Open game’s launcher, then head to Options… and set Anti Aliasing to 2x.
-e-
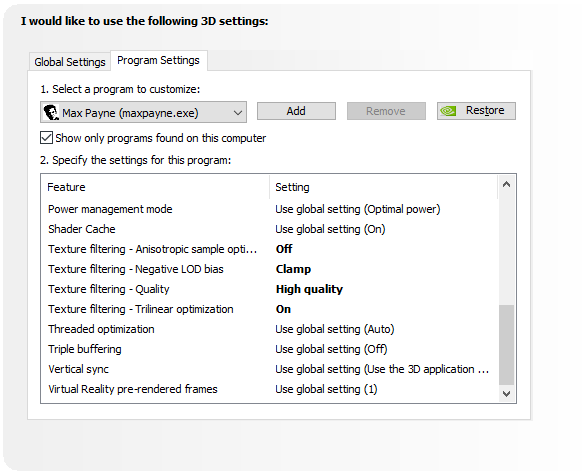
In the nvidia control panel
3) Launch your video card settings program: Nvidia Control Panel.
4) Head to Manage 3D settings, then go to Program Settings and find or add MaxPayne.exe there.
5) Then you’ll see the settings for this application.
6) Apply following settings:
Antialiasing – Mode: Enhance the application setting
Antialiasing – Settings: set anything you want, because it will be edited using NPI
Antialiasing – Transparency: Maximum that your PC can handle.
-e-
7) Press Apply to confirm the settings
After this you will probably still have the white lines, but by setting a custom anti aliasing mode it can be fixed.
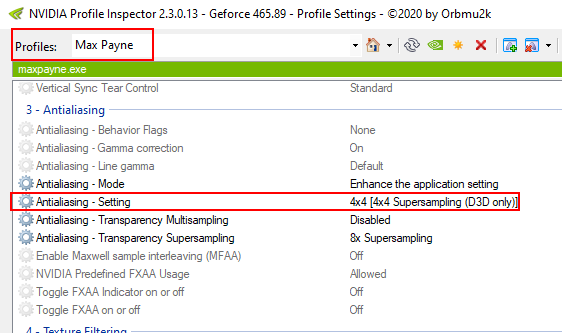
In the nvidia profile inspector
8) Now open Nvidia Profile Inspector
9) From the Profiles box at the top, select Max Payne
10) Then you’ll see the settings for this application.
in section 3 – anti aliasing, find anti aliasing – setting and from the dropdown box next to it and select 4×4[4×4 Supersampling (D3D only)]
-e-
11) press the apply button on the right top and exit the program.
Launch the game and play 🙂
Afterwards
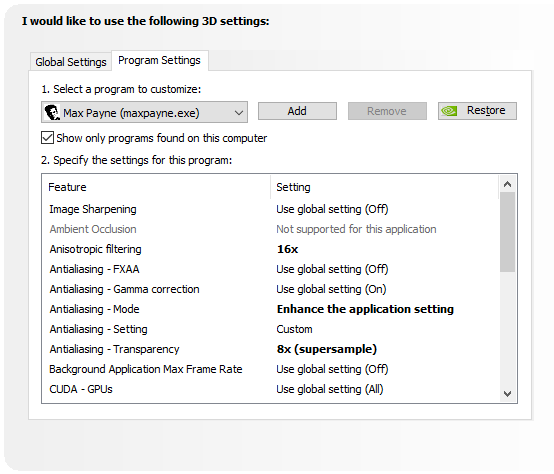
if you go back in the nvidia control panel after npi, you will see custom aa.
-e-
This picture shows the aa in action, look at the top of max’s head.
-e-