Overview
In this guide, I will show you how to make a Starbound server so you and your family and/or friend could play together.
Introduction
Hello, my name is Captain Truculent Pizza or known as krisnarocks (my youtube name). Today, I am going to show you how you could play Starbound with your family/or friend with the build-in Starbound server application. I will be using windows 7. If I found a way to make the server work on mac and linux, I will update this guide or make a new one.
I will update this guide when I got home. I still have to add some more images and make some steps clearer. I will also add a port forwarding section soon. I hope you like my first guide. If you have a question, please do not hesitate yo ask.
Sincerely,
Captain Truculent Pizza
- March 22, 2014
Updating the guide. Added Linux tutorial, Port Forwarding Basics, and Mac OSX tutorial.
- March 16, 2014
Created this guide. Including the windows tutorial.
Windows
In this section I will make the starbound server in windows 7 32bit.
1. Navigate to C:Program FilesSteamSteamAppscommonStarbound
or where ever you install starbound
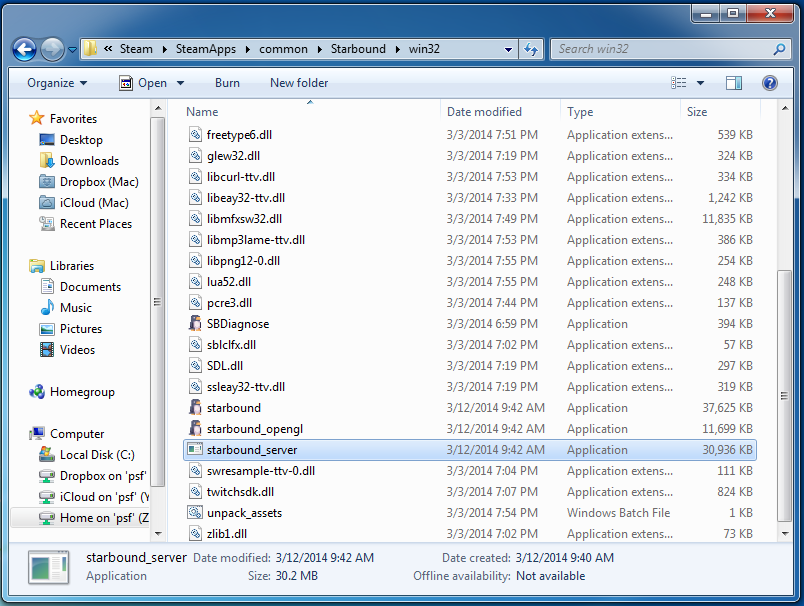
2. Go to the win32 folder
3. Launch the starbound_server.exe (Don’t worry, a new CMD window will open)

4. Wait untill the new CMD window stop outputing message
5. Do a port forwarding. If you do not know how, you could skip this or google “how to port forward [Router Name]”
Note: Change [Router Name] to your router brand name. Google it w/ quotes
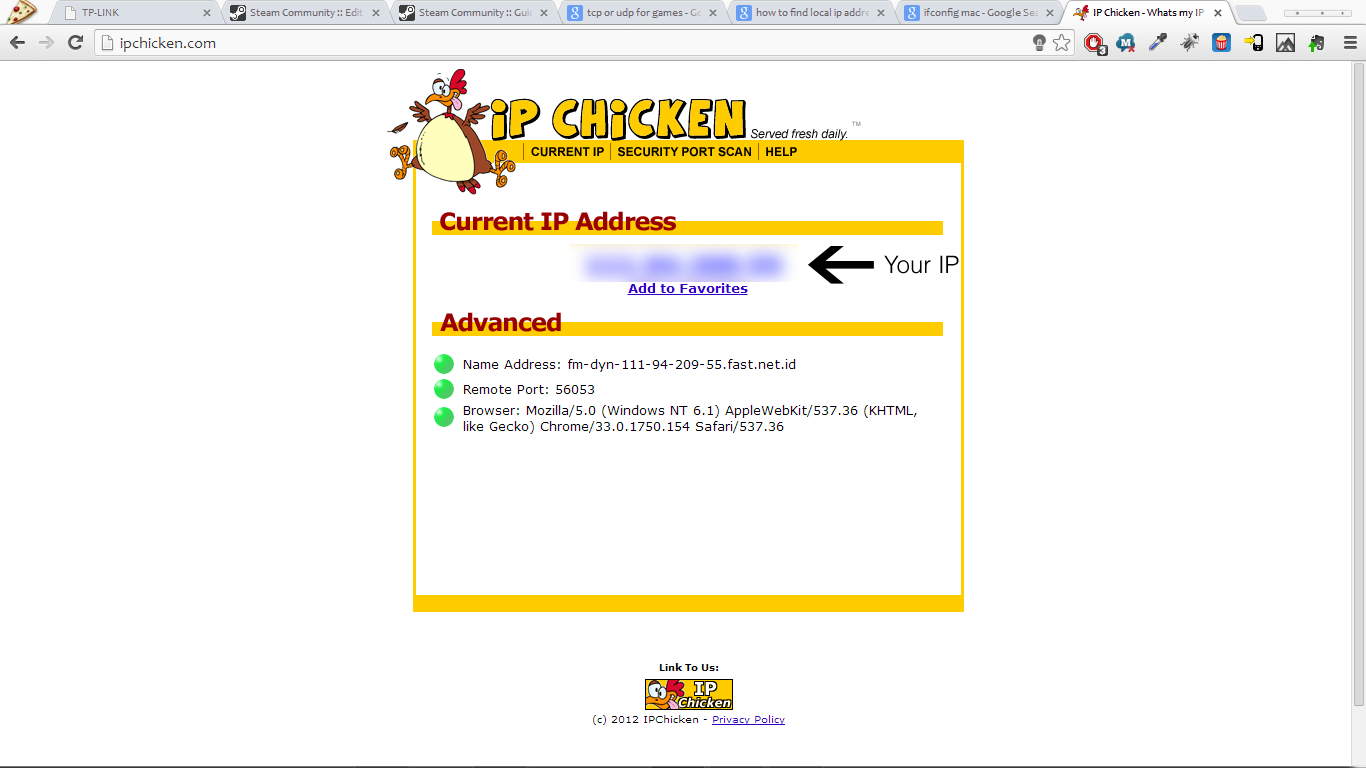
6. Go to [link] and copy your IP. The one under Current IP address and above Advance. The format looks something like thi, xxx.xx.xxx.xx
7. Share that IP to your family and friend. Enjoy playing Starbound with your friend!
Ps: The port that Starbound use is port 21025. You want to make sure that that port is available. This is the port to forward.
Linux
In this section I will make the server with linux. I am using Ubuntu 12.04 32bit. We will be using SteamCMD. To find more information, go here: [link]
1. Open up Terminal. Now, you want to navigate to your home directory.
You could change Steam after the mkdir to anyname you want. I will be using Steam.
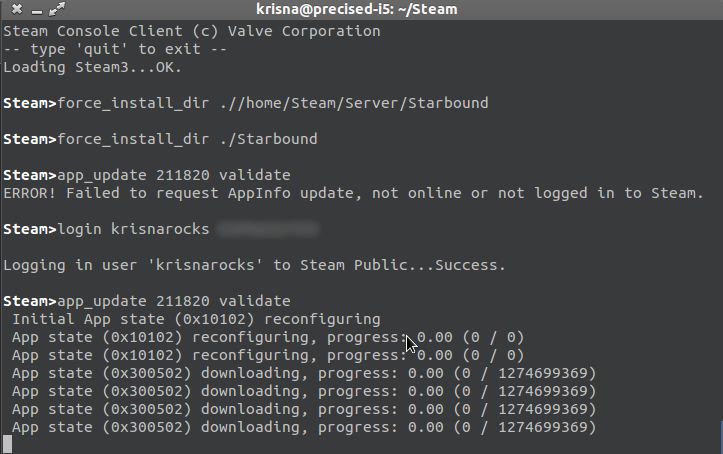
2. Download the SteamCMD package.
Should look something like this:

3. Remove or keep the tar.gz file. I recommend you to remove it to save space. If you decide not to remove it, you could skip the first line of command.

4. When the download is complete, login to your steam account.
Note: The password is not hidden. Make sure no body is watching you.

This act like normal steam. If you are logged in from another computer, the other computer will be logged out from steam. If you haven’t logged in to steam from your Ubuntu and you have steam guard enabled, you will need to enter it. Just follow the instruction.
5. Now, install starbound.

It will make a new directory under /home/Steam/starbound (if you follow along with me)
This will download and update starbound. This step will take some time depending with your internet speed. So, go grab a cup of coffee first then come back. (Start the download at 14:09 and finished at 15:35)

6. Quit SteamCMD
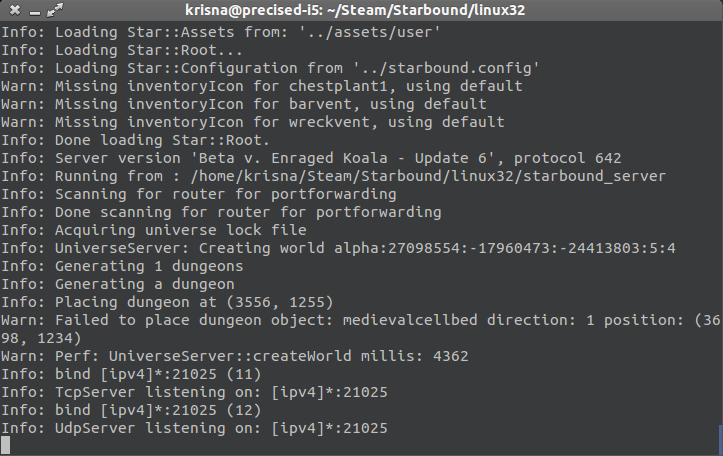
then launch the starbound server.
Depending on your Linux architecture, you must navigate to the correct folder.
64bit:
or
32bit:
then
ctrl+z to clode this window
or
The server will do the first run setup. Wait untill it give no more output.
6. Do a port forwarding. If you do not know how, you could skip this or google “how to port forward [Router Name]”
Note: Change [Router Name] to your router brand name. Google it w/ quotes
7. Go to [link] and copy your IP. The one under Current IP address and above Advance. The format looks something like thi, xxx.xx.xxx.xx
8. Share that IP to your family and friend. Enjoy playing Starbound with your friend!
Voilà! Your linux starbound server is completed! Continue reading so you will not miss any information.
- Enter the screen with this command:
- use CTRL+a then CTRL+d to exit screen without shutting down the server.
- To list all the screens, use this command:
- To shutdown the server, use this command:
If you are using screen mode:
If you are in the default terminal window: CTRL+c
- To update the server, do the following command
cd /home/Steam ./steamcmd.sh
then follow step 4 – 6.
- To view how many player is online, execute this command on another terminal window
netstat -nt | grep -c 21025
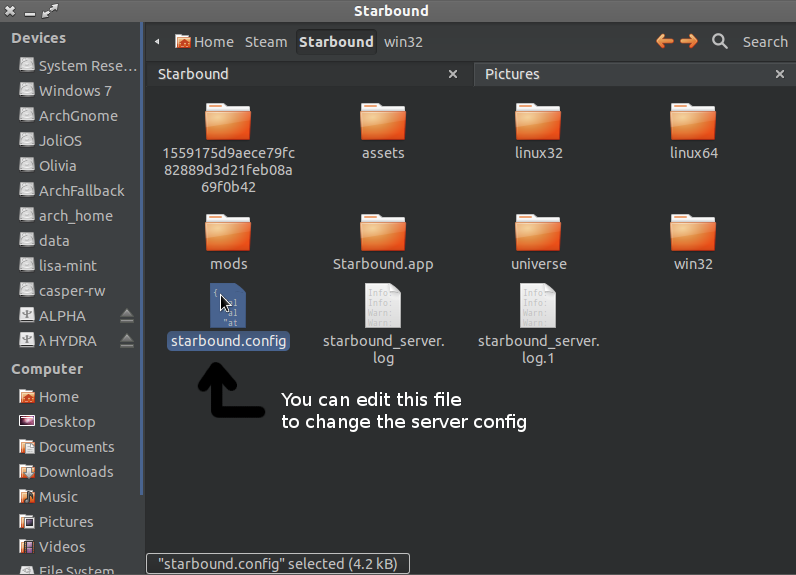
- To change your server config, edit the starbound.config. You can find this in /home/Steam/Starbound/linux[architect]/starbound.config
If you encounter an error, leave it in the comment box.
Mac OSX
In this section I will make the server on Mac OSX. I am using OSX Maverics 10.9.2. This will be an easy setup just like the one in windows. Lets go to the tutorial.
1. You want to go to your steam folder. ~/Library/Application Support/Steam/SteamApps/common/Starbound. You could use ⌘+Shift+g and type the location.


2. Right click on Starbound.app (the penguin icon) and click show package content.

3. Navigate through Contents > MacOS. Double click on starbound_server.

4. Wait untill the new terminal window stop outputing message
5. Do a port forwarding. If you do not know how, you could skip this or google “how to port forward [Router Name]”
Note: Change [Router Name] to your router brand name. Google it w/ quotes
6. Go to [link] and copy your IP. The one under Current IP address and above Advance. The format looks something like thi, xxx.xx.xxx.xx
7. Share that IP to your family and friend. Enjoy playing Starbound with your friend!
Port Forwarding Basics
I will be using windows 7 32bit. Every thing should be the same except for step 1. Read on if you want to port forward.
1. Open CMD/terminal and execute the following command
Windows
You should see you computer network information. Find the one that says IPv4. Copy the default gateway address.

Linux/Mac
Find the line that says “inet addr”. On mac its under en0. Find the default gateway address. Copy the IP until the first character of the last digits (192.168.1.101).
2. Paste the gateway address in your browser and press enter. Login when you are prompted. The default login information is usually (user:password) admin:admin, root:admin, admin:root. If it doesn’t work, and your admin or reset the router.

3. Locate the forwarding tab. Mine is located under the Advance tab.

4. Add a new entry. Enter this information:
Service Port: 21025
IP Address: Server’s IPv4 (Step 1)
Protocol: UDP (If you have the option that says “ALL”, use “ALL”)
Common Service Port: Leave empty

5. Go to [link] and copy your IP. The one under Current IP address and above Advance. The format looks something like thi, xxx.xx.xxx.xx
Click “Done”
Resource and Closing
Thanks for reading my guide until the end. I wish that you enjoy read this guide as much as I had fun making it. If you have any question or error, just post it in the comment section bellow. I will see you in the next guide.