Overview
The Indie Guide to Starbound 1.1 is a massive, print-friendly guide filled with 64 pages of fantastical tips to help new & experienced players navigate the galaxy. Covering character creation, the races, tips for getting started, planet side exploration, quests, boss fights, tools, crafting tables, navigating stars & planets, biomes, ore, armor, tech, pets, fishing, the Outpost & its shops, NPCs, villages, dungeons, fossils, ship upgrades & much more!This guide is designed by professional graphic designer, YouTuber & Twitch streamer, RedLace, who has nearly 700 hours in Starbound.
Introduction
As some of you may know, from watching my live streams, I am a Graphic Designer and Gamer. These two professions have come together in more ways than one and they always seem to find a way to rub off on one another. This Starbound Indie Guide is where my love of gaming, meets my love of graphic design and gets mashed together to create this helpful, unofficial guide, filled with all sorts of tips and tricks I have learned while playing, both solo and with you watching. I have played over 600 hours of Starbound and is easily one of my favorite games of all time, I hope you enjoy it as much as I do. That being said, I’d like to dedicate this guide to my super fantastical viewers as my way of saying thanks! See you at the next live stream! Enjoy! – RedLace

This guide has recently received a MAJOR overhaul since the release of Starbound 1.0 and then 1.1. The guide now includes twice as much content and the original early access content has been reworked and brought up to date with the newest version of the game.
To read the full guide, visit [link]
Character Creation
You will need to create your character and choosing your new character involves making a number of decisions. You will need to decide if you want to be male or female, what race you’d like to play as, your features, your outfit, your stance, and pick a name for yourself. Or let the dice decide!
There is currently no way to change your physical appearance or adjust your race at a later time, so be sure to choose wisely.
You have three choices for game difficulty which is decided when creating your new character.
Casual: Lose 30% of Pixels on death. Respawn on your ship.
Survival: Lose 30% of Pixels and drop items in your inventory on death. Respawn on your ship. You can retrieve your items from where you died. Does not drop weapons, armor, torches, or flashlight.
Hardcore: Death is permanent. You will no longer be able to play this character, does not respawn.
To read the full guide, visit [link]
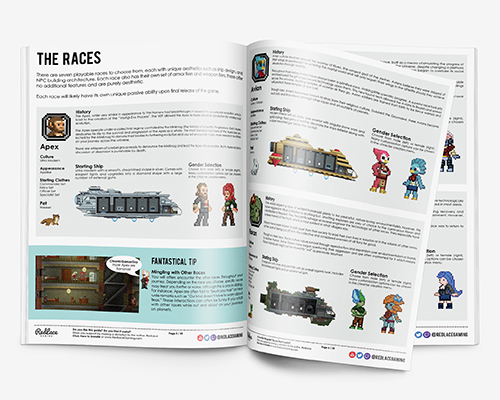
The Races
There are seven playable races to choose from, each with unique aesthetics such as ship design, and NPC building architecture. Each race also has their own set of armor tiers and weapon tiers, these offer no additional features and are purely aesthetic.
Each race will likely have its own unique passive ability upon final release of the game.
To read the full guide, visit [link]
Getting Started
Congratulations on getting one of my favorite games! I have been playing Starbound for over two years now and have spent over 600 hours in-game. Fans of Terraria will find themselves in familiar territory when it comes to mining for ore to upgrade gear and exploring biomes. In Starbound though, you aren’t in one world, you have infinite worlds to explore in this vast universe with endless biomes, interesting villages to encounter, and randomly generated monsters to battle. And did I mention, you have a super fantastical space ship?
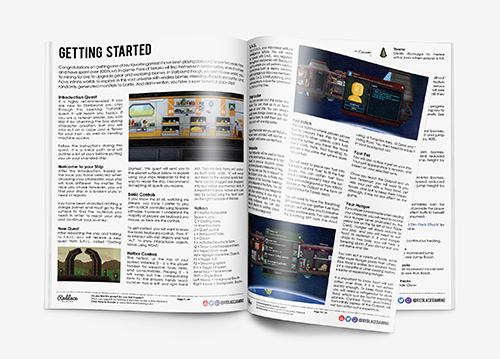
It is highly recommended if you are new to Starbound you play through this opening “tutorial” quest. It will teach you basics. If you are a veteran player, you can skip it by checking the box during character creation, but you will miss out on a cape and a flower for your hair – as well as vending machine access.
Follow the instructions during this quest. It is a linear path and will outline a bit of story before putting you on your stranded ship.
After rebooting the ship and talking to S.A.I.L, you will receive a new quest from S.A.I.L. called ‘Getting Started’. This quest will send you to the planet surface below to explore using your ships teleporter to find a way to repair the ship. I recommend accepting all quests you receive.
The Getting Started sections covers a wide variety of topics including;
- New Quests
- Basic Controls
- Hotbar Controls & Hotkeys
- S.A.I.L
- Ship Locker, Teleporter & Fuel Hatch
- Your Pet
- Player Hunger, Health & Energy
- Stat Boosts & Status Effects
- Buffs & Debuffs
- Cooking Basics, Recipes, & Crops
- Farm Animals
- Combat Basics
- Sidebar Menus (Inventory, Codex, Inspect, & Pixels)
To read the full guide, visit [link]
Quests
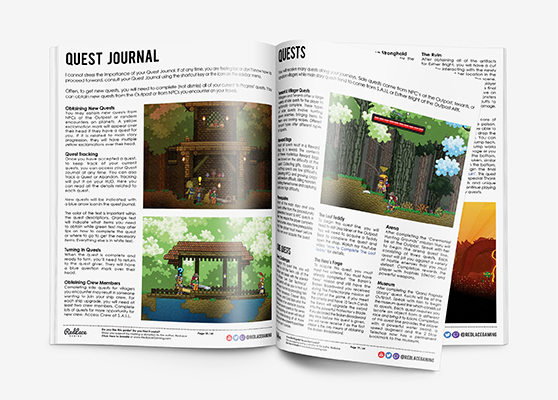
I cannot stress the importance of your Quest Journal. If at any time, you are feeling lost or don’t know how to proceed forward, consult your Quest Journal using the shortcut key or the icon on the sidebar menu.
Often, to get new quests, you will need to complete (not dismiss) all of your current ‘In Progress’ quests. You can obtain new quests from the Outpost or from NPCs you encounter on your travels.
You will receive many quests along your journeys. Side quests come from NPC’s at the Outpost, tenants, or random villagers while main story quests tend to come from S.A.I.L or Esther Bright at the Outpost ARK.
Tenant and Villager Quests
Villagers and Tenants offer a large variety of side quests for the player to optionally complete. These types of side quests involve hunting down enemies, bringing items to them and cooking recipes. Different tenant types offer different types of quests.
In the full guide I cover all side quests and main story quests.
To read the full guide, visit [link]
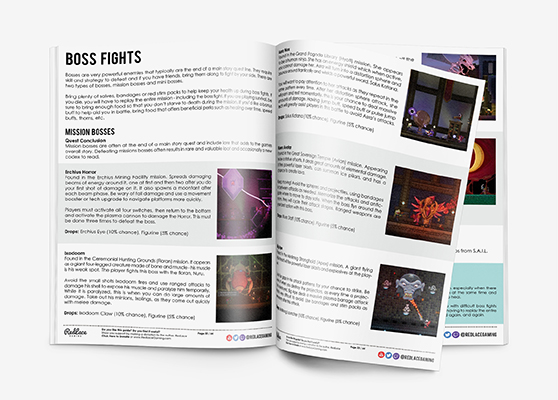
Bosses are very powerful enemies that typically are the end of a main story quest line. They require skill and strategy to defeat and if you have friends, bring them along to fight by your side. There are two types of bosses, mission bosses and mini bosses.
Bring plenty of salves, bandages or red stim packs to help keep your health up during boss fights. If you die, you will have to replay the entire mission – including the boss fight. If you are playing survival, be sure to bring enough food so that you don’t starve to death during the mission. If you’d like a bonus buff to help aid you in battle, bring food that offers beneficial perks such as healing over time, speed buffs, thorns, etc.
Tools
You will need the proper tools if you wish to traverse the galaxy and find the many wonders hidden on planets. Tools are basic items you will need that will help you along your way, unrelated to combat.
Not all tools are used for resource gathering, some provide other functions. For instance, lighting up a dark cave, freedom of movement, or climbing.

The Matter Manipulator manipulates anything that matters! All jokes aside, it is the first tool players receive from S.A.I.L. when they begin the game and permanently occupies a quick slot. Use ‘R’ to access it.
The Matter Manipulator can be upgraded a total of 12 times using Matter Manipulator Modules. You will use your Matter Manipulator more than any other tool in the game, guaranteed. It can be upgraded as you progress in the game to become more efficient, collect liquids, and mine larger areas. Additional, optional functions can also be unlocked as you progress including Wiring Mode and Paint Mode.
Upgrades on your Matter Manipulator’s Expansion Slot allow the player to utilize new tools that are now part of their Matter Manipulator such as Paint and Wire modes. These add fun new features to players in the game for building and construction of new wired up gadgets (think automated doors).
Once you upgrade your Matter Manipulator’s Expansion Slot to Upgrade 2, you can utilize Paint Mode. This mode allows you to paint blocks new colors and remove colors you previously painted.
Painting can be done in a small area or block by block (similar to block placement methods). Quick select this tool with the ‘Y’ key. The right mouse button toggles color, left mouse button applies color.
Once you upgrade your Matter Manipulator’s Expansion Slot to Upgrade 3 (max tier), you can utilize Wiring Mode. Wiring allows players to control the state of powered items, such as doors and lights, using wires. You can create basic circuits such as on/off states for lights or more advanced circuits using logic gates. Quick select this tool with the ‘T’ key.
To read the full guide, visit [link]
Going Planetside
Once you have familiarized yourself with your ship, the controls, and equipped yourself with some basic tools and weapons from your ship locker, you are ready to venture to the planet below. Simply interact with the teleporter to beam down. Be sure to have items ready in your quick slots for easy access because you will need them. The planet you are orbiting is not a friendly place and you will need to defend youself and make shelter. You may arrive during the day or night, so be prepared!

The planet you begin on is random however, the starting planet is always a threat level of ‘Mostly Harmless’. This means, enemies are relatively easy to defeat assuming you have equipped your weapon. It also tends to always be a lush, forest planet providing the player with plenty of the resources they will need to get started, such as wood, coal, and vines.
To build anything beyond the basics, you will need the Inventor’s Table to build the other crafting tables. Pull up your crafting menu (C) and select the Inventor’s Table. You will need 12 Timber and 4 Wooden Logs. Now you can craft a variety of useful crafting stations by interacting with your Inventor’s Table (hover the cursor over the table and click ‘E’ to interact).
Vehicles are items which can be “driven” by the player to make traveling go more quickly on ground or by water. Vehicles are summoned by controllers which also act as a storage mechanism for the vehicle when it isn’t being used. Vehicles are often acquired mid-to-late game and can be purchased from Penguin Pete the Shipyard Captain at the Outpost.
Dungeons are open world structures that players encounter on their travels across the universe. You will also visit dungeons while completing randomly generated side quests from NPCs often located in villages. The number of dungeons on a planet depend on the planets size.
To read the full guide, visit [link]
Crafting Tables & Stations
You will need to build crafting stations in order to craft items and progress your character. As you progress in the game, new crafting stations will become available and you will be able to upgrade each crafting station to allow you to build new blocks, armor, weapons, tools, etc. Some items can be crafted on the fly by hand, typically for survival and with minimal choices.
To read the full guide, visit [link]
To begin crafting, you will need to make an Inventor’s Table, which is how you can access all blueprints for all the other crafting stations.
To begin building a base to call home, you will need the Wooden Workbench to craft basic necessities such as doors, lights, beds, chairs, and more. The Sewing crafting stations will allow you to sew basic items and clothing to get started.
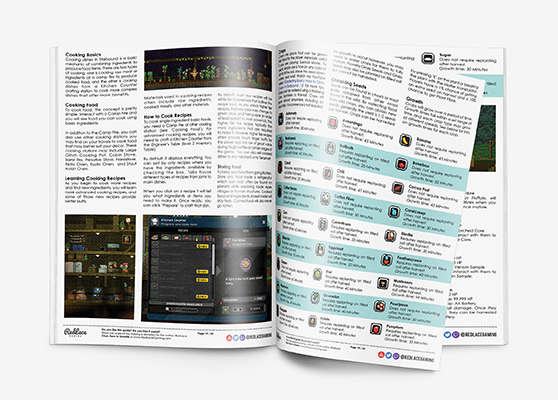
Cooking is essential to survival in Starbound. If you chose to play Survival mode, like I did, you must eat periodically or risk starving to death, thus dropping items and losing hard earned pixels.
While there are other ways to ensure you don’t starve other than cooking, such as through purchasing canned food at the Outpost or finding food in chests and crates, cooking is by far the easiest and most effective method to survive. To cook, you will need to start with the basics.
These crafting stations can make your time in Starbound much more pleasant. The medical stations will offer useful healing supplies to provide the player with positive status effects and ways to keep players alive in sticky situations. The farming and hunting stations will allow you to begin setting yourself up for survival. If playing in survival mode, the foraging table is essential and it allows you to grow crops for food or profit, as well as providing you with valuable tools to aid in your underground and planetside exploration.
Once you have acquired bars from smelted ore, you are ready to craft combat armor & weapons. You will need to start with an anvil. Through upgrades, you can access higher tiered gear. Craft weapons and armor, necessary to upgrade armor and weapons to higher tiers through crafting with bars.
In order to craft the highest tier advanced weapons and armor, you will need to combine the Replicator (tier 3 anvil) with an add-on component below. Each add-on component offers players a specialized set of armor and weapons based around their preferred play style.
Add-on’s must be placed on top of a Replicator to create the new crafting station. You can only have one add-on installed at a time, so in order to have all three crafting stations, you would need three Replicators.
You can remove Add-on modules from a Replicator once installed. This allows the player to switch between stations if they chose, without the need to have three Replicators to access each station.
Various crafting stations can be made that are not necessary to completion of the game, however, they add cool new features for late game players as well as new ways to earn more Pixels & print objects players have found along their journeys an unlimited number of times.
Navigation & Planets
Traveling in Starbound is done using your ships navigation system and traveling the universe. As you progress, you will also unlock Teleporters for quick two-way travel between areas you can bookmark and use on your Ship Teleporter Pad.
The players starting planet is completely random somewhere in the universe. However, you will always spawn on a Mostly Harmless planet to begin.
Traveling between planets is done via the Ships Navigation Console, located at the front of your ship by interacting with your ‘Captain’s Chair’. Traveling to planets within the same solar system (orbiting the same star) has no fuel cost. I recommend visiting the other planets in your system in the early game, as it is a great way to gather resources.
Traveling outside your current solar system is locked until you complete the Erchius Mining Facility mission which repairs your ships FTL. Traveling between stars (solar systems) costs fuel, which can be obtained from airless Moons underground in the form of Liquid Erchius (requires liquid collection upgrade on your Matter Manipulator) or in the moonrock (it glows purple) using your Matter Manipulator or a Pickaxe. Cost of fuel to travel varies from star to star, but a general rule of thumb is, the farther away the star, the more fuel it will cost to travel there. Beware of the monsters guarding the fuel on the moons, don’t let them get too close to you and keep moving!
Every Star (solar system) has at least one airless moon (to obtain fuel) and one strange gate (to access the Outpost). Some planet types cannot be traveled to, such as Gas Giants. Every planet has unique planet coordinates, as seen in the navigation console that can be shared with other players so they can travel to the same, identical planet as you. There are 12.667 quadrillion planets that can be generated currently. Each planet is procedurally generated.

Each planet is made up of different biomes. Major Biomes are dominant on a generated planet and can be seen on the planet surface. The temperature, enemies, minor biomes, and weather is dependent on the planet (info can be found in your Navigation console from your ship before beaming down).
Minor Biomes and Underground Caves are also on each planet. These cannot be the dominant biome of a planet and typically generate within a Major Biome. Underground Caves can only be found underground and do not generate on Moons, Barren or Tentacle Major Biomes.
Stars are represented in the navigation console when searching for new solar systems. Each star has a random number of planets orbiting around it.
Stars themselves cannot be traveled to, but you can select planets within that stars solar system, to travel there from the navigation console.
To read the full guide, visit [link]
Tiers & Ore
The upgrade path in Starbound consists of obtaining higher tier armor and weapons which can be crafter from various ore. Upgrades often result in the ability to travel to the next tier of planets where you can gather higher quality ore to craft higher quality gear.
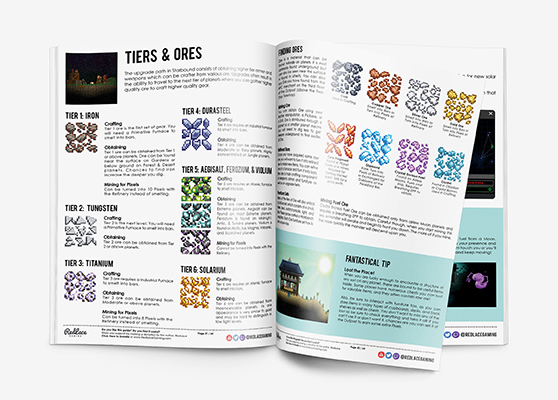
Ore is a material that can be found naturally on planets. It is most commonly found underground but can also be seen near the surface or found in chests. You can also buy Ore you have found from the Ursa Miner on the third floor of the Outpost (above the Two-Stop Teleshop).
To read the full guide, visit [link]
Armor & Tech
Armor provides protection to the player, passive bonuses to player stats, such as health, defense and energy, and increases the players attack power. There are four slots available for armor: Head, Chest, Legs, and Back. Consequently, you also have the same four slots for vanity armor.
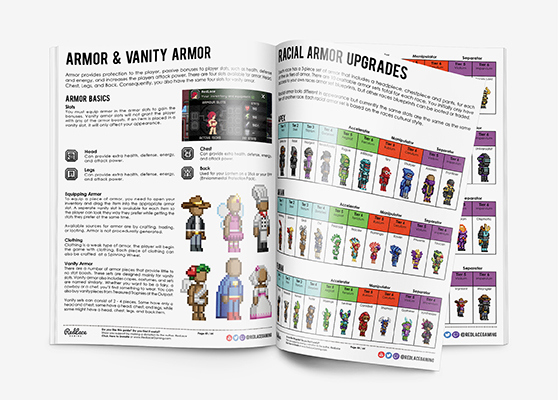
Each race has a 3-piece set of armor that includes a headpiece, chestpiece and pants, for each of the six tiers of armor. There are 10 craftable armor sets total for each race. You initially only have access to your own races armor set blueprints, but other races blueprints can be looted or traded.
Racial armor looks different in appearance but currently the same stats are the same as the same tier of another race. Each racial armor set is based on the races cultural style.
The player can equip Tech, which are enhancements that provide new abilities. To view and equip techs, the player must visit the Outpost Tech Lab (on the second floor). Up to three techs can be equipped at one time; one head, one body and one leg tech. You can swap techs at any time.
The Player must first speak with the Lab Tech to obtain a quest. You must bring items and complete a challenge obstacle course to unlock the new tech. You will have to do all three tech quests in order.
To read the full guide, visit [link]
Ship Upgrades & Ship Crew
Each race has a unique ship based on their culture. As a player progresses through the game, they’ll unlock additional upgrades to their starter ship. These upgrades provide the player with additional space on their ship to place objects, new crafting stations, and containers.
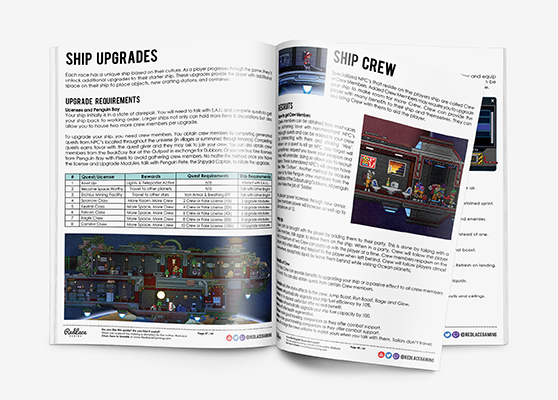
Your ship initially is in a state of disrepair. You will need to talk with S.A.I.L and complete quests to get your ship back to working order. Larger ships not only can hold more items & decorations but also allow you to house two more crew members per upgrade.
To upgrade your ship, you need crew members. You obtain crew members by completing generated quests from NPC’s located throughout the universe (in villages or summoned through tenancy). Completing quests earns favor with the quest giver and they may ask to join your crew. You can also obtain crew members from the BeakEasy Bar at the Outpost in exchange for Dubloons. Or you can buy fake licenses from Penguin Bay with Pixels to avoid gathering crew members. No matter the method, once you have the license and Upgrade Modules, talk with Penguin Pete, the Shipyard Captain, to initiate the upgrade.
Speciailized NPC’s that reside on the players ship are called Crew or Crew Members. Added Crew Members may require you to upgrade your ship to make room for more Crew. Crew can provide the player with many benefits to their ship and themselves. They can also bring Crew with them to aid the player.
Crew members can be obtained from most races by obtaining favor with non-merchant NPC’s through quests and can be added to your crew by interacting with them and clicking ‘Hire’. When on a quest to kill an NPC, you target will sometimes request you lower your weapon and they will surrender, doing so allows you to recruit them. These surrendered NPC’s will always have the title ‘Outlaw’. Another method to acquire crew is to hire Penguin crew members from the BeakEasy at the Outpost using Dubloons. All penguin crew take the job of ‘Soldier.
As player power increases through new armor, crew members power will increase as well up to a maximum of 12.
To read the full guide, visit [link]
NPC’s
Players have the opportunity to become a landlord in Starbound. This begins by purchasing a Colony Deed from Frogg Furnishings at the Outpost. Tenants can provide players with pixels, gifts, or a place to buy and sell items in exchange for a safe place to live if a merchant moves in.
First, obtain your Colony Deed from Frogg Furnishings at the Outpost for 750 pixels. In order for a tenant to spawn, there must be a floor, outer walls, and a background wall for the entire structure. It is important to know, doors count as valid walls. Once the housing is suitable, place down the colony deed. When the tenant arrives a horn will sound and confetti will fly. The type of tenant that appears is based on the furnishings in the house (i.e. Glitch furnishing will spawn a Glitch tenant).
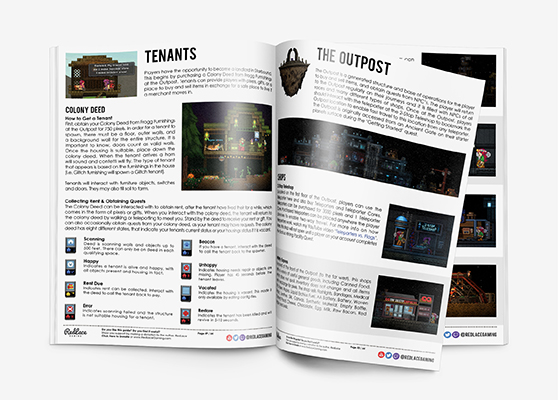
The Outpost is a generated structure and base of operations for the player to buy and sell items, and obtain quests from NPC’s. The player will return to the Outpost regularly on their journeys and it is filled with NPCs of all races and many different types of shops. Once at the Outpost, players should interact with the teleporter at the 2-Stop Teleshop to bookmark the Outpost location to enable fast travel to this location from any teleporter. The Outpost is originally accessed from an Ancient Gate on their starter planets surface during the ‘Getting Started’ quest.
The full guide covers all the shops at the Outpost and how to unlock them.
To read the full guide, visit [link]
Collectables
Pets come in two forms, captured pets and ship pets. Ship pets live on the players ship and never leave while captured pets can be taken with you on your travels and deployed to aide you.
Ship pets spawn into the game with the player and are based on the players selected race. This pet cannot be changed, nor can the color, and the color of your pet is randomly selected. These pets never leave your ship because they don’t follow you (although they will often run to greet you when you teleport to your ship).

You can also capture wild monsters and tame them into pets usng Capture Pods. Many monsters will register into the Collections Library window upon a successful capture and the Filled Capture Pod is picked up by the player. Most unique monsters count towards the collection, with the exception of a few. See right for collection.
Pet Collars can offer fantastical benefits for your pets. They are special augments you can attach to your pets inside the Capture Pod. They are applied by selecting the collar and right clicking the filled capture pod. Each collar provides a unique effect and only one can be applied per pet. Applying a new collar will overwrite the original collar.
There are a number of fish that can only be caught using a fishing rod and only on Ocean planets. These fish won’t even appear in the wild without a fishing lure to attract them. Day, night and depth can be factors in where they appear. All fish caught will add to your Collections.
Left click or up to reel in, down to let out more line and descend, and left/right to steer the lures direction. When you master the lure controls, fishing will be a simple task. Moving the lure away from the undesireable fish and towards the fish you want to catch is how you can catch rare fish. Different lures offer different benefits to make catching fish easier. When you catch a fish, reel it in, but only while it is not swimming directly away from you. When a fish pulls your line, the line will blink quickly, indicating the player should stop reeling in or risk the fish breaking the line and getting away.
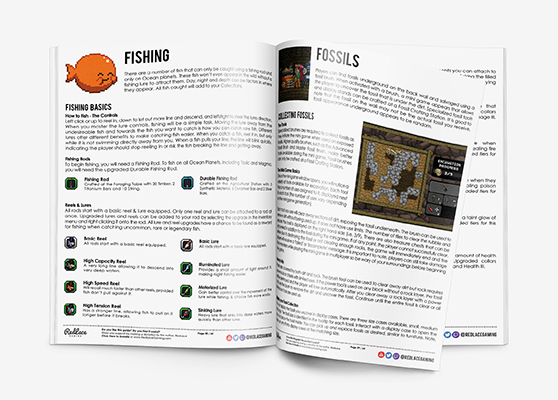
Players can find fossils underground on the back wall and salvaged using a fossil brush. When activated with a brush, a mini game appears that allows the player to uncover the fossil that is under the dirt. Specialized fossil tools and display stands can be crafted at a Fossil Crafting Station. It is good to note that the fossil on the wall may not be the actual fossil you receive, fossil appearance underground appears to be random.
To read the full guide, visit [link]
Thank you, About the Author & the Crimson Co-Op
Thank you for downloading The Indie Guide to Starbound. To read the full guide, visit [link]
I hope you enjoyed reading it and I hope it helps you along your journey in Starbound. You can check out one of my home planets below.
If you feel this guide was helpful to you and you would like to thank me for my time and effort that went into creating this guide, tips are much appreciated! Thank you to all who have supported me thus far!
Make a Donation to Thank RedLace[twitch.streamlabs.com]
RedLace is live 5 days a week starting at 12:00 noon (Pacific Standard Time) on Twitch. I often stream Starbound and if you would like to hop over and say hello, I’d love to hear from you! Don’t forget to Follow to receive announcements for when I go live.
Follow RedLace on Twitch[www.twitch.tv]
The Crimson Co-Op is a group of fantastical gamers uniting together to share their passion for video games. The group was founded by RedLace as a way to give back to her fantastical viewers & community by organizing weekly members only play-date events, offering 24/7 access to multiplayer servers for a variety of games, & more fun stuff!
Read about all the Perks of Crimson Co-Op Membership
To become a member of the Crimson Co-Op and unlock all these fantastical perks, RedLace asks you make a one time donation of at least $10 USD to support her channel and the Crimson Co-Op.
Join the Crimson Co-Op[twitch.streamlabs.com]