Overview
This guide is a NON-VIDEO collectable guide to help you get all that there is to see in the game.
Overview
This guide is a WORK IN PROGRESS. Therefore it is incomplete at this time, and I will work on it as I can.
UPDATED 1/14/2018: Added Act 2-2
Personally, I HATE video guides, I don’t want to see a 4 minute video of someone playing and talking just to find the part where the item I am looking for is. So I have decided to be a good guy and make a guide for all of us who like images and text to help us find all the items.
Enjoy!
Quantum Break Act 1 (Riverport University Experiment)
Narrative Object 1: University Map (Document)
 This first collectible is right after you get out of the cab at the very start of the game. Just run up and examine the university map next to where a student is sitting.
Narrative 1
Narrative Object 2: Protest Flyer (Document)
 Directly after the university map, head inside the archway and grab the protest flyer sitting on a table to your left.
Narrative 2
Narrative Object 3: Stop Monarch Problems Poster (Document)
 Next to the couple sitting on a bench and the “Conserve The Library” sign is another university info area. Interact with it to pick up the Monarch poster.
Narrative 3
Narrative Object 4: Sofia Amarel Seminar Poster (Document)
 Turn around after seeing the previous collectible and run across to the other sign to find the seminar poster collectible.
Narrative 4
Narrative Object 5: Bobby Radford Radio Show Recording (Audio File)
 Right after the previous two documents you walk down a path towards a large glass, circular structure. Check the chair next to the “go around” sign to hear the audio.
Narrative 5
Narrative Object 6: Amy’s Monarch Timeline (Document)
 Directly to the right of the girl with the ponytail is a “sign the petition” poster and a bike rack. In-between is the “Monarch problems” poster, which is the next collectible.
Narrative 6
Narrative Object 7: Alan Wake Returns (Video File)
 Further to the right of the bike rack is a small tent room with a television. Turn the TV on to see an Alan Wake easter egg, which may indicate the developer is finally working on a new game in that franchise!
Narrative 7
Narrative Object 8: Dr. Kim Memorial Article (Document)
 Before going inside the physics research center, head to the left of the doors to find two articles displayed on the columns. The first one is the Dr. Kim article, while directly to the right is the Paul Serene article.
Narrative 8
Narrative Object 9: Paul Serene Focus Article (Document)
 This one is easily found directly to the right of the previous collectible on the next pillar.
Narrative 9
Narrative Object 10: William Joyce Clearance (Email)
 Go inside the physics research center and access the computer sitting on the reception desk to read this email.
Narrative 10
Narrative Object 11: Monarch Solutions Job Fair Poster (Document)
 When Paul asks you to go in the elevator, instead head over to the room on the left with the large glass display case. Look at the board on the wall to grab this collectible.
Narrative 11
Narrative Object 12: Project Promenade Presentation (Video File)
 In the area with the projector and the chairs, sit down and watch the video presentation for this collectible. Sitting down and watching the presentation will also unlock the “Marketing Spiel” achievement.
Narrative 12
Narrative Object 13: Jack And Paul Photo (Image)
 After going into the lab, turn to the right and look at the picture and statue sitting on the top level of the desk.
Narrative 13
Narrative Object 14: Project Promenade Beta Test (Email)
 To the left of the photo is another desk. Interact with the laptop there to open this email and nab the 14th collectible.
Narrative 14
Narrative Object 15: Coming Home? (Email)
 Further left from the previous two collectibles, go down the stairs to another desk and grab the clipboard sitting on the edge to read the printed email.
Narrative 15
Narrative Object 16: Corridor Schematics (Image)
 Slightly further into the room and on the other side of the wall opposite the previous collectible, this one is found by examining the schematic on the board.
Quantum Break Act 1 – 2 (Campus Escape)
Narrative 16
Narrative Object 1: Paul Serene Lab Clearance (Email)
 Inside the server room, check the computer on the circular desk (near the large red cable on the floor).
Narrative 1
Quantum Ripple 1
 After the gun battle in the laboratory, head over to the right side of the room and look for a dry erase board. Study the equation on the board to initiate the first ripple.
Ripple 1
Narrative Object 2: FWD Library Protest (Email)
 Before going into the elevator, go around behind it to a room with brick walls and pick up this forwarded email found on a tablet sitting on the couch.
Narrative 2
Narrative Object 3: University Operation (Email)
 During the frozen time segment with the soldiers on the ground floor of the building, grab this collectible sitting on the tiered desk with the potted plant.
Narrative 3
Quantum Break Act 1 – 3 (Library Chase) Collectibles
Narrative Object 1: Bobby Bradford Radio Show Segment (Audio File)
 In the construction site area, interact with the radio sitting on the blue barrel to get the only narrative object in this segment of the game.
Narrative 1
Quantum Break Act 1 Junction Collectibles
Quantum Ripple 1
 Off to the right near some crates is the statue you saw earlier inside the physics lab by the photo. Interact with it to initiate the ripple.
Ripple 1
Narrative Object 1: William Joyce Dossier (Document)
 Just slightly beyond the statue is a black crate covered in papers. Interact with the documents to pick up this object.
Narrative Object 2: John Joyce Dossier (Document)
 Over to the left of the previous collectible is another similar black crate covered in paper. Grab the top one to unlock this final collectible of Act 1.
Narrative 2
That completes all the collectibles you can grab in Act 1 of Quantum Break before the branching paths and T.V. episodes begin
Quantum Break Act 2 – 1 (Industrial Area)
Chronon Source 1
Near the start of the level, when you see two people pointing guns at each other by a van, turn around and run towards the back to find the first Chronon source floating above the two cylinders. Use it to upgrade a power and unlock the “Chronon Surge” achievement.
Chronon Source 2
Not long after the first Chronon source, this one is found floating above a crate near some foliage on the ground.
Narrative Object 1: Monarch’s PR Strategy Poster (Document)
In the room with the barrels and the monitor screens, check the fuzzy green board to unlock this collectible.
Ripple 1 / Narrative Object 2: Monarch PR Plan (Email)
To the right of the PR strategy poster is a laptop, which unlocks both the ripple and the narrative object when you read the email.
Narrative Object 3: Ground Zero Map (Document)
Turn around from where you unlocked the ripple and look at the map on the wall to unlock this narrative object.
Chronon Source 3
Use the elevator to head up to the second floor (the open area without much railing) and you’ll find this Chronon source in the corner near a lamp and some yellow railing.
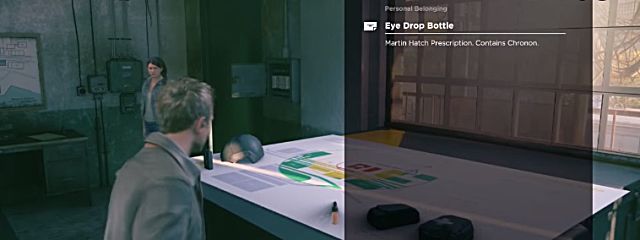
Intel 1: Eye Drop Bottle
When you reach a room where either Amy or the cab driver is standing (depending on which option you took in the Act 1 Junction segment), grab the eye drop bottle, which is the first “intel” collectible.
Assuming you grabbed either the previous Quantum ripple in this Act or the two located in Act 1, the “Knowledge Is Power” achievement will unlock as soon as you grab the intel.
Narrative Object 4: Ground Zero Operation (Email)
In the same room, turn around and head over to the table up against the window. Access the laptop to read this email.
Chronon Source 4
When you leave the previous room, climb up the crate onto the deck with the yellow tarp and then go up the wood ramp. Turn left and jump up on the hanging wood segment. The source is floating in the air at the far left end.
Chronon Source 5
Turn around and run to the opposite end of the segment. Jump across to the rail car and then leap across again to the brick building with the stacked crates. Drop down through the whole in the ceiling to find Chronon source #5.
Chronon Source 6
Back up on the train cars, jump across the car that has a protruding board to the long string of rail cars. Leap across to the yellow car with a board ramp and then hop up onto the wood section covered in grafiti.
Run down the hallway and jump out the far window onto another rail car. Turn right onto the sheet metal roofing and then jump down past the fence into a small courtyard area with a bicycle. The source is floating in the middle by a table.
Narrative Object 5: Internal Monarch Comms 1 (Audio File)
In the room with the white walls and black crates where you bring in your sidekick, run over to the table on the far wall (beneath the screen on the wall). Turn on the radio to get this collectible.
Narrative Object 6: Changing Video File
Turn around and look at the computer screen your sidekick has turned on and watch the video to get this collectible – what is shown on the video will change depending on which option you chose in the Act 1 Junction segment and who is still alive.
Narrative Object 7: RE Jack Joyce (Email)
To the right of the computer (the left side of the room when you first come in the door) is a laptop sitting on a crate. Read the email to get this collectible.
Chronon Source 7
In an alleyway between the warehouse buildings is a locked door marked by large yellow graffiti blob creature spray painted on the wall. Jump up the trash can nearby to get on the roof. The source is floating just above where you jump up.
Narrative Object 8: Internal Monarch Comms 2 (Audio File)
On the second floor area where you open the chain link fence to access a room filled with computer monitors, turn on the radio sitting on the left side of the room.
Narrative Object 9: Monarch Concerns (Email)
Directly to the right of the previous audio file collectible, access the laptop on the desk to read this email.
Quantum Break Act 2 – 2 (Ground Zero) Collectibles
Narrative Object 1: Sofia Amaral’s Chronon Presentation (Video File)
At the start of the area, go examine the television on the left (just above a desk) to view the video presentation.
Narrative Object 2: Chronon Tech Phase 2 Milestones (Email)
After running down the ramp into the lower level with the robot structure, access the laptop on the table (next to the two yellow objects) to get this email.
Chronon Source 1
Shortly after the previous narrative object you will end up on the second floor. Go down the yellow and black stairs to a small room covered in graffiti with a chain fence on the side to find this Chronon source.
Chronon Source 2
In the next area with wooden crates on the left and sheet metal on the right, don’t go down where you are supposed to in order to access the next fight. Instead, head the other direction and look for a hole in the floor to drop down into. The source is on the floor in this room by the empty shelves.
Chronon Source 3
When you get outside and see a white and yellow trailer, don’t go inside yet and instead run across the park lot to the yellow radio tower. The source is floating at the top.
Narrative Object 3: Trailer Note (Document)
Right by the trailer and across from the previous Chronon source, grab this note sitting on the hood of the Monarch car.
Narrative Object 4: Theresa Sedmak Riverport Radio Show (Audio File)
At the exact same location as the previous object, just go to the door of the Monarch car and turn on the radio to hear this audio file.
Narrative Object 5: My Screenplay! (Email)
 Inside the trailer, this email collectible is found to the right of the door on a silver laptop.
Narrative Object 6: Next Steps (Email)
 In the corner of the same trailer where you found the previous email, look for another silver laptop on a desk beneath a white board.
Chronon Source 4
 After the trailer you can run inside a garage with a broken down boat. Run into the corner of the garage behind the large yellow tank to find this source.
Narrative Object 7
 Inside the tent with the “Ground Zero” signs in various places, this collectible is found by examining the red sign in a corner next to a rack of coats.
Quantum Ripple 1
 In the warehouse segment after the tents, head through a blue door across from a staircase. Activate the sign with the T-Rex that says “Rexes” to activate the ripple.
Narrative Object 8: Trespasser Alert (Email)
 On the upper level of the warehouse you will run through a door with a dinosaur painted on the wall. Walk through the fenced area to get this email on the laptop.
Intel 1: Sudden Stop
 In the room with the MRI machine and two soldiers, look at the book on the black patient operating table to grab this intel, which is another of the game’s many Alan Wake easter eggs.
Narrative Object 9: Dr. Kim’s Lab And Serene’s Treatment (Email)
 Near the previous intel, look for a television on a counter on the other side of the room to grab this email.
Narrative Object 10: RE Jack (Email)
 Again in the same room as the previous two collectibles, this one is directly across from the Sudden Stop intel. Read the email by interacting with the tablet sitting on the shelf.
Chronon Source 5
 Before you leave the area by heading through the silver doors with the orange stripes, instead go back through the shattered area with the debris on the ground and follow the line of white and yellow wall/fence segments. The source is floating in front of the wall with the elephant painting.
Narrative Object 11: RE Liam Burke’s Status (Email)
 Inside the tent across from the silver door, look for a laptop on top of a white box to grab this email.
Chronon Source 6
 When you reach the area with the ship and the yellow crane, head over to the left by the truck and the barrels to find this Chronon source.
Narrative Object 12: Liam Burke Psych Evaluation (Email)
 In the same area as the previous Chronon source, look for a couple of port-a-potties next to a van. The email is found in the back of the van.
Narrative Object 13: Amy Ferrero (Email)
 Near the line of vans is another tent. Head inside and you will find this email sitting on a bench on the left side by a rack of suits.
Chronon Source 7
 At the end of the tent where you found the previous email, look behind the white shelf (on the opposite side of the rack of suits) to grab this source.