Overview
Locations of all rare animals in Far Cry Primal (including survival mode), useful tips on hunting and taming them and also some tips on game strategy and tactics in general.
Introduction
Hunting is a huge part of the game – you kill animals for food and weapon resources, you need their skins to upgrade your equipment and to build and improve huts in your village.
Another integral part of the game is taming various predators to make them your companions, each one with its unique skills and characteristics.
Half of the animal species in Oros have rare morphs, and finding, hunting and taming all of them could be a challenge, especially in survival mode. Here are the reasons why you need to do this:
- Upgrading some items of your equipment to a highest level requires rare skins.
- You need rare skins to improve or sometimes even build at least half of the huts, which in turn will give you large amount of XP and unlock important rewards and skills. You also must build and improve all the huts to achieve 100% completion of the game.
- Taming a rare predator has its advantages – rare animals are stronger than their common counterparts and resistant to fire.
- To complete the game by 100%, you must kill at least one beast from each animal species and its morph in Oros*, and tame every kind of land predators.
———————-
* except rare bitefish and monkey (here is the complete list)
In this guide I will show you some places with greatest chances of finding each rare animal (I chose to pick locations that are closest to Takkar’s village, your starting point in the game). Also, I will offer you tips on hunting and taming rare animals, including advices specific to survival mode (they are highlighted in italics).
To make navigation easier for you, I listed all the topics in the Guide Index on the right below.
• GENERAL GAME TIPS
First allow me to offer you some general game strategy and tactics tips that could be relevant to your hunting and taming ability and could make things much easier for you in this regard. You can skip this section, if you want, but I’d really like you to stay and look into it – I really wish I knew all that stuff I’m going to tell you below at my first run of the game. 😉
1. On your path to Oros
After you fall from the cliff, talk to your dying friend and bury him, you will have to gather some resources, craft a bow and hunt three goats. Then you’ll be prompted to go to the far end of the hollow to continue your journey, but it is a good idea to stay there a bit longer to hunt and gather resources.
It is a good opportunity to practice with your bow and to practice sneaking up on your prey. And in the process you will fill your bag with meat, bones, animal fat, animal hides and goat skins (in survival mode you should first eat the obtained meat to fully restore your stamina).
In survival mode it is CRUCIALLY IMPORTANT to constantly replenish your stamina and keep your bag full of meet at all times!!!
You should learn a habit to ALWAYS eat some meat BEFORE you skin your game (you will learn quickly how many pieces of meat each animal gives to refill your bag).
You also shouldn’t miss any opportunity to get easy meat – chunks of meat and animal corpses lying around different locations, round sacks hanging in the trees above campfires, a goat standing still inside the firing range, tortoises near the water (poke their heads with your spear until they’re dead), couples of flightless birds – grouse in the north and hens in the south.
Whenever you’re near a resting point, you can always stop and sleep there to fully restore your stamina.
By killing animals you will also gain XP (headshots will double the amount of XP).
Scavenger birds land on the corpses of animals you killed after you move away to a sufficient distance. You can hear the birds squawk when they are about to land, and if you stay crouched and quiet they’re less likely to fly away even if you’re close enough to shoot them. Killing birds is a great hunting practice and will reward you with good amount of XP and feathers for the future quiver upgrade.
By gathering plants and rocks you can stock up on hardwood and flints, and at the same time fill your bag with village resources: alder wood, slate and reeds.
When you finally get to camp at the far end of the hollow and it turns to night, if you go back again there will be tapirs instead of goats. Get at least 3 tapir skins for the future pack upgrade to carry double amount of food and weapon resources. Killing tapirs will give you more XP than goats (to register a headshot, first arrow must be to the body so that the next arrow to the head will kill the tapir instantly), and also this is the only opportunity in the game to hunt at night without predators present (you might hear the sabretooth, but there are never any predators in this hollow).
2. First steps in Oros
When you’ve reached Oros, I recommend first of all to upgrade what you can and fill your resources packs by hunting and gathering in the area around your cave, which is the safest place there is. Shoot 2 birds and kill 2 boars and 7 dholes to upgrade your arrow quiver and guts bag to level 2.
You can find the list of all upgrades in this guide:
[link]
Then go see Tensay the Shaman to get a taming ability, your first pet and the owl. (On the way to the shaman don’t forget to unlock nearby bonfire and kill you some bears for the 3rd quiver upgrade, if you have the guts. 😉
As you get more XP, learn REVEAL TERRAIN skill as soon as possible – when you start exploring the map, it will allow you to reveal more stuff (such as locations and collectibles), which will bring you more XP. This is a must-to-learn skill in survival mode.
After completing this quest build Tensay’s hut to gain some XP and to unlock beast master skills. If you have enough XP, learn the skill to tame wild cats as soon as possible – it will allow you to get some strong and very useful pets. DON’T build a hut for Sayla yet, it will trigger a script to start the next campaign mission, and you better gain some skills, improve your equipment, get a stronger pet and also bring more villagers before that…
Now is the time to upgrade the spear – your most important weapon. The spear is one of the two items in the game that you can upgrade to a highest level before even starting the campaign; and fully upgraded spear gives you enormous defensive and offensive advantage.
3. Upgrading the spear – a trip to the North
To upgrade your spear to levels 2 and 3 you need some northern resources.
In normal mode you can quickly get 6 North Cedars needed for the 2nd level upgrade by farming at Nakuti Bonfire (the closest bonfire NE to the village; one North Cedar grows there just behind the shed). Unfortunately, in survival mode this cedar spawns very rarely.
EASY and EFFECTIVE RESOURCES FARMING TECHNIQUE:
(Works 100% only in normal mode*.)
To refresh resources, go to nearest resting point (a discovered campor fast travel location
) and do the following:
Sleep until dawn twice, then save and quit to menu and reload the game.——————–
* Unlike the normal mode, in survival mode spawn probabilities of rocks, trees and plants are much less then 100% – you see stumps in place of trees/plants and dark patches in place of rocks (every individual tree, rock and plant has its fixed spot). So after you refresh the resources, only part of them will respawn. If you exit to menu and enter the game again, different trees, rocks and plants will spawn in random order, and the same will happen every time you reload the game.
So, in the case of that North Cedar at Nakuti bonfire, the chance you will see it respawn immediately after the refresh is small – you will have to continue reloading the game until you see it again.
It’s also important to understand how saving and loading the game really works:
[link]
Travel North-East to the light brown area at the edge of the frozen lands in the upper right corner of the map below (click to enlarge):
On your way there get as much XP as possible by discovering locations and camps, collecting collectibles (see the map), taming every new animal you see (if you have required skill) and completing random tasks to rescue hostages etc.
There are also two caves on your route that you can explore without a grappling hook, which will give you a lot of XP and some northern clay (caves are the only places where you can find resources that are not specific to the region).
If you’re confident enough, you can also try to capture nearby bonfires and outposts – if you do it stealthily (by distracting and separating enemies with rocks, performing quiet takedowns and careful headshots), you’ll gain a LOT of XP and new fast travel points. Just ground your pet in a hidden corner before capture attempt, unless it’s a jaguar.
If you see from your hiding that your pet got stuck in a fight in the middle of an outpost and is about to die, DON’T try calling him to you with “Alt” key, just dismiss him from your pets menu (“B”). The moment your pet is dismissed, his health meter stops draining, and you can safely heal him when you summon him again. This is a crucial tip for survival mode, where pets are weaker and you can’t revive them with red plants.
When you reached that brown area in the NE corner of the map above, unlock two local campfires to use them as your base camps for resource farming (if you’re having trouble finding north clay, see the 2nd to last tip in this chapter).
You should NEVER go too far into the frozen lands before you get winter clothing (fully upgraded winter clothing in survival mode), since you have only 4 minutes (2-3 in survival mode) until you freeze to death! Here are some tips if you choose to disregard this advice: to stop your cold-meter from draining just set your weapon on fire (with “Y” key, you need to have animal fat); to warm-up quickly – find a bush nearby and ignite it.
If you go south from the campfire on the right, you’ll find some Yaks (including white one if you’re lucky) and reveal the magical Marsa Cave (see the picture below). In this cave you can tame and kill three rare predators – stripe wolf, black jaguar and black lion (see detailed description of Marsa Cave in “Black Lion” chapter).
After you’ve tamed a black lion, you’ll feel much safer – it can even deter a sabretooth from attacking you. There are also common cave lions around Marsa Cave to tame and harvest, and you’ll find common jaguars just south of the cave.
Further to the south-east there is a riverside Swaras outpost with an excellent fishing spot a bit north from it (and an area with a good chance of encountering black dhole to the south-west of the outpost). And on the other side of the river you can finally meet and potentially tame sabretooth tiger (not recommended at this point if you play in permadeath mode 😉 ..and BTW, in survival mode sabrethooths in that area are active at night):

There is also large North Clay deposit along the river to the east of Swaras outpost (click to enlarge):

* Be aware that in survival mode you’ll find only part of the resourses shown on this map.You can use resource farming technique mentioned in the beginning of this chapter.
And be careful – a sabretooth almost always spawns near the NW end of the large island where the river turns north! Best way to fight him – swim back and forth across the narrow strait at the NW of the island and shoot the sabretooth from across the strait.
There is a place to the NE from the Marsa Cave where you have a very good chance to meet LEOPARD – small abandoned village about 150 meters into the frozen lands (click to enlarge):

It has a burning fireplace and a couple of burning torches that will allow you to warm up and survive there without winter clothes. This is the only leopard spawn location along the southern edge of the frozen lands (main leopard habitat is much farther to the north), so you’ll have a unique opportunity to tame this animal before you get warm clothes. Pet leopard will really help you hunt, since he tags all animals around him (this is a great deal for the fishing in survival mode, for example).
So, if you exploit that particular area (between the river and the frozen lands to the northwest) to full extend, you will potentially:
- Upgrade your spear, arrow quiver and guts bag to level 3;
- Tame almost all predators (including brown bear and sabretooth, if you’ve learned TAME APEX PREDATORS skill), except badger, cave bear and black dhole (although probably you’ve already met the last one at this point);
- Stock up on many animal skins and resources (I’d stay a bit longer to fill my pack with northern resources needed for future upgrades – check them out in my crafting guide);
- Learn a substantial number of skills and increase your village population.
Now you need a bunch of southern resources to upgrade your spear to levels 4 and 5.
4. Upgrading the spear – a trip to the South
First fast travel back to your village and upgrade Tensay’s hut to level 2 (with the rare lion skin you’ve got in Marsa Cave). If you don’t have enough resources, gather them around your village or take from the stash. If you have less than 40 villagers, go to the closest bonfire and repeatedly save and quit to menu – when you reload the game, usually a random rescue/skirmish task spawns nearby (if it won’t, walk around a little or reload the game again). Upgrading Tensay’s hut will reward you with 3000 XP, which I recommend to invest in learning “TAME CUNNING BEASTS” skill, you’ll need it very soon.
Now take a trip to South-East to gather southern resources. You should reach an area between three campfires in the bottom right corner of the map below:

On your halfway there visit the Cave of Hasari to tame and harvest Black Dhole, White wolf, Cave Bear and Badger (you need “TAME CUNNING BEASTS” skill for the last two). See full description of this cave in “Black Dhole” chapter below.
In the area marked above you can farm plenty of South Maples, South Stones and South Rock Dust to fully upgrade your spear and even to fill your pack with southern resources for the future bow and club upgrades (to check what resources are required for them see my crafting guide). I recommend to have at least 6 south stones and 8 rock dust in your bag before you leave the South, to be able to upgrade your bow right away after building Takkar’s Cave – it is a major game-changing improvement (Level 2 bow can kill regular udam (except ones with bombs and slings) with one shot to the body and has greatly increased rate of fire).
Remember that this area holds more dangers than anywhere you’ve been up to this point. Be VERY careful with Izila warriors – those skinny blue bitсhes are tougher, faster and deadlier than hulking and sickish Neanderthals. Also, you must watch out for sabretooth tigers and stay away from wooly rhinos, unless you dare to hunt them with only two spears on your belt (or even one in survival mode). But if you do have a steel pair to kill 5 rhinos, you will be rewarded with complete set of rhino skins required for the final spear belt upgrade.
There is a place further to the south-east (NW of Blajiman Stones) with a dead rhino just lying there (click to enlarge):
(You can also see this location marked on the map in the “Two Horn Rhino” chapter down below.)
Skin the rhino, then save and quit to menu and reload the game. You will spawn at nearest camp to the north-west (it needs to be discovered!), from which you can return to that place and skin that rhino corpse again. Repeat this another 3 times and you have your 5 rhino skins. 😉

It is very important to keep a distance between your pet and the rhinos (and mammoths for that matter) – instead of being scared off by your companion, they become aggressive towards both of you and will chase you with stubborn persistence.
If the only thing you want is peace and quiet while you gather sticks and rocks – bring your badger, he will scare away all wildlife in the neighborhood (except human animals).
Now, when you finally upgraded your spear and other available equipment, tamed and killed all predators, filled your bag with resources for many future upgrades and gained many skills and XP, it is time to return to your village and start the campaign.
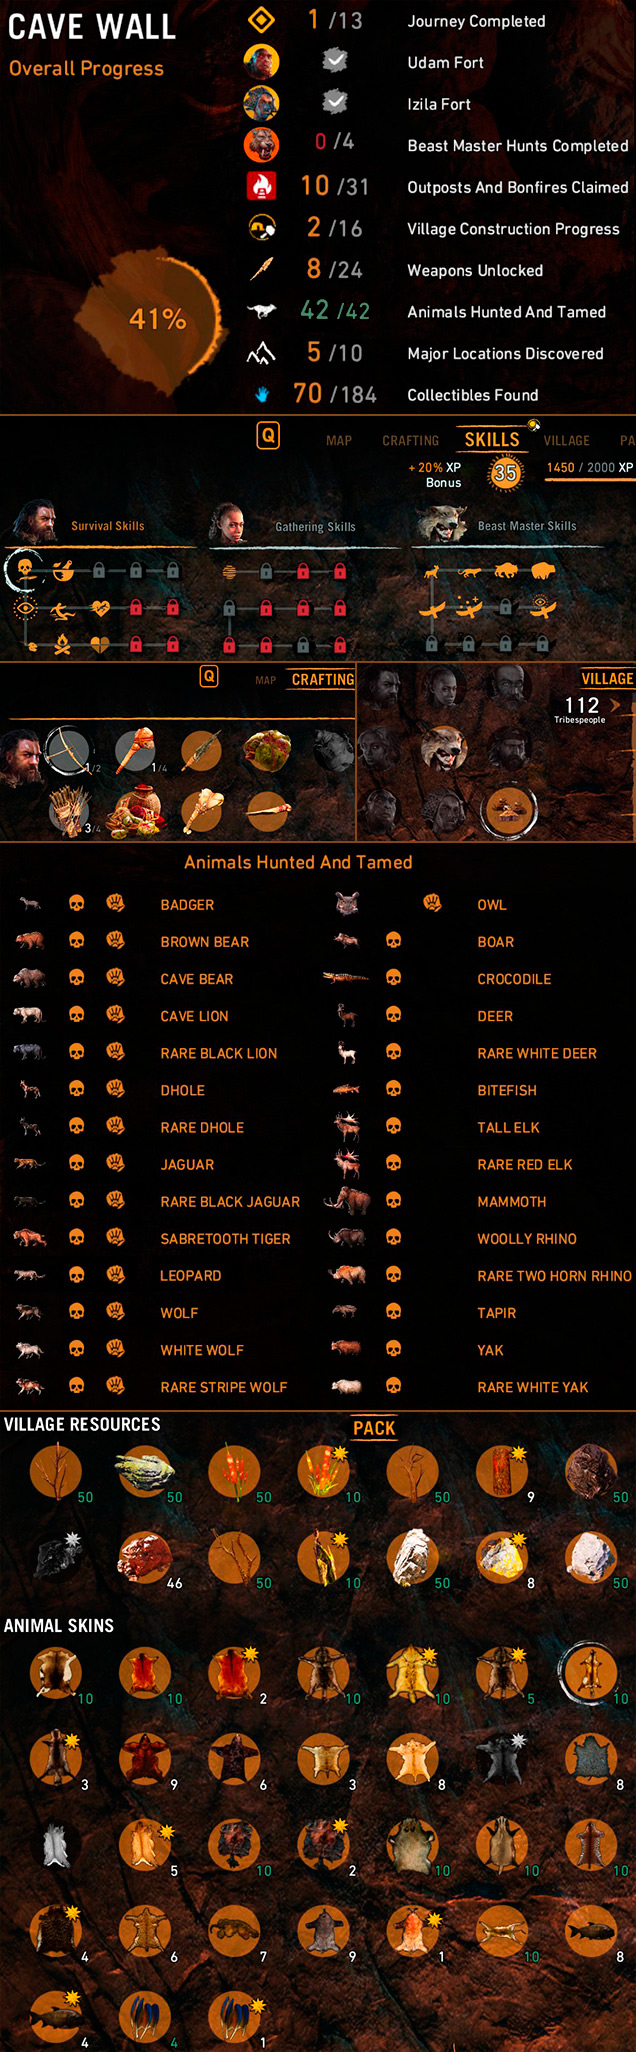
As an example, these are my stats before I started the main campaign (survival mode on expert difficalty):
* Note that many of the skins in my pack were found in loot sacks and hunter caches.
5. Fully equipped Wenja
Fast travel back to your village, build a hut for Sayla and complete the 1st campaign mission. Now you can build Takkar’s cave, which will unlock bow and club upgrades (and sting bomb, which is really useful for “Slay” Wenja events). If you have the resources, you can further improve your cave and Sayla’s hut, it will reward you with a LOT of XP and some cool food recipes.
One of the most game-changing equipment improvements you will ever make is to increase the number of spears you can carry. To unlock the spear belt upgrade, you must bring Wogah the Craftsman to your village, so you should do it as soon as it becomes available, which is right now (BTW, it will also unlock the grappling hook and all other belts and bags and more cool stuff after you build him a hut). I hope, you already have at least 3 wolf skins in your bag when you bring Wogah, so you could finally add another spear to your belt and go get them lions, fishes and rhinos to become a true warrior with 6 spears behind his back (5 in survival mode).
First thing you should do after building Wogah’s hut is to take his 1st quest – it’s a short trip to a nearby waterfall to get rare feathers, so you could finally fully upgrade your arrow quiver.
Now all that’s left to unlock remaining weapons and equipment (except berserk and fire bombs) is to bring Jayma and Karoosh to your village. Building and improving Jayma’s hut will reward you with a sling and fancy bows; Karoosh will teach you to craft two-handed club and winter clothing to be able to explore the frozen North.
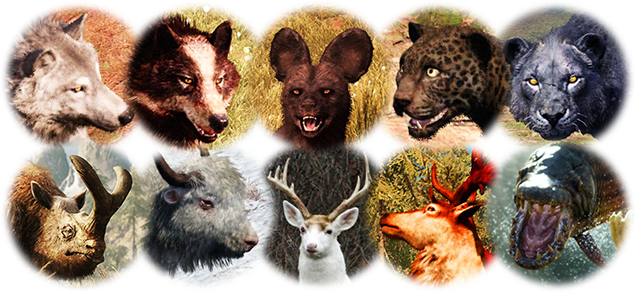
• RARE ANIMALS – GENERAL INFO
In addition to their distinctive visual appearances, you can spot and trace rare animals from a great distance with hunter vision. In hunter vision rare animals leave behind them some sort of glowing smoke trails, that stay in the air for a long time (even after the animal dies):

As a general rule, rare animal have the greatest chances to appear around the areas on the map which are marked with the icons of that animal species. (To see animals’ icons on the map you need to zoom in or choose a “hunting” map filter.)
But going to one of those areas will not give you a 100% guarantee to meet this rare animal (actually, for some animals in survival mode it’s close to 0% chance). So how do you deal with that?
First of all, we need to understand how the game engine works. Nothing in the game world exists by itself independently, all computer generated life is scripted, i.e. appears only around YOU. The world is empty – only when you approach a spot on the map, virtual animals and people start to spawn there; and they disappear as soon as you leave.
In some places and instances (mostly during non-random quests) the spawn of NPCs is scripted in a way so that a certain NPC (or one of a limited set of NPCs) will have a 100% chance to appear in a certain spot (or in one of a limited set of closely spaced spots).
But in a free roaming mode NPCs spawn in a fully random manner, where every spot on the map has a set of spawn probabilities for every kind of virtual creature (with a significant chance that nothing will appear in this spot at all). These probabilities will decrease as more and more creatures fill the area, because their density is set to a limited value. So every time you go to a certain place in hope to encounter certain animal, you virtually “roll a dice”.
Even if I show you specific places which have the greatest chances of meeting a certain rare animal, its spawn probabilities there are still low, and your goal is to “roll the dice” as many times as you need to get the “desired number”. So how do you “take the dice off the table” to be able to “roll again”?
To refresh the spawn of animals, people and random tasks around a spot on the map you can:
- Move away from the spot to a sufficient distance.
- When you’re near a resting point, sleep until dawn; or save and quit to menu, then reload the game.
- If that resting point is also a fast travel location, teleport to another location and back (works better with a triple jump via two other fast travel points).
With regard to land predators, there are different types of places and instances (like some caves or hunting missions) where the spawn of a rare predator is certain or almost certain.
Another thing you want – not to miss an animal that spawned near your location and not lose the animal after you spotted it. Besides the hunter vision, there is a tagging feature which will really help you to spot and track an animal. There are 3 ways to tag an animal:
1. Aiming with your weapon after learning “TAG ANIMALS” skill* (the animal must be inside the range of that weapon, so the longbow is your best choice).
2. With your owl, if you have “tag animals” skill;
3. Pet leopard will tag every animal around him, even if you don’t have the skill.
________
* To unlock “tag animals” skill you need to bring Jayma the huntress to your village and build her a hut:

If all you need is a skin for an upgrade, you don’t always have to search and kill the animal. Here is the list of places you can possibly FIND a rare skin:
- Almost always in Hunter Caches.
- Very rarely in a loot sack that is hard to reach (at the end of this guide I will show you one of these sacks).
- After Sayla’s hut is upgraded to level 2, once in a while occasional rare skin spawns in your reward stash.
- Extremely rarely dead rare animal is found in some hard to reach spot of a quest location (rare bitefish corpse on the bottom of some cave is the only one such instance I can remember clearly).

• HERBIVORES

Unfortunately, there are no special places or tricks to find rare herbivores; your only option is to repeatedly roam places that are known for their greatest chances of encounter of a certain rare animal.
* There are only two exceptions:
- You hunt rare elk during the 1st Jayma’s quest.
- There is a hunting quest with a good chance to encounter rare rhino (more about this quest in “Two Horn Rhino” chapter below).
White Deer

Appearance: Bright white fur.
Distinctive features: Can absorb more damage than common deer.
Rareness in survival mode: Very rare.
Upgrades: Jayma’s hut – level 2 (2 skins/ 1 in survival mode).
Deer is a very timid animal – it runs away the moment it sees you, and it is a fast runner.
Usually you can see a white deer in a group of other deer, but sometimes you may encounter a lone white deer, less often a pair of them.
Here are three of the best places to find a white deer:
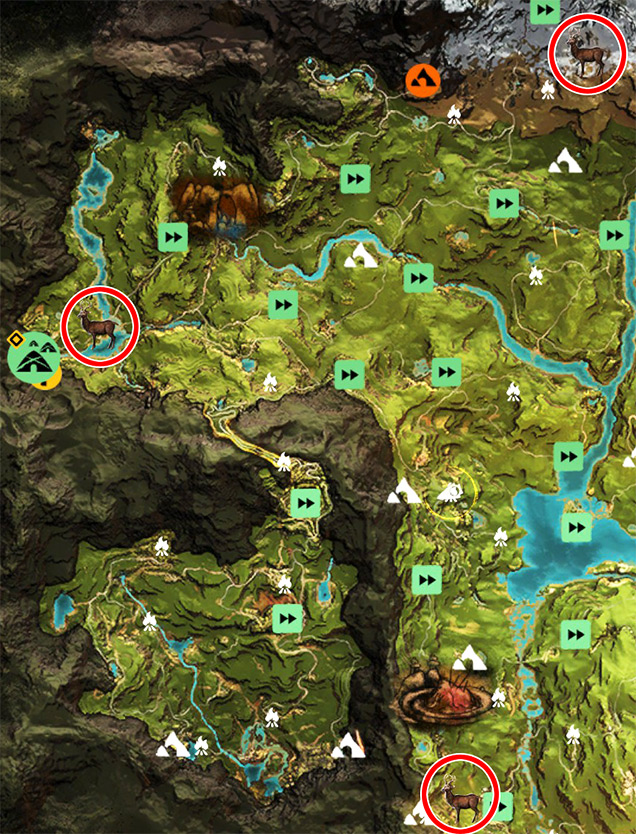
While two more remote locations have slightly better white deer spawn probabilities (you can sometimes spot a couple of them at once), the area next to your village is the safest one, which could be crucial if you play in permadeath mode.
Exit Takkar’s cave and turn left, enter the second cave on the left, exit it from the other side and carefully approach the small pond with your hunter vision activated. If you don’t see a white deer there, go further to a river where you picked green plants for Sayla’s wounds. Cross the river and turn right, then circle back to the village along the stream. If there is no luck, sleep until the next morning and try again.
This deer’s hide is really white, so it coud be easier to see it with your hunter vision turned OFF, when it’s not obscured by its bright smoke trail. In normal mode it can be really fast and easy to spot the white deer and immediately kill it with your owl (for this you need to learn “OWL ATTACK” skill, which is disabled in survival mode).
White Yak
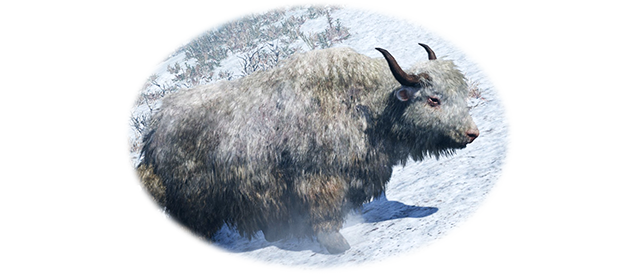
Appearance: Dirty off-white fur.
Distinctive features: Can absorb more damage than common yak.
Rareness in survival mode: Moderately rare.
Upgrades: Winter clothing – level 2 (2 skins).
Tough and strong animal; while not as aggressive as the wooly rhino, it will stand its ground and butt you if you get too close. In normal mode white yak usually grazes within a herd of common yaks, in survival mode every time I saw one it was alone.
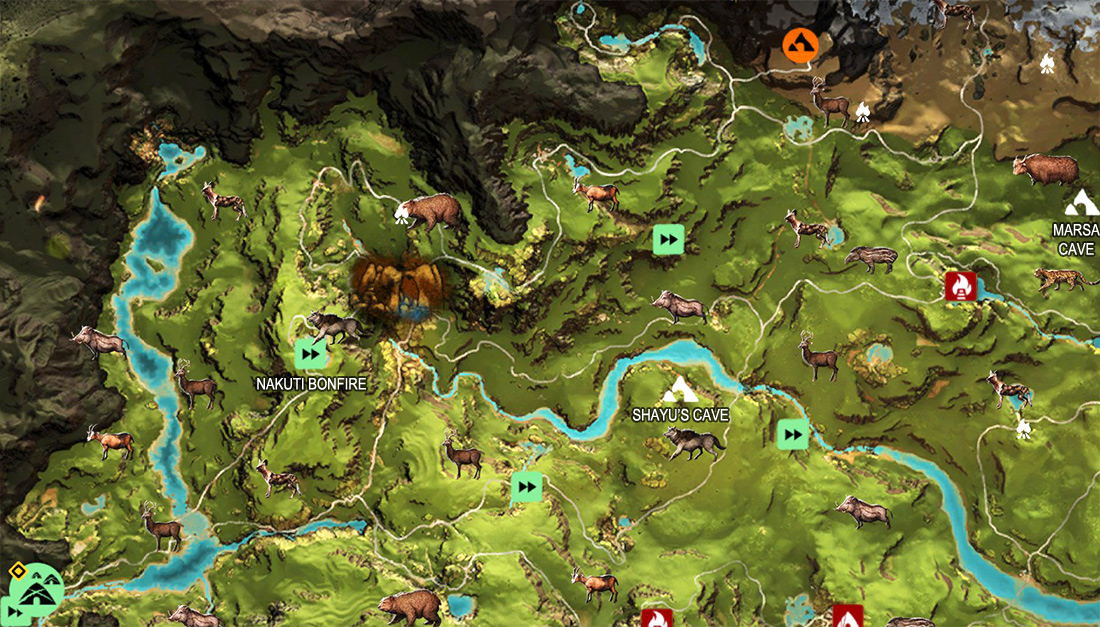
Here is one of the best locations to look for a white yak, it is also the closest to your village and not too far north so you won’t freeze to death during the hunt (click to enlarge):

Red Elk

Appearance: Off-white fur with reddish-brown back, belly and legs; Red antlers.
Distinctive features: Can absorb more damage than common tall elk.
Rareness in survival mode: Extremely rare.
Upgrades: Roshani’s hut – level 1 (2 skins/ 1 in survival mode).
Large and very strong solitary beast. Red Elk, being as much durable as a rhino, is very hard to kill, and his huge antlers can deliver a lot of damage. Although aggressive, he will not chase you to death like the rhino would – he prefers to run, and his long legs make him move really fast.
Real name of this extinct species is Irish elk (Megaloceros giganteus)[en.wikipedia.org]. Although most of its skeletons have been found in Ireland, it was not exclusive to Ireland and was not closely related to either of the living species currently called “elk”. Its closest living relative is fallow deer, and for this reason it’s also called “Giant deer” or “Irish giant deer“.
There’s not enough paleontological data to know what Irish elk’s color really was, so both of its morphs in the game are products of the dev’s imagination.
Here’s one of the best places to look for Red Elk:
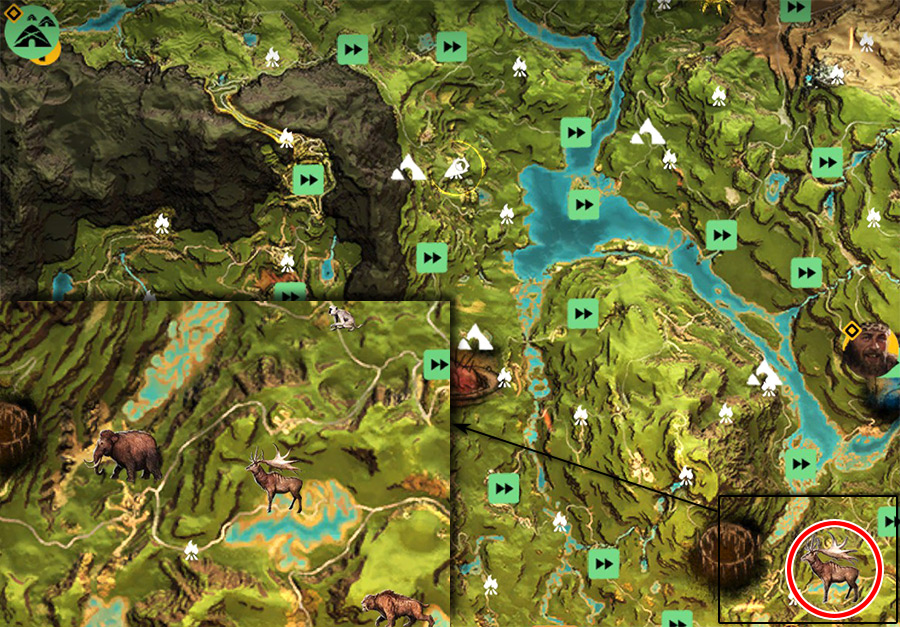
In normal mode I saw Red Elk on the north shore of a large swamp to the east of Blajiman stones (Izila “Stonehenge”) every time I went there.
You hunt one Red Elk as a main goal of the 1st Jayma’s quest (completing this quest unlocks “The Great Beasts” missions).
This means that in survival mode you don’t need to look for this animal at all, since in this mode you need only one Red Elk skin to build Roshani’s hut. (Which is a good thing, since in survival mode Red Elks are extremely rare.)
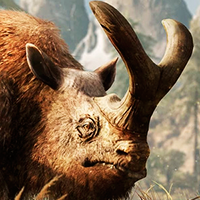
Two Horn Rhino
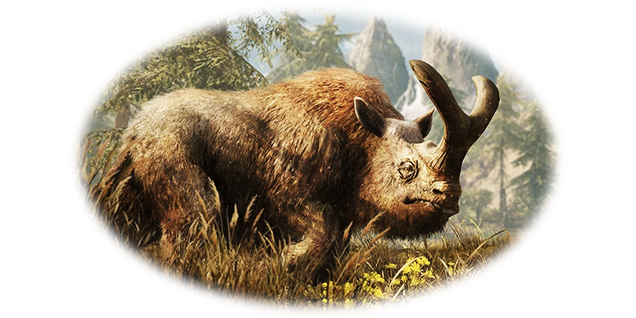
Appearance: Light-brown fur; Y-shaped horn with two rounded tips.
Distinctive features: Can absorb more damage than common wooly rhino.
Rareness in survival mode: Moderately rare.
Upgrades: Dah’s hut – level 2 (1 skin).
Unlike other animals in Far Cry Primal, common wooly rhino and two-horn rhino aren’t morphs of the same species, but two entirely different species (a possible prototype of the latter could be Megacerops[en.wikipedia.org]).
Rhinos are the toughest and most dangerous herbivores you will ever need to hunt for their skins. Almost as much durable as old mammoth (and rare rhino being even more durable), rhino can kill you very quickly with its horn. In addition, they graze in tight herds, so attacking one member of a group could easily trigger all his buddies if you accidentally get too close to them. And four рissеd rhinos chasing you around is no joke. Also, unlike any other animal, mammoths and rhinos are not scared away even by strongest predator: on the contrary, they get irritated by it and switch into aggressive mode (except the badger, but who isn’t terrified by the badger? ;).
If you choose to take down a rhino with your pet, send only the strongest animals – anything weaker than sabretooth or bear will lose the fight, and even the winning of your sabretooth/ bear is not guaranteed in any way, you must join the attack to ensure survival of your pet.
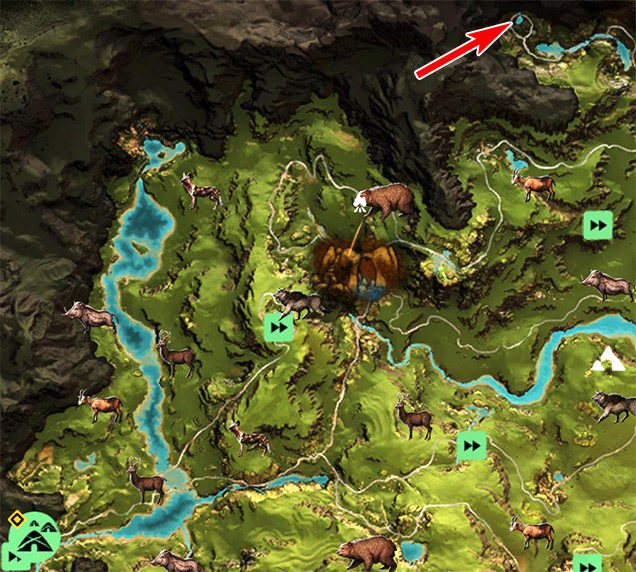
Here are three locations with pretty high spawn rate of two-horn rhino closest to your village:
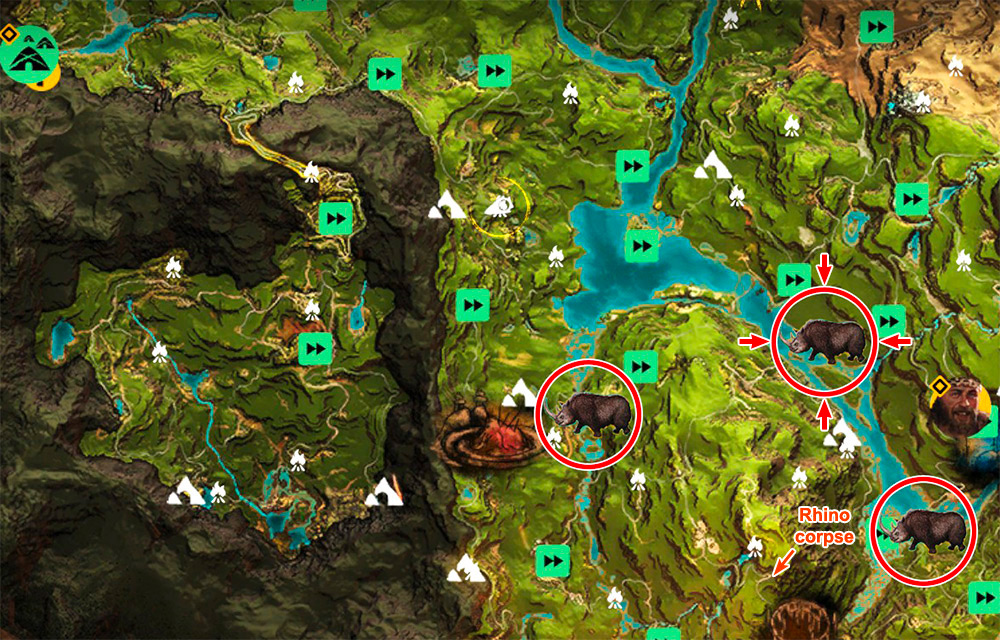
The most western location has smaller chance of meeting rare rhino compared to other two, and I would personally recommend the location north of the river next to the big island (one that’s highlighted with arrows):
In that area, rhinos walk along the river bank and along the large river island. So when you hit the rhino (fully upgraded spear is your best friend in this scenario) and he turns on you, you can quickly retreat to the water (just don’t accidentally jump into the mouth of a crocodile ;).
And if you have your own amphibious tank brown bear (with “beast rider” skill), rhino hunt becomes real fun, since now you can hit the rhino from the water without retribution and also no longer worry about fishes and crocs.
Also, in that area you have to watch out for sabretooth tigers, but you can turn it to your advantage – throw bait near the rhino and prepare popcorn to watch heavyweights tearing each other apart, getting weak and possibly dying.
* There is also a good chance two horn rhino will spawn among the rhinos you’ll be required to kill during one hunting quest 
• PREDATORS

In addition to the random spawn of rare predators in their marked habitats, you have other very good options to find them:
- Special places like the Cave of Hasari and Marsa Cave, where a rare predator spawns almost every time;
- Hunting quests
– one rare predator will be among the animals you need to exterminate (in survival mode there is a chance it won’t spawn, but in this case you can restart the quest from the “Esc” menu before you reach required number of kills);
- If you desperately need a particular skin for some upgrade, you can kill and skin your own pet. In normal mode it will cost you a number of red plants in order to revive it, in survival mode you will have to find and tame that animal again.
We’re lucky to have the Cave of Hasari and Marsa Cave – these two places are extremely important in survival mode – they provide an opportunity to tame any rare predator whenever you need one (if it suddenly dies from falling down from some cliff, for example).
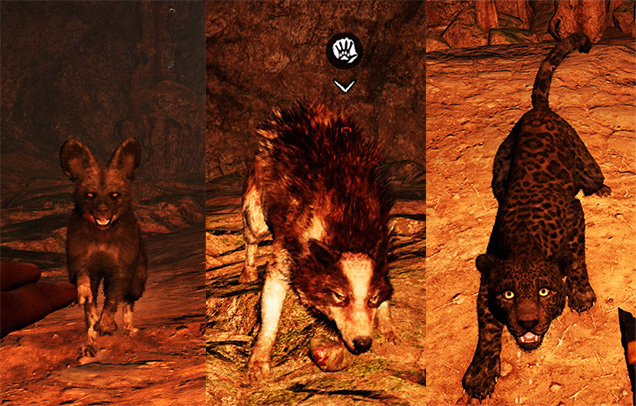
Black Dhole, Stripe Wolf, Black Jaguar: Magical Cave of Hasari
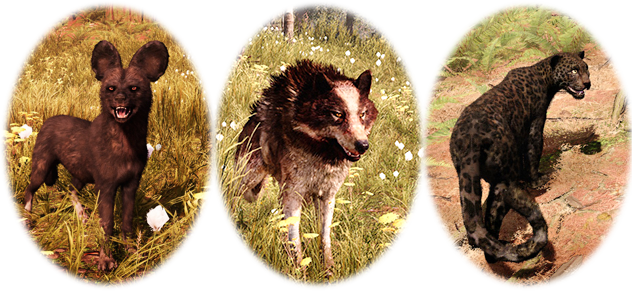
There are various places with good chances of finding these animals, but I’ll show you one very small area with 100% guarantee of encountering all three of them after visiting there enough times, even in survival mode (there are 2 such areas for Stripe Wolf and Black Jaguar, you can find the description of the 2nd area in the next chapter).
Besides these two special places, in survival mode you have a small chance to meet Black Dhole to the SW of Swaras outpost and Black Jaguar to the north/NW of Swaras outpost (for the location of this outpost see the 2nd from the top picture in the “Trip to the North” chapter above).
There is a small cave not too far from your village to the east, where in addition to Daysha hand and cave painting (which are very easy to find) you’ll find a random rare predator (black jaguar/ black dhole/ stripe wolf) or a cave bear which spawn there every time you visit that cave.
Here’s Cave of Hasari location on the map:
(This is where you meet Jayma for the 1st time.)
Enter the cave from a lower entrance (click to enlarge):
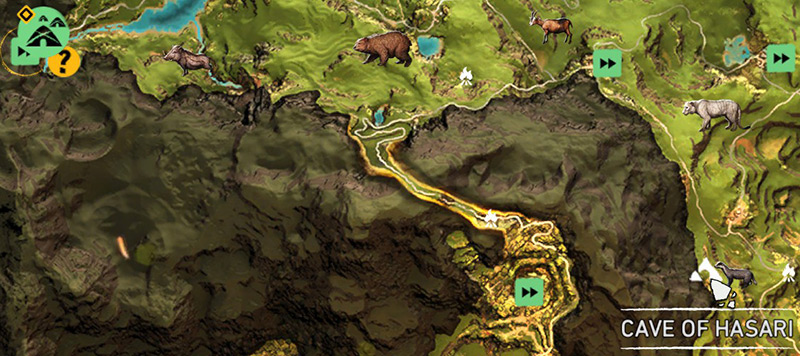


* (you can also go through the main entrance and get down to the lower cave after breaking the wall)
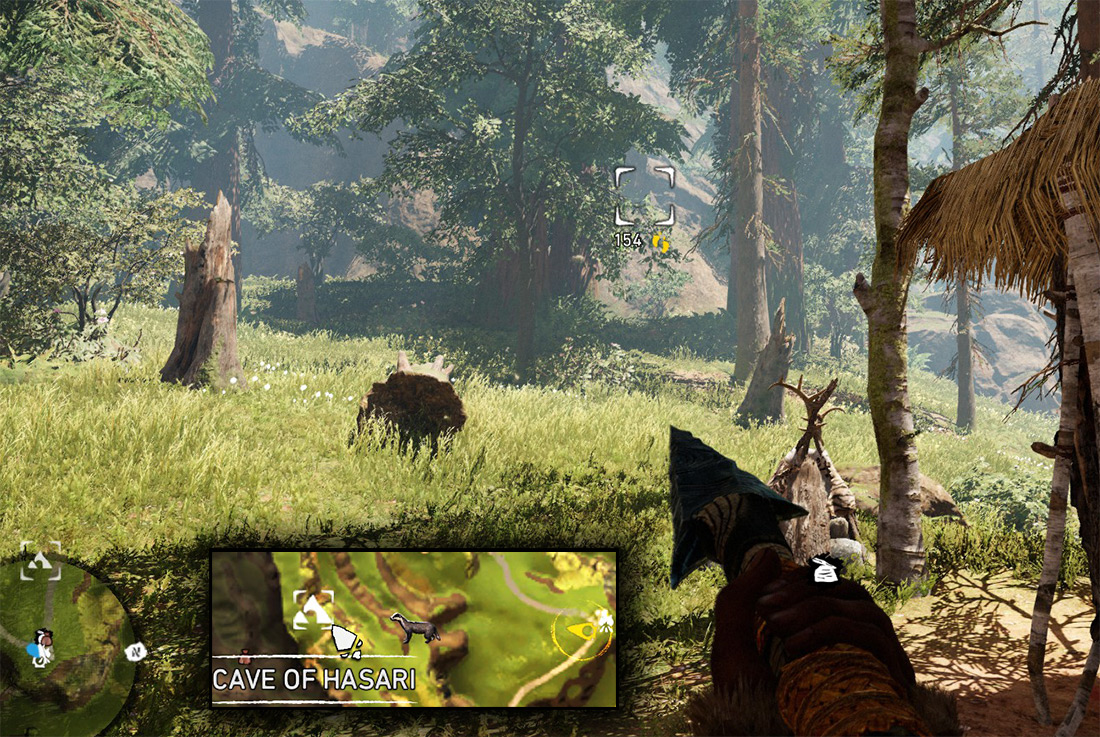
There is always a pack of predators (Dholes/ Wolves/ Jaguars) or a Cave Bear inside the lower cave. Pack of predators always includes at least one rare animal. You need to move around the cave to make all animals spawn.
First animal you see after you enter the cave will be on your right (of course, you don’t have to go deep into the cave to see the animal in order to know who’s inside, if you can hear it and can identify an animal by its sound). If you see or hear a species you already tamed/killed (each one has a spawn probability of 25%), just save and quit to menu. When you load the game again, you will spawn at nearest fireplace to the east (it needs to be discovered!) from which you can quickly get to the Cave of Hasari for another try:
If you repeat this procedure enough times, you’ll eventually meet all three of those rare predators:
Before taming the rare specimen, kill all his buddies inside the cave. Bring a strong pet and keep it close so that the beasts do not pile on you (leopard is a great choice, he will tag all animals around you). When you’re ready to tame the rare animal, order your pet to go sit in a corner to avoid distractions. Usually all animals stay inside the cave, but if you wound a beast, in rare instances it might run outside. Although, usually it returns to the cave.
Also, on your way from the camp to the cave there is a very good chance to encounter a Badger and a pair of Wolves, one of which is White. Also, this cave is the closest Cave Bear spawn location. Also, the whole area near the Cave of Hasari and further north is teeming with Lions with a good chance to meet a rare one (never saw one in survival mode, if you wanna meet rare lion for sure, go to Marsa Cave).
So, inside and near this magic cave you’ll be able to hunt and tame all land predators in the game (including all existing rare predators) except Brown bear, Sabretooth and Leopard.
* In addition to the Cave of Hasari, there is Marsa Cave with similar features, where you can get rare wolf, jaguar and lion, but it is farther away from your village and has marginally smaller spawn probability of each animal. I’ll describe Marsa Cave in detail in the next chapter.
Black Cave Lion
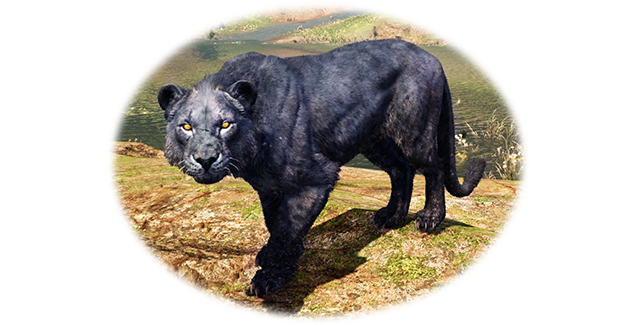
Appearance: Bluish-black fur.
Distinctive features: Stronger than common lion; Fireproof.
Rareness in survival mode: Extremely rare.
Upgrades: Tensay’s hut – level 2 (1 skin).
Cave lions are strong, durable and relatively fast animals. You need a strong pet close to you to sway a lion from charging. Safest way to kill a black lion – leveled up spear thrown to its head; arrows and weak spears to the body won’t do enough damage. Traps placed in front of you will severely injure and distract a lion.
There are several places with a good chance to meet black lion in normal mode (in survival mode it’s extremely rare), but one of the best locations that is also not far from your village is the area north to the Cave of Hasari (see the screenshot of the map in previous chapter).
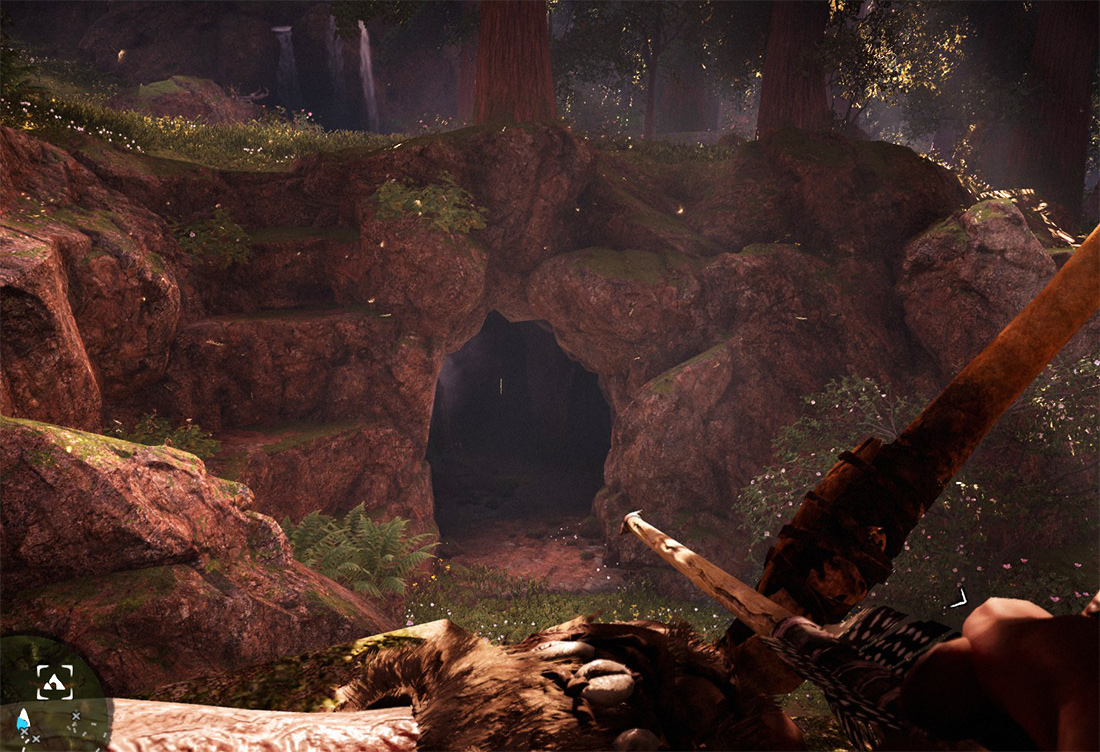
The only location I know that gives you 100% guarantee of eventual finding black lion (especially in survival mode) is Marsa Cave NE to your village (see the 1st screenshot in the “Upgrading the spear – a trip to the North” chapter above).
Quietly approach the cave from NW exactly as shown on the map below:

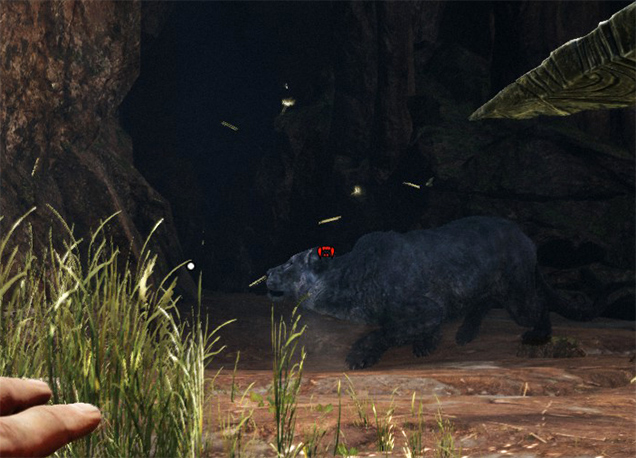
(If you come from any other direction you are likely to alert whatever spawned inside before you can spot it). Crouch and sheak up to the edge of a cliff under the big redwood tree on your right and look inside the cave:
There is a 20% chance you’ll see a rare black lion inside:

Now you can sneak up closer and tame or kill the lion:
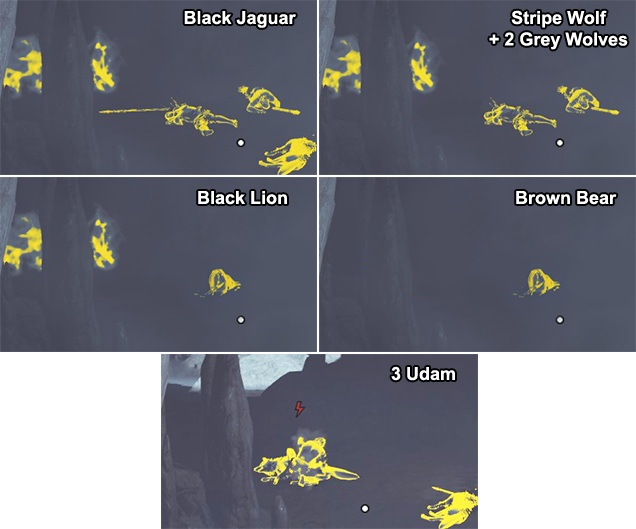
When you visit Marsa Cave, you will encounter one of the following (each variant has equal probability of 20%):
- 1 Black Jaguar;
- 1 Stripe Wolf + 2 gray wolves;
- 1 Black Lion;
- 1 Brown Bear;
- 3 Udam – one armed with a club, one with spears and the 3rd one with poison bombs (in an early stage of the game you shouldn’t mess with the last one if you’re not 100% sure that you’ll get an arrow to the head of a moving target in a split second ;).
The technique to find all animals at that location is the same as with the Cave of Hasari in the previous chapter – when you see something you no longer need, save and quit to menu, then reload the game and travel back to the cave from nearest discovered/conquered resting point.
- 2 human corpses and 1 wolf corpse – Black Jaguar;
- 2 human corpses – Wolves (another indicator – more then one predator tags);
- Loot sack and glowing smoke trail – Black Lion;
- Loot sack and no smoke trail – Brown Bear;
- 2 wolf corpses – Udam (and you can see Udam with hunter vision) :
Also, if you’ve already learned to identify animals by their sounds, you can find out what’s inside the cave by sneaking close enough to hear it (if you stay quiet, you can hear the animal/enemy even from the vantage point at the edge of the cliff).
White Wolf
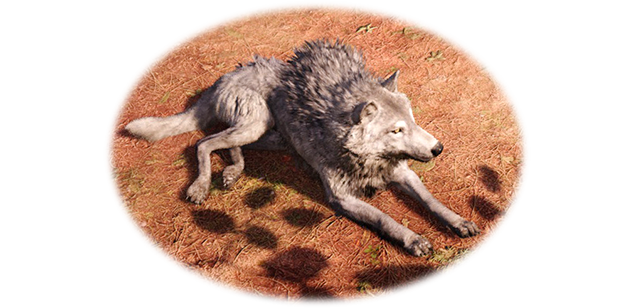
Appearance: Light-gray fur; Doesn’t leave smoke trail with hunter vision.
Distinctive features: Stronger than grey wolf, but weaker than stripe wolf; Not resistant to fire; Always with a pack of other wolves (or at least one grey companion).
Rareness in survival mode: Relatively common.
Upgrades: Hunter belt – level 1 (2 skins); Winter clothing – level 2 (2 skins).
As I said, white wolf is the only rare animal that doesn’t leave smoke trail with hunter vision, so it’s kind of “semi-rare”. It is indeed more common than any other rare animal – if you move farther away from your village, large packs of wolves almost always have a white wolf as their alpha male (except the Snowblood Wolves valley down south – I never saw a regular white wolf there).
That’s why I don’t post any screenshots of the map here – any remote location with wolf icon would give you a good chance to encounter white wolf. (The best chances are at night, when wolf packs constantly spawn around you.)
One specific location I’ve already mentioned is the Cave of Hasari (see above).
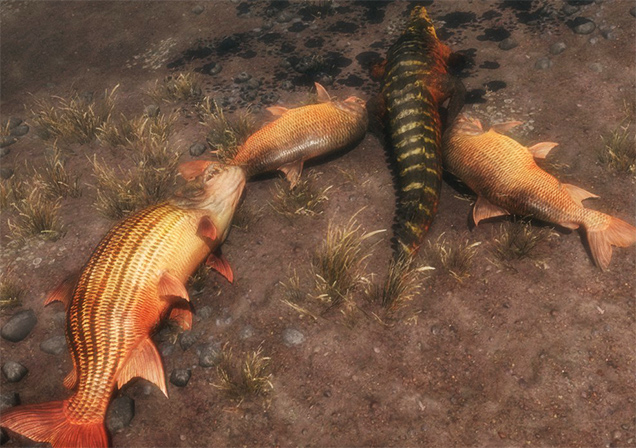
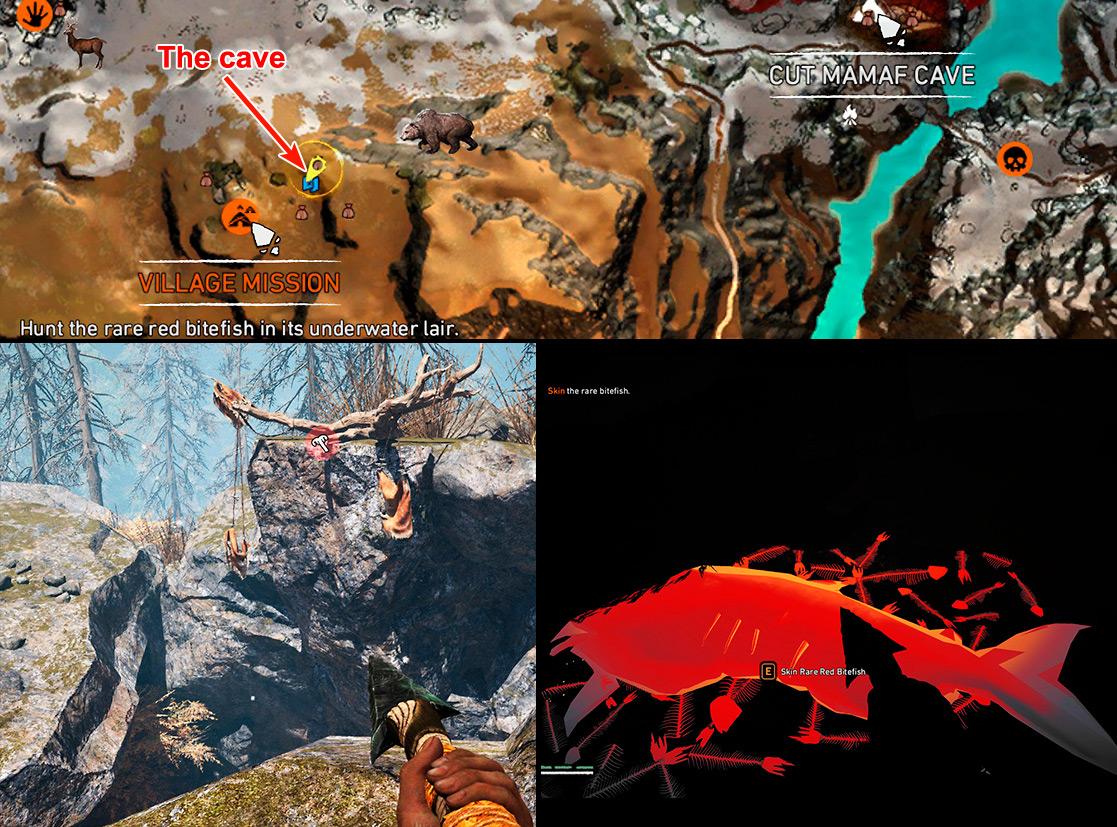
Rare Bitefish

Appearance: Dark horizontal stripes; Larger than common bitefish; Has more massive jaws and long crooked upper front teeth; The color of its fins is more reddish; Its smoke trail could be invisible from above the water.
Distinctive features: Can absorb more damage than common bitefish.
Rareness in survival mode: Very rare.
Upgrades: Roshani’s hut – level 2 (2 skins/ 1 in survival mode).
Rare and common bitefish side by side (click to enlarge):

Here are two excellent fishing locations:

Both locations are abundant with fish with a good chance to meet a rare one. The key is to find shallow waters near the shore, so the fish would more likely to rise to the surface.
Down south good fishing spot is the lake shore to the east of the outpost, on the opposite side from the fish icon on the map. At the location up north you can also find good spots with shallow water along the river (note that northern shore of the river is safer than southern one, which has lions, tigers and rhinos frequently spawn there).
The basic and proved way to hunt for bitefish is to wait for it to come close to the shore (or to lure it near the shore) and impale it with a spear. Note that when the fish is moving, you need to aim in front of its head.
There are three ways to attract bitefish – throw bait, use yourself as a bait or kill a crocodile or another bitefish to draw its mates to come feed on the corpse. Dead corpse will also help you hit the fish, since while eating it becomes stationary target.
Another way you can go is to use your brown bear as a fishing boat.
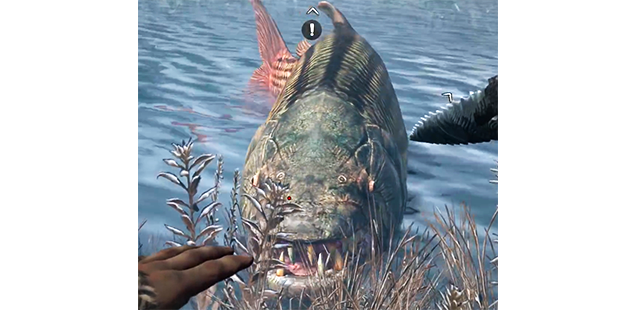
There is a rather extreme method to allow the fish to bite you repeatedly under the water. At some point it will cling to you and you’ll be prompted to quickly mash a random key to punch the fish and finally kill it with your knife (or die if you’re too slow).
Two problems with the rare bitefish (as opposed to a common one) – first, it’s not very responsive to baits; and second, I never succeeded to make it cling to me – it just repeatedly takes big chunks off your body. The 3rd problem is its distinct durability – to kill the rare bitefish with one shot you need a headshot with an upgraded spear.
Another issue is that often rare fish’s smoke trail is invisible from above the water, and you can’t see the stripes in hunter vision, you can only try to single out a rare specimen by its size and the shape of its jaws and teeth. Without hunter vision you can see the stripes from above the water only when rare fish rises to the surface and shows its back, or when you come close above it with your owl.
Turning hunter vision on while under the water can allow you to spot and detect rare bitefish by its smoke trail in survival mode.
In normal mode, as opposed to survival mode, fishing is really easy, since you can clearly see the fish with hunter vision. Personally I strongly recommend the “dead crocodile” method that I describe in detail in survival mode section below – in my opinion it is the easiest and most effective technique. (Obviously, in normal mode you won’t need all the detection tricks I mention below.)
Rare Bitefish – part 2
There are several ways to spot and tag the fish from the shore in survival mode:
- With your owl – when you look through the water surface from above, the reflection stops interfering and you can clearly see the fish (and its stripes if it’s the rare one):
And if you’ve learned “TAG ANIMALS” skill, the fish becomes tagged when your owl comes close enough. (To unlock this skill you need to bring Jayma the huntress to your village and build her a hut.)
- By throwing bait – when the fish is going for the bait, it becomes tagged with a black circle tag. Aim below the black tag to tag the fish with a long-term red predator tag (if you have animal tagging skill, of course):
- By turning the fish into aggressive mode – when the fish detects you in the water and switches into attack mode, it becomes highlighted in hunter vision in survival mode and stays visible for a very short time even after you get out of the water, and if you’re quick enough you can tag the fish by aiming at it with your bow before it stops glowing.
- With your leopard – he tags all animals around him (tagging range is about 50 meters) even if you DON’T have animal tagging skill. So pet leopard is extremely useful, you really should go get him by following my tip at the end of “Upgrading the spear – a trip to the North” chapter above (leopard spawn location is less than 500 meters to the north of the northern fishing spot).


Crocodiles hide under water lily patches and could be hard to see without a hunter vision highlight. You can detect them with your owl, look for them from under the water, or just scan water lily patches with the reticle of your aimed bow until it turns red. When the croc is spotted, come closer to see it and shoot it in the head:
* It’s better to make the croc turn and face you before shooting (by making him notice you), than to kill him when he is turned sideways as in the screenshot (later you will see why).

Dive to collect your arrow/spear, but DON’T SKIN the croc, so it stays visible in hunter vision. Stay in the water until you see a bitefish coming for a double snack (you and the croc), then get out of the water and stand right in front of the dead crocodile so that it doesn’t obscure the fish if it comes up behind the corpse. Turn hunter vision on, aim your spear to the croc and wait. Soon you will hear a very distinct rustle when the fish starts biting off the corpse. Quickly scan around the croc with the reticle to tag the fish (unless it has been already tagged by your leopard), and then throw your spear, aiming directly under the tag while the reticle is red. This way you greatly increase the chance to hit the bitefish’s head:

If you have no ability to tag the fish, you still can hit the fish in the head, if you just aim close to the corpse while the reticle is red. You can also see the dark silhoette of its biting mouth when it obscures the glowing corpse:


And if your first spear or arrow doesn’t kill the fish, you can then track it by the glowing projectile stuck in its body (in hunter vision).
Even if first fishes that come are regular ones, eventually the rare bitefish will arrive if you wait long enough (dive into the water from time to time to look for it and attract it by your smell, just don’t swim too far from your dead croc so it won’t disappear):
If the rare bitefish doesn’t come (which could happen in survival mode), move along the shore to another spot, or go sleep in a nearby resting place to refresh the spawning process and try your luck in the next morning.
If you can’t find a croc in the area, you would have to kill a regular fish, which is easier than a rare one – it responds much better to bait, less durable (one spear to the body will do the job), and if you use yourself as a bait, will eventually cling to you, allowing you to kill it on the spot.
Finally, on the extreme side, here’s very risky but effective method to kill the rare bitefish: If you let it repeatedly attack you in the water, it becomes agitated and chases you to the very edge of the land, where you can get out and turn around for an easy kill:
You skin a dead rare bitefish on the bottom of a cave during one of the last village quests (NE to Marsa Cave, west from Cut Mamaf Cave):
* Secret loot sack with 2 rare skins
If you’re tired of searching around and chasing after rare animals, there is an opportunity to get 2 skins of any rare animal you’re still missing for some upgrade. There is a small, but deep lake inside a cave NE to your village:
(This is where you save Dah from drowning.)
To reach the loot sack you need to swim to the north end of the lake, then dive down to the bottom of a deep tunnel (you can use “Speed boost” recipe if you wanna be sure you’ll come back up to the surface after reaching the bottom).
Inside the loot sack you’ll find 2 skins of a random rare animal. If you’re out of air after collecting the loot, you can open the map and fast travel out of there to avoid drowning (or just exit the game).
As I said, you don’t know for advance which skins will be in that sack and you might end up with skins you don’t want. There is a way to make multiple attempts to collect needed skins from this cave:
Moment before diving into the water, save the game (it must be player save and not the quick save!). If you got the wrong skins, exit the game and then load your player save. You will spawn at nearest resurrection point and will have another chance to go back to the cave and loot that sack.
In survival mode, which has no player saves (or if you don’t want to create new player saves), you can manually backup and load your save, as explained in my advanced saving guide (method #2 in “unlimited save slots” chapter):
[link]
Or you can just exit the game without saving and delete the latest auto-save created at the moment after looting the sack (“Rolling back to previous “hidden” save” chapter). In this case you must exit the game immediately after looting, since your death or fast travel will create another auto-save!
There is another secret loot sack near your village that doesn’t show on the map. And there is good reason for that – it is REPLENISHABLE sack that gives you one random rare skin + one random rare resource EVERY time you save and reload the game! So it’s kind of a huge cheat, since now you can farm rare skins and resources indefinitely and don’t even bother to go out and search for them… So click on the link below only if you’re REALLY lazy. 😉
– Link to the screenshot –
Last word

Thank you all for reading my guide, I’d really appreciate your comments and any constructive criticism (and of course, likes and subscriptions :)).
