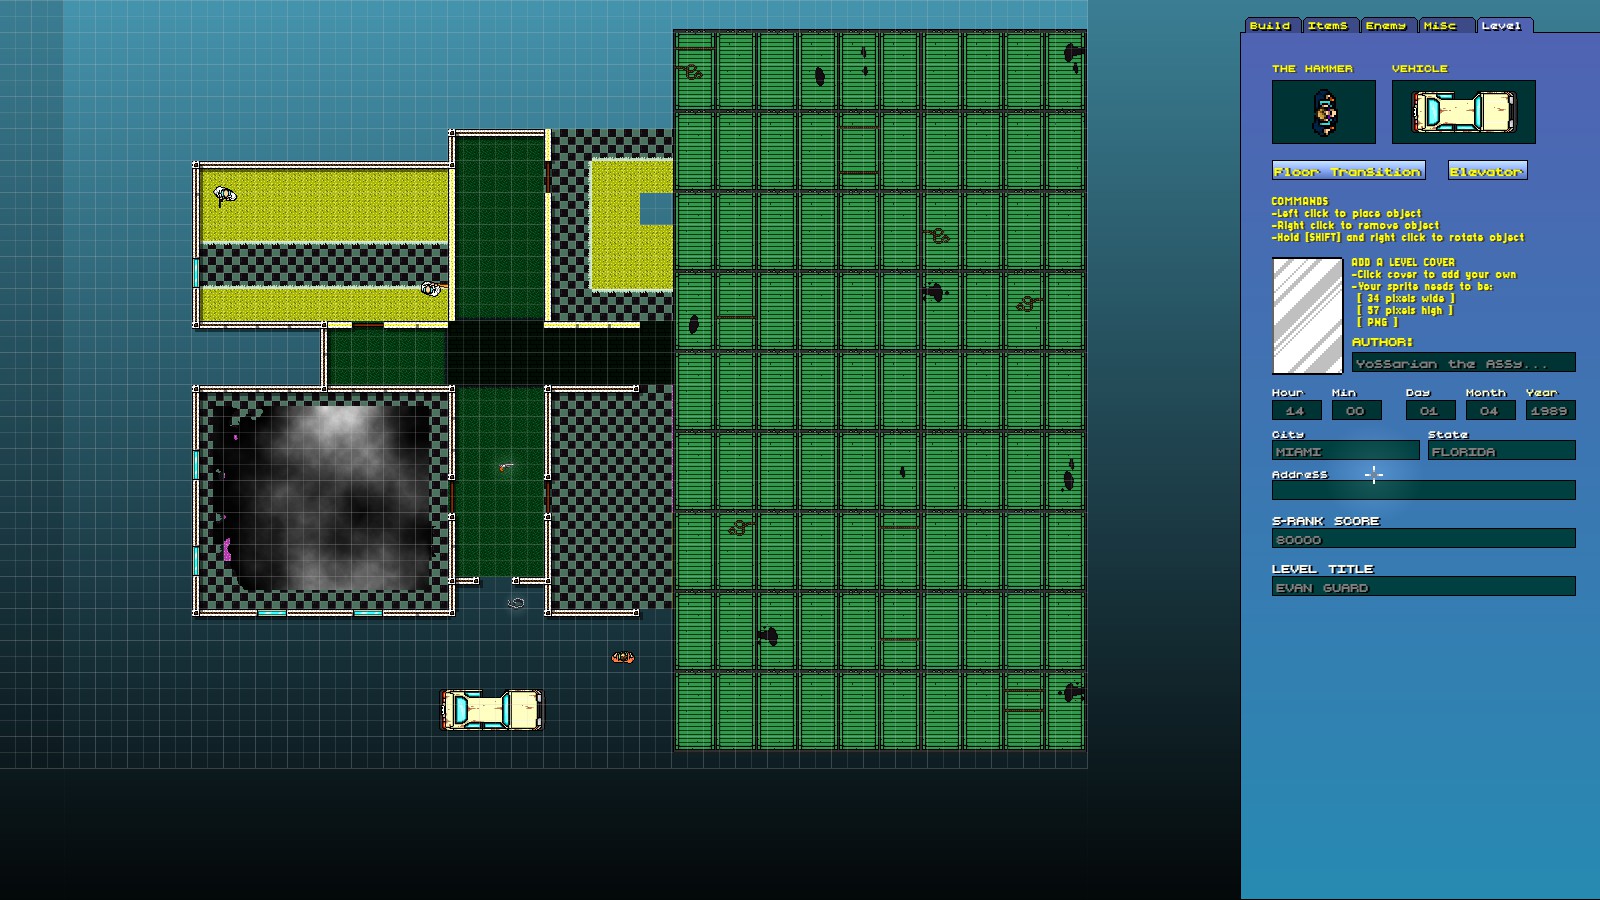
Overview
(UPDATED 5/24/21) This guide will explain how to add special effects (like nuclear blasts and smoke effects), NPCs (like the party guests in Down Under and strippers in Seizure), and bosses (like the Swan and the Bear) to your Level Editor maps using Notepad++.
Getting Started
Just like the past three guides I’ve made, you will need Notepad++ to do anything this guide suggests. To download it, go to this website: [link].
I would recommend testing out any levels altered with this guide before publishing them anywhere. Crashes can occur if incorrect numbers are put into Notepad++, or if a line is deleted. Not only that, but some bosses and effects are prone to crashing due to their complex nature.
If you haven’t read any of my other guides involving Notepad++, I would recommend doing so before using the info found here. This is written assuming you are already familiar with it.
If you are unfamiliar with using Notepad++, here’s how it works: when you place down an item or enemy, its IDs are listed in the level.obj file for that floor. There are two main types of IDs to look for: the sprite ID and the object ID. Sprite ID determines how something looks, while object ID (located two lines below sprite ID) determines how it acts in-game. Between those two spaces is the direction (0-360 degrees) it is facing. By changing the sprite and object ID of an item you added to the level, you can add virtually anything to the Level Editor that isn’t there by default. Everything below has its IDs listed as (sprite ID, object ID).
Any item that has a sprite ID of -1 will usually be invisible and change the floor’s atmosphere.
To change the frame number of an object (for items like the Dead Ahead floor and Miami Mutilator victims), change the number below the object ID to the number you need. For example, changing it to 1 for the Dead Ahead floor will spawn a smaller version of the container floor. If an item has multiple frames, I will list the total amount in the guide.
For the full sprite and object ID lists, download them here:
[link]
[link]
NOTE: Changes from Notepad++ will not stay unless you save the level again in the Editor before playing it. Playing the level without saving it from the Editor will not show anything you just added.
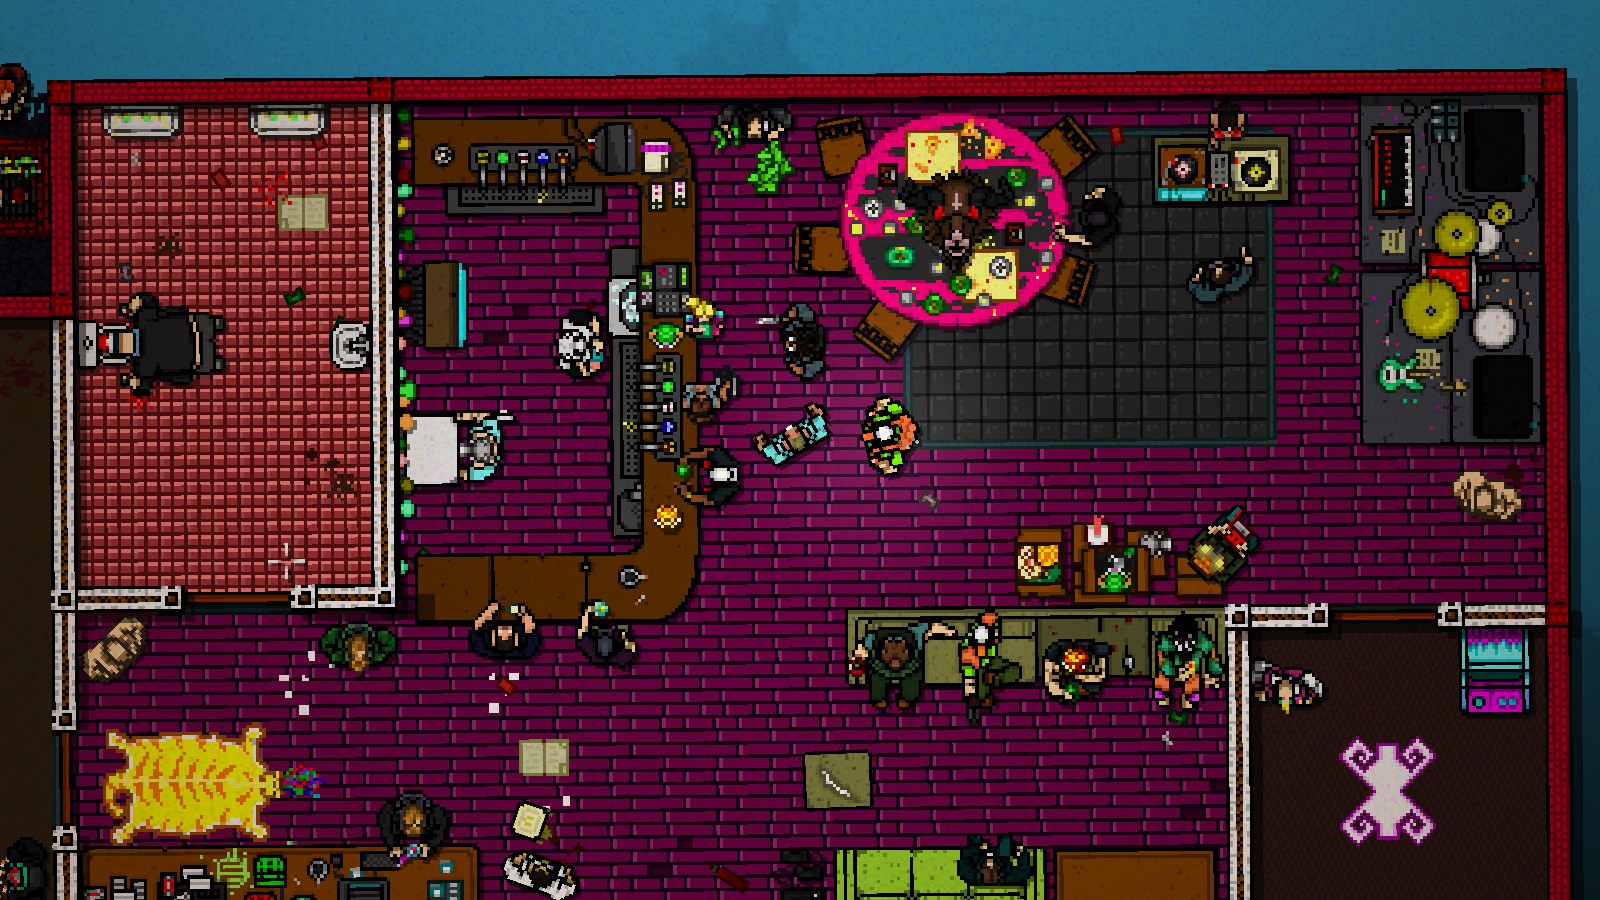
Special Effects pt. 1
For when darkness or rain isn’t enough to decorate your level, there’s always story mode special effects.
To make this work, place down any item or enemy [ex: Acidbath1 has the IDs of (2197, 1295)] and replace its IDs with…
1. HAZY/DEMON LSD FILTER (-1, 1059):
Moves the screen and adds a slight red tint, like in the first few screens of Apocalypse. Turns any mobsters into Demons if they pick up the Kalashnikov, Uzi, or Shotgun after being knocked down. Also turns all dogs into three-headed demon dogs. As a bonus, The Son’s stomp execution against mobsters doesn’t glitch and works while this filter is active. However, this will cause executions against Mafia enemies for characters other than The Son, Jake, and Jacket to glitch and spawn the default corpse sprite.

1.5: STATIC-FILLED DARKNESS (-1, 1059):
A side effect of having the Hazy/Demon LSD filter active. Placing down any darkness on your level will make it a grainy and static-filled black void, obscuring anything inside and causing the cursor to trail if it moves over it. Any changes to the sprNoise sprite will affect the darkness. As shown in the preview image, making sprNoise transparent will make the darkness pitch black.

2. BLURRING/VISIBILITY LSD FILTER (-1, 1186):
Creates sprite trails for bullets, blood, and characters. Makes LSD Son and Fat Demon Mobsters visible. Necessary for Swan and Tiger bosses to work.
3. PRISON ALARM (-1, 2169):
Gives the current floor a light red fade in-out effect. A lighter version of the Oscar mask effect.

4. TALK SHOW LIGHT (-1, 320):

Darkens a section of the level and adds moving lights to it. While it can be moved, it does not cover the whole floor. It also disappears if the player dies. Best thing to do is to build the level around it.
4.5. TALK SHOT SPOTLIGHT (514, 321)

When used inside the Talk Show Light, this places a spotlight down at a specific point in its darkness. This could be used to highlight characters, enemies, or other important objects.
(Thank you to Maxim_S for discovering this and making the preview image.)
5. MIDNIGHT ANIMAL CREDITS (-1, 2252):
Shows the credits from Midnight Animal over your level. Useful for Pig Butcher levels.

6. NUCLEAR FLASH (-1, 2051):
Shows a brief flash of white when the level starts. Nothing else happens.

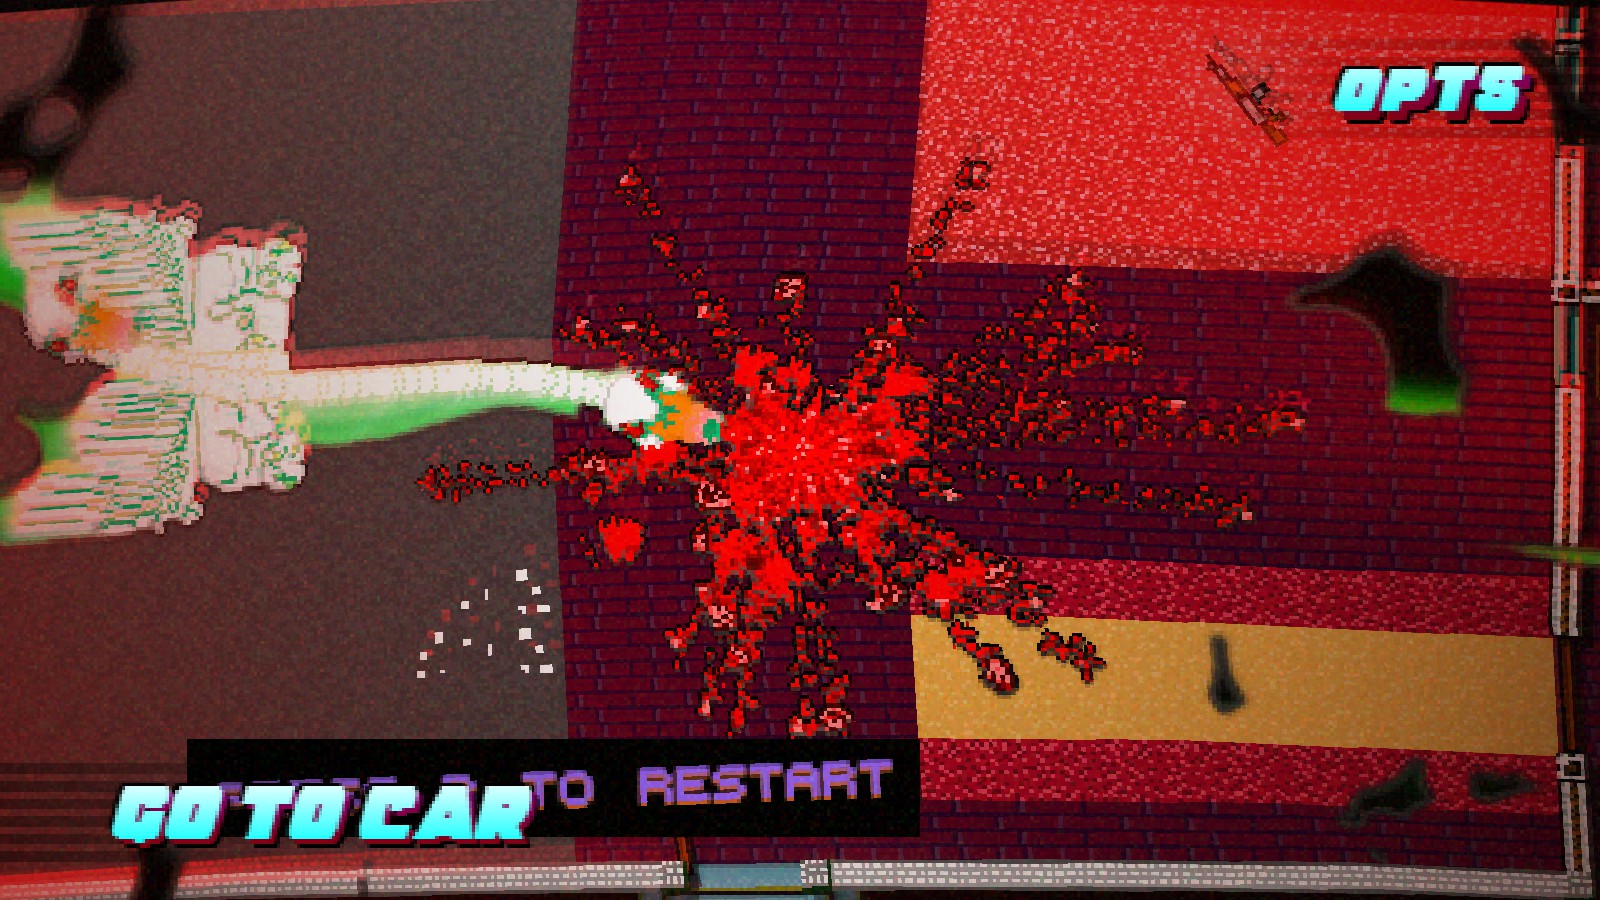
7. NUCLEAR EXPLOSION (-1, 1803):
When your character walks to the left border of your level, the nuclear blast from Casualties’ outro will occur, destroying everything in sight. After that, the game will load the introduction to Act 5 with the main menu music. After you complete the intro cutscene, the level ends.
Making a fade out cutscene where the effect activates avoids the Act 5 intro and continues your campaign.


8. SOLDIER LEVELS CAMERA (-1, 1182)
Keeps the camera focused on whatever your level borders are. Used in Beard’s levels and many cutscenes. This can allow for campaign mode-style level transitions. It breaks on the current floor if Evan goes into rage mode.

9. VHS STATIC (-1, 1073):
Adds a large rectangle of static to your level. This overlaps floor tiles, but not walls or props. Usefulness of this is what you make of it.

10. OCEAN WAVES (-1, 1598) OR (-1, 1596):
Adds a large ocean wave background to the left side of your map. This does not show up in editor view and cannot be moved with any cursor. 1596 is labeled “Ocean” and 1598 is labeled “OceanDay.”

Special Effects pt. 2
11. RICHARD FILTER (-1, 1642):
Darkens the level, adds flies that buzz around the screen, and removes your crosshair. This is the effect used during Richard’s appearances in the story. You cannot damage enemies or shoot while this filter is active.

12. EXTREME CLOSE-UP AND SLOWDOWN (-1, 990):
A strange effect that has 3 properties when active.
1st, it zooms the camera in close on a specific spot on the map. The only way to move the camera where you want it is to hold shift. Aiming is more difficult due to this.
2nd, it slows the game down considerably, giving the player more time to react to enemies. This compensates for the limited range of vision available for the player.
3rd, it adds a white filter over the game, like the haze from Dead Ahead or Midnight Animal’s smoke effects.

13. GREEN RAIN (-1, 1282):
Turns all raindrops and splashes into a dark green color. This is only visible if you have added rain to all or a part of your level. In the files, it is referred to as “SewerDrip.”

14. STATIC INTRO (-1, 1961):
Shows a burst of TV static after the level’s title is displayed. It only appears once, and does not repeat if you die on that floor. This effect appeared in Final Cut and Caught.

15. SPRITE BLENDING (-1, 1870)
Blurs blood, gore, corpses, bullets, and glass to cover the player and objects. Makes enemy walking sprites repeat multiple times. Knocked out enemies also have repeating sprites.

16. WAVES BACKGROUND (3010, 1738)
The waves background from Dead Ahead. This can be added to any floor, overlapping whatever background the level already has. Unlike normal backgrounds, this will remain if the level is put into a campaign. It must be added to each floor to appear throughout the level.

17. THUNDER NOISES (-1, 975)
Randomly plays the thunder sound effect from Final Cut and Caught on whatever floor it is added to. This does not change the background.
18. CREDITS SEQUENCE (-1, 1834)
Overlays the Apocalypse credits over a section of the floor. It can be covered by tiles, walls, and items.

19. SEIZURE SPINNING LIGHTS (-1, 2327)
Adds a spinning light effect to any of these three items while active: StripClubEntryPodium, StripClubPodium, and StripClubPodiumPrivate. It does nothing if none of these items are present.

Obstructive Special Effects
Unlike the previous effects, these ones have unique sprites that obscure part of the level in editor view. When making levels, it might be wise to add them last so you won’t have to keep moving them around while designing it. However, any effect that acts as a “floor” should be placed first.
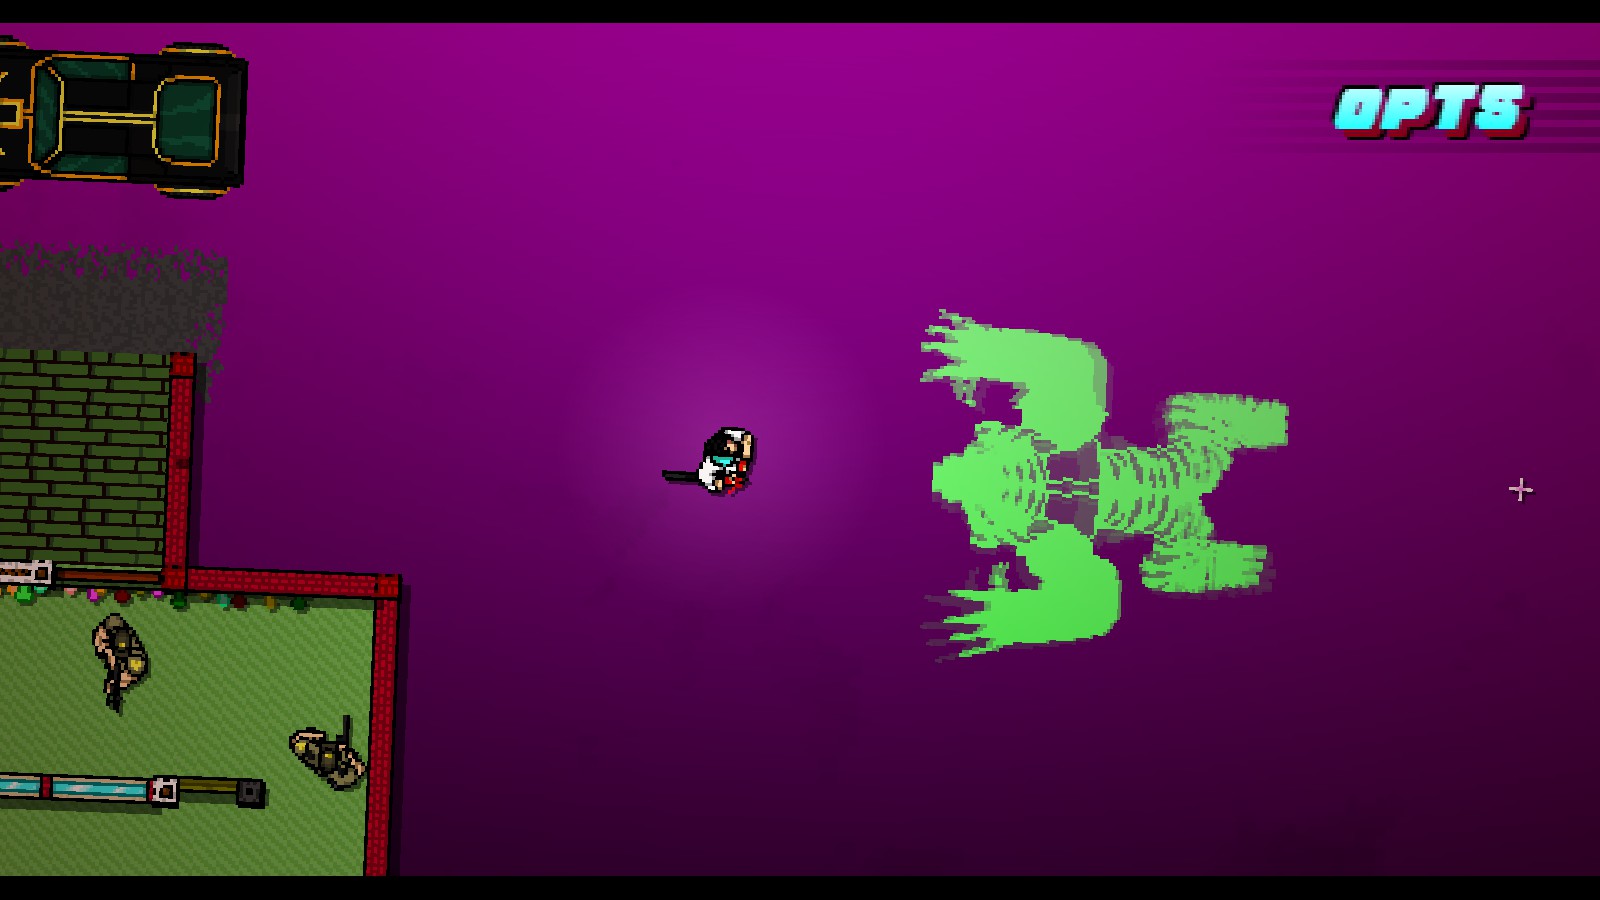
SMOKE CLOUDS AND HAZE
These effects can have their colors altered by mixing sprite and object ID combinations. Some of their sprite IDs have more noticeable changes than others (i.e. Meth Lab Smoke has more vibrant colors than the Sewer Cloud). Give them all a shot!
Sprite IDs — Smoke Shape
- Execution Haze – 410
- Fans HQ Haze – 425
- Homicide Freezer Smoke – 1329
- Meth Lab Smoke – 2494
- Dead Ahead Hazy Rooms – 3021
- Elevator Smoke – 3077
- Bar of Broken Heroes Smoke – 3472
- Sewer Cloud – 3946
Object IDs — Smoke Color
- Black – 253
- Rapidly-Flashing Red – 775
- Light Blue – 1746
- White – 2033
- Green – 2279
EXAMPLE COMBINATIONS AND OTHER ITEMS
1. MIDNIGHT ANIMAL SMOKY ROOMS: (103, 43)
Puts 2 room-sized smoke effects into the level. These were used in the first floor of Midnight Animal.


2. DEAD AHEAD CONTAINER FLOOR (2999, 1727):


The floor of the initial boat sections of Dead Ahead. This completely blocks any floor tiles from showing up, and is not visible when it is vertical. When placed horizontally, it takes up a large portion of the level, but does not obscure walls. A smaller version of the floor is available in the second frame of this item.
3. SEWER GAS CLOUD (3946, 2279):
Adds a cloud of transparent smoke to the map. In the editor view, the cloud appears as a large black block that obscures a lot of the map, so remember what you have placed below this once you have it down.


4. HOMICIDE FREEZER SMOKE (1329, 820):


5. BAR OF BROKEN HEROES SMOKE (3472, 2033):
The smoke and haze from Subway’s secret outro. It is rectangular and juts out to the left slightly.


6. DEAD AHEAD HAZY ROOMS (3021, 1746):
Four side-by-side small room-sized fog effects and one by itself below them. Unlike the other smoke effects, this does not cover up as much of the overall view. To move it, grab one of the smoky areas instead of the middle ground between the rooms.


7. EXECUTION HAZE (410, 253):
The haze effect from Execution’s second floor. If the user lays out walls along the grid, a colored haze will surround each edge and hang over the level. Unfortunately, it doesn’t look that good unless it is lined up almost exactly.


8. METH LAB SMOKE (2494, 253):
The post-explosion smoke from Withdrawal’s meth labs. It has the strongest change in colors from a change in object ID.


9. ELEVATOR SMOKE (3077, 2033):
The cloud of smoke from Casualties’ ending elevator trap. It fits smoothly over any elevator, though it is slightly too small to fit into a room.


10. FANS HQ HAZE (425, 267):
The faint outline and tint over the Fans’ bar and headquarters. Like the Execution effect, it needs to be lined up exactly to look good.


11. USING OTHER SPRITES:
Using a character or furniture sprite ID with a smoke object ID will give that sprite the properties of the smoke. The changed item will not be solid, will slowly cycle its frames, and cannot be interacted with.
Background Modding
The backgrounds of single levels can be modified through their .hlm files. Unfortunately, the same does not go for campaigns, as .hlm files do not function the same way in them. In editor view, they will always appear light gray.
To give your level a normally-inaccessible background, change line 14 in its .hlm file to one of these. For reference, the default background has the ID of 974. If you open the backgrounds menu in the editor in a level with any special backgrounds, the game will crash.
1. INTO THE PIT VOID/BACKGROUND – 1284:
Gives every floor in the level an black background that flashes dark purple with kills. This is the same background used in floors 2 and 3 of Into The Pit.

2. GAME OVER VOID/BACKGROUND – 292:
GIves every floor in the level a background that shifts from navy blue to black. This is the background that appears in the 2013 demo’s Game Over screen, which goes unused but still present in the main game. It also strongly resembles the background from Hard Mode levels.

3. TIGER BOSS BACKGROUND – 1191:
Similar to the Into the Pit background, this gives all floors a black void. However, this flashes bright red whenever an enemy is killed. This appeared in the Tiger’s floor of Apocalypse.
4. LIGHT ORANGE BACKGROUND – 749:
The “morning” loading screen background from Beard’s levels. It functions as a level background, albeit with no flashes when you score a kill.

5. SOLDIER LEVELS CAMERA – 1182:
While technically not a unique background, this still works as one. Using the Soldier Level Camera as a background applies the effect to every floor with the default purple and blue void. If you aren’t interested in any of the other backgrounds and want the effect in place, this could potentially save some time. Pausing the game turns the background grey, but dying resets it to normal.

6. SUNSET OVERLAY – 1770:
The overlay effect from Stronghold. This applies the sunset effect to every floor on your level with the default void. You can double up on the effect by adding it through the editor, making the colors appear washed-out from the brightness.


7. NON-REACTIVE DEFAULT BACKGROUND – 2362:
The default purple and blue void that all campaigns use, but with a minor difference: it does not flash or react when enemies are killed.

8. DARK RED BACKGROUND WITH THUNDER – 1283:
An unused variant of the Dark Brown background in the Level Editor. The background shifts through shades of dark red, and thunder occasionally flashes in the background.
Unique NPCs not in the Editor pt. 1
By default, the Level Editor has a lot of options for adding characters to cutscenes or as level decorations. However, there are some unique characters that are not available. Listed below are the sprite IDs of characters and items that cannot be normally placed in levels.
For an easy replacement, place down a prop of a mobster walking with a Kalashnikov (sprite ID 1500) and swap the ID with one of the entries below. Adjusting its animation speeds will affect the replacement, assuming it has more than one frame. NPCs are stored in a floor’s .obj file if they were added as items or the .npc file if they were added through the cutscene menu.
FANS PARTY CAMEOS:

482 – Guy vomiting (MOON)
488 – Perturbator
492 – Blond Guy sitting and flipping burgers (Jasper Byrne)
2931 – Guy with beard and green hoodie dancing (Castanets)
2932 – Guy with hat and vodka dancing (Coco Bryce)
2935 – Robot in hoodie with glowing face (Magic Sword)
2939 – Guy with dreadlocks flipping knife (Scattle)
2930 – Ram’s head with glowing eyes (Carpenter Brut)
2933 – Female DJ with equipment (Elin)
2936 – Guy with sunglasses dancing (Magna)
2938 – Team selling merchandise with table (Riddarna)
3784 – Old TV (Mitch Murder)
3783 – Guy with beard and red hoodie dancing (Dubmood)
3782 – Guy in hat holding hand out (Dave Minus)
3779 – Red haired guy rubbing hands together (Benjamin)
3781 – Shouting Guy in blue shirt (Dag)
3780 – Guy with neon blue hoodie and sunglasses (Benny Smiles)
4057 – Glowing green sewer entrance (Sjellos)
4059 – Bearded guy with hookah (Simon)
4068 – Owl mask sitting with Gameboy (Rasmus)
4062 – Pot dealer (Green Kingdom)
4065 – Guy in varsity jacket with beak (Vestron Vulture)
4064 – Tanned guy with glasses (Modulogeek)
4063 – Police car with pink grafitti (Cinimod)
4066 – Glowing pink logo (Chromacle)
4069 – Girl with beer can (Blanchard)
4070 – Guy in sweater sitting (Evans)
SEIZURE OUTRO:

2076 – Stripper licking thumb
3540 – Stripper brushing her chest
3541 – Stripper bouncing her chest
3542 – Stripper shrugging shoulders
3543 – Stripper snorting
PARDO’S NIGHTMARE:

3343 – Phantom sitting
3344 – Phantom walking
3345 – Phantom falling down
3348 – Phantom choking Pardo
3359 – Phantom pointing
HENCHMAN CAR DREAM:

1756 – Henchman in car with money bag
1888 – Henchman in car with Mafia Richard
1757 – Henchman in car with Jacket Richard
ABYSS MASKED NPCS:

Note: Some of the characters shown above can be found in the “Multi-Frame NPCs” section of the guide.
2516 – Owl Mask
2517 – Wolf Mask
2518 – Giraffe Mask
2519 – Monkey Mask
2520 – Panther Mask
2521 – Locust Mask
2522 – Chameleon Mask
2523 – Elephant Mask
2524 – Chicken Mask
HAWAII WAR:

1199 – Barnes with MP5
1200 – Daniels standing
1201 – Jacket smoking
1202 – Colonel leaning on table
1267 – Jacket and Barnes using radio
1268 – Barnes beating up fat soldier
1269 – Jacket smoking with MP5
1274 – Jacket holding soldier at gunpoint
1275 – Daniels at table with map and dead officer
2227 – Mark with sunglasses and coffee mug
2228-2229 – War Photographer taking photos
2230 – War Photographer putting away camera
2232 – Alex smoking
2233 – Ash fixing radio
2234 – Tony drinking
2235 – Evan talking with notepad and pen
2236 – Evan writing on notepad
2237 – Corey eating pizza
2238 – Guy with glasses and hat playing Gameboy
2242 – Jacket walking unarmed
2761 – Jacket sunbathing
2762 – Colonel drinking and lying down
2763 – Barnes and Daniels playing cards
2770 – Barnes sitting
2771 – Daniels sitting
3023 – Colonel walking with panther mask
3024 – Colonel raising his arms with panther mask
3025 – Colonel walking with bloody face
3026 – Colonel’s mask dropping
3050 – Colonel talking with heavy machine gun
3051 – Daniels talking with shotgun
3055 – Barnes pulling fence away
3071 – Russian general shooting himself
3072 – Barnes picking lock
3073 – Jacket wounded
3078 – Barnes walking with kalashnikov
3079 – Daniels walking unarmed
3080 – Daniels kneeling
3081 – Barnes dead
3083 – Beard carrying Jacket
3085 – Jacket wounded with medics
3086 – Beard giving photo
APOCALYPSE:
(Note: Any NPC with a * next to its name will have its sprites trail when used with the blurring LSD filter.)
2035 – Tiger boss’s body attacking
2036 – Tiger boss’s head roaring
2037 – Tiger boss’s head during attack
2039 – Bear boss walking upright
2041 – Mobster walking with double barrel without outline*
2044 – Tiger boss walking*
2058 – Hallucination bird*
3154 – Swan boss body*
3156 – Swan boss shadow/gargoyle*
3160 – Swan boss head*
3169 – Bear boss running
3170 – Bear boss eating
3171 – Bear boss dead
3172 – Bear boss getting up
3182 – Zebra boss*
3184 – Zebra boss head*
3186-3189 – Zebra boss exploded pieces*
3209 – Demon mobster idle with Club
3217 – Demon mobster walking with Uzi
3218 – Demon mobster walking unarmed
3219 – Demon mobster walking with Club
3220 – Demon mobster getting up off ground
3221 – Demon mobster attacking with Uzi
3222 – Demon mobster attacking with Club
3223 – Demon mobster attacking with Shotgun
3224 – Demon mobster walking with Shotgun
3226 – Fat demon mobster walking*
3227 – Fat demon mobster attacking*
3228 – Fat demon mobster dying*
3231 – Demon mobster walking with Kalashnikov
3232 – Demon mobster attacking with Kalashnikov
3235 – Demon dog walking without outline*
3236 – Demon dog running without outline*
3237 – Demon dog eating without outline*
3250-3258 – Mafia corpses warping and disappearing*
3258 – Demon dog eating
3259 – Demon dog running
3260 – Demon dog walking
3261 – Mobster eating
3262 – Mobster turning into demon
3264 – Demon mobster getting up from wall
CREDITS:

3509 – Actress sitting down with glass
3510 – Pardo against wall with Magnum
3511 – Empty whiskey bottle
3512 – Jacket sitting down in prison uniform
3513 – Richter’s mom with bag
3514 – Richter laying down with sunglasses
3515 – Evan’s baby in chair
3516 – Evan in chair
3517 – Evan’s kid in chair
3518 – Evan’s wife in chair
Unique NPCs not in the Editor pt. 2
Sometimes, there are so many NPCs that you need two sections to cover them…
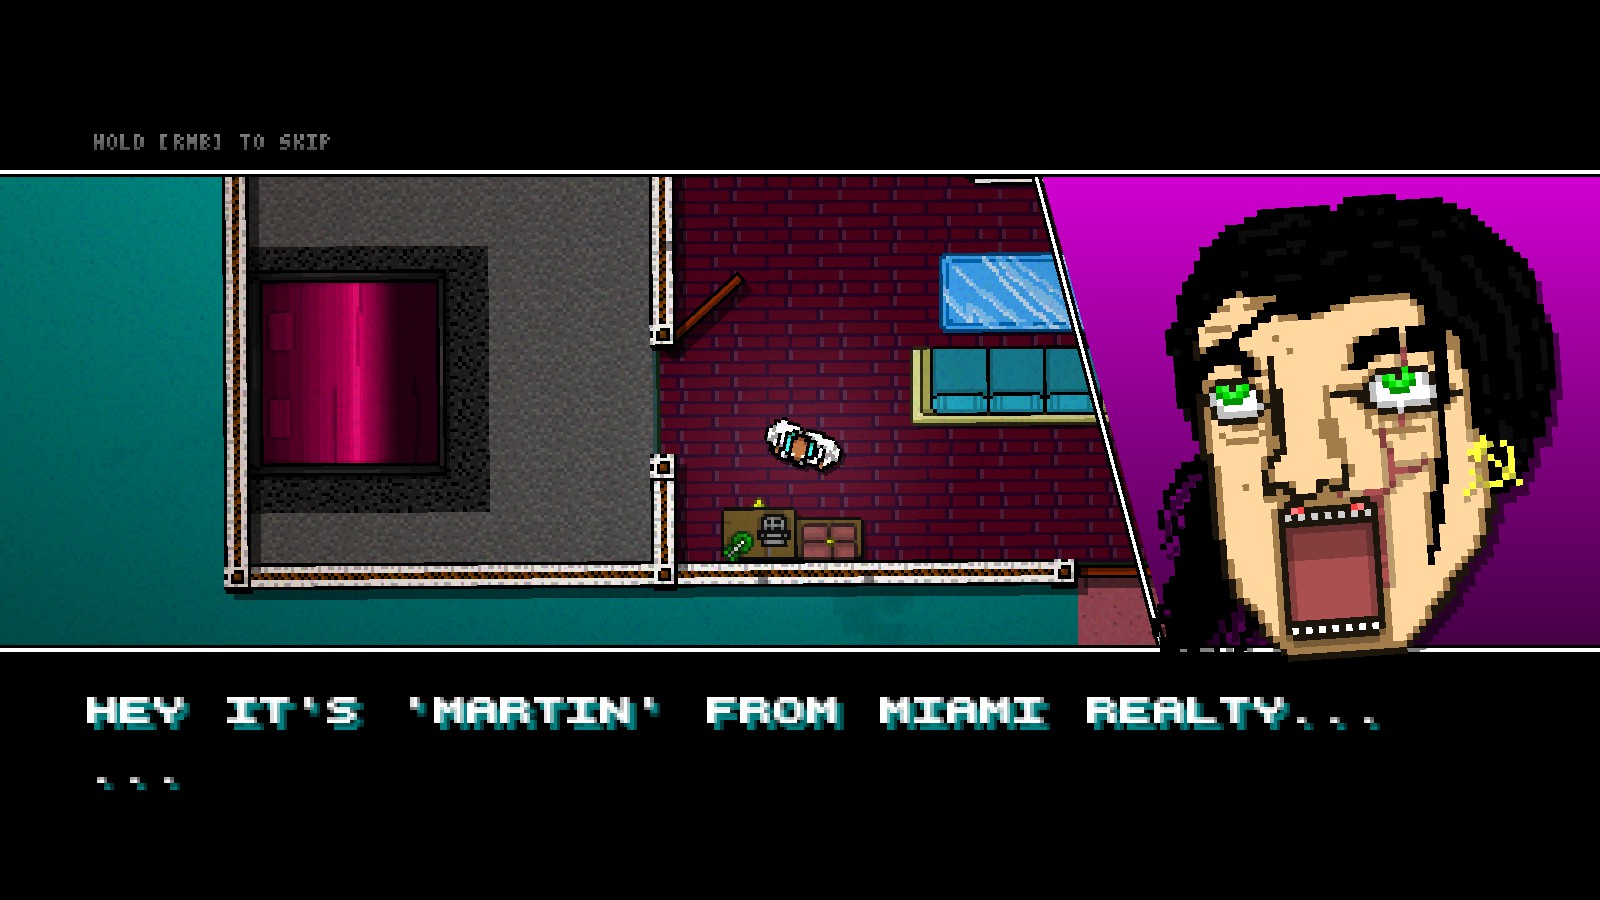
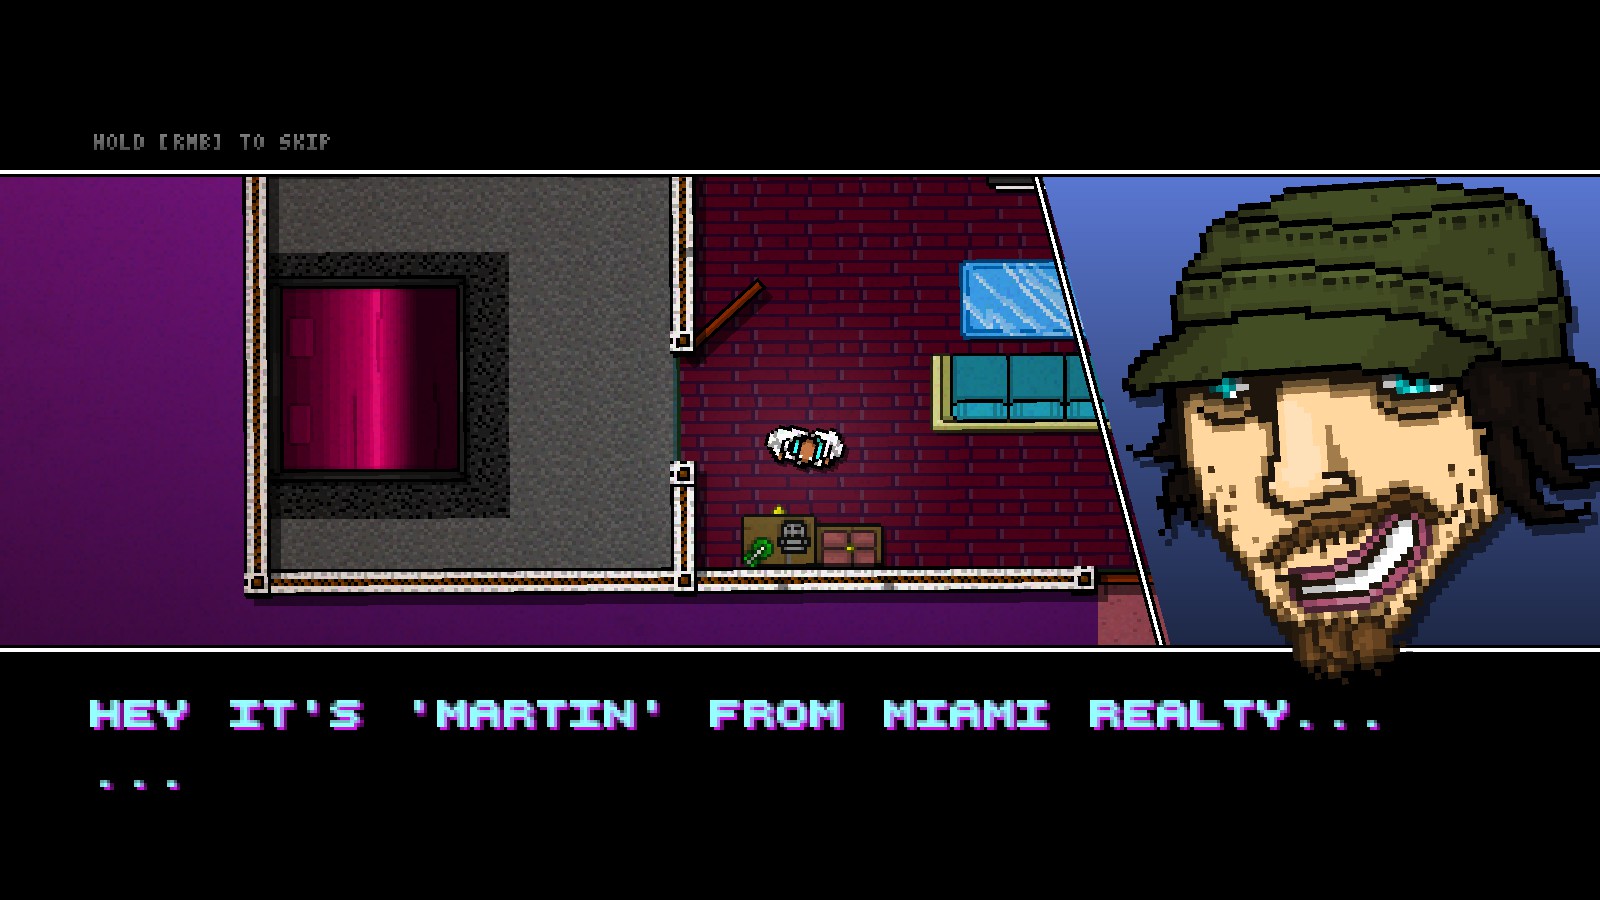
FILM CREW AND FINAL CUT INTERVIEW:

278 – Blond guy holding camera with one arm
279 – Cleaner with mop and bucket
281 – Director sitting
282 – Sound engineer with mic
287 – Director walking
493-495 – Host sitting, talking, and gesturing
496-498 – Martin Brown in suit sitting and talking
502 – Shaded girl with ponytail sitting
504 – Shaded woman sitting
505 – Shaded bald man sitting
506 – Shaded man in suit sitting
508 – DJ with equipment
509 – Audience member getting up and putting on Richard mask
511 – Talk show host clapping
513 – Assistant with camera
516 – Host decapitated
517 – Pig Butcher with suit in bloody chair
521 – Talk show coach worried
529 – Martin Brown with suit getting up
530 – Martin Brown standing with suit and hammer
BAR OF BROKEN HEROES:

2815 – Alex, Ash, and Tony at table
2816 – Henchman and Son drinking
2822 – Old Biker sitting
MIDNIGHT ANIMAL TUTORIAL ENEMIES:

21 – Pig Butcher forcing himself on Girl
27 – Blue Hoodie Guy attacking with Bat
29 – Black Guy knocked against wall
30 – Black Guy dancing
31 – Black Guy walking
32 – Blue Hoodie Guy walking
33 – Pink Hoodie Guy walking
34 – Girl walking
37 – Girl crawling
38 – Pink Hoodie Guy smoking
39 – Girl reading script
40 – Blue Hoodie Guy walking with Bat
41 – Black Guy pulling
42 – Black Guy dead
43 – Black Guy shot
47 – Blue Hoodie Guy dead
48 – Blue Hoodie Guy shot
52 – Pink Hoodie Guy dead
53 – Pink Hoodie Guy shot
56 – Turqoise hat
57 – Shirtless Guy dead
58 – Shirtless Guy shot
174 – Blue Hoodie Guy dancing
230 – Shirtless Guy walking
232 – Shirtless Guy knocked against wall
242 – Shirtless Guy punching
257 – Girl and Shirtless Guy kissing
389 – Glasses Guy resting against wall
390 – Glasses Guy dead
1629 – Girl pulling out 9mm
1630 – Girl firing 9mm
1631 – Girl walking with 9mm
1695 – Girl looking around
UNUSED/UNAVAILABLE PLAYER ABILITIES:

17 – Pig Butcher headbutting
23 – Pig Butcher smashing Black Guy against wall
24 – Pig Butcher smashing Blue Hoodie Guy against wall
25 – Pig Butcher smashing Pink Hoodie Guy against wall
26 – Pig Butcher smashing Shirtless Guy against wall
2016 – Writer walking with Double Barrel
2017 – Writer walking with Kalashnikov
2018 – Writer walking with Knife
2019 – Writer walking with M16
2020 – Writer walking with Shotgun
2021 – Writer walking with Silencer
2023 – Writer walking with Uzi
2046 – LSD Son walking with Shotgun [NOTE: The Shotgun is a separate sprite for this, 2047]
2056 – LSD Son firing shotgun [NOTE: The Shotgun is a separate sprite for this, 2057]
2059 – LSD Son walking
2395 – Rat flipping Shotgun like Pardo
3192 – LSD Son walking with Magnum
3193 – LSD Son firing Magnum
3265 – LSD Son dead
3266 – LSD Son slashed
3896 – Henchman doing overhead attack with Skateboard
SON’S FAMILY:

2735 – Bodyguard standing
2736 – Father with Richard mask
2737 – Father talking
2738 – Bodyguard putting Richard mask on Grandfather
2809 – Grandfather putting on Richard mask by himself
MISSING SOLDIER SPRITES:

(Note: While some sprites from the Soldier faction are available in the Editor by default, these are not.)
1126 – Soldier rolling back and forth on fire
1127 – Soldier on back burning
1128 – Soldier on ground burning
1129 – Soldier running while covered in flames
1130 – Soldier falling to ground while burning
1161 – Fat Soldier walking with MP5
1162 – Fat Soldier firing MP5
1163 – Fat Soldier walking with Knife
1164 – Fat Soldier attacking with Knife
1165 – Fat Soldier dead with Knife or MP5
1166 – Fat Soldier dying
1279 – Soldier running while burning
4042 – Fat Soldier dead without weapon
DOGS:
1766 – Dog walking
1767 – Dog eating
1768 – Dog running
1769 – Dog dead
1770 – Dog slashed
1771 – Dog shot
1995 – Dog pieces
2594 – Dog exploded
3319 – Leashed Dog pouncing on left
3321 – Leashed Dog pouncing on right
3324 – Leashed Dog dead
3996 – Dog tased
4281 – Dog knocked out
4287 – Dog burnt
FIRST TRIAL INTRO:

(Note: The court tables shown in this screenshot can be found in the Unused Story Mode Furniture section of the guide. The audience members are in the section below this one.)
1709 – Jacket in suit
4058 – Maskless Biker
Multi-Frame NPCs and Specific Dead Sprites
NPCs with multiple frames have problems when added with a regular NPC’s object ID. Adding them with their own unique object IDs allows them to appear normally and function as intended.

I would avoid using items like AcidBath1 as a base for spawning these, as it rapidly cycles through its frames. A better choice would be AcidBath3 (2198, 1293).
To pick the frame you want, select the line below the object ID and change it to a number for your intended NPC. Remember that frame numbers go from 0-9, not 1-10.
- Jurors: (1712, 1037) with 10 frames
- Unicorn, Horse, Fox, or Pig Mask sitting: (2525, 1434) with 4 frames
- Frog, Mole, Crocodile, Bat, Dog, or Fish Mask standing: (2526, 1435) with 6 frames
- CSI Members: (3372, 1949) with 3 frames – talking to first frame ends level early
- Release Guard corpses: (3660, 2137) with 6 frames – can be walked over
- Release Guard corpses against wall: (3661, 2138) with 3 frames – can be walked over
- Demonstrators: (3754, 2194) with 4 frames
- Cameramen: (3755, 2195) with 6 frames
- Reporters: (3785, 2212) with 4 frames
- San Francisco Citizens: (3894, 2248) with 4 frames
- Surrendered Soviet Soldiers: (1270, 769) with 3 frames
HARD MODE INTRO NPCs
The special NPCs from the intro have multiple frames – one where they are alive, and one where they are dead. Some also have a talking frame. Unfortunately, their assigned object IDs crash the Level Editor. To get around this, the object ID of 1037 should be used alongside any of the sprite IDs below.
Note that all of these NPCs have lines in front of their seats. These lines can be hidden by placing them against tables or other items.
- Large table with movie projector – 3545
- The Cop – 3546 (3 frames: sit, talk, skeleton)
- The Fans standing together – 3547 (2 frames: sit, shot)
- The Henchman – 3548 (3 frames: sit, talk, dead)
- The Soldier – 3549 (3 frames: sit, talk, skeleton)
- The Pig Butcher – 3550 (2 frames: sit, shot)
- The Rat – 3551 (2 frames: sit, skeleton wearing mask)
- Richard – 3552 (18 frames: turning on projector)
- The Cobra – 3553 (2 frames: sit, dead wearing mask)
- The Son – 3554 (3 frames: sit, talk, legs broken)
- The Writer – 3555 (3 frames: sit, write and talk, skeleton)
- Movie screen – 3556 (2 frames: off and on)
PLACING SPECIFIC DEATH SPRITES
Due to the limitations of the Level Editor’s NPC tab, you cannot place specific death sprites without changing a regular item’s sprites. You can get around this by using a death sprite’s ID alongside the object ID of a multi-frame NPC. Picking a specific frame works the same way.

To choose a specific sprite, use one of the sprite IDs below with one of two object IDs. 1037 makes the bodies solid, while 2137 allows you to walk over them. Regardless of which object ID you choose, the frame number – located one line below the object ID – will determine what sprite shows up.
Use the same methods described above to pick out the sprite you want the player to see in your level. The Level Editor or HLMWADExplorer are good tools for previewing what sprites are available in each ID.
Mafia death sprites:
- Blunt – 1460 (12 frames)
- Cut – 1461 (8 frames)
- Bullet – 1462 (12 frames)
- Shotgun – 1463 (9 frames)
- Wall Bullet – 1515 (2 frames)
- Wall Melee – 1516 (4 frames)
- Wall Shotgun – 1517 (2 frames)
- Knockout – 2107 (5 frames)
- Explosion – 2593 (5 frames)
- Slashed – 2892 (3 frames)
- Pieces – 2893 (8 frames)
- Nailgun – 3861 (5 frames)
Gang death sprites:
- Cut – 212 (8 frames)
- Blunt – 213 (12 frames)
- Bullet – 214 (12 frames)
- Shotgun – 215 (9 frames)
- Slashed – 216 (11 frames)
- Wall Bullet – 470 (2 frames)
- Wall Melee – 471 (3 frames)
- Wall Shotgun – 472 (2 frames)
- Pieces – 1752 (8 frames)
- Chainsaw – 1753 (3 frames)
- Knockout – 2453 (5 frames)
- Dodger Knockout – 4147 (5 frames)
Colombian death sprites:
- Blunt – 2306 (12 frames)
- Cut – 2307 (8 frames)
- Bullet – 2308 (12 frames)
- Shotgun – 2309 (9 frames)
- Slashed – 2310 (3 frames)
- Pieces – 2311 (8 frames)
- Wall Bullet – 2319 (2 frames)
- Wall Melee – 2320 (4 frames)
- Wall Shotgun – 2321 (2 frames)
- Dodger Knockout – 4148 (4 frames)
Police death sprites:
- Blunt – 1561 (12 frames)
- Bullet – 1562 (12 frames)
- Shotgun – 1563 (9 frames)
- Wall Bullet – 1568 (2 frames)
- Wall Shotgun – 1569 (2 frames)
- Wall Melee- 3389 (4 frames)
- Thrown Knife – 4358 (5 frames)
- Cut – 4360 (8 frames)
Guard death sprites:
- Blunt – 2689 (12 frames)
- Cut – 2690 (8 frames)
- Bullet – 2691 (12 frames)
- Shotgun – 2692 (9 frames)
- Wall Bullet – 2697 (2 frames)
- Wall Melee- 2698 (4 frames)
- Wall Shotgun – 2699 (2 frames)
- Thrown Knife – 4257 (5 frames)
- Pieces – 4270 (8 frames)
Soldier death sprites:
- Cut – 1122 (8 frames)
- Bullet – 1123 (12 frames)
- Shotgun – 1124 (9 frames)
Prisoner death sprites:
- Blunt – 3586 (12 frames)
- Cut – 3587 (8 frames)
- Bullet – 3588 (12 frames)
- Shotgun – 3589 (9 frames)
- Wall Bullet – 3594 (2 frames)
- Wall Melee – 3595 (4 frames)
- Wall Shotgun – 3596 (2 frames)
Fat Enemy death sprites:
- Soldier with MP5 or Knife – 1165 (6 frames)
- Police Inspector – 1571 (3 frames)
- Gang – 2188 (4 frames)
- Mafia (explosion) – 2595 (2 frames)
- Mafia (normal) – 2598 (4 frames)
- Prisoner – 3681 (4 frames)
- Soldier without a weapon – 4042 (5 frames)
STORY MODE VANS
Some of the vans seen in Story Mode – and those that didn’t make it into the final game – can be added to the Level Editor. Their sprite IDs are listed below, and the object ID of 1037 is best used alongside them. Their individual frames feature doors, windows, and engines opening and closing.
Some of their floors and engines may be missing, and will have to be added individually. When doing this, remember that older items always appear below newer ones.
A few of these items can work well as animated NPCs, but most do not have animations that play smoothly that way.

- Ash repairing Fans’ Van with Tony by window – 1882 (14 frames)
- Ash finishing repairs on Fans’ Van – 1883 (13 frames)
- Fans’ Van floor and engine – 1884
- Phone Hom Van opening door – 2605 (13 frames)
- 50 Blessings Manager in Phone Hom Van – 2611 (12 frames)
- Ash fixing engine of Fans’ Van – 2775 (14 frames)
- Beta Getaway Van opening door – 2779 (13 frames)
- Getaway Van floor – 3952
Cutscene Faces not in the Editor
Unfortunately, not every face sprite is usable in the level editor by default. You can fix this by editing your level’s .csf file with Notepad++. Below every line of dialogue is the sprite ID for whatever face will be displayed. For example, the first face sprite in the Cutscene Editor, sprFacePig, has a sprite ID of 500. To make use of locked-out face sprites, replace every instance of the sprite you used with one of these:
1. HOUSTON’S MASK (2772):
A moving, uncolored version of Houston’s mask from Payday 2. Originally made by Dennaton during their crossover DLC with Overkill.

2. “GOTTA GET A GRIP” FACE (3196):
The Son’s mouth-stretching face from Apocalypse. Animation loops over and over again.
3. HALF OF SON’S FACE (3197):
Listed in the files as “SonGateCover.” Probably used to hide your character after he is sucked into the face sprite.

4. JONATAN THE JANITOR (3649):
One of the two janitors. Modeled after developer Jonatan Soderstrom.
5. DENNIS THE JANITOR (3648):
The other of the two janitors. Modeled after developer Dennis Wedin.

6. MYSTERIOUS, UNNAMED FAT MAN (4254):
An unknown overweight man with purple eyes and brown hair. The IDs location in the files suggests it was made at the same time as the Fans’ unmasked faces and the Hammer’s face.

7. BLOODY COLONEL (3029):
The Colonel’s face after a bloody panther mask falls off of him in Casualties. For some reason, this is not available in the editor, even though his other faces are.

8. FANS MASK CYCLE (391):
Technically not an official face sprite, but it still works as one. This cycles between the 5 Fans masks rapidly. Could be useful for a collective piece of dialogue or a comedy campaign.


9. BARNES (1272):
Barnes, one of Jacket’s squadmates during the Hawaii War. For some reason, all of his and Daniels’ sprites are unavailable without Notepad++.

10. DANIELS (1273):
Daniels, one of Jacket’s squadmates during the Hawaii War. For some reason, all of his and Barnes’ sprites are unavailable without Notepad++.

11. DRUNK COLONEL (2765):
The Colonel with a sad expression and a delay between his individual eyebrows blinking. He appears this way at several points in the Hawaii campaign due to his alcoholism.

12. RICHTER’S TAPES (4049):
Richter’s cassette tapes from his answering machine. These are obtainable in an easy-to-miss cutscene in the outro of Subway, and briefly appear as a face sprite then.

13. POLICE OFFICER (1338):
The generic Police faction face from Homicide, Dead Ahead, and Caught. While the “scared” version of this face is in the editor, the standard version shown here is not.

14. VENTRILOQUIST DUMMY (3353):
The ventriloquist dummy’s face from Caught’s second intro. In the game’s files, it is referred to as both “Phantom” and “Ventriloquist.”

15. EYEBALL (3804):
The large eye from the Control Scheme menu. It looks back and forth while animating.

16. ALL CHARACTER FACES (3799):
Like the Fans Mask Cycle, this cycles through an assortment of character faces and ability icons. None of them animate.


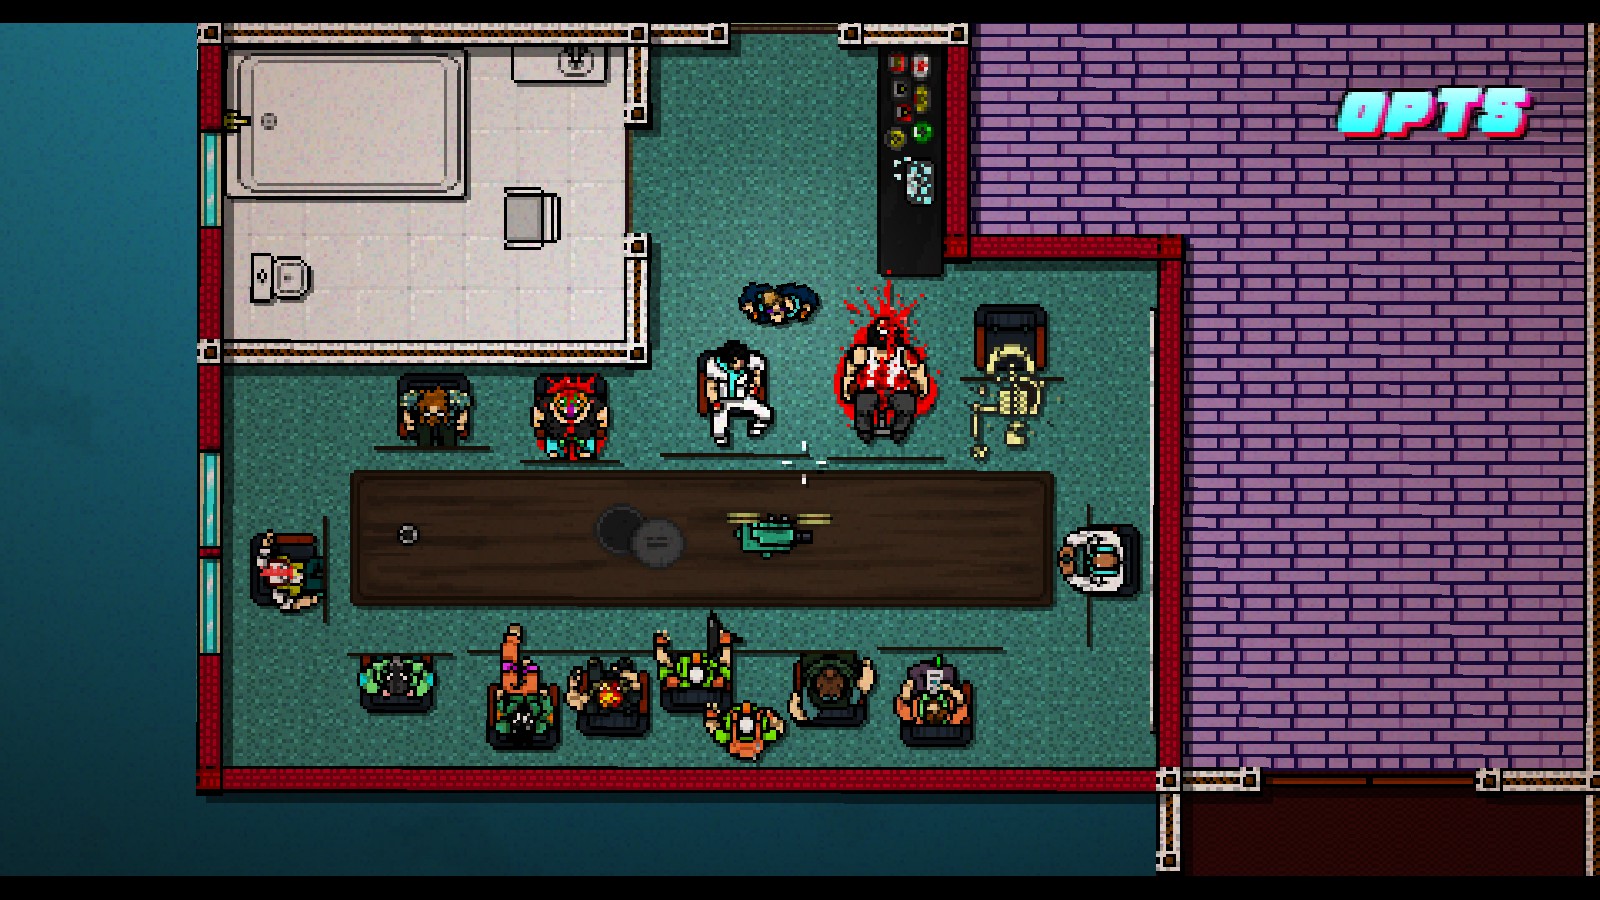
Boss Enemies
Bosses are considered props/items in the Level Editor – they do not count toward the total enemy limit, and they do not have to be beaten to end a level. If a floor only contains a boss, it is considered “clear.” Aside from that, they essentially work as they did in campaign.
This will cover the 6 bosses that work in the editor without crashing. The zebra boss is currently not stable enough to work.
1. SWAT BOSS (3772, 2200); WAYPOINTS (3773, 2199)

2. BEAR BOSS (3170, 1822)

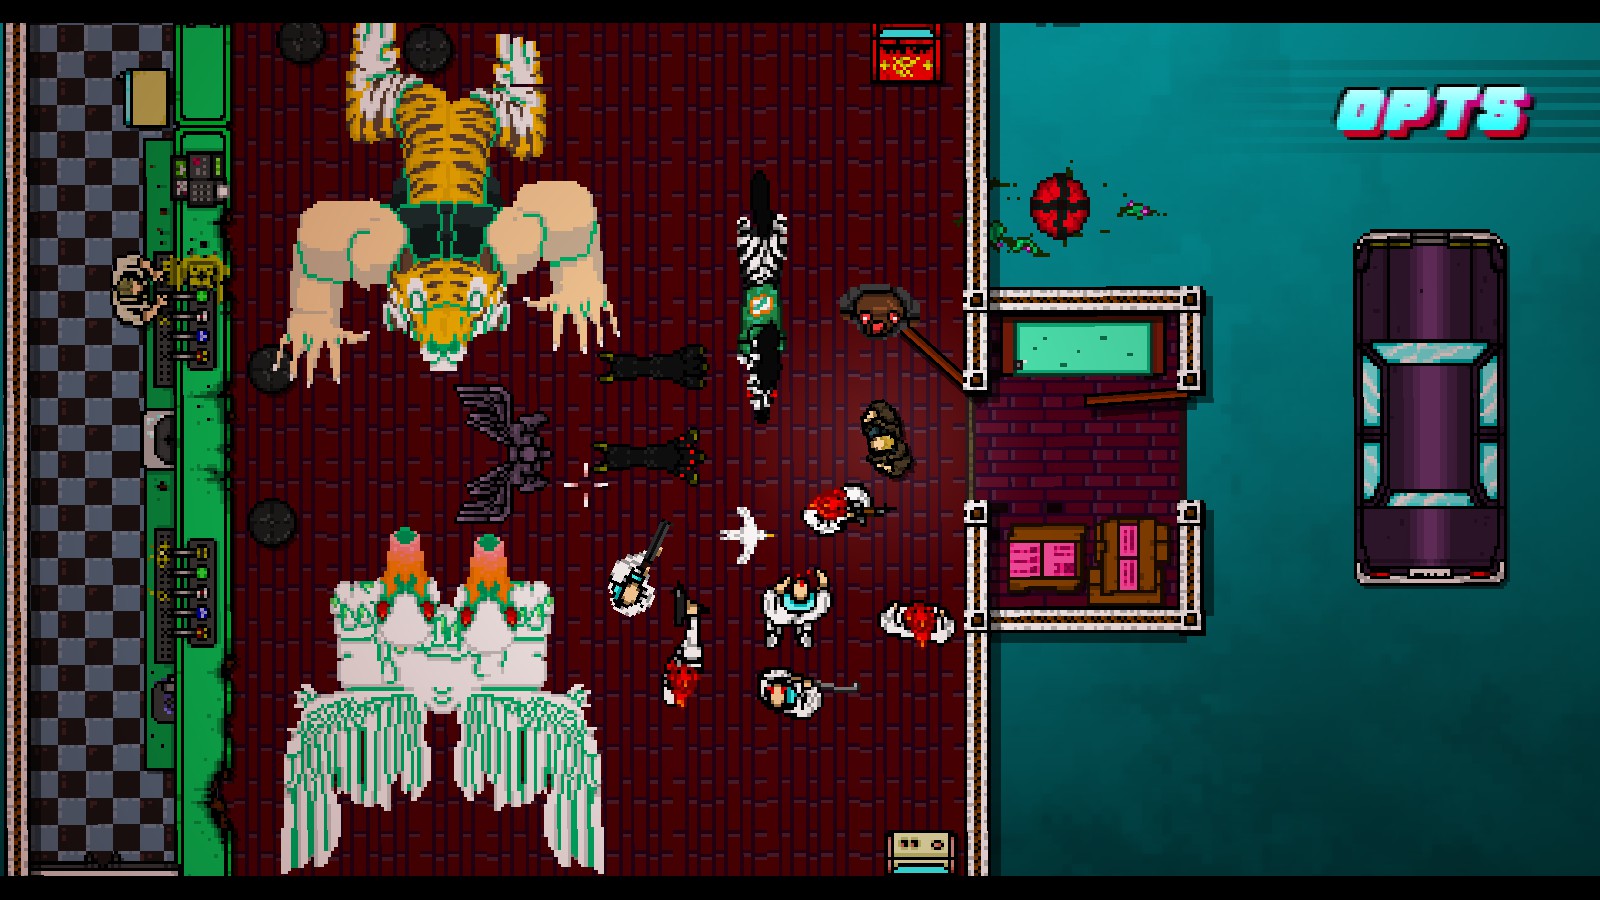
3. SWAN BOSS-
BODY (3154, 1809), MELEE HEAD (3163, 1810), GUN HEAD (3163, 1811)
The two-headed giant swan from Apocalypse. All parts of the boss must be placed down in their normal positions for this to work. It shrieks at you and prepares to attack as soon as you enter its floor. One head will shoot fireballs, and the other will try to bite you. Moving past a certain point will cause it to spam fireballs. It can only kill you if you are playing as LSD Son. Only melee attacks can kill it. Works best with both LSD filters active.

4. TIGER BOSS – BODY (2044, 1188), HEAD (2036, 1192)
The giant tiger from Apocalypse. The head is a proximity trigger that decides where the boss will attack, but the tiger will only appear when it charges you. Its attack can kill any character. Bullets, punches, and melee attacks can kill it. The player can avoid its attack, so place the boss in a narrow area. It can only charge from left to right; no other direction works. Works best with both LSD filters active.

5. GANG LEADER BOSS (3278, 1880), WAYPOINT (-1, 1881)
The patrolling boss from Subway. He walks around a level and calls enemies to fight you if he spots you. He works with any faction. If you knock him out or kill him, then walking into the top area of the floor will cause the level to end.

To make him work, follow these steps:
1. Place the waypoints in the order you want the Gang Leader to walk around. It depends on which one is being read by the game. Waypoints cannot be seen or moved, so make sure the objects that you will be replacing are at your desired locations.
2. AFTER THIS, you can place the Gang Leader. It’s important to place him last, or else it won’t work! The reason why the game crashes is because Gang Leader checks the waypoints that are created before him ONLY ONCE, that’s why you have to place him after the waypoints.
3. Place down a cutscene with 2 parts of dialogue (not just 1 part with 2 lines) over your character, then wait for a few seconds before closing it. After that, he should function normally.
Credit to Maxim_S, Toxic Coffee, and The Workshop Labs for discovering how to make this boss work!

6. PRISON BOSS (3569, 2100)
The first enemy Richter fights in Release. He charges at the player and kills them with a headbutt if they get close. Melee attacks kill him, but bullets go through him. Weapons will appear with arrows beside them while he is alive. He works with all characters, but his execution shows you as Prisoner Richter and leaves behind a special version of Richter’s corpse.


To make him work, follow these steps:
1. Start the player in a cutscene trigger and add 1 scene of dialogue. Make sure there is enough distance between the player and the Boss.
2. Once the player stops walking, hold right click to skip the dialogue. If you don’t skip it, the game crashes.
3. The boss fight will begin normally now. If you die, it will restart from the point where the dialogue ended.
He gets stuck on solid objects, but he goes through all walls except for Black Rails. They can be spawned in the .obj file as (2286, 1345) for horizontal, and (3623, 2103) for vertical.
Thank you to wosted, Toxic Coffee, and The Workshop Labs Discord for figuring out how to make this boss work!

Unique Enemies not in the Editor
This section is dedicated to enemies with unique behaviors that aren’t in the Editor by default. This includes the knife-wielding Fat Soldiers and the idle Guard enemy with a baton. They are (mostly) treated like normal enemies in-game.
1. FAT SOLDIER WITH KNIFE (1163, 698)

2. FAT DEMON MOBSTER (3226, 1854)

3. IDLE TALKING POLICE (1336, 2409)
A Police enemy that stands still and gestures as if he is talking. Upon noticing the player, he will pull out either a shotgun or a pistol and try to kill you. He behaves like the smoking Mafia and Gang enemies.

4. IDLE GANG STEALING MONEY (1927, 1144)
The last Gang enemy from the end of No Mercy. He grabs money from his left and stuffs it into a bag. When he notices the player, he drops the bag and pulls out a random gun. The bag has unique effects: it can be picked up once the floor is clear, and doing so allows you to end the level early. However, picking it up can also turn your character into the Henchman.

5. IDLE GUARD WITH BATON (3650, 2168)
A Security Guard who raises and lowers a baton while standing still. Like the Mafia, Colombian, and Gang idle pipe enemies, he will remain still until he spots the player. He will then charge at you with a baton.

6. IDLE PRISONER BEATING UP FAT GUARD (3733, 2167)
An idle Prisoner enemy who repeatedly punches a downed Fat Guard in the face. When he notices the player, he will stop what he is doing and pull out a random gun (a magnum or shotgun) and attack the player. When he dies, the body of the Fat Guard will remain there unless the Prisoner is killed before he can react.


7. IDLE MOBSTER WITH SILENCER ON PHONE (1521, 916)
A minor variant of the Idle Mobster with Phone in the Editor. This enemy appears infrequently in story mode. He talks on a phone while holding a Silencer in his other hand.. When he spots the player, he puts away the phone and starts shooting with a Silencer, just like the normal version.

8. IDLE GANG SEARCHING FRIDGE: (1303, 211) FOR ENEMY, (1304, 74) FOR FRIDGE

A cut Gang enemy looking through a fridge. It would attack the player if alerted. Since it does not work by itself, this uses the idle knife object ID as a substitute. The fridge will disappear when the enemy is alerted, so have the two fridges overlap when placing the item and enemy. The item version of the fridge will remain in place after the enemy pulls his knife and pursues the player.
(Thank you to the Workshop Labs Discord for figuring out how to make this work!)

Other Special Enemies
UNARMED ENEMIES
Enemies that start without weapons. By default, they will back away from you if you get close to them. If a weapon their faction can use is near them, they will run to it and attack you with it.

- Soldier – (1116, 697) to stay still, (1116, 674) to look around
- Prisoner – (3579, 2112) to stay still, (3579, 2111) to look around
- Police – (1550, 934) to stay still, (1550, 932) to look around
- Guard – (2682, 1533) to stay still, (2682, 1532) to look around
- Colombian – (2295, 1357) to stay still, (2295, 1356) to look around
- Gang – (207, 186) to stay still, (207, 183) to look around
- Mafia – (1453, 877) to stay still, (1453, 876) to look around
- Demon – (3218, 877) to stay still, (3218, 876) to look around
CRAWLING ENEMIES
Enemies that start out crawling on the ground for a few seconds. They leave behind a blood trail on the ground, and can be executed for 1000 points. They share the same object ID, but use different sprite IDs based on faction.

- Mafia – (3813, 2221)
- Gang – (3812, 2221)
- Police – (3817, 2221)
- Colombian – (3819, 2221)
- Guard – (3822, 2221)
- Soldier – (3815, 2221)
- Prisoner – (3823, 2221)
Music Modding
To play songs from the game that are normally unavailable in the editor, create a cutscene that triggers a new song playing (for example, In the Face of Evil is evil.mp3).
Once you save your level, open the .csf file in Notepad++ and look for the song in question. All it takes to replace that with a normally-unusable song is to change the name of the track listed. All tracks in the game have no spaces and, in .csf files, are considered to be in .mp3 format.

The bonus songs you can use are…

- YouAreTheBlood – the credits song
- ZebraBackground – the ominnous background music that plays during the zebra boss fight
- Videodrome – the “Level Clear” song
- Hotline3 – the post-credits scene song, a short section of Perturbator’s “Welcome Back”
- Pursuit – a slightly-different version of Bloodline
Explosives and Gameplay-Effecting Items
These items have some amount of impact on the gameplay of your level. Whether they cause damage to you or enemies, change your character, or leave weapons for you to use, they will affect how your modified level plays out.
1. EXPLOSIVE METH LABS (2491, 1398), EXPLOSION TRIGGER (2493, 1397)


These items create explosions that kill enemies, knock down doors, and muffle the game music. Deaths will turn the player’s corpse into Jake and enemies into mobsters. Some enemies may slide until they hit something solid.
Meth labs come in 2 parts: the lab itself and the explosion trigger. Shooting the lab will cause it to break regardless of whether the trigger has been placed down. The trigger is an invisible item that determines whether the lab will explode and where it will explode. The best place to put it is the top left corner of a 5×5 room, which is the size of the explosion.
1.5. MAKING CARS AND OTHER ITEMS EXPLODE


If you swap the sprite ID of the meth lab while an explosion trigger is down, the newly-reskinned lab will still explode when a bullet hits it. This can allow you to make explosive cars, generators, NPCs, and so on.
You can also create multiple explosions by putting down more than one trigger. However, they will always activate at the same time.
2. ROBBER AI PARTNER (3747, 2186)


Places down a masked mobster with an Uzi. He will hide behind whatever prop you put him behind and shoot up with his gun. No matter where he is facing, the bullets will go up. He can kill enemies, which gives you points. When all enemies are dead, he will run to a certain point on the map and gain a cutscene arrow. Talking with him will crash the game, so avoid him at that point.
3. MARK’S CAR (2750, 1587)

Mark’s car from the intro to Death Wish. It can be used as a static prop, but also has a unique feature: its trunk open and closes. It also has a mask box in its trunk, which can be picked up with right click. Doing this will turn you into Mark, so right click again if you want to get rid of that. The car will appear incorrectly if it isn’t facing the way it is in my picture: the trunk will be detached and away from the car.
4. GUARD SHARPSHOOTERS: (2680, 2170) FOR SHOTGUN; (2679, 2173) FOR MAGNUM

The two types of Guards from the 4-way hallway of Release. They stand still and shoot you with infinite ammo if you get close to them. They can’t be killed and do not count toward the enemy total for the floor. Unlike hiding enemies, they will not shoot at you while you are behind doors. If all enemies on a floor are killed, talking to to them will crash the game.
5. ESCAPING PRISONERS: (3575, 2172) FOR DEFAULT

The fleeing prisoners who get shot in the first section of Release. They run around the floor and collide with walls, trying to escape to a lower point in the level. Sometimes they clip through walls and escape the level entirely. If they are close enough and in sight of a Guard Sharpshooter, they will be shot at and potentially killed. They drop whatever weapon they are carrying on death.
The weapon they carry depends on the sprite assigned to them. 3575 gives the big pipe, 3632 gives the toothbrush shiv, 3578 gives the baton, 3577 gives the glass shard, 3576 gives the magnum, 3674 gives the shotgun.
6. GUARD CLOTHES (3664, 2158)


Richter’s change of clothes from Release. This is a usable item that can only be activated when every enemy on the floor is dead. If you right-click it when the room is clear, a brief flash of white occurs and you become Guard Richter. This can happen to any character, regardless of who they are or what enemies they are fighting.
7. SUBWAY GATE: (2449, 1372) FOR GATE WITH SIDE PART (2448, 1371) FOR GATE BY ITSELF

The direction-blocking gate from Subway. You can cross through it one way, but you cannot go back through it the other way. The blue gate can be spawned by itself you can place it in any direction, and it will still work. This is best placed against walls or other items.
8. DEAD MOBSTER HOLDING SHOTGUN (3249, 1868)

A bloodied mobster holding a floating shotgun atop a pile of Mafia corpses, first seen in Tony’s floor of Apocalypse. The shotgun can be used, though it has some odd behaviors. The first attempt to pick up the shotgun will throw it for any character other than The Son, though the second attempt will work as usual. As The Son, you can pick up the shotgun immediately, but it will turn you into the LSD Son character until you drop it. Throwing it returns you and the shotgun to normal.
9. LEVEL END DOOR UNLOCKER (210, 1146)

The NPC from the end of No Mercy. While the floor has enemies, he is invisible and cannot be interacted with. Once all enemies are dead, he reappears, and all cutscene or locked doors can be opened from then on. Getting too close to him after that will crash the game.
10. FLAMETHROWER ATTACK (-1, 325)

The stream of fire from the flamethrower. Holding left click shoots fire wherever you are aiming, which can kill Soldier enemies.
11. SUITCASE WITH MONEY (1484, 929)


The suitcase filled with cash from Hard News’ final floor. Picking it up as Jake will have him carry it around. When playing as another character, left-clicking turns you into Jake and right-clicking makes the case disappear.
Unused Story Mode Furniture
These are items from story mode that, for some reason or another, aren’t available in the editor. Most are furniture items, and none have any “major” effect on gameplay. To easily get to the other frames of an item, place down a regular item with the intended frame number and replace its IDs with one of the IDs below.
1. INTO THE PIT DECORATIONS

The various items from Into the Pit that are unavailable in the editor. Many of these have a “sewer” theme, keeping with the later floors of the level. Some can be walked over.
- Ventillation Shaft: (2172, 1280)
- Torture Table: (2204, 1292)
- Ladder: (2151, 1288) [WARNING: When the level is clear, you can use this to go down a floor. This will crash the game.]
- Sewer Grate with Ladder: (2150, 1285) [WARNING: When the floor is clear, you can use this to go up a floor. This will crash the game.]
- Leave or Die Graffiti: (2179, 1286)
- Plastic Floor Cover: (2203, 1291)
- Sewer Grate with Acid Stains: (2206, 1299)
- Wood Chair with Plastic Cover: (2202, 1300)
- Sewer Pipe: (2153, 1278)
- Sewer Pipe End: (2155, 1279)
2. PIG BUTCHER FURNITURE

Dirty, grungy items that appeared in Final Cut’s intro and main level. Note that any item marked with * can be walked under. If you want these to be solid, use the object ID of 1295 instead.
- *Talk Show Chairs: (503, 311) for regular, (522, 311) for dirty
- *Teleprompter: (510, 318)
- *Talk Show Table: (512, 317) for regular, (515, 317) for bloodied
- *Talk Show Camera: (523, 316)
- *Talk Show Broken DJ Equipment: (520, 314)
- Torn-Up Armchair: (519, 835)
- Torn-Up Papers: (1693, 1018)
- Desk with Pink Phone: (1608, 945)
- TV with VCR: (1694, 1020)
- Dirty Bathtub with Body Bag: (1689, 1008)
- Chair with Restraints: (1611, 947) with 2 frames
- Talk Show Armchair: (531, 835)
3. POLICE-RELATED ITEMS

All sorts of items relating to crime and law enforcement. These appeared mostly in levels and cutscenes featuring Pardo.
- Police Car: (1339, 824) for regular, (3840, 2227) for car w/ cop and open door
- Police Interrogation Desk without Chairs: (1644, 980)
- Blue Turbine: (3002, 1730)
- Entry Bridge: (3015, 1740)
- Flickering Boat Lamp: (3017, 1745)
- Crime Scene Tape: (3351, 1936)
- Police Chief Desk: (3358, 1940)
- Mutilator Messages: (3368, 1945) with 3 frames
- Crime Scene Sign: (3369, 1946)
- Mutilator Victims: (3370, 1947) with 3 frames
- Prison Blood Messages: (3692, 2156) with 5 frames
- Jake’s Clothes and Evidence: (3743, 2179)
4. APOCALYPSE PLANTS

The unusual greenery surrounding the Tony boss fight and Fat Demon floors of Apocalypse. All of their sprites trail when using the blurring LSD filter, showing up more vibrantly when moving or using the hazy filter alongside it.
- Big Tree: (2051, 1194)
- Palm Tree: (2052, 1193)
- Large Bush: (3237, 1856)
- Corner Bush: (3239, 1857)
- Small Bush: (3241, 1868)
- Large Vines: (3238, 1859)
- Corner Vines: (3238, 1860)
5. CORNERS AND DOORS


These items work well with walls and doorways.
- Bunker Corner: (2508, 1413)
- Roof Wall Corner: (2912, 1688)
- Locked Sliding Doors: (2919, 1696)
- Bank Vault Door: (2726, 1555) – moves around when pushed
- Bank Vault Opening: (2725, 1549)
6. OTHER UNUSED ITEMS


This covers all the items not relevant to previous sections, like transportation props and industrial equipment.
- Subway Train: (2463, 1375) to drive away, (2463, 1079) to stay and block bullets
- Danger Sign: (3036, 1764)
- Upright Danger Sign: (3035, 1765)
- Apocalypse Lab Island: (3267, 1879) with 2 frames
- Office Golf Pieces: (3300, 1913) with 4 frames
- Richter’s Burnt Car: (3453, 1295)
- City Bus: (3483, 1079)
- Hobo Sifting through Dumpster: (3488, 2047)
- Circular Power Plant Turbine: (3044, 1760)
- Pool with Body Bags: (2581, 1439)
- One to Fifty Graffiti: (3563, 2096)
- 50 Blessings Logo w/ Candles: (2528, 1436)
- American Flag w/ 50 Blessings Logo: (3032, 1753)
- Dead Panther: (3033, 1754)
- Skinned Panther Face: (3034, 1755)
- Court Table: (1706, 1293) with 2 frames
- Big Court Table: (1716, 1293) with 2 frames
- Gangster searching through Fridge: (1303, 1295)
- Open Fridge: (1304, 1293)
- Colombian Boss’s Chair: (3317, 1293) with 2 frames
Other Cosmetic Items
Last but not least, these items have some unique features that leave them between “special effects” and “normal, unused items.” They can make good decorations for flashier custom levels.
1. HUMAN BOXING BAG (3560, 2094)

A captive Colombian cartel member who can be punched like a boxing bag. Originally appeared in Take Over’s intro.
2. STROBE LIGHT GENERATOR (2446, 1369)

A small disco light generator that originally appeared in Seizure. It is not solid and can be walked through.
3. NIDHOGG ARCADE MACHINE (3337, 1930)
An arcade machine for Nidhogg that originally appeared in Take Over. For some reason, it’s not available in the Level Editor by default. It functions like the other machines, and it can be broken.

4. EXECUTION DJ (488, 305)

The DJ from Execution, referred to in the object list as Perturbator. Whenever the player shoots a gun, he ducks for about 3 seconds before he goes back to shaking his head and occasionally moving his arm. Unlike most NPCs, he can be walked through.
5. HIGHWAY LIGHT (1887, 1111)

The street light from Moving Up’s end cutscene. It brightens a small portion of the level and can be walked through. The light always projects downward, regardless of the direction the street light is facing. In editor view, it appears as a small blue circle.
6. DEMOLITION BROKEN FLOORING


Credit to alickswootton on Reddit for finding this first.
This creates the broken wooden floorboards from Scene 18: Demolition, revealing crates of Soviet weapons underneath. While in editor view, the weapon crates will not appear, but they appear when playing the level. The whole thing can be flipped and rotated, and can also be walked on.
- FOR CRATES TO APPEAR: (-1, 2332)
- Largest Opening: (2651, 1506)
- Oval-Shaped Opening: (2652, 1507)
- E-Shaped Opening: (2653, 1508)
- Small Circle-Shaped Opening: (2654, 1509)
7. EXPLOSION OF GORE (3228, 1854)

Creates an explosion of blood and gore when you start the floor. This is actually a dying Fat Demon Mobster, and appear as such in editor view. Without the blurring filter active, the explosion will seemingly come from nowhere.
8. BROKEN WALL EDGE (1869, 1740)

The broken wall debris from Moving Up’s second floor. This can be walked over and rotated as necessary. SInce the actual wall’s object ID does not work, this uses the Entry Bridge’s as a working replacement.
9. SEWER WATER: (-1, 1281) AND (-1, 1274) FOR EFFECTS; (2156, 1266) FOR LARGE WATER SECTION; (2157, 1269) FOR MEDIUM WATER SECTION

The sections of water from Into the Pit’s sewer floors. They create several cosmetic changes on gameplay with the effects active. Enemies and players create visible footsteps on the water when walking over either size of section. Also, any blood that gets on the water mixes with it and slowly fades away. There is a small section in the files, but it does not work properly in-game.
10. SMOKE BARRIER: (2048, 1189) FOR VERTICAL; (2049, 1190) FOR HORIZONTAL
Creates a wall of black smoke at a certain point on the map. Obscures almost anything inside of it. Originally used in Tony’s boss fight. Its effects are only visible with the blurring LSD filter active.

11. POOLING EFFECT: (102, 52) FOR BLOOD; (1874, 1101) FOR WATER
Spawns a small pool of either blood or water that spreads out. The water effect can be seen through and spreads out quicker, while the blood effect covers anything under it and moves slower.


12. BANKER: (2716, 1558)
A bank teller from Blood Money’s first floor. He always sits in a green chair, and he can be walked over. Shooting him kills him but awards no points. Melee attacks do not affect him.

Video Tutorial & Conclusion
Still confused about the ins and outs of Notepad++? Don’t worry, mvfoleh and robracer97 have a video tutorial that will explain everything about it! From adding meth labs to changing level backgrounds, this covers it all.
Hopefully, this guide is useful for anyone who doesn’t want to have to scramble through the ID lists for the item/effect they want! Have fun with the new effects and NPCs!