
Overview
In this guide, I will present you some basic tips and some advanced tips I have used in my Mini Metro runs.
Starting words
In this guide, I am going to give you some tips on how to improve your Mini Metro runs. This supposes, thus, that you know the basics of the game, such as the types of stations, the way the game functions, when the game is lost, the upgrades you can get, the available commands, etc.
If you just started Mini Metro, this guide below might help you a lot. Sure, it has been made when the game was in beta and so the screenshots in it show a game graphically different, but all the basics haven’t changed as the game progressed and thus it is still highly relevant.
[link]
Keep in mind I realized this guide with mostly an experience with the Normal mode. Thus, some tips may not be applied to the game when played in Extreme.
Also, remember that to use most of my tips, it’s more practical for me to pause the game, so time can stop and I can think about my situations at hand.
That’s right: with you being able to stop time, Mini Metro allows you to become Dio Brando.
ZA WARUDO! TOKI YO TOMARE!
Enough with stupid jokes, though. On with the tips!
Basic Tip: Moving trains and carriages
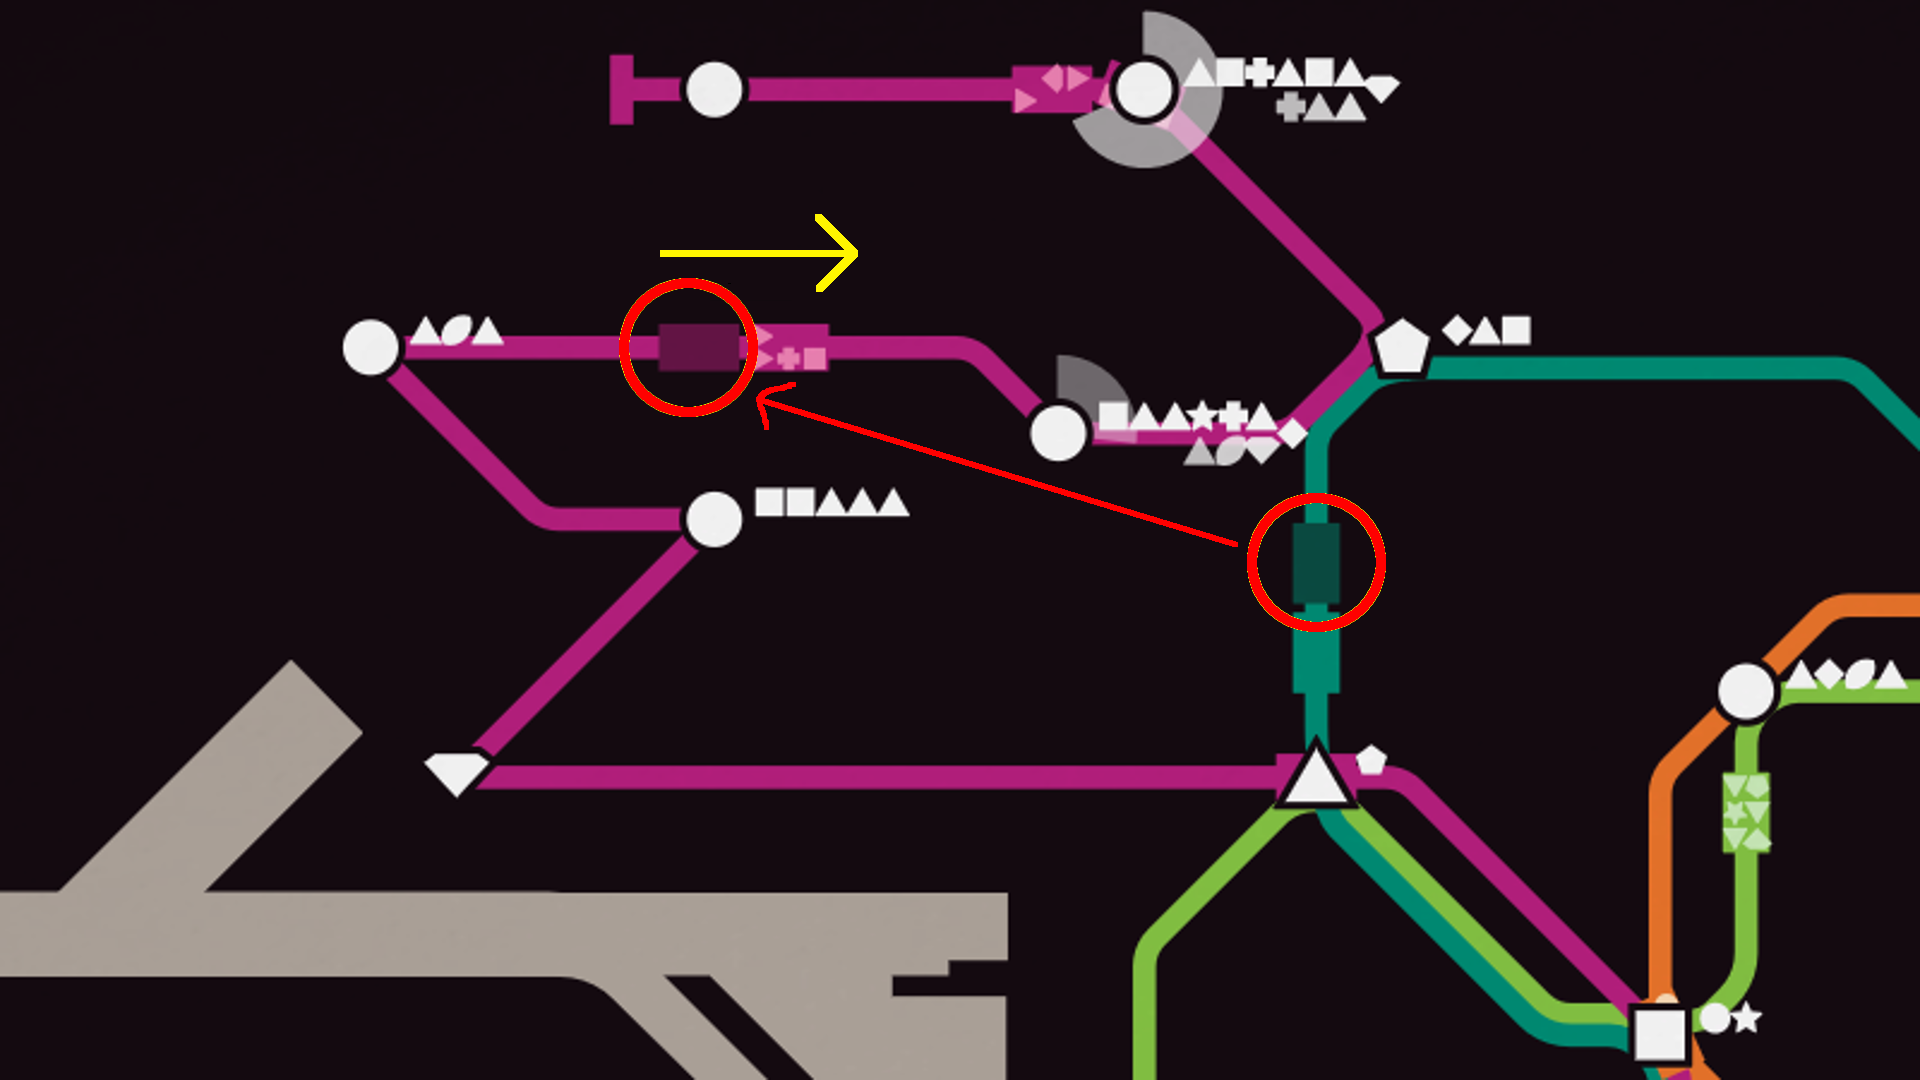
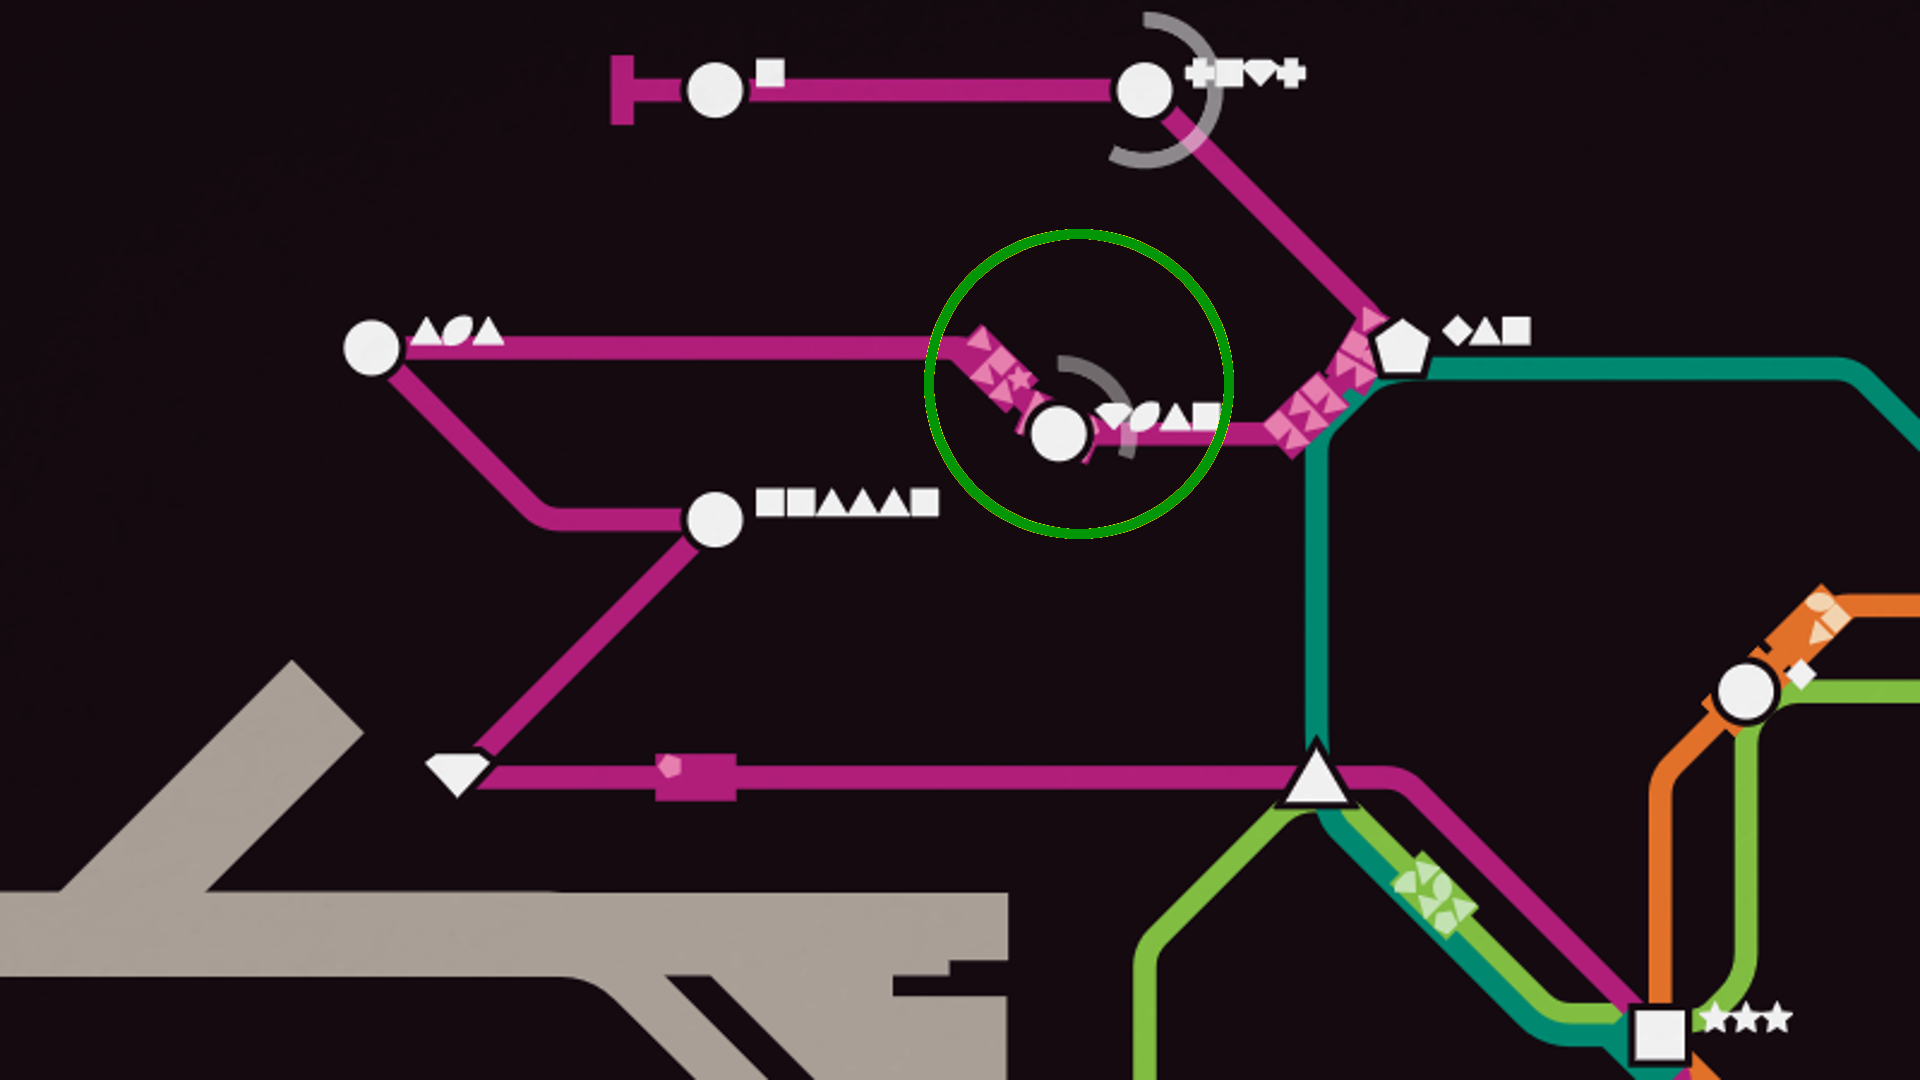
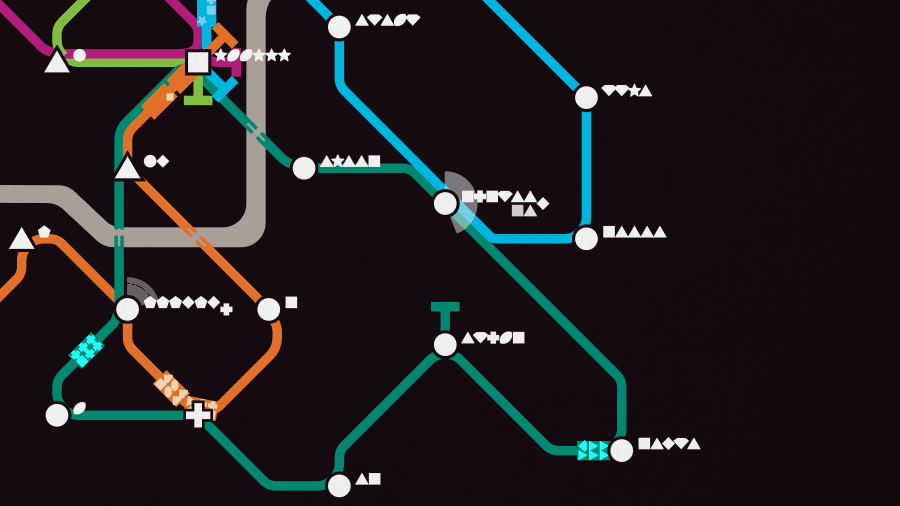
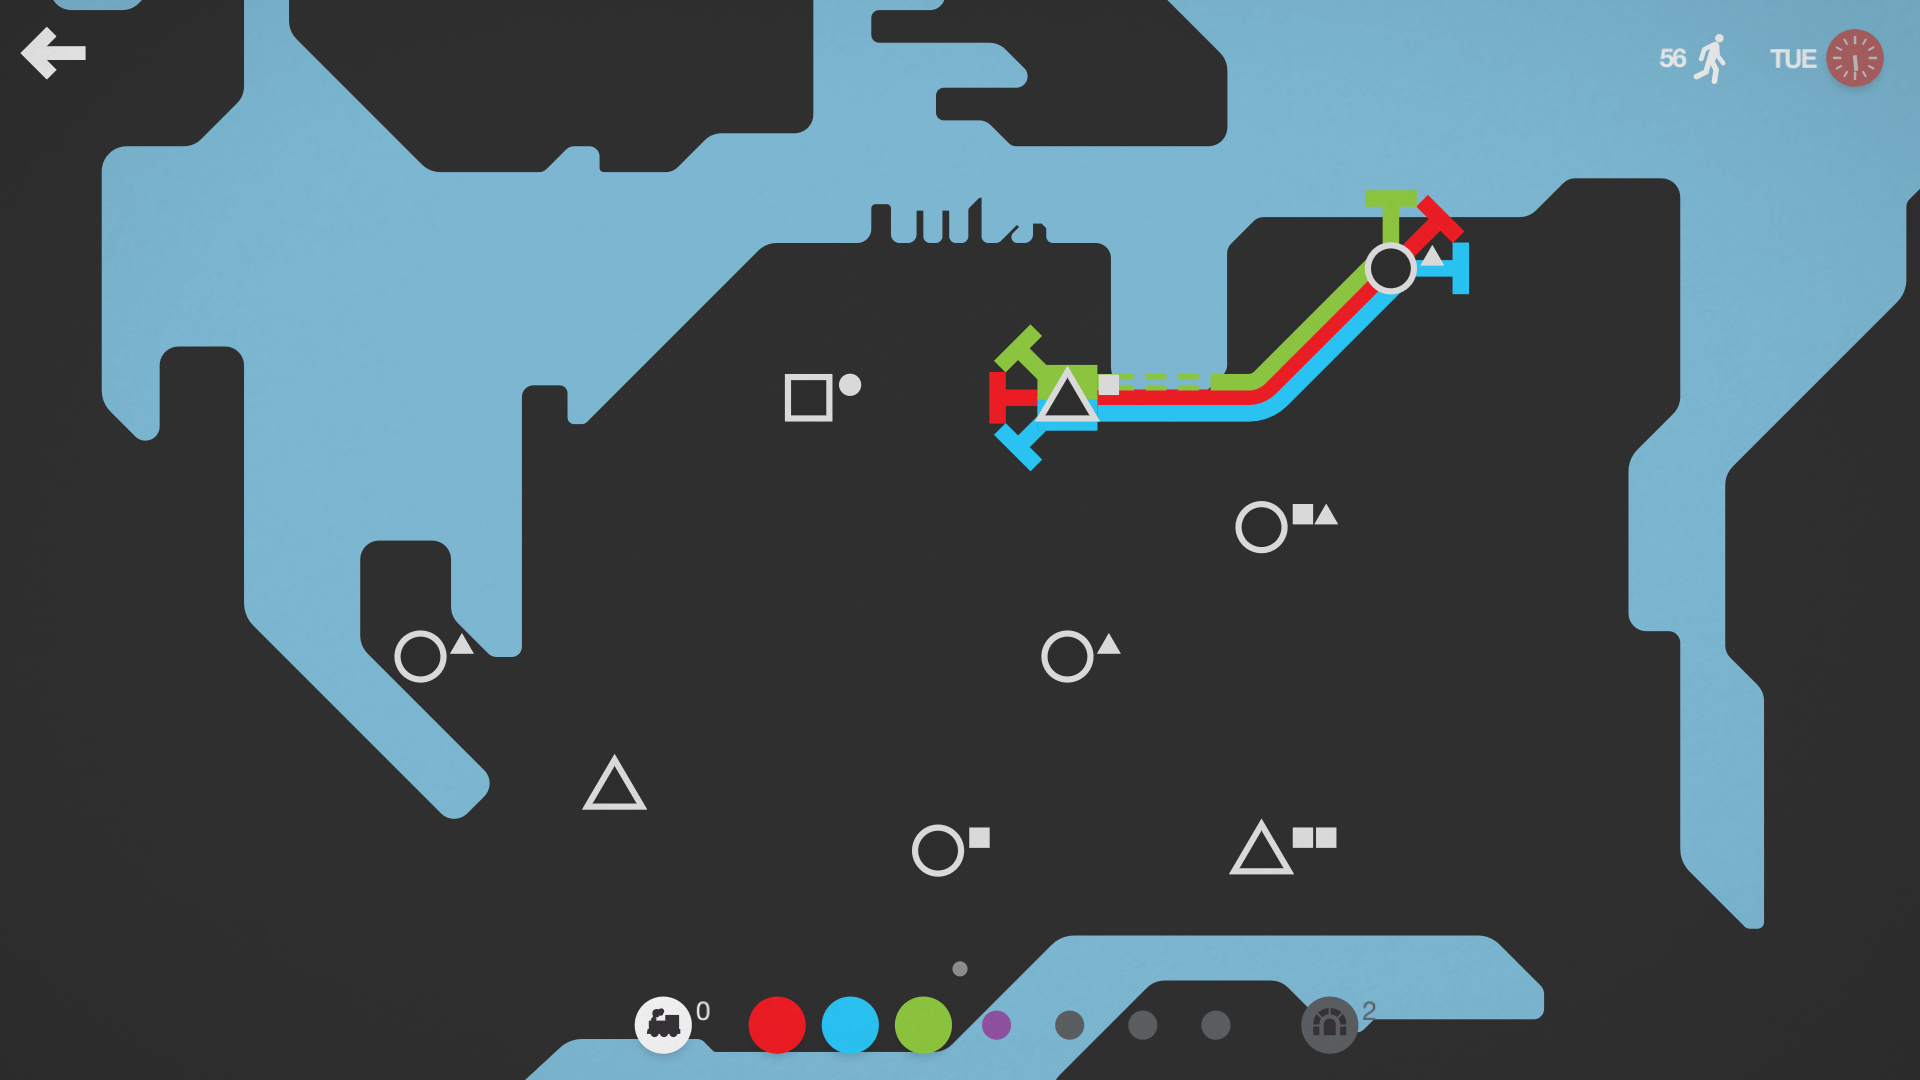
While it might seem counterintuitive at first, especially when you think about the game on a realistic point of view, it is possible to move the trains so they can be more useful at another spot, for example, to empty an overcrowded station or to buff the capacity of another line.
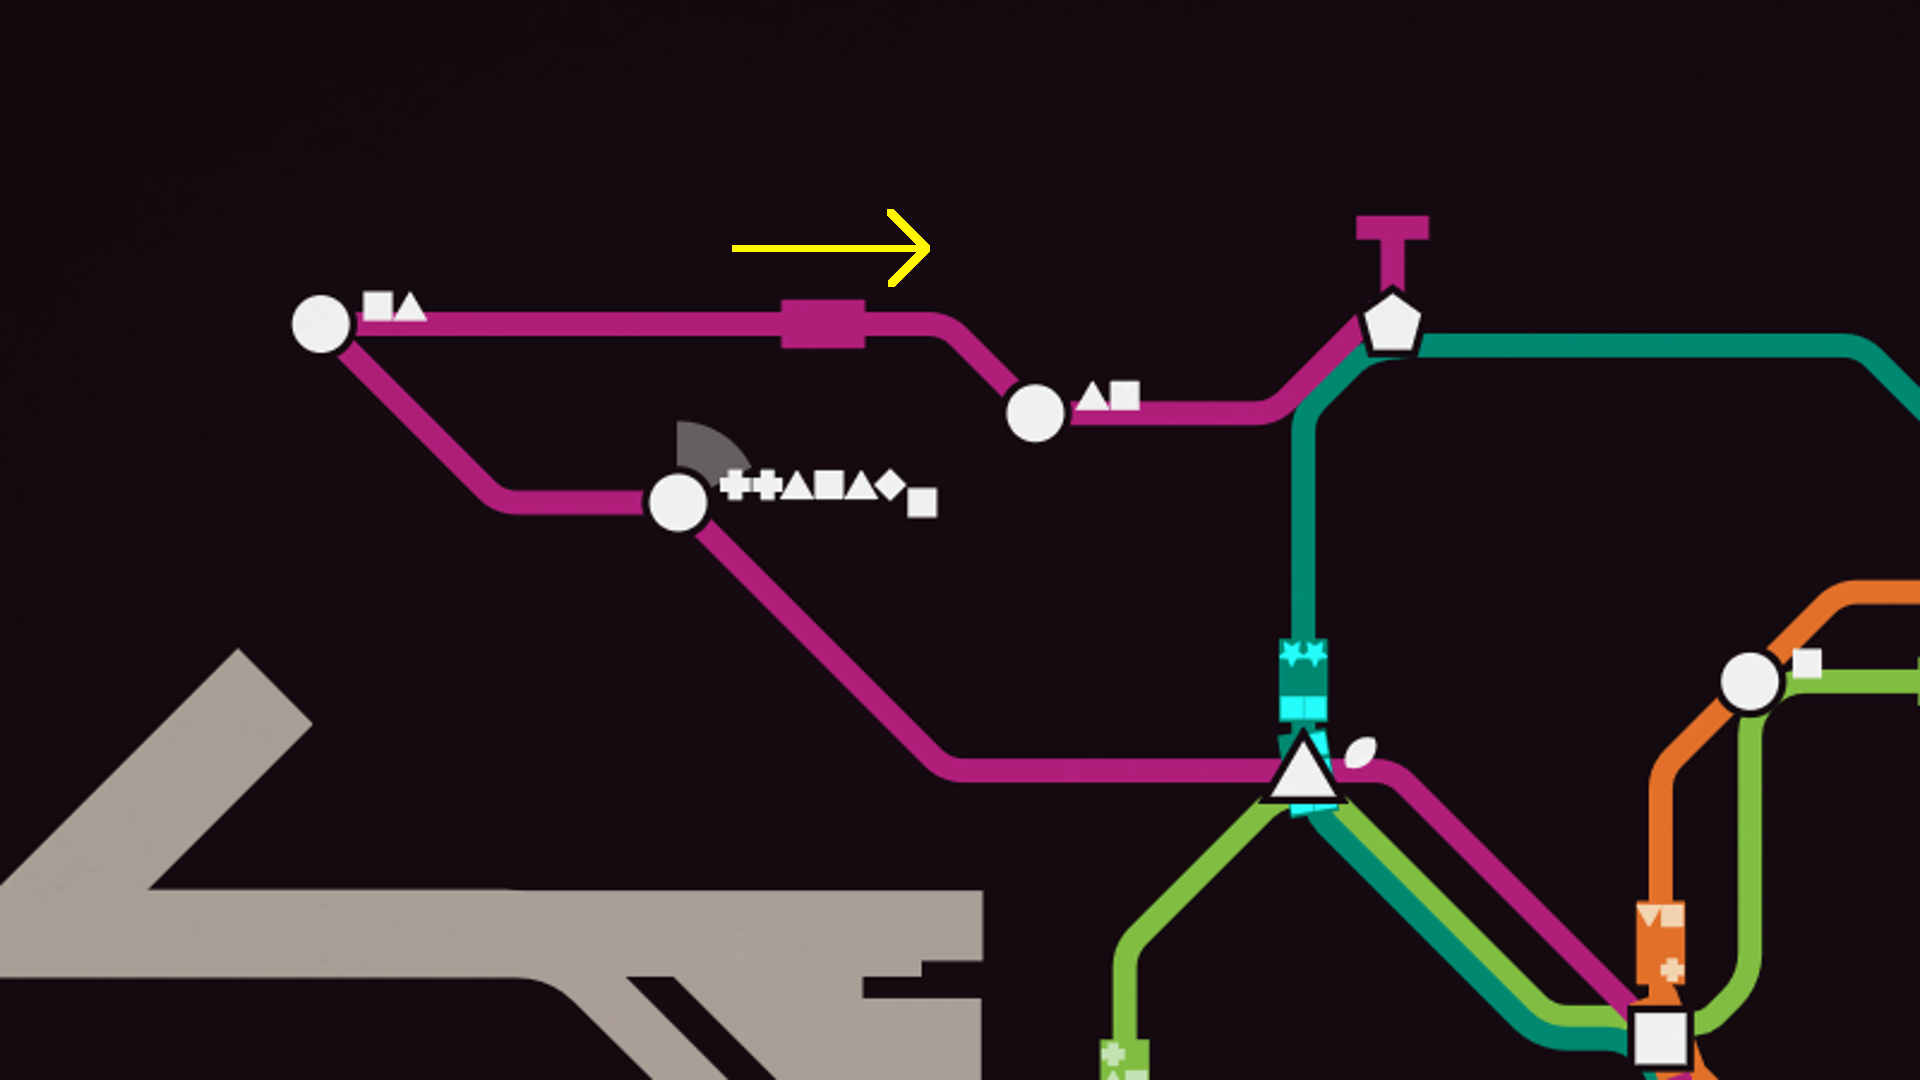
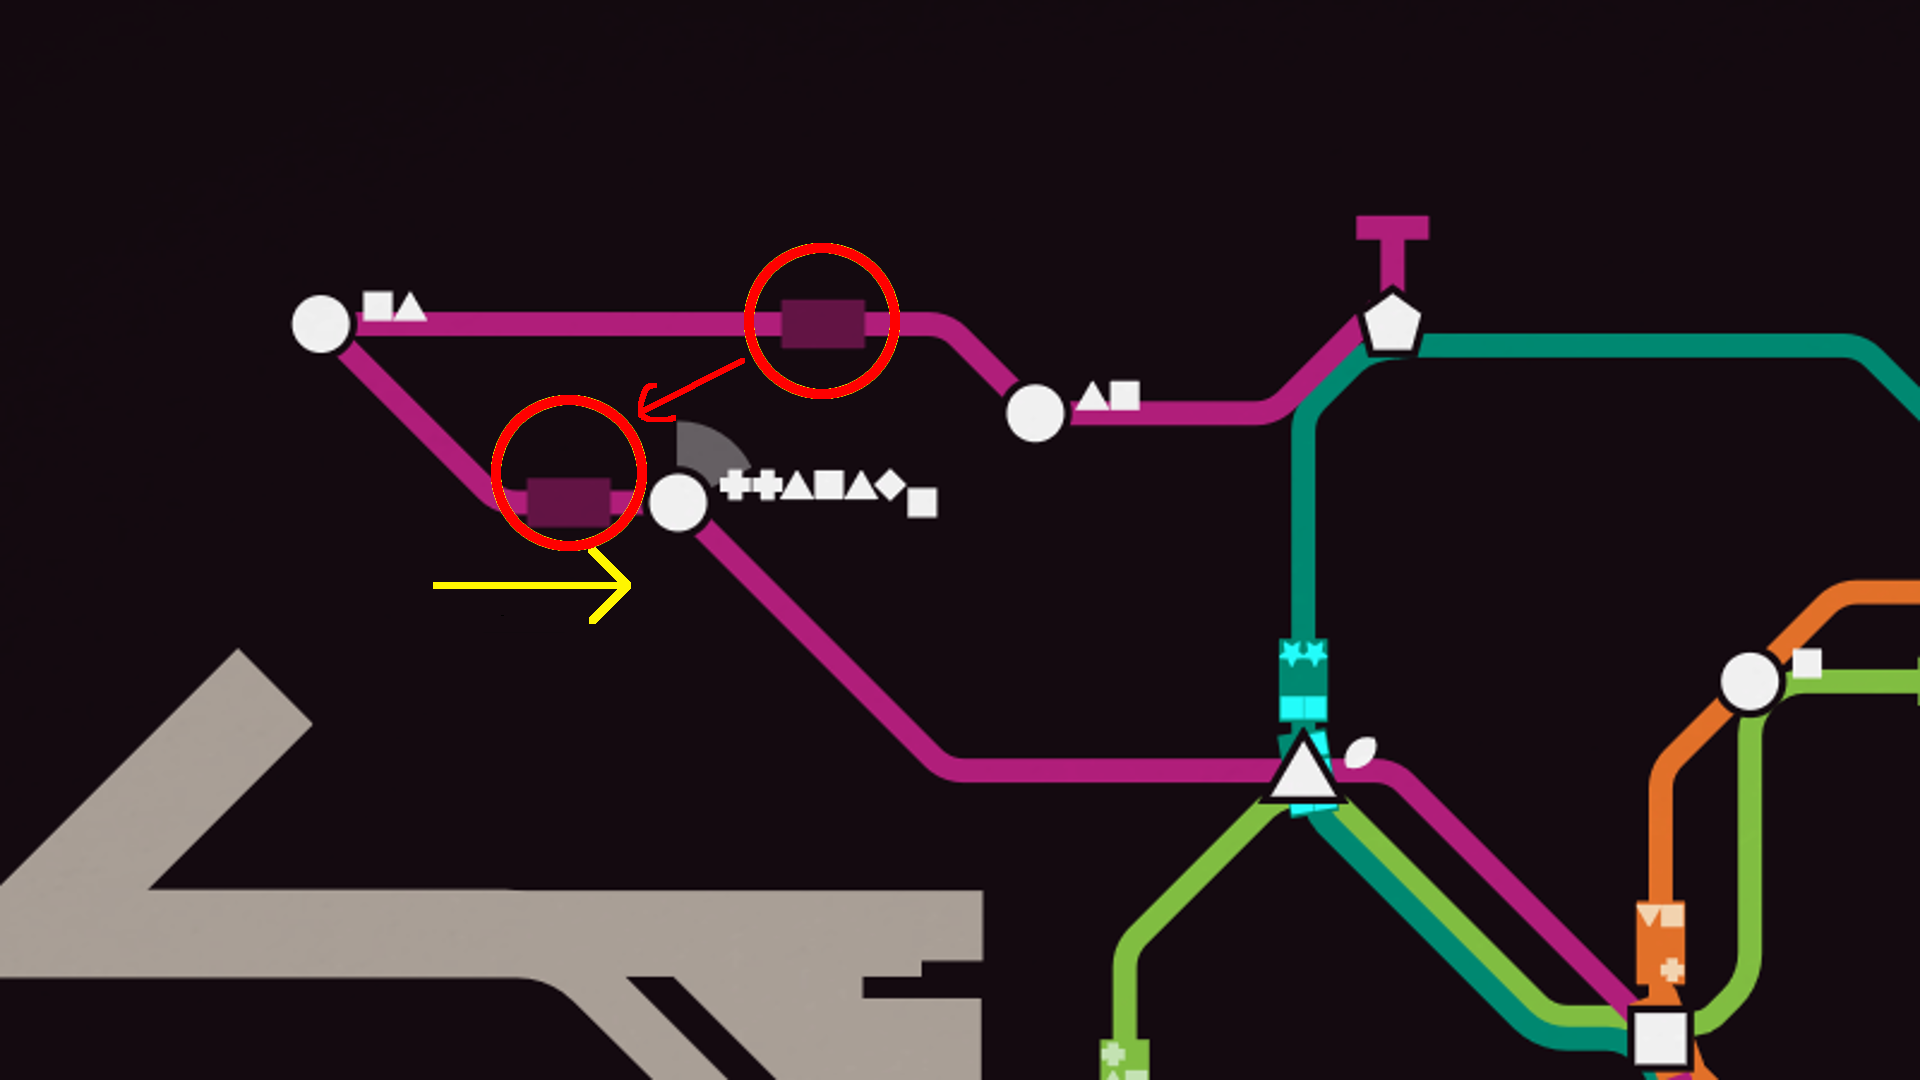
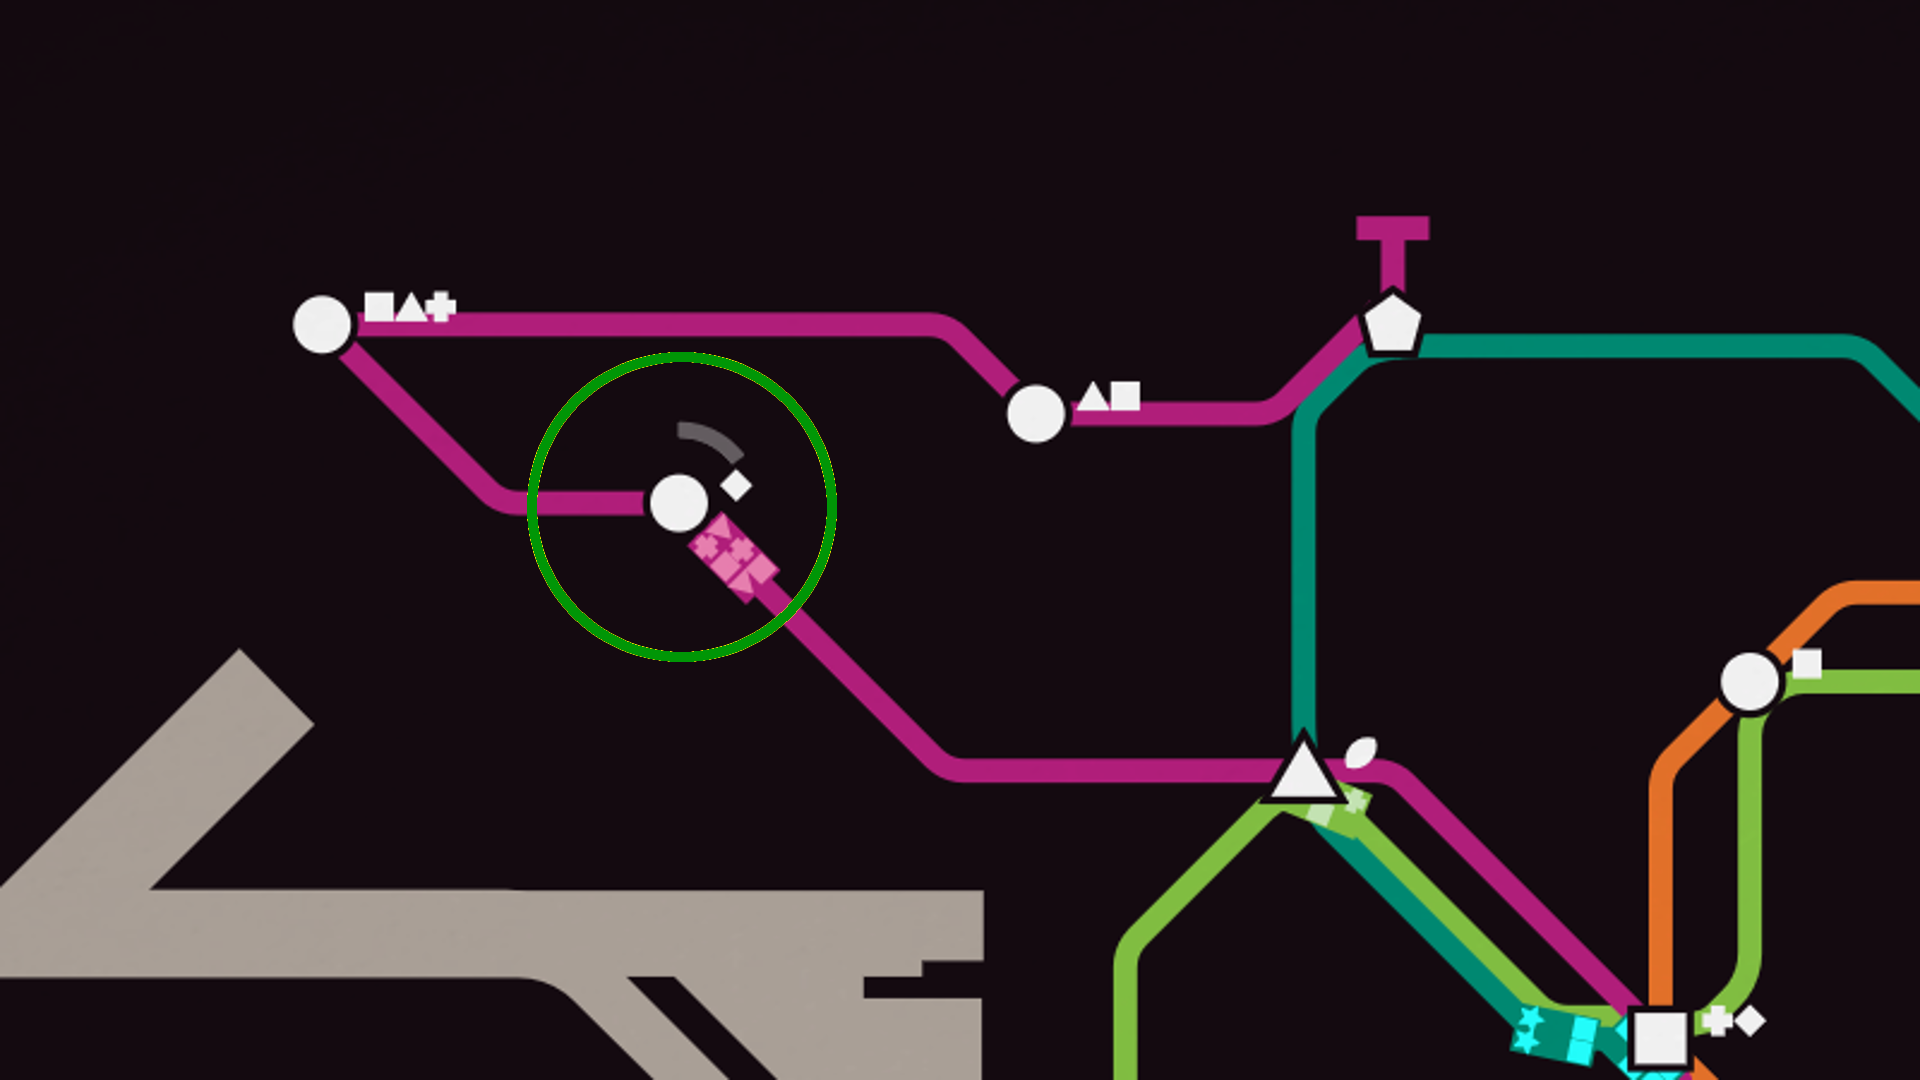
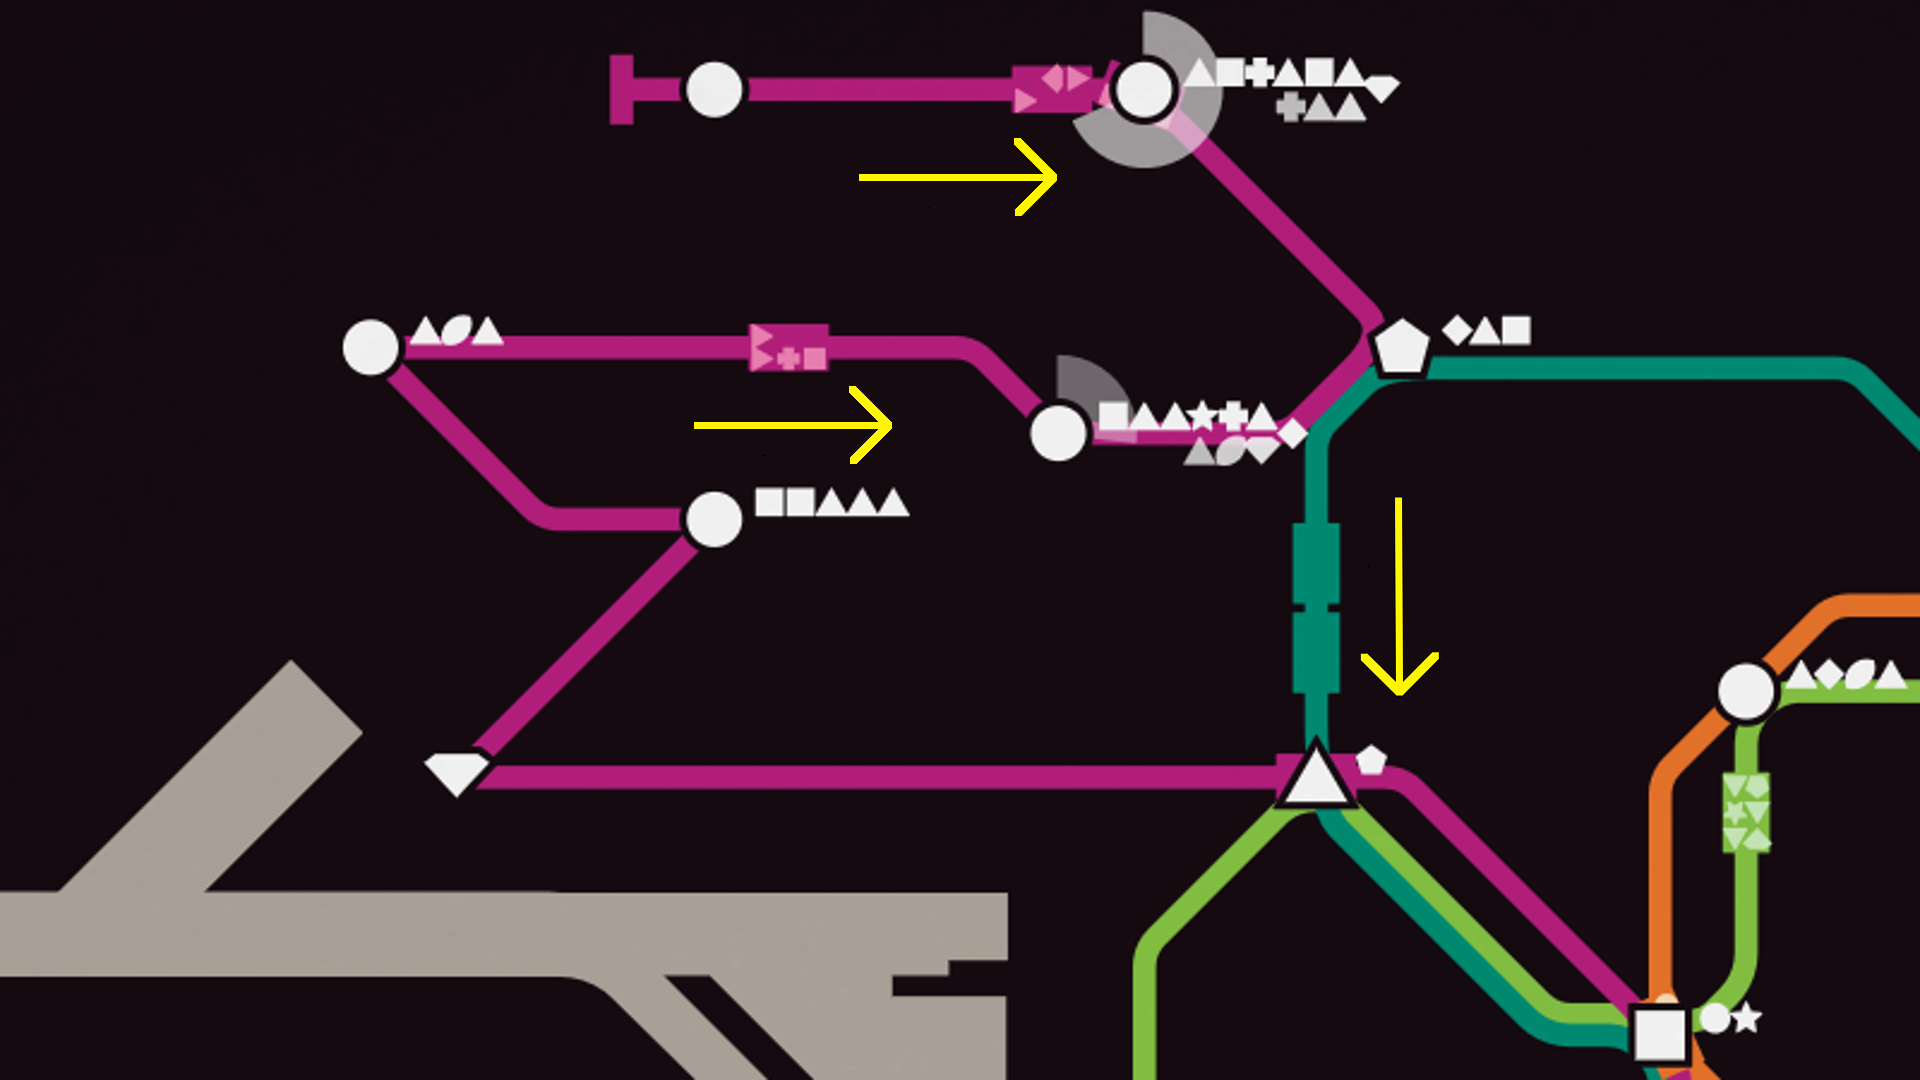
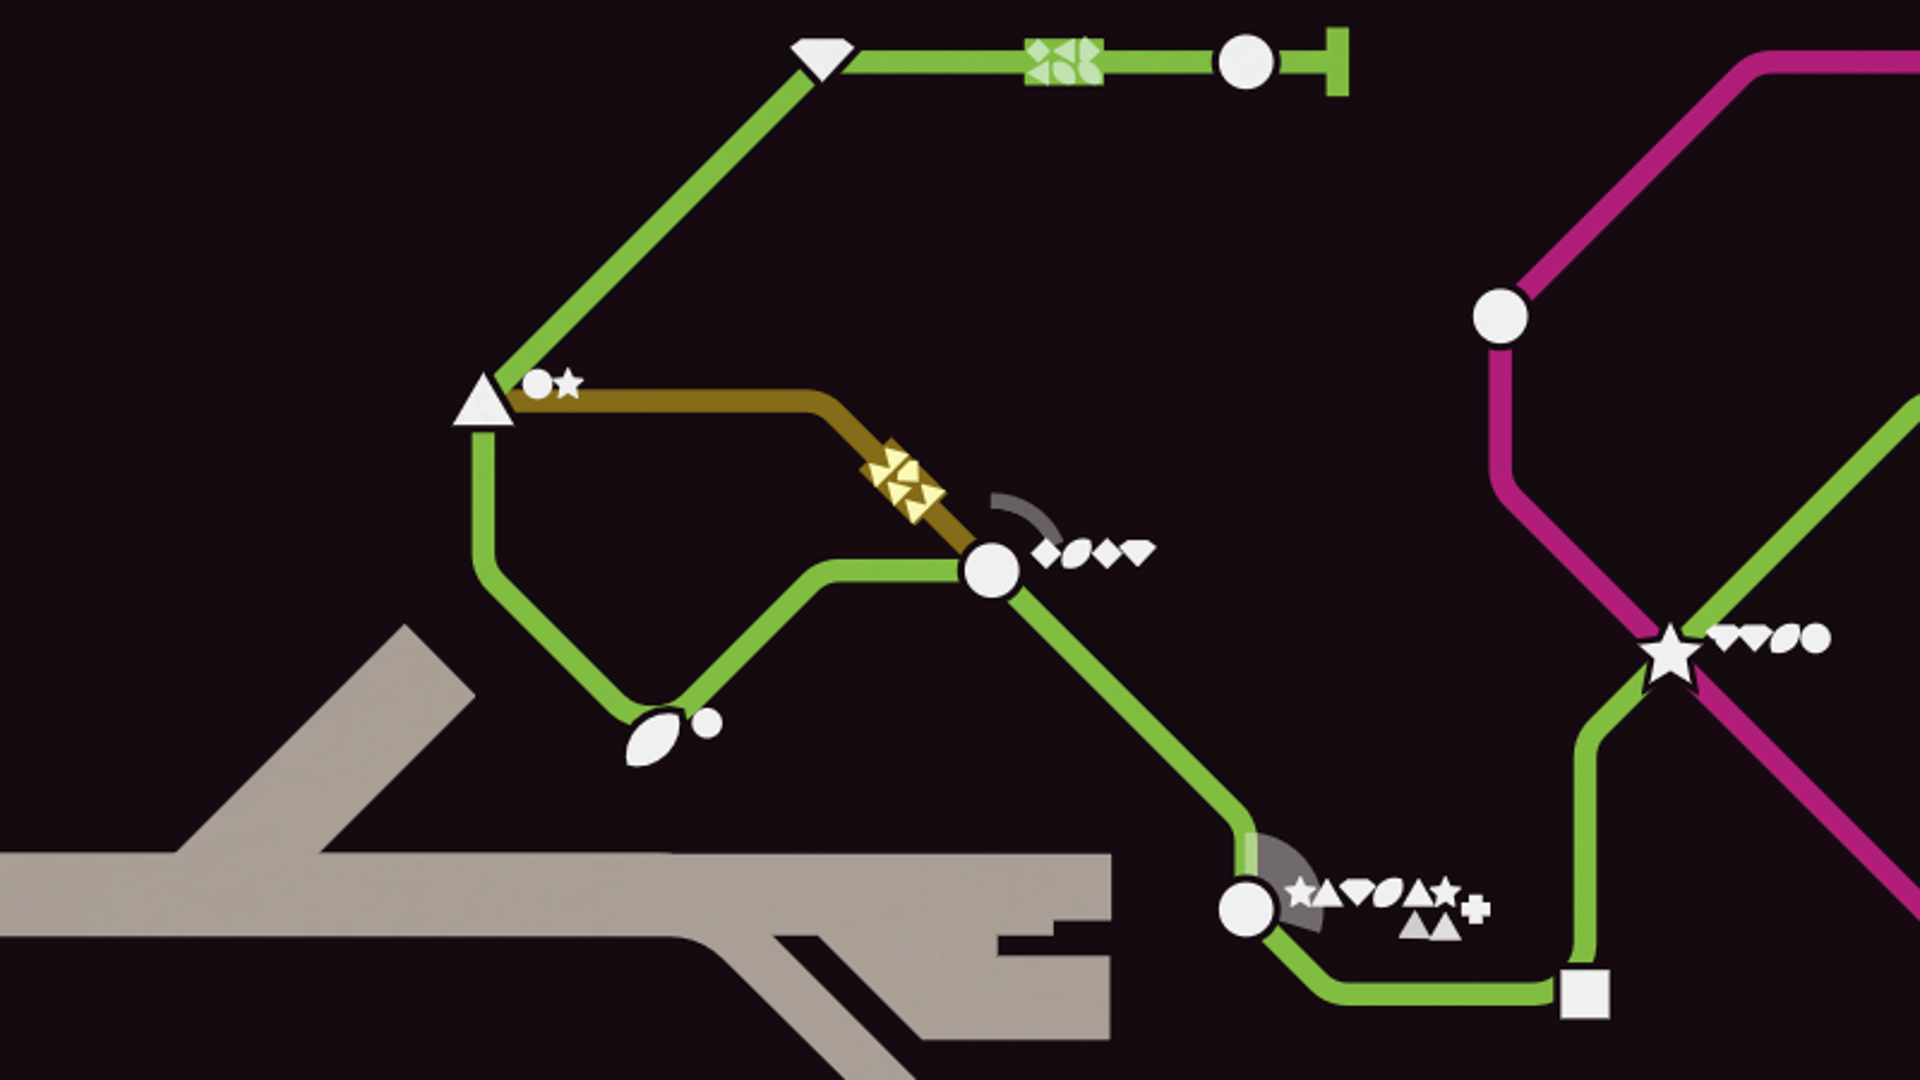
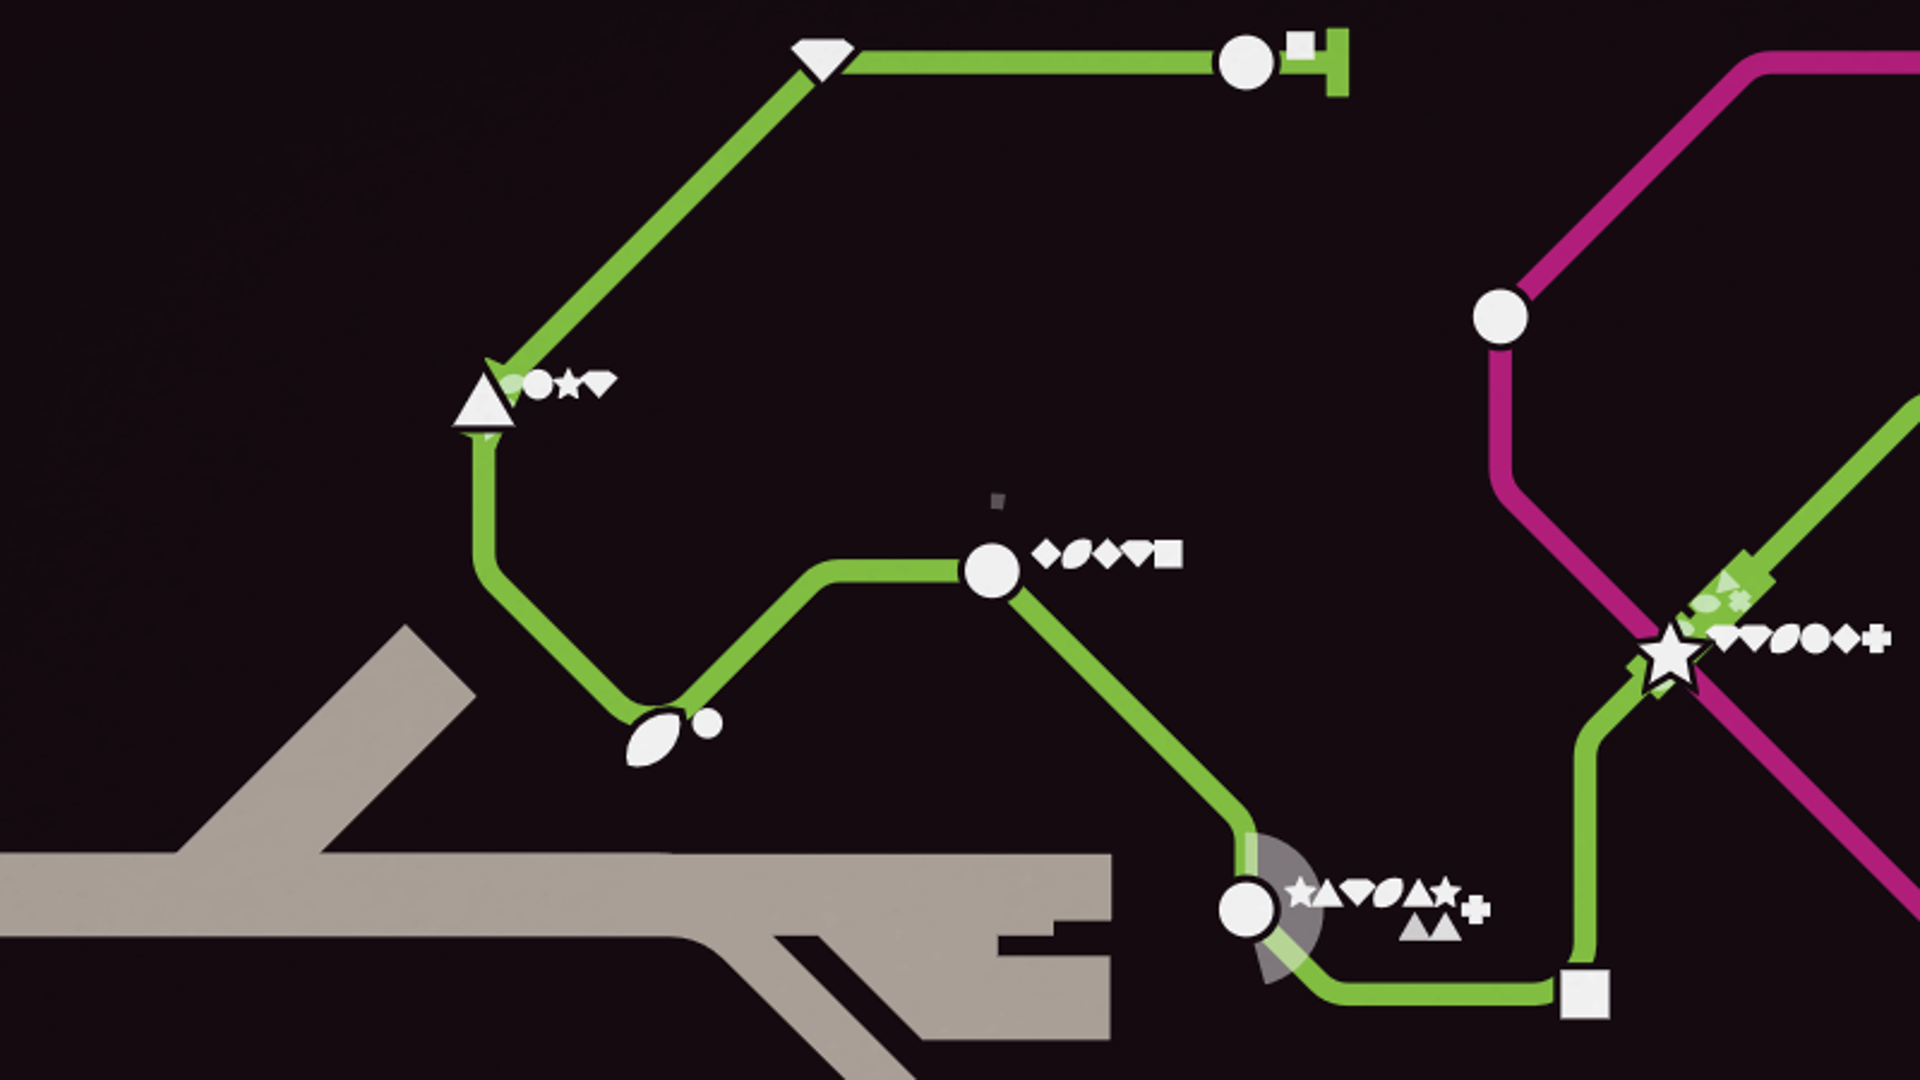
On the blue-green line on the right, an empty train with a carriage is passing by. We can move its carriage to reinforce the violet line and not have the two circles overcrowding anymore.
Some things to consider:
- In the case of an overcrowding station, try to drop the train as close as possible from the station to be sure it arrives on time before the game is over. When a train arrives at a station, the game-over clock freezes, giving you an extra few precious seconds to get it back past the overcrowding point.
- When selecting a train to move, consider the distance it has to move and the passengers that are in it. Indeed, the train will only change places when it made all the distance to another station on its original run, and it will drop all its passengers at said station. Gauge the situations.
- When considering the direction of the train to move, consider the types of stations in this direction and the passengers to drop and to pick by on the run.
- Watch the other trains on the line if there are any. If you drop your train too close to another train going in the same direction, one of the trains will stay at its station until the other is far away enough, making you lose time. However, it all depends on the situations, so sometimes you don’t have the choice.
- If you selected a train or a carriage by mistake, just drop it at a blank point of the map far away from any line. The train will go back to its natural color and continue on its way.
- Be careful! Once you release the click to move your train or carriage, you can’t move it again until it has changed places. This can be a game changer, so watch out for all the parameters!
Basic Tip: Breaking the stations in a row
Having two or more stations in a row is never a good thing, as when a train is full when emptying the first station, it will go past the second one as it has no place to drop its passengers. The best way to deal with this is to break the cycle by adding a station from a different type inbetween, for example a triangle.
Generally, having two stations from the same type in a row, though unperfect, is still okay if the rest of the line can absorb it. However, three stations or more in a row can become a problem really fast. Usually, moving trains to those stations or getting another line to stop at one of the stations in a row can help getting a little breath. But watch out: depending on the situation, it can also worsen the overcrowding. Once again, gauge what you have in front of you.
There are two common cases of stations in a row:
- Sharing is caring: if several of your lines are going towards the “circle paradise”, you can share the circles between them, for example with one line dealing with the north, one with the south and one with the center. You can also make a line deal with more circles if it’s shorter or has less stations on its run, to let the longer lines breathe in the area and continue to deal with their respective stations. Lastly, you can connect those lines at circles set in strategic places to allow the trains to drop passengers in lines that can welcome more of them, or that are more direct.
- The “Titan Line”: One risky strategy that still can work if the number of circles is small enough or depending on the situations, is a “Titan Line”, a giant line connecting all of the circles to another station that isn’t one, that would act as a hub. Of course, this line will need extra attention from you since you can expect stations overcrowding quickly in the area. To ease your task, you can put more trains and carriages in this line while still reserving some for the other lines: and when a train arrives at the hub, you can move it at the beginning of the line or at an overcrowded station while directing it towards the hub. If your map allows interchanges, such as in London, Paris or New York, you can make the hub an interchange so it can welcome more passengers without being overcrowded and so the passengers can drop out and get in quicker.
Basic Tip: Loops
Loops are an awesome beginner strategy and a great one for an early game. Even if putting one or not depend on the situation, it usually is very good at getting passengers where they want, especially if the loop is only connecting circles and triangles, the most common stations. However, I still wanted to share two quick tips for Mini Metro beginners:
- If you are putting two trains on a loop, don’t forget to put them in opposite directions! Your loop will be far more efficient that way. Also, if you are putting three or more trains on a loop, watch out for its length. If it’s too short, the extra trains will stop constantly at stations to leave space between them and the train at the front. Consider the situations.
- Be extra careful with loops crossing one or multiple rivers. It can work in your favor in some circumstances, but don’t forget they are using two bridges/tunnels. On maps like Berlin where tunnels are sparse, this can be deadly quickly. If, for example, there is only one circle on the other side of a shore, it’s better in my opinion to just connect it to a standard line than to use two bridges/tunnels on a loop connecting only one station, except if the situation changes (more stations with different types pop up) or if you’re aiming for the “São Paulo Grand Prix” achievement.
Advanced Tip: Sharp turns VS Soft turns
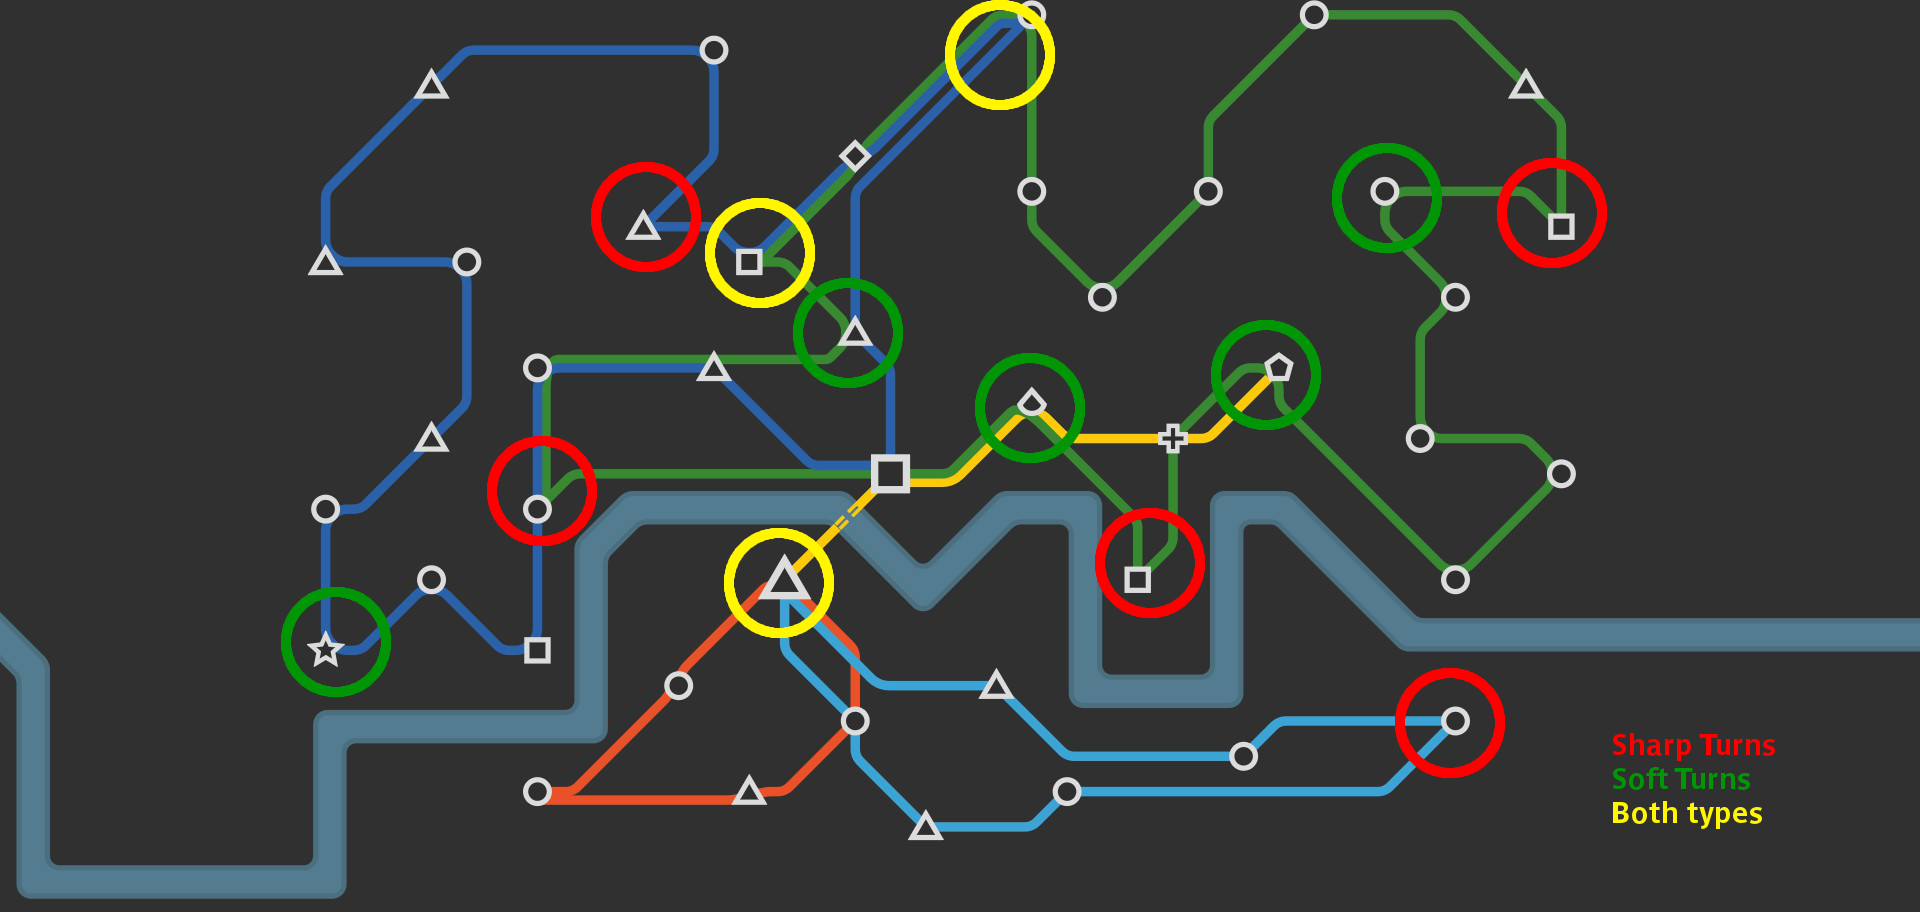
- The line can either make a sharp turn, which means the train will always stop at the station no matter what, even if the station is empty, if the train is full or if no passengers need to drop off or get in a train,
- Or the line can otherwise make a soft turn, which means the train will only stop if the station has passengers or if there are passengers needing to be dropped.
The difference is easily spottable on the map: when the angle of the line is forming a peak, it’s a sharp turn; when the angle of the line is round, it’s a soft turn.
Obtuse angles and right angles are prone to soft turns, though a misstep in the creation of a line can make a sharp turn; acute angles generally create sharp turns, though a soft turn can be created if the lines are oriented a certain way.
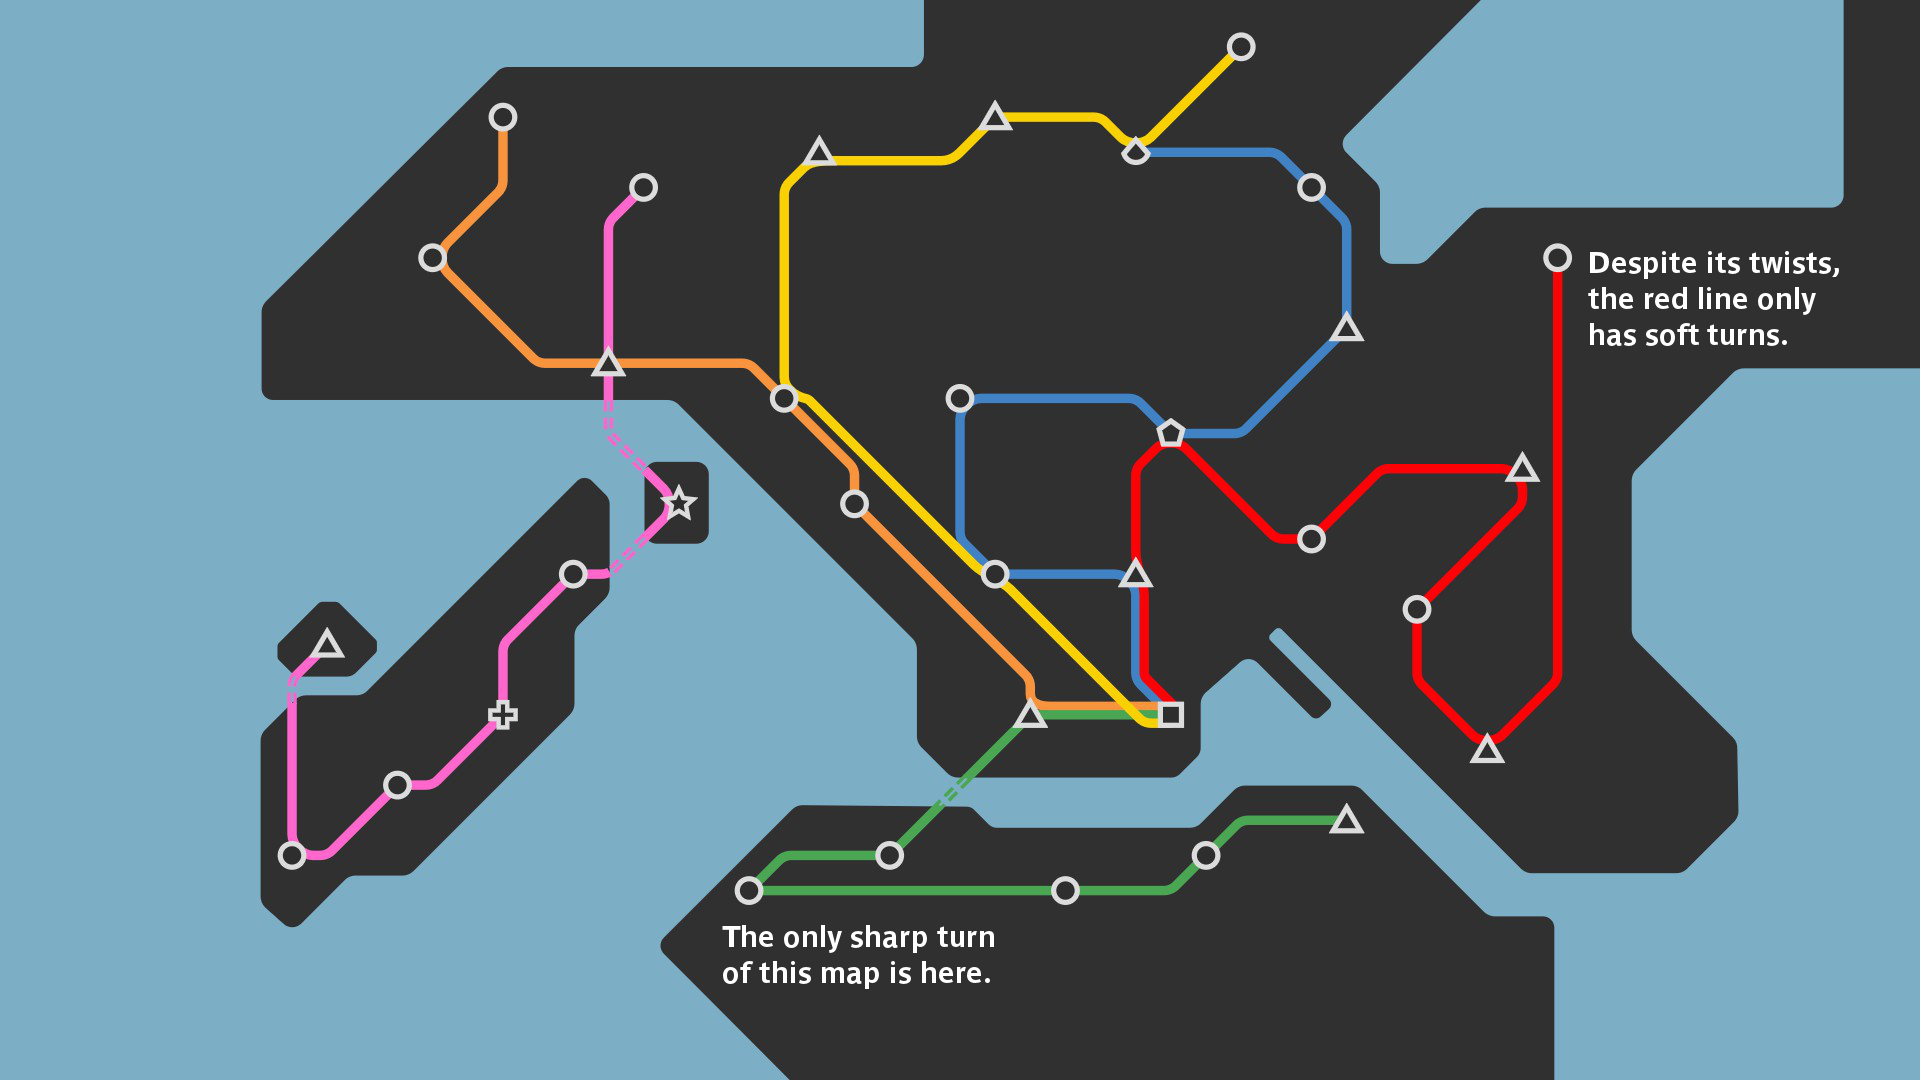
If the line is forming a triangle, you can just put the sharp turn on the most extreme station while waiting for another station to pop and that you can eventually connect to create a soft turn.
If the line is forming an S however, meaning that the line is going in a direction, turning sharply to connect a station to the side and then going again in the starting direction, you generally have the possibility to choose the station where to put the sharp turn. In that case, it’s generally better to put the sharp turn on the most important station where the line turns, for example a triangle, a square, or a special: indeed, it is already more likely for trains to stop at these stations anyway to drop people by, thus making the time wasted at getting through a sharp cut replaced by a time more useful.
Advanced Tip: The “Phantom Line”
A lot of Mini Metro players have their own strategy to get the achievements or break the high scores of the game. One strategy that saved many of my games when aiming for the achievements is the one I like to call the “Phantom Line” strategy. It’s a strategy that I start to use in mid game and that often comes as a last resort in end game.
To set this strategy in place, you will need an extra line and an extra train to run on it. After building your network, only this line should stay free. Once you get a station close to being overcrowded, or overcrowding with no trains on the line being close enough, you can connect this station to another station of a different type with this extra line, that I call “the Phantom Line”. Once the train on this “phantom line” is filled and starts to drive towards the station of destination, you can remove the “phantom line” to use it elsewhere at another moment.
The type of station you want to connect the “phantom line” to depends on several factors: how close it is, who are the passengers waiting at the starting station, what time is left on the game-over clock, the type of the station of destination, etc. For example, if there are many triangle passengers waiting at the overcrowding station, you should consider connecting the “phantom line” to a triangle station, even if a square station is closer.
If you want to take this strategy further, you can also keep a bridge/tunnel for the “phantom line” to use if the overcrowding station is on an island. However, this strategy is riskier in the long run.
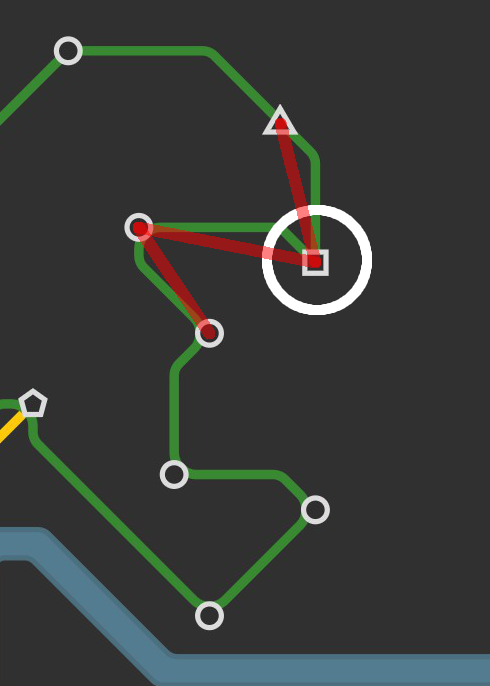
Advanced Tip: Line Superposition and Prioritarization
When several lines are taking the same path between two stations, they are overlapping on the map by getting next to each other.
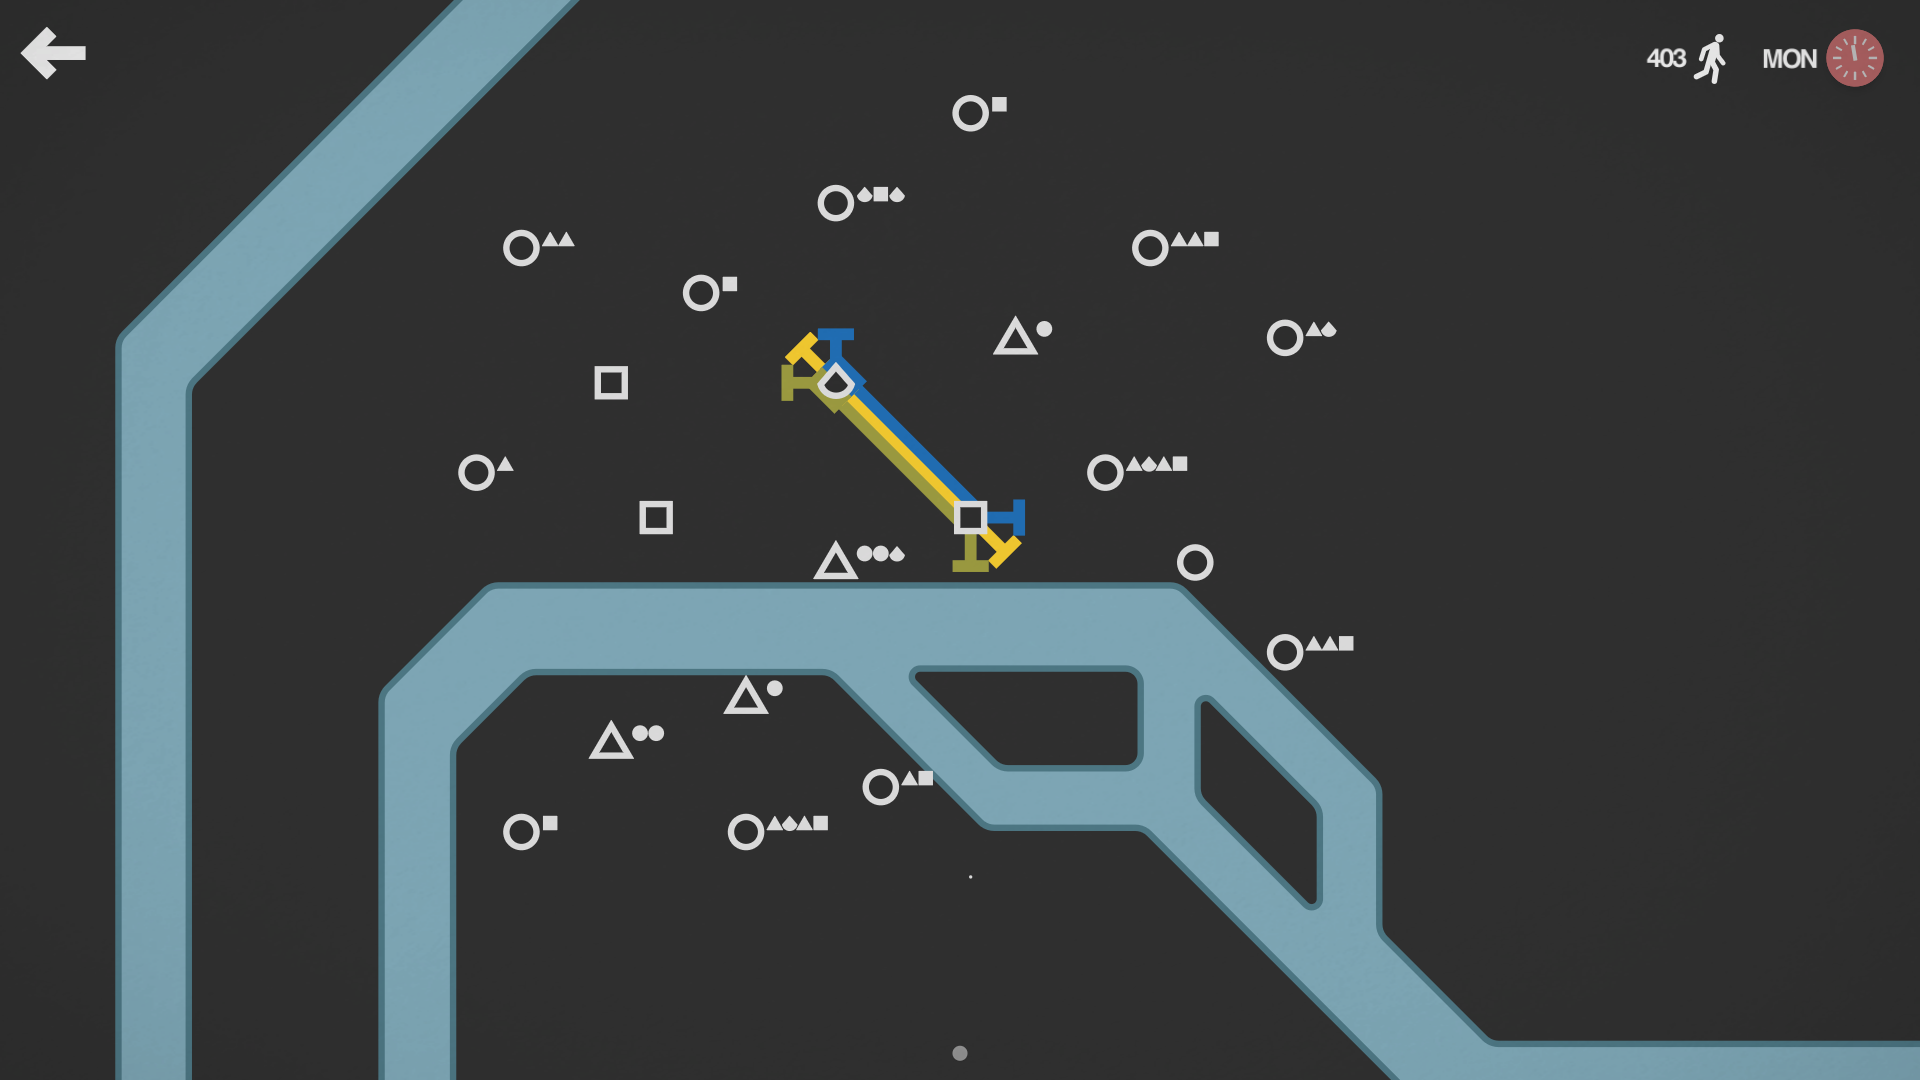
That alone can pose problems: for example, if two stations are very close to a coastline, such as in here on the Auckland map, one of three lines will consume a tunnel, which can be very frustrating when trying to achieve “Second Harbour Crossing”.
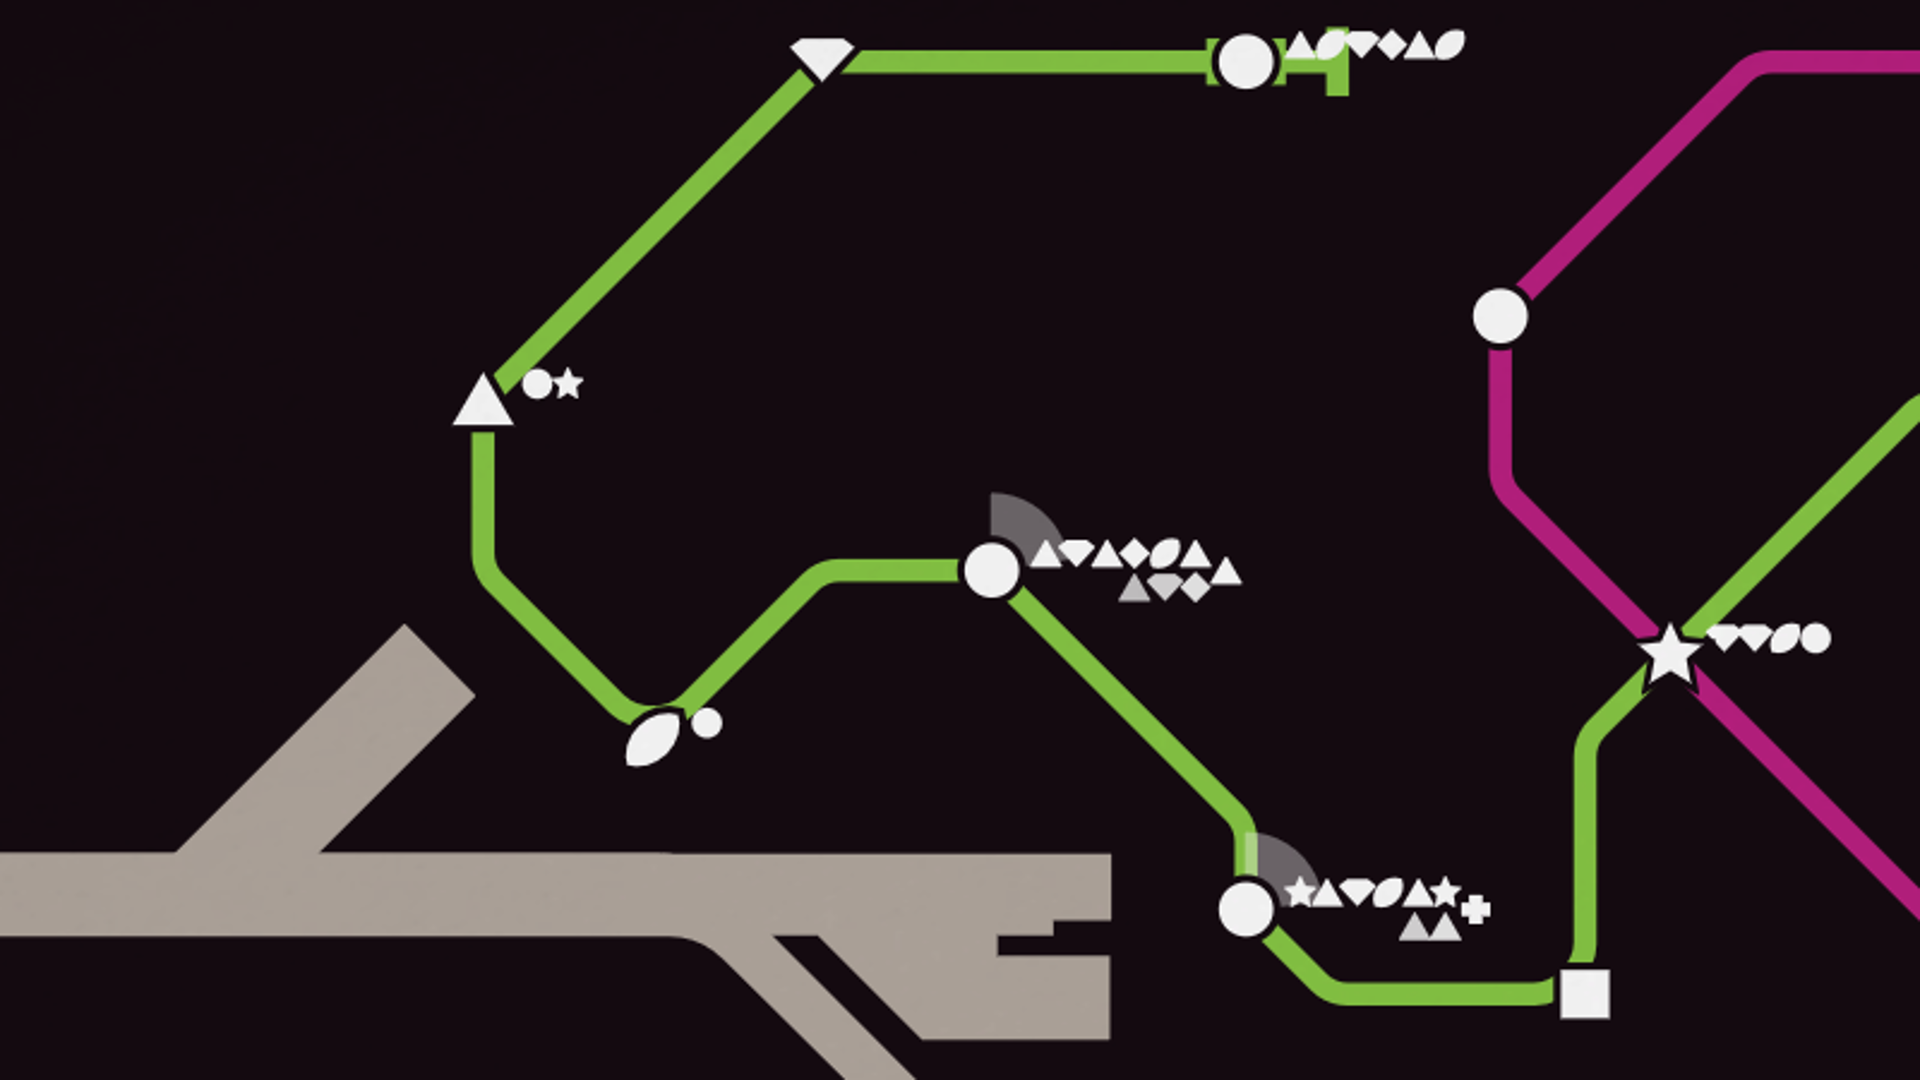
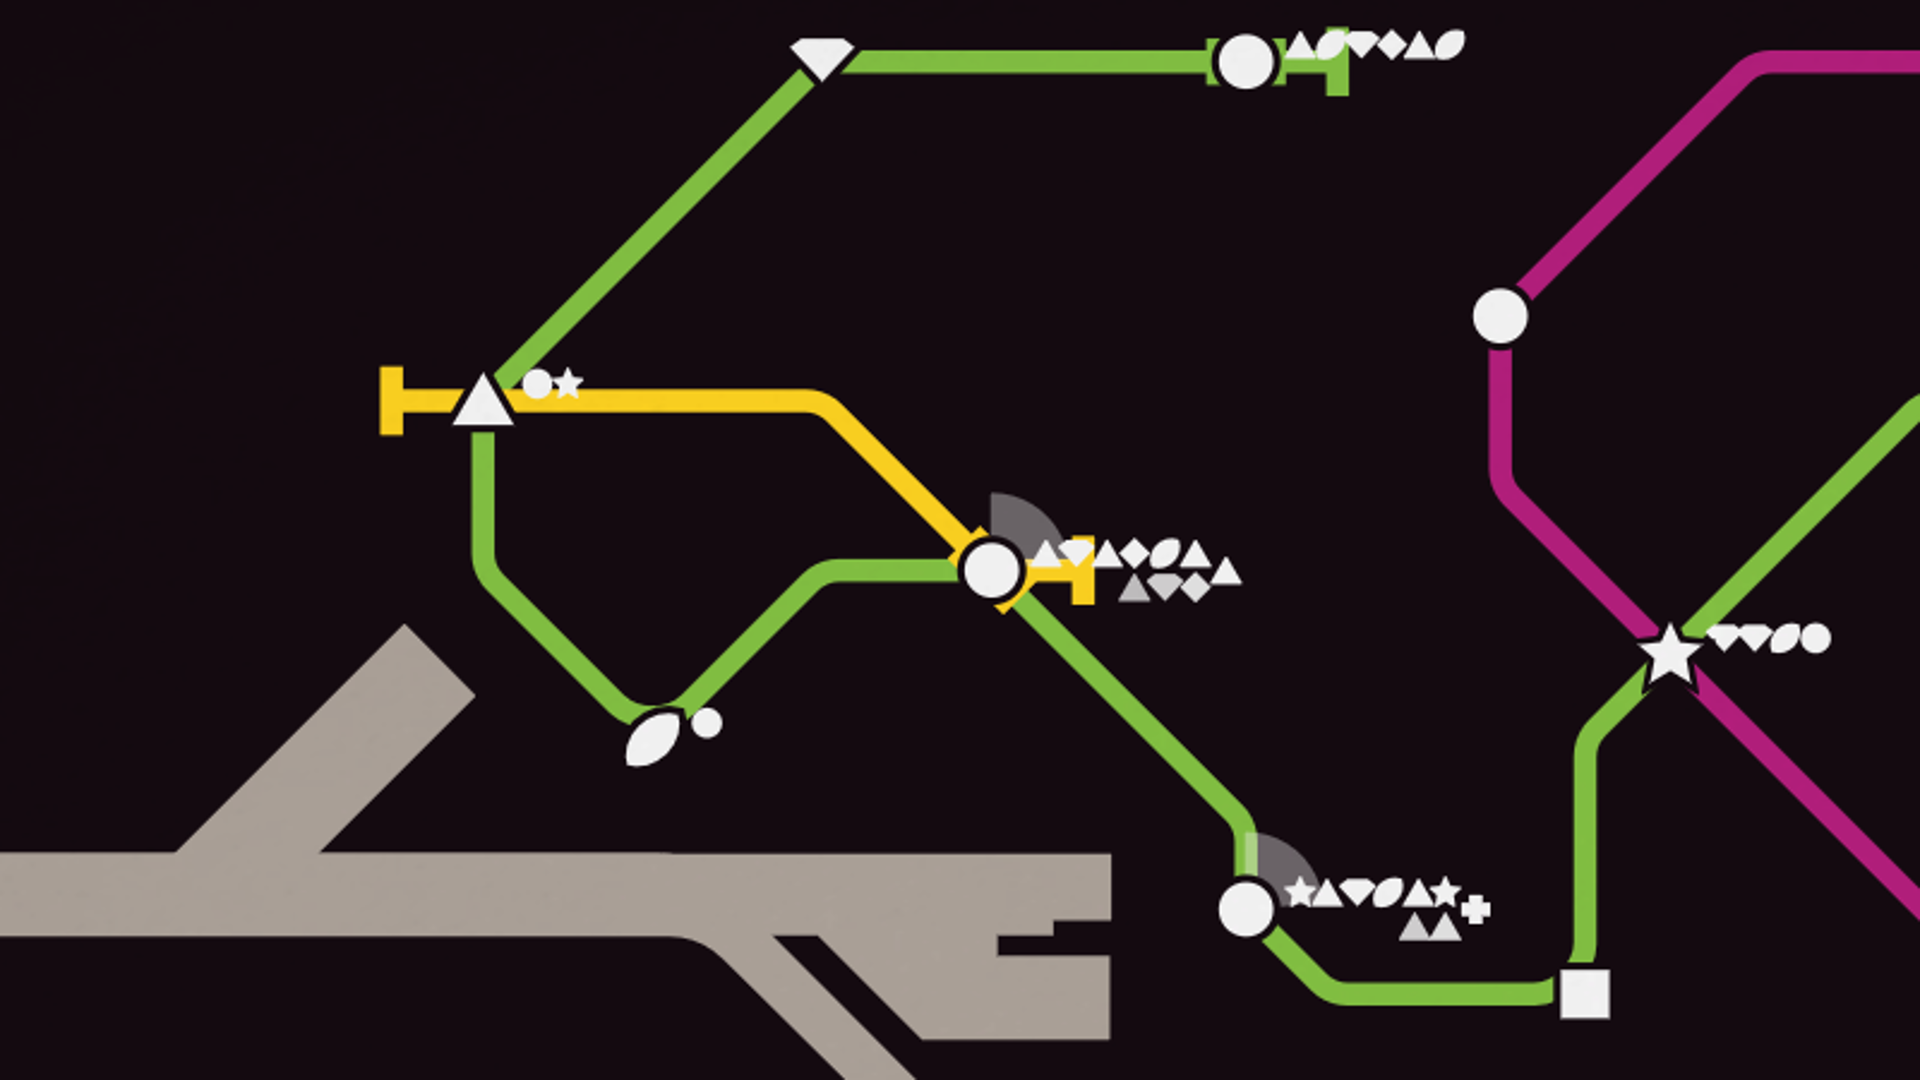
However, the Auckland map issue indicates something interesting: the lines that are staying on the coastline are the ones that were placed here first. That means that depending on the order of arrival of the lines, they will consume one of the 3 or 6 line-spaces available between two stations in a specific order. I call this complex-to-describe procedure Line Prioritarization, and I am going to use an example to try to make this clearer.
Keep in mind that the situation here is completely made up, so the stations aren’t arranged logically: but here, it’s the lines that interest me.
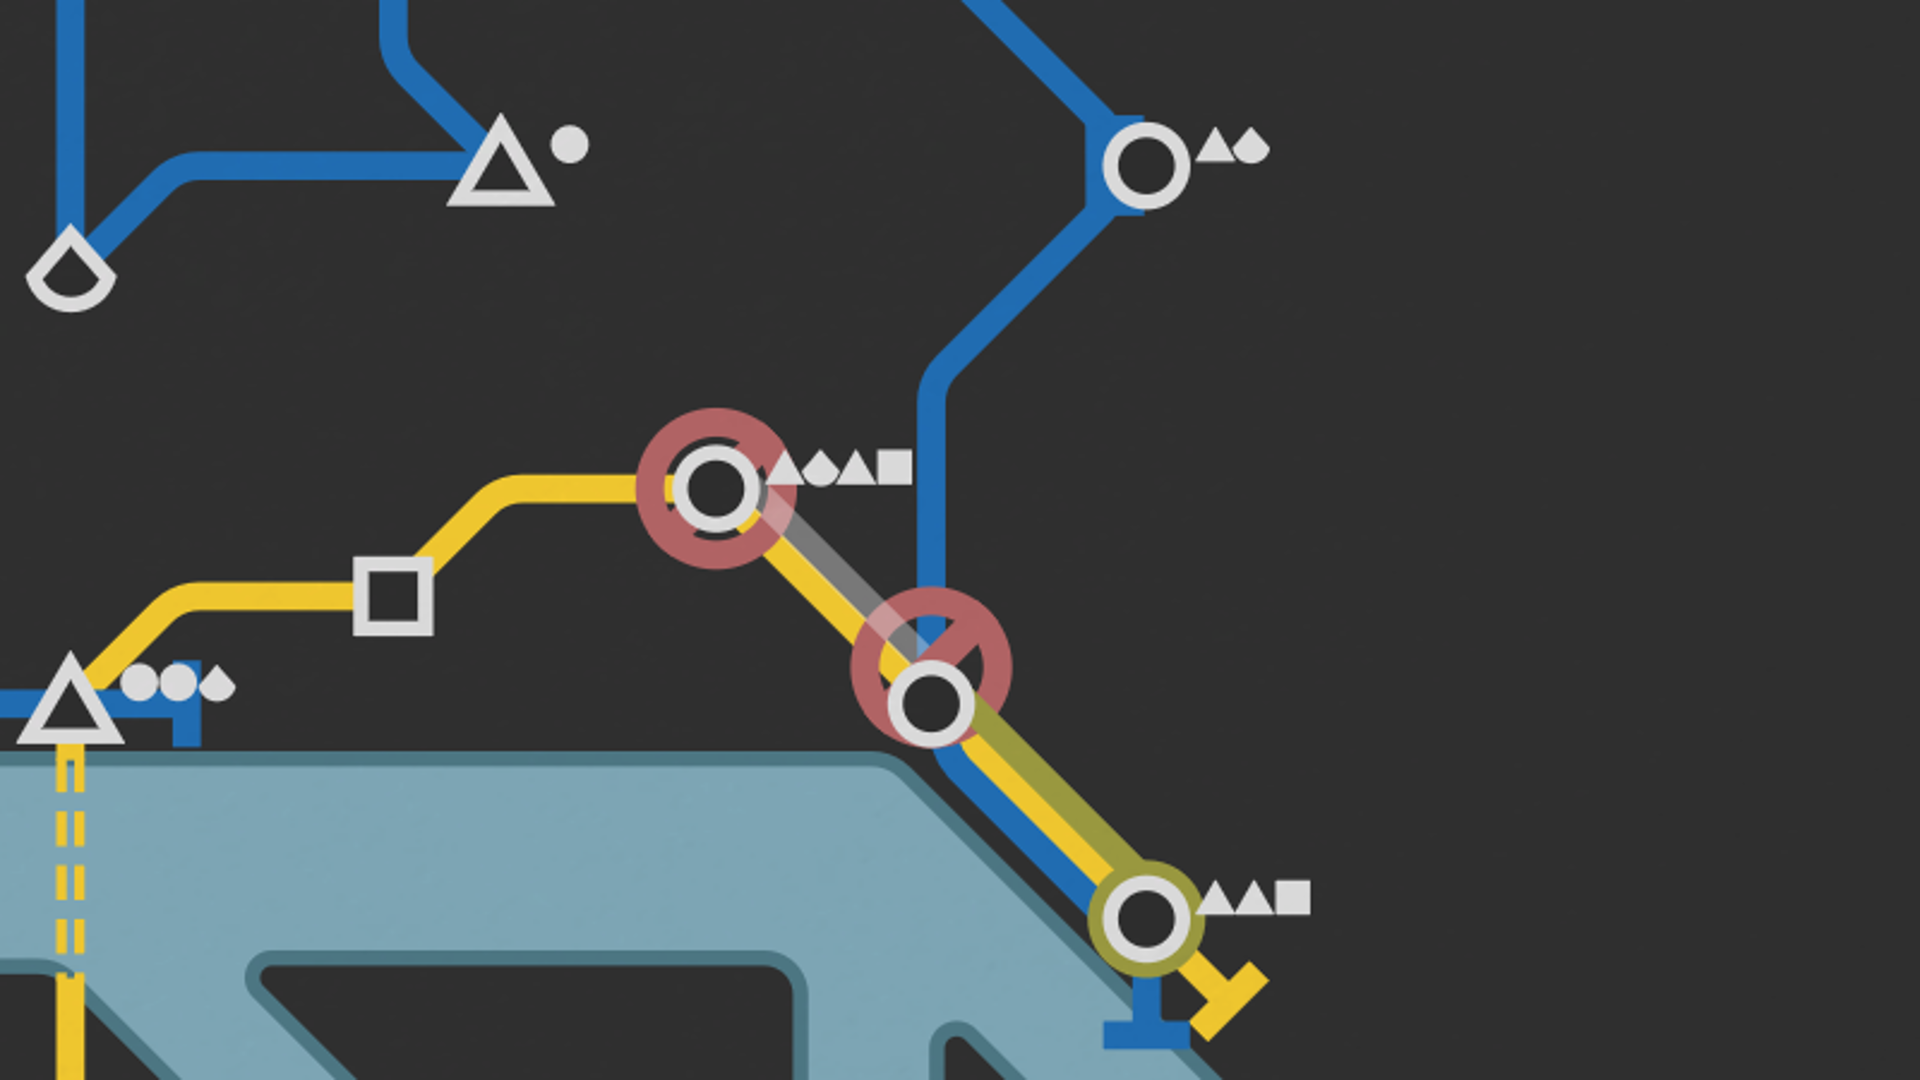
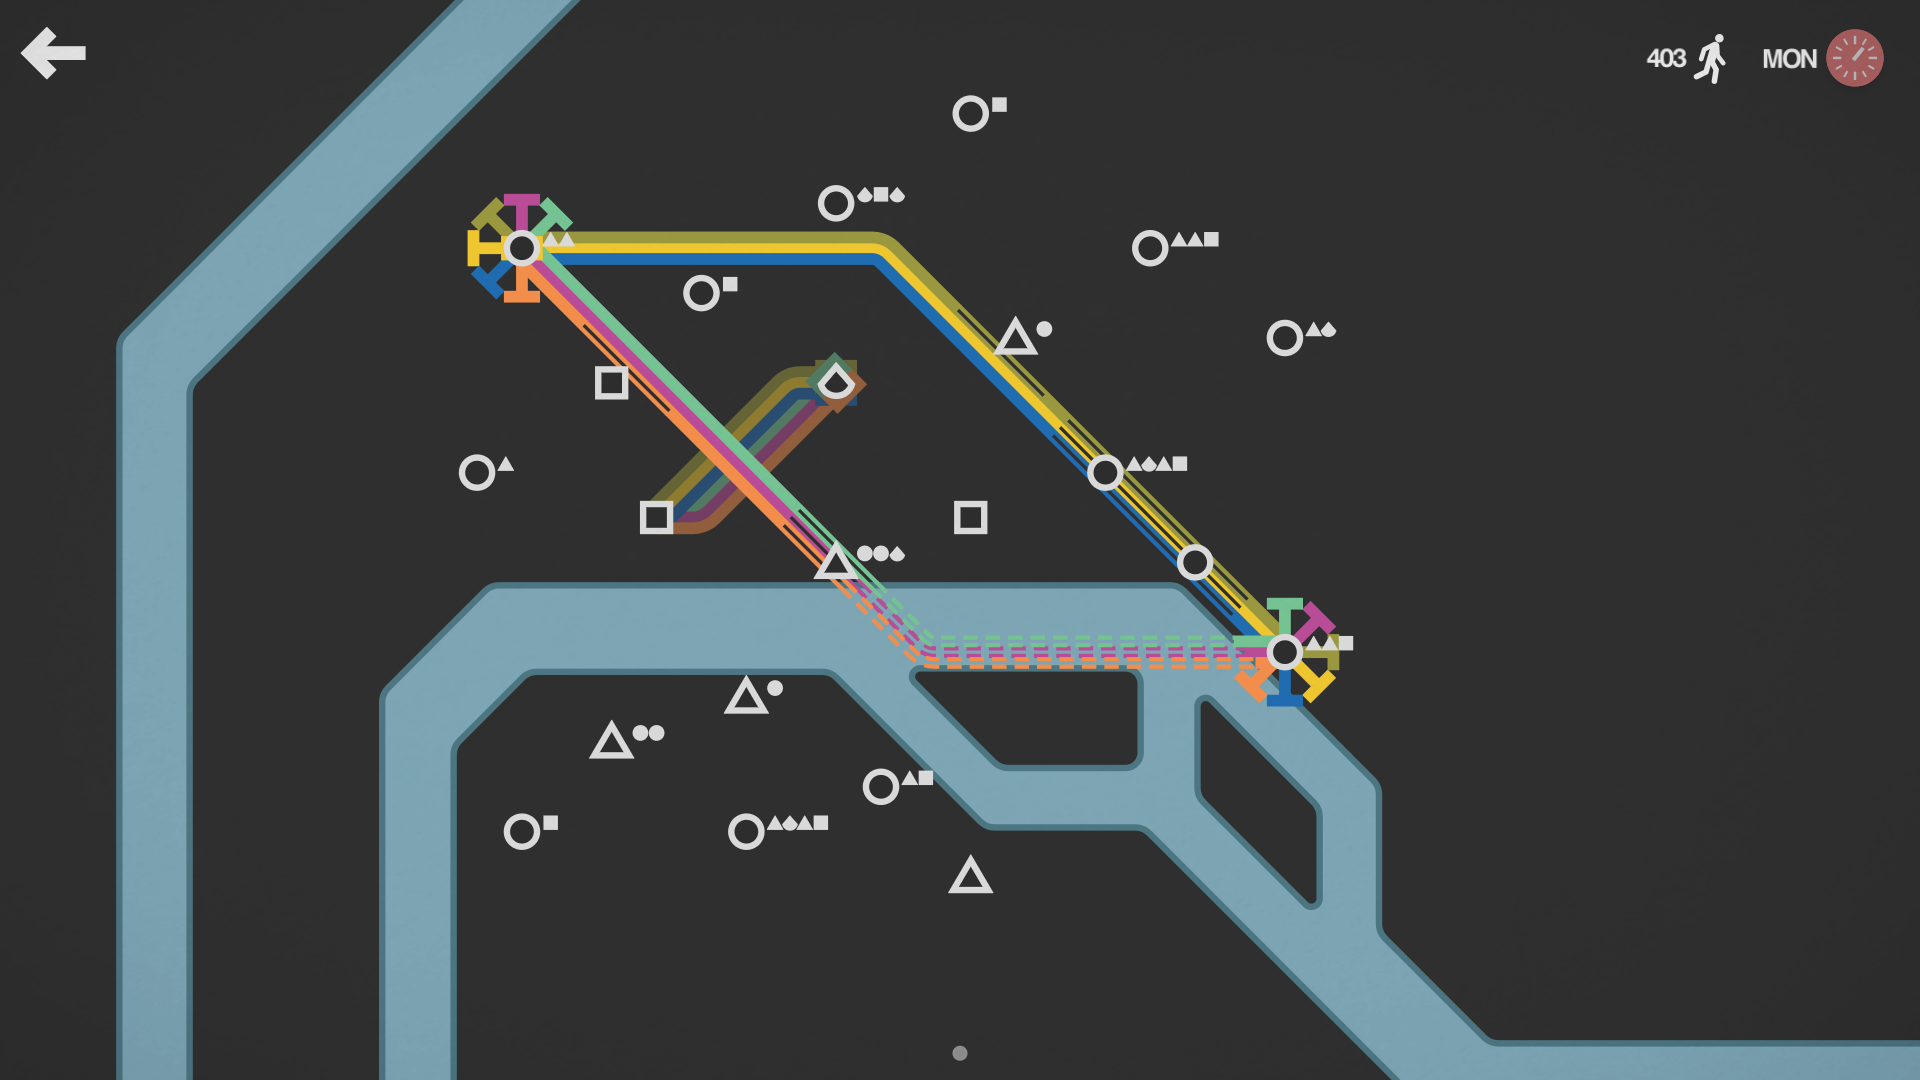
To make this happen, I will have to desconstruct the yellow line and the blue line at that point to make the green line pass here first. Keep in mind that if there are trains in the area, you must wait for them to have left before constructing the lines again.
That means you will have to make a good use of your time by carefully counting your play and pause presses.
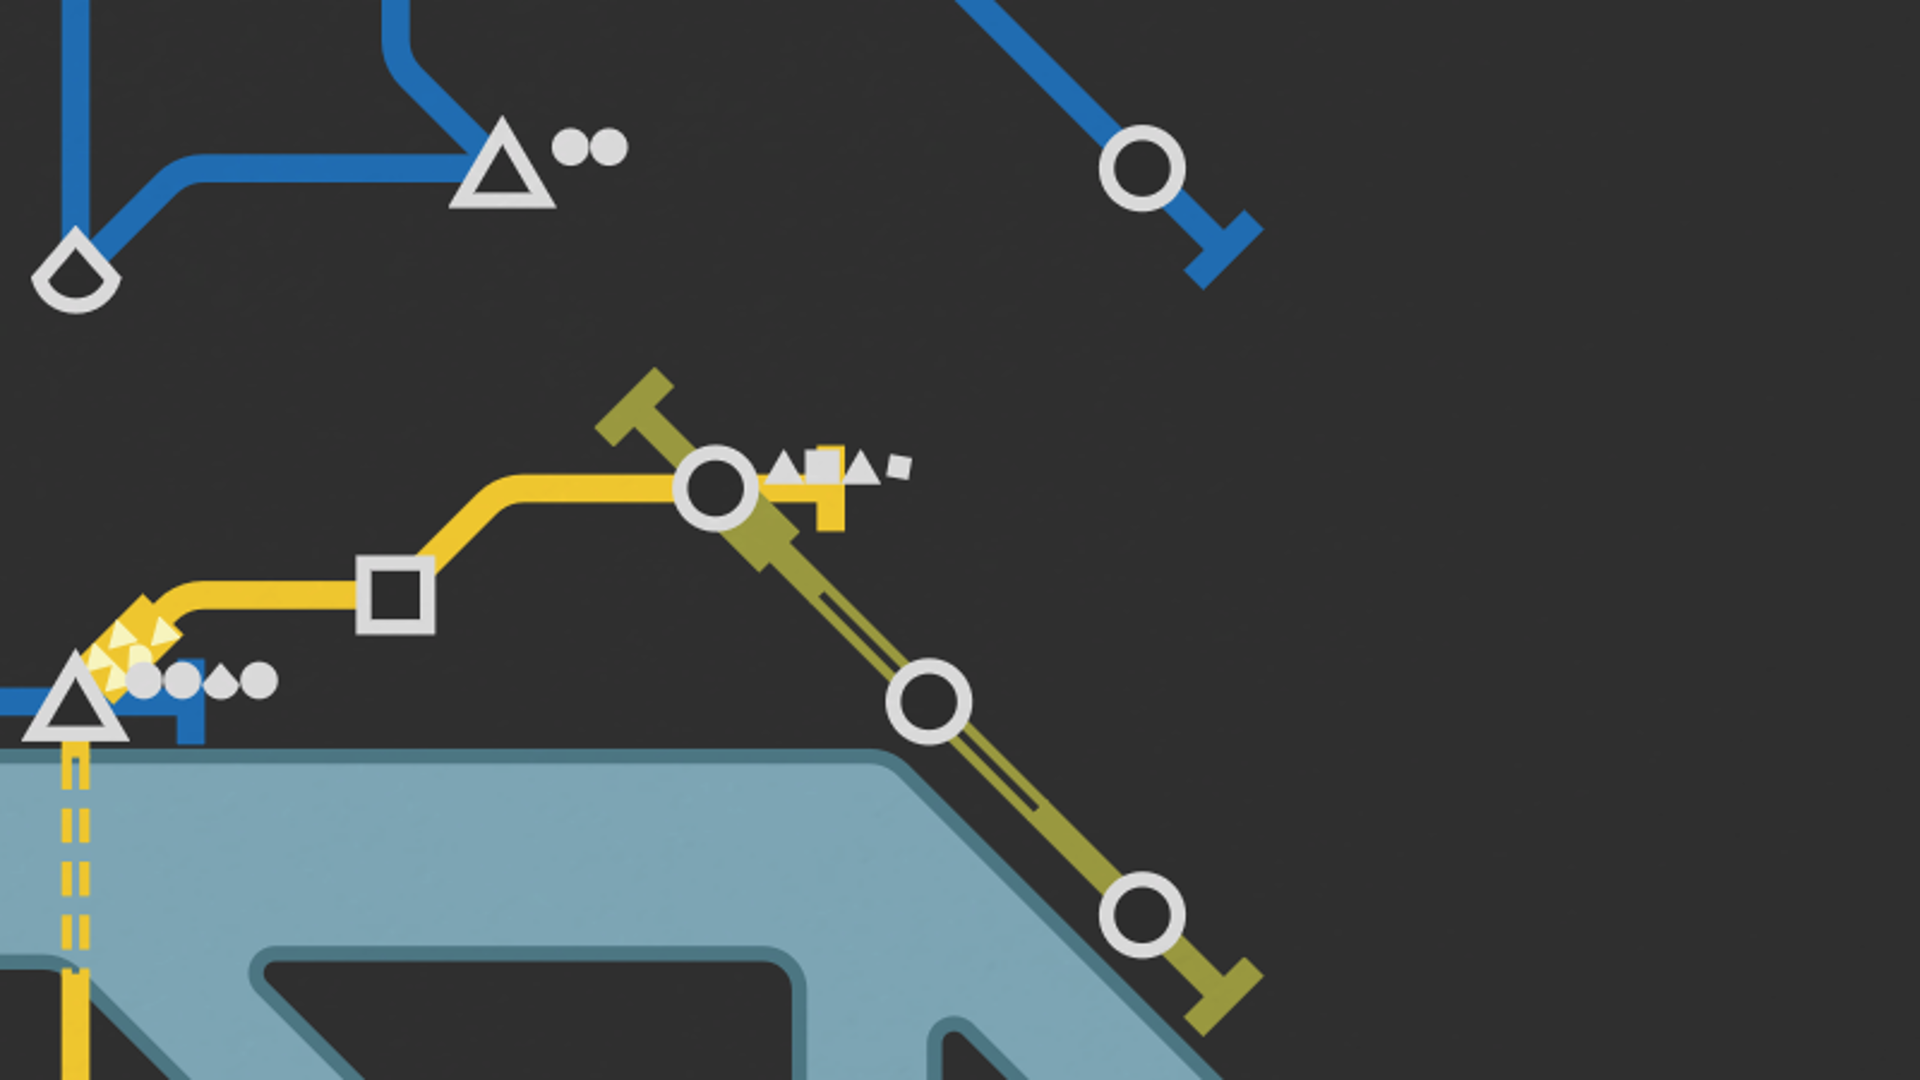
I can now build once again the two existing yellow and blue lines at the places they were.

You can also notice, however, that the order of the lines has changed. On the first screenshot, the yellow line was in the center: on the third, it’s the green one. Because of line prioritarization, the first line to be built will always be placed at the center. (remember too that if the blue line is slightly different, it’s still going through the same stations: thus, it has the same path as before)
Concluding words
Thank you for your attention! I hope you will find those tips useful in your Mini Metro experience. I may change this guidein the future to add more tips or maybe reformulate existing ones so you can understand them better, or if I have screenshots of situations explaining the tips more clearly. Also, remember that those tips aren’t obligatory in any way: sometimes, one of those tips can do more harm than good. It all depends on the situations: keep adapting to what luck brings you in this game.
In the meantime, enjoy this exclusive promo artwork of the upcoming “Mushroom Kingdom” DLC map, with carts that can only allow two passengers, but that go faster than a Shinkansen!
Have a good day!