Overview
Sheriff Lonestar is easily my favorite Awesomenaut in the entire game. He has a lot of late-game potential, and he can do a whole lot for a team. Playing Lonestar properly will more often than not be the difference between losing and winning a game. Learning how to master this Awesomenaut will demonstrate how much power he holds at the end of his blaster.
What you’re Getting Yourself Into
Playing Sheriff Lonestar is generally thought of as pretty easy and simple. He fits a good example of something that is easy to play, but hard to master. However, there will be a few things that are expected of you. You are a pusher. That means you must push. You have solid displacement, and can turn an enemy push into plenty of kills for you or your team. You have solid mobility, at least once you get boots. You can chase down plenty of people, and can escape from fatal situations extremely easily. You need to be ready to take advantage of every little aspect that Lonestar has at his disposal. Are you ready? You sure? Okay? Okay. Let’s get started.
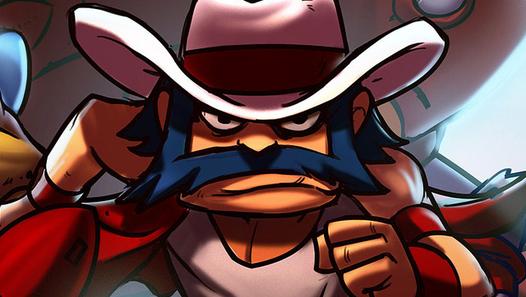
The Cowboy Himself
“At the heart of the milky way lies the Bovinion system, ruled by a semi intelligent cow-like species. Although technologically advanced to an acceptable level, these Bovinions have maintained a tribal form of society for several thousands of years. Until recent years, an age-old custom in this society was to scare young Bovinion calves with bogeyman stories about a scary cowboy. Naughty Bovinion calves would, as the story went, be caught by this cowboy’s unrelenting lasso.
Recently, a wealthy Bovinion visionary opened up a park where visitors would come to see a genetically re-engineered cowboy in action. But disaster struck and the cowboy escaped his cage. Before the Bovinions could react the cowboy had wrangled the entire park staff. Terror shook the Bovinion civilization as the cowboy started to wrangle every single Bovinion on the planet! Suddenly the Bovinions found themselves out of their cities and wrangled into herds on green meadows by the whisky drinking, bucket spitting, yeeehaawing horror.
Once the entire Bovinion civilization had been wrangled, the cowboy, naming himself Sheriff Lonestar, rode a rocket ship into the sunset, his job complete. Now Sheriff Lonestar fights as a mercenary in the robot wars, combining his awesome cowboy-powers with high tech weaponry to earn some solar to spend on whisky and cigars.”

Dynamite
“Lonestar is a great fan of shooting things, but sometimes bullets just won’t cut it. So to make sure it stays down, Lonestar will chuck cigar-lit sticks of dynamite at his foes!”
Lonestar’s first ability involves him throwing a few sticks of dynamite at an enemy. Each stick does 20 damage. You will have 2 sticks at base. This ability will indeed damage turrets. Each stick will do

Holding down the right mouse button, or whatever you’ve bound your first ability to, will cause you to “charge up” the dynamite. This will allow you to throw it further, as shown by the lines extending off of the dynamite. While it may be awkward to use initially, learning how to properly use your dynamite will help your brawling potential exponentially.
Get into the habit of using Dynamite for everything. The cooldown is low enough that you can use it to harass enemy ‘Nauts, farm up on some droids, kill some health creeps, push some turrets, etc. It can be used basically anywhere, so take advantage of it.
Hyper Bull
“To keep himself sharp, Lonestar trains with powerful holo-Bulls that knock anyone away. New fangled portable holo-tech allows him to turn his training program on his enemies!”
The Hyper Bull is Lonestar’s second ability, activated by whatever keybind you’ve set that to be. When activated, a bull will move horizontally across your screen in whatever direction you happen to be facing. Whatever it hits will be knocked back, making the Hyper Bull a great zoning tool.

Think of the bull as a zoning tool. You can manipulate your enemies into going somewhere they don’t want to, such as knocking them into one of your turrets. On the other side, you can knock enemies away from your turrets, protecting them from danger.
Take advantage of the bull, and learn how to use it. When I was new to this game, and I started to play Lonestar, I completely ignored the bull. Don’t make that mistake.
Blaster
“Even though it’s a bit modern for his tastes, Lonestar has shot his way out of many a tight situation using his deadly and accurate space blaster!”
Lonestar’s blaster is one of my favorite features of the character. It’s easy to use, and is a basic weapon in design. When you pump some upgrades into it, however, it can output some serious damage.

One of the most important features of this gun is that it does 100% damage to buildings. This is part of why Lonestar is a really good pusher. Since his gun has really good scaling, and since it will always deal full damage to turrets, you can shred turrets extremely quickly with this thing.
Practice with the blaster. It’s an essential part of playing Lonestar.
Double Jump
“Using the simple thrusters he integrated into his classic cowboy boots, Lonestar can do an extra jump in mid-air. Handy for traversing mountains of wrangled Bovinions!”

As simple as it is, it’s still very important that you know how to use it successfully. It’s a basic jump, but there are a few little tricks you can do with it to be very efficient with your mobility.
This is so important because you are a slow character. Your mobility is very low, especially for how squishy you are. You need to be careful about how far you push yourself in a fight. Sometimes, you’ll just be pushed too far out to escape. Sometimes you won’t. It’s up to you to get comfortable with the jump in order to maximize your mobility.
This will be described more later, but boots are mandatory on Lonestar. You must have them on your loadout!
Forging a Good Loadout
Generally speaking, Lonestar is rather lucky in that his build diversity is among the best out of any Awesomenaut in the game. This means that there are tons of viable and effective builds that can be used. However, there are a few upgrades that are considered mandatory.

On a side note, you don’t need to have any levels to access it, so even you newer players can use it!


Now, for the rest of the loadout, I’m going to leave that up to you. Lonestar has a whole lot of build flexibility, meaning that there isn’t a “set-in-stone” build for him. I’ve mentioned all of the upgrades that you must have on your loadout, but everything else is up to you. You can’t learn Lonestar from just reading a guide, you have to play him for yourself. Jump into a practice match or two, and figure out something that works for you. You might like to play Lonestar a much different way than I do, so go figure it out for yourself.
Okay, I’m sort of lying. You really should figure out what works for you, but I’m actually going to post my build. If you want to, go ahead and use it. It’s not like I have it copyrighted or anything. I do think that it’s best, however, that you find a build that works for you.

Somewhat Advanced Strategies
When playing Lonestar, there are ways that you can use your abilities to do many different things. Here, I am going to describe a couple of these different maneuvers.
Bullpins
Bullpins are a very useful tool for any Lonestar looking to get a kill. A bullpin involves knocking someone into an object (turret, wall, Sieged Derpl, etc.) while the bull follows up and “sandwiches” them in between the bull and the object. This is an example of a bullpin. The Froggy G bot is stuck in between the turret and the bull, and, as such, cannot do anything. This makes for an easy kill opportunity.

It takes a lot of practice to learn how to bullpin people and where you can bullpin people. Basically, you just want to throw a bull at your target, and hope that they end up getting stuck to something. When trying to bullpin someone to a turret, make sure to put the bull slightly above them!
This gives your bull a larger area of effect. In the picture, you can see that the bull is slightly above the Froggy G. This makes it harder for him to jump out of it, since it covers up a larger area. Again, practice is required to successfully bullpin. Keep working on it.
Facemite
This isn’t really that advanced of a strategy, and it’s extremely simple in nature. It basically involves running right next to someone, and throwing your dynamite without charging it up at all. You just tap your dynamite button for a short period of time. Facemite is very useful because it minimizes your downtime from charging up your dynamite, allowing you to get back to shooting people quickly. It also makes it extremely easy to land your dynamite, and you don’t have to worry so much about missing. Just be careful about who you’re approaching. You generally only want to get up close enough for a facemite if it means you can get a kill. Otherwise, you’re best staying at a longer range and poking with your dynamite.

It’s rather hard to make out in the picture, since the effect of the dynamite is in the way, but I think it helps to portray the idea. You can see that I’m right next to this bot, and I just tap my dynamite key, ensuring a quick use of my dynamite.
You can also see that I hit him with facemite right after I bullpinned him. This allows me to quickly burst him down, almost guaranteeing a kill out of my bullpin.
In my opinion, these are some of the most important things you can work on. You need to be looking for opportunities to bullpin people all the time, since they make for easy kills. You also need to be on the lookout for potential kills from some facemite and a couple of blaster shots. Once you start to get the hang of these, you’ll be able to do some work in terms of kill potential.
However, hands down the most important thing that you should be doing all of the time when playing Lonestar is…
Pushing
Quite simply, Lonestar is an extremely good pusher. He is, arguably, the best pushing in the entire game. Playing a proper Lonestar is mostly focused on pushing. It’s so important that I have to make a whole section out of it.
Pushing can consist of many different things, including, but not limited to:
- Pushing out the droid waves
- Poking or cheesing an enemy turret
- Attacking an enemy turret with droids to tank for you
- Pushing a turret with your entire team
- VOLTAR TRAIN!!!!1!!11
By picking Lonestar, many of these apply to you, and you need to be sure to take advantage of them.
Pushing the Droid Waves

You should be doing this a lot. Pushing out the droid waves is done by just killing droids. Use your dynamite or your blaster, either one is fine. You can even use your bull to literally push the droid waves. You want to make sure that the droids are getting closer to your enemy turrets, so that you can get in position to take further pushing action. Basically, just kill droids. It helps your team a lot, and you’re rewarded with 5 solar per droid you kill.
Poking/Cheesing Turrets

Poking and cheesing turrets is done by using aspects of your character to damage turrets without using droids. Lonestar can poke turrets really well by using your bull to tank a few shots, and then throwing your dynamite at it. This doesn’t do all that much damage to a turret, but if you poke it every time your abilities are off cooldown, the damage you’re dealing can add up quite a bit.
Attacking an Enemy Turret with Droids

This is why you’ve been pushing those droid waves up. When they get to the turrets, and they can start tanking for you, that’s when you can do some serious work. Push that turret with everything you can. Use your abilities as they come off of cooldown, and keep on shooting it up with your blaster. You never want to underestimate the amount of damage that you can do to turrets, just keep up the pressure. You’ll be rewarded.
Pushing a Turret with One/Two Teammates

This is the kind of pushing that will generally come if you end up killing one, two, or maybe even three enemies. When this starts to happen, you’ve basically already killed the turret, especially when you have other really good pushers on your team. If you can get this kind of pushing to happen frequently, then enemy turrets will not be standing for long at all. However, your teammates will generally only group up and push after killing a bunch of enemies, so keep that in mind.
These are a few kinds of pushing that you should be taking advantage of as Lonestar, since you can do all of these very well. All of these different forms of pushing have their own special times to be used. You need to make sure that you’re using every one of them during a game.
Oh, and speaking of pushing…
If you see one of these guys rolling down the map…
Please, do you and your team a favor, and push, push push!

Finally, don’t overextend. You need to push, but you also need to stay alive. If you’re poking a turret on your own, that’s great. They’re leaving you alone. Just make sure you’re prepared for when someone ends up coming.
Right here, I’ve backed off a bit, since someone has come to stop my pushing. In a case like this, you can run off to another lane, and try to push there, you can wait for them to go away, and continue your pushing, or you can call for help and try to kill them, among many other things. Part of pushing is knowing when to start and stop. Basically, if somebody comes to try and stop your pushing, just back off for a bit. You need to be pushing a lot, but that doesn’t mean that you have to be pushing for the entire game.

Matchups (Non-Starstorm)
Generally speaking, Lonestar is pretty lucky in terms of ‘Naut matchups. He doesn’t have many bad matchups, only a handful he’s fighting at a disadvantage. However, I will still go into detail about matchups.


Matchups (Starstorm)
The Starstorm ‘Nauts get their own section simply because I ran out of room. But we can pretend that I have a bigger reason. Okay? Okay.


Team Compositions
Lonestar can be built into a whole lot of different team comps. As a good pusher, he can fit in with a lot of defensive ‘Nauts, or you can pair him with other pushers in order to easily kill towers. I will list a few different potential team compositions that can take advantage of Lonestar’s strengths.
For tons of pushing power
For solid pushing, and ridiculous turtling
For loads of CC and lockdown
For lots of kills utilizing the bull
For amazing late-game potential
These are just a handful of examples of what you can do. If you can get creative, and I know that you can, then you should be able to come up with even more killer team compositions that will surely win you the game, at least in theory!
Early Game
Early game is Lonestar’s weakest point. His upgrades are very expensive, and it takes some time to farm up the solar that you need. Generally speaking, your priority is pushing. That being said, don’t be afraid to make a kill happen. You’re great at killsteali– I mean, finishing people off. Just don’t steal kills from your teammates all the time, and everything will be fine. If you see someone running around at about half health, you should be able to kill them, as long as they’re not a tanky character. Just be careful about running straight at them. Kills are much easier to secure if you use those bullpins that I mentioned earlier.
Yeah, those. Take advantage of the damage output that turrets have. They’re much better than yours. If you’re pinning someone to a turret, try to secure the kill. That’s part of the reason as to why facemite is useful. It’s a lot easier to secure a kill against a turret with a 40 damage burst than your 5 damage blaster shot. If the turret does end up securing the kill, it’s no big deal. Just gather the solar, and get back to pushing.
Mid Game
As you enter the mid game, you’ll start to gather some of your strength. If your enemies haven’t tried to dislodge you, the you should have a turret or two destroyed. At this point, you’ll be deciding in what upgrades you want to invest in. Do you want to play Gunstar, and pump most of your damage into your blaster? Do you want to have a few upgrades on your bull first? Do you want everything pumped into your dynamite? Lonestar is very flexible, meaning you can specialize in different things in different games, choosing what you feel is most appropriate.
Personally, I like to have my dynamite maxed out by this point, and I like to have boots. Being the mid game, I won’t have a whole lot more than this. After maxing out my dynamite, I generally start investing into Gunstar, so that I have solid pushing power from my blaster, and my dynamite damage is solid enough to burst people down.
But, of course, what you have all falls down to personal preference.
Either way, since it’s the mid game, big pushes will start to break out, meaning the game may end before you can reach the late game.
Yeah, I know, reusing pictures. How lazy.
That being said, things like this will start to occur in the mid game. You’ll have killed two or three of your enemies, and your team will group up to get a good push going. Since Lonestar is one of the best pushers in the game, you can often end a game with one of these pushes, especially if your team consists of many other good pushers.
Late Game
Welcome. You’ve made it to the late game. This is where your full potential lies. If you get maxed out, or close to maxed out, you can very quickly become an unstoppable force of destruction.
Basically, just keep on doing what you’ve been doing. Your kill potential is about as good as your pushing potential, so think about whether pushing or getting kills is more important.
Remember, the game could very easily be won or lost depending on your actions. Think quickly before you act, but think thoroughly. Pushing without getting kills can leave you vulnerable. Getting kills without pushing will make it easier for your enemies to make a comeback. You need to determine which one is more important at any given time.

And please, if you’re stomping really hard in a game, just end it. You don’t have to make your enemies suffer for longer than they need to. You can end a game extraordinarily quickly, especially in the late game, so do it.
Wrapping It All Up
So, hopefully this guide has given you a bit of insight on how to play Lonestar. I tried to put as much stuff in here as I could, but I recognize that I still left a bunch of stuff out. However, part of the learning process is figuring things out for yourself. So go ahead and do that. After all, you’re only going to get better after you practice. Others can direct you, but it’s up to you to improve. Lonestar is a character with loads of potential. In order to successfully play Lonestar, it’s up to you to figure out how to use that potential.
Now get out there, kick some butt, and chew some tobacco.
