
Overview
Update: 4/22/2018. Hello everyone, back in 2015 I created a list with a names of items to foIlow in game to make a run under 3h. and as aSM Volk comment “I’ve been using this one, a little blunt but useful”. So I decided to update a guide to make it more user friendly for a new and returning player with visual guide. List is the same, however now its showing as “Guide Index” on a right, so if you are not sure where is this item is located just click on it.
Source and Links
Maps,Items location, Rooms and Items descriptions images taken from: Evil Resource: The definitive Resident Evil fan resource site
A dedicated resource for all information related to the Resident Evil franchise
[link]
[link]
Gameplay recorded with: XSplit – Live Streaming & Recording Software for Games
Live stream and record your content with ease & share it to streaming services like Twitch, YouTube, Facebook, Mixer, etc. Start your broadcast today.
[link]
Images edited with: Adobe Photoshop
[link]
Adobe Photoshop is a raster graphics editor developed and published by Adobe Systems for macOS and Windows. Photoshop was created in 1988 by Thomas and John Knoll. Wikipedia
[link]
Items Rotation List: My own
Color Code
Pink – Very Easy
Green – Easy
White – Normal
Red – Hard
Blue – Real Survival
Yellow – Invisible Enemy
Unlockables
Modes

Real Survival — Complete the game on Normal. In this mode, the item boxes are not linked.
One Dangerous Zombie — Unlocked (and automatically turned on) when you complete the game with both Jill and Chris on Normal. It can’t be turned off. In this mode, Forest Speyer comes back as a zombie with bandoliers of grenades strapped to him. You cannot shoot him without setting them off, if you do, the explosion will kill you and end the game.
Side note: As soon as you complete first step of Part#2 this mode will be gone for the rest of the gameplay.
Invisible Enemy — Unlocked when the game is completed twice on any difficulty. Like the name of the mode implies, every single enemy in the game is invisible.
______________________________________________________________________________
Weapons
Samurai Edge — Beat the game on either Normal or Hard under five hours.

Anti-Tank Rocket Launcher — Beat the game on either Normal or Hard under three hours.

Costumes

Jill’s Costume 1 (Original)

Jill’s Alternate Costume 2 (BSAA)

Jill’s Alternate Costume 3 (Sarah Connor) — Complete the game once with Jill on any difficulty.

Jill’s Alternate Costume 4 (Nemesis) — Clear the game twice with Jill on any difficulty.

Chris’s Costume 1(Original)

Chris’s Alternate Costume 2 (BSAA)

Chris’s Alternate Costume 3 (The Mexican) — Clear the game once with Chris on any difficulty.

Chris’s Alternate Costume 4 (Code Veronica) — Clear the game twice with Chris on any difficulty.

Door Skip Mod
its not cheating if you are not trying to set new World Record
[link]
=====Part #1 Mansion=====
Golden Arrow / Arrowhead
Arrowhead = Once removed from the Golden Arrow, this small item is used to open the crypt in the Graveyard behind the Mansion.

Sword Key
The cemetery can be accessed through a door in the entrance hall at the top of the central staircase. Arrowhead from the Golden Arrow can be inserted into the statue of an angel in this location, which opens a hidden passage to the underground crypt.

Herbicide

Dog Whistle & Lighter

Imitation of a Key

Armor Key
The Imitation of a key is used in place of the Armor Key on an indentation, allowing the key to be taken without setting off a trap.

Grenade Launcher (skippable)
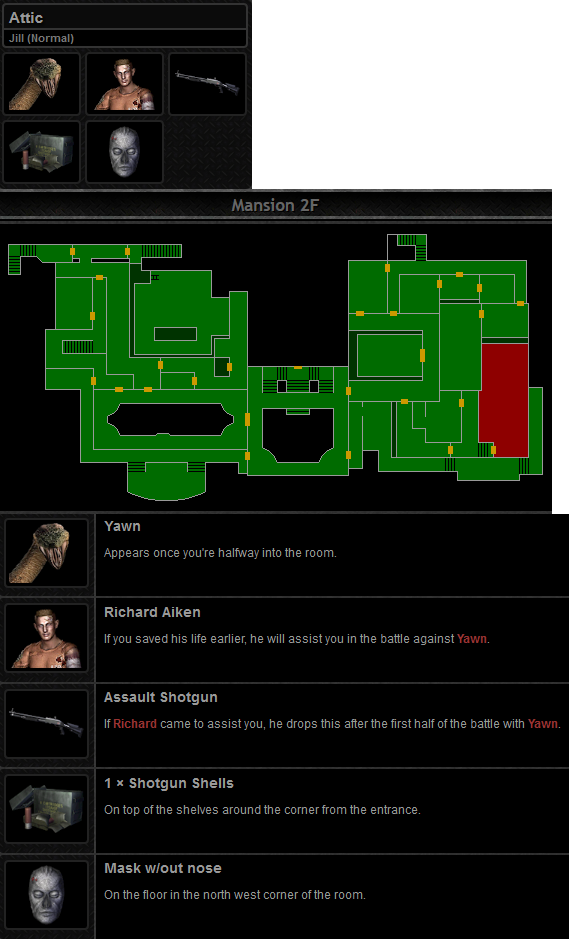
Assault Shotgun only obtainable if the player manages to bring Richard the serum in time to prevent his death. The weapon becomes available once Richard sacrifices his life to save Jill Valentine from the Yawn

Richard Aiken

Serum
- Drop Knife
- Drop Sword Key
- Save Game (if you want to)

Mask W/out Eyes

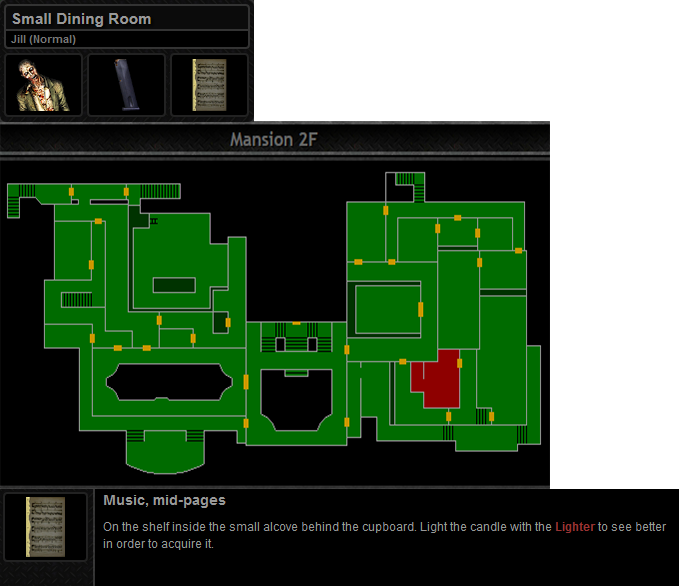
Music Mid-Pages
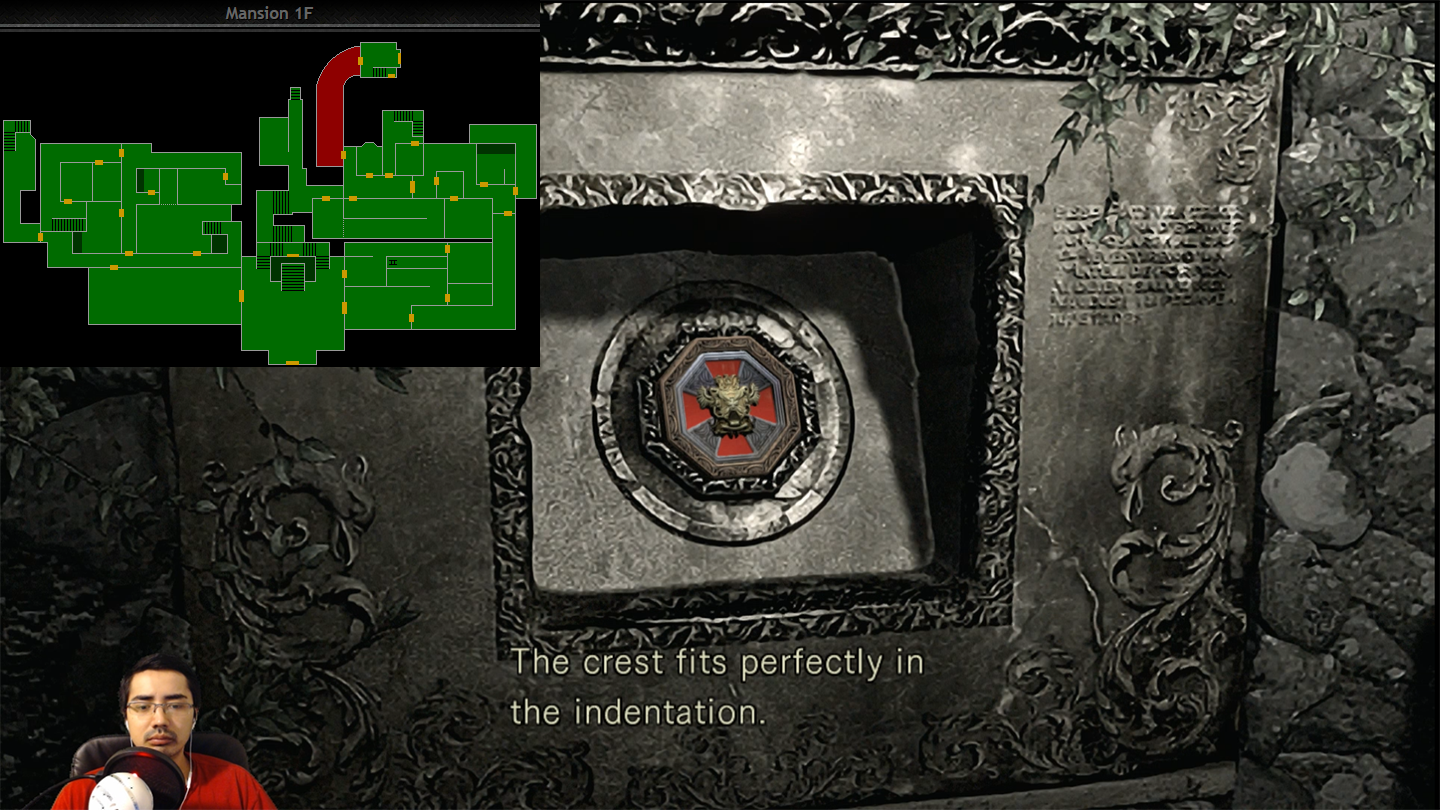
Emblem

Gold Emblem

Shield Key
- Large
- 2x Left
- 6PM

Mask W/out Nose
Serum (Skippable) [Skip if player did NOT get poisoned by Yawn]
- Use Serum
- Drop handgun
- Drop Lighter
- Save Game
Mask W/out All
- 2nd on a Right
- 1st on a Left
- 1st on a Right

East Wing Storeroom (Skippable) [Skip if player DID get poisoned by Yawn]
- Drop handgun
- Drop Lighter
- Save Game

Mask W/out Mouth
- 1st next to door
- 1st on other side
- 2nd on other side

Crimson Head Prototype 1
- Mask Placing Order
- 1st on 1st
- 3rd on 2nd
- 2nd on 3rd
- 4th on 4th

=====Part #2 Guardhouse Residence=====
Garden Shed – To Cabin
Use [Stone & Metal Object] to open a door to Garden Shed

Square Crank
- Red = West
- Blue = North

Drain Water Pool

Unprinted Book

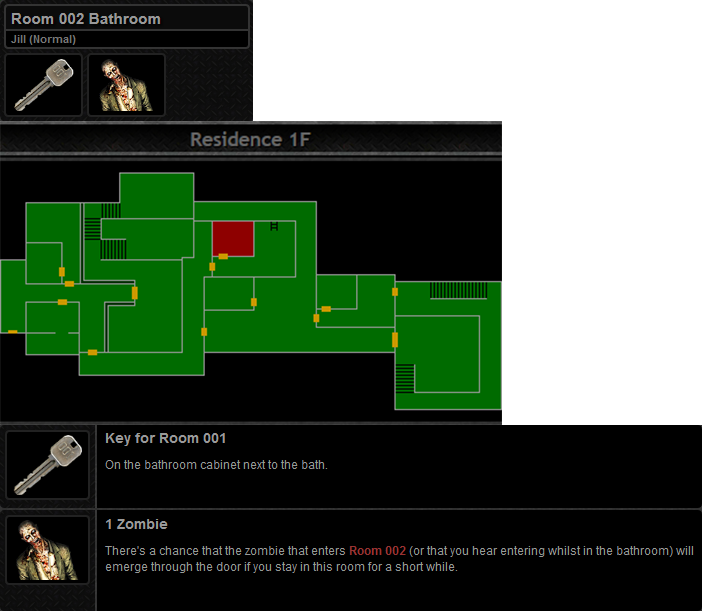
Room 002 Bathroom
Room 001 Bathroom

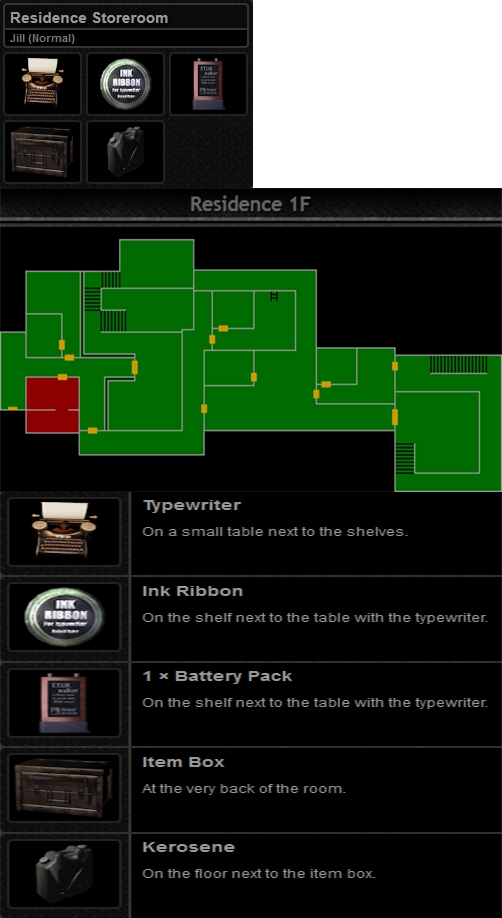
Residence Storeroom
- Save Game
- Drop Crank
Control Room
- Top
- Right
- Left
- Back – white board on table tells you Switch #
- Oil Switch # (Random)
- Right
- Left
- Top
- The control room is located at the bottom of the Aqua ring near the area full of water with sharks. Use the control room key to get inside the control room.
- Go to the control panel downstairs and press on the water drain switch. It’s located where the panel displays the word ‘error’ in red.
- As soon as you press the switch, an emergency alarm will fire. You will have to continue the rest of the puzzle fast. Press the safety mechanism switch which lies on the same panel.
- Next, you need to find the lever to pull in the control panel. It’s near the other switches you pressed. Pull the lever when you find it. The mechanism will fail, don’t worry.
- Go back to the area in the room where there are large tanks and press on the switch #
- Go back to the control panel and shut the safety off again.
- After shutting down the safety you need to pull the lever one final time. This time the glass windows will be barricaded.
- Now press on the switch that drains the water and it will work. When the water gets drained, it will open the path to previously blocked areas.

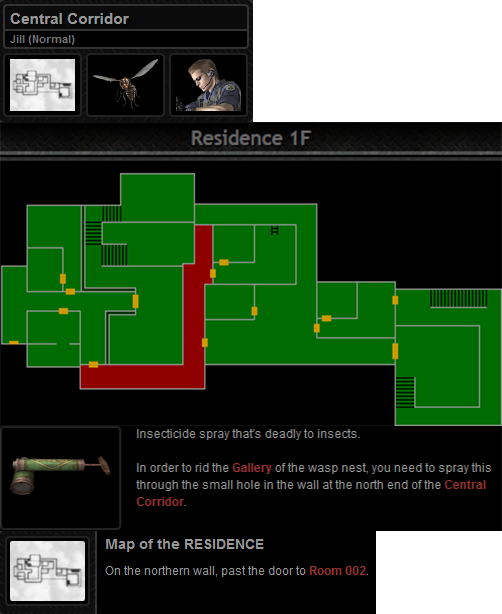
Insecticide Spray

Map of the RESIDENCE
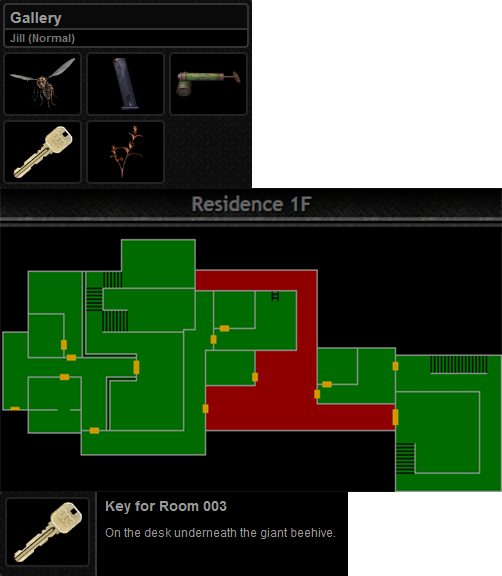
Key for Room 003
Room 003
Rotation: 1 & 4 | 2 & 6 | 3 & 7

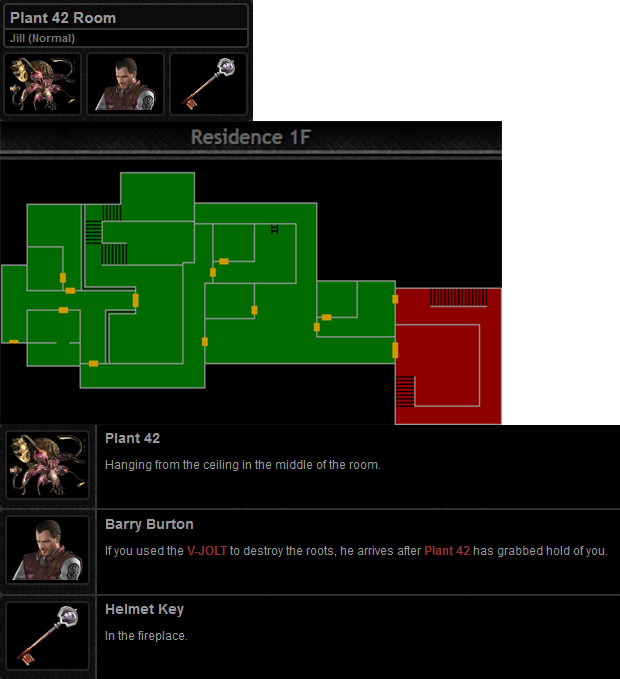
Helmet Key
Residence Storeroom (Skippable)
- Save Game
- Drop or Take Iteams
=====Part #3 Mansion=====
Back to Garden Shed

Last Book Vol.1

Power Supply

Battery

Last Book Vol.2

Red Gemstone

Medical Storage Room (Skippable)
- Drop Last Book Vol. 1
- Drop Last Book Vol. 2
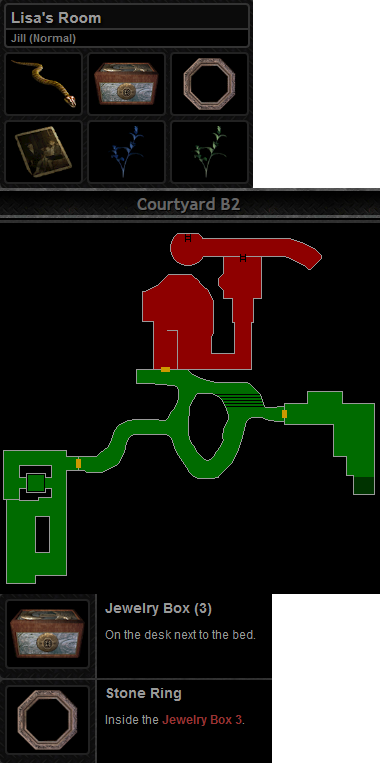
Jewelry Box

Metal Object

=====Part #4 Courtyard B=====
Battery (Waterfall Area)

Hexagon Crank

Entrance Passage
- Drop Metal Object
- Drop Crank (Green)
- Take Survival Knife
- Save Game

Spider Room (Skip Black Tiger)

Cylinder

Shaft
Code: #4 > #2 > #3 > #1

Stone Ring
Item Box (Cabin)
- Take [Metal Object] from {Item Box} and {combine} it with [Stone Object]
- Take [Last Book Vol.1] from {Item Box} and {Examine} it to find {Medal of Eagle} inside
- Take [Last Book Vol.2] from {Item Box} and {Examine} it to find {Medal of Wolf} inside

Stone & Metal Object
Take first [Stone & Metal Object]
=====Part #5 Underground Laboratory=====
2x Stone & Metal Object Door Lock
Barry’s 44 Magnum
- NO

Fountain
- [Medal of Wolf] on a left side
- [Medal of Eagle] on a right side

Operating Room
- Login: JOHN
- Password: ADA
- B2 Password: CELL

Key for the Power Area
Password: 8462

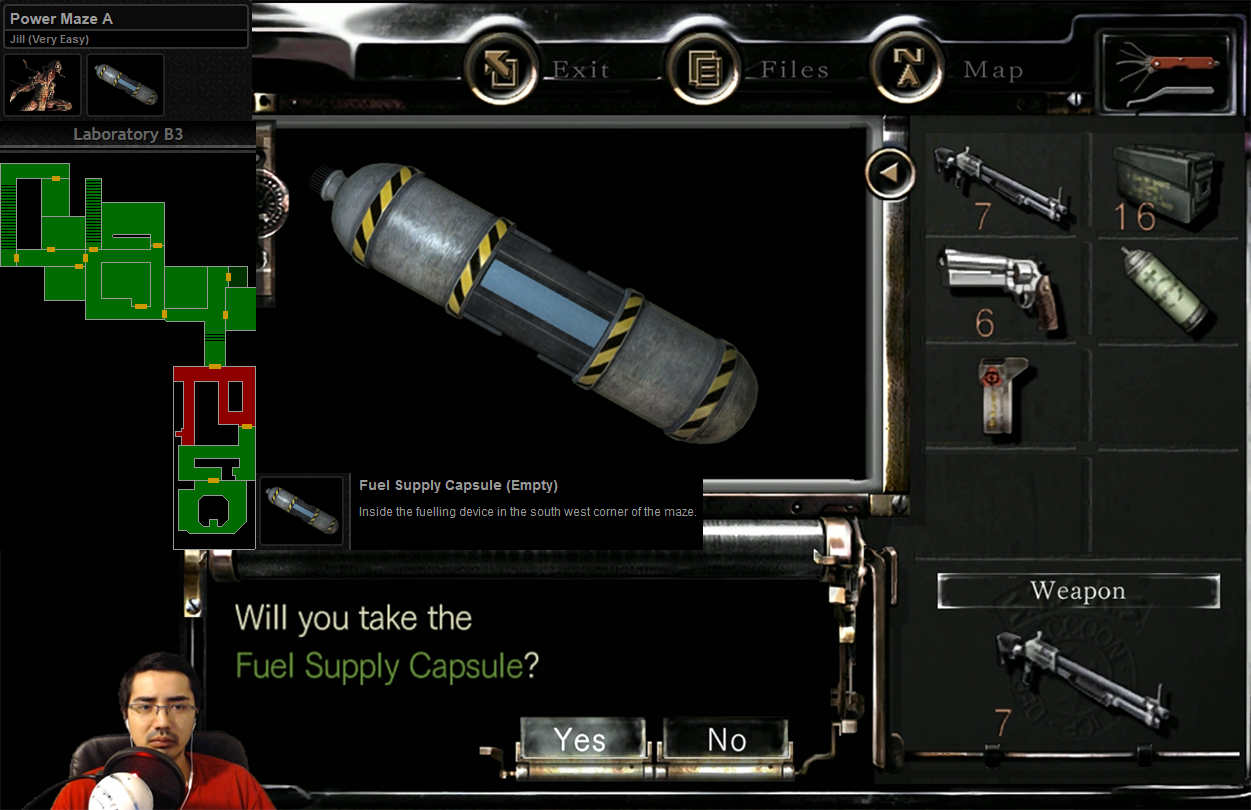
Fuel Supply Capsule (Empty)
Refill Fuel Supply Capsule Machine

Walk Back

Power Control Room

Main Laboratory
- Kill [Tyrant] with [Barry’s 44 Magnum]
- Grab [Master Key]
- Release the emergency electronic lock

Passage to Heliport

Result
