
Overview
A passionate player’s perspective on what works for Last Stand’s Lord General. Use this guide to get the most out of your squishy human hero!
Introduction
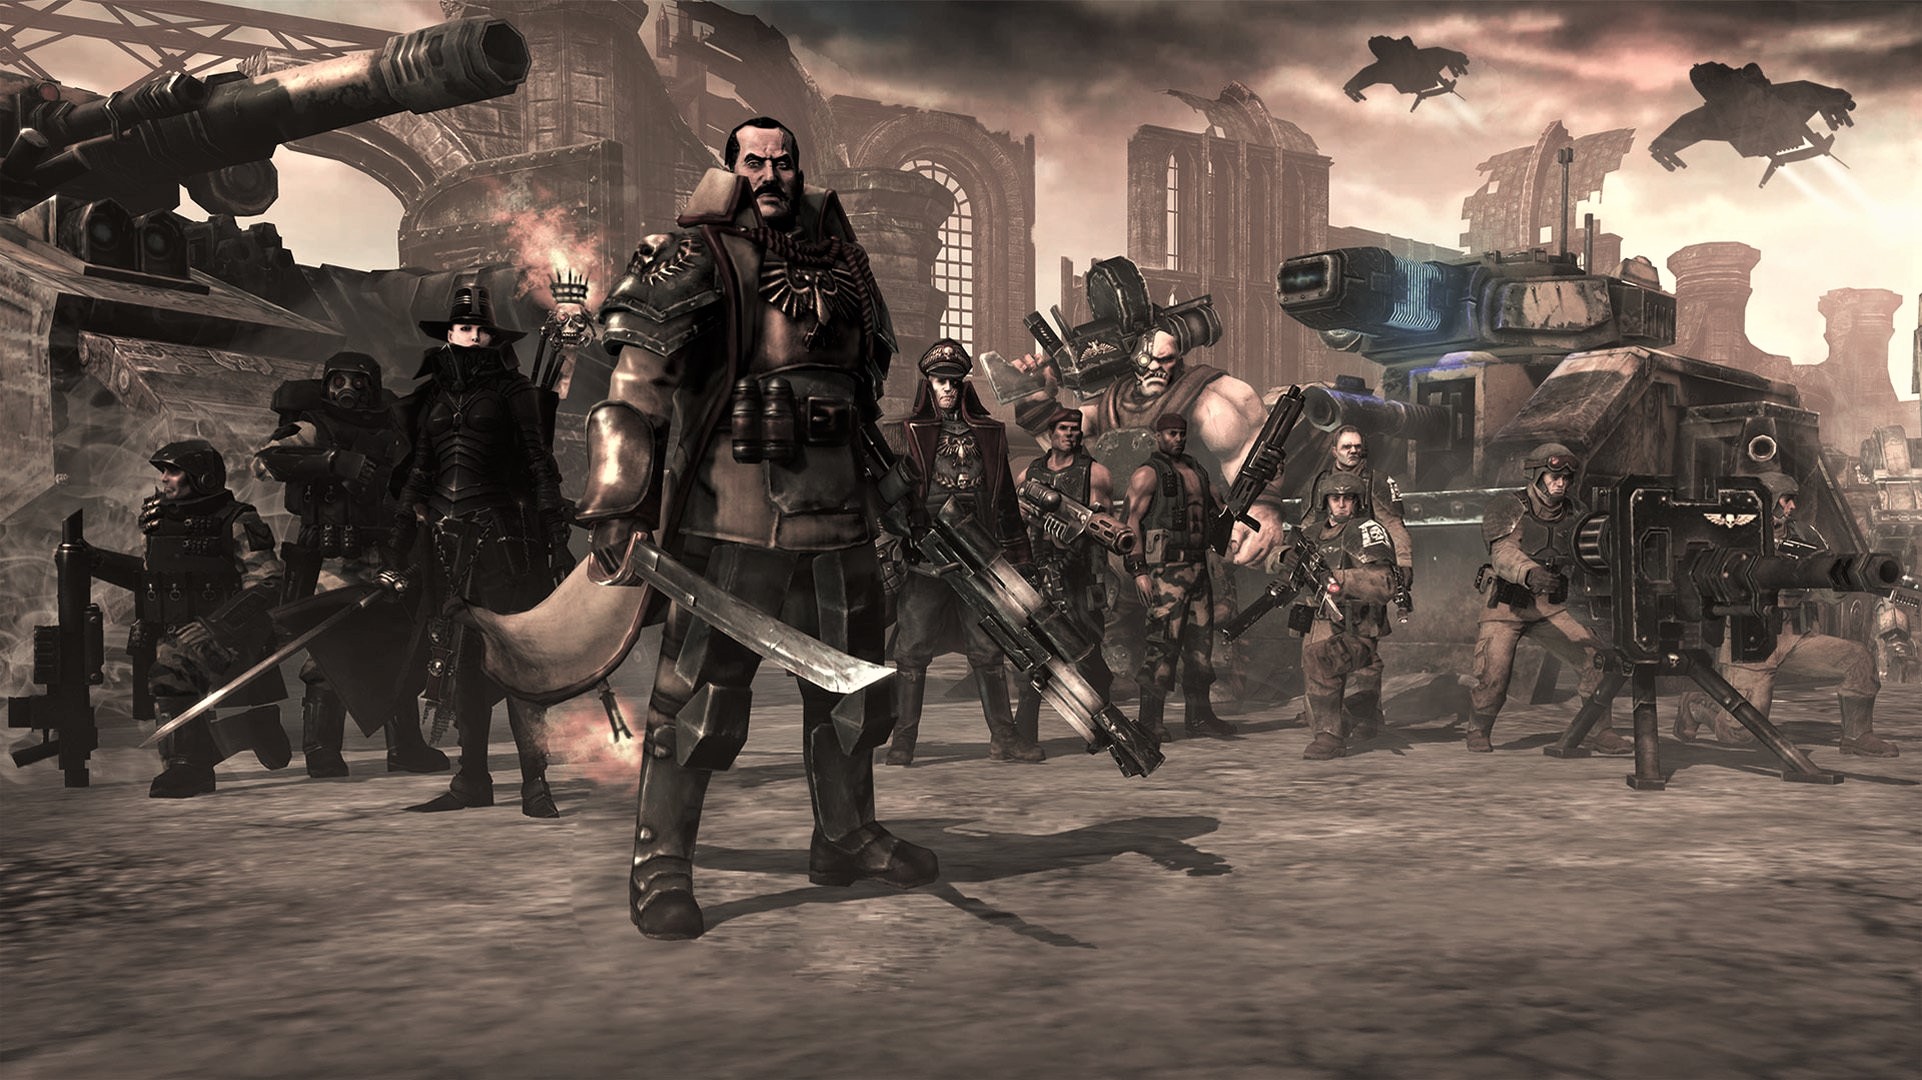
Despite their frailty, these brave human souls fight against overwhelming odds… and they win. Through the synergy of combined arms, the cunning of terrain, the virtue of preparation and the sheer balls-to-the-wall grit of sacrificing themselves in the thousands for even a single objective, these mere mortal men and women stand as a tenacious wall between the Imperium and the many, many ludicrously powerful things that want to eat/ corrupt/ torture/ manipulate it.
It was this mindset that allowed me to take the Lord General up to level 20 not once, but twice, with a third Elite star well on the way. This class is just that much fun for me, and I intend to share that passion with you today.
Also, the General in Last Stand looks like a grimdark Freddy Mercury combined with the meme version of Lord Kitchener, and that alone is reason enough to play him.
What To Expect From The Lord General

Certainly, if you’re used to the likes of the Jump Pack Space Marine, the Warp Sorceror, Teleportation / Warseer Pistol Farseer or literally any Tau Commander, you may get cold feet when you first try the General out. Stick with him, however, and you’ll quickly find his strengths are well worth it. A well-played general excels at locking down vast portions of the map, and well-employed summons can create welcome sanctuaries for your team even in the midst of utter CHAOS.
For the first few levels (1-4), however, you won’t yet have the gear needed to set yourself up that way. The Departmento Munitorum is slow like that.
So instead, at that early stage of the game you have potentially greater melee damage compared to an equally-early-level Space Marine Captain, but you won’t have anywhere near the same staying power, and melee damage without staying power is worthless. You’ll have some ranged options comparable to the Tau Commander or Ork Mekboy, but without the mobility to fully take advantage of them you’ll be prone to getting gang-banged the second your enemy decides you’re the most delicious thing in the arena. Even the Lord General’s best ranged weapon – the Deadly Sniper Rifle – leaves him open to being swarmed and NOMMED by Banshees and Hormagaunts when unsupported. The trick to surviving these early levels, then, is to choose gear that complements your team-mates and stick close to them as much as possible.
Is your team running a lot of plasma, anti-armour or power weapons? Then pick the Flamer and help screen against Banshees for them. Covering team weaknesses like this will always be appreciated. Likewise, are your colleagues packing lots of AoE like flamers, mortars, power claws and the like? Then pick the Sniper Rifle so you can eliminate those pesky Zoanthropes, Wraithlords or Swarmlords before they cause trouble for your allies.
Yes, that’s right. From the very first level, your Lord General is one of the best heroes in the game for eliminating those big-&-scary high-priority targets, despite being a very squishy human when left unsupported. Once you reach level 5, however, you’ll have access to both a turret and some soldiers, meaning you can now summon some decent support of your own and finally peel yourself off your other team mates.
From that point onwards, the Lord General becomes exponentially more and more fun to play. By level 20, you could potentially become a one-man army, capable of soloing anything with a little cleverness. Your enemies may be strong, but strength is no match for intelligence and resolve (or large caliber explosive rounds, for that matter)! Now, allow me to explain what all your General’s wargear does so you can get the best use out of it…
Weapons Of The Lord General, Part 1
Note that all the Lord General’s weapons take up two hands mechanically, even though they look one-handed on the model. You can never equip a melee and ranged weapon at the same time as the Lord General, nor can you equip multiple melee or ranged weapons at once. Equipping a ranged weapon will force you to use a 6.0 DPS Power Sword if you get locked in melee, and equipping a melee weapon will force you to use a 0.5 DPS Laspistol until you get into close range.

- Ranged Weapon
- 6.0 DPS, 100% Accuracy
- Ignore Cover: Flamer attacks completely bypass any protection given by cover when dealing damage to enemies.
- Area of Effect: Flamer attacks affect multiple enemies in a large radius around the target.
- Wargear Package: Weapon Specialists will equip the Flamer alongside their Lord General.
6 damage per second doesn’t sound like a lot, but it’s enough to kill most light infantry (Guardians, Scouts, Gaunts, Guardsmen, Banshees, Heretics) in 3-6 seconds. Combined with its Area of Effect and Ignore Cover traits, this makes the flamer an amazing option for utterly annihilating swathes of lightly-armoured opponents.
Thanks to its excellence at melting down lots of light targets quickly, indiscriminate of what they’re hiding behind, it’s frightfully easy to rack up a lot of kills with this weapon. Where it really shines however is with your own Guardsmen. Each Guardsmen squad you summon contains two Weapon Specialists, allowing you to stack up to three cones of flame over an area for 18 damage per second. That ignores cover. And did I forget to mention it affects multiple targets? Those insufferable waves of Banshees on Wave 9 of the Bloodied Colosseum weep when they see a Lord General bring this to the table.
Where this weapon suffers is when fighting against armour, or when facing small groups of highly resilient targets. Area of Effect is where most of your damage comes from with this weapon, so you will always suffer in situations where you can’t make effective use of it. Heavy infantry (Space Marines, Tyranid Warriors, Wraithguards) can still be fought if you have Guardsmen, but only if you aren’t getting focused down by more than 1-3 of these Heavy squads at once, and tanks should be left to your team-mates unless you can get into position for some Rear-Armour Damage.

- Ranged Weapon
- 12.0 DPS, 100% Accuracy
- +1 Energy Regeneration
- Grants Ability – High-Powered Shot: Spend 20 Energy to fire shot that does a large amount of bonus damage. Kills most light and heavy infantry in one shot, knocking down survivors.
- Unlisted Property: Semi-Heavy – Does not require a set-up time, but must stand still to shoot.
In some ways, the complete opposite of the Flamer. The Deadly Sniper Rifle suffers when having to fight hordes without support, especially since you cannot fire it while on the move, but is able to attack from a much longer range. Although it only does 12 DPS, it dishes that out with a 60 damage shot every 5 seconds, meaning it can deal terrifying damage to all infantry as well as respectable damage to vehicles, heroes and superheavies, especially when using the High-Powered Shot.
When using this weapon, remember that there are two tricks you can use to mitigate the low fire rate: firstly, move after every shot. Although you must wait 5 seconds each time you fire, and you must stand still to shoot, no one says you have to be standing still between shots. Anticipate where danger is coming from, and use your weapon’s cooldown time to get away from it. Secondly, your High-Powered Shot doesn’t use your weapon’s attack cooldown, meaning if you have the energy to burn you can fire a normal shot and a High-Powered Shot in quick succession for a neat, if expensive, DPS boost.
Speaking of Energy, that +1 to regen is a lifesaver, making your troops, turrets and other tricks infinitely more spammable. Unless you’re using Guardsmen or fighting alone, it is difficult to go wrong with the Deadly Sniper Rifle.

- Ranged Weapon
- 9.0 DPS, 50% Accuracy (so, 4.5 effective DPS on average)
- Zealous: Bolter attacks heal the user for 25% of damage done.
- Wargear Package: Weapon Specialists will equip the Bolter alongside their Lord General.
While the Sniper Rifle and Flamer are both good at what they do, the Bolter is…not. In comparison to the Flamer, this weapon does less damage due to its poor accuracy on top of still having to contend with cover, and being unable to damage more than one target at a time. Its range isn’t that much longer than the Flamer’s either.
It’s a pity, then, that this weapon’s unique trait is a lifesteal effect. 25% of 4.5 damage per second is about 1.125 extra HP per second on average which is resoundingly okay, but with such a poor damage output you’re almost certainly going to be constantly overwhelmed, and the lifesteal simply won’t make up for that.
In case you aren’t convinced that this weapon is terrible, let me reiterate: it can be reliably outdamaged by Flamers on single targets – the one big weakness of the Flamer. It also does less than half the damage of the Space Marine Captain’s Bolter, and no one who took that weapon took it for the damage. Don’t take this weapon unless you want to get outgunned by Ork Shootas.

- Melee Weapon
- 19.0 DPS, 15% chance of performing an AoE attack that knocks down enemies and deals bonus damage.
- Inspiring: Power Sword attacks boost the damage and movement speed of the user and any nearby allies for a few seconds.
- Armour Piercing: Power Sword attacks ignore 100 points of the target’s armour rating.
- Melee Charge: Will chase down nearby targets and knock them down upon making contact.
Thanks to its respectable single-target damage and Armour Piercing trait, this weapon at first seems to neatly fit alongside the Deadly Sniper Rifle in the “mess up a Wraithlord” category. An excellent weapon for use against priority targets, but it has one major drawback that needs to be borne in mind.
It’s a melee weapon. This means that, if you want to use it, you’re stuck with the Laspistol for ranged damage. This in turn means you cannot use cover while attacking and you are compelled to walk into the line of fire in order to reach your targets and deal damage. This is bad news for the General, as his armour rating tends to be poor (especially if he wants to grab traits like Unshakeable or Fearless), his health never rises above 100 and he has no real way of reliably closing the gap or even disengaging on his own until level 20. This makes the weapon much more situational than it first appears, but don’t worry, there are places where it can shine.
Notably, this weapon is amazing when playing with an allied Hive Tyrant. Imagine running into battle alongside a Tyrant Guard, its taunts soaking up fire for you, and then you lay into the enemy alongside it and perhaps a friendly Warrior or some allied Genestealers, with each of your strikes upping the insanity of their damage output. This weapon can also work well with the Captain’s Dreadnought or some of your own minions like Ogryns or Catachans, allowing them to open up enemy tanks for breakfast. This weapon shouldn’t be taken for general use, but it can certainly have its moments. Use it well.
It’s too bad the Lord General can’t drive up to people in a tank. Inspiring a Leman Russ would be the best thing since sliced bread.

Weapons Of The Lord General, Part 2

- Melee Weapon
- 10.0 DPS, 0% chance of performing an AoE attack that knocks down enemies and deals bonus damage.
- +50 Armour Rating
- Armour Piercing: Power Sword attacks ignore 100 points of the target’s armour rating.
- Melee Charge: Will chase down nearby targets and knock them down upon making contact.
- Grants Ability – Clear Out: Spend 25 Energy to perform an AoE attack that knocks down enemies and deals bonus damage.
While the Inspiring Power Sword was a healthy mix of offense and minion-buffing, the Protective Power Sword is all about defense. The +50 armour rating can help keep you alive when using the Mordian or Armaggedon Carapace armours, and it can be combined with Cadian armour or the Black Plate for ludicrous durability, but generally the damage loss on top of being stuck with using a melee weapon on the Lord General simply isn’t worth it. +50 armour rating usually amounts to no more than an extra 10-14% damage resistance, which simply isn’t worth the near-50% reduction in damage output compared to the Inspiring Power Sword.
Clear Out is also a curse in disguise, forcing you to use half your energy to perform a special attack that the Inspiring Power Sword could do passively for free. Not the best weapon to bring along in most situations, although permissible if your troops (Ogryns with a Comissar, or Stormtroopers with Rocket Run) and turrets (Vanquishers) are set up to do enough damage on their own and you just need the extra survivability.

- Ranged Weapon
- 5.5 DPS, 100% accuracy
- Knockdown: Grenade Launcher attacks knock down enemies.
- Area of Effect: Grenade Launcher attacks affect all targets near the point of impact.
- Wargear Package: Weapon Specialists will equip the Grenade Launcher alongside their Lord General.
- Grants Ability – Blind Grenade Volley: Spend 20 Energy to launch a volley of three Blind Grenades, stunning enemies near all points of impact.
- Unlisted Property – Mortar: Grenade Launcher attacks fire over obstacles, ignoring cover and line of sight.
- Unlisted Property – Semi-Heavy: Does not require a set-up time, but must stand still to shoot.
Despite dealing only 5.5 damage per second, this weapon is amazing for a variety of reasons. Firstly, its range is comparable to the Deadly Sniper Rifle, meaning you can start hurting most enemies long before they’re able to shoot back. Secondly, this weapon can fire over anything, including the buildings in Bloodied Colosseum, meaning even in closer ranges you can still get some cheap damage on enemies without them being able to retaliate by (ab)using terrain.
Finally, the combination of Knockdown with Area of Effect is amazing. In the first Dawn of War, the combination of AoE and Knockdown let your cheap Guardsman squads stunlock large clusters of enemies into oblivion, allowing them to safely engage and defeat foes that are, on paper, much stronger than them. The same is true in Last Stand. As a result the Grenade Launcher excels at safely dispatching ranged infantry, both light and heavy. Even Zoanthropes or Wraithguards will inevitably fall to a Lord General and his Guardsmen when they pack Grenade Launchers.
However, the weapon is not without weaknesses. Although much better than the Flamer against ranged Heavy Infantry despite doing lower damage per second, the Grenade Launcher tends to flag when facing swarms of fast-moving and/ or Unshakable melee units, especially when they attack from multiple directions. This is because Grenade Launchers do not attack in a constant stream like Flamers do, but rather in moderately powerful bursts that require a 2-3 second cooldown. Fast enemies can exploit this cooldown to close in on you without taking damage, especially if you’re distracted.
Next, the Semi-Heavy property of this weapon, which the Deadly Sniper Rifle also has, means you’ll struggle to kite melee enemies; being unable to move and attack at the same time is a huge downside when dealing with melee swarms and will lead to you being overwhelmed if you’re not careful.
Luckily, in these cases you can use Blind Grenade Volley to stun your pursuers and make a daring escape. Just be careful not to get caught with low Energy at a bad time.

- Ranged Weapon
- 7.3 DPS, 75% Accuracy (so, 5.475 DPS on average)
- Armour Piercing: Plasma Gun attacks ignore 100 points of the target’s armour rating.
- Wargear Package: Weapon Specialists will equip the Plasma Gun alongside their Lord General.
Dealing less damage per second than the Flamer and Grenade Launcher while lacking Area of Effect, Mortar or Ignore Cover, this weapon at a glance seems like a bad choice. This becomes even more apparent when compared to the Space Marine Captain’s Plasma Gun, which has more than triple the DPS and comes with an anti-mob ability in the form of Hellfire Grenades.
However, thanks to the Armour Piercing trait, three shots from the Lord General’s Plasma is enough to badly wound or even kill most individual infantry regardless of whether they are light or heavy, meaning you can often out-damage Flamers or Grenade Launchers when facing relatively small groups of durable opponents such as Space Marines, Tyranid Warriors or vehicles. Thanks to Wargear Package, it’s also easy to have three Plasma Guns on the field at any one time. This weapon thus does a decent job at picking off heavily-armoured infantry and the damage really adds up if you can focus all three of your Plasma Guns on a single target. 16.35 DPS (Accuracy penalty already accounted for) being pointed at a dreadnought can really mess it up when its armour rating is treated as 100 points lower than it should be.
Although you don’t have the Captain’s same damage per shot, nor do you have his Hellfire Grenades, by this stage of the game you do have access to things that he doesn’t in order to make up for your own Plasma Gun’s shortcomings; your Heavy Bolter turrets can be used to lock swarms of infantry in place while your Plasma gun cuts them down one at a time, and unlike the Captain you can take the Combat Expert trait (and give it to your minions!) with this weapon, meaning between you and your Weapon Specialists your Plasma Guns could potentially outdamage his (21.9 DPS w/ Accuracy included for the General vs 16.95 w/ Accuracy included for the Captain). Overall, a decent anti-armour weapon, although it’s barely better than the General’s Bolter against lighter targets, so make sure you have something to help you survive the non-Marine waves.
Armour Of The Lord General, Part 1

- Armour Rating: 125
- +0.2/0.3 Energy Regeneration (depending on whether you believe the item card or the character stat table, respectively)
Providing almost as much protection as the Space Marine’s Armour of Resilience, the Cadia-Pattern Carapace Armour is made for Lord Generals who want to get stuck into the fray alongside their men.
The extra Energy Regen bonus, while not huge, is still an effective 20-30% boost if your build doesn’t have room for the Deadly Sniper Rifle, making it easier to redeploy Guardsmen or activate tricks like your Refractor Field. Overall, a good option for Generals who want to spend more time on the front lines as well as those who want just a little more ability-spam.


- Armour Rating: 79
- Fearless: The Lord General is immune to suppression while wearing this armour.
- Grants Ability – Tarantula Heavy Bolter Turret: Spend 25 Energy to air-drop a light turret at a location of your choosing. The turret has dual Heavy Bolters, effective at suppressing large groups of enemy infantry. The Lord General can only deploy one turret at a time.
The armour rating puts your durability on par with a typical Chaos Sorceror, but the turret more than makes up for that. Suppression drastically cuts down on an enemy’s ability to catch or hurt you, and the turret can draw fire away from you and towards itself, taking hits you’d otherwise have to worry about.
That said, be aware of enemies who can leap, teleport or fly, as they can potentially avoid the turret’s suppression and deep strike right on top of it before tearing it apart. Use weapons (or minions!) with Knockdown or Area of Effect to keep your turret safe when this happens, although Plasma can also work against things like Assault Marines, Tyranid Warriors or Vehicles, the last of which the turret is hopeless against. A safe turret is a happy turret, and a happy turret will keep swarms off your back.
The Fearless trait, however, isn’t anything to write home about on the Lord General: two of his best weapons (Sniper Rifle and Grenade Launcher) not only outrange most enemies, most enemies with suppressive attacks are even more cumbersome than you are, making them easy targets for Knockdown or a High-Powered Shot. Even if you’re running something like the Flamer, your horde-killing ability means you’ll have plenty of room in the map to stay outside a suppressive enemy’s cone of fire, making it very easy to flank and kill them without needing Fearless at all.

- Armour Rating: 72
- Unshakable: The Lord General is immune to knockdown while wearing this armour.
- Grants Ability – Tarantula Missile Turret: Spend 25 Energy to air-drop a light turret at a location of your choosing. The turret has dual Missile Launchers, effective at wearing down armour and disrupting squads with Area of Effect Knockdown attacks. The Lord General can only deploy one turret at a time.
Like the Flamer and the Deadly Sniper Rifle, this armour is one of my favourite pieces of the Lord General’s wargear. The armour rating is still on par with that of the typical Chaos Sorceror, while giving you one of the most important traits in Last Stand; Unshakable.
The sheer number of things that can knock you down in Last Stand is insane; grenades, shotguns, special melee attacks, leap attacks, jump attacks, missiles, Zoanthropes, Fire Prisms…
The list goes on, but Unshakable means you’ll stay on your feet no matter what. And staying on your feet can mean the difference between safely reaching cover or dying horribly. It can mean the difference between reviving a team-mate or being knocked away from them, separated and wiped. It can mean the difference between incinerating a treacherous group of Catachans or being ragdolled to death by them with impunity. It can mean the difference between escaping enemy Assault Marines… or getting knocked on your back and eviscerated with a chainsword. On a character like the Lord General, I cannot recommend Unshakable enough. Knockdown immunity can and will save your character’s life.
But how does this armour’s turret compare to the previous one? The Tarantula Missile Turret is better at dealing damage to a wider variety of enemies. Its Knockdown effect is also useful for keeping enemies away or knocking melee characters off of you, but although its attacks are Area of Effect, it cannot affect as many enemies at once as the Heavy Bolter Turret, meaning it is slightly easier to get overwhelmed during some waves. The Missile Turret also fires a little low, meaning its attacks can be completely blocked by heavy cover, reducing the number of viable locations you can set it up in.
Still, in my opinion this is a worthy trade-off for its armour-punching capabilities as well as the Unshakable trait. Works especially well alongside Flamers since missiles and flames cover each other’s weaknesses rather well.
Armour Of The Lord General, Part 2
Mordians always did favour style over practicality.


- Armour Rating: 37
- Grants Ability – Executioner Heavy Turret: Spend 40 Energy to air-drop a heavy turret at a location of your choosing. The turret is equipped with a Leman Russ Executioner cannon, effective at tearing through squads from a distance with Area of Effect. The Lord General can only deploy one turret at a time.
Let’s address the elephant in the room. 37 armour rating is not a lot. In fact, it’s low enough for squads of lasguns to reliably kill you if you’re caught out of cover or away from a building. For this reason, it’s important to equip accessories that increase your armour and health regen, like the Honorifica Imperialis. It’s also best paired with a long-range weapon that lets you comfortably sit far, far away from the main action. Compared to previous turret armours, Mordian Carapace gives up all defensive traits and most of its protective ability in exchange for letting you deploy a massive turret.
However, due to its energy costs, the turret is not viable in a vacuum. This means you need to build around it a little. Use any combination of Stormtroopers, Repair or the Deadly Sniper Rifle so that you can keep it deployed despite its heavy energy costs. Once deployed and maintained, you’ll have access to a long-range infantry-melter (it seems to have about the same range as your Sniper or Grenade Launcher). The Executioner fires bursts of plasma-cannon fire, dealing good damage to squads. However, unlike every other form of plasma in Last Stand, this turret doesn’t seem to have armour-piercing, meaning you’ll likely feel a little disappointed as Space Marines or light vehicles survive multiple bursts from this energy-hose of a turret.
Other shortcomings include a lack of crowd control (Bolter turret gave suppression, Missile turret gave knockback, Mordian turret just gives damage), as well as a slow turning-speed due to being a heavy turret, meaning it’ll fare worse against melee squads compared to a much cheaper Tarantula turret. It’s not a bad anti-squad weapon, and it looks flashy and awesome as hell, but it’s difficult to recommend it as a general-use option. It’s a way to improve anti-squad potential in very specific builds, but can otherwise be overlooked.
Think those are trees in the background? Look closer. Armageddon is a land of tanks, insane fortifications and big-ass guns.


- Armour Rating: 30
- Grants Ability – Vanquisher Heavy Turret: Spend 40 Energy to air-drop a heavy turret at a location of your choosing. The turret is equipped with a Leman Russ Vanquisher cannon, firing powerful ordnance capable of penetrating armour and knocking down surviving targets. The Lord General can only deploy one turret at a time.
The weaknesses of this armour are virtually identical to the Mordian Carapace that came before it. Despite this, the Vanquisher makes it a much more appealing choice.
First, the bad stuff; Vanquishers technically do AoE damage, but the radius is so small that targets have to be standing right on top of one another for you to notice, making it very much a single-target weapon.
Luckily, it performs the role of a single-target killer very, very well. The Vanquisher is one of the few weapons in the game that actually outranges the Deadly Sniper Rifle, capable of shooting from the north end of the map to hit a target that’s still in the spawn area on the opposite side. It seems to ignore armour almost entirely, doing enough damage to kill most infantry in one shot, and more damage to vehicles than a Medallion Crimson-buffed Deadly Sniper Rifle. This makes the Vanquisher one of the very best anti-armour options that the Lord General has. As long as you remember that the Vanquisher is an expensive heavy turret, and support it accordingly, you’ll soon be cackling with glee as this holy beast of a machine reliably punches holes in dreadnoughts, predator tanks, wraithlords, enemy heroes, superheavies…

- Armour Rating: 125
- Black Armour: The Lord General receives 50% less damage in melee while wearing this armour.
And now we come full circle, ending on a relatively high-durability turretless armour. Unlike the Cadian Carapace, this armour eschews the utility of Energy Regen in exchange for raw protection.
Because the Black Armour trait applies directly, rather than through armour rating, its melee damage reduction effect cannot be reduced by armour-piercing or corroding weapons like Bloodletter swords (you’ll always take 50% or less of a melee weapon’s listed damage when hit).
A great option for Melee and Ranged Lord Generals, it allows you to survive many encounters you otherwise couldn’t. Notably, a Lord General with a Deadly Sniper Rifle and Honorifica Imperialis could out-melee a Tyranid Warrior one-on-one and do a decent job holding off about thrice that amount without firing his weapon once. That’s how ridiculous the melee protection is; even with the 6.0 DPS default power sword you can still kick a little butt in CQC, although in most situations you’re better off using that protection to get yourself to a team-mate. If you get swarmed without a horde-killer weapon, the worst thing you can do is obstinately choose to be alone.
Accessories: Men, Medals And More

- + 25 Armour Rating
- + 2.0 Health Regen
A medal awarded for bravery (you’re choosing to play the Lord General, after all), and wearing it will certainly let you be braver. When I look at this wargear, the first thing I compare it to is the Space Marine Captain’s Parable of the Stalwart Brother. Like the Parable, this medal is an accessory that increases durability by buffing health regen. Unlike the Parable, this medal not only gives more health regen, it gives extra damage reduction through an armour rating buff too.
Don’t underestimate the value of this accessory’s healing factor. For Ranged Generals especially, it’ll do more to keep you alive than the armour you wear. That + 2.0 HP regen is effectively a +100% health regeneration increase for the Lord General in most team compositions, and is still a +50% health regeneration increase on a team using Larraman’s Blessing. For passive healing, this is amazing.
Especially useful when recovering from chip damage, and when fighting against weapons with armour-piercing, corroding, or damage-over-time effects. An excellent accessory no matter what armour you’re using, as faster health recovery is always a godsend. On less protective armours like the Armageddon, the +25 armour rating boost can make a significant difference in your damage reduction too, giving you more leeway in terms of the burst damage you can take.
As powerful as these effects are, however, they won’t always make up for poor terrain or threat awareness. Don’t get cocky.

- Grants Ability – Refractor Field: Spend 25 Energy to generate a protective energy dome that moves with the Lord General. The Lord General receives 50% less ranged damage while the Refractor Field is active, and all allies within the field’s glowing radius also receive this benefit.
This dome stacks multiplicatively with armour, behaving much like the Black Plate’s trait but for ranged damage. It also stacks with things like cover and the Tau Commander’s Shield Drone. A bit energy heavy, but it’s the closest thing that Melee Generals get to a gap closer until level 20. Ranged Generals don’t need this as much since they can take advantage of cover and buildings, but it can help them protect their Guardsmen from heavy fire like Zoanthropes or Wraithguards and can be a lifesaver for nearby team-mates.
Does nothing against Melee foes, however, so save your energy and don’t waste a Refractor Field trying to stop Assault Marines or Banshees.

- Combat Expert: The Lord General deals 30% more damage while wearing this medal.
Awarded for continuing duty despite suffering terrible injuries (and odds are you have suffered many terrible injuries as part of your learning curve with this class), this medal lets you come back with a vengeance. Although not as necessary as other guides make it out to be (it can be overkill depending on what you want to do), that +30% damage buff comes in handy for a variety of things.
It’s best paired with the Deadly Sniper Rifle, where it can cleanly kill Zoanthropes in one shot and make enemy armour much easier to deal with. It also makes Heavy Infantry notably easier to fight with Flamers, and makes the Plasma Gun better in general.
Hilariously, the damage buff affects not just your weapons, but some of your abilities too. A High-Powered Shot with a +30% damage buff turns the Lord General into a terrifying long-ranged hero killer (watch out for your clone on Wave 16 of the Bloodied Colosseum though, and warn your team-mates ahead of time. Because the Sniper Rifle isn’t flashy or very visible, a lot of people underestimate how much it can hurt when given that +30% boost… and then they insta-die without knowing what even happened). Meanwhile, a Rocket Run with this boost will go from devastating everything caught in its wake to devastating anything that’s even on the edge of its wake.
Does not boost the damage of turrets or minions.

- Grants Ability – Repair: Spend 20 Energy to instantly restore a large amount of health to a turret of your choice within range.
Because you sadly cannot summon Techpriests, your Lord General has decided to take matters into his own hands. I’ve heard rumours of being able to repair buildings or allied vehicles with this, but I’ve never been able to do that in-game myself. So, this is just for turrets; whether the turret belongs to you or an allied Lord General doesn’t matter.
However, you’ll notice that Repair costs 20 energy to use. In comparison, it costs only 25 energy to reinstall another Heavy Bolter or Missile turret wherever you like. This makes Repair a waste of an accessory slot in most Lord General builds, with one notable exception: maintaining heavy turrets. Vanquisher and Executioner turrets cost the ridiculous amount of 40 Energy to deploy, meaning they’re normally incredibly painful to lose or replace. Repair, however, lets you keep your heavy turrets in top shape at half that cost, allowing you to access their tremendous firepower while costing less Energy to maintain than Tarantulas.

- All of the Lord General’s Minions gain a Sergeant or Sergeant-Analogue, adding another member to the squad.
- The Guardsman Sergeant comes with a Laspistol and a Chainsword. He helps protect the squad in melee.
- Catachans get a Sarge, who carries a Laspistol and a Catachan Dagger, as their Sergeant-Analogue. Again, he helps protect the squad in melee.
- Ogryns get a Bone’Ead as their Analogue. He’s armed with a Ripper like the rest of his squad.
- Stormtroopers get a Veteran Sergeant as their Analogue. He’s armed with a Hot-Shot Lasgun, like the rest of his squad.
- Battle-Hardened: All members of the Sergeant’s squad, including the Sergeant himself, gain an extra +100 armour rating and +2.0 health regeneration.
- Unlisted Property: Promotions – If the Sergeant of a squad dies, a member of the squad’s rank-and-file will pick up his wargear and assume his role. In the case of Guardsmen, Weapon Specialists are always the last to be promoted. In all cases, the squad will remain Battle-Hardened until the end.
The most universally useful Wargear option the Lord General has. The Sergeant does so much for the viability of your minions that it’d be difficult to justify not taking him. He’s just that useful, and his presence alone can transform a squad from a rag-tag bunch of hooligans into a proper retinue befitting a General. Firstly, the simple act of increasing your squad’s total members by one ups its health and damage immediately. For Stormtroopers or Ogryns, whose sergeants use the same weapons as their men, the presence of a Sergeant increases the squad’s damage per second by 25% and 33% respectively through the simple virtue of having another body shooting at the enemy.
Next, their Battle-Hardened trait is like an Honorifica Imperialis on steroids for your troops, significantly raising the survival chances of each individual member. This in turn keeps your squad’s effectiveness at maximum for longer (a soldier can’t shoot if he’s dead after all), and in turn lets each squad go much further than it normally would, saving you lots of energy you’d otherwise need to spend replacing casualties.
Accessories: More Men, More Medals And The Mother Of All Nukes

- Grants Ability – Reinforce: Spend 10 Energy to air-drop reinforcements, replenishing the numbers of all friendly Imperial Guard Minions, whether yours or an ally’s, that are near the landing zone.
Best taken when there are multiple Lord Generals playing in one match. With the exception of Stormtroopers, all Imperial Guard Minion squads cost 35 Energy to summon. On paper, Reinforce is therefore a great way to keep your squads running at under the third of the cost when you’re the only Lord General on the team, or a great way to potentially save the team 95 Energy if everyone’s a Lord General.
In practice, however, it’s not so great, relying on a combination of prediction and sheer damn luck. Let me explain; Reinforce takes a few seconds to air-drop its payload and if the wounded squad you intended to replenish moves away from the landing zone, or even dies outright before the payload arrives, then no reinforcements will actually spawn, effectively making you waste Energy. Sometimes your squad will be near/ alive enough to the landing zone to qualify for reinforcements but still won’t receive any, probably either because the Departmento Munitorum made another rounding error or because your logistics officer is a damn heretic.
And even should the stars align, and your squad doesn’t wander off from where it was standing, and the air-drop doesn’t bug out, and nothing kills your squad in the short interval between the air-drop landing and the reinforcements actually spawning, you have to acknowledge that it’s still arguably more cost-effective in the long run to respawn your entire squad in a more advantageous position for 35 Energy than it is to keep using Reinforce on a squad in a terrible position for 10 Energy a pop. The only exception to this is if your squad is needed alive to hold aggro, since Reinforce lets the squad keep aggro while resummoning resets it.
Overall, very few builds exist where this Accessory is the best option. You’ll probably be fine ignoring it for most of your Last Stand career.

- All of the Lord General’s Minions gain a Commissar, adding another member to the squad.
- No matter what kind of squad he is attached to, the Commissar is a genetically “pure” human who comes with a Bolt Pistol and a Power Sword. He protects his squad in melee.
- Minion Combat Expert: The Commissar inspires the troops attached to him to fight with fanatical devotion to the Imperium of Man. All members of the squad, including the Commissar himself, gain a +30% damage boost.
- Unlisted Property – Set A Good Example: The Commissar will not die while any of the rank-and-file members of his squad still lives. Sergeants do not count as rank-and-file, but Weapon Specialists do.
- Unlisted Property – Doctrinal Tensions: Catachans are less likely to throw grenades when they have a Commissar attached.
Much like the Sergeant, adding a Commissar to your squad will boost its health and damage output by simple virtue of having an extra body fighting the enemy. That said, while the Sergeant is focused on preserving the lives of his men, the Commissar is all about ending the lives of his enemies quickly, with little regard for safety. When working alongside one another, however, the Commissar and Sergeant can turn even humble Guardsmen into an utter force to be reckoned with, potentially putting even Space Marines to shame.
Guardsmen and Stormtroopers can pack a surprising punch when led by a Commissar, and Ogryns are much more effective at shredding through the enemy when fighting alongside this symbol of Imperial Might. Unfortunately, tensions between Commissars and Catachans seem to be rife. Although Catachans can and will still throw grenades, they’ll do so far less often when under the direction of the Commissar. To be fair though, while a Catachan-directed grenade will decimate infantry, a Commissar-directed grenade is powerful enough to seriously dent a Dreadnought.
For Catachans, it’s up to you to decide whether having more powerful grenades is more important than more frequent ones, but for any of your other squads the Commissar is a must-have that’s almost as good as the Sergeant if you want to get the most out of your minions, and Guardsmen in particular seem to benefit the most from his presence.

- Grants Ability – Take Aim!: Spend 20 Energy to temporarily grant a target a large damage boost. The target can be yourself, your Minions, your team-mates or their Minions.
I am not sure what the exact bonus for this ability is, but from what I can tell it provides at least as much damage as the Commissar or Medallion Crimson do. What makes this ability good, however, is that it stacks with things like the Commissar and Medallion Crimson, and that you aren’t restricted to using it on yourself or your squads. Casting this on your team’s main damage-dealer can boost their output to utterly insane levels, allowing them to carve extreme carnage across the battlefield.
It’s also a way for you to boost your Catachans’ damage without bringing in a Commissar. This ability is fairly long-lasting, and its cooldown is just short enough for it to be ready for use again as soon as it wears off. A good option if you need to crank your damage output (or anyone else’s) that little bit higher and are able to meet the Energy costs.

- Grants Ability – Rocket Run: Spend 50 Energy to mark an area for strafing with rocket-pods. After a brief delay, a Valkyrie aircraft swoops in and rapidly drops a line of explosives, causing catastrophic damage and knockback to everything in the blast radius.
Many classes have a “Nuke” ability. The Farseer has Eldritch Swarm. The Mekboy has Roks. The Space Marine Captain has Orbital Bombardment. The Necron Lord has the Nightbringer. None of them, except perhaps the Nightbringer, bring as much devastation as Rocket Run. Rocket Run is also one of the fastest and most reliable Nukes, bringing its devastation in a relatively swift and predictable fashion compared to its competitors. Yet another feather in its cap is that it only takes up an Accessory slot, unlike the other classes’ Nukes which require foregoing one’s Commander slot.
Backed with the Medallion Crimson, this ability can and will one-shot anything short of a Wave 16 Bloodied Colosseum Necron Overlord built for tanking. Even without the Medallion Crimson, Rocket Run excels at wiping entire hordes off the map without you having to expose yourself or risk the lives of your men (the range of this ability is about the same as High Powered shot, and doesn’t require line of sight). Even heavier targets like vehicles suffer under a Rocket Run. Space Marines stand no chance, and will get vaporized in an instant if caught under the blast radius. It shouldn’t sound surprising, then, when I tell you that this ability can completely change the tide of a battle. The best offensive option the Lord General gets, and one of the best offensive abilities in all of Last Stand.
Its cooldown isn’t that long either, meaning its Energy cost is the only major limiting factor. As a result, it pairs extremely well with things like the Deadly Sniper Rifle, Cadian Carapace Armour and Stormtroopers.
“Dear Grid Coordinates” will sum up your experience with Rocket Run.

…
There are two caveats to bear in mind before using this ability, however. Firstly, like most Nukes your Rocket Run is fully capable of friendly fire. If you don’t pay attention to your aiming, you’re going to kill your own allies, especially if they don’t have Unshakable since each explosion from Rocket Run will knock them into the next. You can even kill yourself like this if you’re being excessively silly.
Speaking of aiming, the next caveat is that after you click on your ability or select it via hotkey, you’ll need another two clicks to activate it. The first click tells the Rocket Run where it should start its strafe, while the second click tells it which direction it should go in from there. The mathematical area that gets bombed, however, always stays the same, so don’t worry about how far apart the clicks are from one another. Enemies caught at the beginning of the Rocket Run’s strafe tend to take much more damage if they’re not Unshakable due to being knocked from one explosion into the next as mentioned earlier, although even a single explosion is devastating.
Use with care, and try not to get too trigger-happy with this thing. Areas that have been bombed become Light Cover, giving a defensive bonus to anyone standing amidst the ashes, although Rocket Run itself doesn’t care about cover when it does its damage – even the heaviest covers are wrecked by this ability, and a map that’s been bombed with this ability enough will soon look like the immediate aftermath of Cyrene.

- Duelist: The Lord General’s melee damage is increased by 40% while he wears this medal.
A simple wargear, it is like the Medallion Crimson but gives up versatility for more power. A great option for Melee Generals, where the damage bonus can put them on par with a kitted-out Space Marine Captain, but one of the worst options available for Ranged Generals, where the damage bonus kicks up their rarely-used Power Sword’s 6.0 DPS to a whopping… 8.0 DPS, which is about the same amount of melee damage that Ranged Generals can get from the Medallion Crimson anyways, on top of the gun and ability damage boosts.
In other words, a great option for Melee Generals who want to deal some real damage with their weapons, but should otherwise be left alone.
The Commander Slot: The Lord General’s Retinue Options, Part 1

- Grants Ability – Deploy Guardsmen: Spend 35 Energy to air-drop a squad of Imperial Guardsmen at a location of your choosing. Once deployed, the Guardsmen will usually stay close to their General and target whatever he is targeting. Each Lord General can only have one Guardsman squad active at a time.
- Weapon Specialist: Some members of the squad will equip any weapon their Lord General is using so long as it has the Wargear Package trait. If a Weapon Specialist dies, one of the regular Guardsmen will equip their wargear and take their place.
In addition to any Sergeants or Commissars added through Accessories, a Guardsman squad consists of:
- 4 Guardsmen, equipped with Lasguns and Flak Armour.
- 2 Weapon Specialists, equipped with Flak Armour and whatever Wargear Package weapon their Lord General is using. If the Lord General isn’t using a Wargear Package weapon, they’ll default to using Lasguns too.
By default, Guardsmen are very basic. Their Flak Armour is so weak that it makes even the Armageddon Carapace look protective in comparison, while their Lasguns do less damage individually than the Lord General’s Bolter, of all things. So, they must be terrible, right? Well, no.
Give them a little love, and their strength will begin jumping exponentially. Thanks to the Weapon Specialist trait, they will bring along copies of your Flamer, Plasma Gun, Bolter or Grenade Launcher should you choose to equip it. Taking the Flamer turns your Guardsmen into the bane of all Light Infantry, most notably letting them triumph over enemy Guard forces several times their size as well as handily defeating Banshees before they get in melee range.
The Grenade Launcher, meanwhile, lets them triumph over all ranged infantry, while the Plasma Gun makes them decent, although not spectacular, against a broad range of targets. The Bolter, however, can be ignored; it is still better than leaving your Specialists with Lasguns, but that isn’t really saying much.
Adding a Sergeant further helps the squad by making their armour as strong as revered Cadian Carapace, like the suit the Lord General can wear. Add a Commissar, and even their Lasguns will become a legitimate threat to most infantry, with a Commissar-directed volley capable of seriously hurting Marines and killing lighter targets outright.
A Guardsman squad with a Sergeant, Commissar and Wargear Package is thus a potent threat that can wreck havoc on their weapons’ intended targets while still providing a decent distraction against targets they aren’t as well-equipped for. A squad of Flamer Guardsmen won’t win against a Wraithlord, for instance, but with a Sergeant leading the group it’ll sure as heck slow it down.
Weaknesses to be aware of no matter what you equip them with, however, are Jump attacks and Area of Effect. Although Sergeants make their armour tough, it doesn’t change the fact that individual Guardsmen still have fairly low maximum health, meaning their squad durability is derived from their numbers. This also means their durability quickly goes out the window when targeted by an attack that can hit them all at once. Sergeants will still dramatically reduce the casualties from such attacks, but there’s only so much they can do if unlucky enough to be focused down by a Zoanthrope or a Fire Prism.
Likewise, they’ll crumple if overwhelmed in melee. While some options, like the Flamer, are great melee deterrents, Jump attacks like the jetpacks of Assault Marines or Storm Boys can spell death for a Guardsman squad, as they’ll be forced to forego their Wargear Packages for much less effective bayonets before they even have a chance to shoot.
That said, there have been cases where a Guardsman squad jointly led by a Sergeant and Commissar has been able to gang up and poke such melee enemies to death, but not without great casualties; in such situations, 1-2 Guardsmen will die per melee foe, which is actually pretty damn good as long as there isn’t more than 3 of them.
When it comes to replacing casualties, it is best to wait until all regular Guardsmen have died and only your Specialists are left. Unless, of course, you have nothing else that’s important to spend Energy on in the immediate future. This is because the regular Guardsmen contribute very little to the squad’s effectiveness aside from bodyguarding the Specialists, the latter of which are the ones who haul almost all the weight offensively. Use this guideline to help you stay as effective as you can be when Energy is tight.

- Grants Ability – Deploy Catachan: Spend 35 Energy to air-drop a squad of elite Catachan Devils at a location of your choosing. Once deployed, the Catachans will usually stay close to their General and target whatever he is targeting. Each Lord General can only have one Catachan squad active at a time.
- Knockdown: Catachan Shotgun fire has a chance to knock down infantry.
- Explosives Expert: Catachans occasionally toss frag grenades… less so when a Commissar is around.
- Unlisted Property – Uncanny Senses: Catachans can spot infiltrated units such as Lictors or Scouts more easily from further away.
In addition to any Sarges or Commissars added through Accessories, a Catachan squad consists of:
- 4 Catachans, equipped with Shotguns and their ROCK HARD ABS.
Compared to regular Guardsmen, Catachans are tougher (despite being bare-chested, hence ROCK HARD ABS), do more damage and fare far better in melee. Their Frag Grenades are also roughly on par with the Space Marine Captain’s, and these guys throw them for free! This, combined with Knockdown, makes them highly effective against infantry. Note that their Shotguns are mostly a crowd control weapon outside of short ranges, with their Grenades doing the real damage beyond that point.
These guys are the perfect bodyguards for a Sniper-wielding Lord General, using their Shotguns and Grenades to keep you from being overwhelmed while you assassinate high-priority or high-armour targets that they aren’t as well-equipped to deal with. Because they follow you around, they also aren’t a bad choice for Melee Generals using an Inspiring Power Sword. Give them a Sergeant, and perhaps a Heavy Bolter Turret, and you won’t be disappointed.
Rock. Hard. Abs.

The Commander Slot: The Lord General’s Retinue Options, Part 2

- Grants Ability – Deploy Ogryns: Spend 35 Energy to air-drop a squad of heavy infantry, in the form of Ogryns, at a location of your choosing. Once deployed, the Ogryns will tend to wander off and do their own thing, which typically involves attacking the nearest enemy in sight. Each Lord General can only have one Ogryn squad active at a time.
- Healthy: These Ogryns have a higher maximum health pool than normal.
- Unlisted Property – Melee Charge: Ogryns will chase down nearby targets and knock them down upon making contact.
In addition to any Bone ‘Eads or Commissars added through Accessories, an Ogryn squad consists of:
- 3 Ogryns, equipped with Rippers and ROCKIER… HARDIER… abs?
Much like the Catachans, Ogryns synergize much better with a Lord General who uses a Power Sword or Sniper Rifle – generally it’s best to save your Wargear Packages for your Guardsmen. Unlike Catachans, however, your Ogryns are not dutiful bodyguards. Rather, they are terrifying beatsticks. Most minions need a Sergeant in order to have respectable durability. Ogryns, however, take a Sergeant for amazing durability. Due to their small squad size, the presence of a Sergeant makes a huge difference on their damage output too. Each individual Ogryn is capable of putting out and absorbing heavy amounts of damage, and their Bone ‘Eads just enable this insanity, letting these amazing humans (yes, Ogryns are still human) survive outrageous scenarios that would’ve wiped any of your other squads several times over.
Just for fun, I once let my Ogryns charge off with their Bone ‘Ead into a massive wave of enemy Ogryns coming out the gate on Wave 6 of the Anvil of Khorne. The result? All the enemy Ogryns from that gate were killed, and not a single one of my own Ogryns had died. In fact, their health was almost full since Battle-Hardened is one hell of a trait to have on these guys. Did I mention they did this without assistance from team-mates?
Really, with the Sergeant Accessory these guys become so tough and so damaging that in my eyes they feel like a discount version of the Space Marine Captain’s Dreadnought: maybe a little more vulnerable in some aspects, but also much easier to spam if you had to.
Something important to note is that unlike Guardsmen who crumple in melee, or Catachans who are okay at it, Ogryns practically LIVE to be in close combat! Their Ripper guns do heavy damage, but are wildly inaccurate. To compensate, the Ogryns will close the distance between them and their target before charging into them, bludgeoning them to death in close quarters. If you have a Commissar attached as well as a Sergeant, expect to see these guys tear vehicles right open.
As powerful as they are, however, their tendency to focus more on killing things than protecting you compared to the Lord General’s other options means you’re more likely to be caught alone at a bad time by the enemy. That said, pay a little extra attention to your surroundings and you’ll be fine.

- Grants Ability – Deploy Stormtroopers: Spend 35 Energy to air-drop a squad of elite Imperial Stormtroopers at a location of your choosing. Once deployed, the Stormtroopers will usually stay close to their General and target whatever he is targeting. Each Lord General can only have one Stormtrooper squad active at a time.
- Grants Ability – Tactical Withdrawal: Spend 6 Energy to select a point on the map. The Lord General will then Retreat to that point, taking the shortest route possible to do so. While Retreating, you cannot control your Lord General until he reaches his destination and he takes more damage in melee, but he also gains a bonus to movement speed, immunity to suppression and resistance to ranged damage. These bonuses and vulnerabilities end once the Lord General arrives at the marked destination.
- Special Ops: All of the Lord General’s abilities gain a 25% discount.
In addition to any Veteran Sergeants or Commissars added through Accessories, a Stormtrooper squad consists of:
- 4 Stormtroopers, equipped with Hot-Shot Lasguns and Carapace Armour.
The last Minion the Lord General gets, let’s break this squad down. Hot-Shot Lasguns are decent weapons, dealing damage somewhere between the Lord General’s Bolter and the Lord General’s Plasma Gun. This is pretty good, considering you get 4-5 Hot-Shot Lasguns in a squad. These weapons will allow Stormtroopers to consistently outdamage regular Guardsmen as well as outperform the Catachan’s Shotguns at medium to long range. Unlike Ogryns, Stormtroopers are rather accurate too, making them a decent ranged squad.
Their Carapace Armour, meanwhile, means they have somewhat-decent protection as a baseline, comparable to Armageddon Armour or Catachan Abs. So why, then, are these minions commonly considered the worst in terms of their direct contributions to a fight?
Well, they may out-damage regular Guardsmen individually, but they don’t get Weapon Specialists or high numbers, which are what made the Guardsman squad shine in the first place. Stormtroopers may have a similar squad-size and durability compared to Catachans, and may outdamage their Shotguns, but Stormtroopers do not get Frag Grenades, which to be honest is where the lion’s share of the Catachan’s offense comes from. They also don’t get any utility like the Catachans do – they do not detect infiltrators, nor do they knock down opponents with their basic attacks.
In terms of customization, specialization and utility, then, Stormtroopers are on par with Ogryns, which are little more than beatsticks in a fight. However, Ogryns will vastly outperform Stormtroopers in this role, having far more health, protection and damage despite having fewer members. And don’t even think about getting your Stormtroopers into melee – having neither the Guard’s numbers nor the Catachans’ close combat expertise, Stormtroopers have by far the worst odds against foes like Tyranid Warriors or Banshees.
So now you may ask, “Why use Stormtroopers at all?”
Because everything they bring to the fight is focused on making YOU better. Most minions come with traits that make them better, but the Stormtrooper squad focuses everything on their General instead.
The Special Ops trait they give you is a huge boon. It reduces the cost of High-Powered Shot from 20 Energy to 15. It reduces the cost of Vanquishers from 40 to 30, just a scant 5 Energy more than what you’re used to paying for Tarantulas. The Stormtroopers themselves effectively only cost 26 Energy since this trait applies to their summoning costs too, making them much easier to spam than other minion types. This means they’re still well worth summoning, and can still do decently when given a Sergeant or Commissar.
The ultimate boon, however, comes from what Stormtroopers do for your Rocket Run. Rocket Run is already one of the best Nukes in the game, and Stormtroopers reduce its cost from 50 Energy… to a mere 38. That’s right. You can now drop Rocket Runs the way you’re used to summoning Guardsmen. Holy Hell. Pair with the Deadly Sniper Rifle for the extra Energy Regen and you’ll practically have a Rocket Run ready to go whenever you please.
Because this minion squad is so focused on buffing the efficiency of your abilities, they’re probably the only squad where you can eschew using Sergeants or Commissars and not have your build suffer for it. Whether you actually deploy your Stormtroopers and use them, or whether you just equip their Commander Item to abuse Special Ops is up to you.
…
Next, while Stormtroopers may not have much personal utility, the addition of Tactical Withdrawal is useful on any build. Ranged Generals can use it to evade hordes or get to cover safely, while Melee Generals can use it to quickly close the gap on ranged targets with minimal danger. Speaking of Melee Generals, cheaper Rocket Runs can let you have your fun with swords while still posing a credible threat to anything on the map.
Overall, Stormtroopers pair best with anyone who needs extra mobility, anyone who wants to spam powerful abilities more often and anyone who doesn’t want to depend too much on their minions in a fight.
Finally, Stormtroopers are best for anyone who loves their over-the-top voice acting, as they’re the only minion in Last Stand who speaks. The lines themselves sound a little sheltered, but the delivery always sounds awesome.
“QUIT THE FIELD OR DIE, ELDAR SCUM!”
“Never fought Orks like these before!”
“Never thought we’d be fighting our own men.”
“SPACE MARINES CAN STILL DIE, SAME AS ANYTHING!”
Conclusion
And that’s a wrap! This wound up being much longer than I thought it would, but I found there was too much to say about each piece that I didn’t want to leave out.
If you’ve tried out the Lord General, what has your experience been like? Despite how much I’ve played him, I still wouldn’t consider myself the best, and it’s always great hearing more perspectives on tactics and wargear combinations! Let me know what you think.
Below is a list of builds I like to use. I hope you enjoyed the guide, and that it helps you in your future endeavours!
Builds
Norton Security Services – Requires Level 9 Or 14
- Weapon: Flamer
- Armour: Artificer Carapace
- Accessories: Sergeant, Medallion Crimson (or Commissar), Honorifica Imperialis
- Command Slot: Guardsmen
So-called because this combination gives you a highly effective firewall thanks to the triple Flamers. Excellent against Light Infantry, the Artificer Carapace is there to shore up your weaknesses againts armour without giving up too much protection. Choose Medallion Crimson or Commissar based on preference. Although other Wargear Package and turret combinations are viable (like Plasma with Heavy Bolters, or Grenade Launchers with any turret), I find this one to be the most consistent. It works especially well when playing with Necron Lords, most Tau Commanders and most Space Marine Captains since they tend to focus much more on single-target damage.
On a team that already has lots of anti-armour capabilities, this build can be a viable alternative to Rocket Run if friendly fire is too big a concern. On a team without anti-armour, however, there will be struggles in later waves. Still, a good build for unlocking Duelist Honours and the Black Plate relatively early on.
Catachan Arsenal – Requires Level 10 or 19
- Weapon: Deadly Sniper Rifle
- Armour: Master-Crafted Carapace
- Accessories: Sergeant, Medallion Crimson, Honorifica Imperialis (or Rocket Run)
- Command Slot: Catachans
This set-up creates a wonderful self-supporting formation. Catachans protect you from infantry, the Heavy Bolter turret helps lock more infantry down, and your Sniper Rifle picks off heavy targets that your turret and Catachans aren’t so good against. The Honorifica Imperialis is a nice safety net, but between the long range, knockdown and suppression this build gives you don’t really need it. Swapping it out for Rocket Run when you can is especially effective, allowing you to wipe the slate clean in situations where Frag Grenades just aren’t enough.
Mad Jack – Requires Level 10 or 15
- Weapon: Inspiring Power Sword
- Armour: Black Plate (or Cadian Carapace if you don’t have the Achievement)
- Accessories: Sergeant, Duelist Honours (or Medallion Crimson if you don’t have the Achievement), Refractor Field
- Command Slot: Catachans or Ogryns
A melee build focused on leading the charge into the face of the enemy and then wrecking them. Once your minions hit the field, use Refractor field to keep both them and yourself alive. Duelist Honours will make you a respectable melee fighter, while Sergeant will cut down on resummoning. As you have no mobility, however, make sure you never bite off more than you can chew, and ideally always keep a team-mate close.
The Heavy – Requires Level 16
- Weapon: Deadly Sniper Rifle
- Armour: Armageddon Carapace
- Accessories: Sergeant, Honorifica Imperialis, Repair (can be swapped for Commissar or Refractor Field)
- Command Slot: Ogryns
Ogryns are amazing at disrupting infantry, Vanquishers are amazing at tearing down armour, and the Deadly Sniper rifle makes sure you have the Energy to pay for both. Repair is recommended to help with Energy budgeting, but you’re welcome to opt for a Commissar to take your Ogryns further (although I personally find the Sergeant is sufficient) or a Refractor field to help you survive and possibly protect your turret.
Honorifica Imperialis is mandatory for your survival as Ogryns tend to wander away from you, while the Sergeant is mandatory to help your Ogryns triumph.
The One-Man Army – Requires Level 20
- Weapon: Deadly Sniper Rifle
- Armour: Black Plate (or Cadian Carapace if you haven’t unlocked the Achievement)
- Accessories: Rocket Run, Medallion Crimson, Honorifica Imperialis
- Command Slot: Stormtroopers
This build takes the Stormtroopers’ concept of buffing the General to its logical conclusion. Black Plate plus the Honorifica Imperialis lets you be surprisingly durable for a Lord General, while between your Sniper Rifle and Rocket Run you can eliminate almost any target single-handedly. Remember to use Tactical Withdrawal frequently, however, so that you’re always out of your opponent’s reach. Don’t bother summoning Stormtroopers with this build, your Holy Trinity will be High-Powered Shot, Tactical Withdrawal and Rocket Run.
Artillery Wins Wars – Requires Level 20
- Weapon: Deadly Sniper Rifle
- Armour: Artificer Carapace (or Armageddon Carapace)
- Accessories: Rocket Run, Sergeant, Honorifica Imperialis
- Command Slot: Stormtroopers
A more balanced Stormtrooper build that focuses on having turrets and minions. Take the Artificer Carapace for survivability (and Unshakable, which pairs very well with Tactical Withdrawal), or the Armageddon Carapace for sheer anti-armour goodness. Stormtroopers with a Sergeant will keep stray groups of infantry off you, while Rocket Run can take care of the rest.
The Madder Jack – Requires Level 20
- Weapon: Inspiring Power Sword
- Armour: Black Plate (or Cadian Carapace if you don’t have the Achievement)
- Accessories: Honorifica Imperialis, Duelist Honours (or Medallion Crimson if you don’t have the Achievement), Rocket Run
- Command Slot: Stormtroopers
A less practical but arguably more awesome version of the One-Man Army. Use Rocket Run to drastically soften up hordes, then Tactical Withdrawal to “retreat” into the enemy and pick off any surviving enemy heroes or vehicles. Your Stormtroopers won’t be of much help to you minion-wise, but between Rocket Run and Tactical Withdrawal you can live your melee fantasies while still contributing in a wide variety of situations.