Overview
Official guide for 911 Operator’s Call Editor made by Jutsu Games.
Launching
Do the following steps to launch Call Editor:
1. Launch Steam
2. Go to Steam Library
3. Find 911 Operator
4. Right click on 911 Operator display options and choose “Launch Game Editor”
We recommend enabling Contributors beta if you want to work with Call Editor. That’ll provide an earlier access to updates and error message in case of a bug. However, that’s not necessary to use the editor.
Enabling Contributors mode:
1. Launch Steam
2. Go to Steam Library
3. Find 911 Operator
4. Right click on 911 Operator display options and choose “Properties”.
5. Click on Betas tab.
6. Choose “Contributors – content creators” from the list
Calls Creation Basics
Every call in 911 Operator has 3 main parts:
Dialog
It’s the part which the player sees after picking up the call. It contains all dialog options, which could belong to one of the two possibles types of speaker: Operator (player) or Caller. Every dialog option has its unique name called ID.
IMPORTANT: Dialog option can’t be displayed twice. If a player chooses one option, it’s marked as “used” and it won’t show again in that dialog.
Scene
At a scene, you can find all elements which are on the site of an incident (e.g. caller, injured man or car on fire). In the game, the player sees the scene when the units arrive at the place of the incident. However, the scene starts existing from the moment of picking up the call and disappears after all of its elements were resolved (e.g. all injuries were healed) or the call was ignored.
Summary
That’s a brief summary of the call. It usually has a short description of the problem and information about what happened after the end of the conversation. It can be made of a few different elements that are added depending on player’s actions.
Every call must have a unique ID.
Every call element (scene element / dialog option / Summary element ) must have an unique ID in the context of the call.
ID cannot contain any spaces or special characters or CAPITAL LETTERS. It should be a short word or a number.
You can override the default calls by setting the same call ID. The game looks for a call in a specific order:
Custom Calls
Workshop folders
Default calls
Every dialogue should have two reminders (dialog options with id: reminder, reminder2), which are displayed after a few second of player’s inactivity. Most popular reminder phrases are: Hello? Are you still there? etc. etc.
Screen description
Left top corner:
FILE displays options:
NEW creates a new dialog,
OPEN FILE opens the .xml file with dialog,
SAVE saves current work
SAVE A COPY AS… saves a copy if you don’t want to overwrite the original file,
SHOW ALL views all calls available in your copy of the game:
GET MORE opens the Workshop and allows to download new content
IMPORT RAW CONV allows you to open a file exported from Google Sheets (old method of creating calls)
HELP opens documentation of Call Editor

The column on the left is a list of calls divided into 3 categories:
CUSTOM CALLS (calls created in the editor or imported from local memory using the editor)
WORKSHOP CALLS (calls downloaded from the Steam Workshop and your calls uploaded to the Workshop)
BASE CALLS (original calls from 911 Operator and DLCs)
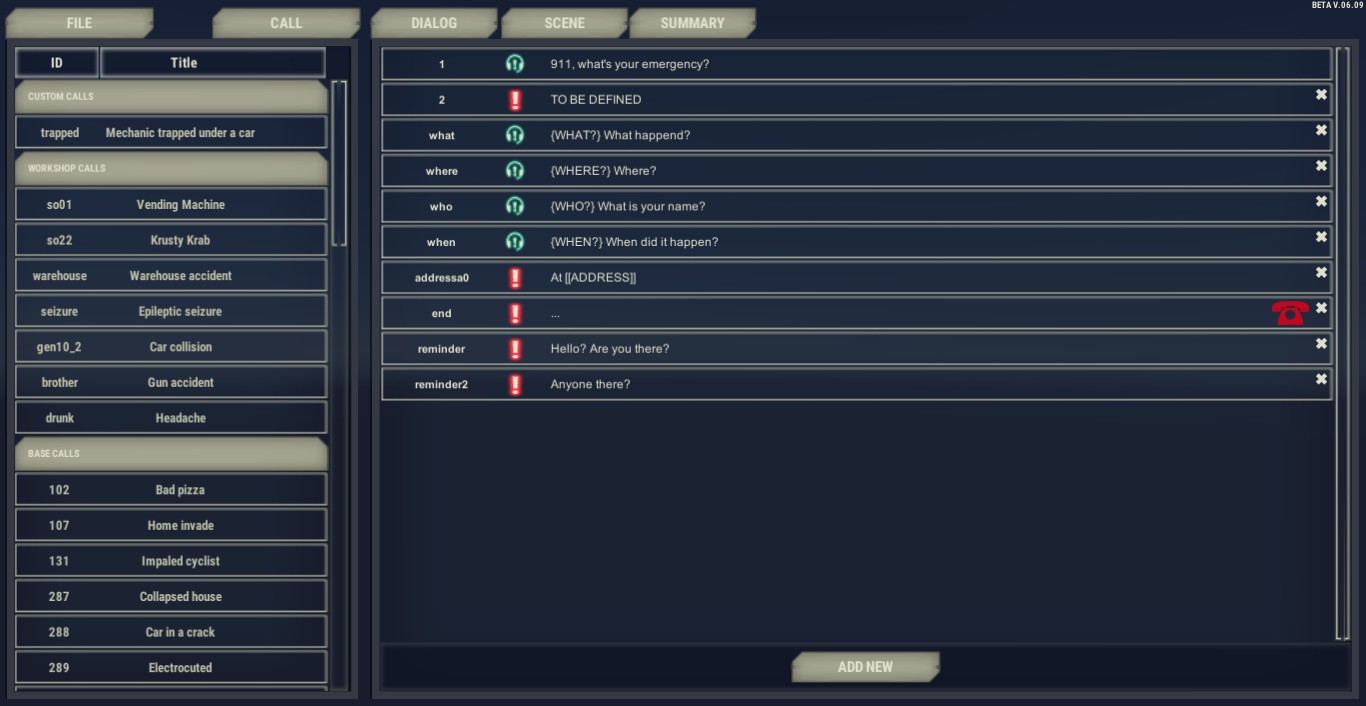
At the top of the screen, you have 4 important buttons: CALL, DIALOG, SCENE and SUMMARY
CALL
Shows details of selected call: its code identifier (Conversation ID), title, a path of directory, image, and type (Element).

DIALOG
contains all dialogue options
every option has its own id, displayed on the left
options could belong to the operator (green headset with ! inside) or a caller (red ! mark)
Selected option is highlighted in blue, next possible options are green, the previous option is red.
Red icon of phone means end of the call (actionHangup)

SCENE
contains all objects on a scene
every object has its own id, displayed on the left
Every object has its name displayed in the middle
Every object have a tag displayed on the right

SUMMARY
Contains all pieces of Summary, which are displayed after the duty

Creating a simple call
Here is quick instruction how you can make your first simple call. Let’s create a short call about a car mechanic trapped under the car. He can’t breathe, which makes the dialog short and allows only for a few questions.
After launching the editor click FILE button
Select NEW
Now, you need to set short, unique ID name of this call (not displayed in the game) and its more descriptive title, which is visible for player as a name of the incident. It should be one word without spaces. DO NOT USE CAPITAL LETTERS!
Write “trapped” as ID of the call and “Man trapped under the car” as a title.
We added basic template with most common questions to help you with starting writing your own call.
Click option ID 2 with red exclamation mark. This means that it’s caller dialog option.
Go to the left and click in the box described as TEXT. Write there: “Help, I can’t breathe!”
Add new option and write the response: “My… car… my car fell on me…”. That’s option should be spoken by caller. But we can see green operator icon next to option id. That is why we have to change the speaker. On the top left you can see “Speaker” dropdown. Click and choose caller.
Now we will add some transitions.
Select the first option with id what (“{What?} What happened?’”).
Go to Element Properties and click ADD DIALOG TRANSITION.
Click on the option with id 3 (Help, I can’t breath).
You can check the linking by clicking on any of them: green highlight is showing next option and red stands for the previous one.
Let’s connect the address now.
Click on option id “addressa0”, go to text box on left. You can edit the text, but make sure that you won’t delete [[ADDRESS]]. This will be replaced by text address provided by action “actionSetLocation”. You can see it below, in Action on end panel.
Add another option with id:4. Change speaker for Operator and write “The help will be there soon!” in Text box.
Click on the option id 3 and link it to the option id 4.
Let’s add the last option.
Click on option ID “end” and modify the text for “Okaaay. . . . . .”
This will be the last dialog option but we still have to connect it using transitions to option id 4.
Click on the option id 4 and add transition to id “end”.
Now we can check if all the options are linked. As you can see we didn’t use options id “Who” and “when”, they are not connected anyhow. That is why we need delete them.
Delete the unused options using cross icon on the right.
The text of the dialog options is finished. Now, go to Scene tab.
Click on “sceneElem_1”
This element will be our trapped man, so put Caller as a description in the text box. Change his tag to the injured and set level of his health in the element properties by clicking plus and writing hp=40.
We also need to determine his gender: in this case click plus in the Element Properties and type sex=M.
Let’s proceed to the third part of the editor called summary. Here, you can determine what player can see in the summary in the description of this call.
Click “story_1” and write: “The man lost his consciousness”.
Go back to the Dialog tab in order to determine which option will activate that piece of the summary.
Select option with id end, go to the top of the left panel click Summary and choose story_1 from the dropbox.
Congratulations, you’ve finished your first call. Click on the FILE button and click SAVE. Now, you can test it in the game by pressing “~” during a duty and entering “startcall trapped”.
Good practices
ID names:
We recommend using short, descriptive word as an ID. Numbers are difficult to handle when the dialog is a bit more complex.
For Example, use the id “where” for a dialog option “{WHERE} Where are you sir?”
“end” option:
An option with an ID “end” will be displayed if there are no more options available. It’s a good idea to put “end” option in a dialog as a rescue wheel: in case of an error in transitions between options, when there are no more dialog options and no “actionHangup”, the game won’t freeze, but it will display “end” option.
Ending the dialogue:
The last option should be spoken by the caller, because as a rule 911 operator stays on the line until a caller hangs up.
Address:
A player should have a possibility to ask about the address as often as it possible during the dialog – usually he should to that at the beginning anyway, but allow him to choose otherwise.
Advanced Dialog Creation
In order to make a dialog transition:
1) Click on the dialog option
2) Click ADD DIALOG TRANSITION on the right
3) Select dialog option
By using ADD DIALOG TRANSITION you’re choosing the next option in the dialog.
If you add transitions to more than one Operator’s options, a player will have a choice between them.
While writing operator’s lines, you can prepare a short version of the dialog option, which is displayed for the player at the dialog option’s BUTTON. When player chooses that option, the full version will be displayed. In order to make an abbreviation of dialog option, put the short version of the text in curly braces before the first sentence.
Example:
{HELP HIM} He might have a heart attack. Don’t be afraid and help him!
Good practices for dialog option abbreviation:
Keep the sentences in curly braces short
Abbreviation should be short version of operator’s words, NOT the description of operator’s actions.
“Back” option allows you to display options from two steps back in your transition path. If you add “back” option after caller’s answer, it will add all remaining options from previous Operator’s line. That function is very useful for creating small branches of the dialog.
For example, use “back” option after obtaining the address, because after that you might want to go back to any part of a dialog.
There three types of calls, which you can set in “Calls” properties:
- Generable Once – simplest type of the call, you should pick that if you want to make the call which will be available in the Free Game. This type of a call will occur only once per city
- Generable – a popular type of a calls with different variations of caller responses, so the call can happen more often than once per city
- Scenario Call – those calls can only be enabled by scenarios and editing in-game files.
You can put different elements (people, objects) on scene and set proper parameters for them (e.g. fire could have parameter workchange set on positive number which means the fire is rising)
There are 5 different types of people who can be placed on a scene:
- suspect (always requires police intervention)
- witness (need to be investigated by the police, but most likely won’t be taken into custody)
- injured (requires medical help)
- dead (medic or policeman need to examine the body)
- passerby (mainly for story purposes, doesn’t require any action, unless it’ll be hurt by some other object)
There are also a few different objects:
- Fire – needs to be put out; firefighters are the most efficient for that
- Tech (Technical work) – different kinds of works like removing obstacles; firefighters are the most efficient in that)
- Deco (Decoration) – mainly for story purposes, doesn’t require any action, unless it’ll start burning
- Timer – invisible for a player, could determine what will happen after given amount of time; more info in next section
Every scene element should have some parameters set. Those will specify their nature, type, behaviour, appearance and other things.
Table of parameters

Below you can check which parameters you can use to describe a specific type of scene element.

You can find full documentation including Scene elements here:
[link]
Any element on scene could be blocked by another scene element. It means that emergency units can’t do anything with that element until a blocking element will be resolved and disappears.
To enable blocking element click on the scene element which you want to block, expand a list of element in Blocked By category and choose blocking element.
Examples
The element named Hostage (injured) is blocked by element Terrorist (suspect). First, the police must take the Terrorist into a custody, then a medical help can be provided to the Hostage.
The element Collapsed house (tech) block element Child (injured). First the firefighters must do the tech job, then medical help can be provided to the Child.
Question about the address is one of the standard elements of the call. Here are two most important elements of it:
[[ADDRESS]]
When a caller is supposed to say actual address, you shouldn’t manually write the streets or numbers but put [[ADDRESS]] inside the sentence in the Text box. The game will replace that with a randomized address.
e.g. I’m near [[ADDRESS]].
Send the police unit to [[ADDRESS]]!
actionSetLocation
It should be ALWAYS put in “Action on end” section for EVERY dialog option which has [[ADDRESS]] in Text box. The game will set a randomized location of the call when this option is used.
After each duty, a player can see a summary of each call. The editor allows you to prepare different pieces of summary which can be activated by dialog options or scene elements.
Summary tab
Here you can add new summary piece by clicking ADD NEW. After creating it, you can change its id and write a description in the Text box which be displayed to a player in the Summary after activating it in a dialog option or a scene element.
Activating summary pieces
After creating a summary piece you can activate it in any dialog option by choosing it from expanding list near to Summary button in dialog option description (above Emotions field).
If that dialog option will be displayed during the call, the linked Summary piece will be included in description of that call in summary.
Thanks to that you can create different summaries which will be adequate to choices of a player. If you want to show a specific part of that summary always for that call just choose dialog option with id 1 and set there this part of the summary.
Adding summary to the scene elements works very similar: click on any element and choose piece of Summary from the list. However, the summary is shown only if element was successfully resolved (e.g. injured cured or taken to hospital). If the element disappears, because a player ignored the call, units didn’t arrive in required time or team members didn’t manage to resolve the element (e.g. injured died or criminals escaped) the piece of Summary linked to that element won’t be displayed.
Setting Reputation effect
After resolving or ignoring any call, a player receives a specific number of Reputation points: positive is that a reward for proper behavior or negative as a penalty. A player can see detailed results after finishing the duty, but game mechanic allows to set or modify a number of points during the ongoing call conversation.
opinionEffect
The basic way to set a number of reputation points is to set opinionEffect value in any part of the call. In order to do that you should put the line opinionEffect = with number value in Action on end section.
eg. opinionEffect = 4
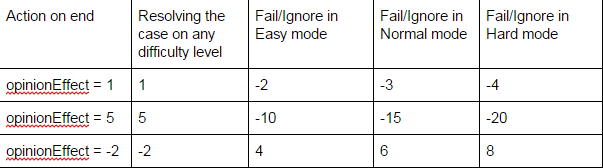
The number specified after equality sign sets number of reputation points given to the player after resolving all elements on the scene.
If the player ignores or fail the call, the opposite value will be given with multiplayer based on a level of difficulty:
2x in easy mode
3x in normal mode
4x in hard mode
Examples:
You should set the negative value as opinion Effect if the call is irrelevant (like prank call) and a player should get the reward just for ignoring it.
If the opinionEffect has been already set in a call, you can modify it by using + before =
eg.
option id:1 opinionEffect=5
option id: 2 opinionEffect+= 2
Summary: opinionEffect = 7
If opinionEffect wasn’t set during call creation, it has a standard value: 3.
onIgnore
If you want to have a different value for ignoring or failing to resolve the case than the opposition of opinionEffect, you can use onIgnore functionality. OnIgnore is also used in Action on end column.
It allows you to set any value for ignoring the case. It should be used along with opinionEffect for setting a number of reputation points for positive action.
e.g. opinionEffect = 2; onIgnore = 5
onIgnore is also modified by difficulty level, exactly the same as opinionEffect:
2x in easy mode
3x in normal mode
4x in hard mode
Modifying scene by “action on end”
Action on end functionality allows for editing the scene elements during the call. You can put a modifier in every dialog option using Action on end section. In order to do that:
1) Choose dialog option
2) Click + under Action on end
3) Write proper parameters in scheme: <ID element on scene>.<parameter><= OR +=<value>
You can modify every parameter described in Scene section. Here are examples how to use that functionality:
- caller.hp=30
(For element on Scene with ID “caller” level of health is changed to 30) - caller.hp += 30
(caller gains 30 points (added to basic value set in Scene tab)) - caller.hp += -30
caller’s level of health is decreased by 30 points (subtracted from basic value)) - caller.hpchange=+0.1
(from now on the caller will be gaining 0.1 points of HP per second) - caller.hpchange=-0.1
(until now caller will be losing 0.1 points of HP per second) - caller.hpchange+=0.1
(until now caller will be gaining 0.2 points of HP per second added to the basic value set in Scene tab)
Speed
You can also set parameter Speed in Action on End panel. In that case, you don’t need to choose specific element on the scene, but just set the value and whole scene will start moving.
eg.
speed = 80
Dialog options and scene elements availability
The game allows for setting availability for any dialog option or scene elements. It means that you can hide some parts of the dialog and activate them in some circumstances occurs (e.g. player choose proper dialog option). There are two ways of doing it, slightly different for dialog options and scene elements.
Setting the availability of dialog option
You can also set the availability of dialog options from the dialog itself. Thanks to that, you can enable or disable a branch of the dialog, depending on the player’s choices. To do that, you need to specify the ID of the dialog option, add “->active=” and specify if it should be active or inactive. By default, all options are active.
For example:
address->active=false
in “actionOnEnd” section will disable the “address” dialog option from the conversation
Setting availability of scene element
Every element on scene can have active (default) or inactive status (invisible to a player). You can set it in parameters of the scene element (by typing isActive=true or false in Element Properties in Scene tab). But it also possible to change that statuss during the call. To do that, you need to specify the ID of the dialog option, add “.isActive=” and specify if it should be active or inactive.
For example:
caller->active=false
in “actionOnEnd” section will disable the “caller” scene element
Multiple dialog paths (generable calls)
In 911 Operator you can find calls in which caller might say different answers for the same questions. In Call Editor you can set different caller’s options as a response to one operator’s option and the game will randomly choose of them.
How to make a call with different variations of caller options:
1) Create a dialog
2) Create at least two different Caller options
3) Link all of them to the Operator’s question
4) Now the game will choose one of them randomly while playing a dialog
Writing a call with different variations of caller options is much more difficult than writing a “normal” dialog. We recommend writing a few simple calls before making a call with different variations. Also, it’s worth to carefully examine calls from 911 Operator with “gen” in their IDs as an example (eg. gen18).
Chance
1.You can modify the probability of randomizing the option by setting the “chance” parameter for the dialog option
2.Go to the option which you want more or less possible to draw.
Go to Element Properties and write chance=<insert_value_here>
The default value is 0.33. If you want to make option more possible set the larger number.
Using the Search mechanic (SaR DLC)
In Search and Rescue, we’ve added the Search mechanic that requires the player to find an object in a specified area.
To enable the mechanic in your calls, enable “Searching” in the Call tab.
Search Area determines how many sectors will appear – the number of sectors equals to a square of the number you’ve put in. It’s best to keep the number between 2 and 9, although any number will work.
Search Work determines the amount of work that a unit will have to do when sent straight to the incident, instead of checking sectors one by one. It should be bigger than the number of sectors multiplied by 6 (every sector takes around 6 seconds to clear, and checking them manually should be more effective), for example – if you set Search Area to 5, it means that there will be 25 sectors. 25 times 6 is 150, so Search Work should be set to more than 150.
In the next step, go to the Scene tab. In order to make an element searchable, put “toSearch” in its properties. Not all elements on the scene have to be searchable, for example – if the Caller reports a thief on the run, only the thief is supposed to have “toSearch” in Element Properties.
Please remember, that although you can create Search calls without having the Search and Rescue DLC, you won’t be able to play them.
Finding call files on local disc
1.Go to Steam Library and click right mouse on the 911 Operator
2.Choose Properties
3.Click Local Files tab
4.Choose Browse local files
5.Go to 911_Data -> StreamingAssets -> CustomCalls
6.Find the folder with created call. Its name is the same as id of this call.
Path of directory:
Steamsteamappscommon911 Operator911_DataStreamingAssetsCustomCalls
Audio
It’s possible to add a voice-over for calls created in Call Editor. This is how to do it:
1.Prepare audio files for every dialog option.
2.Required formats: MP3 or OGG for Windows, OGG for Mac.
3.Give a proper name to every file according to this scheme:
c<callid>_<optionid>.mp3 (or .ogg)
Examples:
cbribe_26.mp3
cgo90_nocry.ogg
4.Move all files to a proper folder:
- Copy all files prepared in step 1 and 2
- Open the folder with created call. Its name is the same as id of this call.
- Go to the folder Sounds
- Paste all files
Audio
Basic looped background:
If you want to make a sound background which will be looped during the whole call make audio file with the name:
c<callid>_0.mp3 (or .ogg)
eg. c53_0.mp3
And copy that file along with other audio files (Go to Steamsteamappscommon911 Operator911_DataStreamingAssetsCustomCalls{callid}sounds or see detailed instruction in the section “Finding call files on local disc”).
Activating background during the call:
1. Make a file with a background sound.
2. Put it in sounds folder in CustomCalls (go to Steamsteamappscommon911 Operator911_DataStreamingAssetsCustomCalls{callid}sounds or see detailed instruction in the beginning of Sound section).
3. Open a call in Call Editor
4. Select a dialog option in which you want to have a different background.
5. Go to Element Properties and write: bgsound={name_of_the_file} (eg. bgsound=bgparty)
Now, the background will be played in a loop until end of the call or another background specified in one of the next dialog options.
IF you want to change the background after one dialog option, select another background file by writing bgsound={name_of_the_file} in Action on end field.
If you setting background in Element properties, the background will be played since the beginning of this dialog option.
If you setting background in Action on end, the background will be played after the end of this dialog option.
You can use existing backgrounds from the calls in 911 Operator. Here is the list of existing recordings (in tab CONTENT): [link]
If you want to end all of the backgrounds during the call and have a silence: make an audio file without any sound and set is as a background.
Audio files from 911 Operator
You can try using orginal recordings from 911 Operator (e.g. by cutting them properly or selecting adequate operator’s questions). Here is the link to download them:
[link]
Universal muffled sounds for dialogs
If you don’t have a voiceover in your dialogues, you can use pack of muffeled sounds prepeared by our studio:
[link]
Translations
1. Open created dialog in Call Editor
2. Click on Call tab
3. Click Generate Localization File
4. Go to Steamsteamappscommon911 Operator911_DataStreamingAssetsCustomCalls{call_ID}lang
5. Edit the “default” file. DON’T change the words before the colon (eg. call.bribe.dialog.address:) and edit only words in quotation marks (eg. “Where are you?”).
6. Save the file with the name of a used language. Name of the file should be the same as the name of this language translation (you can check it here: Steamsteamappscommon911 Operator911_DataStreamingAssetsLanguages) Here is the list of supported languages:
de-DE
es-ES
fr-FR
it-IT
jp-JP
pl-PL
ru-RU
zh-CN
Translation file should be encoded in UTF-8. If your file doesn’t work, use Notepad++ and try to convert encoding to UTF-8.
Currently, there is no possibility to make the translations of the audio files. If you want to localize the audio files you should make copies of the calls in Call Editor with the same ID.
Testing a call
TEST YOUR CALL IN GAME BEFORE UPLOADING TO THE WORKSHOP
1.Save the finished call.
2.Launch 911 Operator and start a game.
3.Press ~
4.Write startcall <id_of_the_call> (e.g. startcall bribe)
5.Play the call carefully and check every possible path of it.
6. If you find a bug, go back to the editor, fix it and repeat a process.
Uploading a call to the Workshop
When you are sure that your call is finished and you have successfully tested it, you can upload it to Workshop.
1. Load your call in Call Editor
2. Click the CALL button
3. Click the ADD TO WORKSHOP button
4. Wait a while for the call to upload
5. When the pop-up appears (“The item has been uploaded to Workshop!”), click OK
6. Wait
7. When the pop-up appears (“File was moved to Workshop content!”), click OK
Congratulations, your call is now uploaded to the Steam Workshop. Now, you can go to the Steam client, open the Workshop, choose Your files (Files you’ve posted) and edit your call (add contributors, edit description etc.).
If you want to change something in the content of uploaded call:
1. Launch the Call Editor
2. Choose your call from the list WORKSHOP CALLS
3. Make changes
4. Click the CALL button
5. Click the UPDATE IN WORKSHOP button.
Call editor allows you to add the image which represents the call in Workshop.
1) Load a call
2) Click Call button
3) Click Select Image
4) Choose an image from your local disc.
Properties of the image:
It must be under 1MB in size.
Suggested formats: JPG, PNG or GIF.
Suggested ratio: 512×512
We recommend finding an image that would represent the main theme of the call.
Useful links
Documentation of Call Creation:
[link]
Audio files with dialogs from 911 Operator:
[link]
Audio files with muffled dialogs (could be used instead of voiceover):
[link]