Overview
The basic RPG Maker MV has only 3-frames-4-directional movement. This guide will help you to make your game more interactive. In the end you’ll be able to have unlimited-frames-8-directional (diagonal) movement with extra poses, such as idling, walking, running and jumping. Good luck!
Introduction
In order to start, you need to download these 3 plugins:
- Galv’s Character Frames[galvs-scripts.com]
- Galv’s Character Animations[galvs-scripts.com]
- Galv’s Diagonal Movement[galvs-scripts.com]
First one lets you to increase the amount of frames per animation, so instead of default 3 you can make 4,5,6 or any other number. Also, this plugin changes the way animation plays: instead of a 1-2-3-2-1 order, it’ll be 1-2-3-4-5-6-1-2-3-4-5-6 (in this case, the number of frames is 6).
Second one lets you to add extra poses for your character, such as running and jumping, when RPG Maker has only idle and walk poses, which makes your game look unrealistic.
Third one lets you to add 8-directional (diagonal) movement and diagonal sprites. This helps very much if you’re making an isometric game, or just don’t want a player to be restricted to any kind of grid.
Installation
Once you downloaded the plugins, you have to copy and paste them in your project root folder js/plugins directory. To activate them, click plugins button:

Double click a blank line and select the plugins:
- GALV_CharacterFrames
- GALV_CharacterAnimation
- GALV_DiagonalMovement
Make sure it’s put in this order:

Now we’re done with installation, let’s make our sheet!
Calculating tilesheet size
First, you should decide a size of a single sprite for your character. Say it’s 100×100 pixels.
Then, what is the number of frames per animation you want? Again, say it’s 8.
Multiply your frames by 4, so that you have the space for walking, running and jumping animations – 8×4 = 32.
Multiply 32 by your sprite size – 32×100 = 3200.
And since we also use diagonal sprites, multiply 8 by your sprite size – 8×100 = 800.
And the final tilesheet size would be the last two results – 3200×800. I hope I explained well.
Making the tilesheet
Once you’ve chosen a tileset size, you should ‘snap to grid’ it in your editor of choice, I used Aseprite.
The grid size is the same as your sprite size.
Tilesheet has 4 columns that are (in this case) 8 sprites long:
- Idle
- Walk
- Run
- Jump
And every column has 8 rows (8-directional sprites).
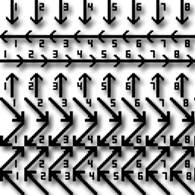
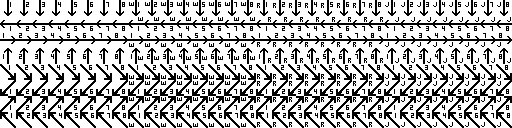
Here’s a simple example of what side your character moves to, what position is he in (idle, walking, running, jumping), and what is the number of playing sprite:
Importing a tilesheet
Once you’ve drawn and properly pasted your sprites in a tileset, you should import it.
Save completed tileset into project root folder img/tilesets/character directory. And here’s a little trick.
You should add this to your tilesheet name: %(x). Where x is the number of frames. Since I use 8 in this tutorial, my file would be called: tilesheet%(8).png
Click database icon:
Then click ‘Characters’ from the left menu and double click ‘Character’ in ‘Graphics’.

Choose the file you pasted and click ‘OK’.
The End
Thank you for reading.
[imgur.com]
If you have any feedback, or something wasn’t clear, feel free to comment.