Overview
🇷🇺 : (без DLC) примеры прохождения карт на уровне сложности Insane🇬🇧 : (DLC included) map walkthroughs on Insane difficulty
🇬🇧 [ENG] Mine, Bridge, Arc, Glade, Complex
🇷🇺 русскоязычная версия руководства располагается после англоязычной версии
weapons:
- Assault / Tesla
- Sniper
- Freeze
towers:
- Holo
- Slowfield
- Scatter / Gatling
overview:


- build one-two killzone areas consisting of Scatter / Gatling + Slowfield. the best places is right at the beginning of the maze and upper open zone. on the example above I have constructed only one killzone area and prefer to max-upgrade Holo in the lower area
- move between Holos and shoot enemies as they advance (A->B->C->D), don’t forget to create Televators
- I prefer Gatlings over Scatters on the map due to relateve shortness of the map and needed to have good DPS with minimum resources – Gatlings + Holo is better option for me here
- the hardest waves would be Tanks (wave #4, wave #13) & Big Walkers (wave #7, wave #18, wave #20) – so if you miss few of them don’t that much, all other maps are really easy
- I prefer Assault over Tesla because of its grenade alt-fire, which I find more useful here than Tesla’s alt-fire
- because of map’s length you don’t have enough resources to upgrade weapons much. I had Sniper lv6, Assault lv5 and Freeze lv1
weapons:
- Assault / Tesla
- Sniper
- REX
towers:
- Holo
- Slowfield
- Scatter
- Violator
overview:


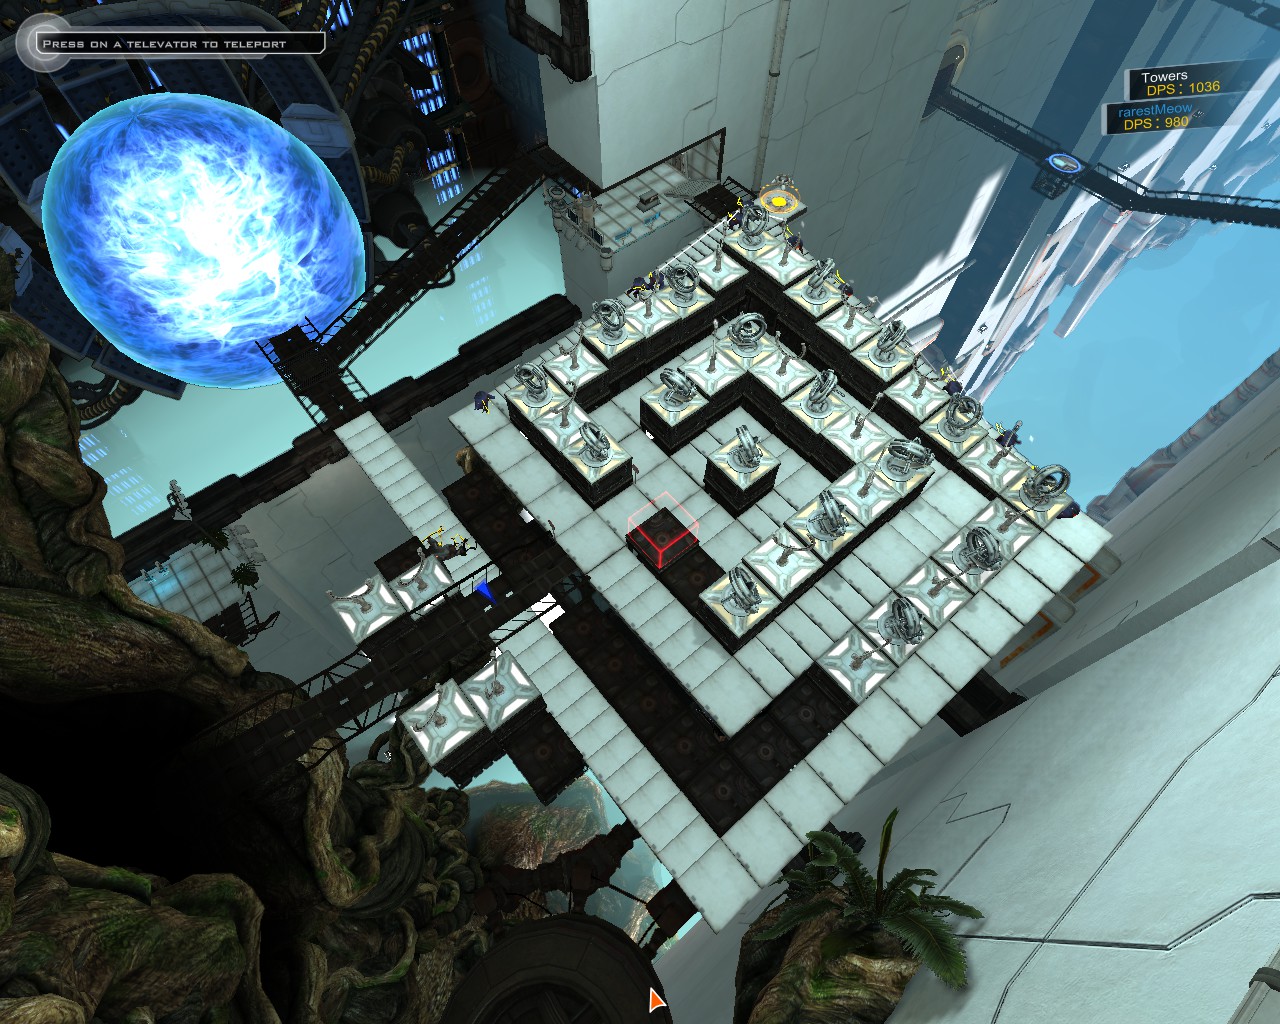
- surprisingly easy map that can be trivialized even more with a right “wave-like” maze (see images above)
- most of the maps would be Scatters lv2 with 10-13 Violators lv3. for that map you do not need to upgrade towers further; it is one of the cases where the quantity is better than quality
- I have marked with a purple color the placements of Violators, feel free, however, to experiment a little; you do not need more than 13 Violators
- you do not Freeze here, just lay Slowfield everywhere and call it a day
- your main killbox is bunch of Holos at the beginning of the maze. first shoot bunch of enemies at their spawn point (A). then, when enemies come closer move to the (B) and unleash REX/Assault/Tesla on them. after that just jump from tower to tower and kill all survived enemies
- Holos lv4 work very good, see no purpose to upgrade them further
- for first six waves you do not need towers at all; spend all resources on upgrading Sniper, constructing a maze, building Holos & Slowfields
- at the end, you, probably, will end up with Sniper lv6, Assault/Tesla lv6 & REX lv5
- the hardest waves would be, surprisingly, #15-23-25. during those waves lots of Spores + ground enemies will attack, and because of such combined land/air attack – Scatters will be less effective, be careful
weapons:
- Assault / Tesla
- Sniper
- REX
towers:
- Holo
- Slowfield
- Scatter
- Gatling
- Violator
- Accelerator
overview:


- overly simple and straightforward map, which might be hard at first but with a proper setup is getting trivial
- the idea is to build two high-leveled Holos and travel between them back and fourth. on the images above you can see two Holos and 4 places to shoot from (A->B->C->D). the latest place (D) is very optional and highly likely all enemies will be dead before you need to move at that place all together
- Gatlings are the slimmest towers and placing them together at the corners, or close to Holo allows you to pass through them, cutting the road (purple lines at the image). yes, you can rocket-jump too, but why you should?
- we use Gatlings in the build solely against Soakers and to create a shortcuts for you, so we will not upgrade them much
- Scatters & Violators are mostly against aerial enemies, so upgrade them before any major air attack
- Accelerators in the upper corridor and in the center are main damage-dealers against ground enemies (apart from your weapons of course). upgrade them before each wave with Hoverers
- Freeze is not necessary because of Slowfields
- near wave #25 you will have more resource than you actually need
- upgrade Sniper to lv4 before wave #8 (Tanks + Soakers) and to lv6 before wave #18 (Spores + Gliders). upgrade Sniper before Assault/Tesla
- kill first few aerial targets from place (E), then move to place (A), then to (D)
- if you done everything right and will actively use Holos (including killing enemies at their spawn point), then you can finish the map without any ground unit even entering the right zone
weapons:
- Tesla
- Sniper
- REX
towers:
- Holo
- Slowfield
- Scatter
- Violator
- Accelerator
overview:


- the map is tricky (enemies are attacking from two different directions), but doable and fairly simple when you catch its flow
- at the beginning of wave go to (A), snipe enemies thought Holo at their spawn points (launch few rockets also), when they come closer switch to Tesla/REX and kill as many of them as you can. teleport to (B). with a right timing enemies will be around you, shoot them. them check overview map to which side has more enemies alive and where your presence is needed more and where towers can do alright without you
- put lots of Violators at the beginning and end of each side (7-9 on each side is about right). mind that there some straw blocks you can put towers on (purple color on the image)
- build lots of Scatters and Accelerators. 5:4 ratio is okay
- upgrade Accelerators to lv2 asap, Scatters/Violators to lv2 before wave #18. after that just keep upgrading them to lv3
- upgrade Tesla as soon as you can, you need to get lv6 before wave #15; Sniper lv6 is a must before wave #18
- spend resources from first four waves on upgrading your weapons, and creating a maze on right size with few Scatters/Accelerators. before wave #5 your map should look something like this:

weapons:
- Assault / Tesla
- Sniper
- REX / Freeze
towers:
- Holo
- Scatter
- Accelerator
overview:

- that map is quite straightforward: create a Holo, upgrade it as soon as possible, upgrade your weapons according to what enemies will be next, build Accelerators/Scatters in check-pattern
- upgrade your Assault/Tesla to lv6, Sniper to lv5. I believe Freeze is better choice here rather than REX (to stop Big Walkers at wave #15)
- upgrade Accelerators to lv2, leave Scatters at lv1. that’s it. you will put all your resources into the weapons/Holo
- basically, just stand the whole level at spot (A) and kill everyone at sight anyway you like; leave that spot only to kill straw enemies and those who managed to survive you and towers
- Chargers and Blockers are the worst enemies here, keep an eye on them
🇬🇧 [ENG] Facility, Yogscave, Christmas, Whirlpool
weapons:
- Assault / Tesla
- Sniper
- REX / Freeze
towers:
- Holo
- Slowfield
- Scatter
- Accelerator
- Violator / Kairos / Anti-Air
- Violator / Kairos / Anti-Air
overview:


- might be one of the hardest map in the game
- the main idea is to separate all thee fronts of enemies from each other, giving you a room to manually kill one front and severely damage two other with lots of towers
- you definitely need to make a way from upper front to Core as long as possible (toughest enemies come from here)
- build two Holo-blocks and shoot enemies through them. snipe few of them via (A) first, then backtrack to (B) and Tesla/Assault/REX through two Holos, then shoot from (C), then climb the Televator and kill everyone who survived. after that to (D) to kill newcomers and then back to (B->C)
- Sniper lv3 before wave #3 is must; there is no way you can kill both Tanks and Spores the other way. better do not build towers, but concentrate on building a maze and upgrading the weapons
- bunch of Accelerators lv3 with Scatters lv3 will mow all enemies. upgrade towers on the central platform first
- before the last wave sell one Holo (the left one) and shoot aerial enemies from the left Holo. it will save you few credits. as well you can sell every second Slowfield
- Kairos and Anti-Air will gradually help you against air enemies, do not upgrade them past lv3 tho
- it is quite hard to beat final wave #30 without letting anyone to enter Core, quite possible few air enemies will enter it
weapons:
- Assault / Tesla
- Sniper
- REX / Freeze
towers:
- Holo
- Slowfield
- Scatter
- Accelerator
- Violator / Kairos / Anti-Air
- Violator / Kairos / Anti-Air
overview:


- the first three waves are quite brutal, but then, after building a maze and putting towers it is getting to be one of the easiest map in the game
- your main line of defense is lots of Scatters/Accelerators in a semi-random pattern. just put lots of them around
- build Kairos/Anti-Air close to the enemies’ entrance. if done right then those towers will shoot vertically up and slow/kill 80% of all air enemies
- with lots of Accelerators lv5-6 the boss will be a breeze. it is also a good idea to rebuild a maze before his appearance (to make him go a longer path) and sell all your AA-towers to save few resources

weapons:
- Tesla
- Sniper
- Freeze
towers:
- Holo
- Slowfield
- Scatter
- Accelerator
- Penetrator
- Anti-Air
overview:


- surprisingly challenging map with a simple rule: quantity over quality. you need to build lots of towers and don’t waste much resources on upgrading them
- from the beginning (before wave #1) upgrade Tesla to lv3
- mostly stay around Holo at spot (A), kill all “top” enemies, then switch to “bottom” ones
- Scatters lv2, Accelerators lv2-3, Penetrator lv2-3, Anti-Air lv4 – is your main goal
- place Anti-Air towers in the spots near waves’ entrances (purple color) and upgrade them before each air wave. if done right they will kill ~70% of all aerial enemies
- “bottom” air enemies appear sooner than “top” air enemies
- Tesla is a must-have and should be upgraded to lv6 ASAP, Freeze is good to be upgraded too (lv 3-4), Sniper is not that important, lv5 is enough
- Blockers and Chargers are your worst nightmare here
weapons:
- Assault / Tesla
- Sniper
- REX
towers:
- Holo
- Slowfield
- Accelerator
- Gatling
- Scatter / Violator / Lightning
- Scatter / Violator / Lightning
overview:


- that map… you know how hard it is
- most of the time concentrate your firepower thought the Holos at spot (A) and switch to spot (B) at need
- from the beginning of the map invest lots of resources into the towers. you need to build a whole row of Gatlings, put all Accelerators in places, few Slowfields here and there, other towers and Holos. in fact spend more resources on towers rather than weapons until you finished wave #7
- wave #7 is, no-doubts, the hardest wave on the map, and maybe in whole game. regular Walkers are not an issue, however lots of Big Walkers with tremendously huge health bars are a pain. before wave #7 your map shall look like this:
- upgrade your Assault/Tesla & Sniper to lv6 after finishing wave #7, REX must be lv5 before you hit wave #20
- before wave #20 sell 4x Holos at the left (you will not use them anymore) to get some extra resources
- Gatlings are not something important damage-wise here. they exist here solely to pour thought Soaker’s armor, and so you do not need to upgrade them at all
- on the map above you can see few Lightnings here and there. replace them to the preferable towers

if you want to thank me……then check my guide about fixing various game issues: launching, crashing, optimization, stuttering, gamepads, etc. the guide is huge, but the topic is broad to begin with
[link]
🇬🇧 [ENG] DLC: Map Pack 1
weapons:
- Tesla
- Sniper
- REX / Freeze
towers:
- Holo
- Slowfield
- Scatter
- Accelerator
- Anti-Air
- Violator(optional)
overview:
Because of a Bug the Images only expand if you click on the top 10% part of the Picture.


- Not a very difficult Map. The Teslagun is your friend here and should priortized over the Sniper. In general you have plenty of time to deal with the Waves because the Maze is pretty long.
- All Air Enemys will come from the down side of the Picture. Anti Air at Purple Points are required and Scatterers are Importent too.
- For the Towers: quantity over quality and Weapons over Towers. Upgrading the Rex or Freezer is not needed and not recommended until lategame.
- build two Holo-blocks and shoot enemies through them.Focus especially on Runners and Blockers. Tesla’s alternative Fire is great to keep Blockers on the ground for your Sniper and the Accelerators to deal with.
- First shoot from the Telelift next to A then jump down and shoot through the Holos. You can stay on A until the last enemies went through the Holos and then jump to B to clear the Survivors in most Waves.
- Upgrade all Towers evenly and Anti Air only before the appropriate enemys come.
- Most Enemys wont come to the last Half of the Maze so focus upgrading only the first Half until Point B.
- Scatters and Anti Air should be Level 4 for the last 5 Waves.
weapons:
- Tesla
- Sniper
- REX / Freeze
towers:
- Holo
- Slowfield
- Scatter
- Accelerator
- Anti-Air
- Violator(optional)
overview:
Because of a Bug the Images only expand if you click on the top 10% part of the Picture.


- After the first Waves the Map gets pretty boring, since you will be standing the whole Time on A and B.
- Anti Air(Purple Squares) is very Important and should be on Level 5 for the last Wave. You can sell in the last waves all Accelerators, if you need Money. You can build one or two Violators for the Gilders but in General they are not needed.
- In the first Round upgrade your Tesla and build the Maze. After that upgrade your Tesla and Sniper according to the Enemys that will come.
- Build first all the Towers and then start upgrading the Beginning of the Maze as your Main Killzone. Build the Slowfields in about the last 10 Waves.
- The last Row of Scatters should be upgraded only before Air Waves and should be on Level 4 for the last Wave
- From Point A the alternative Fire of the Tesla is reaching right behind the two Holos and the Primary Fire reaches the marked blue field. Use the Blue Field to clear out Runners.
- Stay on A till the whole Wave passed the Blue Field then get on B between the Telelift and the Holo and shoot on the remaining enemys.
- Support the Anti Air with the alternative fire of the Tesla in the last Wave since there will be a lot of enemys to deal with.
weapons:
- Tesla
- Sniper
- REX/Assault
towers:
- Holo
- Slowfield
- Scatter/Gatling
- Accelerator
- Violator
overview:
Because of a Bug the Images only expand if you click on the top 10% part of the Picture.


- On this Map you have to do everything yourself. All Waves beside the ones with Soakers are managable. In fact you have to be very careful about them. Gatlings and Scatterers are recommended.
- There are no Air enemys, so dont be suprised, that you cant select the Anti Air.
- Upgraded Violaters in the marked rectangle can assist you with the Big Walkers and Hoverers and shoot into the Spawn.
- Upgrade your Tesla first, then the Sniper. Set Telelifts on the higher Plattforms so you can reach every Spot on the Map.
- Build two Holos and shoot enemies through them into the Spawn. You can clear alot of the Waves here. Focus especially on the Soakers, since you cant create real Killzones
- Build more Gatlings or Scatterers then Accelerators, since the only Enemys that will come near the Spawn are the Soakers and Hoverer.
weapons:
- Tesla
- Sniper
- Freeze/Assault
towers:
- Holo
- Slowfield
- Scatter
- Accelerator
- Anti-Air
overview:
Because of a Bug the Images only expand if you click on the top 10% part of the Picture.


- This Map is pretty similiar to the last Map. You do all the Work and killing Soakers is a pain in the Ass.
- Build Scatterer and Anti Air against Air Enemys. There will be coming a lot but its managable.
- Upgrade the Tesla in the First Waves and then the Sniper to level 6. Upgrading the Tesla above level 4 is not necessary. Upgrading Freeze/Assault isnt not necessary at all.
- You can kill a lot of enemies in the Spawn. After that you can teleport up and clear the remains. No Enemies besides the Soaker should it make near the Core.
- You dont need more then 4 Anti Air Towers and you shouldnt upgrade them above lvl 2. Use the Ressources into the Scatterers instead.
- The Accelerators can stay mostly level 1. Upgrade 2-3 of them to Level 2.
- For the Soaker: Try to deal evenly damage on all of them at the Spawn with the Tesla. After that use your Sniper in the last part of the Maze to Pop them. You might need a few tries to kill all of them.
🇬🇧 [ENG] DLC: Map Pack 2
weapons:
- Tesla
- Sniper
- REX
towers:
- Holo
- Slowfield
- Scatter
- Accelerator
- Anti-Air
- Violator
overview:
Because of a Bug the Images only expand if you click on the top 10% part of the Picture.


- I really liked this map, because it gives you a lot of options to play with. I recommend you to find your own Maze and Tower Composition on this one, since its one of the most forgiving Levels if you dont have the optimal setup.
- In General dont cheap out on Scatters, since there will be a lot of Air Enemies. You can build Anti Air but its not mandatory.
- As for Weapons the Tesla and the Sniper are enough. Upgrade both to 6 but prefer upgrading the towers.
- In the first Wave upgrade the Sniper and Tesla Gun, then build the lower Maze so you can focus first and then the other side.
- In the later waves you should upgrade the lower half first, so the Towers will clear the line mostly itself. For the upperhalf you can just shoot through the Holos.
- Just upgrade all Towers evenily and you should be fine.
weapons:
- Tesla
- Sniper
- REX / Freeze
towers:
- Holo
- Slowfield
- Accelerator
- Gatling/Lightning
overview:
Because of a Bug the Images only expand if you click on the top 10% part of the Picture.


- Oh Boy this Map. This Map has some pretty hard Waves and i cant really give you a Guide to survive with a 100% Core.
- Hardest Waves will include a Spam of Big and normal Walkers. You can use Accelerators and Gatlings altough other Towers maybe a better option on this Map. Lightning maybe an good Option.
- Strangly the last Waves are becoming pretty easy. So after Wave 9 you can relax again a bit and be pretty sure to win this game.
weapons:
- Tesla
- Sniper
- REX/Assault
towers:
- Holo
- Slowfield
- Scatter
- Gatling
- Accelerator
overview:
Because of a Bug the Images only expand if you click on the top 10% part of the Picture.


- This Map was bugged for me. Big Walkers, Hoverers and Soaker are spawning in one Cluster so you get the whole wave at once. Especially the soakers are getting problematic this way, because your Towers dont have enough time to inflate them. You may have to replay especially Wave 17 a few times, before you can survive it.
- Besides the mentioned above you can clear a lot of Enemies with the Holo at the Spawn. Upgrade Tesla first, then the Sniper. The Single Accelerator is great to kill the Big Walker and Soaker.
- Stay at the Holo until the complete Wave spawned, then teleport to B to kill the Remains.
- You can focus the upgrading on the Main Killzone next to the Holo and the single accelerator. The other Towers dont need upgraded until wave 17.
- Before Wave 17 you should put on every free Spot next to the Route a Gatling or Scatterer to inflate the Soaker fast enough. Use Tesla evenly an all Soaker and pop them soon enough with the Sniper, so the Towers dont waste shooting them.
🇷🇺 [РУС] Mine, Bridge, Arc, Glade, Complex
⚠️ руководство написано на основе англоязычной версии игры, и я не имею представления как названия карт/оружий/башен/врагов были переведены на русский язык. чтобы не было путаницы – буду писать на английском. извиняюсь
оружия:
- Assault / Tesla
- Sniper
- Freeze
башни:
- Holo
- Slowfield
- Scatter / Gatling
общий вид:
- карта проходится без особых проблем если построить 1-2 киллбокса. на примере выше я соорудил один киллбокс в верхнем секторе. можно также построить внизу, но я думаю там лучше обойтись максимально прокачанным Holo
- двигайся сообразно потоку врагов по точкам (A->B->C->D) и стреляй сквозь Holo
- поскольку мы ставим Holo в точку (С), то лучше использовать Gatlings а не Scatters (чтобы они стреляли сквозь Holo для большего урона)
- Tanks (волны #4 и #13) и Big Walkers (волны #7, 18 и #20) – самые сложные враги здесь, исключительно из-за того что не хватает ресурсов прокачать все оружия. лучше сконцентрироваться на прокачке Sniper
- я полагаю гранаты Assault будут здесь куда полезнее чем Tesla – но дело вкуса
- учитывая короткость карты и невозможности везде поставить Slowfields – лучше взять с собой Freeze
оружия:
- Assault / Tesla
- Sniper
- REX
башни:
- Holo
- Slowfield
- Scatter
- Violator
общий вид:
- удивительно лёгкая карта, которая проходится весьма тривиально если соорудить волнообразный лабиринт (см. выше)
- большая часть башен это Scatters lv2 и 10-13 Violators lv3. количество выше качества – не трать ресурсы на дальнейшее улучшение башен
- фиолетовым цветом я отметил куда я поставил Violators. или скопируй их размещение, если поставь по собственному желанию. более 13 Violators на этой карте не нужно
- поскольку мы закроем всю карту Slowfield – нам не нужен Freeze
- стреляй сквозь Holos по точкам спауна врагов (А), а когда враги подойдут поближе, переключись на точку (В) и обрушь поток REX/Assault/Tesla, что желаешь. потом просто прыгай с башни на башню и добивай оставшихся врагов
- Holos lv4 работают отлично на этой карте. нет никакой нужды улучшать их дальше
- первые шесть волн отлично проходятся без башен. потрать ресурсы на конструирование лабиринта, улучшение пушек, Holos и Slowfields
- прокачай Sniper и Assault/Tesla до lv6. REX можно оставить на lv5
- самый сложные волны это #15, 23 и 25. во время этих волн будут атаковать и воздушные и наземные враги и из-за этого Scatters будут не особо эффективными. переключаемся с одной группы врагов на другую и убивай всех подряд
оружия:
- Assault / Tesla
- Sniper
- REX
башни:
- Holo
- Slowfield
- Scatter
- Gatling
- Violator
- Accelerator
общий вид:
- карта может казаться сложной, но на самом деле если понять как она работает, то всё будет весьма просто
- идея карты заключается в том чтобы построить два хорошо-прокаченных Holos и переключаться между ними сообразно потоку врагов. на изображениях выше 4 точки для стрельбы (A->B->C->D), где последняя точка опциональная – враги, вероятнее всего умрут до того как придётся с этой точки стрелять
- Gatlings самые тонкие башни в игре, и если их поставить на углы друг-друга, то между ними можно пройти (аналогично если поставить Gatling на угол Holo). на изображениях выше я отметил фиолетовой линией где можно пройти между башнями
- мы не улучшаем Gatlings потому что они нужны только для того чтобы причинить урон Soakers и чтобы создать срезки, о которых говорилось выше
- Scatters и Violators на этой карте по-большей части нужны только против воздушных врагов, улучшай их соответственно перед воздушной атакой
- Accelerators – основная атакующая сила на этой карте. улучшай их каждый раз перед атакой Hoverers
- опять же, Freeze нам не нужен потому что у нас вся карта в Slowfields
- по правде карта настолько лёгкая, что ближе к волне #25 у тебя на руках будет значительно больше ресурсов чем тебе нужно
- Sniper обязательно нужно улучшить до lv4 перед волной #8 (Tanks + Soakers) и до lv6 перед волной #18 (Spores + Gliders). Assault/Tesla могут подождать – главное улучшить Sniper
- убей пару воздушных врагов с точки (E), затем двигайся к точке (A), затем к (D)
- если всё будет сделано как надо – то наземные враги даже не зайдут в правую зону
оружия:
- Tesla
- Sniper
- REX
башни:
- Holo
- Slowfield
- Scatter
- Violator
- Accelerator
общий вид:
- карта весьма сложная, потому что требует постоянно переключения с одной стороны на другую. но если словить ритм то карта проходится без особых хлопот
- в начале волны стреляет в врагов из точки (A) (включая стрельбу по их спаунам из REX), когда они подойдут поближе то переключайся на Tesla/REX и убей как можно больше из них. затем телепортируйся в (B) – враги как раз должны проходить эту точку. убей как можно больше из них. затем посмотри карту и оцени где твоё участие требуется больше и действую по обстоятельствам
- поставь кучу Violators в начало и конец каждой стороны (7-9 на каждую сторону). обрати внимание что на карте есть свободные блоки за пределам общего лабиринта, куда также можно поставить башни (фиолетовый цвет на изображениях)
- построй очень много Scatters и Accelerators. пропорция 5:4 сойдёт
- улучши Accelerators до lv2 как можно скорее, затем Scatters и Violators до lv2 перед волной #18. после этого продолжай улучшай всё до lv3
- улучши Tesla до lv6 перед волной #15 и Sniper до lv6 перед волной #18
- потрать ресурсы с первых четырёх волн на улучшение оружия, создание лабиринта и на создание Scatters/Accelerators на правой стороне. перед волной #5 карта должна выглядеть как-то вот так:
оружия:
- Assault / Tesla
- Sniper
- REX / Freeze
башни:
- Holo
- Scatter
- Accelerator
общий вид:
- очень простая и доступная карта: поставь Holo, улучши его до максимального уровня как можно скорее, улучшай оружия сообразно тому что за враги готовятся напасть, построй кучу Accelerators/Scatters в шахматном порядке
- Freeze значительно упрощает карту (особенно против Big Walkers на волне #15)
- улучши Accelerators до lv2, не улучшай Scatters. потрать все остальные ресурсы на оружия и Holo
- в целом, просто стой в точке (A) и убивай всех врагов подряд. уходи с этой точки только чтобы добить выживших
- Chargers и Blockers – твои злейшие враги на карте
🇷🇺 [РУС] Facility, Yogscave, Christmas, Whirlpool
оружия:
- Assault / Tesla
- Sniper
- REX / Freeze
башни:
- Holo
- Slowfield
- Scatter
- Accelerator
- Violator / Kairos / Anti-Air
- Violator / Kairos / Anti-Air
общий вид:
- одна из самых сложных карт в игре
- общая идея заключается в том, чтобы разделить три потока врагов друг от друга, уничтожить поток врагов который идёт снизу, серьёзно повредить башнями остальные два и добить их
- путь от верхнего входа врагов до базы должен быть как можно длиннее, потому что самые сильные враги идут оттуда
- постреляй спаун врагов из точки (A), затем двигайся в точку (B), затем в (C), заберись наверх башен и добей выживших, затем постреляй следующий поток врагов и двигайся в точку (D), затем повторяй вес процесс
- обязательно улучши Sniper до lv3 перед началом волны #3 – иным образом убить Tanks и Spores невозможно. я думаю лучше не строить к этому моменту никаких башен и потратить ресурсы ну создание лабиринта, улучшений оружия и Holo
- куча Accelerators lv3 и Scatters lv3 уничтожат большую часть врагов. улучшай башни на центральной платформе в первую очередь
- перед последней волной продай левый Holo (он больше не нужен) и убивай воздушных врагов сквозь оставшееся Holo. башни серьёзно ранят Big Walker прежде чем он доберётся до тебя
- Kairos и Anti-Air существенно упростят схватку с воздушными врагами, не улучшай их выше lv3
- довольно тяжело пройти последнюю волну не дав никому добраться до базы. если не получается пройти с 100% рангом, то не прыгай выше головы – для достижения нужно лишь пройти карту, а не сохранить 100% базы
оружия:
- Assault / Tesla
- Sniper
- REX / Freeze
башни:
- Holo
- Slowfield
- Scatter
- Accelerator
- Violator / Kairos / Anti-Air
- Violator / Kairos / Anti-Air
общий вид:
- первые три волны будут на удивлении сложными, прямо исключительно сложными. но если их пережить – то затем карта становится настолько простой что 95% врагов даже и половину её не будут проходить
- твоя основная линия защиты это куча Scatters/Accelerators поставленные в произвольном порядке
- построй Kairos/Anti-Air поближе к точкам спауна врагов. если поставить их правильно то они с самого начала будут стрелять вертикально вверх и убивать/замедлять 80% всех врагов
- с кучей Accelerators lv5-6 финальный босс будет чертовски простым. хорошая идея – немножко перестроить лабиринт к его приходу (чтобы он дольше проходил) и продать противо-воздушные башни
оружия:
- Tesla
- Sniper
- Freeze
башни:
- Holo
- Slowfield
- Scatter
- Accelerator
- Penetrator
- Anti-Air
общий вид:
- довольно сложная карта, царём которой является правило: количество лучше качества. спамь кучу низкоуровневых башен и не трать много ресурсов на их улучшение
- твоё самое первое дело на этой карте это перед началом самой первой волны прокачать Tesla до lv3
- в целом стой рядом с Holo в точке (A), убей всех врагов которые идут с верхнего прохода, потом быстро переключись на врагов ниже
- Scatters lv2, Accelerators lv2-3, Penetrator lv2-3, Anti-Air lv4 – вот твои башни на этом уровне
- размести Anti-Air рядом с входами врагов (фиолетовый цвет на карте) и улучшай их перед каждой воздушной атакой. если всё сделать верно, то они убьют ~70% всех воздушных врагов ещё до того как они доберутся до Scatters
- воздушные враги снизу приходят чуть раньше чем воздушные враги сверху
- Tesla должна быть улучшена до lv6 как можно скорее, Freeze тоже стоит улучшить до lv 3-4, Sniper можно оставить на lv5
- Blockers и Chargers – главные твои враги здесь
оружия:
- Assault / Tesla
- Sniper
- REX
башни:
- Holo
- Slowfield
- Accelerator
- Gatling
- Scatter / Violator / Lightning
- Scatter / Violator / Lightning
общий вид:
- это карта… думаю ты уже знаешь что тебя здесь ждёт
- проводи больше всего времени в точке (A) и двигайся в точку (B) по необходимости
- с самого начала карты трать ресурсы на создание лабиринта и установку башен. Gatlings и Accelerators должны стоять на своих местах перед началом волны #7. в целом до этой волны трать все ресурсы на башни и лабиринт, оружие не столь важно
- волна #7, бесспорно, самая сложная волна на карте и, быть может, самая сложная волна и игре. перед её началом карта должна выглядеть как-то так:
- после окончания волны #7 улучшай Assault/Tesla и Sniper до lv6, REX должен быть улучшен до lv5-6 перед началом волны #20
- перед волной #20 продай 4 Holos слева чтобы освободить ресурсы
- Gatlings нужны исключительно чтобы сбить броню Soaker. они дешевле чем Scatters. не улучшай их
- на изображении выше есть пара Lightnings – на их место можешь поставить башни по своему вкусу