
Overview
This guide will walk you through using a program called Xpadder to gain full control of the game to use a controller effectivly.
Lets start!
Want to use a controller? Sick of the games basic and useless controller options? Yeah, I hear you, i wanted the same and couldn’t find a decent forum post that could give me the answer. So i went looking and here is what I’ve come up with.
This guide does use an exterior program called Xpadder. You do have to pay for it from their website. But im sure you’ll work out a way to aquire it.
Onto the setup!
Setup of Xpadder.
Okay, so i use a Razer Onza, but any xbox controller should work in the exact same way.
First things first, setting up Xpadder. If you just want to get right into it, here is a link to the keybindings that i use, so far it works for me and should set the basics up for you.
Controller – [link]
Profile – [link]
Otherwise, need to set it up yourself, this’ll get you started.
Load up Xpadder.
Plug in your controller and wait a few seconds for it to recognise one is plugged in
About 3/4 up the left side is a controller looking button, click it.
Then click New.
A new window will open wich is the image tab.
Basically here is where you can paste a picture of your controller.
The program its self should have come with a general set of pictures to put here, select one if you want or leave it blank, your choice.
Next tab is Sticks.
Check both enabled check boxes.
Click detect then push the sticks in the directions it says on the screen.
Next is the dpad tab, again click the enabled check box and go through the motions of doing what it asks you to do
Next is the Buttons tab, on this one make sure to press every single button on your controller.
You’ll notice that they’ll stack right next to each other, you can click and drag them around the little screen so you can make them line up with your controller picture for better reference when you go to load in your key bindings.
Lastly is the Triggers. Again hit enable then pull the corrosponding triggers.
Hit Ok and we have set all the bindable keys.
Binding of your Keys.
So now is the probably the hardest part (it really isnt that hard). This is where we bind all our keys.
I’ve added a picture here to make the binding process a little easier.
There are a few blank squares as i couldnt work out if anything else needed to be added.
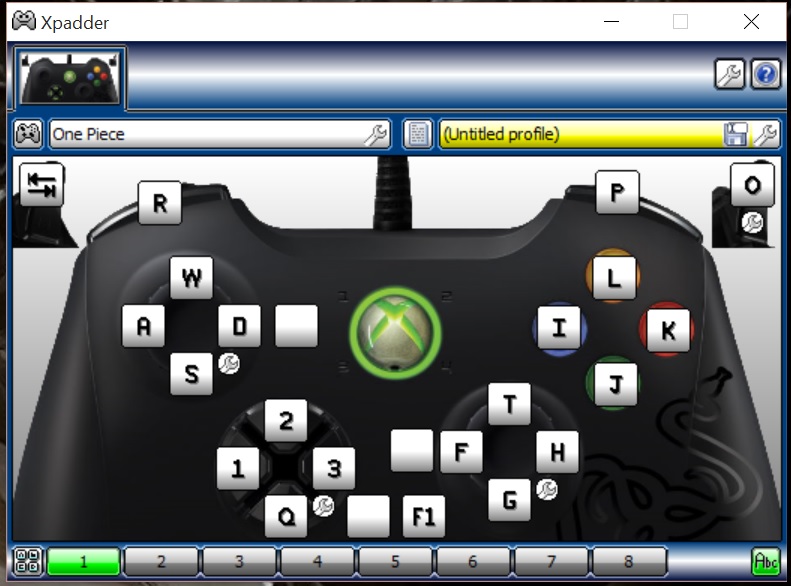
But anyways the buttons read as follows.
Left stick – run around
Right stick – camera view
Dpad – Map left and right, change support character up and down.
Start – Pause
A – Standard Attack
X – Range Attack
Y – Special Attack / Special Kizuna Attack
B – Evade / Dash
Left Shoulder – Perform Gesture
Right Shoulder – Kizuna Rush
Left Trigger – Lock on
Right Trigger – Unique Action
Once you’re done here, make sure to save your profile so that you can bring up all your bindings when you start the program up.
The Final Part
So, we’re all set up and ready to go? Awesome, but before you start up the game ready to let some fist fly, unplug your controller. Why you ask, thats an easy one, for some reason the game doesnt recognise the controller if you plug it in after you’ve hit the main menu. This is a good thing, trust me.
So, load up the game, make sure xpadder is running in the back ground and then plug your controller in. Now you’re ready to go. Job done. All you have to do now is to navigate the menues with the keyboard and when you’re in game you have full controller support.
I’d be under the asumption that there are many other controller re mappers out there but this one is just the one that i had on hand at the time and it worked.
Cheers and have fun in game!
If you have any questions or comments, please dont hold back and ill answer what i can!