
Overview
Here i’ll talk about EVERYTHING this amazing game has and what it offers! Starting from armor and equipment, to events and rare monsters. This is my first guide and i hope you’ll enjoy it!
Intro
Hello! Thanks for stopping by 😀
After several months of hard work, i gladly present you my finished guide!
There’s some things i want to say, before we start. Also if i missed anything please leave a comment in the comment section below!

In this guide you are not going learn how to be the best player in Spiral Knights, meaning that
you’ll have to learn your own strategies, learn what suits you best and what weapons you like
the most (what a bummer, right?). However, this guide will give you the knowledge about everything this amazing game has and offers. I will give you some tips and tricks but everything else is in your own hands. Nothing here is stolen, or copied from other people or their guides. I will be using screenshots from wiki and some self made. I hope you’ll enjoy!
Be sure to click the “Rate up” button, since it takes you less than 
second but it took me months and a bucket full of sweat, to complete this huge project!
Character
When first entering the game, you will have to create your own knight!
To begin, choose your knights armor, design, accessories, eyes, color and name.
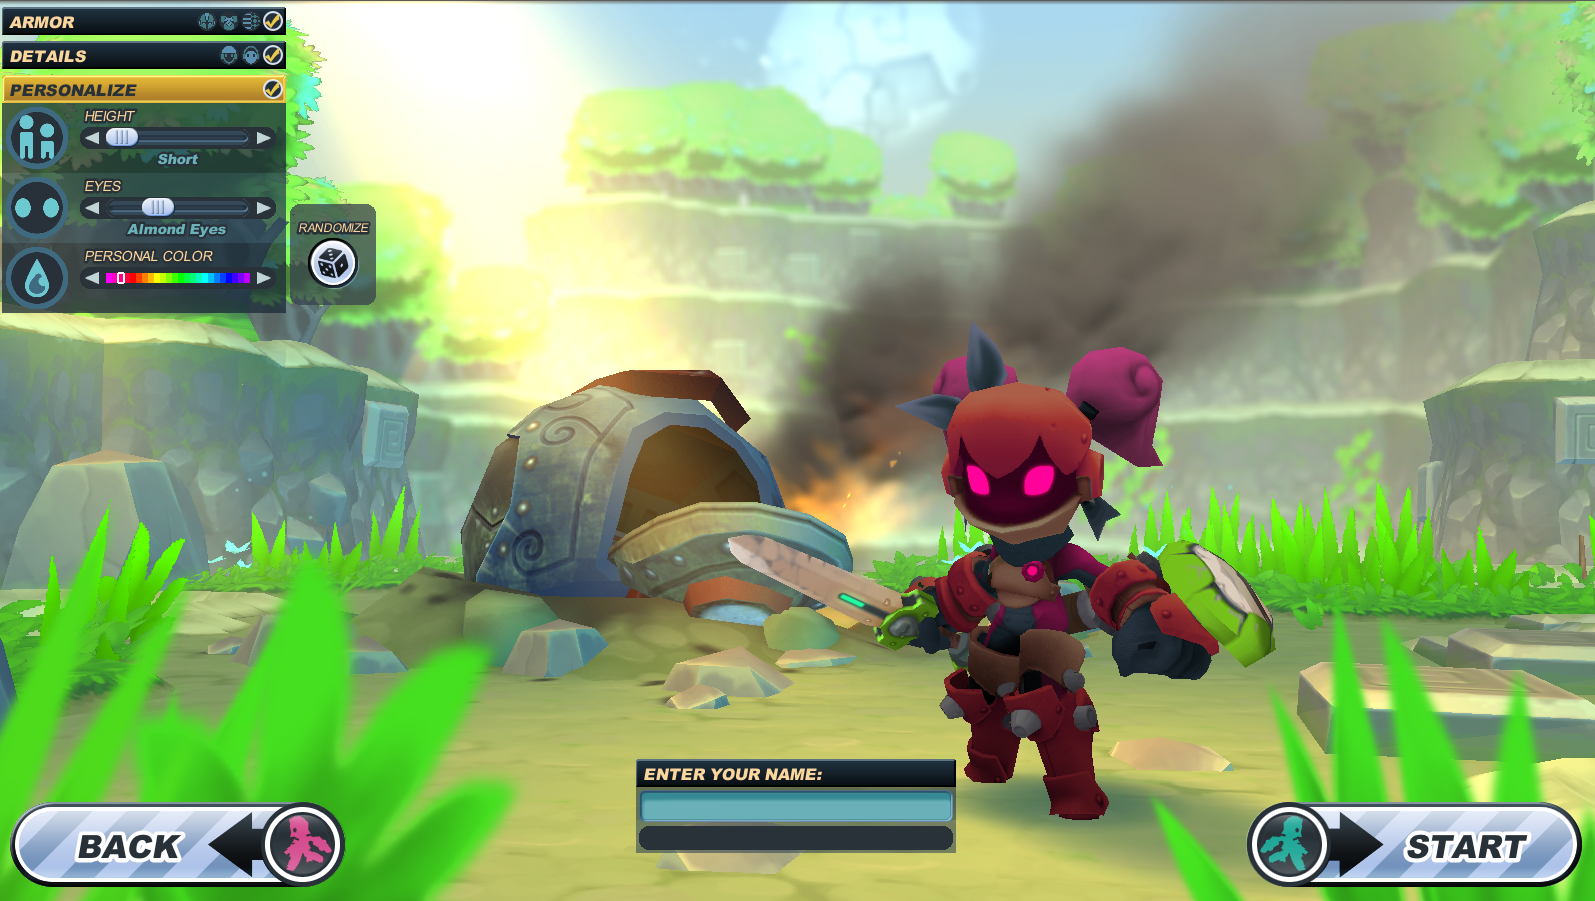
You are not going to be able to sell this “beginner” armor in any way, ever. Changing your
color/nickname later will cost you money- Crowns, so choose wisely.
Then going further in the game, they tell you a lot of stuff, be sure to read all that…
Default controls are set to mouse control, however, i strongly recommend you using “WASD” keyboard buttons since you have more control in your hands. Defaults are: walk left mouse button, attack is right mouse button and shield is X keyboard button.
“Dash” and “Shield bash” can be set up in controls too! Dash button is very useful in tight spaces while dodging enemy attacks. While Dash has it’s own separate cooldown, the Shield bash uses your shields power.

Dash on the left and Shield Bash on the right. Find more about Shield bash in
guides “Equipment” section.
Crowns
Earning your first crowns is easy, go kill some enemies or destroy bushes and plants!
There are 5 different crown types:


They sometimes drop coins and hearts.
There is NO limit how much crowns
you can keep in your inventory, it can be few crowns, few thousands or even millions of crowns.
Also great way to earn crowns is to do arcade, its fun and you will meet “Basil” at depths 4, 13, and 23. It’s an npc that sells uncommon recipes that you can sell and gain profit. Another way is to do boss runs as they give you more crowns than usual missions, i’ll tell you about that later in the guide.
You can see how many crowns you got in your Inventory/Arsenal by using button “i” or clicking on the cute little chest on your screens right bottom.

Energy
You can’t earn energy. The only way to get energy is to trade with other
players (in return getting energy) or by exchanging crowns for energy in “Supply depot”
To get energy for crowns or crowns for energy, click “Supply depot”
on your screens right side in “Activities”

Then clicking on “Trade” in “Energy depot” window.

Click the first (left) button if you want to sell 8,810 Crowns and get 100 Energy
Click the second (right) button if you want to sell 100 Energy and get 8,330 Crowns

You can also post your own offers for how many crowns you want to pay for 100 energy (left), or how many crowns you want for your energy (right). Offers that are not filled immediately appear on the screen under “My Offers”. If an offer is not filled in 10 days, it is canceled. When enough players want more crowns and have enough energy, the cost of energy will drop, and players will get less crowns for their energy. If enough players are running low on energy, the costs of energy will rise.

Energy can be used to buy several things, for example: Crystals (for Forging), Orbs (for Crafting), Weapons, Armor, Shields and more!
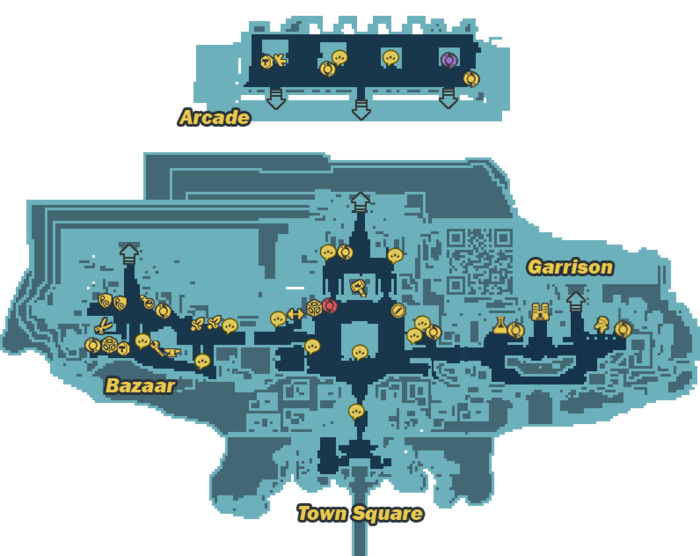
Haven
Eventually while doing missions you’ll reached Haven! (“Town square”)
What now!? Do more missions or explore the Haven!
“Town square” is for selling and buying stuff from other players.
“Bazaar” is for buying cheap weapons and other gear from npc’s, adding accessories to your armor/costume and adding “Unique variants” to your weapons or unbinding them.
“Arcade” is for buying items for tokens earned in “colesium” and browsing through arcade levels.
“Garrison” is for lab visits, entering other guilds or “Hall of heroes”
Symbols


You can choose between different haven instances.


Population Meters
One green dot out of 3 means there aren’t many people there
Two yellow dots out of 3 means the instance is decently populated.
Three red dots out of 3 means that instance is at maximum capacity.
The Auction house is located just north of the Town Square fountain in Haven. It is a place where Knights can buy and sell items for crowns on the exchange market.

Knights can search for offers by pressing the “search” button. The list can be sorted by time remaining, the bid price, the purchase price, number of variants, or star level.
Bidding
To place a bid, select an item to bid on, then enter the number of crowns you are willing to bid. If someone outbids you while you are online, you will receive a notice in your chat log and your crowns will be refunded instantly.
The Auction Time Thresholds are:
Very Short: less than 5 minutes (time is extended with every new bid)
Short: 5 minutes – 1 hour
Medium: 1 – 4 hours
Long: 4 – 24 hours
Very Long: 24+ hours
Some auctions may also have a “Buy Now” button. Purchasing the item in this manner places the item in your mail immediately, but you pay the “buy now” price listed on the auction instead of the bid price.
Selling Items
To put an item up for sale in Auction House, you have to pay a fee.

☆☆☆☆☆: 5 crowns per unit
★☆☆☆☆: 12.5 crowns per unit
★★☆☆☆: 25 crowns per unit
★★★☆☆: 50 crowns per unit
★★★★☆: 100 crowns per unit
★★★★★: 250 crowns per unit
2. 5% of the Initial Bid
3. 0.5% of the Buy Price
4. A multiplier is applied to the listing fee for auctions with a duration of greater than 4 hours:
12 hours: 4-hour Listing Fee x 1.2
1 day: 4-hour Listing Fee x 1.5
2 days: 4-hour Listing Fee x 2
If the item successfully auctions, the seller pays 10% of the final selling price, and the listing fee is refunded wholly. Withdrawing the item from auction or the auction expiring with no bids results in no refund of the listing fee.
Equipment
This might be the longest and the most IMPORTANT part of the guide, and its going to be about “Equipment”. There’s a lot of equipable items. For example: Helmets, Armors, Swords, Handguns, Bombs, Costumes, Shields and Trinkets. There’s 0-5 Star gear available (although trinkets can be only 1-5 stars) Some gear 4 or 5 star versions don’t exist. And of course, the bigger star gear you want the more expensive it is.
☆☆☆☆☆ <– Your start armor.
★☆☆☆☆
★★☆☆☆
★★★☆☆
★★★★☆
★★★★★ <– End game gear.
By forging and heating your gear, your armor- helmets, swords, etc. will make them stronger.
For example, armor will make you take less damage, swords will deal more damage and all weapons will charge faster.
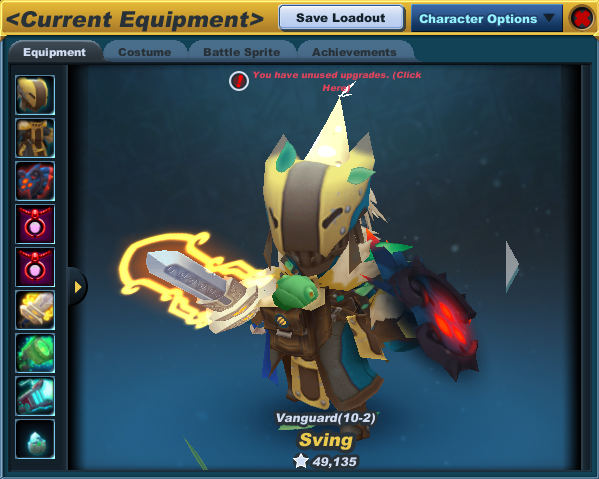
You can access your “Current Equipment” by pressing button “p”
So lets look at all this gear in order.
They work by the same principle really, they both provide you defense. The only big difference is that they have to be equipped in different slots. There’s tons of armor to choose from. They all have different defenses and Enhancements. The higher star armor and helmet you have equipped, the more your maximum health is increased in missions.
<– Helmet slot

<– Armor slot
Helmet And Armor enhancements
By forging you can get enhancements, its basically a permanent buff on your armor, some armor have some – some don’t. You cant add them or remove them, you can just make them stronger by forging. Some armors even have permanent debuffs marked as red arrow down instead of this blue arrow up. Here’s some buffs: movement increase, damage increase etc.

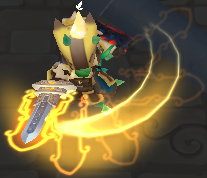
Shield is adventurers best friend. It can help you getting out of tight spots, and hard situations.
So its really important to learn how to use it. If you are good player you can survive without armor, but without shield its all most impossible. Use shield with holding right mouse click.
Holding your shield will make you move slower but in the same time invincible till the shield is broken. If mobs hit your shield it will break. If broken (or damaged) shield will recharge by itself.
(Photos- from full hp shield to broken shield)


Top: Full Health. Bottom: Moderate Damage.
Find this bar under your characters health
Also you can “Shield bash” as mentioned before in the guide. Shield bashing will make your enemies “Stunned” (slows their movement), deal a small amount of damage and push them away from you, due to the raw power of your shield.
-“Shield bash”

<– Shield slot

Trinkets… whats that you might ask, well, its an equippable item which gives you buffs.
There’s a lot of different trinkets. For example trinkets that give you: Health, attack speed increase, charge time reduction, and different status resists.
In the start photo i had equipped two trinkets (yeah you can equip 2)
Each of those red trinkets (“True Love Locket trinkets”) gives player health bonus +6
so in total i had equipped +12 health.
Pretty damn handy when playing “Lockdown” in Coliseum with the right gear.
Trinkets can only be equipped by buying a special “Trinket slot upgrade” from supply depot.
Using the upgrade will allow you to use a trinket for a month. After 30 days the trinket slot will be locked again. Leaving you with a locked slot and your crafted (or bought) trinket!
-“Trinket slot upgrade”

So using 2 trinket slot upgrades will grant you 2 slots for 2 trinkets!
Trinkets can be crafted and bought.
Trinkets can be bought in “Auction house” in town square and crafted in arcade (marked as purple alchemy machine in guides map)
<– Trinket slot (a)

<– Trinket slot (b)
Here i will tell you about 3 weapon types.
Swords, Guns and Bombs.
So in Spiral knights, you can charge your weapons by holding down your attack button and waiting till the charge flashes and makes DZING kinda noise.
Swords are the most popular choice. Swords deal great damage if used properly.
You can use sword-shield technique.
Simply hit someone with your sword, then immediately press your shield button.
By doing this, you can move away faster and attack more frequently.
Charging a sword will make a special attack that deals more damage
than the usual swing (see what i.. nvm).
<– Regular swing with a sword. (Click)

<– Charged sword. (Hold click)

<– When released makes a charge-attack (Release)
Guns are very good at distances and dealing with mobs that have low hp.
You can also use guns to destroy boxes and other covers quickly if needed.
If there’s two mobs together, shooting them in right in the middle (and actually hitting them lol) will make them both take damage!
Charging a gun will make a special attack that deals more damage than the usual shot.

<– Regular shot with a gun. (Click)

<– Charged a gun. (Hold click)

<– When released makes a charge-attack (Release)
Bombs are very good at crowd controlling. It can deal damage to every single mob that is in the bombs radius (outer circle) so in right situations bombs can do massive damage.
With bombs, you have to charge them, to be even able to put them on the ground and detonate them. All you do is charge the bomb with holding down your attack button and releasing it.
You have to charge the bomb every single time when you want to place and detonate a bomb. When placed a bomb, it shows gray circle. When the gray circle moves to the border, it detonates the bomb.

<– Charged bomb (Hold click)

<– Placed bomb (Hold then release)

<– Detonated bomb (Released)
<– Weapon slot (a)

<– Weapon slot (b)
<– Weapon slot (c)
<– Weapon slot (d)
Accessories
An Accessory is an aesthetic item that can be attached by Bechamel (npc at “bazaar”) to a helmet or armor to modify the player’s appearance. They all come in different colors, shapes, sizes and effects, just like humans and potatoes… sorry. Some accessory colors are dependent on your personal color (Prismatic color pattern ones). There’s just so much accessories.
There’s multiple ways to get accessories.
Lockboxes– Accessories can be obtained from lockboxes but it needs to be opened with a key.
Prize Boxes– This type of box is available during events or promotions. Doesn’t need a key to open. Mission rewards– A selection of Crests can be obtained once per knight as mission awards.
Auction House– Players may sell and/or buy accessories in the Auction House.
Supply Depot Sales– Supply Depot will sometimes have accessories during Sales
While searching accessories in auction house, you can preview them on your current set, by pressing “preview” button.
So when you actually get the accessory in your inventory you can visit Bechamel in Bazaar. To add an accessory to your desired armor or hat- talk to the npc, find the accessory in your arsenal, find the desired armor or hat piece and press accessorize!

Upgrading helmets or armor (for example 3* to 4*) with an accessory attached does not destroy the attached accessory, unless the attached accessory’s slot is not available on the to-be-crafted item.
But not all gear can use all accessories. To find out what can you use on your particular set piece hover your mouse over it and look for these symbols…


There’s two ways you can remove accessories from your armor or helmet. You can either remove it and have the accessories back (costs energy- can be bought at supply depot) or remove it by destroying it. Choose what you want to remove and how to remove it (Blue option to restore accessories, Red option to destroy them).

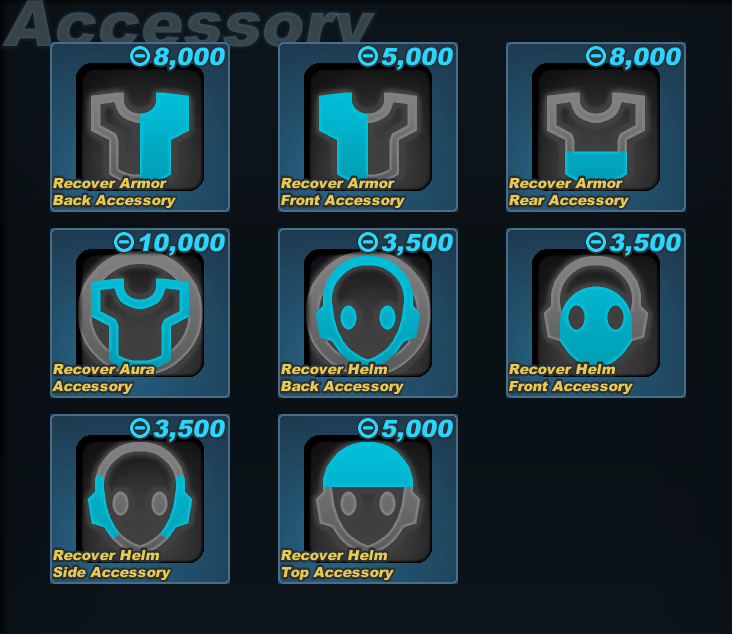
For the full list of all accessories click here[wiki.spiralknights.com]
Damages And Statuses
Some monsters resist some damage types, and deal different damage types to you as well!
There’s some armors that give you a mix of two different defense types (examples below).

(OK-ish for all most everything, but beyond far from the best)
<– Normal + Piercing defense
(Best armor against – Beast and Slime family)

<– Normal + Elemental defense
(Best armor against – Gremlin and Construct family)

<– Normal + Shadow defense
(Best armor against – Undead and Fiend family)

By forging an armor or helmet it makes the bar longer, thus giving you more defense. So the conclusion is that you should choose armor specific for the level and monsters you will encounter there. But of course, you should never rely on armor.
Attack has 4 types – Normal, Piercing, Elemental and Shadow damage. Same as armor, weapon damage types can be mixed together (you cant mix them, or separate them) you can just equip a sword that suits you best for killing different monsters (guides “Monsters/Bosses” section)

As said before some monsters resist some damage types.
Right weapons can make a huge difference.

Status effects are statuses that effect the behavior of both players and enemies.
You cant add or remove statuses on your armor or helmets.
A status bar on armor basically reduces or increases the time of an effect on you.
For example if you are in poison.
Without armor that decreases poison status length – 7 seconds

With armor that decreases poison status length – 6 seconds

With armor that increases poison status length – 8 seconds

This is just an example. These numbers can vary on your equipment.
Here’s the full list of all statuses
-“Curse“, when you have this negative effect, you will get fair amount of damage every time you perform an attack on weapons that have an red eye symbol. Thus can be very annoying. There is a chance that you will have a weapon without the curse status. Monsters also can be inflicted with this status effect, by “vials”.


-“Fire“, when you have this negative effect, you will take periodic damage. Meaning you will loose some of your hp every second. If you charge weapons and the fire hits you you will loose some of the charge meaning you will have to charge again. Monsters also can be inflicted with this status effect, by “vials”. And careful around your allies, as it can hurt them as well if you are near them.


-“Freeze“, when you have this negative effect, you will freeze on one place and going to be able to hit or shoot only in front of you till the status wears off, a very dangerous status. Other players can chop off ice from you with a simple hit. Monsters also can be inflicted with this status effect, by “vials”.


-“Poison“, when you have this negative effect, you are not going to be able to heal with hearts or capsules. You also take more damage from monsters, and do less damage to them while in this status. Monsters also can be inflicted with this status effect, by “vials”.


-“Shock“, when you have this negative effect, at random intervals it will cause you to spasm. Also it deals damage, every time it spasms you. A good technique is holding shield while in shock status, as you wont take any damage from shock spasms what so ever! Although be careful while near allies, standing very close to other players will deal damage to them too. Monsters also can be inflicted with this status effect, by “vials”.


-“Sleep“, when you have this negative effect, you will go to sleep and regenerate low amounts of hp. Look for a party member to wake you up with “gentle” poke of a bullet or blade if you get cought with this effect. Monsters also can be inflicted with this status effect, by “vials”.


-“Stun“, when you have this negative effect, your movement speed will be decreased dramatically. Meaning you will move, attack and interact with objects slower than usual. Very deadly while in combat, although holding shield usualy helps you getting out without a scratch. Monsters also can be inflicted with this status effect, by “vials”.


Crafting And Forging
You can save some money by crafting since other players craft stuff and sell it in shop to gain “Profit” (they want to earn crowns by doing that) You can also save crowns by crafting because maybe you have the required materials already! You can craft any gear piece, at an alchemy machine. By crafting you also have a small chance getting Uv’s (more about it in guides “Unique variants” section).
There’s six different Alchemy machines. Each of them offers you to craft different gear.

Alchemy machines from left to right in photos
“Default Alchemy machine” (basic gear crafting, located allmost everywhere)
“Krogmo alchemy machine” (trinket crafting, located in arcade)
“Mysterious alchemy machine” (for crafting special items from events, located in arcade)
“Sanctuary alchemy machine” (very rare gear crafting, located in “Shadow Lair”
“Armero alchemy machine” (crafting statues for your guild hall, can be bought in guild halls)
“Sprite Food alchemy machine” (for crafting pet food, located in town square or in the lab)
To craft you need three orbs, lots of materials and some crowns.
You can find tons of materials in arcade, or rank missions.
Recipes are essential for crafting gear that you choose. Here you can see the price for different star recipes.
★☆☆☆☆: 250 crowns
★★☆☆☆: 1,000 crowns
★★★☆☆: 4,000 crowns
★★★★☆: 10,000 crowns
★★★★★: 25,000 crowns
You can buy recipes from “Basil” (located in arcade, sells uncommon recipes) and in “Hall of heroes” (cheapest variant and sells basic recipes).
You can craft: Swords, Guns, Bombs, Helmets and Armor, Trinkets and Shields. In the screenshot (right side) you can see that i am just missing a level 10 sword, to craft a tier 3, 5* sword.

Here you can see how many crowns and what orbs you need for crafting different star equipment…
★☆☆☆☆: 200 crowns and 3 Flawed Orbs of Alchemy
★★☆☆☆: 400 crowns and 3 Simple Orbs of Alchemy
★★★☆☆: 1,000 crowns and 3 Advanced Orbs of Alchemy
★★★★☆: 2,500 crowns and 3 Elite Orbs of Alchemy
★★★★★: 5,000 crowns and 3 Eternal Orbs of Alchemy
Theres five different orb types:


You can buy them at shop (not recommended since its expensive) or at supply depot in “Rarity” section in pack of three. Also you can find them in arcade and as rank mission rewards!
Its a required part of crafting. You have to heat your equipment if you want to upgrade your gear, aka make them one star better.
Theres five different crystal types:

at “Vatel” – vendor at bazaar for 70 crowns. Used in 0* gear forging.

at “Vatel” – vendor at bazaar for 125 crowns. Used in 1* gear forging.


You can open this forging menu by pressing button “u” on your keyboard.

Theres 3 different options you can choose for forging a gear piece (3 buttons under “Apply Crystals”)
You can choose the cheapest one (uses the least crystals of all 3) and only have a chance to have a heat bonus. The forging will probably fail since its cheap and has 30% to forge.
Then theres the second option not the cheapest nor the most expensive. (Uses a good amount of crystals) you have a chance to have a heat bonus and also a chance to skip a level, 75% to forge.
Then there the most expensive option. 100% forge success but uses tons of crystals at the highest forging levels, a chance to have a heat bonus, skip a level, or get a forge box.
You can sell the box or open it, it doesnt require a key like most boxes do. Items like Crystals, Uv tickets, Alchemy orbs, Sparks of life (revives player when died in missions) can be unboxed.
Also the higher level item you forge, the more crystals you will need.
So at the end, to craft weapons you need to collect heat from missions (you only get heat at missions when you have the gear piece equiped, if you die you loose a good amount of heat) Then you have to forge the item. Then you can craft the upgraded version! But upgrading a 0*, 1*, or 2* star item does not require any heat on the item. To upgrade a 3-star item to 4*, the 3* item must have heat level 5 or higher. To upgrade a 4* item to 5*, the 4* item must have heat level 10.
A purchased or crafted gear piece allways starts at heat level 1.
The maximum level on any gear piece can be level 10.
Unique Variants
Unique variants aka “Uv’s”, can be bought or achieved when crafting. Uv tickets can also be found in “Forge” boxes. You can get 1, 2 or 3 Uv’s on a gear piece except for Trinkets.
-A helmet with a defense bonus

When crafting, you have a small chance to get a random unique variant.
You can also buy a uv. The more Uv’s you want on a weapon the more you have to pay. You can buy and use uv tickets in bazaar, at Punch.
1 unique variant cost 20,000 crowns


2 simultaneous unique variants cost 75,000 crowns

3 simultaneous unique variants cost 225,000 crowns

On weapons you can get
Attack speed increase (ASI) (can’t be obtained on bombs)
Charge time reduction (CTR)
Damage bonus vs (construct, gremlin, fiend, beast, undead or slime)
On armor and helmet you can get
Bonus protection from normal, piercing, elemental or shadow damage
Bonus resistance against stun, freeze, poison, fire, shock or curse status
Unique Variants already on an item can be locked when using Punch’s services.
When crafting or buying, the uv type is completely random. There’s different kind of degree probabilities.
Low: 56.79% to 74.69% chance
Medium: 13.58% to 29.02% chance
High: 2.47% to 12.35% chance
Very High: 1.24% to 9.88% chance
“High” and “Very High” unique variants are very rare.
Bound Items
Bound items are items that you can’t trade or mail to other players. If you equip any unbound items, they are going to be bound on you. Basically if you equip something it becomes bound to you and untradable.
All tokens, artifacts, minerals and items you buy for tokens are bound to you (for ever).
Shields, helmets, armor, swords, bombs and guns can be unbound by “Vise”
(unbinding smith, find him at bazaar, next to variant smith).
Choose your star ticket (on left side menu) and choose the same star item from your inventory to unbind.

To unbind 1 star gear, you need 100 energy
To unbind 2 star gear, you need 200 energy
To unbind 3 star gear, you need 600 energy
To unbind 4 star gear, you need 1,800 energy
To unbind 5 star gear, you need 4,000 energy
When unbinding items, heat level of that specific item is removed completely (if any).
Battle Sprites
Battle sprites are pets. There are currently 3 Battle Sprites that exist in the game – Drakon, Seraphynx and Maskeraith. You can change their appearance by choosing new ultimates, it also changes your pets abilities. To reset pets skills a “Reset Star” can be purchased
from the Supply Depot (for 2,000 energy).

Pets can have different reskins, you can buy them or craft them, its a different pet, that needs leveling up again from level 0. You can re-name your pet by opening your arsenal, opening your “Battle sprite” tab, then clicking on a pet and then selecting “rename” option. Find your pet in your current equipment, press “P” then “Battle sprite” at the top! Choose your pet wisely, since you can only buy a new one, you cant change it for free.
Battle sprites max level is level 100.
Feeding your pet is simple, go to your pet in your equipment, and click the arrow, “>”.
Then find your pet food in your arsenal and click on it. You can feed pets with any materials, but when he needs to level up, you need a special pet food.
You can add perks to your pet. Perks give you bonuses, like perk “Healthy boost” gives you +6 hp. Higher your pets level the better perks you get.
You can equip different harnesses on your pet. The harness controls whether the sprite inflicts normal, piercing, elemental, or shadow damage. Keep in mind that “Advanced” harnesses reduces skill cooldown by 5% and “Elite” harnesses reduce it by 10%.
The player must own the previous version of a harness before they can purchase the next version. If you want the best harness then you have to have default Harness, then buy an Advanced Harness, and then buy an Elite Harness. Harnesses are bound upon purchase. Equip it at your pets tab, clicking on your default harness. You can buy them in “Laboratory” from “Riley”
-“Iron” harness- Free

-“Advanced iron” harness- 32,000 Crowns at Lab

-“Elite iron” harness- 128,000 Crowns at Lab


You can buy normal, shadow, elemental and piercing harnesses. Certain sprite families cannot equip certain harnesses.
Fact: Perfect for players who choose to play on offense.
Perfect for: Close-up combat
Inflicts: Fire

Fire is a strong effect. It’s great for those who like to inflict strong effects. It’s also great to help protect yourself and do fire damage.
The first skill, Firebolt, is very weak and does not deal a lot of damage.
Food
-“Power Mote“, fed to Drakon that’s level 1-14

-“Power Dust“, fed to Drakon that’s level 15-29

-“Power Stone“, fed to Drakon that’s level 30-49

-“Power Orb“, fed to Drakon that’s level 50-74

-“Power Star“, fed to Drakon that’s level 75-100

Drakons ultimates


Reskins

-Gun Pup, Spiraltail, Divine Drakon and Shadow Drakon.
Fact: Ray of light can do extra damage to the undead and fiend families.
Perfect for: Aiding, supporting your party and for those who die often.
Inflicts: Normal

This is great for those who support their group. It deals extra damage to the Undead and Fiends. If you always need some health, you could use the Heart Attack ability, which your group will love you for. You have a good chance of getting some hearts. Pick Seraphynx if you are in a group where the people die a lot.
Seraphynx is a great sprite. However. it only does extra damage to two families. It’s not very popular when the bonuses do extra damage to some monster families. Heart attack is sometimes useful, but sometimes it doesn’t turn out to be useful.
Food
-“Divine Mote“, fed to Seraphynx that’s level 1-14

-“Divine Dust“, fed to Seraphynx that’s level 15-29

-“Divine Stone“, fed to Seraphynx that’s level 30-49

-“Divine Orb“, fed to Seraphynx that’s level 50-74

-“Divine Star“, fed to Seraphynx that’s level 75-100

Seraphynx’s ultimates


Reskins

-Black Kat, Tabby and Siamese.
Fact: Maskeraith’s shadow cloak is great for sneak attacks.
Perfect for: Sneak attacking and poisoning.
Inflicts: Normal, Poison

In some situations, you would need to poison your enemies so that they can’t be healed by a healing source (Menders, Silkwings, etc.).
Unlike Drakon, Maskeraith does poison, but doesn’t do direct damage. Shadow cloak basically makes you invisible to enemy monsters, thus they don’t aggro on you. Also, in Shadow Cloak, performing any action such as dashing, attacking and charging will make the cloak disappear, as well as getting hit.
Food
-“Shadow Mote“, fed to Maskeraith that’s level 1-14

-“Shadow Dust“, fed to Maskeraith that’s level 15-29

-“Shadow Stone“, fed to Maskeraith that’s level 30-49

-“Shadow Orb“, fed to Maskeraith that’s level 50-74

-“Shadow Star“, fed to Maskeraith that’s level 75-100

Maskeraith ultimates


Reskins

-Punkin, Spiralhorn, Snarblepup, Freeze Maskeraith and Volcanic Maskeraith.
Monsters
Monsters are terrible creatures that want to kill you with any price, however, some monsters are friendly and not so agressive. You can meet them in various missions and depths.

-Monster attacks can be predicted and dodged very easily, just watch the red stripes in front of them, as soon you see them, run or dash away!
Monster theme and color can change, for example in some depths they can inflict poison, and in other levels – fire.
There are currently 6 different monster families.
Beast family

Most common beasts are Bunnies, Wolvers and Chromalisks.

Construct family

All constructs resist piercing damage and are weak to elemental damage.
Most common constructs are Mecha knights, Gun puppies, Retrodes and Lumbers.

Fiend Family

All fiends resist shadow damage and are weak to piercing damage.
Most common fiends are Gorgos, Greavers, Trojans and Silkwings (healers).

Gremlin Family

All gremlins resist elemental damage and are weak to shadow damage.
Most common gremlins are Thwackers, Menders (healers), Scorchers and Knockers.

Slime Family

All slimes resist piercing damage and are weak to shadow damage.
Most common slimes are Cubes, Lichens, Polyps and Drops.

Undead Family

All Undead resist shadow damage and are weak to elemental damage.
Most common undeads are Howlitzers, Kats, Zombies and Scarabs.

Unknown Family
Also there’s some monsters without a family, meaning that some monsters are not
weak or resistant to any damages. For example Wisps and Shankles.

To kill a Wisp (left) – wait till it stops, and retreats its spikes, then attack it.
To kill a Shankle (right) – wait till it stops, and shows its little face, then attack it.
These are uncommon monsters that roam or once roamed spiral knights. Sadly enough some of them were removed. Arcade is the best way to find them.
Love Puppy

Can rarely be found in arcade and in some
other missions. Shoots hearts, that heals you.
By killing it you have a small chance to
get a health trinket.
Drops

Tetra-Heart Pendant +5 HP, Penta-Heart Pendant +6 HP
Impostocube
Can rarely be found in slime levels.
Acts like a regular slime thus will attack you.
Small chance to drop accessories.

Drops
-Toupee, his own hair, can drop in different styles

-Dapper Combo, moustache with a pipe, can drop in different styles

-Pipe, his own smokin pipe.

Mewkat
A cute and rare little kat, found in
shadow levels. Doesn’t attack you.
Small chance to drop accessories.

Drops
-Ghostly aura, an aura with ghosts.

Rock Jelly Cube
Found in fortress areas.
Disguises its self as a rock.
Can attack nearby players.

Soul Jelly
Can be found in lichen levels.
Its an incredibly rare member of the slime family.
The core resembles a Phantom’s head.

Sloombargo
Can be found in “Starlight Cradle” levels.
A mist surrounds this slime that put knights
into deep sleep for a short period.

Gold Puppy
Randomly appeared in various arcade
levels. Cannot be killed or damaged.
This monster no longer exists.

Gold Trojan
Randomly appeared in various arcade
levels. Cannot be killed or damaged.
This monster no longer exists.

Main Bosses
A Boss is an unusual monster that appears in a special location in the Clockworks. There are four main bosses, which appear at the end of each tier. More powerful versions of the four main bosses appear in the “Shadow lairs”. There are also various mini-bosses scattered throughout the clockworks. These Story-Line bosses are much stronger than regular enemies, so they might need a strategy.
Doing boss runs will yield you more crowns than usual missions do. The four main bosses drop tokens, which can be exchanged for rewards at Brinks (npc, at bazaar). “Shadow lair” versions of these bosses drop more tokens than regular ones.
Mini-bosses do not drop tokens, but in some cases they can drop other loot. In total there’s 18 bosses (mini bosses + main bosses). Here i’ll tell you briefly about all about main bosses (regular and shadow lair versions).
Snarbolax

Its a quite tough boss to solo when in low tier. The strategy, is simple. Hold your shield and wait till the boss moves close to the bell in the middle, then hit the bell. Hitting the bell while snarbolax is in radius, will make him disable his shield. While his shield is down you can start killing him. Note that while he is in black form (shield on) he cannot be damaged. This boss deals normal and piercing damage to you, and is weak to piercing as well like beast family.
Remember
This boss can be killed in T1 mission “Shadow of the Beast” at rank 3-2.
You can only deal damage to this boss, when he is effected by the bell.
Watch out from spikes he throws, while waiting for him moving to the bell.

Royal Jelly

Remember
This boss can be killed in T2 mission “The Sovereign Slime” at rank 5-2.
When his crown broke, wait until his shield goes down, only then attack.
This boss heals over time by those mini slimes so don’t wait and use poison vials.

Roarmulus Twins

and time, can lead them to the other twin. If the rocket fails and hits barricade, try again, if it doesn’t fail and hits twin, you can start killing the twin. This boss deals Elemental damage to you, and is weak to elemental.
Remember
This boss can be killed in T2 mission “Built to Destroy” at rank 6-2.
While fighting this boss, there’s infinite monster spawner, Boss and monsters can cause shock.
Watch out from lasers and rockets, they all hurt you.

Vanaduke

Remember
This boss can be killed in T3 mission “The King of Ashes” at rank 9-2.
As mentioned before vana will spawn guards and zombies, killing them is optional.
Watch out from vanas mace, it does hurt a lot. Only some shields in game can resist it.

Rabid Snarbolax

Snarbolax (find above). Except its much harder- they hit harder, and now there’s two of them at the same time. Focus on one of em, bring to the bell, hit it. Then kill the snarbies.
Also by killing both of them, you will get 6-8 “Frumious Fang” tokens.
Ice Queen

Royal Jelly (find above). Its much harder than the regular boss. Again just hit her till her crowns cracks then breakes. Wait her to stop spinning and start hitting her again. Those mini slime will still heal her, like the regular jelly king.
By killing it you will get 6-8 “Jelly Gem” tokens.
Red Roarmulus Twins

Roarmulus Twins (find above). Again its just a harder, and much more powerful version of the twins. Switch those switches in the right time, let the rockets fly to the opposite twin and hit him. Then hit the injured twin. Continue that, watch out from lasers and robots.
By killing them you will get 6-8 “Bark Module” tokens.
Darkfire Vanaduke

Vanaduke (find above). If you thought the regular version is hard… then… well… think again. Still some people can solo this fairly easily. Just hit him, then water his mask, hit it. Beat vana again, water mask for the last time, and kill vana. Still, vana is going to spawn some zombies and guardians.
By killing it you will get 6-8 “Almirian Seal” tokens.
Mini Bosses
These are bosses, that most of the time, don’t require a special strategy to defeat. If a player plays good enough and avoids its attacks, he/she can successfully defeat a boss without a special strategy. Some of them don’t even drop any loot. And here’s the list of them.
Ironwood Sentinel

No real strategy is required since you will have some helpers.
Just hit and kill him.
Found in- Crash Site: Waking in a New World.
He deals normal damage to you, and has no weaknesses.
Razwog

Just hit and kill him.
Found in- Crossing the Chasm: The Journey to Haven.
He deals normal damage to you, and has no weaknesses.
Collector

into the Clockworks (says the wiki). Again can be tanked and killed very easily.
Found in- The Collector: Camp Crimson, Breaking in the Recruits: The Overworks
He deals normal and elemental damage to you, and is weak to elemental.
Sputterspark

Found in- Shocking Sentient Sentries, The Great Escape: The Yard.
Arkus

Found in- The Silent Legion: Cryptic Statuary.
He deals normal and shadow damage to you, and is weak to nothing.
Warmaster Seerus

Found in- Grand Arsenal: Engines of War (expansion).
He deals elemental and shadow damage to you, and is weak to shadow.
Drops

-Fractured Seerus Mask Fragment in Tier 1 (T1 material, used to craft T1 “Seerus” Mask)

-Flawed Seerus Mask Fragment in Tier 2 (T2 material, used to craft T2 “Seerus” Mask)

-Perfect Seerus Mask Fragment Tier 3 (T3 material, used to craft T3 “Seerus” Mask)
The Big Iron

Found in- Ghosts in the Machine: Iron Hulk (prestige).
He deals elemental damage to you, and is weak to nothing.
Maulos

Found in- Heart of Ice: Amu-Sol (prestige).
He deals normal and shadow damage to you, and is weak to piercing.
Dread Velvet

Found in- A Gremlin in Knead: Moonstone Mixup (event mission).
He deals normal and elemental damage to you, and is weak to nothing.
Tortodrone

Found in- March of the Tortodrones: Call of the Colossi (event).
He deals normal, elemental and piercing damage to you, and is weak to nothing.
Drops
-Ancient Shell 1-4 (material) used to craft “March of the Tortodrones” event items.

Margrel

He deals normal and shadow damage to you, and is weak to elemental.
Drops
-Ancient Page Tokens 6 (token, used to buy event items from “Montague” in Moorcroft Manor)

-Black Kat Cowl (Hat, Only for the person who has summoned “Margrel”.)

-Wicked Whisker (Material, used to craft “Kat” helmet and armor)

Herex

Minerals
A Mineral is a crystalline substance that can be found throughout the Clockworks. They play a vital role in the leveling of Battle Sprites. There are 5 mineral types: Crimsonite, Luminite, Dark Matter, Moonstone and Valestone. Minerals cannot be traded, though sprite food made from them can. There are only 3 Battle Sprites at this moment- Drakon, Seraphynx and Maskeraith, each pet has it’s own required food crafted from a corresponding mineral.
Crimsonite

Dark Matter

Dark Matter is a key ingredient in food for maskeraith sprites.
Luminite

Luminite is a key ingredient in food for seraphynx sprites.
Moonstone

Moonstone is not used to make any sprite food.
Valestone

Valestone is not used to make any sprite food.
Moonstones and Valestones are almost useless because no pet food can be crafted from these minerals. These 2 crystals can only be used in a rotating prestige mission called “Geological Survey” in exchange for prestige points. It requests an amount of two different mineral types to complete.
After three hits a “crystal spire” is reduced to a size that can be picked up and carried on the player’s back. There are four sizes, worth 1, 2, 4, or 6 minerals respectively. The size that drops from a mined mineral is random.


Because all party members get the same minerals at the elevator, there is no reason to fight over who picks up which mineral. Playing in large parties earns you minerals much more quickly than does playing solo.
Minerals can be found much more commonly within certain strata, which originally corresponded to how gates were constructed. Here you can see a table showing you in what locations are certain crystal found most commonly.


minerals


Pickups
Pickups are items that can be found in clockworks by killing monsters or opening Treasure Boxes. You can’t bring pickups back to haven.
Your pets skills have a cooldown but pickups don’t. Activate pickups by clicking on them in your Belt or by pressing 4-7 number buttons, pickups stack up to 3.

★☆☆☆☆
★★★☆☆
★★★★★


The more star vials the bigger is the damage and the time lasting on these effects, vials will also destroy projectiles in their path when thrown.
☆☆☆☆☆
★★☆☆☆
★★★★☆


Barriers only last for 8 seconds.
☆☆☆☆☆
★★★☆☆
★★★★☆


★★★★★
Consumables
These are the things (the things we lo..) no. No.
These are the things, that you can and should, pick up during missions.
There’s three things that effect your health. Hearts can be found by killing monsters.
In some missions you can find health stations, if stepped on them, they will restore your health.

Small Heart– refills up to 1 bar of health

Medium Heart– refills up to 2 bars of health

Large Heart– refills up to 3 bars of health
Hearts will disappear after 120 seconds if not picked up.
Then there’s pills! (a pickup) They instantly refill some of your hp.
Health Capsule– restores 3 health bars.
Super Health Capsule– restores 6 health bars.
Ultra Health Capsule– restores 12 health bars.
Vitapod– increases your maximum health. After you leave a mission the Vitapod with the extra hp disappears. The number on the pod shows, how much it will increase your max hp. Currently, the biggest pod gives you +21 health.


If we talk about negative statuses, you can use remedy capsules! When consumed, remedy capsules remove afflictions you may have such as fire, curse, stun, etc.
Remedy Capsule– removes all current effects that are on a player.
In game currency. These cute little crowns drop from almost every monster or plant you smash.
Heat is used for leveling equipment. After a mission, the heat will be split to each of your gear pieces that still need heat. Here’s the three embers that can be picked up from monsters.

From left to right.
Small Ember– Grants a small amount of heat.
Medium Ember– Grants a moderate amount of heat.
Large Ember– Grants a large amount of heat.
Ability Boosters are uncommon drops which temporarily increase the player’s abilities. Ability Boosters last 30 seconds and same-type abilities cannot be stacked in intensity – picking up an Ability Booster while already boosted will reset the boost timer to 30 seconds. You can pick up different kinds of boosters at the same time though. Some battle sprite abilities will grant similar boosts (different duration), even using the same icons in the HUD. There’s only three ability boosters.
Attack Booster– Increases the Damage you inflict for 30 seconds.
Defense Booster– Increases your Defense for 30 seconds.
Speed Booster– Increases your Movement Speed for 30 seconds.


Usables
A variety of usables are available in Spiral Knights, usually purchasable at the cost of energy. Some of the usables (except for upgrades of course) can look the same but have different colors. Only one example is shown in each category.
Trinket Slot Upgrade

Weapon Slot Upgrade

Krogmo Coin Booster

Heat Amplifier

Heat Amplifiers for 2 days, 7 days, and 30 days cost 800, 1600, and 5000 Energy, respectively, from the Supply Depot.
Lockboxes

Prize Boxes

Gift Boxes

Sprite Pods

Eyes

Height Modifiers

Personal Color

Confetti’s

Buckets

Fireworks

Name Change Pass

To use a name change pass, look for the item in the ‘Usable’ section in the inventory and select the option in the dropdown menu to activate. Enter the new name for the
knight in the popup window.
Guild Name Change Pass

To use a name change pass, look for the item in the ‘Usable’ section in the inventory and select the option in the dropdown menu to activate. Enter the new name for the guild in the popup window that appears. Any knight ranked guild master may change the name of a guild.
Both knight and guild name change can be done only once in a 30 day period.
Trading
Trade allows knights to exchange unbound equipment, materials, recipes, trinkets, upgrades, crowns and energy with other knights.
Equipment that has been bound (once been equipped) cannot be traded unless unbound.
Right click on the knight you wish to trade with and select trade from the menu.
When you are exploring a gate and cannot click on other knights, you can click on the knight in the party list in the upper left part of your screen and select trade from the menu.
If someone has ignored you, they will not see your trade requests.

The other knight will receive a popup notice on the right side (open activity arrow on the right side if its not open already), and can choose to accept the trade, reject it, or hide it. If the knight clicks to hide the trade, it can be reopened.


Big thanks to Wrphl, for helping me take these screenshots.
If you want to successfully sell your items, you can also write in trade or zone channels.
/trade text here
/zone text here
The trade channel lets you send text, to all people in all zones.
The zone channel lets you send text, only to people in your zone.
If its your first time using trade channel, it wont let you send any text. So you have to type /join 2 in the chat. I have no idea why, but well… you have. If you’ve reached haven, you will probably notice that there’s tons, tons of people spamming their trades. It can indeed be annoying. Oh and if we are at it, you can clear your chat by /clear.
You will often see people using these acronyms (short-ish words)
- CR- Crowns
- CE- Energy
- E-Energy
- WTB- Want To Buy
- WTS- Want To Sell
- PM- Private Message.
If a player is not online, you can also write a mail and attach a tradable item to it. Open your mail, click on compose, write other persons name and a message. When attaching an item, the price is increased to 100 crowns per mail.
As mentioned before items which are bound to a knight cannot be traded or emailed. The description of a bound item will include the sentence “This item is bound to you.” Items that have been equipped will bind to the knight who wear them, and equipment bought from Brinks for tokens is also bound to its owner. Materials bought from Brinks do not bind.
Other items that cannot be traded or mailed include tokens and minerals.
Guild
A guild is an association of knights with common goals or interests. A guild can join to Lockdown or Blast Network matches and compete versus other guilds. Creating a guild costs you 500 energy and 50,000 crowns. If a guild is made, you can start recruiting new players.
To invite a player to your guild, click on his name and click “Invite to guild”.

If you are a “Guild Master” you can promote other players to different ranks. There’s five ranks.
Recruits can use guild treasury and guild chat.
Members can use everything that Recruits can, access Member storage.
Veterans can use everything that Members can, access Veteran storage, visit design mode.
Officers can use everything that Veterans can, access Officer storage, invite people, promote/demote.
Guild Masters can use everything that Officers can, can remove newer guild masters.
Note:
Any rank can visit guild hall at any time.
Only Officers and Guild Masters can remove players from a guild.
Only Officers and Guild Masters can edit design for guild and actually save it.
To demote or promote players, go to your social menu, left click the person in “guild” section and make a the right choise.
When using “guild chat” only the players in that guild will be able to see the message! There’s two guild chats- all player chat and officer chat. Only officers can use officer chat.
/guild example
/g example

/officer example
/o example

Each guild has its own guild hall- a private room where guild members can meet.
To visit your guild hall, open your activity tab on the right side and click on “Go to guild hall”, you will be teleported to your guild hall. You can decorate your guild with decorations, to make it more appealing.
A command console is everything you need to make a nice guild hall. You cant move it elsewhere. In this console you can add your own daily message, change decorations, themes, open your guild treasury and more!


Birdsong Emporium
The Birdsong Emporium allows high-ranking guild members to purchase items for the guild using funds from the Guild Treasury. These items include various Guild Hall furniture items and upgrades. Purchased items go directly into the Guild Treasury, and thus cannot ever be removed from the guild. Also purchase rooms to fill out new expansions, or replace existing rooms with new and different ones. As a Guild Hall’s size increases by adding expansions, the selection of items available in the Birdsong Emporium’s catalog also increases.

Guild Record
The Guild Record logs important recent activity within the guild, such as donations to the Guild Treasury, deposits to and withdrawals from the various Guild Storage’s, and promotions, additions or departures of guild members. They allow higher-ranked guild members to track who is donating or taking a lot from the guild, and act accordingly.

Guild Storage
The Guild Storage acts like a shared Arsenal among all guild members where items can be deposited and withdrawn freely. There are separate storage’s for members+, veterans+, and officers+. Guild members of the appropriate rank can add or remove equipment or items to the Storage as they see fit. Items placed in Guild Storage can be removed and claimed by any guild member with access to Guild Storage.

Guild Treasury
The Guild Treasury contains all the items and crowns collectively owned by the guild. The costs of new rooms, items from the Birdsong Emporium and upkeep are also paid from the Treasury, so guild members will have to be certain to keep the Guild Treasury full of crowns. If you put something in the guild treasury you cant get it back. Ever. No one. The larger your guild hall, the more upkeep will be required. Upkeep is paid in crowns on a weekly basis. Any furnishings placed in the removed expansion will be returned to the Guild Treasury.

Design Mode
Design Mode allows a guild member of Veteran rank or higher to rearrange the furniture and other infrastructure within a Guild Hall. Once in Design Mode, furniture items can be picked up and put back down again much like a Gold Key or Heavy Statue, and by default they can be rotated while held by using the Mouse Wheel. When you are happy with your rearranging, a guild member of Officer rank or higher can Publish the changes from the Command Console and make them visible to the rest of the guild.

Environments
Environments are unlocked via expansions and add aesthetic effects to a guild hall. Environments change the weather and other ambient effects of the Guild Hall. If the required expansion is removed, any non-default environment will be restored to the default.

Expansions
Guild Halls can be expanded by purchasing expansions. Expansions have variable sizes and properties. The more expansions you have, the more rooms, upgrades, and features you will have available as a guild, such as increasing guild member limits. When an expansion is installed, an installation fee is paid and Upkeep is affected. When removing expansions the installation fee must be paid again to install the room or expansion once more.

Rooms
By default, all rooms are “empty rooms” that can be filled with any furnishings that have stored in the Guild Treasury, or have specific featured rooms installed within. featured rooms include easy access to select merchants, services, and even peaceful hang out spots such as a snipe garden. You’re still free to decorate a featured room, but they tend to include special props and decorations on their own and have limited spaces for furniture to be placed.

Themes
Themes are unlocked via expansions and add aesthetic effects to a guild hall. Themes change the lighting, walls, floor, fog and background of the Guild Hall. If the required expansion is removed, any non-default theme will be restored to the default.

You can also buy guild Upgrades, they are “Guild Storage” or “Membership Limit” (100 to 300 people) upgrades. Most of these are unlocked by installing Expansions.
Upkeep is a weekly crown payment that a guild pays from its Treasury. Upkeep is derived from guild hall expansions. Once an expansion is purchased (starting with 1st Floor East or 1st Floor West), upkeep begins.
If a guild is unable to pay their upkeep, they will instantly go into default- doors will appear on the entrances to other rooms. Once this fee is paid by depositing enough crowns into the Treasury, the doors that appeared at the time of default will be removed and the guild will have begun their upkeep cycle again.
Rank And Prestige
Rank and Prestige are things you will eventually get by playing missions! When you first create your character you are a recruit and you have no prestige.
Your personal rank shows how much of the main quest (rank missions in mission tab) you have done.
Different ranks allow you to wear different star gear and the higher your rank is the higher tier missions you can access.
The lowest rank is “Recruit” and the highest rank is “Vanguard”. There’s 10 ranks in total. The blue bar shows your progress to rank up!
Recruit– 0* Equipment, tier 1

Squire– 2* Equipment, tier 2
Soldier– 2* Equipment, tier 2
Knight– 3* Equipment, tier 2
Knight Elite– 4* Equipment, tier 3
Defender– 4* Equipment, tier 3
Defender Elite– 5* Equipment, tier 3
Champion– 5* Equipment, tier 3
Vanguard– 5* Equipment, tier 3
In some cases, player rank determines event and promotion rewards. Some rank missions have special rewards.
Prestige is a feature of the Mission System that serves as a running “score” for the knights.
By doing mission you gain prestige points. When enough points are collected you will get a badge.
These badges are displayed next to your knights name. It might take you weeks or even months to get your desired badge.
Needs 5,000 prestige points


Needs 10,000 prestige points
Needs 15,000 prestige points

Needs 25,000 prestige points


Needs 45,000 prestige points

You can deposit “Supply Pack” in a mission called “Supply Delivery” for some easy prestige points! You can buy these supply packs at Auction House or at Vatel in Bazaar.
-“Compact Supply Pack” costs 1,000 crowns.

-“Standart Supply Pack” costs 2,500 crowns.

-“Deluxe Supply Pack” costs 6,250 crowns.

Treasure And Health Boxes
These boxes are scattered all around the clockworks. You can find them in almost every mission!
Open these boxes by hitting them with a sword, gun, a charged bomb or Vials! These boxes can also be found behind “Energy gates” or in “Treasure Vaults” (in arcade).


Green Treasure Boxes may contain crowns, heat, random pickups or a vitapod. These boxes can also drop materials, treasure box tokens, rarity or even a piece of equipment (very, very rarely).
Red Treasure Boxes may drop heat, crowns, treasure box tokens or rarity items.
Heart Treasure Boxes will allways contain hearts or vitapods.
Grinchlin Treasure Boxes contain only unique materials used to craft winterfest-themed gear. These boxes only can be found in “Grinchlin Assault!” Danger Mission.
Primal Spark is a wisp of the essential spirit of nature.

Grim Spark is a wisp of the essential spirit of darkness and decay.

Forge Spark is a wisp of the essential spirit of technology and progress.

Tokens can be exchanged for trinkets or other items at token trader in Bazaar.
Packs And Prize Boxes
Starter Packs and Prize Boxes can be bought with real money. They can be bought at Supply Depot in Purchase tab.
Most of the items you get from these packs are bound to you upon purchase.
These packs include energy, costumes, starting gear and some other funky stuff.

These packages can only be purchased one time per account.
Deluxe Starter Pack Includes:
7500 energy, Weapon Slot Upgrade, 30 Day Heat amplifier (heat booster), 10 Sparks Of Life, an Artifact. Tri-Guard Armor and Helmet, Green Ward (shield), Red Saber (sword), Chilling Duelist (gun) and Static Flash (bomb) -1 star items. Price- 17,87 euros (19,95 USD).
Battle Pack includes:
9500 energy, 25 Sparks of Life, 10 Krogmo Coins, 5 Krogmo Coin Boosters (boosts the amount of tokens you get as colesium reward), an artifact, PlasmaTech Bombhead mask and PlasmaTech Demo Suit. Price- 22,34 euros (24,95 USD).

Purchasable Prize Boxes
Usually they contain “reskins”. Yes, sadly enough most of these boxes that cost real money are costumes and gear, that already exist in game but only with changed color and/or added details.
Some boxes come with re-textured Battle Sprites or new furniture. There’s ton, a TON of these boxes, so lack of costumes wont be a problem next… infinity, or so. You can see some of them in the picture above. Buying these boxes in a bulk (more than 1) is cheaper, 1 box costs- 4,44 euros (4,95 USD), 5 boxes cost- 17,88 euros (19,95 USD) and 14 boxes cost 44,76 euros (49.95 USD).
Downloadable Content
Even though the game is free to play you can still buy some things from steam. At the moment there’s only two expansions and they both cost money- steam funds. Sometimes steam has discounts and sometimes these expansions are with a discount.


The strategy to defeat this boss is in guides “Mini Bosses” section.
This pack comes in three tiers (tier 1, tier 2, tier 3). All tiers have their own star item rewards. Here i’ll just be showing tier 3 items.
Mission rewards

-“Perfect Mask of Seerus” crafted with its star material.

-“Dark Retribution” bomb that deals shadow damage. When placed activates flying orbs.

-“Warmaster Rocket Hammer” sword, that’s really hard to master. Has three swings to control. Deals elemental damage.
The missions and boss are quite hard and i would only recommend this dlc to more experienced players.

Amplifier (heat booster), 4 silver keys (to open lockboxes). This expansion pack without a discount
costs 36,99 euros (39,95 USD).
Costumes

-“Heavenly Guardian Helm” costume

-“Heavenly Guardian Armor” costume

-“Infernal Guardian Helm” costume

-“Infernal Guardian Armor” costume
The only reason to buy this expansion pack (in my opinion) would be if in a need of a lot of energy and Sparks of Life. You can farm crowns and energy fairly easily and buy Sparks of Life with energy any way.
Commemorative Items
There’s a free hat for a Steam game called “Team Fortress 2” that you can get by playing Spiral Knights! The hat is called “Spiral Sallet” and to get the hat for Team Fortress you need to complete a simple achievement – “Mission Accomplished”. To complete this achievement you simply have to reach the first Clockworks Terminal in arcade.
If you don’t know how to complete this achievement and you are interested in the hat, please read the steps below!
Please note that this Team Fortress 2 hat is not tradable but you can still wrap it with “Gift Wrap” and trade/gift it to someone. (No longer do-able due to changes in TF2?!)

Follow these few easy steps to complete the achievement and earn the hat!
- The first step is to install Spiral Knights.
- The second step is to create a character and finish the tutorial.
- The third step is to reach Haven by doing a few missions.
- The fourth step is to make sure that you have a mail from “Saxton Hale”.
- The fifth step is to open your missions and go to the Arcade tab. Select any gate and start a tier 1 mission (depth 0).
- The sixth step is to finish 3 levels (depths) till you reach the Clockworks Terminal!
- The seventh step is to make sure you have another mail from the “Mann Co.” telling you that you have completed the achievement and acquired a hat for Team Fortress 2.
- The eight step is to launch Team Fortress and enjoy your spiral-y hat.
You can only get one hat per each Steam account.

-A letter from “Mann Co.” that informs you that you have completed the achievement and acquired a hat for Team Fortress 2.
Arcade Levels
You can access Arcade levels by going to Missions and selecting Arcade category. The Arcade features four active gates in rotation all the time and are open for exploration by knights. Gate themes and names are randomly generated and have different thematic levels. However, the random generation prevents two themes from occupying the same tier.
To create a party, choose a gate, select your difficulty and tier then click on START button.

Increasing the difficulty of the level (Elite being the toughest/hardest) will significantly increase crown amount, treasure drop rate (items like Orbs and Sparks of LIfe) and enemy hit points.
While roaming around arcade levels you can
find rather interesting stuff. Some them are these “Energy” gates
that require 3 energy to open them! They carry treasure boxes or sometimes “Danger” rooms.

You can also find “Mecha knights” that you can revive using 5 energy, these robots (also a turret exists, that is stationary) will defend you.
Each gate contains three tiers of increasing difficulty separated by subtowns. Each tier is subdivided into two strata.
Stratum 1 – Depth: 01-03 (Tier 1)
Stratum 2 – Depth: 05-07 (Tier 1)
Stratum 3 – Depth: 09-12 (Tier 2)
Stratum 4 – Depth: 14-17 (Tier 2)
Stratum 5 – Depth: 19-22 (Tier 3)
Stratum 6 – Depth: 24-28 (Tier 3)
As said above, all levels are divided into 3 (since there’s 3 tiers).
Tier 1 – Depth 0-7
Tier 2 – Depth 8-17
Tier 3 – Depth 18-29
Between these strata lies a Clockwork Terminal, a safe floor where you can change equipment, heal yourself, buy recipes from Basil, and access the Supply Depot.


While exploring arcade you will notice this level Icon. 
Clockwork depths have level icons that denote the type of level Knights will delve into.
Background color indicates the elemental theme of the depth and determines which status ailments will appear. Icon determines the map style and layout of the depth. Icon color tells Knights what kind of monsters lurk in the depth, and in turn which damage type to expect.

Each gate can have up to 6 different strata. There are 10 possible stratum themes.

Shadow Lairs
Shadow Lair is a special area in Clockworks that contains harder version of ordinary bosses. It contains only main bosses. Shadow Lair is a very hard place to finish alone, so be sure to gather all of your best friends. You can choose what ever boss you want to face first, by choosing the appropriate gate. Find these Shadow Lair gates in Clockwork Terminal at Depth 23. To get to Clockwork Terminal, create a Tier 3 arcade mission. Go through the levels (and collect all Vitapods and Capsules you can) till Depth 23 and there you are, in the Terminal. Find these gates by going all the way up from your spawning point.

-“Darkfire Vanaduke gate”
To enter these mysterious gates you need a key. The key costs 1.800 Energy, it has 1 use before breaking. A good idea would be that every party member pays 450 energy and one person buys a key. The key can be bought in Supply Depot or sometimes at Auction House. You only need 1 key for the whole trip down till the boss. A Shadow Lair expedition does not end with the defeat of the Shadow Lair boss. The party must fight its way through the Unknown Passage.


As explained before, there’s 4 gates. Each one of the gates resembles a boss. Bosses in Shadow Lairs are reworked and are much tougher, you will meet new monsters that you might never seen before. The tactics for all bosses are all the same but harder to accomplish since these bosses hit harder and have much more health. For brief tactics go to guides “Main Bosses” section.
Rabid Snarbolaxes

Ice Queen

piercing, and freeze is recommended. Shadow and elemental weapons
Red Roarmulus Twins

Darkfire Vanaduke


-“Nightmare Mane” after the Rabid Snarbolax Shadow Lair.
-“Celestial Ore” after the Ice Queen Shadow Lair.
-“Gremlonium” after the Red Roarmulus Twins Shadow Lair.
-“Maiden’s Tear” after the Darkfire Vanaduke Shadow Lair.


Echo Stone is a pillar of light that explains some of the backstory of the Shadow Lairs and the Swarm. By reading it till the end you get an Echo Stone artifact, that contains a permanent record of this backstory.
Coliseum
You can visit the coliseum by clicking on the crossed swords icon on the HUD. All Coliseum events have a crown entry fee but if a player chooses to drop out of the queue, the entry fee will be refunded.
Entering Lockdown or Blast Network will cost you 200 crowns. If you and your team wins you are rewarded with 280 crowns and 2 Krogmo Coins. Loosing team gets no crowns in return and 1 Krogmo Coin.

Theres 2 Colesium events that you can join, Blast Network and Lockdown. Also a guild versus guild option is available for both events.
Blast Network


explosion, including the Knight who placed it.
While playing this gamemode you can get in to Free For All mode (kill everyone except yourself) or Random Team mode (kill enemy team).If you are defeated you will wait in the rolling respawn queue. All players in the respawn queue will respawn at once after the respawn counter reaches zero.

A Knight may have up to 15 Bomb Blast Ups.

A Knight may have up to 5 Bomb Count Ups.

A Knight may have up to 5 Speed Ups.
Lockdown


Special Ability: Striker Dash
- Activating this ability allows you to sprint for 3 Seconds.
Bonuses:

- Sword Attack Speed Increase: Medium
- Sword Damage Bonus: Medium
Penalties:
- Health penalty: -3 (Base Health: 2)
- Bomb Charge Time Increase: Very High

Special Ability: Guardian Shield
- Activating this ability creates a shield that protects you and your teammates.
Bonuses:

- Health Bonus +9 (Base Health: 14)
- Bomb Charge Time Reduction: Low
- Sword Attack Speed Increase: Low
Penalties:
- Gun Attack Speed Decrease: Low

Special Ability: Cloaking
- Activating this ability causes you to turn invisible for a period of time.
Bonuses:

- Health Bonus +7 (Base Health: 12)
- Charge Time Reduction: Medium
- Gun Attack Speed Increase: Medium
- Bomb Charge Time Reduction: Medium
Penalties:
- Sword Attack Speed Decrease: Low
Note that equipping various Trinkets can dramatically help you survive in Lockdown.
Golden Slime Casino


by a drop from slimes and trojans or from opening Treasure boxes. These coins can only
be used at Golden Slime Casino like said by their description.
Golden Slime Casino can be found in any tier arcade levels. These casinos appear randomly in a level. 


Several different machines are randomly available in every Casino. Each type has its own prize pool, though prize pools are currently very similar. Watching the prizes spin will reveal the wheel’s type.


Prize Wheel.

Slime Lockbox.

certain items.
Events
There’s six events that occur every year. Some of them occur once a year, other events occur more often. During some events, Havens appearance can change and you can find event themed monsters in clockworks. Every year the start and end dates of events are set differently, sometimes, some of these events just start randomly.
Dark harvest Festival

Goal of this event is to find “Punkin King”. Then his gonna TRICK or TREAT you. When he treats you he drops “Candy tokens”. If a trick happens, hit him to get more and MORE CANDY TOKENS. Find this King in arcade levels! Exchange these candies in haven at npc “Maskwell” to get some hats and prize boxes!
“Dark Harvest Prize Boxes” drop some nice costumes and accessories.
“The Dark Harvest” prestige mission spawns “Scarabs” (in last level) that drop “Brittle candy”, that can also be exchanged for items at Maskwell.

Shroud of the Apocrea

Goal of this event is to solve puzzles and destroy graves (graves spawn “Souls”, so you should kill them) in “Grasping Plateu” to collect “Apocrean Sigils”. These Sigils can be exchanged with the Lost Soul Merchant for Apocrean-related materials. Players can use the materials to craft various Apocrea-related gear.
If only everything was so nice and easy. While you hunt for Sigils, a tall monster “Apocrean Harvester” will stalk, and try to kill you. Just what ever you do, don’t fight him, run away as soon as you see him. Find Grasping Plateu, Lost Soul Merchant and Apocrean Harvester in prestige mission called “Shroud of the Apocrea”.

Kataclysmic Confrontation

Goal of this event it to grind levels (where regular kats can be encountered) to find “Black Kats”. These Kats drop “Ancient Pages”. These Pages can be brought to “Moorcroft Manor” to an npc named “Montague” for unique Kat-themed rewards. These Kats have a very small chance to drop “Book of Dark Rituals.”
This book spawns “Margrel” if it is brought to the “Konjuring Kat” in Moorcroft Manor. This event comes with “That Mold and Black Magic,” “Bad Luck and Brimstone,” and “Purr Terror,” prestige missions, the reward is some prestige points and Ancient Pages!

March of the Tortodrones

Goal of this event is to grind “Devilish Drudgery” levels to find special scenario rooms. Survive these arenas and be awarded with “Amu”, “Ur”, “Tor”, “Nok” and “Sol” materials. They are used (combined with 10,000 crowns) to craft “Fiendish ID Cards”. The card is used to gain access to the “Grim Gate”. In Grim Gate you can find Tortodrones.
Kill both Tortodrones (and hit their corpse) and be awarded with 2-8 Ancient Shells. Craft Tortodrone-themed items from these Ancient Shells. Find the Grim Gate in “Call of the Colossi” prestige mission.

Caketastrophe

Similarly to Dark Harvest event, your goal is to find event themed arenas in arcade levels. Kill all the cakes in the arena, and be awarded with “Cake Slice” tokens. Exchange these tokens with Maskwell at Town Square, to get Prize Boxes and Cake-themed helms! Play a prestige mission called “Total Caketastrophe” to earn some Cake Slice tokens.
Defeat the evil cake mini-boss called “Dread Velvet” in a prestige mission “A Gremlin in Knead” and earn some more Cake Slices!


Winterfest

Your goal in this event is to help “Impostoclaus”. Bring presents as fast as you can, to the gremlin children in the back alley of “Emberlight” (put your picked presents in the pile at the end of the map). You have a choice to choose green or red presents. Green one gives you less “Winter Wish” tokens, but the red present slows you down but gives you more tokens.
Watch out from angry monsters, they will try to stop you bringing your presents. Help Impostoclaus in prestige mission called “Save Winterfest”. Fight in deadly arenas to get event materials in prestige mission called “Grinchlin Assault”, and craft Winterfest-related gear at the Mysterious Alchemy Machine. These materials drop only from Treasure Boxes. Deeper you go, the more boxes you find.


April Fools’

Shroud Of The Apocrea
Dark Harvest Festival
Kataclysmic Confrontation
March Of The Tortodrones
Caketastrophe
Winterfest
Mini Events
Loadout
A loadout is a saved combination of armor, trinkets, and weapons which allows you to quickly 


When the loadout is marked to PvP (crossed swords) you can equip or unequip this loadout in Lockdown. When the loadout is NOT market to pvp (swords not crossed) you cant quip this loadout in Lockdown.
To see what gear is equipped in a loadout, hover your mouse over it.
Chat And Mail
Chat and Mail are the primary form of player communication in Spiral Knights. Moderators often ban (and warn) people, that send racist and/or offensive things in chat.
Think twice before sending anything to anyone.
To open chat window press Enter or / key.

Various chat command scan be used too. For example:
/invite <player_name> (Invites a player to join your party/lobby)
/tell <player_name> <message> (privately sends your message to your chosen person)
/clear (clears your chat and its history)
/complain <player_name> (opens a window to fill a report for a specific player)
Theres a ton of chat commands, find the rest here[wiki.spiralknights.com]

Also theres Emotes that you can activate in chat. For example:
/applaud <target> (makes your character applaud)
/sleep (makes a sleep animation, untill you move)
/wave <target> (waves at a player)
/laugh <target> (laughs at a player)
Theres a ton of emote commands, find the rest here[wiki.spiralknights.com]

You can open mail by clicking the “Uplink” button at left, bottom corner of your screen.

Then it’s going to open a big window. In the middle you can see mails (if any) that have been sent to you (they self delete 30 days after sent date). You can read them and/or delete them by clicking on the letter (there’s a delete button on the bottom of a letter). Note that deleting mails is permament and cannot be undone. To write an email press the “Compose” button on your right, upper corner of your “Spiral Uplink” window. Sending a mail costs you 25 crowns.

When you are done writing your letter (firstly make sure you typed the players name in correctly), you can click “Send”, or add an “Attachment” (by clicking “Attach” button at the bottom and choosing items from your inventory). You can attach crowns, energy, materials or any other “Unbound” or tradable item. If you wish to send any attachments with your letter, its going to cost you 100 crowns. If the person you sent your letter to, doesn’t open the letter in 30 days, your letter with your attachments will be sent back to you.
Achievements
Achievements mark the Knights accomplishments. There are currently 58 achievements to unlock and here’s the list… of all of them…

To view your locked and unlocked achievements press “P” button and select Achievements tab.

Here is the list of unobtainable achievements, due to changes in Spiral Knights.


As of 2013-07-30 update you can no longer revive using your health.
As of 2013-10-16 update you can no longer deposit minerals into a gate.
Reporting
Game masters take player complaints very, very seriously. If people report you, you eventually will get warnings from GM’s. Don’t run around spamming reports to people you hate, you can try talking with them, or just Ignore on them.

If someone is saying racist or offensive things, you should consider reporting him. Click the “Complain” button.
To report a player, click on his name and click “Complain”. It opens a window, then click on “File a complaint” in the middle. Then select the reason you wish to report him to! Then be sure to read all the given information, and press the appropriate action.


Gm’s always see what messages you are sending to other players (admins have access to chat logs). Think twice before sending anything. If you break the rules, you can get banned.


Aphrodite, a Spiral Knights Game Master!
To report a bug press F2 on your keyboard and
add detailed information about it.
Options
The Options menu gives you the ability to customize parts of your Spiral Knights experience. Options are divided into several categories.
- Here you can change your in game client Language. This game supports English, French, Spanish and German!
- Choosing Party with Any will allow you to join parties that use any language.
- Region changes referred host location your client connects to. There’s hosting in the USA and Europe.
- And finally you can change your UI, Music or Effect Volume!

- In this tab you can change your games Resolution or toggle fullscreen mode.
- You can also adjust your Graphics quality. If you experience performance issues you might want to set the quality to medium or low.
- Click the Edit Advanced button to have a list of additional video options to help optimize your game experience.

Advanced Video Options
- Enable Vertical Sync; if you experience screen tearing while playing enable this to smooth things out.
- Compatibility Mode reduces the graphics effects and can make the game run more smoothly on older computers
- Render Effects enables more advanced graphical effects for those using more powerful computer hardware. Cannot be enabled with Compatibility mode on.
- Cull Transients prevents certain effects that are not in your screen.
- Antialiasing Level smooths jagged edges and is more noticeable at higher resolutions. The high value settings should be used on more powerful graphics hardware.

- Check Show Attack Damage to have your game display the damage numbers for your attacks.
- Check Display Monster Health to have individual health bars appear above monsters.
- Check Display NPC Names to make the names and titles of NPCs appear over their heads.
- Check Show Weapon Selection Wheel to have the weapon wheel appear when switching weapons.
- Check Show Lockdown HUD arrows to have persistent direction arrows on the edge of the game window while playing Lockdown.
- Check Auto Target by Default to automatically lock on to targets when near (easier combat, shows enemy information, can be set up as toggle in the controls options, for a quick use.).

- You have the option to drop, comicify or not filter Offensive chat.
Drop- This removes the entire message if a curse word is found anywhere in the message.
Comicify- This will replace curse words with a random combination of !%@#$%&* as replacements.
None- This will not filter the words at all.
- Set how you want the game to Display names for other knights. You can select Always, Speaking Distance, or Hover (hover over a knigt).
- See your Ignored list. You can choose to unignore another knight from this list.
- Toggle show or hide a Knight’s Rank information appearing over their name.

- Here you can choose between three different default Control Styles or choose to define custom controls.

- The game will Prompt (pop-up) you for confirmation for the following actions when these boxes are marked:
When you learn a recipe
Use an Upgrade
Use a mist tank
Create a party when none are found.
Offer to create desktop shortcut.
Offer end-of-session survey
Unbinding item with heat
Replace item variants
Removing a loadout
Unlocking a lockbox
Removing an accessory
Change personal color
Change eyes
Change height
Show Mission Introduction

System Requirements
These are the minimum system requirements to run Spiral Knights.
Windows XP, Windows Vista, Windows 7, Mac OS X 10.4 or later, Linux
Java 1.5
Display 1024×600
1.3ghz processor
Graphics: 64mb Video Memory. GeForce 5 series, ATI Radeon 8500. Latest video driver.
Memory: 1 GiB (or 512MiB for Windows XP)
300MB Hard drive space
Internet Connection: 56 K modem or better (64 kbps broadband recommended for download)
(Laptops and desktop onboard graphics controllers generally perform well below desktop video cards.)
If you are having performance issues try updating your Java.
Find and read more about technical issues here[wiki.spiralknights.com]
The Story Of Cradle

As they where preparing to land, something caused damage to the ship and it started to fall down. They crashed down and those that were able to escape from ship using escape pods scattered all over the planet. You are one of these knights and your story begins here…


It is believed that the disappearance of alpha squad has to do something with shadow lairs as in their final log they described cores opening and being attacked by a strange shadowy creatures, these creatures are a stuff of nightmares and are unlike anything else.
These creatures are devilish reincarnations of what they used to be. The brain behind it is called Swarm, and swarm is this black mist that exists with the deepest and darkest parts of Cradle.
The artifacts in the sanctuary are voices and memories that are telling you the
story of the planet from someones else’s prospective. This someone seems ancient, someone who was on this planet since its creation. It tells you how the planet was created as a barrier, it tells you how it was meant to act as a shield to protect “her”. However something unexpected happened and the final barrier, final defense for “her” went wrong, terribly wrong… it started consuming, learning and adapting. Soon it was bigger danger then anything else, she tells you of a story of how Swarm became a nightmare. She warns you of the storm that’s coming and tells you to prepare.
Tortodrones, were said to be created by ancient people who lived there long ago to protect their treasures from intruders. Tortodrones don’t attack anyone until provoked and they were usually walking around temples. Little totems and structures can still be found in clockworks that relate to them. Likewise these ancient people and tortodrones could have something to do with core.

This story is real and is also explained in Echo Stones and other Artifacts in game.
Nick – the lead developer of Spiral Knights revealed interesting things on the forums and talked about the games story. Nick worked on this game for 7 years but on 01.16.2014 he left the developer team and started his own new projects (more about Nick in guides History section).
The story was told to me by Lonely Tear, huge thanks to him!
Rise Of Knights

Not much is known about this mobile game, only few videos exist of this spin-off.
Guessing by the video you can create your own team by choosing melee fighters, tanks, and ranged attackers. Every knight and every weapon is unique. You can navigate through the “broken” world and meet new monsters, new lands and challenges.
The game is free to play but it has some in-game items that may be purchased using real money.
As far as i know, the game was (maybe still is) available for IOS for a short while.
Underwhirled Drift
History


Spiral Knights was created by Three Rings Design and published by Sega. Spiral Knights has been in development since around 2007. Nick Popovich was the lead designer of Spiral Knights. When the game was officialy launched in 4th of april 2011, Nick posted this on the forums…
“After nearly four years of development, Spiral Knights has officially launched today. This is a huge moment for me, the Spiral Knights team and all of Three Rings and I am so happy to be able to share it with them.
The best thing I can say about Spiral Knights is that it is a game I’ve always wanted to play. Years ago, as many games made the transformation into becoming living, online worlds I became very excited at the possibilities. In my head, I pictured all the games I loved from my childhood that were, bigger, dynamic and could be shared with more than just a couch’s worth of friends. That experience never really materialized.”
Things were great, everyone was happy, new content was flying our way. Yet after 3 years, in 16th of january 2014, Nick Popovich posted a forum thread, saying that he resigns from his position at Three Rings and that he will be pursuing a new adventure in independent development. He posted this…
“I first began work on Spiral Knights seven years ago. Since then, there have been many happy surprises, many big changes. And now, I am here to tell you all that another big change for me is underway. As of today, I have resigned from my position at Three Rings and will be pursuing a new adventure in independent development. I wanted to take a moment and talk to you about what that means for Spiral Knights. The Spiral Knights team grew up with me, slowly adding new members over the years. We did this instead of quickly creating a large team once production was underway; we wanted only the very best people that would come to own and invest themselves in the game. This slow, selective process has lead to a talented, tight-knit group of individuals who all care deeply for the world that we created together. I am just a piece of that team; one knight in the squad. This team is ready, willing and able to face the challenges ahead. I am excited to see what they will do in the Clockworks next.
I would also like to thank each and every player for making Spiral Knights a success. Seeing you explore the nooks and crannies of the Clockworks, chatting with you about the game and every silly moment I spent with you in Haven has meant the world to me. Spiral Knights is in so many ways a realization of a childhood dream of mine and I can’t thank you enough for supporting it. To every player and the whole of Three Rings and Sega: you have my deepest thanks and warmest wishes for the future. And though I now set course for unknown worlds and distant stars, know that a piece of my heart will always remain on Cradle, beating in the chest of a brave little knight; sword in hand and ready to face whatever is next.
– Nick”.
However, sadly after his resigning post, players left the game due to developers not making the right choises and “milking” players with promo boxes that were purchasable only by real money. Later no original content was released anymore. The game was on the edge of dying.
In 4th of april 2016, Community Manager of Spiral Knights- Eurydice, announced this on the forums…
“On Wednesday, April 6th, it will be transferred to a company called Grey Havens. Grey Havens is a group of former Three Rings employees who have come together to keep the games and communities we love alive and happy.”
Nobody knew what to expect from this Company. Grey Havens encountered numerous problems while under way yet they did set Spiral Knights back on the tracks. Till this day Grey Havens are developing the game and have made few new updates. New content like Golden Slime Casino and Iron Guild Hall Update has been also added to the game.


[imgur.com] left Spiral Knights, is now Co-Founder of Monomi Park and has created another successful game called Slime Rancher, we should never forget Nick and what he has done for us. What ever happens, lets not forget Mr.Popovich nor the times we had[forums.spiralknights.com] in Spiral Knights.

In the 2nd of april 2014, soon after Nicks resignment, developers added a statue in Havens snipe garden, that resembles Nick as an Impostocube…
End Conclusion
If you have reached so far… good job. I really appreciate that. My plan was to help new players and teach them all the little things about the game.
While creating this guide i started to hear negative comments about it. I heard people say “Why would anyone read this?” or “That’s pointless!”. After a while i had these thoughts myself for weeks. I didn’t want to continue working on it and i stopped. I just quit and had an idea to never publish it.
I never expected that it would take me much time and effort to finish this huge project, however, i am
still improving it and adding new things every day. If you find something that needs to be added or removed, please add a comment below. Also be sure to rate this guide since i was
working for several months to create this one of the kind guide, just for you to enjoy.
Thank you so much for stopping by and have a great, great day!

Changelog
Recent updates and changes in this guide!
16.01.2014 – Created.
08.07.2015 – Published.
25.08.2015 – Added “Pipe” To “Impostocube’s” drops list.
25.08.2015 – Added “Shadow Lair” section.
26.08.2015 – Added “Colesium” section.
27.08.2015 – Added “Loadout” section.
28.08.2015 – Added “Arcade Levels” section.
29.08.2015 – Added “Achievements” section.
04.09.2015 – Added “Herex” To “Mini Bosses” list.
04.09.2015 – Added “Story Of Cradle” section.
05.10.2015 – Changed guides “Thumbnail” picture/art.
16.10.2015 – Added more information about “Minimap”.
16.10.2015 – Added information on how to report a “Bug”.
16.10.2015 – Added a table of equippable “Harnesses” for each pet.
16.10.2015 – Added information about “Auction House”.
16.10.2015 – Added a lot more information that was missing.
08.12.2015 – Added “Supply Pack” at guides “Rank And Prestige” section.
01.02.2016 – Added information about the “Spiral Sallet” in the “Commemorative Items” section.
27.04.2016 – Added “Drakons” yet another reskin “Spiraltail”.
28.04.2016 – Added information about “Rise Of Knights”.
30.04.2016 – Added more information about damage types in “Damages And Statuses” section.
21.05.2016 – Added section with information about “Golden Slime Casino”.
25.05.2016 – Added more information about “Golden Slime Casino”.
31.05.2016 – Added more information about reskins and ultimates in guides “Battle Sprites” section.
03.08.2016 – Added information about games development in guides “History” section.
03.08.2016 – Fixed small imperfections and typos.
13.08.2016 – Fixed guides “Thumbnail” picture/art.
30.08.2016 – Added “Minerals” section.
31.08.2016 – Updated “Achievements” tab.
01.09.2016 – Updated and changed more than 23 images to newer and more pretty ones.
11.09.2016 – Added more information about rare monsters.
16.09.2016 – Updated “Minerals” tab.
26.02.2017 – Removed text colors.
12.05.2017 – Added information about sleep status in guides “Damages And Statuses” section.
12.05.2017 – Removed “Slooms” from list of rare monsters.
12.05.2017 – Updated pictures, fixed small imperfections and typos.