Overview
A quick guide on how to get past what some would consider as the worst monster type to face against in Spiral Knights; the fiends family.
Devilites
DEVILITES (normal)

One of the best and fastest ways to mow these little guys down is by using the famous blitz needle. This gun shouldn’t be very hard to accquire, as its recipe can be found in your 8-2 Hall of Heroes mission. Seeing as this is a gun you must have for farming Vanaduke anyway (guides on this can be found elsewhere, as I’m sure there’ll be plenty around on these), using your blitz on devilites would just be a side benefit for this gun. If at all possible, an ASI (Attack Speed Increase) Unique Variant, or a CTR (Charge Time Reduction) Unique Variant would benefit greatly, and reduce the likelihood for you to get hit while using your blitz.
One downside to this gun is that your knight will not be able to move while firing the gun. This can leave you vulnerable to the devilites’ fast and some-what unpredictable range attacks (you know, those chairs they chuck at you…). To avoid taking too much damage while using your blitz on these guys, you’ll have to lure these guys into attacking you FIRST, dodge their attacks, then release the charged fury from your blitz on these guys. One of the most common mistakes I see from people using blitz against devilites is that they are just blindly releasing charged shots on them without baiting out the devilites’ attacks first, with the result that by the time the devilites are killed, the person holding the blitz either severely injured, or ends up dead.
DEVELITE OVERTIMER
These guys are the “harder” version of our previously mentioned devilites. They hit harder, dodges faster, and are definitely annoying when encountered in groups.
The same strategy applies to these guys as it does with devilites. Blitz will work wonders against them, no matter how good they are at dodging.
When fighting these guys however, care MUST be taken to avoid taking their hits. One hit from them can deal a HUGE amount of damage. If possible, avoid their attacks at all costs, even if it means having to take the hit from a normal devilite. When using charged blitz attacks on these guys, make sure that you’ve baited out their attacks before going in for the kill. Not doing so can result in you being dead in just a couple of hits from these guys.
PIT BOSS (and Yesman)
These big blue coffee addicts doesn’t directly attack you. But they are never alone! They almost always spawn with a group of devilites nearby, and what these guys do is that they try to convert normal devilites into Yesmen. These Yesmen, after conversion, will turn green, and stops attacking you.
Blitz is perhaps the best option to attack these guys. These guys have a large chunk of health, so blitz is the fastest weapon around that can kill these guys with ease.
BEWARE however, NEVER kill a Pit Boss blindly! It’s true that these guys don’t hurt you, and neither will the Yesmen, but if the Pit Boss is surrounded by a group of Yesmen and it dies, all the Yesmen that this Pit Boss recruited will become Devilite Overtimers!!! Therefore, before killing these guys, make sure that ALL its Yesmen are killed first. This shouldn’t be too hard, as they don’t attack you at all, so virtually any weapon will work well against them. Once all the Yesmen are killed, the Pit Boss will turn himself into a normal purple devilite. This you can kill with ease using any piercing weapons.
Greavers
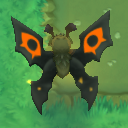
Perhaps one of the MOST HATED monsters ever encountered in the clockworks are the greavers (dem ol’ bats!). (This is also why the cover image is a greaver). However, after reading this guide, you should never have to fear those fluttering nuisances ever again!


Aside from the above strategy, some of the other strategies that I use, especially when I have to fight greavers on top of other monsters, would be to spam charged brandish attacks. Brandish-line swords have a very nice line-of-explosion attack when you use their charged attacks. Using this strategy with a sword such as combuster can mow down groups of enemies with ease when they’re lined up in a single line. Since greaver attacks are cancelled when hit with any form of attack from you, they can be easily countered by spamming these charged explosion attacks in their general direction. To counter their attack pattern, you could also try backing into a corner, so that no matter where the greaver tries to fly to, it will always be in your line of fire. It’s not as effective as the first strategy, but given enough time the greavers will die, and there’s very little chance you will take damage during this.
Lastly, should you find yourself in the position of a broken shield or simple too many of them are around, you can always use the “Dash” ability, that comes with every knight. Doing so will make greavers lose you for a few precious seconds, even when they are about to attack you. This could be important, as you can use this time to regroup and let your shield recharge for a new attack.
Here’s a video of me fighting some greavers in the Grinchlin Assault mission (3rd wave of first arena is where you’ll first see them in there).
(If the video doesn’t work, try using this direct link instead: [link] )
More will be added!
Of course, there’re more fiend types out there, such as the famous trojan (dat damn horse!), the Gorgos (yes, those ugly one-eyed fat-asses), and even the silkwing! More will be added as I continue to work on this guide. Stay tuned for more!