Overview
How to make Village of Shadows difficulty easy. This is not a full walkthrough, rather a guide on what weapons to get and upgrade, and some general gameplay tips to get through the more challenging segments of the game. There is a lot of misinformation on what weapons are and are not “best”, so I intend to clarify that too.This is NOT a speedrunning guide. If anything, it is the opposite; the goal here is to make VoS easy enough for the average player to get through it with minimal stress.
Weapons to get
CP is limited in RE Village, and Lei can take a while to farm. Here are the weapons you should prioritize buying, upgrading, and spending CP for infinite ammo on, and why.
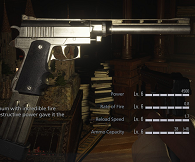
#1 S.T.A.K.E. – Your new favorite weapon.
When fully upgraded, this magnum handles very much like a somewhat slow handgun. Likewise, that is the role it will mostly fill, excellent for picking off single or small groups of enemies, and with a high magazine capacity.

It should be noted that, in spite of the displayed the damage, the S.T.A.K.E. is NOT actually the most powerful shot-per-shot weapon in the game. More on that later.
#2 WCX – Mow ’em down!
The WCX costs more CP than the Dragoon, and does require being upgraded to unlock infinite ammo, but it is outright better in every way. The WCX does almost twice the damage per shot, and boasts a MASSIVE 80 round magazine when fully upgraded, meaning less time reloading, and more time shooting. Once you upgrade and unlock unlimited ammo for the S.T.A.K.E., get this next if you aren’t willing to wait to get the following weapons on this list.

This weapon will be your go-to for handling large hordes of enemies, and suppressing Dimitrescu’s daughters. It also boasts a very high DPS, however assault rifles in RE Village have much lower stagger/stun chance per bullet compared to other weapons, therefor it should not be used on bosses. This is for Lycans, Moraica, and those flying…things(I forget their name.)
#3 Grenade Launcher – Pocket Artillery.
Whilst infinite ammo is not entirely necessary, it is convenient to have if you find yourself short on inventory space. The Grenade Launcher’s biggest strength are its flashbangs, capable of stunning entire groups of enemies for several seconds, allowing you to use other weapons to pick them off, or allowing you to gain separation between a tougher opponent.

The explosive rounds are also useful, and can be used in lieu of pipe bombs on Soldat Panzers, and breakable wall sections, but you can throw 3 pipe bombs in the time it takes you to reload the Grenade Launcher once. Keep that in mind.
#4 M1851 Wolfsbane – Boss-fighter.
As mentioned in the S.T.A.K.E. section, the S.T.A.K.E. is not the strongest shot-per-shot weapon in the game. Either due to a bug not properly displaying the damage, or a hidden modifier, the Wolfsbane actually does anywhere from 150% to 200%(perhaps even more) damage than the S.T.A.K.E. This should be the first weapon you use on every boss fight.

You can test this yourself in-game on various enemies, not just Varcolacs and lycans, but every enemy in the game.
However, it should be noted that the Wolfsbane has some drawbacks, which is why you would want to the S.T.A.K.E. over it if you have to choose between the two; the Wolfsbane has long reload time, fires slower, and a small magazine size. All time spent reloading is time you are completely vulnerable, and you will likely find most of your damage taken on VoS is during reloading. During boss fights, only reload if you have enough time, otherwise swap to the S.T.A.K.E. once the cylinder is empty.
Honorable mention #1: Handcannon PZ – Sniper Pistol
In spite of the description, the Handcannon PZ is actually the weakest of the “magnum” type weapons. However, that is not to say it is useless.

You can effectively think of it as a stronger sniper rifle, boasting a high critical headshot multiplier, overpenetration, and incredible accuracy. It does not have a scope, but It doesn’t take much practice to aim with it. Because it uses sniper ammunition, and would be used instead of the sniper rifle, purchasing infinite ammo for it isn’t necessary.
Honorable mention #2: Pipe bombs…lots of them. – Horseshoes and Handgrenades
As mentioned in the Grenade Launcher segment, you can throw pipe bombs faster than the launcher can fire, and while I’m not certain of this, pipe bombs certainly “feel” like they do more damage than high explosive shells.

Either way, they are excellent for crowd control if you don’t have the time to reload your launcher, and aren’t too expensive to buy or craft. Having a few on-hand is nice for those moments when your magazine is empty, and the lycans are in your face.
Weapons to avoid
Sadly, most weapons are just outright not viable, or simply not very “good” on Village of Shadows. This includes…
#1 All Handguns – Don’t bring peashooter to a cannonfight
Don’t waste your time, Lei, and CP on handguns for the sake of VoS. Even the V61 and USM-AI, the best handguns in the game, are pretty much useless with the high vitality of all VoS enemies. Sure, you could use them for a challenge…but the point of this guide is to make thing as easy as possible.
#2 Shotguns – Leave it on the wall.
Shotguns serve an essential role on all other difficulties, and you might be thinking the SYG-12 would make a good choice, but you’d be wrong. Everything the shotguns can do, your magnums can do better.
Why is this? Because the niche of the shotgun in Village is typically to deal with multiple “lesser” types of enemies, boasting a high chance of stunning and staggering them, and large up-front damage. Enemies on Village of Shadows, however, have a lot of stun/stagger resistance, meaning they’ll often just eat the pellets without even flinching.
They can still do some decent work, but it’s really not enough to justify dumping a lot of CP on if you want to make the run easy as possible.
#3 Dragoon – WCX’s mutated dumb little brother.
The Dragoon may seem tempting at first, being that you don’t have to buy upgrades for it, and you can get infinite ammo right away. However, while investing in infinite ammo for it is worth it, buying the weapon for Ethan to use is NOT.
The Dragoon’s damage just does not cut it on Village of Shadows at all, taking around 15 shots of its 30 round magazine to kill a single lycan(less if all shots are headshots, but it’s very inaccurate.) It’s a good weapon for other difficulties, but it’s totally eclipsed by the WCX.
Be patient, save your CP and lei for the WCX. You’ll avoid so many future headaces.
#4 Karambit/Knife – Ethan’s hands have suffered enough.
Don’t get in melee with enemies.
I’ll say it again; DON’T get in melee with enemies.
A Lycan will take you to almost dead in a single grabble-bite attack, and even the Karambit’s high damage just isn’t going to cut it on VoS. Keep your distance from all things at all times.
Farming and Learning
This is where most of the work comes in.

So if you’ve played the game once by now, you probably know that it’s impossible to afford upgrading all those weapons in a single playthrough, even if you gather every single treasure, and kill every single enemy.
Obviously, you’re going to have to play through the main game a few times, about 2-3 times should net you enough Lei to upgrade your needed weapons.
After you complete the game for the first time, save the cleared game on a new slot, and when you do a “new game+” by loading that cleared game, save on a different slot. Only overwrite the cleared game with another cleared game, allowing you to stock up on Lei, upgraded weapons, challenges, and crafting materials with the same “character.”
Your goal should not just be to upgrade your weapons, but also to learn all the ins-and-outs of the game map, as well as its enemies, so nothing surprises you. Be sure to gather lots of chem fluid and all the herbs you can find, as your crafting materials will carry over to each new game+.
At the same time, try to complete as many challenges as you can, many of which will be very easy given your fancy upgraded weapons. Playing on casual difficulty and being decent at blocking, you can get knives out, dashing dad, slob, frugal father, and dense dad all in the same run! That’s a lotta CP!
When not trying for the “Dense Dad” challenge, craft and hoard many First Aid Meds. As seen in the previous image, it takes 1 herb and 1 chem fluid. About 20 can safely carry you through all of VoS with plenty to spare, but feel free to make even more. With infinite ammo, there’s little else to spend materials on anyways.

Notably difficult parts 1
Playing on VoS is already a large difficulty spike in itself, but a few key areas of the game particularly stand out.
#1 The Village intro – Thankfully, no chainsaw guy this time.
There are more thorough guides on how to do this, so I’ll keep it short. Basically, it’s all on a time and kill limit. After a certain amount of enemies killed and time passed, there will be a trigger that ends the sequence. Kill about 10 or 20 lycans, then run around the edges or the river outside.
#2 Moreau – Have you ever seen the rain?
Moreau can take the unaware player off-guard, normally just a damage sponge on other difficulties, he can be incredibly lethal on VoS with his massive damage increase. The overall strategy remains the same, but there is some initial prep that can make it easier.
Moreau doesn’t immediately spawn when you enter his arena, allowing you to set a trap with a mine…or a few, depending on how many materials you have to spare.
Place your mine(s) here. Moreau is particularly vulnerable to being stunned by explosions, and can easily be kited along a predictable path. Otherwise just blast him.

It may seem like you have to hit the “tongue” of the beast to deal full damage, but that is not true; Moreau takes full damage no matter where you shoot. Otherwise, it’s the same; run from him, hide under roofs during acid rain, shooting him whenever you have the opportunity.
#3 The Stronghold – Spring the trap.
On your way to the stronghold, you will find 2 levers needed to open the gate. Activating either of these levers will trigger the lycans to attack you.
To make this easy, craft, buy, or find 10 mines. Place the minds in key locations, but avoid stacking them so they don’t detonate each other and waste them. By now, from previous playthroughs, you should know were the lycans land on the terrace. If not, place the mines around the lever platforms, such as the base/on the stairs, near the ladders, and even on the platforms themselves.
When you’re ready, activate one gate lever, then immediately rush to activate the next. Defend yourself with your S.T.A.K.E. and WCX until the gates upon, then run to the stronghold.
Once entering the stronghold, save your game, and proceed up the stairs and down the hall until you step inside the stronghold proper. The lycans will not trigger spawning until you approach the central pillar. Time to place more mines.
The area depicted here is almost immediately at the entrance of the lycan stronghold. In picture 1, there is a ledge which a lycan will spawn on and leap off of, which often results in the player suddenly getting ambushed from behind. To avoid this, place 2 mines on the ground below the ledge at the spot aimed at in picture 2.


Afterwards, proceed along the path until the lycans spawn. Pick off the ones in front of you, and as soon as you hear your mines explode, turn around and shoot the 2 lycans who tried to ambush you. From here, proceed through the stronghold had normal, taking it steady, using the S.T.A.K.E. and WCX to thin their numbers.
Once you reach the top where the big lycan and several regular lycans drop down, whip out your grenade launcher and shoot a flash bang at them. Alternatively, 3-4 pipe bombs will kill all of the normal lycans quickly, leaving the large one easy to deal with.
Urias is very easy. Use your Wolfsbane and S.T.A.K.E. and he’ll fall over and seconds.
Notably difficult parts 2
#4 Heisenberg – It’s ALIVE!
Heisenberg’s fight is often misunderstood on how you’re “supposed” to do it. On other difficulties, you can just shoot him until he dies in no particular way, but on VoS, you have to follow the mechanics.

For the majority of the fight, you will be driving the tank. The tank itself has some mechanics to be aware of.
A) The Machine Gun – what you will do most of your damage with.
B) The Cannon – has a long reload, and will knock both heisenberg and you backwards
C) Chainsaw – this is how you block, but it will only work if you are pointed at the attack
D) Movement – the tank moves half as fast when you are shooting. STOP shooting when you need to move. It moves the same speed in all directions.
E) Healing – you CANNOT heal while on the vehicle, so be sure to top-off your health before mounting.
Heisenberg also has his own mechanics.
A) Buzz-saw arm charge – Heisenberg will charge at you with either his left or right arm saw.
B) Massive, destructive whip of metal – if you take too long, this will likely kill you.
C) Scrap explosion – Heisenberg will summon 4-5 large walls of metal, closing them in on himself. If not damaged enough, these will explode outwards for a lot of damage on the player.
D) Red areas – Heisenberg’s weak spots. You’ll know when you’re hitting them as the sparks will be larger, slightly yellow, and make a sort of “electric” sound.
With all that in mind, here is how to kill him relatively easily.
Before the drive out into the boss arena from the elevator, look around and you will see 3 metal towers. Shoot those with your machine gun to destroy them, so you don’t get stuck on them later.
When the boss fight starts, immediately gain as much distance as possible, and start firing your machine gun at the red areas on Heisenberg’s left or right arm. Blowing these up will stun him.
Save your cannon for whenever he gets too close – do not waste it, for it has a long reload, and separation it creates WILL mean the difference between life and death. Just use your MG for damage.
When he summons a lot of metal walls to cover himself with, focus all fire on the little red spot on his “head” poking through the gap. This will interrupt the attack, and send lots of metal plates into the ground. Position yourself so that one or more of these plates are between you and Heisenberg, as they will temporarily halt him from getting close(they will be destroyed eventually though, so don’t get cocky.)
If both of the red spots on his arms are destroyed, there is a 3rd weak spot towards the bottom of him(his left, your right) you can shoot.
If he does get close, stop attacking, hold the block button and try to block his attacks. After blocking, drive away quickly. Remember, you move very slowly when firing, so when it’s time to get out of the way, stop shooting.
As long as you keep destroying the weakpoints on his arms, using the cannon to knock him back, and properly executing the scrap wall phase, you should get past phase 1 with little difficulty.
Once you make it past phase 1, phase 2 is easy. Pull out your wolfsbane, shoot him a few times(where doesn’t matter), and the fight is over.
#5 Chris’ Segment – Where’s Sheva when you need her?
The key here is patience. You have bad weapons for VoS, but it’s doable. Additionally, Chris is also a bit more durable than Ethan, but blocking is still essential for your healing items are limited.
In the first part, slowly make your way through the lycans that attack you, making sure to pick up the supplies on the green crate before you open the large gates.
Proceed forward, where you will then be confronted by 2 Varcolacs; run past them. They cannot follow you into the next part after you drop off a short ledge.
Then, just like before, take it slow, killing lycans little by little. At some point, a large lycan and several others will appear. Toss a couple grenades to help deal with them. Save your flashbangs for now(you will need them later.)
As you slowly make progress towards the big Mutamycete tower, keep an eye to the right for another supply crate, containing a healing item and flashbangs. Once you clear out all the lycans, feel free to approach the Mutamycete tower, but DON’T LASER IT YET. Scout around the area – to your right will be a house, around the back of which has one supply crate. Likewise, a house to your left will have another. Both of these have healing items, grenades, and flashbangs. Collect these first.
After you’ve gathered the supplies, go to the house left of the previous corridor, finding a ladder near the crates leading up to the roof. Climb up, laser the tower once. Now the next segment will be pretty nasty and quick, so be on your toes.
An infinite amount of waves of lycans will come for you, but focus down the archer standing at the base of the tower. Stay on the roof for now, using grenades to blast back enemies, giving you time to shoot them or reload. When you hear that the laser is ready to fire again, jump off the roof, running away from the house, then turn around and throw a flashbang at the lycans following you. Immediately swap to the laser, and target the tower – the flashbang should stun them just long enough to get the shot off.
Make your way back to the roof, and do this a third time. Don’t worry about wasting grenades now; you won’t need them after this part.
After the tower is destroyed, it’s time for the boss fight. The arena is tiny, and the boss itself is difficult to hit. Focus almost entirely on blocking. When it is time to laser him, through a flashbang and immediately swap to the laser, just like with the tower before. When he gets blasted to the ground, run up and unload your entire magazine into the weak spot on his back. Repeat this 3 more times, and he should be dead.
#6 Miranda – Healing Juice Spam
Miranda isn’t technically difficult, but she hits extremely hard even when blocking, her attacks can be difficult to avoid, and she has a LOT of health. Make sure you have a lot of healing items before going into this, and block every single attack you can’t avoid.
Before the fight, however, load your Grenade Launcher with flashbangs. When the arena goes dark, swap to the launcher, and fire a flashbang to cancel the darkness effect. Otherwise, play out the fight as normal, and be liberal with your healing.
Other tips
Blocking – When fully buffed by food, blocks can negate almost all damage taken. When things get too close, opt for blocking instead of attacking.
Food buffs – it should go without saying, but buffing yourself with all food upgrades should be done before you enter Village of Shadows
Lei – VoS makes enemies drop a HUGE amount of Lei. You can easily make 4-5 million in a run, if you also go after treasures
Mines – Not as necessary with infinite ammo, but are useful for stunning enemies you’re running away from.
Lady D’s dungeon of Amputee fetishism – Before miss booba cuts off your hand, you can lay a bunch of mines around the corridors to deal with the moroaica that spawn during this segment.
Sturm – you don’t have to shoot the weakpoint at the back. Aim for the legs and spam fire wolfsbane or S.T.A.K.E. to end this fight easily.
Soldaten – Shooting their arm when they cover their chest can knock it out of the way. Otherwise, stun them with the grenade launcher.
First lycan enemy – immediately hold block as soon as you gain control of your character, as this enemy rushes you instantly unlike earlier difficulties.
Conclusion
Village of Shadows is all about how prepared you are going into it. It is, without a doubt, an extremely difficult way to play if you play the game as you would any other difficulty. However, if you know the game well enough, it can be fairly straightforward, and doesn’t take a master to do.
I truly do believe a lot of the difficulty of VoS is overstated, simply by players who go into it without foresight, or who don’t understand the game’s mechanics fully. That’s nothing against them, we’ve all been there, but I wanted to clear up confusion with this guide, as many of the other VoS guides seem to set players up for frustration(such as those that say “just get infinite ammo stake and go” – it’s doable like this, but not necessarily the easiest way. In this case, patience pays off.) Being how I absolutely hate games that frustrate me, I wanted to help others avoid this frustration, and get their achievement in the easiest, most stress-free way possible.
Now go out there and get your cheesy meme pistol. Keep in mind that the rocket pistol really isn’t that effective of a killing tool, more of a “fun weapon” to dork around with, given how much it staggers and knocks back everything. In spite of its lackluster killing power, it is a pretty fun weapon, and worth getting for the silly factor alone.
Thank you for reading, and remember; patience is everything.