
Overview
Now I know there’s a tutorial etc. and this guide may not be as helpful as everyone thinks but I’ll do my best to explain the big points in the game. I hoope it helps and if you feel I’ve missed anything please give me a comment so I can improve!
Introduction!
Hey all! So I decided to make a guide on Stronghold about the basics of the game. If you’ve been playing a while or done the tutorial then you won’t need this I just wanted to do everything in a nutshell mainly.
In this guide I’ll be talking about the simple, but important, things (in my opinion) including:
– Honour
– Research
– Food
– Popularity
– Castle defence
– Troops
– the faction war
I will do my absolute best to give as much detail as I can and if you have anything to add then please comment and I will put it in the guide!
note:
Just added a “points” section
03/03/2012 – Started updating “Research! Research! Research”! Section (may take a few days to complete properly but it will be done! sorry about the delay of it.) and started on second villages procedures.
24/03/2014 – went through the whole guide again correcting mistakes. If there is anyone else who wants to contribute please do say because I don’t play as much as I use to.
18/05/2014 – Saw two comments made from an experienced player correcting where I went wrong on the Honor decoration as well as also telling me that I forgot about taxes (oops! sorry!) Big thanks to Brian for pointing that out for me! 🙂
Honor system
The honor system is a great starting point as this is the way you can process through the game, get new upgrades and so on. Collecting honour allows you to advance through the rank system and you can spend honour on levelling up your lord.
Honor is given depending on some different key aspects of your village.
The menu on the right of the screen with the crown on it, shows how much honour you make a day! Very important 😛

Building a church can be expensive, but can also in some ways be worth it. Some people use Monks as a weapon and this would greatly help them out. A Church costs wood stone and gold to build but also can improve your popularity bonus.
Decorative are researched, along with churches, and are found under the “town buildings” tab. At the moment, I only have small decoration, the amount of honour they offer is depending where they are placed. The closer to the keep they are placed, the more honour they bring in. Although it says it offers 2, This is added to a total and then multiplied by how happy your peasants are to give you that much more honor. So instead of getting an extra 2, your actually doubling it! This technique could be useful for the first day and could lead you to leveling up multiple times on the first day.
Thank you to Brian for makin sense of this for me! 🙂
Arts are researched, and are gained at different levels. If you are looking to improve the amount of honour gained, this can be an easy way to get it without changing any of your village.
The Parish Bonus depends on what parish you are in. Parishes can place certain buildings down (such as statues) to improve the amount of honour everybody gains in their parish. This means unless you control a parish, there’s not too much you can do on this one.
Special cards can be played, which we will address later, which means you have an increase of honour! woohoo!
The observant ones may realise that the “happiness” level at the top is the same as the current multiplier! woohoo! This means that if you keep your peasants happy, then you will gain even more honour a day! Lucky you eh? 😀
On that note, I believe it might be a good idea that once you have a basic economy set up, you might want to focus on the “static” boosting for honour. That way, at least your guaranteed that honour no matter what your popularity is. Just ensure you have your castles priorities right 😛
Popularity and the benefits!
Popularity in my opinion is very important in the game. It determines the honour multiplier, as we discovered above, and it also shows how much people love you and how fast more people will come to the castle!
Back on the right side of the menu, the unhappy face and the unhappy face shows weather you are liked or hated. if your hated, people will leave the castle (NOOOOOO!!) but if your loved, then they will flock to your castle! (yaaayy!!) This is important and maintaining a balance of all the things that are required of you are here!

The top picture is taxes. Setting a tax rate is very interesting in my opinion and I have long tried to set it right. So far I have established if you have “no tax” then your people will be happy (this gives me a +5 bonus on both my villages) however, you also have to deal with a parish tax. when you click the gold picture, a box underneath will appear under it (mine automatically appeared and is under the topic “low taxes”). From what I believe, I think that this is what your parish tax you, and then the parish is taxed by county and so on. Therefore, as long as you make more gold a day than the parish take, we should be alright! This doesn’t have to be satisfied by taxes, we can also trade, which we will talk a little about later on.
Food I will talk about in a little while and explain what each of these mean along with ale.
The bed picture is about how much free space you have, the more you have, the happier they are, although I’ve only ever lost popularity for overcrowding. Who would have thought they wanted space anyway… Troops will not take room away but actually takes them from their home and puts them in a barracks but more of that later.
Popular and unpopular buildings I need to look at a bit more before I talk about it.
Events are external items that can impact on your little village. Things like rain, bandit camps, wolves and castles will make the villages sad while good weather, and some cards can improve it. I think my friend had trouble once when he was overflown. You can deal with these yourself with a load of troops like in the normal stronghold games or try and get the parish leader to help – they are so helpful!
So in short, keep taxes coming in, bandits and wolves away and make sure you have enough food…
Talking of food…
Food for me can be very important. Without it, people will starve. The main thing we have to do is keep our food being made above what is being eaten. But it can have so much more than that.
Food itself in the popularity has three different lines:
– Food being eaten
– Food being made
– Types of food fully eaten
All of these have a massive impact on popularity. The mistake I made in my village is I focused on one type of food. Sure as a “village idiot” there isn’t much more you can do. However, as you level up you will see a lot more.
The research tree “farming” will tell you that:
- You can already make apples
- You can make cheese at level 2 (bumpkin)
- make ale at level 3 (Yokel)
[*} Make meat at level 7 (Bondsman) - Make bread at level 8 (Freeman)
It is important to even it out and make sure you don’t overload one type of food. if you change how much you eat, make sure you have enough food to make it. This will change straight away unless you build houses, which it will then increase over time.
Just make sure you don’t overdo yourself because your granny can get full rather quickly and we can always improve things via research.
Production
In Stronghold Kingdoms, there are many things you can produce, from raw materials all the way to weapons. It’s just a case about when. The four main ‘stockpiles’ are:
- The Stockpile
- The Granary
- The keep
- The inn
The stockpile is the most commonly used area for storage. It really is like a Tardis in there. The best way about maximising your production is to stone quarries, woodcutter huts, iron mines, Fletcher, Pole turner, Armourer and blacksmith as close as you can to the stockpile. Note that you can only build stone quarries, woodcutter huts and iron mines in selected locations. When you look at resources, it will say that weaponry is stored in the armoury, which is a little section within the stockpile.
The Granary is where all the food, except ale, is stored. Placing your food near here increases maximum food production. Just remember what I said before, don’t go over the top, and keep it spread between as many as you can. They all produce different amounts at level 1 so don’t just go for one type, it will have a massive effect in the long run.
The keep stores everything in the basement for the banquet! Banquets are made by collecting certain amount of food etc., I’ll explain that one in the next section properly. But they are under the crown tab and placed near the keep for maximum production.
The last stockpile is the inn. The inn is where the ale is stored! (YAAYYY!!) Ale is drunk by all the citizens and they all drink the same amount. You must ensure that the hop farms can produce enough to sustain it for you in the long run. It normally doesn’t give too much honour unless you make loads of it, but then I would focus on researching a higher level hop farming if you do in attempt to conserve more space.
Alongside where you place it, production is also about how much you research, you may need to research things so everything is evened out but I believe that stone is more important than wood. But when i overpowered my stone production, my wood production failed so try and find a good balance for all of it.
A thing that I missed from production!! (oops!) GOLD GOLD GOLD!!!!!!!
Under the tab on the right, where the coin is, it will tell you how much money you bring in from taxes, and how much is taken away from you. Simply, the more houses you build, the more taxes you get! Just remember to build up your farms as well so you can feed everyone 🙂 There is a limit on hovels so place them carefully! Gold can be used for almost everything so is a very good resource to have handy!
Thank you to Brian for helping me see the obvious and missing out a VERY important part.
“Converting villages”
Before I start this section, this has absolutely nothing to do with monks or faith. Converting village means you can make your castle into a different terrain that has different benefits. However, you will lose all your buildings and will have to start again. Is it worth it? I suppose it depends on what you want to do with it.
Converting is easy, you can’t do it on the first few days and once you have done it you can’t do it again for another 7 days so make sure your happy with what you are. Converting is found at the top of the page inside “settings”. An odd place I know.
After you click convert you will get a new screen up that shows you these cities.

The question mark will tell you what each one does and gives a bonus in etc. The natural defence bonus can be sort of helpful but not as well as I think (in my opinion, but it did save one of my towers from an army of peasants.)


New Villages
There are two main ways (that I know of) of gaining another village. Remember, you can only gain another village if you are the right level (Level 13 for the first I believe)
The first way, is to use charters. A charter can be seen on the map and vary on price depending on location (weather it’s where the parish is, or how close it is to you I’m not sure on that yet) the cheapest one for me has always been inside the parish.
The second way of gaining a village is to attack another village with a captain, a slightly “cheaper” way but can be more expensive. This will cost you a bomb of honour, depending on who you attack. This can indeed, however send you into minus honour but you have to be dedicated to get your second village up and running and making honour ASAP.
Research! Research! Research!
Which brings me on to my next topic! 😀
Research can be very important in the game as this helps you advanced and become a better town in general. When you start a new game you will start with 8 research points, and whenever your village is destroyed for whatever reason, research and your rank will always stay with you. Pretty handy right?
The topics you can research consist of Industry, Military, Farming and Education. I’d like to go into a bit more detail into what the sections are in a whole and what they can help you with.
Industry is the backbone of your village. Industry is where all the production happens, whether it be raw materials or weaponry. The only thing it doesn’t consist of is farming (surprise surprise!) Sometimes it is better to research the points rather than build a new one. In my castle, every time I build a new stone quarry, it only produces 300, where as if I focus on researching, all the others (God knows how many I have.. about… 10?) all get increased. Worth the wait? I thought so! 😛
Saying that, that would mean that no matter what you do, stone and wood would be your most important factors within industry. Without that, you won’t be able to create an army, defence or make any money off trading.
Banqueting can be sort of resourceful as long as you have enough coming in, If you scout any resources coming in, you won’t be able to use it until you have access to it (although you will have room to store it)
Weapon making is important if you want to create an army or if the market value is right, in the parish I’m in, there is more money in selling armour (in one trip, I suppose it depends how you work it out) than raw materials, but check your local parish, each one is different!
*See Table 1 for industry table*
[/tr]
[/table]
Trading and wealth
Although there is a guide on here for trading, I thought I’d put it in here just to make sure everything was covered 🙂
In short trading is the best way to make money – weather you spend it giving it to the people, paying parish taxes or buying research points. Although money doesn’t make your village go round, it can certainly help.
Trading happens between yourself and a stock exchange. A stock exchange can be one of the following places:
- the same county as you (any parish within and including the capital Dorset for example)
- The same province at level 15 (witch I believe would be Southwest England for Dorset – use the map to find out where you are)
- The Same country as you at level 17 (England in the case of Dorset)
- Everywhere at level 19 (In Dorset’s case…everywhere)
Each parish will set their price depending the resources that they have. For example, if you sent 10 merchants to the market to sell wood, then the price would fall 10 gold. This means that on a big scale map, you could make a profit off the land.
Thank you Gonecrazy100 for that information! 🙂
Merchants tend to travel slowly unless you upgrade them. My advice is that if you are going to sell a lot, upgrade the speed ready for the higher levels and see what places benefit you the most.
However, each merchant takes up 10 spaces in your army size, therefore if you are focusing on an army as well, be careful on how much space you actually do have. (Still takes up one peasant though)
Local Defence
Recently I joined a new world only to find out I spawned in the middle of a war zone and I was going to die… I didn’t want to be a push over, so I made this base!
In all fairness it wasn’t made of wood and it didn’t have that many archers.. the green ones aren’t mine 😛 I was lucky enough to be sent aid. the stone was all completely wooden and I had armed peasants. However, this was the founding’s of my castle defence! 😀 now compare it to this….

As you can see, he has a bit more defence than I do, and the castle is properly formatted, however this is a parish castle so it isn’t kind of fair. But this is the type of castle we would all like to build in the end, one that has lots of troops, and easily defendable. Level 6 offers you a great defence – bows while castle defences range from level 2 all the way up to max. Castle defence mechanisms are free to use at 1 and 3 – level 1 for stone walls and gate and level 3 for pits etc.
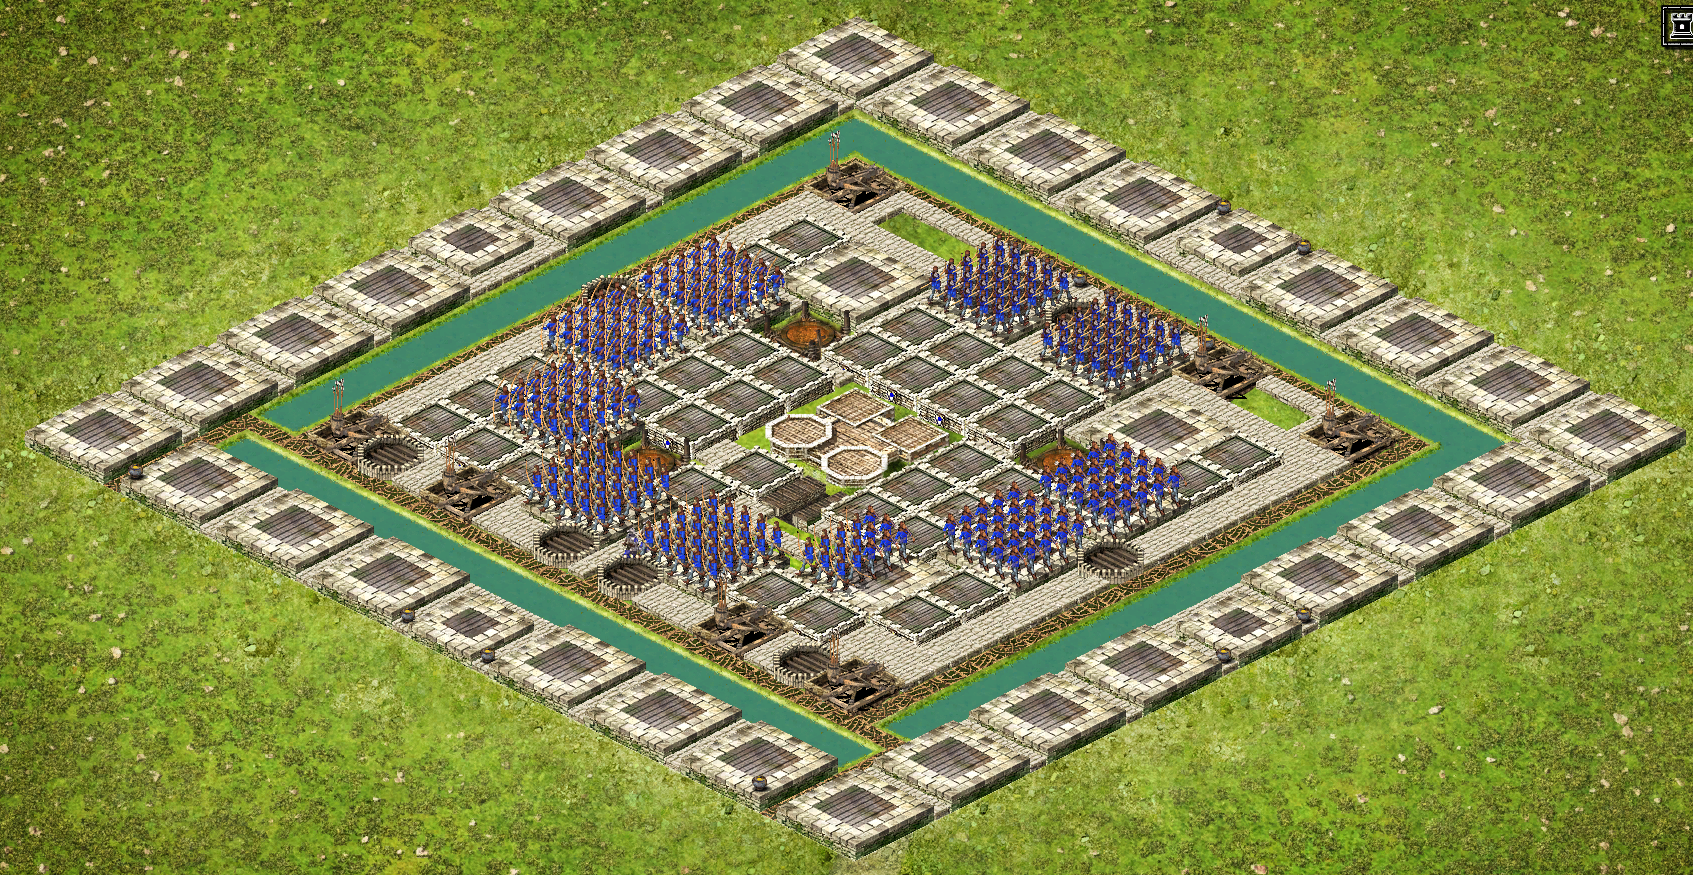
My favourite basic defence is a stone gatehouse with 3 stone thick layer around it, like so.
I was attacked recently like this by an NPC and they failed (few) but with enough archers at the back row then they have a harder time trying to get to you. I’ve always tried to start on the inside and work my way out, so if I’m attacked while trying to build my castle, at least they can all group together and it costs slightly less when you upgrade at first.

Guardhouses are important as well! It increases the amount of people you can have in castle defence by 10. I place them close to the castle protected by archers so I don’t have to rebuild and replace. It’s important to ensure you have enough room for them so you don’t fall short of troops.
Also, I don’t know how I got it, I think it might be a parish thing but I can build Tunnels witch allows a load of peasants to charge at the enemy which is always fun to watch in the replay. Place it outside the castle walls where you feel is a good idea to. Depends on what sort of advantage you are looking for after all!
A village may also ask if they can make a vassal with you, this gives you a lot more honour a day, depending on their rank, and also means they can store troops in your village. I am not entirely sure if you can take over the village by this method but I don’t think so, however, when they station their troops there they can attack a nearby village with their troops from your village. This is handy if you are having problems with someone and they are willing to help you.
Another great defence technique I have learnt about is the research “Castellation”. The Castellation research tree increases the fire rate that the keep fires arrows at attacker. This can be useful when they get near you keep and can be a nice little “last line of defence” weapon.
The towers are worth looking at. They all hold different amount of archers and can easily defend a castle. Stone costs more to build can hold a lot more and can help build a sturdier defence. My favourite is the great tower, as this holds 25 archers (you can place them on the actual stone part of the wall witch is kind of weird) but you can always build up to it and is a 1,000 stone increase from 16 archers up to 25.
Troops!!!
Troops are quite important to a castle defence and attack. Here is a rundown of each troop and what they do and best for.
Armed peasants – WARNING! DO NOT GO NEAR WHEN ANGRY!
A troop of armed peasants are crazy fools. Armed with what looks like a pitchfork and have no armour, a good starting unit to have and could take out a rabble. Later I will add a video of a rabble attacking a wolf lair to see what happens!
Scouts – what use are they?
Scouts are available from level 1 and play two primary roles – Firstly, to scout different stockpiles in the wilderness and bring home as much as they can and secondly, to scout enemy castles. Scouts aren’t always used because it takes a longer process for attacking and can sometimes have them killed. However, I tend to use them so I know exactly what I’m doing, and how I go about it. As you can now place your troops when you attack, you can see where their weak spots are and attack accordingly. Improving speed can decrease the time it takes and if you use them for “forging” then you can also increase how much they can carry each.
Archers – Watch the skies me Lord!
Archers are effective in groups and from a long range. Personally my favourite weapon in all medieval times. However, they aren’t that capable of bringing down a wall, but could certainly take down a few men. Especially in a small group of them. I wonder how they cope against wolves too…
Pike men! Watch where you point that thing!!
Pike men are known to be a defensive unit as they have longer weapons that can poke your eye out. More effective than an archer at close range and must be better than a rabble. I like to have pike men outside my door to make me feel protected.
Swordsmen – Where the fun begins maybe?
Swordsmen require the hardest level (13) and I have only just got them so not too familiar with them. I would consider them for attacking and I wouldn’t mind seeing them against wolves either… only one thing for it then!
Knights – defence!
If you research “Sally forth!” you will be able to send a knight or two (well up to10 knights) into the battle to help defend the castle.. Never tried it but it looks so so entertaining 😀 I can’t wait to try that one!
Catapults – Attack!
Catapults are the main way for taking a castle with very strong defence. They attack from a distance ensuring that the troops have an easier time getting in.
Captains – What was yours is now mine!
Captains are researched at level 12 where you can have the opportunity to have a second village! If you send a captain into battle with a small army they will work their way to the keep and as long as the captain is still alive, you can capture it. I recently did this with an inactive person (witch I feel sorry for 🙁 but my friend needed me!) and attacked while my captain was still alive and my peasants ran in arms flying. Amusing to watch.
Have faith…
This section is currently lacking but this is currently what I am looking into and the benefits of monks etc.
Theology can be learnt at level 8 and can have some massive effects on parish and other villages. From curing the sick to even stopping people attacking them! At level 8 everything is unlocked and ready to be researched. To actually obtain a monk you need to have “Ordination” researched, which is accessed at level 5 theology. From then, you can buy a monk using your gold. However, be prepared to pay the price if you want more monks, as they do get more expensive as you buy them. Another thing to point out is that it’s maximum monks per village, not in all of them. So if you have 2 villages and level 1 Ordination, you can have 2 monks. Also, be aware that monks are only one time use and once you’ve used them, that’s it.
As you go on to research you can do a lot more powerful things, almost as if God was on your side. You start off with the power to only influence the election. You can increase or decrease the votes with monks. Here is a list of the Powers you get with each research:
- Research Baptism – allows to remove Disease from the parish (you won’t be effect that way)
- Research Marriage – gives the entire parish a popularity boost – probably handy to use in your own land
- Research Confirmation – Decreases popularity within a parish. Probably not a good idea to do in your own parish unless you aren’t effected of course (haven’t tried that yet).
- Research Eucharist – stops a village from being attacked for a selected amount of time. Handy if you have just claimed a village for yourself.
- Research Confession – This will restore religious power to someone who has been “excommunicated”. In other words, reverses the one below 😛
- Research Extreme Unction – takes away religious abilities so they can no longer work alongside the lord.
Each one of those are in the research tree below. Just remember to use them wisely and to your advantage!

Communication
Communication is important. Weather your declaring war, asking for help, or even just talking to a friend! You need to know where to look and where you can get help from.
The first system introduced is the favourite mail system, which means you can mail anybody and search for someone to mail to. Don’t know their name? You can search for them if they have a title, such as “Earl of Dorset” and mail people that way. It is instant and easy to communicate this way and means you can talk to people in private.
The mail is located top left corner next to the “i” icon, a closed letter meaning you have mail, and an open one meaning you haven’t got any new mail.
Next to that icon is a speech bubble. This is a general chat for everyone who plays kingdoms, on and off steam. It launches a new window up and is divided into several categories, including a help channel so you can get help off other players within the game. Just ensure you don’t spam anyone or annoy anyone.
The last option I know of is the parish wall, I always contact my parish leader this way if it’s about what I can do to assist the parish and other villages. If I need help, I’ll go there (unless I’m too embarrassed too).
Parish leaders are there to help, most people are really friendly within the game and will always do their best to look after you. I mean, your all in the same neighbourhood!
Quests
Quests have started to appear more often in stronghold Kingdoms than I remember, Quests are access via goblet along the tab, like in the picture below. Completing a quest gives you different rewards and are very worth doing, especially from a low level. More and more will be unlocked as you go through but they give you a few basic ones to begin with. Each quest is explained and a harder one becomes available when you have completed a quest.

Playable Cards
Playable cards are boosts that you can purchase with crowns and get free each week depending on what you do.
For the free cards, there are certain requirements that you must reach in order to get more cards. To view these, go to the world map and look at the top right, underneath your crest. If there is a bar there, this means you have already collected your last card. The card spawns X amount of times a week depending on what you have done. If you click it, it will show you what you need to do! But here is a quick table :3
If you brought crowns on one world, then I believe it carries across to all the others, as I could get 14 a week if I brought crowns: L
The houses, the factions, and the…leftovers?
All in All, there’s a massive war going on. Sometimes you won’t realise it and other times you will. Each world is divided into 20 different houses which is then divided up into different factions, which are player ran.
In short, each house races to get as much power as they can. Each round, there is one winner, and two losers. The two losers are eliminated and the winner gains a glory star, HOWEVER, if a loser has a glory star and gets eliminated, they will lose a star instead of being completely eliminated. Also, when 6 houses are left, 1 house is eliminated each time.
I assume that the different colours on the map show what each country wants and owns. We vote a parish leader in who then takes control of the parish and makes it their colour. Then they vote for the county leader such as the Earl of Dorset who then votes for I’m guessing the country leader, The idea is to land grab as much as you can and keep the losers losing stars. It’s all too political for me, I’m trying to learn the basics and help out the best I can but I will revisit this when I know more about it.
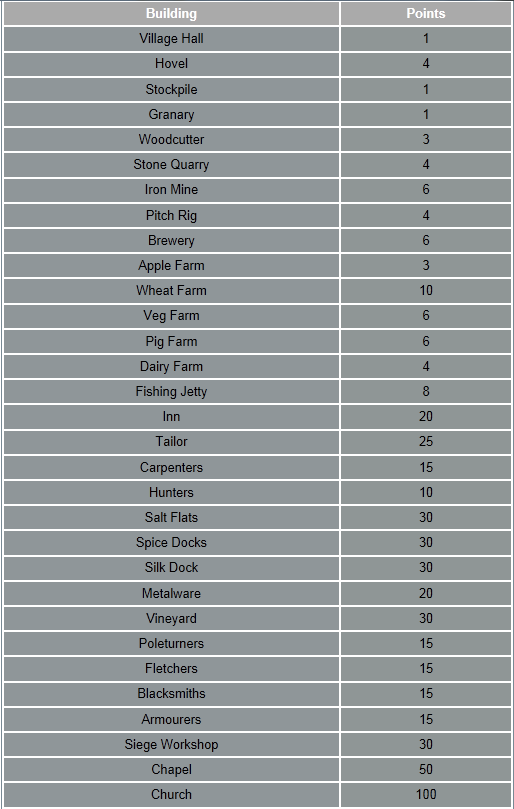
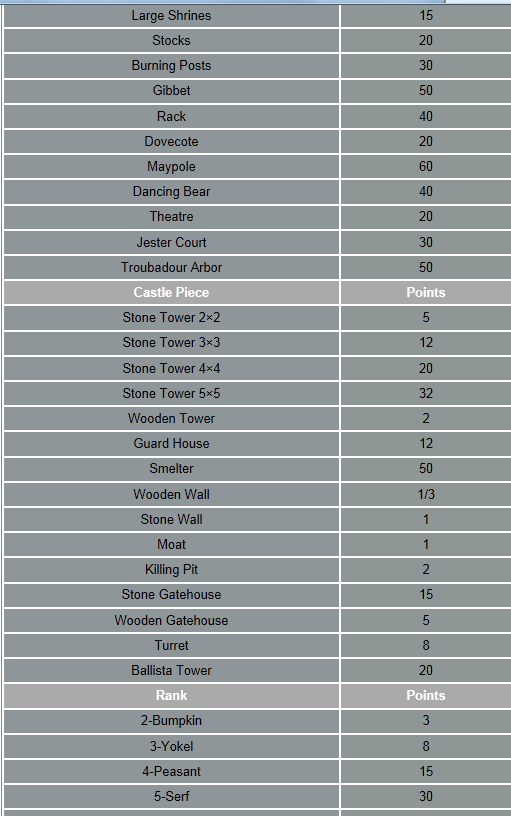
Points
In the upper top left there are four different Icons. The one that is a pie chart is your leadership points. Improving this score gets you up the leader board. So how do we increase points?
The three ways you can increase your points is by:

- Building in your village
- Building on your castle
- being promoted
Each time you build something in your castle or village you get more and more points and you get different points for building different structures. This table from taken from Stronghold Wiki [help.strongholdkingdoms.com] witch shows what buildings get you points.

There are various sub leader boards that you can see within the game from this menu at the top right

There are different leader boards for various different things, including points! There is an achievement for being in the top 100 so I’d get cracking 😛
Achievements
Achievements show various milestones that you have achieved. For example, there’s one for killing 20 wolves, trading and even donating to the parish! These can be found under the promotion bar and will unlock as you complete them. I feel a sense of pride when I get them, my brother always said they were a waste of time. But it’s something to do right? 😛 take a look they are under the promotion button at the top (with the crown) and have some pretty interesting things.
Conclusion
Right, I think that covers about everything? :L if you have any questions or anything you would like me to add, please leave a comment and I’ll reply as soon as I can. 🙂 I hope it helps and good luck in the brave world!!
I’d just like to thank Ness, the other contributor who is a great friend of mine and helped me create this guide. He encouraged me to make this guide to help him and of course anyone else who would like help. I really hope it helps and I hope you all enjoy playing Stronghold Kingdoms as much as I have learning about the different aspects.
Once again thank you and please do comment your thoughts and improvements. I will take everything into consideration.