
Overview
This guide will show you how to finish all missions (including training) and obtain all achievements in NITE Team 4.Also includes Operation Withering Dusk + all related achievements.
A warning first off
My guides tend to be straight forward. I will provide solutions to every mission in the game and not just hints.
There are spoiler-free guides out there and I strongly recommend using them to try and solve the game by yourself before you use my guide.
>>Here<< you can find the guides LeikRad<3 wrote. They are spoiler-free so you might be better off checking his guides first.
General stuff – please read
– If you are looking for a specific achievement, you can hit CTRL+F and search for the achievement name.
– Every time you completed a phase the ‘Back to certification’ button will show up. Click on it followed by ‘Continue training’.
– I will quite often write type … instead of actually typing you can also copy & paste the stuff (yes, this is the *super* lazy attempt :p). While copy&pasting make sure you didn’t paste a space before or after the command (especially with FoxAcid).
– If I write “type [command], [command], …” you don’t just copy/type the whole line but every command on it’s own followed by enter.
– Don’t close any program you ran inbetween the diffrent phases of a mission/training. You might still need it/it’s content.
Terminal Operator I – V + Chatterbot
I recommend doing these after you completed the other missions to save yourself some work.
The 5 Terminal Operator achievements are gained by entering a specific amount of command lines into a terminal.
To increase the number open the ‘DNS & VHOST Mapping’ module 2 times, put both next to each other and type sfuzzer niteteam4.com -t 1 in both followed by hitting enter.
Now you switch form one to the other module by clicking with mouse and launching the command by pressing arrow up followed by enter.
For Chatterbot you need to type 200 commands into Uplink 51. I’d recommend spamming ‘help’ or ‘hint’ until you got it.
Getting started
After starting the game you have to create an agent profile.
Do so and you will atuomatically be logged in.
This is about what you should see now
Click on the square with the circle in it in the top right corner.

After listening to the lady on the next screen select “Academy” (You can also skip her monologue but it’s nicely done and worth your while).
Basic Terminal Operations
Stinger OS Basics
It’s been a while since I got the achievement but I think the Bootcamp achievement should be unlocked after starting the training.
Phase 1
Open the ‘Host Fingerprint’ module from the ‘Information Gathering’ menu.
Drag the window around and type ‘help’ in the console afterwards.
Phase 2
Open the ‘Drone and Imagery’ module (bottom of the screen, fourth symbol)
Enter 38 for lattitude and -77 for longtitude and click on the hand symbol between the coordinates.
Eye in the Sky achievement should unlock at this point.
Click on ‘Back to globe’
Phase 3
Click on the big square in the top left corner.
On the next screen you click on the symbol I marked for you

Shape Shifter achievement will be unlocked.
To also unlock the Chameleon achievement you can click on the brush-symbol show in the screenshot below and change your UI skin.

Basic OSINT
Phase 1
Open the ‘DNS & VHOST mapping’ module from the ‘Information Gathering’ menu.
type sfuzzer niteteam4.com -t 10
Phase 2
Open the ‘DNS & VHOST mapping’ module from the ‘Information Gathering’ menu.
type osintscan niteteam4.com -s google.com -d 500
Phase 3
Open the ‘DNS & VHOST mapping’ module from the ‘Information Gathering’ menu.
type osintscan 98.124.199.93 -s bing.com -d 500
Advanced OSINT
Phase 1
Open the ‘DNS & VHOST mapping’ module from the ‘Information Gathering’ menu.
type sfuzzer niteteam4.com -t 5
type sfuzzer niteteam4.com -t 20
Phase 2
The ‘DNS & VHOST mapping’ module should already be open. If not open it.
type sfuzzer niteteam4.com -t 15
type osintscan niteteam4.com -s google.com -d 500
Phase 3
The ‘DNS & VHOST mapping’ module should already be open. If not open it.
type osintscan niteteam4.com -s google.com -d 1000
Fingerprint
Phase 1
Open the ‘Fingerprint’ module from the ‘Information Gathering’ menu.
type fingerprint www.niteteam4.com
Phase 2
The ‘Fingerprint’ module should already be open. If not open it.
type fingerprint test.niteteam4.com
Phase 3
The ‘Fingerprint’ module should already be open. If not open it.
type fingerprint server.niteteam4.com
Exploit Database
Phase 1
Open the ‘Fingerprint’ module from the ‘Information Gathering’ menu.
type fingerprint intranet.freekevin.net
Phase 2
Open the ‘Exploit Database’ from the ‘Information Gathering’ menu.
type searchsploit sharepoint-2007
Phase 3
Open the ‘Exploit Database’ from the ‘Information Gathering’ menu.
type searchsploit CRM4.0
Foxacid
Phase 1
Open the ‘DNS & VHOST mapping’ module from the ‘Information Gathering’ menu.
Open the ‘Fingerprint’ module from the ‘Information Gathering’ menu.
type fingerprint vpn.cyberdy♥♥♥♥♥up.net
Phase 2
Open the ‘Exploit Database’ from the ‘Information Gathering’ menue.
type searchsploit CiscoVPNClient
Phase 3
Open the ‘Foxacid’ module from the ‘Network Intrusion’ menue.
Delivery: UDP
Exploit: Content Spoofing
Rootkit: AfterMidnight
Target URL: Click on the symbol next to the text field and select ‘vpn.cyberdy♥♥♥♥♥up.net’ from the list.
Click the hand symbol in the middle of the module.
On the next screen click on ‘Nite Team 4 controlled’ then on ‘Cyberdyne Group VPN’
Digital Forensic
Filebrowser
Phase 1
Open the ‘Turbine C2 Registry’ (bottom of your screen, first of the six symbols in the middle)
click on ‘Nite Team 4 Controlled’ -> ‘Nite Team 4 FTP’
Open the ‘Password Attack’ module from the ‘Network Intrusion’ menu.
Target: ftp.niteteam4.com
Username: dvoorhees
click ‘Ready’
select ‘John the Ripper’ -> click ‘Start’
Friday the 13th achievement should unlock at this point.
Phase 2
Open the ‘File Browser’ module from the ‘Data Forensic’ menu.
type 192.168.1.5
Username: dvoorhees
Password: jason
click ‘connect’
On the right side of the module doubleclick ‘FTP-Root’ -> ‘dvoorhees’ -> ‘Academy Training’ -> ‘NT4 Files’ -> ‘dvoorhees.nt4’
Phase 3
Open the ‘File Browser’ module from the ‘Data Forensic’ menu.
type 192.168.1.5
Username: dvoorhees
Password: jason
click ‘connect’
On the right side of the module click ‘FTP-Root’ -> ‘dvoorhees’
Now click on ‘Bankofchina_savingsaccount.txt’ on the bottom left side of the module.
XKeyscore Basics
Phase 1
Open the ‘XKeyscore Forensics’ module (bottom of the screen, last of the 6 symbols)
Drag ‘Dylan Voorhees’ and ‘NITE Team 4’ onto the globe.
Click on ‘IDs and Records’
Click on the symbol that starts the search (it’s marked in the screenshot below).

Click on the new symbol ‘Agent Dylan NT4 Profile’
Phase 2
Open the ‘XKeyscore Forensics’ module.
Drag ‘Catherine Wheeler’ onto the globe.
Click the start symbol again.
Click on ‘Agent Dylan under Seargent Wheeler’s command’
Phase 3
Open the ‘XKeyscore Forensics’ module.
Remove ‘Catherine Wheeler’ and ‘Nite Team 4’ from the globe.
Drag ‘The Black Watchmen’ and ‘John Taylor’ onto the globe.
Click on ‘IDs and Records’ and on the symbol that starts the search.
Open ‘John Taylor Mission Report’
Remove ‘Dylan Voorhees’ and ‘John Taylor’ from the globe.
Drag ‘Quachil Uttaus’ onto the globe.
Click on ‘IDs and Records’ and on the symbol that starts the search.
Click on ‘Sigil Mission Report’.
Drag ‘Sigil’ onto the globe and click on the symbol that starts the search.
Click on ‘Sigil Threat Report’
Mobile Forensic
Phase 1
Open the ‘Turbine C2 Registry’ (bottom of your screen, first of the six symbols in the middle)
Click on ‘Nite Team 4 Controlled’
Click on ‘Cyberdyne Group VPN’
Open the ‘XKeyscore Forensics’ module from the ‘Data Forensic’ menu.
If there is still stuff on the globe remove all of it.
Drag ‘Cyberdyne Group’, ‘Sasha Brewster’ and ‘John Dyson’ onto the globe.
Click on ‘IDs and Records’ and on the symbol that starts the search.
Click on ‘Employee Record’ and on ‘Official Employee Welcome Kit’.
Open the ‘Fingerprint’ module from the ‘Information Gathering’ menu.
type fingerprint snet.cyberdy♥♥♥♥♥up.net
Phase 2
Open the ‘Phone CID Backdoor’ module from the ‘Network Intrusion’ menu.
MAC Adress: 6A:7D:69:64:51:56
Vendor: LG
Click on ‘Start Intrusion’
Click on ‘Notes’ (on the smartphone in the middle of the module)
Click on ‘Temporary Password’
Phase 3
Open the ‘File Browser’ module from the ‘Data Forensic’ menu.
username: sbrewster
password: school
Click on ‘Users’ -> ‘administrator’ -> ‘Documents’ -> Projects -> ‘AI_Algorithms’ -> ‘Azurenet’
Click on the csrss.exe (bottom left in the module)
Open the ‘Turbine C2 Registry’ -> ‘Agent controlled’
Click on ‘Cyberdyne Group VPN’
Hasta la Vista achievement should be unlocked by now.
If you’re only here for the achievements you can stop doing the training missions now since there aren’t more to unlock in this part of the guide so you can skip to ‘Operation Castle Ivy’
Network Intrusion
Social Engineering
Phase 1
Open the ‘Social Engineering Toolkit’ module from the ‘Network Intrusion’ menu.
type 1, 1, 1, niteteam4.com
Phase 2
Open the ‘Social Engineering Toolkit’ module from the ‘Network Intrusion’ menu.
type 1, 1, 2, The Black Watchmen
Phase 3
Open the ‘Social Engineering Toolkit’ module from the ‘Network Intrusion’ menu.
type 1, 1, 2, Sunshade Corp, 2, 1, 3, 1, 4, 2, subject, alias, yes
Click on ‘LEON’s COMPUTER’.
Network Scanning
Phase 1
Open the ‘WMI Scanner’ module from the ‘Information Gathering’ menu.
type netscan
Phase 2
Open the ‘WMI Scanner’ module from the ‘Information Gathering’ menu.
type netscan
type dig /erp/it_mainframe
Phase 3
Open the ‘DNS & VHost Mapping’ module from the ‘Information Gathering’ menu.
type sfuzzer sunshade-corp.com -t 20
Open the ‘WMI Scanner’ module from the ‘Information Gathering’ menu.
type netscan
Open the ‘Password Attack’ module from the ‘Network Intrusion’ menu.
Target: mail.sunshade-corp.com
Username: jvalenti
Click Ready -> John the Ripper -> Start
Active Directory
Phase 1
Open the ‘Turbine C2 Registry’ (bottom of your screen, first of the six symbols in the middle)
Click on ‘LEON’s COMPUTER’
Open the ‘WMI Scanner’ module from the ‘Information Gathering’ menu.
type netscan
type dig /erp/active_directory
Phase 2
Open the ‘Active Directory’ from the ‘Information Gathering’ menu.
type /erp/active_directory
Phase 3
Click ‘CN=IT’ -> ‘OU=IT-users’ -> ‘CN=bchambers’
Open the ‘Password Attack’ module from the ‘Network Intrusion’ menu.
Target: /erp/it_mainframe
Username: bchambers
Click John the Ripper -> Start
Man in the Middle
Phase 1
Open the ‘Turbine C2 Registry’ (bottom of your screen, first of the six symbols in the middle)
Click on ‘Dialodge Support’
Open the ‘MITM’ module from the ‘Network Intrusion’ menu.
Click on ‘ARP Poisoning’ -> ‘Scan for Hosts’
Target 1: 192.168.1.66
Target 2: 192.168.1.1
Click ‘Start listening’ -> ‘URLSnapper’
Phase 2
Open the ‘Foxacid Server’ module from the ‘Network Intrusion’ menu.
Delivery: TCP/IP
Exploit: Content Spoofing
Rootkit: AfterMidnight
Target URL: intranet.dialodge.net
Target Technology: Akamai
Target Port: 443
Click on ‘Dialodge Intranet’.
Open the ‘MITM’ module from the ‘Network Intrusion’ menu.
Click on ‘LLMNR Poisoning’ -> ‘Scan for Hosts’
Target 1: 192.168.11.144
Target 2: 192.168.1.1
Click ‘Start Listening’ -> ‘Packet Sniffer’
Phase 3
Open the ‘Active Directory’ module from the ‘Information Gathering’ module.
type /erp/Dialodge_AD
Click ‘CN=Policies’ -> ‘OU=Passwords’
Open the ‘WMI Scanner’ module from the ‘Information Gathering’ menu.
type netscan
Open the ‘Password Attack’ module from the ‘Network Intrusion’ menu.
Click on ‘Hash’
type travis.keenan::dialodge:0F0F809FC89677344052E854A29C83A3:447D6D5AD8C57B28A6552C4CED776EE0
Click on ‘John the Ripper’ and check the boxes behind ‘At least one number’ and ‘At least one symbol’ on the right side of the module.
Click ‘Start’.
Aircrack
Phase 1
Open the ‘Air Crack’ module form the ‘Information Gathering’ menu.
type airodump
type handshake 8A:FB:52:23:4B:98
Open the ‘Turbine C2 Registry’ (bottom of your screen, first of the six symbols in the middle)
Click on ‘Dialodge Support’
type airodump (into ‘Air Crack’ module)
type handshake 1C:28:2E:C5:73:B9
Phase 2
Open the ‘XKeyscore Forensics’ module (bottom of the screen, last of the 6 symbols)
Remove everything from the globe.
Drag ‘Wayne Spalder’ and ‘Dialodge’ onto the globe, click on ‘IDs and Records’ and start the search.
Open ‘Wayne Spalder Schedule’
Open the ‘Air Crack’ module form the ‘Information Gathering’ menu.
type airodump
type handshake 1C:28:2E:C5:73:B9
Click on the + signs marked in the screenshot below

Phase 3
Click on ‘Settings’ in the smartphone in the middle of the ‘Air Crack’ module then click on ‘Personal Hotspot’
Click on the phones notes and then on ‘Certification Information’
Open the ‘File Browser’ module from the ‘Data Forensic’ menu.
Username: wasp
Password: !netrusion
Click on ‘Wasp’ -> ‘ClickHere’ -> ‘DownloadMe’ -> ‘cert_complete.txt’
News Stream Live
Phase 1
Open the ‘DNS & VHOST mapping’ module from the ‘Information Gathering’ menu.
type sfuzzer newsstreamlive.ca -t 10
Open the ‘Host Fingerprint’ module from the ‘Information Gathering’ menu.
type fingerprint extranet.newsstreamlive.ca
Open the ‘Foxacid’ module from the ‘Network Intrusion’ menu.
Delivery: TCP/IP
Exploit: Custom SOAP Request
Rootkit: AfterMidnight
Target URL: extranet.newsstreamlive.ca
Target Technology: Sharepoint-2007
Target Ping: 8082
Click on the hand symbol to start.
Click on ‘News Stream Live’.
Phase 2
Open the ‘WMI Scanner’ module from the ‘Information Gathering’ menu.
type netscan
type dig /srv-admin/employee_registry
After ‘XKeyscore’ has opened remove everything from the globe.
Drag ‘News Stream Live’, ‘Laura Walker’ and ‘Andy Hattaway’ onto the globe, click on ‘IDs and Records’ and run the search.
Click on ‘Camera Crew ID’
Remove ‘Laura Walker’ from the globe.
Drag ‘Ottawa Traffic CCTV’ onto the globe.
Click on ‘Travelling Chatter’ (needs to be blue/active) and click on ‘IDs and Records’ (needs to be grey/inactive). Run the search.
Click on ‘Photo Radar Snapshot’.
Open the ‘Drone and Imagery’ module (bottom of the screen, fourth symbol)
Latitude: 45.3210
Longitude: -75.8333
Hit ‘Enter’
Click on the little car symbol.
License Plate: NSL01
Click on ‘Scan Wireless Signatures’
Phase 3
Open the ‘DNS & VHOST mapping’ module from the ‘Information Gathering’ menu.
type osintscan triummedia.com -s google.com -d 500
Open the ‘Fingerprint’ module from the ‘Information Gathering’ menu.
type fingerprint api.billboard.triummedia.com
Open the ‘Foxacid’ module from the ‘Network Intrusion’ menu.
Delivery: UDP
Exploit: Segmentation Fault
Rootkit: AfterMidnight
Target URL: api.billboard.triummedia.com
Target Technology: mediaserver-3.0.1
Target Ping: 1935
Click on the hand symbol.
Click on ‘Trium Media’.
Open the ‘Drone and Imagery’ module (bottom of the screen, fourth symbol)
Click on the little car symbol and enter the license plate again if it’s gone (NSL01).
Scan for wireless signature and wait for the car to pass by one of the symbols on the map (those are billboards).
When the car is close, click on the symbol. Repeat that several times until only one of the smartphones in the list is blue (active/inproximity). Click on that entry.
In the ‘Phone CID Backdoor’ module (which opens by itself if you did everything correct) click on ‘Activate Microphone’ on the right side of the module.
Operation Castle Ivy
Absolute Beginners
Open the ‘Turbine C2 Registry’ (bottom of your screen, first of the six symbols in the middle)
Click on ‘Nite Team 4 Controlled’ -> ‘Operation CastleIvy’ (scroll down if you don’t see it)
Open the ‘WMI Scanner’ module from the ‘Information Gathering’ menu.
type netscan
Open the ‘Password Attack’ module from the ‘Network Intrusion’ menu.
Target: /user/nlightman/c$
Username: nlightman
Start the program -> Click on ‘John the Ripper’ -> Start
Open the ‘File Browser’ module from the ‘Data Forensic’ menu.
type /user/nlightman/c$
Username: nlightman
Password: bcc2themoon
Click ‘Connect’ -> ‘Backup’ -> ‘Important’ -> ‘Warez’ -> ‘Filez’ -> ‘uni74455.dll’
Master of Puppets
Open the ‘XKeyscore Forensics’ module (bottom of the screen, last of the 6 symbols)
Drag ‘Nathan Lightman’ and ‘GRU Investigation Database’ onto the globe.
Click on ‘Financial Transactions’ and ‘IDs and Records’. Run the program.
Click on ‘GRU Profile’
Open the ‘Phone CID Backdoor’ module from the ‘Network Intrusion’ menu.
MAC Adress: C0:90:30:F6:C2:7C
Vendor: Samsung
Click on ‘Start Intrusion’
In the smartphone click on ‘Notes’ -> ‘Trade Info’
Open the ‘Hydra Terminal’ module from the ‘Network Intrusion’ menu.
type connect trade.cryptnet.auction
Node-ID: A771-091C
(don’t close the Hydra Terminal)
Sympathy for the Devil
Open the ‘File Browser’ module from the ‘Data Forensic’ menu.
type localhost
Click ‘home’ -> ‘niteteam4’ -> ‘Documents’ -> ‘INTEL’ -> ‘China’ -> ‘MSS’ -> ’embassy_dictionary_password.txt’
Go back to the ‘Hydra Terminal’
Click on ‘Block IDs’ -> select an empty Block and confirm the upload.
Auctioneer achievement will unlock.
Click on ‘Dr. Ripper’s Network’.
Open the ‘MITM’ module from the ‘Network Intrusion’ menu.
Click on ‘ARP Poisoning’ -> ‘Scan for Hosts’
Target 1: 192.168.1.122
Target 2: 192.168.1.1
Click ‘Start listening’ -> ‘URL Snapper’
Click on ‘Dr. Rippers’s Network’.
Seek and Destroy
Open the ‘Drone and Imagery’ module (bottom of the screen, fourth symbol)
Latitude: 52
Longitude: 13
Click on the hand symbol -> on the little fire symbol
Open the ‘Hydra Terminal’ module from the ‘Network Intrusion’ menu.
type connect hauze.systems
House-ID: house-107
Username: dfriedel
Click on ‘Patio’ and turn on ‘BBQ Preheat Mode’
BBQ achievement will unlock.
Open the ‘Drone and Imagery’ module again.
Set the upper filter to 200+ and the lower filter to 50+
(If you can’t change the filters – on both of my playthroughs I couldn’t – click on ‘back to globe’, enter Latitude and Longitude again and activated the heatmap once more)
Now click on the little drone symbol and target the area seen in the screenshot below.

Click on ‘Confirm Target Location’.
Which option you choose to end the mission is up to you. Just click on what you like best and confirm by typing ‘yes’.
Operation Dark Sentinel
Strength and Endurance
Open the ‘File Browser’ module from the ‘Data Forensic’ menu.
type localhost
Click ‘home’ -> ‘niteteam4’ -> ‘Documents’ -> ‘Dark_Sentinel’ -> ‘Briefing_Files’ -> ‘german_drone_strike_report.pdf’
Open the ‘Social Engineering Toolkit’ module from the ‘Network Intrusion’ menu.
type 1, 1, 2, Kruger Services, 2, 1, 3, 1, 4, 3, subject, name, yes
Click on ‘KSPC-LUCAS’
Open the ‘WMI Scanner’ module from the ‘Information Gathering’ menu.
type netscan
type dig /erp/accounting/finances
Open the Eploit Database from the ‘Information Gathering’ menu.
typre searchsploit SimplERP
Open the ‘Foxacid’ module from the ‘Network Intrusion’ menu.
Delivery: TCP/IP
Exploit: Custom SOAP Request
Rootkit: Assassin
Target URL: /erp/accounting/finances
Target Technology: SimplERP
Target Port: 9090
Drag ‘Kruger ERP Database’, ‘Dan Friedel’ and ‘Martin Brandt’ onto the globe, select ‘Financial Transactions’ and run the program.
Click on ‘Dan Friedel Rental Agreement’
Remove ‘Martin Brandt’ and therefore add ‘John Schaffer’. Run again.
Click on ‘Kruger Client Transaction List’
Remove ‘Dan Friedel’, add ‘Sophie Aachen’ and run the program.
Click on ‘Sophie Aachen Rental Agreement’
Remove ‘Sophie Aachen’ and add ‘Jan Pfaff’. Run.
Click on ‘Jan Pfaff Rental Agreement’
Remove ‘Jan Pfaff’ and add ‘Martin Brandt’. Run.
Open ‘Martin Brandt Rental Agreement’
Remove ‘Martin Brandt’ and add ‘Michelle Fiedler’. Run.
Open ‘Michelle Fiedler Rental Agreement’
One for all, all for one
Use the following combinations in XKeyscore (symbol 6, bottom of screen) and open the receipts you find through the searches.
(Jan Pfaff + Sophie Aachen) | (Martin Brandt+Michelle Fiedler) + German Cab Transport (Travelling Chatter)
Connecting to 2 suspect networks and identifying their internal systems
Open the ‘Foxacid’ module from the ‘Network Intrusion’ menu.
Delivery: UDP
Exploit: Custom SOAP Request
Rootkit: AfterMidnight
Target URL: shop.hookshotgames.com
Target Technology: CRM4.0
Target Port: 80
Click on ‘Hookshot Shop’
Open the ‘Social Engineering Toolkit’ module from the ‘Network Intrusion’ menu.
type 1, 1, 2, Novelty Publishing, 2, 1, 3, 1, 4, 3, subject, name, yes
Click on ‘Novelty Publishing Admin Server’
Open the ‘WMI Scanner’ module from the ‘Information Gathering’ menu.
type netscan
type dig /erp/accounting/finances
Open the ‘Turbine C2 Registry’ (bottom of your screen, first of the six symbols in the middle)
Click on ‘Hookshot Shop’
Open the ‘WMI Scanner’ module from the ‘Information Gathering’ menu.
type netscan
type dig /erp/accounting/finances
Exploring any external third party that links the various companies
Open the ‘MITM’ module from the ‘Network Intrusion’ menue.
Select ‘ARP Poisoning’ and run a scan.
Target 1: 192.168.1.15
Target 2: 192.168.1.1
Start listening and run the URLSnapper.
Open the ‘Fingerprint’ module from the ‘Information Gathering’ menu.
type fingerprint 19.16.177.159
The homeland is first
Make sure you’re connected to ‘Hookshot Shop’
Open the ‘File Browser’ module from the ‘Data Forensic’ menu.
type 10.212.102.180
Username: MeCacheAdmin
Password: Mecache4u!
Click ‘Hookshot_Games’ -> ‘HR’ -> ‘ID_Cards’ -> ‘Temporary’ -> ‘Carl_Hoffman.id’
Open the ‘Turbine C2 Registry’ (bottom of your screen, first of the six symbols in the middle)
Click ‘Novelty Publishing Admin Server’
Open the ‘File Browser’ module from the ‘Data Forensic’ menu.
type 10.212.102.180
Username: MeCacheAdmin
Password: Mecache4u!
Click ‘Hookshot_Games’ -> ‘HR’ -> ‘ID_Cards’ -> ‘Temporary’ -> ‘Carl_Hoffman.id’
Open the ‘Social Engineering Toolkit’ module from the ‘Network Intrusion’ menu.
type 1, 1, 3, [email protected], no, 2, 4 , 3, 1, 4, 3 , subject, name, yes
Click on ‘Carl-WorkPC’
Open the ‘File Browser’ module from the ‘Data Forensic’ menu.
type /Users/Hoffman/C$
Username: hoffman
Password: ChaosReigns
Click ‘User’ -> ‘Documents’ -> ‘Important_Files’ -> ‘human_solutions_contract.doc’
While I breathe, I hope
Open the ‘Turbine C2 Registry’ (bottom of your screen, first of the six symbols in the middle)
Click ‘Rogue Network’ and then ’37Alpha.Onion’
Open the ‘File Browser’ module from the ‘Data Forensic’ menu.
type /level05
Username: jmilton
Password: angel
Click on ‘welcome.jpg’
Operation Nitro Winter
New Market
Don’t close the Hydra Terminal throughout the whole operation.
Open the ‘File Browser’ module from the ‘Data Forensic’ menu.
type localhost
Click on ‘home’ -> ‘niteteam4’ -> ‘Documents’ -> ‘Nitro_Winter’ -> ‘simplerp_exploit.rar’
Open the ‘Hydra Terminal’ module from the ‘Network Intrusion’ menu.
type connect system.hsconsulting.de
Click on the only available job and accept it.
Open the ‘Foxacid’ module from the ‘Network Intrusion’ menu.
Delivery: UDP
Exploit: Crafted SNMP Packet
Rootkit: AfterMidnight
Target URL: login.limbo.com
Target Technology: PHP-7.0.4
Target Port: 80
Click on ‘Limbo Login Server’
Open the ‘Foxacid’ module from the ‘Network Intrusion’ menu.
Delivery: SCTP
Exploit: Exec Code Overflow
Rootkit: Verboten
Target URL: /erp/accounting/finances
Target Technology: SimplERP
Target Port: 9090
The ‘Verboten’-rootkit will open up.
type run rock.c
type run contactstem
type exec deploy
Go back to the Hydra Terminal and enter ‘NX6QP7’ as confirmation code.
Black Forest
We’re going to do this the super lazy way. Open the Hydra Terminal and click on a mission. Accept it and enter the confirmation code. Repeat until all jobs are done. This way the Salami Slicer Achievement will unlock.
MyAncestree: 7XXZ6K
Coronautica Navigations: DAQUTC
Aristishia Designs: 3FANQ2
Candlelite Web Design: R76JE3
Gener8 Web Hosting: 6KA3HJ
Now go back to the Hydra Terminal.
type query hsc-0486
type query hsc-9855
type query hsc-0136
type query hsc-6653
type query hsc-1246
Free Range
Go to the Hydra Terminal and type ‘refresh’. Find the job for ‘Nexxit GPS’ and accept it.
Enter the Confirmation Code: BG63WH
Go back to the Hydra Terminal. Find the job for ‘Lo Cal Health and Nutrition’ and accept it.
Enter the Confirmation Code: H22TFA
Back to the Hydra Terminal.
type query hsc-000a
type query hsc-9783
type query hsc-7486
type query hsc-8812
type query hsc-0774
type query hsc-2260
type query hsc-5008
type query hsc-7802
XKeyscore will open.
Drag ‘Moscone Center’, ‘Coronautica Navigations’ and ‘Nexxit GPS’ onto the globe, select ‘IDs and Records’ and start the search.
Click on ‘Moscone Center Invitation’.
Mystery Meat
Open the ‘File Browser’ module from the ‘Data Forensic’ menu.
type localhost
Click ‘home’ -> ‘niteteam4’ -> ‘Documents’ -> ‘Nitro_Winter’ -> ‘Unredacted_Bastek_Company_Profile.pdf’
Open the ‘Fingerprint’ module from the ‘Information Gathering’ menu.
type fingerprint bio.bastek.eg
Open the ‘Exploit Database’ from the ‘Information Gathering’ menu.
type searchsploit FingrTip
XKeyscore will open.
Drag ‘AccessBio’ and ‘Raneem Saliba’ onto the globe, select ‘IDs and Records’ and run the search.
Click on ‘FingrTip Algorithm’
Open the ‘Phone CID Backdoor’ module from the ‘Network Intrusion’ menu.
MAC Adress: 5E:93:D9:14:93:9F
Vendor: Sony
Activate the personal hotspot in the phone settings.
Open the ‘Active Directory’ from the ‘Information Gathering’ menu.
type /it/active-directory
Open the ‘File Browser’ module from the ‘Data Forensic’ menu.
type /accounting/client_files
Username: cerika
Password: !luckystar79
Click ‘Transactions’ -> ‘Receipts’ -> ‘Tehran-10015951.pdf’
It’s up to you what you do with the information you found. Make a choice and confirm with ‘yes’
Flat Iron
Open the ‘Foxacid’ module from the ‘Network Intrusion’ menu.
Delivery: TCP/IP
Exploit: Alpha Exploit Kit
Rootkit: AfterMidnight
Target URL: 99.34.62.148
Target Technology: Apache-2.2
Target Port: 80
Click on ‘Bastek CTO Private Server’
Open the ‘WMI Scanner’ module from the ‘Information Gathering’ menu.
type netscan
Open the ‘Password Attack’ module from the ‘Network Intrusion’ menu.
Target: /cto/tlobeoteu/c$
Username: tlobeoteu
Select ‘John the Ripper’ and click ‘Start’
Open the ‘File Browser’ module from the ‘Data Forensic’ menu.
type /cto/tlobeoteu/c$
Username: tlobeoteu
Password: NervesOfSteel
Click ‘User’ -> ‘Documents’ -> ‘nic.cage’
XKeyscore will open. Ignore it.
Open the ‘Hydra Terminal’ module from the ‘Network Intrusion’ menu.
type ‘connect qebai.com/remote/v2x-fe135b019d’
In the new window click on the little map symbol. Next click on ‘Home’ and then ‘add a stop’.
type ‘Sejongno Public Parking Lot’ (or select ot from the list that pops up after you typed the first letter)
Now you only need to click the plus-sign next to ‘Sejongno Public Parking Lot’
Open the ‘Foxacid’ module from the ‘Network Intrusion’ menu.
Delivery: TCP/IP
Exploit: Custom SOAP Request
Rootkit: AfterMidnight
Target URL: 05.ps-gatescan.kr
Target Technology: Apache-2.0
Target Port: 443
Click on ‘Gate 05’
Open the ‘MITM’ module from the ‘Network Intrusion’ menu.
Click on ‘ARP Poisoning’ -> ‘Scan for Hosts’
Target 1: 192.168.255.7
Target 2: 192.168.1.1
Click ‘Start listening’ -> ‘URLSnapper’ (you’ll have to wait a bit)
Open the ‘Drone and Imagery’ module (bottom of the screen, fourth symbol)
Latitude: 37.5
Longitude: 126.9
Click on the hand symbol and then on the little car symbol.
Enter 58L0323 as license plate.
Operation Royal Gate
The Answer
Open the ‘Hydra Terminal’ module from the ‘Network Intrusion’ menu.
type ‘connect system.hsconsulting.de’
Click on the only available job and accept it.
Open the ‘Foxacid’ module from the ‘Network Intrusion’ menu.
Delivery: TCP/IP
Exploit: Custom SOAP Request
Rootkit: AfterMidnight
Target URL: login.bixonbanking.com
Target Technology: Apache-2.0
Target Port: 80
Click on ‘Bixon Banking Login Server’
Glory achievement will unlock here.
Click on the ‘Andromeda Shell’ symbol. (It’s the new symbol on the left bottom of the screen above the game menue)
type ‘1’, ‘VERBOTEN’
Hunting Season
Open the ‘File Browser’ module from the ‘Data Forensic’ menu.
type ‘localhost’
Click ‘home’ -> ‘niteteam4’ -> ‘Documents’ -> ‘Royal_Gate’ -> ‘RAINVEST’
Open the ‘Turbine C2 Registry’ (bottom of your screen, first of the six symbols in the middle)
Click on ‘Nite Team 4 controlled’ and then on ‘Mossad Data Archive’
Open the ‘Information Gathering’ menue and click on the 4th entry.
Open the ‘File Browser’ module from the ‘Data Forensic’ menu.
type ‘/files/backupSrv’
Username: backupAdmin
Password: Xp2s63b6
Click ‘2018’ -> ‘App_Installers’ -> ‘Financial’ -> ‘rainvest_setup-v1.6.exe’
Ace Magnets
Open the ‘Turbine C2 Registry’ (bottom of your screen, first of the six symbols in the middle)
Click on ‘Naicho Finances’
Open the ‘Andromeda Shell’
type ‘2’, ‘6’, ‘yes’, ‘yes’, ‘3’, ‘/db/shokuin/meibo’, ‘yes’
Drag ‘NAICHO’, ‘Bixon Software’ and ‘Kaneko Tetsuya’ onto the globe, select ‘IDs and Records’ and run the search.
Click on ‘Contract Renewal NAICHO Bixon’
Open the ‘Air Crack’ module form the ‘Information Gathering’ menu.
type ‘airodump’
type ‘handshake 52:E6:BA:C2:FB:24’
Click on the plus sign marked in the screenshot below

Activate the personal hotspot in the phones settings.
Open the ‘Andromeda Shell’ again.
type ‘3’, ‘3’, ‘/main/administration/employees’, ‘yes’
Remove ‘Kaneko Tetsuya’. Add ‘Hoke Mizuma’. Select ‘IDs and Records’ and run the search.
Click on ‘Rainvest Press Release’
Open the ‘Andromeda Shell’ again.
type ‘3’, ‘4’, ‘yes’, ‘8’, ‘yes’, ‘yes’, ‘4’, ’98:92:63:A1:5D:22′, ‘Makadon’
Big Brother
Open the ‘Turbine C2 Registry’ (bottom of your screen, first of the six symbols in the middle)
Click on ‘GRU Temp Personnel Archive’
Open the ‘File Browser’ module from the ‘Data Forensic’ menu.
type ‘/secure-temp19478/files’
Username: temp19478
Password: f9ZE_uVk
Click on ‘temp19478’, ‘TcheknobOg.pdf’
Open the ‘File Browser’ module from the ‘Data Forensic’ menu.
type ‘localhost’
Click ‘home’ -> ‘niteteam4’ -> ‘Documents’ -> ‘INTEL’ -> ‘Russia’ -> ‘GRU’ -> ‘spiez_lab_backdoor_exploit.rar’
Open the ‘Hydra Terminal’ module from the ‘Network Intrusion’ menu.
type ‘connect trade.cryptnet.auction’
Node ID: f2n3-959p
Click on Block IDs -> choose one and confirm the upload
Click on ‘Mukd3n’s Private Server’
Open the ‘File Browser’ module from the ‘Data Forensic’ menu.
type ‘/user/mukd3n/D$’
Username: mukd3n
Password: -ruptur3d-
Click ‘Users’ -> ‘Mukd3n’ -> ‘Documents’ -> ‘Misc’ -> ‘SIGIL’ -> ‘PUREMORNING.doc’
Dead Man’s Hand
Open the ‘File Browser’ module from the ‘Data Forensic’ menu.
type ‘localhost’
Click ‘home’ -> ‘niteteam4’ -> ‘Documents’ -> ‘Royal_Gate’ -> ‘ICM32’
Open the ‘Social Engineering Toolkit’ module from the ‘Network Intrusion’ menue.
type ‘1’, ‘1’, ‘1’, ‘dialodge-gaming.net’, ‘2’, ‘1’, ‘3’, ‘1’, ‘4’, ‘3’, ‘subject’, ‘name’, ‘yes’
Click on ‘Jack’s Office-DGaming’
Open the ‘Foxacid’ module from the ‘Network Intrusion’ menu.
Delivery: TCP/IP
Exploit: Alpha Exploit Kit
Rootkit: AfterMidnight
Target URL: 37.67.18.212
Target Technology: Apache-2.2
Target Port: 9595
Click on ‘ICM32 – Unknown’s PC’
Open the ‘MITM’ module from the ‘Network Intrusion’ menu.
Click on ‘LLMNR Poisoning’ -> ‘Scan for Hosts’
Target 1: 192.168.40.210
Target 2: 192.168.1.1
Click ‘Start listening’ -> ‘Packet Sniffer’ (wait for a while)
Royal Flush
Depending on if you want the Deception Achievement or not you have to follow either Route 1 or Route 2. Route 1 will fail the activation which will unlock Deception. Route 2 will activate Fay 2.0 and you will unlock the Long Live the King Achievement.
A warning though: If you choose to go for the Deception Achievement you will have to create a new account/reset yours and replay every mission since the activation of Fay2.0 will be locked and I haven’t found a way to unlock it.
Route 1
Open the ‘File Browser’ module from the ‘Data Forensic’ menu.
type ‘localhost’
Click ‘home’ -> ‘niteteam4’ -> ‘Documents’ -> ‘Royal_Gate’ -> ‘Andromeda_Activation’
Open the ‘Andromeda Shell’
type ‘4’, ‘yes’ -> wait for the timer to run out -> ’99’, ‘4’, ‘yes’ -> wait for the timer to run out -> ’99’, ‘4’, ‘yes’ -> wait for the timer to run out
Route 2
Open the ‘File Browser’ module from the ‘Data Forensic’ menu.
type ‘localhost’
Click ‘home’ -> ‘niteteam4’ -> ‘Documents’ -> ‘Royal_Gate’ -> ‘Andromeda_Activation’ -> Open all files in that folder and put them in an order so you know where Alpha, Bravo, Delta and Echo are.
I had it organized like this

Before I tell you what to type I’m gonna explain what you’ll have to do since the things you have enter seem to vary from playthrough to playthrough. After you started the activation the terminal is going to show you a Sequence ID (for example Echo-11D) and you have to find it in the documents you opened and type it into the console.
You got enough time so don’t worry. You can do it 🙂
Open the ‘Andromeda Shell’
type ‘4’, ‘yes’
In the end you will be asked ‘Who was my first child?’
Answer: FAY
Operation Withering Dusk 1/2
Book Move
Open the ‘File Browser’ module from the ‘Data Forensic’ menu.
type localhost
Click ‘home’ -> ‘niteteam4’ -> ‘Documents’ -> ‘Withering_Dusk’ -> ‘Kotok_Analytics_Data_Buyer-Report.pdf’
Open the ‘Foxacid Server’ module from the ‘Network Intrusion’ menu.
Delivery: UDP
Exploit: Content Spoofing
Rootkit: AfterMidnight
Target URL: email.corococoins.io
Target Technology: OutlookWebAccess
Target Port: 80
Click on ‘Corococoins Internal Server’
Open the ‘Active Directory’ from the ‘Information Gathering’ menu.
type /ad/key_database/kyc
Click ‘Corporations’ -> ‘AlphaBlue’
The ‘XKeyscore Forensics’ module will open automatically. (If it doesn’t, it’s the last symbol on the bottom of your screen)
Drag all available entities onto the globe.
Click on ‘IDs and Records’ and on the symbol that starts the search.
Open the ‘Foxacid Server’ module from the ‘Network Intrusion’ menu.
Delivery: UDP
Exploit: Crafted SNMP Packet
Rootkit: AfterMidnight
Target URL: modulus.eleventenmedia.com
Target Technology: PHP-7.0.4
Target Port: 80
Click on ‘Eleventen Modulus Beta’.
Open the ‘Satelite Feed’ module from the ‘Advanced Tools’ menu (or click on the fourth symbol on the bottom of your screen).
Latitude: 47.5
Longitude: 19.1
Click on the little car symbol and enter NJU-441
Click on ‘Scan Wireless Signatures’.
As soon as the target gets close to one of the Smart Billboards we just hacked you click on it.
You will see a list of mobile devices that are in the vicinity of those billboards.
When there is only one highlighted device left click on it.
(It’s an Apple phone – 1C:98:A2:34:BF:3D)
Now that you got access to the phone click on ‘Emails’ -> ‘Storage Limit nearly reached’
Open the ‘File Browser’ module from the ‘Data Forensic’ menu.
username: A.Gunsberg
password: M1nt_Stat3
Click ‘log.htm’
Open the ‘Host Fingerprint’ module from the ‘Information Gathering’ menu.
type fingerprint ns2.farkaslearning.com
Open the ‘Foxacid Server’ module from the ‘Network Intrusion’ menu.
Delivery: TCP/IP
Exploit: Custom SOAP request
Rootkit: AfterMidnight
Target URL: ns2.farkaslearning.com
Target Technology: Apache-2.0
Target Port: 80
Click on ‘Farkas Learning Intranet’
Open the ‘File Browser’ module from the ‘Data Forensic’ menu.
type /project-manager/repo/
Username: s.polgar
Password: R3ach_F0R_the_$Ky
Click ‘Uplink51’ -> ‘uplink51_instV2.11.zip’
Open the ‘Goliath-7’ module. It’s the third symbol on the bottom of your screen.
Select ‘Uplink 51’ on the right side of your screen and click ‘Activate Cluster’, then ‘Deploy’ and type ‘yes’ followed by pressing ‘enter’.
(You might have to deactivate the cluster and repeat the steps described above to activate it again to trigger a reaction from Dylan)
Now click on the new symbol on the bottom left on your screen.
Open the ‘Foxacid Server’ module from the ‘Network Intrusion’ menu.
Delivery: SST
Exploit: Segmentation Fault
Rootkit: AfterMidnight
Target URL: uplink51.farkaslearning.com
Target Technology: RemoteDesktop
Target Port: 33845
Click on ‘Uplink51 Remote Desktop’
Open the ‘Foxacid Server’ module from the ‘Network Intrusion’ menu.
Delivery: SST
Exploit: Content Spoofing
Rootkit: AfterMidnight
Target URL: 241.248.50.106
Target Technology: PowerShell
Target Port: 5544
Click on ‘Uplink51 Satelite’
Open the ‘File Browser’ module from the ‘Data Forensic’ menu.
type /projects/uplink51/files
Username: s.polgar
Password: R3ach_F0R_the_$Ky
Click ‘Uplink51’ -> ‘Gankai-Var-C-Ver-2.14.u51’
Building a Bridge
Open the ‘File Browser’ module from the ‘Data Forensic’ menu.
type localhost
Click ‘home’ -> ‘niteteam4’ -> ‘Documents’ -> ‘Withering_Dusk’ -> ‘Gankai-Var-C-Ver-2.14.u51’
Now you open ‘Uplink 51’ (it’s the symbol on the left of the screen above the menu) and click the arrow on the right side of Uplink 51.
Should look like this:

Now you click on ‘Gankai Variant C’ and type ‘D01-Guest’ followed by ‘Register’ into Uplink 51.
Open the ‘Fingerprint’ module from the ‘Information Gathering’ menu.
type fingerprint www.quevedolabs.com
XKeyScore will open automatically. Close it.
Open the ‘File Browser’ module from the ‘Data Forensic’ menu.
type ‘localhost’
Click ‘home’ -> ‘niteteam4’ -> ‘Documents’ -> ‘Withering_Dusk’ -> ‘Guadalajara_Tech_Universities.doc’
XKeyScore will open automatically once again.
Drag ‘Carla Repetto’, ‘Quevedo Labs’ and ‘Wizeline Al Academy’ onto the globe, select ‘IDs and Records’ and run the program.
Click on ‘Tapatio Tech Article – Wizeline Al’
Remove ‘Wizeline Al Academy’ from the globe, add ‘Joaquin Araiza’ and run the program again.
Click on ‘Guadalajara Spectator Article’.
Open Uplink 51.
type D01-Guest, register
Hypermodernism
Open the ‘File Browser’ module from the ‘Data Forensic’ menu.
type ‘localhost’
Click ‘home’ -> ‘niteteam4’ -> ‘Documents’ -> ‘Withering_Dusk’ -> ‘Gankai_User_List-QL.doc’
Open the ‘File Browser’ module from the ‘Data Forensic’ menu.
type gankaiQVL214.quevedolabs.com
username: Ab1024-729
password: Proof59
click ‘Gankai_Commands’ -> ‘ARC_TONIC_I.pdf’
Now open ‘Uplink 51’ again.
type Ab1024-729, RRQ, RC3DB5DIM, Kotok
Switch Uplink 51 back to ‘F.A.Y.’
type -hex 416363657373204b6f746f6b20416e616c79746963732064617461736574206174207263332d6462352d64696d2e7175657665646f6c6162732e636f6d207573696e6720796f757220746563686e696369616e205573657249442e
Open the ‘File Browser’ module from the ‘Data Forensic’ menu.
type rc3-db5-dim.quevedolabs.com
username: Ab1024-729
password: Spin-The-Dagger
click ‘Kotok_Analytics_DATA’ -> ‘kotok_data_RC3Db5DIM.axx’
Open Uplink 51 once again and switch back to Gankai Variant C
type KAplo, kotok_data_RC3Db5DIM.axx, Orson Monroy, 12
Strategic Crush
Open the ‘File Browser’ module from the ‘Data Forensic’ menu.
type ‘localhost’
Click ‘home’ -> ‘niteteam4’ -> ‘Documents’ -> ‘Withering_Dusk’ -> ‘Quevedo_Climate_Dataset.doc’
Open the ‘Foxacid Server’ module from the ‘Network Intrusion’ menu.
Delivery: UDP
Exploit: Content Spoofing
Rootkit: AfterMidnight
Target URL: jupiter.botvin.io
Target Technology: CiscoVPNClient
Target Port: 80
Click on ‘Botvin Sol Intranet’
Open the ‘Active Directory’ from the ‘Information Gathering’ menu.
type /sol/active_directory
click ‘CN=Research’ -> ‘OU=Research-users’
XKeyscore will automatically open.
Drag all entities onto the globe, select ‘Financial Transactions’ and run the program.
Click on ‘AtkinSlate Receipt Pages 1-3’
Next you want ‘Dr. Dana Chen’, ‘Dr. Ahmed al-Sayed’ and ‘Bonanza Labs’ on the globe. Select ‘IDs and Records’ and run the program.
Click on ‘New Dataset Email – Bonanza Labs’
Open the ‘Phone CID Backdoor’ module from the ‘Network Intrusion’ menu.
MAC: 3D:1F:00:89:39:3F
Vendor: Samsung
Click on ‘Start Intrusion’
click ‘Messages’ -> ‘Juan Zamora’
Open the ‘Foxacid Server’ module from the ‘Network Intrusion’ menu.
Delivery: TCP/IP
Exploit: H.264 SIP Session Header
Rootkit: AfterMidnight
Target URL: chat.walkerailab.com
Target Technology: ChitChat-v2.34
Target Port: 9922
Click on ‘Walker AI Intranet – Logs’
Open the ‘WMI Scanner’ module from the ‘Information Gathering’ menu.
type netscan
Open the ‘Foxacid Server’ module from the ‘Network Intrusion’ menu.
Delivery: SPX
Exploit: Segmentation Fault
Rootkit: AfterMidnight
Target URL: login.northwesternsecurity.com
Target Technology: ATS-5.2.1
Target Port: 121
Click on ‘North Western Customer Database’
Open the ‘Hydra Terminal’ module from the ‘Network Intrusion’ menu.
type connect vcr.niteteam4.com
Enter the live feed ID: nws-wai-0141
Enter the following start times for the clips:
Clip 1: 2 seconds
Clip 2: 1 second
Clip 3: 7 seconds
Clip 4: 4 seconds
Clip 5: 3 seconds
Operation Withering Dusk 2/2
Symmetrical Defense
Open the ‘File Browser’ module from the ‘Data Forensic’ menu.
type ‘localhost’
Click ‘home’ -> ‘niteteam4’ -> ‘Documents’ -> ‘Withering_Dusk’ -> ‘gankai_Prime.u51’
Open ‘Uplink 51’ and switch it to ‘Gankai Prime’
type hello, Authenticate Signal
Open the ‘Phone CID Backdoor’ module from the ‘Network Intrusion’ menu.
MAC: 3D:1F:00:89:39:3F
Vendor: Samsung
Click on ‘Start Intrusion’
In the phone you will find an app called ‘Auth’. Open it. Copy&Paste the code it shows you into Uplink 51.
type Continue
type fail safe, RA:B:C>RABC
Switch Uplink 51 back ‘to Gankai Variant C’
type Ab1024-729, WolfSec, Titanium
Open the ‘Fingerprint’ module from the ‘Information Gathering’ menu.
type fingerprint sf-moxon.surefirearms.com
Xkeyscore will open automatically. Remove everything from the globe and add ‘SureFire Arms’ and ‘Moxon Security’, select ‘IDs and Records’ and run the program.
click on ‘Moxon Security Memorandum’
Open the ‘Foxacid Server’ module from the ‘Network Intrusion’ menu.
Delivery: TCP/IP
Exploit: Custom SOAP Request
Rootkit: AfterMidnight
Target URL: database.pec-districts.za
Target Technology: OracleAppServer
Target Port: 1521
Click on ‘Pecomm District Database’
Open the ‘Active Directory’ from the ‘Information Gathering’ menu.
type /districts/directory
click ‘CN=Power Plants’ -> ‘OU=Districts-plants’ -> ‘CN=09_Western_Cape’ -> ‘CN=Koeberg’
Open the ‘Hydra Terminal’ module from the ‘Network Intrusion’ menu.
type connect powernu.pecomm.za
click ‘Guest’ -> ‘Recycle Bin’
At this point the Earth Day 1990 Achievement will be unlocked.
Go back to the desktop. Now click on ‘POWERNu’
username: ADMIN
password: PASSWORD
Play the mini-game and make everything look like in the screenshot below.
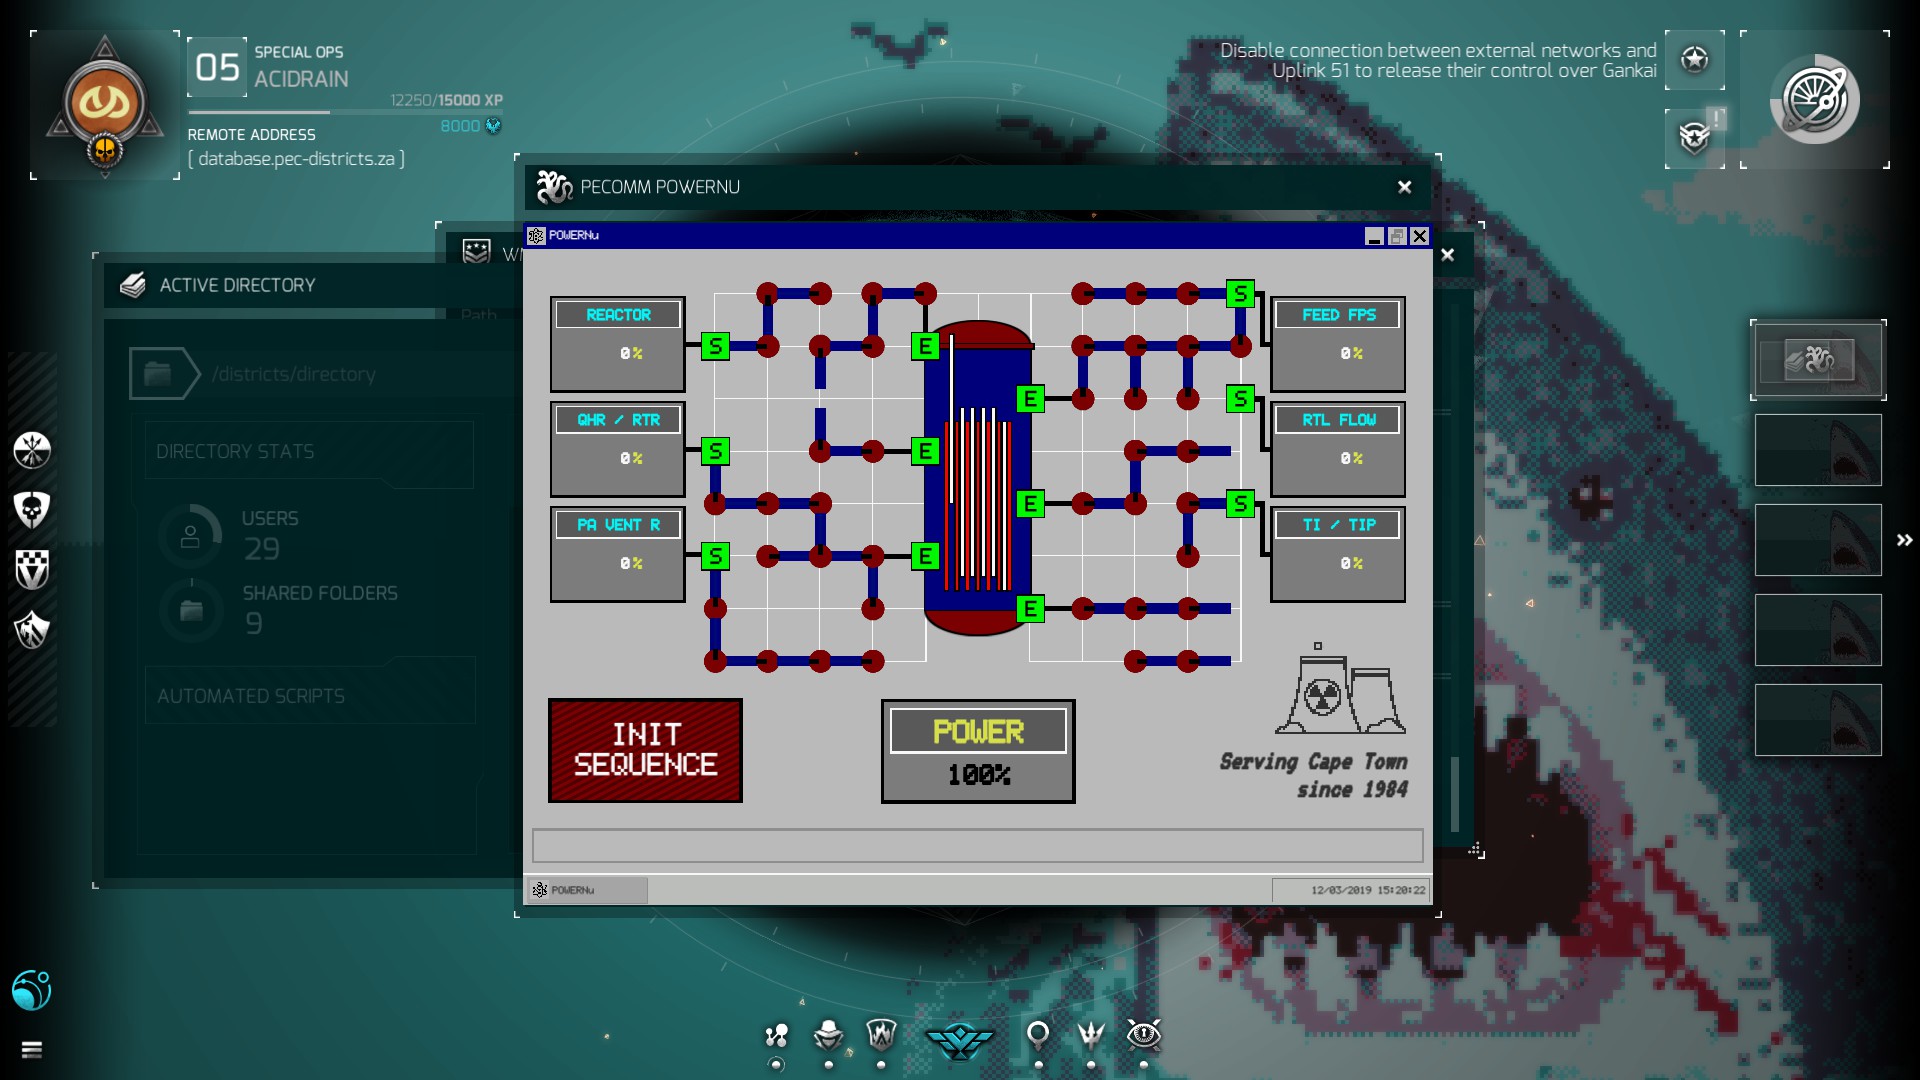
Now click ‘Init Sequence’ and after Dylan gave you his little speech click the button again.
At this point the Attempted Atomic Arsonist Achievement will be unlocked.
Next you make everything look like in the next screenshot.

Click ‘Init Sequence’ again and wait for the timer to run down.
To get the missing achievements type the following things into Uplink 51 (to F.A.Y.)
“Dylan says hi” – Work friends achievement should unlock now.
“Open the pod bay doors” – F.A.Y. 9000 achievement should unlock now.
“A/S/L” – None/All/Everywhere achievement should unlock now.
Open the ‘Satelite Feed’ module from the ‘Advanced Tools’ menu (or click on the fourth symbol on the bottom of your screen).
Latitude: -33.9
Longitude: 18.4
At this point the Extended Forecast achievement will be unlocked.
Bounties
You can find the bounties where you also can find the story missions. (big square with circle in it in the top right corner of the screen)
I actually didn’t plan on doing more than one bounty but I was bored. Might do some more in the future but here is what I got for now.
After entering the solution the Bounty Hunter achievement will unlock.
Bounty -> Solution
Global News -> G-NOME
globalpharmacorp.com -> login.gpc-extranet.com
aventech.com -> /server-03/accounting/erp
mightmedia.net -> media-srv01.mightmedia.net
DGSE / Soldier of Fortune -> Bakri Hakeem Touma
forcsec.net -> 74:35:D9:EB:84:2C
militic.net -> Devon M. Houston
The following solutions were given to me by Dimir
-D-
DGSE / Soldier of Fortune -> Bakri Hakeem Touma
-F-
[link] -> 74:35:D9:EB:84:2C
-DGSE-
Media server: [link]
Recruiting officer: Devon M. Houston
Supplier URL: [link]
-CIA-Person name: Zi Feng
-CSIS-
ERP server: /server-03/accounting/erp
Sub-domain: [link]
Infected station IP: 23.220.36.187
-GCHQ-
Company name: G-NOME
Project name: Project Upward Spiral
Privet key: 0x1Eb0cBc6b247f4e5925AFCB74Bf2AC
Buyer name: Seshata Group
Adress: 13 Rusper Rd, Horsham
-COMPLETE-
-ASIS-
CCTV IL-server: [link]
CCTV WiFi enc.: twofish
CCTV footage: 07rec201810171500.wmv
Group name: AAZ
Poison name: Batrachotoxin
-COMPLETE-
-DGSE-
Media server: [link]
Recruiting officer: Devon M. Houston
Supplier URL: [link]
Recruitment officer: Bakri Hakeem Touma
Owner: Jessie W. Kennedy
-COMPLETE-
Another contribution to bounty solutions by Zhen-Xlogic
-MOSSAD & ASIS-
MOSSAD needs to know the substance used for the attack.
Solution: Batrachotoxin
– MOSSAD & ASIS –
OVERVIEW : Help the ASIS find information about a missing Australian journalist.
PROVIDED INFO : Your target: canberraembassies.gov
OBJECTIVE : Find a vulnerable sub-domain on the Israeli embassy server.
Solution: wireless.il-cane.gov
– CSIS – GCHQ –
OVERVIEW : CSIS wants to help a Canadian company that is competing against a British pharmaceutical company.
PROVIDED INFO : Your target: sepract.com
OBJECTIVE : What is the maximum length allowed by their password polices
Solution: 12
– CSIS –
OVERVIEW : CSIS wants to help a Canadian company that is competing against a Chinese pharmaceutical company.
PROVIDED INFO : Your target: nanofi.com
OBJECTIVE : Find a suspicious bank account ID
Solution: HSBC-018-11175-1921
Another contribution to bounty solutions by Yourop
– RAW –
OVERVIEW: Help RAW investigate the other companies related to the Danbacheng camp operation.
PROVIDED INFO: Your target: AE:21:D2:DF:CC:AA, Google
OBJECTIVE: Find a password for either Egilic or Aqua-worx’s employee intranet portal
SOLUTION: Aqua-worx: verycool!!!
– RAW –
OVERVIEW: Help RAW investigate the other companies related to the Danbacheng camp operation.
PROVIDED INFO: Your target: projects-cn.masklance.com
OBJECTIVE: Find the project manager for Masklance’s upcoming surveillance project
SOLUTION: Fai Tien
– RAW –
OVERVIEW: Help RAW investigate the other companies related to the Danbacheng camp operation.
PROVIDED INFO: Target’s schedule: Friday 0900, URL: Nenstruct.com
OBJECTIVE: Find the senior engineer’s phone IP address
SOLUTION: 54.124.77.65
– RAW –
OVERVIEW: Help RAW find railglobal.co’s waste disposal contractor.
PROVIDED INFO: 73.171.139.158 was found to be vulnerable
OBJECTIVE: Find a vulnerable domain on the contractor’s network
SOLUTION: system-cl3.uquare.com
Another contribution to bounty solutions by Mr.Nobody
G7.0005
SAD,CIA
SAD needs help to identify which part of the US airspace surefire is conducting its aircraft expreiments
Surefirearms.com R&D
TBW archive 43946D
Find the city or the region associated:
answer – SOUTH FRANKLIN, VERMONT
CSIS +10 GRU -10
CSIS suspects Surefire of selling experimental technology to the russians.
Surefirearms.com R&D Division
Find the region where the technology was shipped to
Answer – noatak
Find the awner of the cellphone
forcsec.net , Friday 19
Answer – Jessie Kennedy
Open World
January 2019 – Honey Badger
Part 1 – Alexis Ballard
Part 2 – Philip Woolfe
Part 3 – Smart Card Reader
Open World
Disinformation Sharing
Part 1 – Polycom HDX9002 VCU
Part 2 – citi.064L05QPPMRK6.vaultdata.zip
Part 3 – VRE5DQ
Open World – Ransom Where
Part 1 – Charlie Mast
Part 2 – 127.119.2.63
Part 3 – Karl Zimmerman
Naichi +10
Pieces of a surefire device were found in the debris of Japann.s latest earthquake. Part of its serial number is still readable.
Surefirearms.com weapons division serial number contain x1411-
Find the device`s full product name
answer – jiJinx1411-0519
Straw Sandal
Part One – Dalian
Part two – BIRYONG
Part three – Songwol Presbyterian Church
Halloween
part 1 – 43A1n77ZC
part 2 – Roasted N Ready
part 3 – owa.batesbeverages.com
part 4 – Pumpkin spice flavored syrup
Part 5 – George Bush Center for intelligence
Haloween part 2 (nasa)
Part 1 – /satcat/25544/iss_zarya
Part 2 – 128.245.0.5
Part 3 – 33-5C2 (if not workin try 335C2)
Part 4 – BL4CKH0L3
Part 5 – SPIRITU4LM4CHIN3
Surefirearms black mail
germany – sfdeparkinson.wmv
Another contribution by Retr0_Kid1984
“G7 Chapter 2: Executive Error “
Part 1: Ratko Boskoski
Part 2: fxmsp
Part 3: nsa_hr
“Re-Education”
Part 1 : chinatelecom.tech
Part 2 : dabancheng-project-plans.pdf
Part 3 : 18DW66
If you should find a solution not listed here, feel free to leave it in the comments. It will be added.