Overview
Useful strategies for farming creatures without getting overpowered by their constant respawns.
Remarks
Starting on a new planet can be tricky, as your resources are low and you have a large amount to build. One of the hardest things to get in your early game is gold, and this guide focuses on creating a farming system using as little advanced items as possible. Every item used in this guide is available to a player on the first planet, so it can be used anywhere.
One of the early tricks a player can do is to grab the random crops near-by their starting zone to get some initial gold, but their return is rather small and in middle to late game are not useful at all. This guide focuses on capitalizing on dangerous enemy drops, but negates most of the difficulty found by their constantly spawning nests.

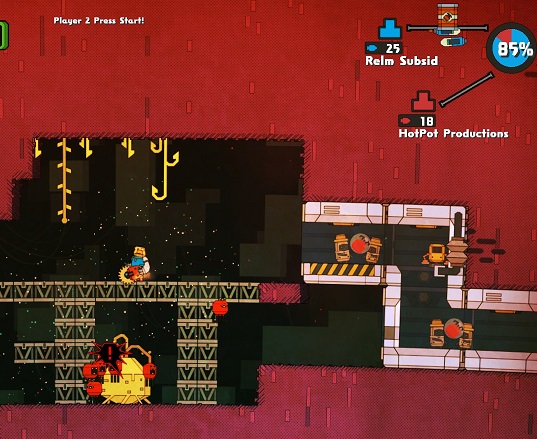
Tomaties – Browbeat Gauntlet
The following section focuses on effective farming for Tomaties. If you encounter a type further in the game that this strategy does work on please let me know and I’ll add them to this section, else they will be added in their own strategy as I encounter them:
While this construction does not require any gold to function, spending gold on robots can be extremely helpful. This will allow your robots to focus on transferring the monster drops back to your base, allowing you to focus on killing as many creatures as fast as possible. The two Robots I use in the below strategy are both available to a newly created player, so they can be incorporated into any planet setup.
Step 1 – Locate a Suitable Nest

Extend a Conveyor out to the Nest area, make sure you keep your path higher then the layer the Nest is on. In the example to the right my path is 2 Corridor pieces higher then where the nest lays.
Step 2 – Battle Layer

In the example to the left I’ve built the Girders one layer down from the Corridors, this is intentional, as any robots you’ve built in the Corridors won’t wander out into your battle layer.
Step 3 – Clean up Area

Getting rid of the blocks gives you the room to jump around and avoid monster hits while removing the plants will ensure you’re only picking up the useful monster drops
Additionally, if there are any dropoffs on the Nest level, as you can see on the bottom left of the picture, block them off with girders. These monsters don’t appear to ever go down through girders, so none will get stuck down there.
Step 4 – Monster Ladders


In order for Monsters to make their way up to the Battle Layer they need some extra help. Building on either side of the Nest construct a 2 wide Girder ladder all the way up to your battle layer, adding a 4 wide layer half way up and finish with the 2 wide sections.
While this Girder ladder will allow the monsters to climb up to your level, odds are they wont bother with you. To complete the farming system we need to make them angry.
Step 5 – Poke the Hornets Nest
To get the monsters below you riled up you need to attack their Nest, this will instantly cause every spawned monster to path directly to you. Once they’ve jumped up on to your Battle Layer they won’t go back down, and you can easily dispatch them with your fists.

When you kill enough monsters the Nest will automatically throw out additional monsters. Since your Battle Layer is so much higher then the Nest those newly spawned monsters won’t drop on top of you. If you are currently attacking a monster those newly spawned ones will try to target you, but since they need to jump up the ladder system it will give you enough time to setup for them.
Step 6 – Automated Delivery
Now that you have a dedicated Battle Layer to farm your monsters, you can setup a robot network to deliver their drops back to your production facilities. If you’ve setup some Soup Machines to take two of the monster meat you are farming then you can rapidly build market share just by killing these monsters over and over again.

Considering two Tomaty Steaks grant you 170 gold each, gathering the money required for Robots should come extremely quickly. I’ve been able to easily complete maps using this method, but you can setup more complicated systems if you have a partner to farm a different monster nest.
Cornbugs – Tower Fall
Cornbugs will usually be the second creature you come across. A normal Nest will usually have 2 Cornbugs, which will not attack you until you start to fight them. Cornbugs are quick movers, but they can’t jump like other creatures, so avoiding them initially can be quite easy. The problem with Cornbugs is they are great climbers, and can easily scale sheer drop offs if you’ve angered them.
Dealing with Cornbugs can be done in a similar manner as Tomaties, utilizing girders to trap them at an appropriate level to fight. The setup and look, however is quite different:

Step 1 – Locate a Suitable Nest

Step 2 – Isolate Movement


Step 3 – A Thrashing

Sausage Bison – Red Cloak, Iron Anvil
Sausage Bison are generally easy creatures to kill, one on one you can easily stun lock them down with punches and defeat them. The problem is they are rarely on their own, you mostly encounter them in groups of two, however that can go even higher.


Safely killing Sausage Bison however, is extremely easy to do:

Build a 2×2 stack of Girders and stand on top of it. Any Sausage Bison currently aggressed on you will charge directly at the Girders. This will stun them, but will not actually destroy the Girders. Since the Sausage Bison can only charge horizontally you can stand on top of your stack and freely sawblade them down:


Strawburies – Dry Land
Strawburies, being underwater creatures, are one of the hardest to farm properly, mostly due to the water they are in. Standard strategies like Girders don’t work underwater as any creature can pass directly through them without being affected.
Generally speaking, fighting Strawburies should be avoided, there’s usually much better options available to you on the average map. Unfortuanetly some maps, (Looking at you Strayale!), require you to fight these, as they are the only viable source of ingredients. The below strategy takes some time to properly implement, but once complete it makes farming these creatures incredibly easy.
The best time to setup these Nests is immediately after landing. You’ll find you run out air extremely quickly while working underground and while you can consume ingredients to give back some oxygen it eats up a lot of time. If you avoid building your office then when your worker dies they will respawn exactly where they died.
Step 1 – Locate a Suitable Nest
The most difficult part of this strategy is actually locating a nest you can use. You need location that can easily be cut off from as much of the water as possible as well as a large enough section of open space / dirt to funnel the water into. The below screenshot shows a prime location that could be used, as the block zones can be put together easily and there is a large expanse of dirt to move the water to.

Step 2 – Wall off the area
Once you’ve located the proper Nest the next step is to cut off as much of the water around it as possible. To cut off water from a different area you will need to grab any dirt blocks you can find and place them in the appropriate location.

Picking up blocks underwater takes a bit of practice but as long as you are swimming downwards you’ll get the pickup icon and your worker will grab the block underneath them. Once you have the block you’ll need to place it in the correct location.


Once your space gets too close you’ll need to place horizontally. When in water your worker will automatically try to place his dirt block at whatever level his head is at, and one block to the side of his current position.
Keep placing blocks until one side has been completely walled off, the top block needs to be higher then the current water level in order to completely cut off the other side.


Once one side has been completed start work on the other, using the same strategy as the first:

Step 3 – Drain the Water
Now that you’ve successfully walled off your chosen Nest you now need to drain the leftover water. Water will always try to level itself off, and uses the highest water block it has to determine the fill height.
Start to cut through your fill area, hollowing out dirt or opening a passage to an open area.


Water can only flow through block sized holes, so if two blocks touch on a diagonal water won’t drain through.
While you are doing this be extremely careful about other water sources, if you accidentallycut into a different water source that water will start to fill your cut out area. In the below example I cut too far downwards and water started to fill my area, negating my previous work:

As long as you catch it quick enough, or have the space to take the excess water, you can fix it. Act fast and try to block off the opening before all of your work is undone:

Keep working at it until the water stops transferring. Head back to your nest and make sure there’s no water left. Once everything is complete you’ll see the creatures near by the Nest, but unable to move around properly. You can now freely engage them and start gathering materials without worrying about getting overpowered.


Don’t forget to build your base first if you haven’t yet so you have somewhere to put your ingredients.
Kabochasers – Climb This

Kabochasers will also consume any ingredient left around them, so be careful if you drop some valuable ingredient near them.


Woolly Mammoths – Run Away!!


Additional Enemies
This section contains information on any creatures that are not highlighted in their own section. The below creatures can be farmed utilizing one of the above strategies, and it will be indicated next to their name.
Shroombas are odd creatures. They posses no unique ingredient of their own but instead drop random plant ingredients. Their drops can range anywhere between 2 and 0 per kill and the ingredients each on can drop can be random, i.e. 1 Shroomba may drop a Bluecap and a Greenstalk at the same time.
Shroombas can be fought using the Browbeat Gauntlet strategy that is used on Tomaties. Shroombas are extremely aggressive and will often engage you before coming anywhere close to their Nest. Shroombas can also jump roughly twice as high as Tomaties, so be careful when setting up your fighting area.

Pinapurana fit their name extremely well, come anywhere close to them and they will latch on and kill you very quickly. Being water creatures they come with the same problems and weaknesses as Strawburies. They can be effectively farmed utilizing the Dry Land strategy, however draining all water even remotely close to them out of spite is encouraged.

Placeholder
The only monster left that I have seen so far are the Corn Bugs & Squidflies, which I should have up soon. If you’ve encountered any additional monsters please let me know and I’ll add them.
If you have any suggestions, remarks or questions please let me know in the below comments.
Happy Hunting!
Kaldris Relm