
Overview
A data base of your fighters, what they fight with, and what helps them fight. Contains equipment and acquisition spoilers.
Introduction
This guide’s purpose is to database all things important to making a good craft. This guide will not go into depth of perks, resources, and the various oddities you encounter on your safe <?> cruise through the beautiful demilitarized zone.
Please be advised that I haven’t experienced everything in this game. Nor do I want to. Looking at you, Thermo Gun. Anything marked with a <?> are unknowns and may require somebody’s help in confirming. If I make a mistake, do let me know.
With that out of the way, ready for numbers?

Spacecraft
It’s rather difficult to play a space game without a vehicle to fly around in. You get no choice in the matter, you must use a ship. You can go without weapons and shields if you want, but the game will not let you swim through outer space.
You do get a choice in craft, though, as soon as you can pay the 10,000c price tag for a 2nd ship. Your choice in a ship is what dictates what kind of combat situations you’ll be best at and what kind of equipment you can and can’t use.
- Hull Hitpoints (Hull HP): The maximum structural integrity of the vessel, when this hits 0, then the last vital piece keeping the craft glued together will fail and your pilot will be exposed to the harsh elements of outer flipping space. Luckily, the eye popping is not shown on screen.
- Armor (Armor): The amount of damage ignored from all sources <?> when they interact with the ship’s hull. By extension, this multiplies effective Hull HP. Healing effects ignore armor.
- Energy Core Capacity (En Max): The highest possible amount of “Energy” that can be stored in your ship’s batteries. Energy is a resource used for boosting, shooting, and managing devices. Remember that passive devices limit the En Max by their En Allocate stat, as noted by the red on the energy meter.
- Energy Core Recharge Rate (En Regen): How much power the reactor produces per second. Everyone’s most vulnerable when they can’t do anything, this stat will keep your own vulnerabilities at bay or stave it off faster. The reactor cannot charge and discharge simultaneously, you also recharge at double speed while totally idle. Extremely important.
- Sensor Strength (Sensors): How “powerful” the ship’s sensors are. I don’t know much about this stat, nor how to measure it. I can only assume that having it high means you can detect threats and loot at farther distances. I’m, ironically, totally blind for this one.
- Primary Weapon Slots (Primaries): How many sick guns you can tote on your ship at any given time. Having 1 is a good idea, but having 3 is better. That means you can pack more weapons for more situations, however, you’ll need to manage each of them too. It’s a bad idea to fumble 5 guns when you only need 2.
- Secondary Weapon Slots (Secondaries): How many, types and ammo, missiles that can be loaded in the launchers at once. Unlike primaries, these are sparingly used, and you cannot go wrong with having more. You can also pack several slots worth of the same missile if you so desire, you won’t be restricted to that.
- Device Slots (Devices): How many tertiary devices can be glued around the ship. While they don’t directly shoot (bar turrets), these passive and active gadgets are the primary method of “growth” in the middle of a run. Actives must be managed, passives must be sustained.
- Consumable Slots (Consumables): How many burnable items that can rolling around in the cargo bay. Consumables, to me, are “get out of jail free cards”. If you desperately need energy NOW, you can make something to fix that. Consumables cost resources, greatly less than the more permanent bits of equipment, but still.
- Enhancement Slots (Enhancements): How many gameplay changing modifications that impact your entire run at a time. These things are mui fun, they often give you a great boon at the cost of an inconvient bane. Each one is unique (except the “By 5” subroutines) and can only be found inside Derelict Colonial Bases (you need a key, fly inside blue glowy squares, remember to use holes to see which doors to open) or Ancient Structures (watch out for blackholes!).
- Criuse Speed (Cruise): The maximum speed your ship can go without boosting or outside influence. As the advancing wall of doom known as Okkar Forces catches up to you, you’ll need to move around quickly. This is what engines are for. A high cruise speed can also assist in evading your enemy, often, a sitting duck is the easiest target.
- Boost Speed Multiplier (Boost): How much faster your vessel flies relative to Cruise Speed with the boosters going off. Sometimes floating around isn’t nearly fast enough. You must go faster. Boosting will drain ?.? energy a second <?> for faster flight. Can also help in just barely dodging missiles. Please watch out for asteroids.
- Fuel Tank Capacity (Fuel): The maximum fuel in the tank, by extension, the more jumps you can make without refueling. Fuel is needed to make jumps, without it, your vessel may take damage and broken subsystems when a jump is attempted. Not to mention, such desperate jumps also consume what fuel is left in the tank. Keep an eye on it. Jumps take 25 Fuel, unless you have the Fuel Conservation enhancement.
- Jump Charge Time (Jump): The time it takes for the jumpdrives to warm up and discharge when aiming at the big green dot in the sky. If things were calm, this would be a short, relaxing sip of coffee. But sometimes you need to escape. Fast. This variable tells you how long you must last in the crossfire. Mind you, taking damage will suppress this charge.
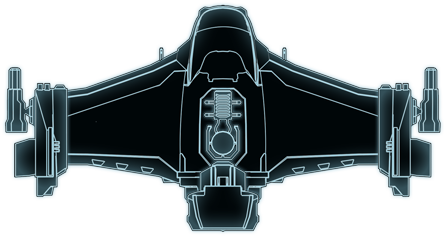
> Colonial Interceptor
A versatile combat ship that can equip most weapon systems and devices. Though it does not have considerable disadvantages, the Colonial Interceptor does not shine in any particular field either.

As the starting craft, the Colonial Interceptor is balanced in all regards and has access to every primary weapon in the game. It has the toughness to go without shields if necessary and has the mobility to evade most projectiles. It’s unique devices are rather boring, though, being the Shield Disruptor and the Weapon Overdrive. If you don’t know what to pick or want specific access to, say, Flak and Coil Gun at the same time, this is your craft.

Pulse Laser

Light Missile x20

Shield

Shield Booster x2

Gatling
<>

Weapon Overdrive
<>

Beam Laser M3

Corrosion Missile x8
Shield

Damage Booster x3
<>
<>

Energized Boost
<>

Fusion Blaster

Plasma Torpedo x8

Shield XC

Damage Limiter x4

Scatter Gun
<>

Shield Disruptor
<>
> Colonial Scout
Fast and swift but also quite fragile, the Colonial Scout demands a clear playing style. To compensate it’s lack of hull hitpoints, it is the only ship being able to use cloaking devices and teleporters.
“Speed when I need it! Who wouldn’t prefer that?” – Hero
By shelling out 10,000c, the Scout offers people the ability to play assassin with the Cloak or skirmisher with the Teleport. The Scout has the fastest speed of the 3 vehicles, posses a higher Energy Regeneration Rate, and has the unique upgrades to Sensors and Jump Charge Time. All this comes at the cost of maximum equipment and durability. Unlike the Interceptor, this thing simply cannot handle a fight without it’s shield. Make good use of the <Ascend> and <Descend> keys, then this thing will absolutely spoil you.
Shock Rifle
Stasis Missile x10
Shield XC

Energy Injector x4
Beam Laser
<>

Cloak

Drone Override x4

Thermo Gun

Shield Breaker Missile x10
Shield

Shield Charge Drone x4
Gatling
<>

Teleporter
Damage Limiter x4

Coil Gun
Corrosion Missile x8
Shield XC

Nano Kit x1
<>
<>

Time Extender

Jump Stabilizer x1
> Colonial Gunship
The Colonial Gunship is a clunky beast to maneuver but it can take a lot of hits. It’s reinforced hull provides the best protection available though this comes with a weak spot: It is not possible to equip a shield device. The front shield generator and a powerful turret provide remedy.

“Nothing like a gunship to make you feel like you’re in control of a situation, huh?” – Hero
The controversial Gunship has many qualities, both good and lacking. First off, it cannot equip a conventional shield. Every bit of scratch damage you take goes directly into your hull, it will inhale nanobots until you can do something about it. Evading is not the answer, it’s much too slow. You’ll have to rely on the Front Shield Generator to resist all forward-incoming firepower and it’s selection of Turrets to quickly take out opposition. Luckily, nothing beats it in hull strength. Want my advice? Stay away from this until you get either Leech, Jump Repairs, or Equalizer enhancements before using this clunky beast.
The Gunship also gets access to a unique Drone perk, when maximized, the field limit goes from 1 to 3, drones appear with Adaptive Armor and Shields of <?> strength, and they repair themselves 10% of their HP each jump.
Fusion Blaster

Heavy Missile x10

Gatling Turret
Damage Limiter x2

Flak Cannon

Mine Cluster x5
<>

Combat Drone x4
Pulse Laser
Light Missile x10

Laser Turret
Damage Limiter x2
Scatter Gun 2880

ARC-9000 x1
<>

Webber Drone x4
Beam Laser M3
Corrosion Missile x8

Front Shield Generator

Anti Missile Drone x4
Gatling
Mine Cluster x5
<>

Nano Injector x2
> Colonial Sentinel ( DLC )
With the option to enable fast hacking and an additional modification slot for weapons and devices the Sentinel further underlines its electronic warfare capability, already given by an exclusive set of unconventional equipment.

I need more experience and input before I can develop a good opinion.
The Sentinel also gets access to a unique perk that increases hacking (long-range scanner, jump suppressor, shipwrecks, jump gate, key delivery) speed from +0% to +50% (effective -0% to -33% time taken), and a perk that increases mod slots to 4 on Devices and then Primary Weapons.

Lightning Gun
Corrosion Missile x8

Shield ST

Device Charger x4
<>
<>

EMP Generator

Turret Override x2
Coil Gun

Destabilizer Missile x12
Shield ST

G&B Distress Beacon x1
<>
<>

Drone Disassembler
Shield Charge Drone x4
Pulse Laser MX

Seeker Missile Battery x4
Shield ST
Shield Booster x4
<>
<>

Static Discharger
Damage Booster x2
Enhancements
-
: Every enhancement has a Positive, a Boon, a reason to use it. Without this, enhancements will not be used except for the self imposed challenge, and who does that, seriously?
-
: However, some enhancements are so good, they balance themselves by hindering you in some way, a Negative, a Bane, something to keep you in check. The real interesting part of enhancements is figuring out how to evade or work with the Bane, limit it’s damage on you. Just because an enhancement rips away your shields or cripples your energy efficiency, doesn’t mean you can just write it off.
> Subroutines ( 1 / 3 )
Subroutines are found in derelict Colonial bases. They’re big, white, and very… rectangular. The Subroutine itself is found by scanning the big blue cube holograms usually found in them behind locked doors. To obtain one, find a Colonial base, find a red door, look through cracks leading to that room to confirm if it’s there or not, then spend an Access Key to open up the red door, float next to the blue cube, and in a few seconds, you’ll be the proud new owner of a random Subroutine.

Navigation


 Saves 0% to 50% of fuel when jumping. Increases jump charge duration and cooldown by 100%.
 The best enhancement when attempting the pacifist challenge, not getting fuel from kills is bad. However, a 12 second jump charge will make mid-combat jumping difficult.

Damage and Repair
For every damaged system receive a 20% weapon damage bonus. None. I can see the applications of this. With some lucky Nano Extractors on subsystems you can go without (shields with no shields, secondaries with no missiles, etc.), you could get an insane amount of damage.

Damage and Repair
After each jump 5% of hull hitpoints are restored. None. Probably the best of the boring “By 5” enhancements, this thing can lick your wounds in dire situations and keep the hull in tip-top shape.

Defense
Hostile homing missiles do not lock on player ship. Player homing missiles do not lock on hostiles. More accurately, all missiles in play turn into rockets. Even ones not related to you. Expect to see Outlaws trying to shoot missiles are G&B, only to have them fail. This subroutine also makes Outlaw Bombers hilariously easy. I’d recommend learning to dodge or shoot missiles than use this.

Defense
5% more hull hitpoints. None. Boring, next!

Defense
5% more hull armor. None. Boring– but while we’re on the topic, the maximum armor is 65%. 30% from Gunship, 10% from armor perk, 20% from Adaptive Armor Mk3, and 5% from this. The Damage Limiter also adds armor, increasing the cap to 125%, but the game won’t heal you.

Devices
Firing weapons while cloaked will leave the ship undetected. Activating cloak will damage the ship by 25 hitpoints. At the cost of 25 health (10% to 7% max HP) per use, and the regular costs of using Cloak, Shadow Strike forces all enemies to forget all about you and go along with their business even if you’re shooting right in their face. This tool makes Hard mode a joke as you can just pop cloak and take out a cluster of enemies without needing the keystrokes to dodge. 25 HP adds up and it’s a good idea to have a cheap method of healing like Leech. Armor also suppresses this damage cost. Warning! Can cause death!
> Subroutines ( 2 / 3 )

Sensors
All enemies and loot are visible on the radar (unlimited sensor range). Hull and shield bars of enemies are not visible. Pretty good, actually. Ensures you will never miss a tech container. The inability to see enemy health means you cannot use a VsShield/VsHull weapon combo like on Interceptor A. Use a single versatile weapon, like Beam Laser or Coil Gun. Fighting tough targets like Corvettes is a huge pain with this too.

Crafting
When crafting a primary weapon, the weapon will be enhanced. Secondary weapons can’t be crafted. Pairs well with Beeline. I thought this would be a good subroutine, but crafting weapons can be quiet expensive, still, an enhanced weapon has bonus stats for free and if you feel unlucky, it might be a good investment. And, no, it will not create “Enhanced Turrets”.

Weapons
Weapons no longer require energy and deal 25% more damage. Shield is permanently disabled. My favorite, weapons not needing energy means that energy can be allocated to boosting or lots of passive devices. It’s amazing what “free ammo” can do to the power of weapons. Without the use of shields, it’s best to disassemble it ASAP in favor of Adaptive Armor. Take extreme care when using this with the fragile Scout, Interceptor doesn’t care.

Weapons
Weapons deal 40% more damage. Energy core recharge rate is lowered by 40%. Slows down the gameplay of the Gunship. But I think this is a good thing. The Gunship works best when played as a “slow but calculated” craft. I believe this thing was made for Gunship players who primarily used drones or the turret, but you can totally melt things with the additional damage. Might be a good idea to invest in the Front Shield Generator so you can get the idling regen bonus while getting rushed from 1 direction.

Weapons
Weapons deal 5% more damage. None. Boring, next!

Movement
Increases ship’s base speed by 30%. Reduces the boost efficiency by 30%. Pretty good, especially in combat where boosting takes energy away from your guns. The math involved takes a ship’s cruise speed, say, 130m/s, multiplies it by 1.3, 169m/s, that’s the cruise speed, from there the boost speed would be, say, 169m/s*2.45=414.05m/s, then the “reduces boost efficiency” comes in, *0.7, meaning 289.835m/s. You got from 130m/s and 318.5m/s to 169m/s and 289.835m/s. In other words, your boosts go slower but your cruise is faster. Especially handy with the Gunship.

Movement
50% less collision damage. Reduced inertia dampening. Multi-star drifting? I’ll never use it, I like my control, but there are people out there who wish there was a way to turn off inertia dampening. Sliding around ensues.
> Subroutines ( 3 / 3 )

Energy
5% more energy capacity. None. Boring, again, next!

Energy
5% faster energy regeneration. None. Seriously? I made an entire section for THESE two? Whatever.
> Glyphs ( 1 / 2 )
Glyphs are like Subroutines. They are found in Ancient structures you might run into. You’ll know it when you see it. To actually get a Glyph, you’ll need to defeat the “Warden” ancient that resides around the structure, it’s the big black ball enemy that shoots a dozen homing bullets at you, then enter the structure. Bam!

Navigation
Displays all Ancient Structures on the star map. None. As the first Glyph you obtain <?>, this handy thing assists in finding other Glyphs to increase your enhancement stores. If you do not benefit from that, Ancient Structures will always have Dark Energy instead of a Glyph and you may still use the jump gate built-in.

Navigation
Begin the run in sector 2. None. Good for achievements and challenges. You lose any possible resources from sector 1 if you take this, the game will be shorter, the outcome will be less, but reaching the end will be easier. I’d stay away.

Navigation
Okkar forces and Colonial warships will not jump in anymore. Every location has a jump suppressor. The enhancement equivalent of “removing the rebel fleet” mods for FTL. You can freely take your time, hours even, in a single sector milking it for all it has. Better take that time too, this Glyph removes any hope you have of just skipping a sector without a Jump Stabilizer. You cannot escape.

Navigation
G&B and Okkar are hostile to each other. Jump destinations cannot be chosen. With this Glyph in effect, the G&B will be perpetually angry at the Okkar. Who wouldn’t? For some reason, though, you lose the ability to select where you go in the star map. The other, possibly rendered, jump destinations will not even show up on the star map. This censoring makes the penalty more bearable. I still cannot recommend this, the off-chance you might evade some combat is not good enough for the ability to evade natural hazards or find traders.

Damage and Repair
If an enemy is destroyed, the player ship’s hull is repaired by 20 hitpoints. Nanobots can only be used for component damage repairs and crafting. The best enhancement in the game, this thing will heal you for 20 Hull every time you get a kill, be it drone or corvette. Extremely powerful for the Scout, great for the Interceptor, lacking for the Gunship. Keep in mind, you cannot use Nanobots for repairing the hull directly, you can still use them for crafting. In other words, your healing now consists of Nano Injectors, all of which cost at least 1 Dark Matter. Precious Dark Matter…

Damage and Repair
After each jump the hull is set to 50%. After each jump the hull is set to 50%. The effective opposite of above, but still very useful. In effect, this Glyph cuts your hull in half but heals you full each jump. It’s bad on the Scout, unspectacular on the Interceptor, but godlike on the Gunship. Being at a low health all the time invites your components being blasted, buyer beware. Small complaint, your ship will almost never look in full order, expect cracks on the cockpit and scorch marks on the hull.
> Glyphs ( 2 / 2 )

Damage and Repair
While boosting the ship’s hull cannot be damaged. If you don’t make a kill at least every 40 seconds you ship’s hull get constantly damaged. Hope you like your boost, and starting equipment. When equipped, this thing adds a small little meter around your health bar that slowly ticks down. The meter lasts for 40 seconds and refreshes every time you get a kill. Failure to do so will cause your ship to bleed out for 5 HP once every second. This damage can be suppressed with armor and can potentially cause death. The benefit is hull invcinbility while boosting. Even asteroids won’t stop you. Because of the bleed, Leech is of high benefit, and you only benefit from this while boosting. Thrust Conversion will slow down your boosts to make fighting easier. Daredevil reduces the energy consumption of weapons by everything. Take great care. Important to know: For some reason, gas tanks and floodlights count as kills for refereshing Berserker.

Defense
Occationally, Ancients will spawn and defend the player ship. None. Handy, and hilarious. These yellow ancients have a tendency to attack everything but the player, including G&B. Luckily, masterminding isn’t a crime in the DMZ. You will not be held accountable for their actions, and you can clean the loot from behind them. A cold but smart pilot would also shoot them and destroy them. They don’t care, and they tend to leave a total of 6-12 Dark Energy behind. This is a pretty good enhancement, provided they show up.

Defense
Every critical hit immediately recharge the shield by 10%. Critical hits don’t deal additional damage. This Glyph can confer psuedo-invcinbility when using a crit modded Gatling, it also restores shields when shields are empty, enough said. Very handy if you like the bigger, slower shields. To actually benefit from this, you’ll need at least 1 level in the Critical Hit Chance perk.

Weapons
When fired, secondary weapons split into two. Runs always start with only one empty secondary slot. Required for missile boats, doubles potential damage per shot. Beware that it will eat your starting missiles and you can only have 1 missile equipped. Feel free to use missiles like mad if you’re using this, missiles drop often enough. Beware that torpedoes tend to miss unless you’re close enough. The ARC-9000 isn’t excluded from this Glyph. No survivors.

Weapons
You are given a very powerful Ancient Shock Rifle which deals even more damage the lower your ship’s hull hitpoints are. Your ship’s hull is damaged each time you fire and no other primary or secondary weapons can be used. By sacrificing your missiles and other guns, you are given this unholy weapon of mass destruction. This 4,000m range, 240 DPS automatic Shock Rifle makes everything it touches cry tears of anguish, including it’s user. Every time you shoot, your hull takes damage, which makes the weapon even stronger. Extremely powerful, but care must be used to not put yourself in a vulnerable situation. I highly, HIGHLY recommend packing any of the repairing enhancements to counter act this issue.
Equipment ( 1 / 2 )
- Hull Damage Per Second (Vs Hull 2): The assumed maximum possible damage per second a weapon can do an enemy ship’s hull, before armor. DPS is more important when fighting hard targets such as Bombers or Corvettes, but it doesn’t hurt to have more against soft targets.
- Shield Damage Per Second (Vs Shield 2): The assume maximum possible damage per second a weapon can do to an enemy ship’s shield. A shield can often get itself back together rather fast, so a high DPS can push that thing down to collapsing and leaving the thing directly open to fire.
- Hull Damage (Vs Hull 1): The base damage a weapon’s ordnance can deal against the enemy’s hull. While DPS is technically more important, raw single shot damage is used for lots of important maths involving the destruction of your enemy.
- Shield Damage (Vs Shield 1): The base damage a weapon’s ordnance can deal against the enemy’s shield. It’s getting rather tiresome attempting to explain basic gameplay mechanics. Many things are easier to see than to explain.
- Fire Rate (Fire Rate 2): How many times a weapon can fire in a second. Higher rate of fires tend to work well for “primary” weapons and helps in whittling down multiple weak enemies at a time. A double edged sword, a high Fire Rate also means high Energy Consumption Per Second.
- Energy Consumption Per Second (En Use 2): It’s common in video games for weapons to have a resource attached to them. It’s usually ammo, but in this game, it’s energy. Shoot your guns too much and you’ll run the batteries dry, unable to do anything.
- Energy Consumption (En Use 1): How much energy is drained from the core at a per-shot basis. This isn’t stated in the game, but if raw damage is, I don’t see why I shouldn’t list this.
- Maximum Range (Range 1): How far a projectile will travel until it ceases to exist. A long range weapon will often let you suppress a far away target and get more time to dodge their bullets and kite them. Even more range will let you take preliminary shots on a target.
- Projectile Velocity (Range 2): How fast a projectile flies through space. Some weapons are marked with “inf m/s”, making them raycast. They can instantly reach their target, it’s quiet lovely, actually.
- Spread (Spread 1): This is why rifling and barrels were invented. Spread is a measurement in degrees and is also referred to as Inverse Accuracy, as if this number is high,
it’s bad. That said, if you’re scopes are off, spread might save you with a freak RNG shot. - Precharge Duration (Precharge 1): Some weapons have a small warm up time before the thing will start shooting. This is to not be confused with the other kind of charging, down below. You can feather the trigger to keep the precharge high without firing, and energy regenerates while precharging.
- Full Charge Duration (Charge Time 1): Some weapons can be charged up and released for a more powerful shot. Beware the charging itself takes an unknown amount of energy, and overcharging a weapon will still continue to consume energy, even though the weapon isn’t getting stronger. So much charge…
- Full Charge Additional Projectiles (Charge Proj. 1): Now, charging up alone won’t do anything unless there’s another stat that interacts with charging, this one increases the amount of lead (plasma?) discharged from a weapon at a given time. More ordnance means more damage, right?
- Full Charge Damage Bonus (Charge Dmg. 1): Other charging weapons just make the single projectile more powerful by increasing it’s raw damage by a multiplier.
- Full Charge Additional Range (Charge Range): Though rare, some weapons can be charged to increase how far a projectile can travel before it expires or detonates.
- Area Damage Range (Explosion Range): Some weapons make big booms. This stat dictates how big of a boom that is. A big boom tends to work well against groups.
- Homing (Homing): Homing.
- Bullet Time Length (Slow Time 2): Only 1 weapon augments it’s owners mind to think and react faster when it’s used. Your ship is unaffected by the slowing effect as it lasts.
- Bullet Time Strength (Slow Time 1): But by how much? How much slower does time move? Half? Maybe? Usually it’s half. 2 seconds become 4. But your ship is still not affected. Expect double DPS and double speed.
- Webbing Effect Duration (Slow Tgt. 1): A successful hit on a weapon with this effect will render the enemy completely incapable of moving and aiming at high speeds. Rendering them completely ineffective in a fight and a sitting duck to your mercy, or lack thereof.
- Damage Over Time Max Damage (Damage Over Time 1): The reaper’s touch is deadly, so long as a single hit lands on a target, they will bleed their hull for the duration of the DoT. Often leading to a slow but certain death.
- Damage Over Time Duration (Damage Over Time 2): But the reaper’s touch is slow. It’s not damage over time unless there’s time for the damage to do damage over time (???).
- Additional Desperation Damage (Desperation Dmg.): Only a cursed weapon can yield rewards the closer it’s owner is to death.
- Self Inflicted Hull Damage (Self Hull Dmg.): Ditto, only a cursed weapon can become a parasite to it’s master and it’s rebellious nature can lead to your downfall. Though, it will never outright kill you.
Equipment ( 2 / 2 )
- Energy Consumption (En Use): Like weapons, active devices use a bulk of power when used, so try not to blow your load too early on primary weapons to forget to use them.
- Energy Allocation (En Allocate): Actives use a bulk of energy at will, but passives use a chunk of energy at all times. Energy Allocation is that red bar on your enemy meter, and it caps out how much energy can be stored at a time. Don’t go nuts with passives.
- Effect Duration (Duration): The effects of devices and consumables don’t last forever, they run out eventually, or they’d be overpowered.
- Cool Down Duration (Cool Down): On the other side of things is how long it takes before the device can be used again.
- Effect (<<Effected Stat>>): Many, many, many devices and consumables effect things other than itself, any reference of + or – refers to a change of stats in another part of the ship. IE, Armor +20 means the Armor of the ship is added by 20, if there’s no + or -, then the stat is just like above. Vs Hull 20 means the device does 20 hull damage, Vs Hull +20 means the device increases the hull damage of something else by 20. Bear with me here.
- Maximum Range (Range): Devices or consumables that explode or effect targets need to be close enough to actually be effected, we don’t want an infinite range Plasma Mine, do we..?
- Shield Hitpoints (Shield Max): Shields must have at least 1 point here to function, this variable dictates how tough the shield is and how much damage it can take before buckling.
- Shield Recharge Rate (Recharge Rate): If the shield isn’t full, and the Shield Recharge Delay duration is up, or when the shield is dropped and the Shield Shutdown Duration is up, then the shield will begin recharging itself at a rate shown here.
- Shield Recharge Delay (Recharge Delay): As long as the shield is still up, this variable is used. When you can evade damage for this time, your shields will begin recharging themselves.
- Shield Shutdown Duration (Shutdown Dur.): Read above, but in this case, it’s when the shields are empty.
- Damage Per Energy (En -> Dmg): Exclusive to the Energy Discharger. take how much energy is lost when using it, multiply it, then add it to the base damage of the Energy Discharger.
- Success Chance (Success): Some things don’t always work, this chance here, obviously, determines if the piece of equipment will actually work or not.
> Primary Weapons ( 1 / 5 )
Primary Weapons are your main form of killing and mining. They use Energy as an ammo resource, which is super cheap. Your selection here is important, so read up before swapping weapons or choosing a loadout. All primary weapons may be found as “enhanced”, shown with a yellow outline and a star. Enhanced weapons have “random stat bonuses”, whatever that means. It’s a good idea to use them over a normal weapon. They can be crafted with the Artisan enhancement, but you don’t get to choose said “random stat bonuses”.
Salvor Armarment Group
Found on: Scout A!
A simple but powerful weapon. It’s got good DPS, low energy cost, and is super simple to use, you cannot go wrong here. Thing is, it’s incapable of doing critical hits, so don’t expect it to suddenly get bursts of extreme damage.
Salvor Armarment Group
Found on: Interceptor B, Gunship C!
I’d wager this be the best normal weapon in the game. A higher DPS than it’s sister at the cost of having a warmup timer and using more energy. As with it’s younger sister, this weapon is also incapable of critical hits.
Baron Nova Gunnery Inc.
Found on: Scout C, Sentinel B!
Extremely costly on the energy, moderate your shots. The infinite velocity is good but don’t use it as a sniping weapon, it’s not accurate enough. That said, it, and it’s sister, are very versatile, pounding higher DPS than the Beam Laser though less efficient and harder to use.
Baron Nova Gunnery Inc.
Found on: Nothing!
With a higher rate of fire, more energy efficiency, and swapped hull and shield damage, the T-1 is a direct update to the standard. It’s still not suitable for sniping, though.
> Primary Weapons ( 2 / 5 )
Baron Nova Gunnery Inc.
Found on: Gunship A!
Got drone problems? Get flak! Flak shells automatically detonate when they detect a nearby enemy. Super effective against drones and swarm fighters. Sadly, doesn’t detonate when it detects landmines, but shooting nearby walls works great at cleaning them. I like this thing. Out of the two, though, I’d still pick this one over the faster firing sister.
Baron Nova Gunnery Inc.
Found on: Nothing!
With nearly 3 times the rate of fire, the 5-5 makes a better versatile weapon than the standard flak. But less range, speed, accuracy, and blast radius hinders it’s unique abilities. If you want a mix of Flak and Coil, grab this.
Federal Arms & Crafts
Found on: Interceptor C, Gunship A!
Pulse Laser on steroids, this thing’s roll in the arsenal is to stand right next to a heavily shielded target, and let ’em have it. Shields fall in seconds, but it’s low hull damage, accuracy, and range have it struggle to keep up with more non-specialized weapons.
Federal Arms & Crafts
Found on: Nothing!
Only slighter higher DPS at a huge cost of almost every other stat. I would not recommend using this weapon at all and instead push in favor of the normal Fusion Blaster.
> Primary Weapons ( 3 / 5 )
Baron Nova Gunnery Inc.
Found on: Interceptor A, Scout B, Gunship C!
While not the most boring weapon in the game, it’s application sure is. It is the standard, versatile, anti-hull weapon with good all around stats. Just keep spraying.
Baron Nova Gunnery Inc.
Found on: Nothing!
Ever wanted to live out your dreams as a Thunderbolt II? Well, now you can! The 40mm has insane damage and can tear things to shreds so long as you get close enough. A welcome upgrade. GBU-31s and Lightning IIs need not apply.
Salvor Armament Group
Found on: Interceptor A, Gunship B!
If we’re talking about boring weapons, THIS is the most boring weapon in the game. It’s the Gatling without the flavor and swapped hull and shield damage. Use it as a preliminary weapon against fighters and corvettes.
Salvor Armament Group
Found on: Sentinel C!
The logical upgrade to the Pulse Laser when you look at the Gatling 40mm. This thing is harder to use, has shorter range, but lots of DPS to compensate. It’s horrible accuracy hurts me greatly. If you like the Fusion Cannon M6-A but want more range, use this.
> Primary Weapons ( 4 / 5 )
Hellhound Ordnance Inc.
Found on: Interceptor C!
Shotguns are always a favorite of mine in shooters. Not this one though. The Scatter Gun charges up and unleashes a hail of shrapnel at a target. The high projectile count and low accuracy makes it technically very accurate to hit it’s mark. But the charge time is too slow and damage too low to use it as a normal gun in normal situations. The math for this thing is weird as it fires more than 1 projectile, like a couple other guns, I won’t be able to get accurate numbers until I learn how to rip data from the game and make absolutely sure.
Hellhound Ordnance Inc.
Found on: Gunship B!
If the former were a Double Barrel, then this latter is an Autoshotty. This thing is automatic and is much easier to use than it’s sister. Also has good energy efficiency for it’s damage. Not a bad weapon all around.
Shiva Systems
Found on: Scout A!
See all those <?>s? The math in this thing is weird and I don’t believe the in-game stat card 96 damage but less than that for a rate of fire over 1/s, what? Moving on, this is a space sniper rifle, capable of doing… 1152 damage in a single shot? Is that right? Ugh… With long range and perfect accuracy, you can go ahead and try to pick off dudes from a distance. Remember that charging also uses energy, and holding the charge prevents regeneration.
Shiva Systems
Found on: Nothing!
Read up on the standard Shock Rifle up above. This thing is overall weaker but confers a world-slowing effect like the Time Extender while it’s charging. This effect stops the moment charging is complete. I’d like to assume all rules for the Time Extender’s slow down are the same for this.
> Primary Weapons ( 5 / 5 )
Maverick Precision Technologies Inc.
Found on: Scout B!
Here comes the Galaxy on Fire 2 flashbacks. This gun is super easy to use, you hardly need to aim it. It can reliably hit anything in range on it’s own, unless it’s too close. Sadly, the damage is much too low, especially for it’s energy cost. This weapon is the only primary weapon that can realible hit targets you cannot see. It can be used to play cover-shooter with the enemy, or suppress them when trying to run away. It’s hilarious to do a ballet while spraying this gun, just don’t expect your targets to die, or your reactor to like it. Remember, if you accidentally lock onto a neutral target, hold down the Change Target button to unlock.
Maverick Precision Technologies Inc.
Found on: Nothing!
The lovechild of the Thermo and the Scatter, this thing charges up to store multiple projectiles, then it’s all unleashed when the trigger is released. It does a high amount of burst damage, but try to main it and you’ll have a bad time. It’s DPS is even lower than it’s sister and it’s harder to use. For a gun that’s designed to be easy to use, this is just disappointing. Stay away.

Unknown
Found on: Ancient Weapon!
Technically a primary weapon, here it will stand. For the actual use and power of the weapon, please refer to Ancient Weapon Glyph above.
> Primary Weapons ( DLC )

Unknown
Found on: Nothing!
Now I’m getting Unreal Tournament flashbacks! The Goo Gun shoots slow projectiles that stick to whatever they hit, and detonate after a few seconds. It’s very much a weapon that should be banned for chemical warfare. Regardless, this weapon has a HUGE DPS against all kinds of targets and it rivals the Flak Cannon for mining potential. The problem? Slow projectiles, short range, and the fuse keeps it from being instant kills.
Maverick Precision Technologies Inc.
Found on: Sentinel A!
Zap zap~ This thing is the daughter of the Beam Laser and Star Wars Battlefront Classic’s ARC Caster. A continuous beam that trails from your target to any nearby targets within 30% it’s range, dealing 50% damage. It’s best used against “lead craft.” The strongest one in a group, the weaker ones will fall shortly. Meaning, it’s good against Outlaw Bombers but bad against Okkar Swarms. It won’t chain to docile units like G&B, nor landmines, but it’s more than happy to chain to Grey Goo, beware!

Unknown
Found on: Nothing!
Ever fought an Okkar Corvette Mk2 and wonder if you could get your hands on that ball-of-death-cannon it shoots at you? Well, here you go! This death cannon charges up ala Shock Rifle and launches a ball of death that murders entire groups of enemies. Provided it hits. Very fun, very deadly, very ineffective against small fast targets. Try not to use it on targets that are too close.

Unknown
Found on: Nothing!
Man, this thing is weird. It looks like a projectile weapon, but stats say raycast. The target lead says it’s raycast but it doesn’t leave the Burning AOE unless the burning particals make contact. Does the beam have direct damage or is it all from the Burning AOE? So many questions! So hard to understand! Fromatting these tables is hard… Regardless, this thing is highly effective on Okkar units as all of it’s damage goes right through shields. I’ll form a better opinion once I learn more.
> Secondary Weapons ( 1 / 2 )
Boom boom, they use ammo as ammo, and, by extension, resources. Use them wisely, but don’t worry about using them too much, they drop often enough to warrent use.
Shiva Systems
“I must say, this does change things somewhat.” – HIVE
Found on: Gunship B!
With the highest base single-shot damage in the game, this too-awesome-to-use psuedo-nuke is intended as a last-ditch effort to take out a hard target. Luckily it’s effective against small targets too, as beams of kill are emitted by the, uh, missile, that greatly damages nearby targets. Don’t stand too close to it’s destination. It can also be disassembled for easy Dark Energy.
Vohs Space Industries
Found on: Gunship A, Gunship C!
Many unknown variables here, the Mine Cluster detonates when it reaches it’s maximum range, spreading a random amount of green flavored mines, supposedly Plasma Mine Mk1s, in all directions. After <?> seconds, these mines will explode by themselves if no enemy gets nearby. It’s cool but not particularly powerful or easy to use. Note to self: give this a unique table for organization.
Ancile
Found on: Interceptor B, Scout C, Gunship C, Sentinel A!
A brutal little thing that pierces shields and melts the hull directly. It takes 12 seconds to deal 240 hull damage and the effect stacks with several. Very handy for fighting corvettes. I think drone carriers are immune to it?
Maverick Precision Technologies Inc.
Found on: Gunship A!
I like this thing, it has high damage, good AoE, relatively cheap, long range, and it tends to nuke things. You cannot go wrong with this powerful, albeit boring, missile.
> Secondary Weapons ( 2 / 2 )
Maverick Precision Technologies Inc.
Found on: Interceptor A, Gunship B!
Baby’s first missile. Weak, but very cheap to make, it’s the bread and butter missile of any missile spamming missile boat.
Ancile
Found on: Scout B!
Guess what this thing does. No, really, guess, what on earth can “Shield Breaker Missile” do? I’ll wait. Got it? Okay. It’s good at it’s job and it shouldn’t be scoffed at. Take notes from the Outlaw Scouts, it’s good when paired with the Gatling.
Ancile
Found on: Scout A!
The Webber Drone’s wife, Stasis Missiles have an uncomfortable high rate of fire for what they do, they freeze a target (or at least greatly slow them down) when they hit an enemy, strangely also stops them from shooting. Very effective against fighters and scouts, it leaves them wide open to high DPS weapons. Because it needs a direct hit to work, it will not do a thing if it hits Front Shield Generators. A welcome change from being webbed all the time.
Federal Arms & Crafts
Found on: Interceptor C!
My favorite missile, this unguided rocket boasts an extremely high DPS and can make larger ships bow before your might. This thing is cheaper than the ARC-9000 but no good against small targets, obviously. I would advice not trying to snipe with this weapon.
> Secondary Weapons ( DLC )
Unknown
Found on: Sentinel B!
Ever played Borderlands 2? Ever used a Slag weapon? Slag does the same thing this does. The missile makes the enemy take almost double damage from all sources for a few seconds. Toss one on a Corvette to make the times fly by.
Maverick Precision Technologies Inc.
Found on: Sentinel C!
The much-anticipated cluster missiles are very powerful and hold their own against big and small targets, marking it’s territory for crowd control beaten only by the ARC-9000 itself.
> Devices ( 1 / 5 )
Some people call these devices, me, I call them gadgets.
Adumbratech Quantum Technologies PLC
“Our vessel cannot be detected as long as the cloak is operational. Just don’t start firing, it will reveal our position.” – HIVE
Found on: Scout A!
The Cloak hides your ship from the enemy’s vision for a few seconds, you can fire at will while in this state, but beware the enemy might still see you and will shoot at you even while cloaked. The Cloak makes a handy tool for recon, combat, and escaping. Beware that missiles are not tricked by it, and Okkar Scan Drones will break your cloak if you get too close. I like the good fight, so I hardly use it.
Benca
Found on: Interceptor B!
When activated, this device drains you of your shields (provided you have one) and forces a 2 second boost of intense speed. Your inertia dampeners and thrusters will have trouble trying to slow you down, and crashes are lethal, but there’s no better way to get around or escape black holes. This is very effective on the Gunship due to it’s high inertia and lack of shields. It also tends to jam, so don’t boost when you activate it, or it might whiff.

First Aeronautics
Found on: Nothing!
The most boring gadget in the game. Remember, though, boring isn’t bad. This device can be equipped multiple times and is the only passive device to not drain your core, it, rather, extends it. Very handy in early game when you don’t necessarily have the energy for long engagements or knowledge of active devices.

First Aeronautics
“Wow! What a kick!” – Hero
Found on: Nothing!
The designated panic button, the Energy Discharger converts all remaining energy into raw kill and blows up, damaging everything and everyone in short radius. You effectively turn yourself into a hand grenade. It’s effective at clearing minds and punishing drones. Not bad, but it’s high cool down time dissuades spamming. I think it also damages you and your shields, but I’m not entirely sure. Very handy when using Daredevil.
> Devices ( 2 / 5 )
Ancile
Found on: Gunship C!
A very powerful defensivedevice for the gunship, the Front Shield Generator summons an impenetrable barrier in front of your cockpit. It resists all non-explosive damage. Gatlings, lasers, webbers, scanners, it will not fall. The only thing that can counter it is explosive damage piercing the shield slightly, and going around, where the shield cannot cover. Effective use of this is absolutely imperative for using the gunship. The barrier doesn’t resist particle effects. It can be difficult trying to shoot back while getting shot at.

Ancile
Found on: Nothing!
While expensive on the Energy Allocation, this passive device adds armor to your ship. This means raw damage reduction to hull damage. The mk3 reduces all damage to your hull by 20%. This may sound like a “I have shields who needs this waste of reactor” device, but don’t get me wrong. It’s the best possible device in the game when you’re running the Gunship or Daredevil enhancement. There’s no other passive device that gives you survivability, so deal with it.

Alioth Electronics
“Mainframe overridden. The compromised vessel will now attack it’s allies.” – HIVE
Found on: Nothing!
Interesting and dark device, it hacks into your currently locked on target and, after the charge time is finished, and it succeeds a % check, the enemy will now fight for you. Supposedly, some targets are resistant to this effect. I wouldn’t rely on this thing to save your life, but the 4,000m range means you can cause havoc at a distance. According to the Everspace 1.1.0 patch notes, this thing can Override Corvettes!

Ancile
Found on: Nothing!
When activated, the MDS will shoot a laser and snipe at any hostile missile that comes too close. Handy when fighting Missile Silos, renders Bombers useless, and not too bad. If missiles really are an issue, a better investment would be learning to juke them then rely on something that can make your juking worse. The MDS does NOT work on “homing bullet” like weapons, such as Thermo Guns.
> Devices ( 3 / 5 )

Primesense Instruments
Found on: Nothing!
By sacrificing a rather uncomfortable large amount of energy, you can increase the range of your sensors by a rather impressive amount, decreasing the chances of missing a potentially valuable cargo or resources. I don’t think this thing is worth it for that kind of energy cost.
Ancile
Found on: Interceptor A, Interceptor B, Scout B!
One of the most important devices in the game, the shield resists all damage taken until it buckles, and can recharge itself automatically. A shield can help you shrug off a good chunk of damage between fights, even if it doesn’t benefit from armor. Try to keep it up, though, waiting 5 seconds for recharging is better than 10 seconds. If you’re using Daredevil, your shield will not work and is better to scrap it ASAP.
Ancile
Found on: Interceptor C, Scout A, Scout C!
The “Extra Charge” edition, this shield is weaker but recharges faster and uses a bit less energy. These changes in stats make this shield better mid-combat than pre-combat. It’s not unlikely that you can fully recharge your shield in the middle of combat, provided you’re good enough at dodging. I prefer this one over the standard.
Ancile
Found on: Interceptor C!
I haven’t even touched this thing, so I’m speculating here. When activated, it will turn off the shields for your locked on target. Good if you don’t have an anti-shield weapon. But at a lengthy cool down, and some enemies being resistant to it, I think just shooting with your anti-hull weapon is better.
> Devices ( 4 / 5 )
Adumbratech Quantum Technologies PLC
Found on: Scout B!
When triggered, your ship will engage a short ranged, forward “blink”, instantly appearing some hundred meters away. The blink has no recharge time, it can be mashed to quickly drain your core. It can be used as an effective, though expensive, method of escaping incoming missiles and the Webber Drone’s, uh, webbing. Don’t do what I did and crash into a Jump Suppressor at full speed 2 jumps before Sector 7 when using this thing. If you try to teleport and a physical object is in the way, you’ll “stop” a few meters before collision. Be VERY careful when using this in tight quarters.
Baron Nova Gunnery Inc.
Baron Nova Gunnery Inc.

Baron Nova Gunnery Inc.
“You would be well advised not to let enemies come too close.” – HIVE
Found on: Gunship A (Gatling), Gunship B (Laser)!
The turret comes in 3 flavors that I have listed here. The Gatling is good against hulls, the Laser is good against shields, and the Missile is good against both but more expensive. The turrets all automatically lock onto and shoot at targets that are in range and in possible rotational area (IE; above your craft) for it’s duration. Don’t be afraid to spam it, it only costs the En Use to use it, and all firepower costs 0 energy. No, the missile turret doesn’t consume missiles, it shoots a salvo of it’s own unique weapon. Just remember, keep the enemies above you, the roll keys are your friend.
Adumbratech Quantum Technologies PLC.
“Actually, it speeds up your brain processing abilities, helping you perceive situations at a normal pace more like, well, mine.” – HIVE
Found on: Scout C!
Now we’re talking! This is my absolute favorite device in the game bar NONE! When activated, time around your ship (IE, everything but your ship) will move at half speed. Your ship is not effected, your weapons still shoot, your ship still handle, and your reflexes are effective at perceived speed, while your enemies will fire and react at half. This effectively doubles your DPS and movement speed for the duration, which, by the way, is perceived at double. That 10 second duration is actually 20 seconds. Your jump charge time is also not effected, but hacking is. Holy cow! This is just too good! Use it! Right now! On everything!
> Devices ( 5 / 5 )

Federal Arms & Crafts
Found on: Nothing!
A simple but handy device, this thing increases the range at which you pick up and interact with loot in open space. Resources are pulled in right away, while equipment you cannot equipped will give you a prompt to manage it from farther away. It’s not necessary, but it’s too good to have around, especially when people complain about the pick up range.
Alioth Electronics
“This will enhance your weapon damage considerably.” – HIVE
Found on: Interceptor A!
Perfect for the inner berserker, this device powers up your weapons damage, rate of fire, and energy consumption for it’s duration. Increasing DPS but a good chunk and, frankly, makes you feel powerful. It’s versatile, works on all primary weapons, and you can’t go wrong with it.
> Devices ( DLC ) ( 1 / 3 )

Adumbratech Quantum Technologies PLC
Found on: Nothing!
If your tactic is to tank as much damage as possible, focus on raw power over self preservation, then this is for you. As you take damage, your energy core will fill up in relation to how hard you’ve been hit. I am unsure how this interacts with armor. Personally, just don’t get hit, this thing is just not a good crutch.

Unknown
Found on: Nothing!
The Decoy Generator summons 2 fake versions of your ship, armed with fake Pulse Lasers, that fly nearby and attempt to combat enemies with poor AI. This is not an offensive device, this thing is designed to pull agro away from you. All the impending doom flying your way will now suddenly attack these non-existant, invincible clones of you. Do not underestimate it, this is a very good device in hairy situations.
Vohs Space Indsutries
Found on: Sentinel B!
Presently overpowered. This thing turns the typical cannon fodder into raw resources, which includes Nano Bots, Power Cells, Compounds, Gel, Processors, Scrap, and Fuel. It only works on the currently locked on drone. It should be noted that ship-spawned drones, like Shield Charge Drones off a Corvette Mk1 will still detonate, but not drop anything. Link Drones are totally resistant to this device. Mining Drones are also resistant. Friendly Drones can be popped at will.

Ancile
Found on: Nothing!
Cheating death is expensive, my friend. An entire device that serves no purpose until the last weld of your craft gives away, taking it along with it. This will provide the 11th Hour Superpower you need to combat the current dire situation or suppress the occational lethal mistake. I have no used this yet, nor will I ever.
> Devices ( DLC ) ( 2 / 3 )
Shiva Systems
Found on: Sentinel A!
Surrounded by baddies and need a quick breather? Pop this to temporarily disable the flight and weapons systems of all enemies around you. It’s like a jamming version of the Energy Discharger. Hell, it even effects turrets too!

First Aeronautics
Found on: Nothing!
Some people think the Energy Discharger is a burden. So why not give it to the enemy?! Target a poor soul with this and flick the switch, they’ll explode in raw energy damaging everything around them. Effectively destroys all nearby drones. It doesn’t damage the target directly, however, and I don’t know if it really drains them of their energy. Energy just seems like a player handicap, not an AI handicap. This is an amazing tool to start a fight with, and is extremely lethal to Drone Carriers.

First Aeronautics
Found on: Nothing!
Okay, this is real simple. It’s an Energy Injector, reusable, at the cost of shield strength. Got it? Good. This simple device instantly converts Shields into Energy, for when you want to push the assault and forego your defenses. It sounds bad, but some creative use can make this thing almost as good as Daredevil for offense! Don’t think too hard, it’s Sentinel + Shield ST + Bullseye + Energy Diverter + Thermo Gun (Rate of Fire and/or Crit mods).

First Aeronautics
Found on: Nothing!
This game has very tight controls as is. There’s little in the way of drifting until your Intertial Dampers get damaged or you pack Intertial Drift. Should you say otherwise, or those previous situations occur, pop this. You’ll obtain godlike thrust vectoring. You press the Spacebar you better be sure you’ll ascend within the next frame. I can see it’s uses on the Gunship to give it some much needed evasion, but it’s simply overkill on Sentinel. Don’t use indoors.
> Devices ( DLC ) ( 3 / 3 )
Ancile
Found on: Sentinel A, Sentinel B, Sentinel C!
With more than 50% the strength of the standard shield, the Sentinel-exclusive ST, “Superior Titanium”, can resist the biggest of blows. But every blow is crippling, do not expect the regeneration to save you mid-combat. I can easily see this being the favorite of many-a-people as it increases the likelyhood of surviving the usualy skirmish unscathed.
Shiva Systems
Found on: Sentinel C!
You know that turret on the Gunship? Well, take that, make it good, and you get this. The Static Discharger zaps anyone nearby regardless of shooting angles. Just get close and let it do it’s thing. Don’t worry about accuracy, it always hits. Now, if that’s not power creep, I don’t know what is. Apparently it can crit, but…

Shiva Systems
Found on: Nothing!
This simple device emulates the effects of being a webber drone, it slows down targets and makes it harder for them to hit you, ditto, easier for you to hit them. It’s a great tool when using slow projectile weapons such as the new Goo Gun, but is a pointless handicap to someone who is accustom to aiming with the mouse.
> Consumables ( 1 / 3 )
Everything except Nano Injectors and Energy Injectors are wrong.
Maverick Precision Technologies Inc.
Found On: Interceptor B, Sentinel C!
Need some extra damage? This will save you, with your shots potentially doing more than double damage for 40 seconds.
Ancile
Found On: Interceptor C, Scout B, Gunship A, Gunship B!
Rather than reducing incoming damage by unique methods, the Damage Limiter, instead, adds armor directly to your ship. This means that the base Gunship with the base Adaptive Armor (40 armor, 40% DR) with the Damage Limiter Mk3 (+60 armor, +60% DR) means invincibility. The best the Scout can get is 80% DR, while the Interceptor can get 90% DR.
Grady & Brunt Prospects
Found On: Sentinel B!
The only reliable form of external backup, this beacon can save your hide by assisting in the destruction of targets or, even better, take the heat off of you. Once they detect no nearby enemy, they jump away.
Alioth Electronics
Found On: Scout A!
This thing instantly turns all drones in it’s effective range to your side. It does nothing to Link Drones. It might be a good idea to execute them when not needed as the hacking will run out and have them shoot you. Beware that drones tend to not realize they’ve gone turncoat and will continue to shoot you for a few seconds after the hack.
> Consumables ( 2 / 3 )
First Aeronautics
Found On: Scout A!
Although seems pointless, this thing has saved my skin plenty of times in early game, when my reactor was weak. Expect to quickly build one and pop them in the Ingame Menu for that last bit of energy you need to end a fight or save your skin.
Benca
Found On: Scout C!
Also very much a “Oh crap I need to get out of here yesterday” consumable, the Jump Stabilizer instantly hacks all Jump Suppressors on the map and creates jump coordinates instantly. I am not sure it the effect is persistent, I don’t know what happens when a Jump Suppressor-equipped Corvette jumps onto the field. Someone help me out here.

Vohs Space Industries
Found On: Nothing!
The Nano Extractor repairs your hull for the equivalent of 4 Nano Bots worth of healing, at the cost of damaging a random component. Components themselves need 3 or less Nano Bots to repair, making this consumable a risky choice unless you invest in the Component Damage Repair Costs perk or are running with the Leech enhancement. The effectiveness of this consumable increases with the Nanobot Efficiency perk.
Ancile
Found On: Gunship C!
In a normal run, these things only serve to give you instant healing when Nano Bots would get out-damaged. Not that good, really. However, these things really shine when using the Leech enhancement. Without the ability to repair with Nano Bots as normal, you can spend some and a bit of Dark Matter to make these instead, which CAN be used. Not bad. Good to know that the Mk1 heals 6 bots worth, Mk2 heals 7 bots worth, and Mk3 heals 8 bots worth. The effectiveness of this consumable increases with the Nanobot Efficiency perk.
> Consumables ( 3 / 3 )
Vohs Space Industries
Found On: Scout C!
The inverse of the Nano Extractor, but without the intended cost. This thing will repair a random component for you, so you don’t need to spend resources beside itself. To be honest, it’s not worth building these yourself unless you don’t have the materials to repair, but do have the materials to make one of these. These should be found, rather than build. Do not pair with the Survival Instinct enhancement.

Federal Arms & Crafts
Mines explode. When dropped, it will take a bit of time to arm, then it will detonate if it finds an enemy nearby. Don’t stick around, you can get hit by the explosion too. It goes without saying that this consumable is effective when running away.
Ancile
Found On: Interceptor A, Sentinel C!
Need to boost your shield to resist all but the highest of enemy DPS? Look no further! The Shield Booster greatly increases the quality of your shield for a limited time, the Mk3 even completely removes recharge delays! Though, you shouldn’t be getting hit in the first place, right?
> Consumables ( DLC )
First Aeronautics
Found On: Sentinel A!
This consumable instantly refreshes all <?> devices that are in cooldown state. It’s alright, it can save your skin provided you lost your device-based safety net, like Time Extender.

Unknown
Found On: Nothing!
Hate waiting 6 seconds or using Fuel Efficiency? Try this. The Plasma-Powered Jump instantly warps you to the next sector, even indoors, but it won’t work if a jump suppressor is nearby. Might be handy to keep, but not to make. It’s 6 seconds!
Alioth Electronics
Found On: Sentinel A!
I haven’t used it, so here goes assumptions! It turns all turrets nearby to your side for a few seconds. Hell if I know if it works on turret hardpoints on Corvettes and Frigates.

Unknown

Unknown
Found On: Nothing!
By doing all their errand, the mentioned characters will give you a blueprint for a consumable used to summon them in the sector, allowing you to trade with Tareen or enhance with Throng. These things are very high on the Dark Energy cost and they show up once a run anyway. You cannot find these in the wilderness, craft wisely.
> Drones
I like to separate these from consumables. Drones fly around and do things, they try to follow your craft and assist you whenever possible, they even stick by you when you do a jump. Beware that enemy Drone Carriers can hack your drones, and the drones themselves tend to pull a good chunk of agro.
Vohs Space Industries
Found On: Gunship C!
This drone attempts to shoot down any missile in it’s range with a sick laser beam. It will not target your own missiles and it turns fighting Bombers into a joke.
Federal Arms & Crafts
Found On: Gunship A!
The Combat Drone pulls the most agro but does the most work, it attacks enemies in range with a Gatling <?>.
Okkar Fleet
Found On: Scout B!
So long as it’s in play, the Shield Charge Drone will fire a beam of negative shield damage at your hull, charging your shield remotely.
Federal Arms & Crafts
Found On: Gunship B!
Finally have our own, the Webber Drone emits a beam of slow on an enemy, sticking it in place and apparently jamming it’s weapons until the drone or the target is destroyed.

Primesense Instruments
Found On: Nothing!
As long as it exists, this drone will buff your sensors, allowing you to pick up things at a greater distance.
Upgrades
Resource and energy heavy, but handy. I feel like my opinion on these are unnecessary, so, I’ll just post lists. You can find weapons and devices with upgrades pre-installed in the DMZ, weapons and devices cannot be “un-upgraded”. Remember to weigh your options, every upgrade (except Energy Efficiency) adds to energy cost.
> Weapon Mods

Weapon Mod
Coil Gun, Coil Gun T-1, Flak Cannon, Flak Cannon 5-5,
Fusion Blaster, Fusion Blaster M6-A, Gatling, Gatling 40mm,
Pulse Laser, Pulse Laser MX, Scatter Gun, Scatter Gun 2880,
Shock Rifle, Shock Rifle Pro, Thermo Gun, Thermo Gun X10
Weapon Mod
Beam Laser, Beam Laser M3, Coil Gun, Coil Gun T-1,
Flak Cannon, Flak Cannon 5-5, Fusion Blaster, Fusion Blaster M6-A,
Gatling, Gatling 40mm, Pulse Laser, Pulse Laser MX,
Scatter Gun, Scatter Gun 2880, Shock Rifle, Shock Rifle Pro,
Thermo Gun, Thermo Gun X10, Turret
Weapon Mod
Beam Laser, Beam Laser M3, Coil Gun, Coil Gun T-1,
Flak Cannon, Flak Cannon 5-5, Fusion Blaster, Fusion Blaster M6-A,
Gatling, Gatling 40mm, Pulse Laser, Pulse Laser MX,
Scatter Gun, Scatter Gun 2880, Shock Rifle, Shock Rifle Pro,
Thermo Gun, Thermo Gun X10, Turret
Weapon Mod
Beam Laser, Beam Laser M3, Coil Gun, Coil Gun T-1,
Flak Cannon, Flak Cannon 5-5, Fusion Blaster, Fusion Blaster M6-A,
Gatling, Gatling 40mm, Pulse Laser, Pulse Laser MX,
Scatter Gun, Scatter Gun 2880, Shock Rifle, Shock Rifle Pro,
Thermo Gun, Thermo Gun X10
Weapon Mod
Coil Gun, Coil Gun T-1, Flak Cannon, Flak Cannon 5-5,
Fusion Blaster, Fusion Blaster M6-A, Gatling, Gatling 40mm,
Pulse Laser, Pulse Laser MX, Scatter Gun, Scatter Gun 2880,
Shock Rifle, Shock Rifle Pro, Thermo Gun, Thermo Gun X10
Weapon Mod
Beam Laser, Beam Laser M3, Coil Gun, Coil Gun T-1,
Flak Cannon, Flak Cannon 5-5, Fusion Blaster, Fusion Blaster M6-A,
Gatling, Gatling 40mm, Pulse Laser, Pulse Laser MX,
Scatter Gun, Scatter Gun 2880, Thermo Gun, Thermo Gun X10,
Turret
Weapon Mod
Coil Gun, Coil Gun T-1, Flak Cannon, Flak Cannon 5-5,
Fusion Blaster, Fusion Blaster M6-A, Gatling, Gatling 40mm,
Pulse Laser, Pulse Laser MX, Scatter Gun, Scatter Gun 2880,
Thermo Gun, Thermo Gun X10
Weapon Mod
Coil Gun, Coil Gun T-1, Flak Cannon, Flak Cannon 5-5,
Fusion Blaster, Fusion Blaster M6-A, Gatling, Gatling 40mm,
Pulse Laser, Pulse Laser MX, Scatter Gun, Scatter Gun 2880,
Thermo Gun, Thermo Gun X10
> Weapon Mods ( DLC )
Weapon Mod
Coil Gun, Coil Gun T-1, Flak Cannon, Flak Cannon 5-5,
Fusion Blaster, Fusion Blaster M6-A, Gatling, Gatling 40mm,
Pulse Laser, Pulse Laser MX, Scatter Gun, Scatter Gun 2880,
Shock Rifle, Shock Rifle Pro, Thermo Gun, Thermo Gun X10
Weapon Mod
Coil Gun, Coil Gun T-1, Flak Cannon, Flak Cannon 5-5,
Fusion Blaster, Fusion Blaster M6-A, Gatling, Gatling 40mm,
Pulse Laser, Pulse Laser MX, Scatter Gun, Scatter Gun 2880,
Shock Rifle, Shock Rifle Pro, Thermo Gun, Thermo Gun X10
> Device Mods

Device Mod
Cloak, Energized Boost, Energy Discharger,
Front Shield Generator, Mainframe Override, Missile Defense System,
Shield Disruptor, Turret, Time Extendor, Weapon Overdrive
Device Mod
Cloak, Front Shield Generator, Mainframe Override,
Missile Defense System, Shield Disruptor, Turret,
Time Extendor, Weapon Overdrive
Device Mod
Cloak, Energized Boost, Front Shield Generator,
Mainframe Override, Missile Defense System, Shield Disruptor,
Teleport, Turret, Time Extendor, Weapon Overdrive
Device Mod
Shield, Shield XC
Device Mod
Shield, Shield XC
Device Mod
Shield, Shield XC
Guide Changelog
7/09/2017 (WIP 0.1) – Conception, Framework, Ship stats start/max, Ship loadouts, Introduction, Ship terms, Start Glyph stats, Formatting for rest.
7/10/2017 (WIP 0.2) – Glyph and Subroutine stats, Primary Weapon stats, Primary Weapon terms.
7/12/2017 (WIP 0.3) – Secondary Weapon stats, Device stats, Merged Primary and Secondary Weapon terms, HIVE and Hero quotes.
7/13/2017 (WIP 0.4) – Consumable stats, Upgrade stats, Device, Consumable, and Upgrade terms, begin final opinionization.
7/14/2017 (WIP 0.5) – Opinionization finished, stats finished, begin spell checking, begin compression, spell check complete, unfilled data fixed, all instances of “second” should be in hundredths.
7/15/2017 (1.0.0) – Guide completion, all possible data from the game are recorded, fancy new logo to commemorate, unknowns still exists, how about a tutorial to rip UE4 blueprints into a readable format, that’d be nice.
7/23/2017 (1.0.1) – Added references to the ability to find pre-upgraded equipment. Added an adendum regarding “Enhanced Weapons”.
7/23/2017 (1.0.2) – Confirmation that the idle regen bonus is *2.0. Confirmation that the Mine Cluster sends out Plasma Mine Mk1s, and he amount of mines is random. Kudos to Giraffasaur for the information. Added Teleport as a good dodge option (especially vs drones). Added reference to charge weapons consuming energy while overcharging.
7/25/2017 (1.0.3) – Made correction to Thrust Conversion, did the math, “boost efficiency” refered to the speed of the boost, rather than energy taken from boosting. Gave Gunship A Mine Clusters, embarrassing mistakes are embarrassing…
7/28/2017 (1.0.4) – Thanks to mitm_nik on Twitch, I’ve isolated the damage formula of the Ancient Shock Rifle, and confirmed Missile Defense System doesn’t work on homing bullets.
7/29/2017 (1.0.5) – Shadow Strike test run complete, opinions added on Cloak and Shadow Strike. Reference to Stasis Missiles and Webber Drones stopping enemies from shooting added. Added information about Berserker. If Giraffasaur is telling the truth, the Gunship has 1 more Device and Consumable slot maximum than localized in the perks screen.
8/05/2017 (1.0.6) – Thanks to Giraffasaur and all his insider knowledge, most enemies in the game can only see you at 4,000m. Low and behold, no weapon exceeds 4,000m, the Shock Rifle cannot be upgraded with Range, so I’ve removed it from the Range upgrade.
8/17/2017 (1.1.0) – Synced guide contents with patch notes and current in game information. Missile Turret now has information. Coil Gun: Spread: 0.7* -> 0.6*. Coil Gun T-1: Spread: 0.8* -> 0.7*. Gunship: HP Start: 1000 -> 1090. Armor Start: 30% -> 35%. EN Max Start: 150 -> 140. EN Max Max: 250 -> 240. EN Regen Start: 5.0/s -> 6.0/s. Cruise Max: 131m/s -> 130m/s. Boost Start: 2.25* -> 2.35*.
10/30/2017 (proto 1.2.0 1) – Preliminary data pushing of the new DLC. Sentinel and Primaries added. Swapped the icon for Ancient Shock Rifle and Shield XC. Standby for remainder and syncing.
11/4/2017 (1.2.0) – Finished filling out data of DLC toys, errors and bad opinions ensue. I REALLY wish there was I way I could decode blueprint .uasset files, would really help! Please?! Do be advised that I haven’t updated the Mods lists, it’s lots of trouble…
11/7/2017 (1.2.1) – Synced stats with 1.2.1, primarily device nerfs.