
Overview
This guide will teach you how to easily kill every boss on Insane difficulty level without getting ploughed!
General Info

- Main focus of this guide is a fast and safe boss fights on Insane difficulty level.
- All strategies work on lower difficulties, except for the Dark which offers even more power to the witcher through exclusive items and have a room for errors.
- All item previews were taken from The Official Witcher Wiki[witcher.gamepedia.com].
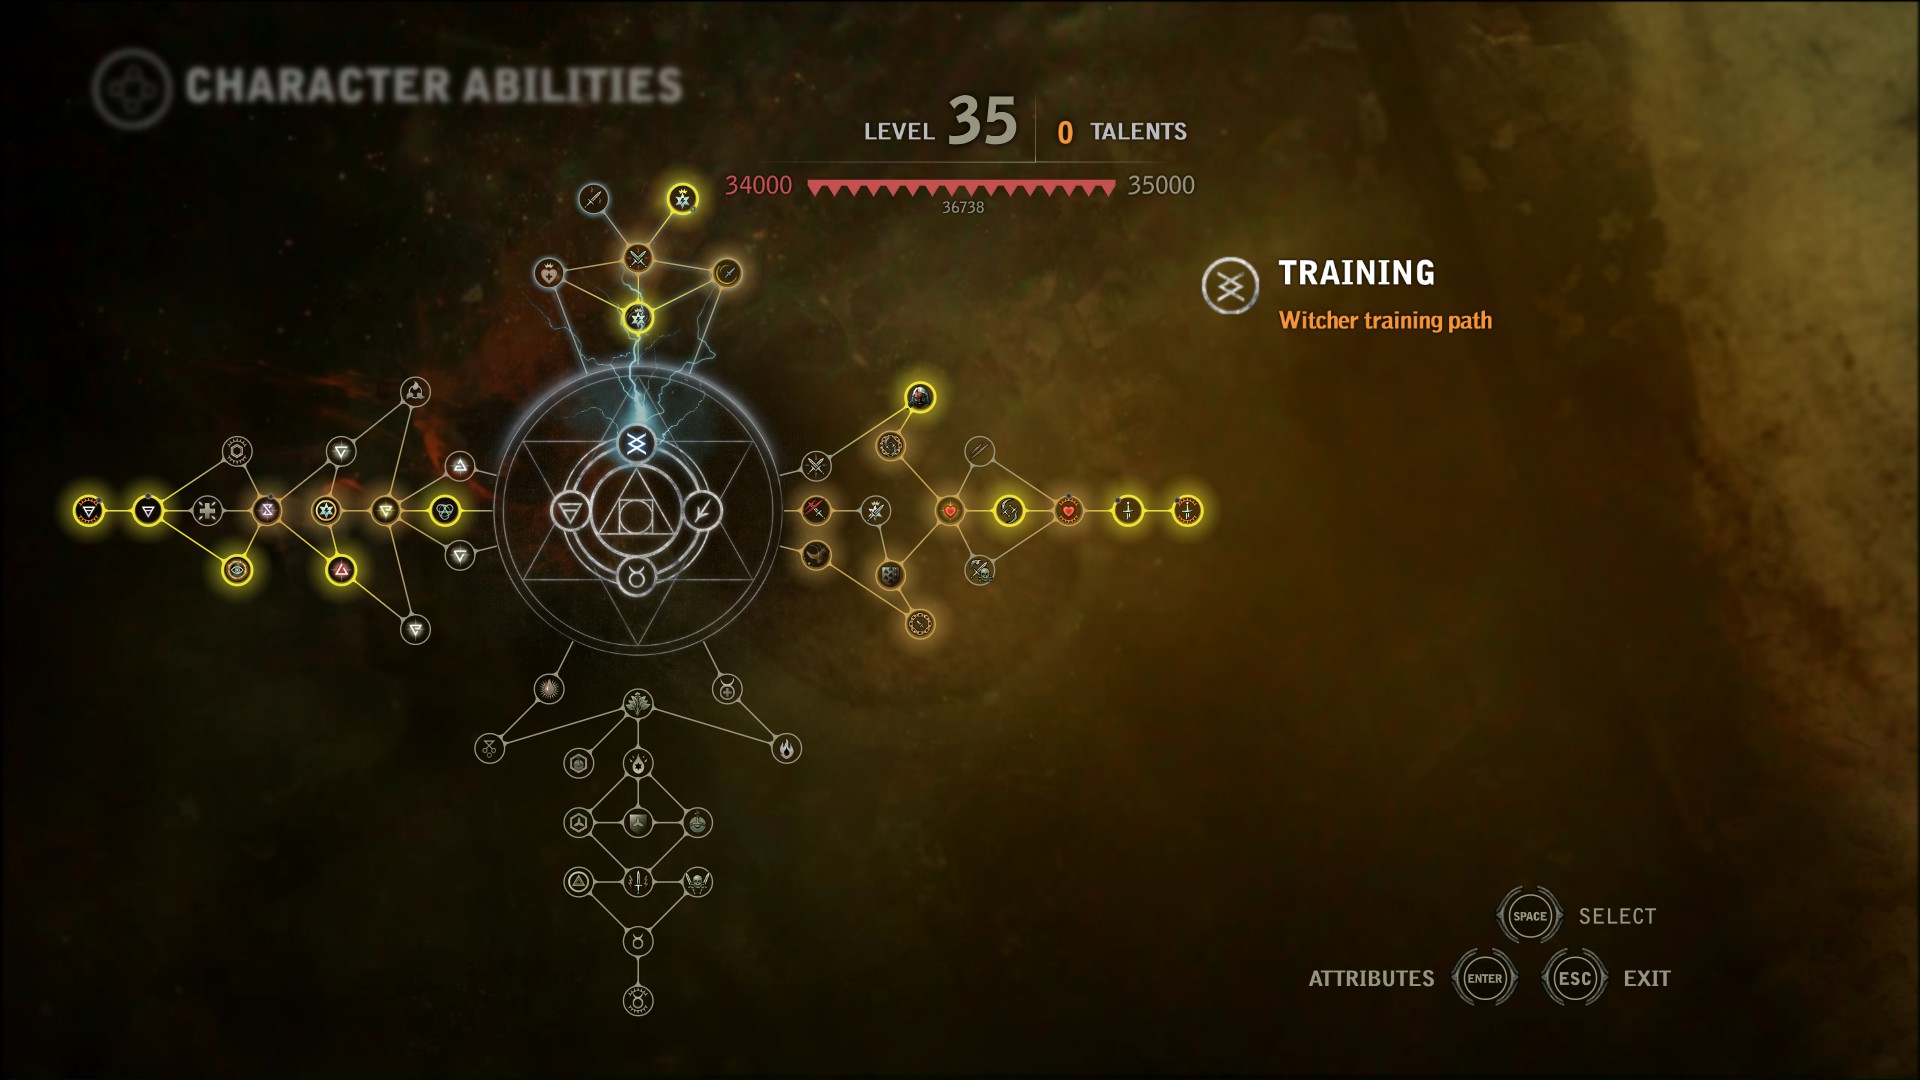
The Build
In my opinion the best way to conquer Insane difficulty is to go Warrior-Mage path, you’ll have good crowd control to get out from risky situations, melee and magical damage to slay your enemies very fast and a Group Finisher along with Heliotrope Sign as an extra airbag. Drawback here is a lack of defense, though it doesn’t matter much, since most prominent foes can one-shot you anyway and if you’re playing on Insane difficulty it means that you’re already now what you’re doing.
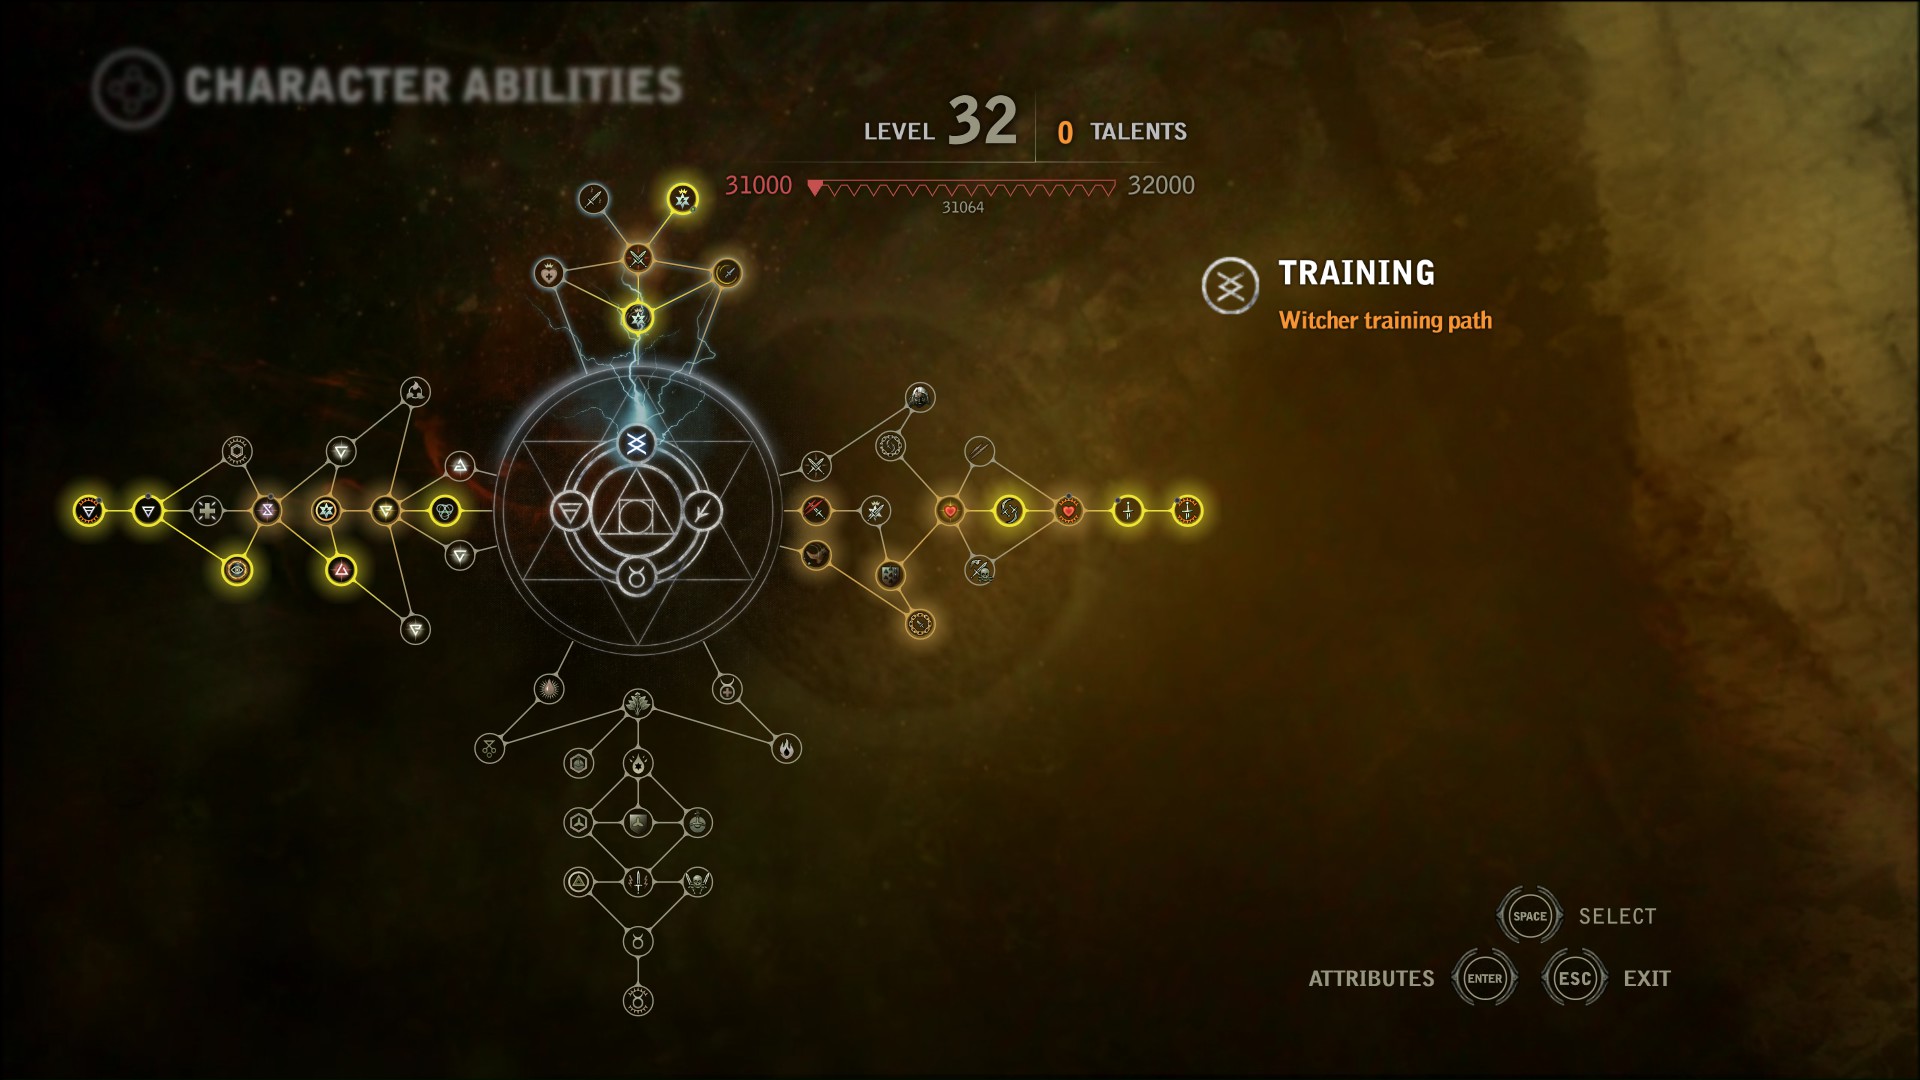
Here’s an example on how the final build should look like:
NOTE: I will provide build progress screenshots before each boss fight.


NOTE ON MUTAGENS: Since it’s a Warrior-Mage build you wont likely find many (if any at all) greater mutagens, so it’s up to you whether to use basic ones or not. I didn’t include them as an important part of this guide since their acquisition is completely random and effects are negligible.
NOTE ON TROPHIES: Use whichever suits your needs at a given time and be sure to get an awesome end game trophies such as Medal of Distinguished Service to Temeria (Roche Path) and Golem trophy (Iorveth Path).
NOTE ON WHETSTONES: You only have 10 of these and you can’t farm/purchase them in the game, so keep them to use against bosses.
Useful Abilities to acquire
Kayran


OR:


Make sure to grab Fortitude LVL2 for additional Vigor. Make a choice between Dagger Throwing & Hardiness, I prefer daggers, with them you can easily kill some tough early game monsters, while +10 HP… Well, wont help you much to say the least.
Get Feet Work, it’s pretty important in the upcoming fight, also grab Schemer & Tough Guy. Start investing in Magic Tree by putting a point into Destructive Magic.

NOTE #1: Kayran has 6 tentacles, 2 frontal tentacles cannot be cut, avoid them by running to the sides.
NOTE #2: You can use Kayran Trap here, but I don’t think it’s worth the risk running to a designated spot to put a trap which ultimately just saves you a couple of seconds.
NOTE #3: If you’re not very confident in you dodging skills then I strongly recommend keeping 
- As soon as the fight unfolds immediately run to the left, dodging first tentacle attack*.
- Set a
Yrden trap and wait in front of it for another attack.
- Dodge the attack and cut the immobilized tentacle.
- Immediately after set another
- Again – wait for attack in front of your trap, dodge it and cut another tentacle.
- Run away again to avoid Kayrans attacks.
- Next run to the right side, dodging possible attacks from the front 2 tentacles.
- Set last
- Cut the tentacle, run away slightly to avoid last series of attacks and perform QTE.
- After the QTE immediately run to the collapsed bridge and roll your way up to victory.
* Note that you CAN be killed in a single blow if it hits you from behind.

Letho (Chapter I)

OR:


Key to the next fight is a constant pressure and for this you’ll need a lot of Vigor, so make sure to invest another point into Destructive Magic followed by Enhanced Quen Sign and Magical Vigor.
- Go ham on Letho right at the start, don’t let him cast
- Initiate fight with
Aard -> 3 Heavy Attacks, try locking him in the left corner.
- Repeat this combo* until you run out of Vigor.
- Letho will be out of health by that time, just back out and wait for the cutscene, be prepared to dodge his magical attacks or bombs in the meantime.
* Position yourself according to his movement, you must be always close in order to connect every attack.
Draug


OR:


You should be pretty buffed up at this point and next boss fight will be extremely easy. Rush through the skill trees to get both Adrenaline Skills and invest 2 points in each Whirlwind and Control over the Power respectively. This yields massive adrenaline generation, really pumps up your resistances, adds magic damage and improves critical chance on everything including signs.
NOTE: Once you enter the mist – any effects of the potions/oils and other buffs will be reset. This effectively makes it impossible to drink any potions beforehand. But you still can use Whetstone once you get control over Geralt during the Draugir fight, just don’t forget doing so.
- Unsheathe your sword and immediately cast
- Repeat this 2 more times and he’s ploughed.
* Draug can start teleporting right of the bat, don’t risk it and just reload the latest autosave if that occurs.
Dragon


You should be maxed out by this point. Grab Violence LVL2, max Combat Acumen & Sense of Magic abilities, upgrade critical effect abilities such as Energy Flow & Finesse. Max 
- After you dealt with de Tancarville cast
- As soon as Dragon breaks in – pummel his head with a continuous chain of Heavy Attacks*.
- You’ll be able to drop his health down to zero which will trigger a cutscene.
- Climb up on top of the tower, re-cast
- Switch to
- Perform the final QTE.
* Dragon will fight back, but it doesn’t matter since his melee attacks cant reach you here, just be sure to cast
** Don’t try fancy things like sword finisher or something like that, Dragon has some weird invincibility frames against melee attacks and remember that he can plough your awesome run in a single hit.
Letho (Chapter III)

OR:

You’re still maxed out, yay. Second fight with Letho will be even easier since you’re a powerhouse now and developers decided to leave Letho on the same power level as he was before, so this fight be pretty much free.
- As before – go straight up ham on him:
This should be enough to outright kill him in just 6 blows.
The Operator (OPTIONAL)
NOTE: This boss is 100% OPTIONAL and also – very hard to kill (at least compared to the other bosses). Only attempt this if you’re 100% confident in your witcher skills!


Level 32 should be enough to deal with The Operator, the key to this fight is critical effects of signs, so max out Energy Flow and don’t forget to visit Winter Shrine outside of Loc Muinne to get Winter’s Shroud perk which will also be very helpful.
NOTE: Be sure to get an additional attack boost by visiting Circle of Strength which located near the stairs leading to the Count Maravels room.
NOTE #2: Again – if you’re not good at dodging and/or positioning then try to keep
NOTE #3: Fill your adrenaline bar before venturing into this fight and use Heliotrope Sign when/if in danger.
- The Operator always greets you with a fireball, dodge it and then hit him with
1 Fast Attack -> 1 Heavy Attack*, roll out and then cast - Wait for the Gargoyles to spawn**.
- Start clearing first wave of Gargoyles by casting
- When both Gargoyles are dead, knock The Operator down again with
- It will incinerate him a few seconds after, wait meanwhile, regenerating your Vigor.
- When his health drops low enough another wave of Gargoyles.
- Knock The Operator with
- Once you dealt with Gargoyles knock down The Operator with
- Now you can start working on his shield, a couple attacks will do, while he’ll be busy burning – finish him off, alternatively you can just spam
* This combo will tear most of his health, so he’ll put shield on himself immediately after.
** If both Gargoyles spawn near or even behind you – don’t risk fighting them, just reload your save since they can instantly gangbang you in just half a second. F9 is your best friend here.
*** The key point here is to proc
**** If you kill a Gargoyle near The Operator it will set him on fire immediately due to their innate ability to explode upon death, saving you the need to throw Dancing star at him.