Overview
For those of you who are looking to take your track designing to the next level, this guilde will show you just how easy it is to create your own custom turns, junctions, and obstacles.
So where do I go to start?
A large majority of Super Laser Racer’s assets are unencrypted, which means you can jet on over to your installation directory and look at the sprites, sounds, and more importantly for this guide: track tiles.
If you’re not a Steam power user and you’re uncertain where Super Laser Racer is on your computer, you can always right mouse click on the game in your library, select properties, select the “Local Files” tab at the top of the window, and click the button labeled “Browse Local Files”.
The folder we’re going to be messing with is located at “super laser racerMediaTilesTrack”. Located there are the base game’s track pieces.
I can see where this is going, but what’s next?
You’ll notice how in the Track folder has three different styles of pieces. There’s “MiniTrack”, “PatTrack”, and just “Track”.
- “MiniTrack” is a transparent image that contains a solid white version of the track pieces. This is used for the mini-map in the top left corner.
- “PatTrack” is the image that tells the game what is going on with that track piece. If the area is gray, that means that it is drivable. If the area is solid black, it will slow the player down and deal damage to them. The red acts as a seperator between the two. Green is used to tell the game that this track piece is used to heal the player.
- “Track” is was the player actually sees when they’re racing.


Alright, what do I need to make my own stuff?
As long as you have an image editor that supports transparency, you’re all set! Photoshop is probably what most people are going to go for, but since I don’t have a copy of that myself, I actually ended up using Paint(dot)Net (which you can get here[www.getpaint.net]) to frankenstien pre-existing track pieces together into new ones. I actually reccomend doing this, since it saves you the trouble of having to duplicate the white glow effect of the track pieces.
Okay, I just got started on making my first Mini, Pat, and Track PNG. Anything I need to know?
The only thing you need to worry about is making sure that the “Mini” track piece is transparent. Leave the Pat and Track images non-transparent though, as Pat needs the colour data to tell the ships what is where, and Track is made transparent by the game at runtime.
One big thing to bring up though is that the track piece *must* be 1:1, with the image size being a multiple of 256. For example, you can have 512×512, of if you want to get real large, 768×768.
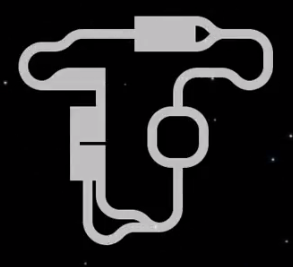
This means if you have a track piece that you want to make that has a 2:3 raptio for instance, you are going to have to make it a square image. An example is this funnel, shown below. I added the straight piece to the left side to make it 1:1. Alternatively, you could stretch the image if you’re into that. You’re the one designing the pieces!

As long as you follow that, you’re all good. (b`-`)b
Finished my Mini, Pat, and Track PNGs! How do I get the game to load them?
As long as it has the correct prefix (for example, MiniTrack_, PatTrack_, etc.), the game will load it correctly. You could continue the numbering system where the game left off, but can name it anything you want! I named my files “[prefix]_TG[track#]”, since it makes it easier to send it to people and avoid potential conflicts with other people’s track pieces.
After you’ve named them correctly (and the Mini, Pat, and Track tiles are all named the same, minus the prefix), it should load in the track editor!
Get in there! 😀
Final words.
I don’t really think there’s much more to add to this guide. Just make sure that you keep the 1:1 ratio of your image and you should be alright!
If you’re looking for some inspiration, I uploaded a video a long time ago from when I was messing around with custom track pieces:
Let me know if I have information wrong in the comments!