Overview
This guide is meant to teach the basics of swarm warfare, including ship design, purpose, and basic tactics.
1.0: Why use a swarm?
The swarm is useful for some special purposes, including
control point defense, extremely powerful offensive push, last resort defense, and other types of tactical moves.
There are some important things to note while using a swarm however.
1. There is a maximum ship limit.
-This is tough when using a swarm, because you have to balance your active fleet between swarm, support, and other types
2. Swarm ships are meant to be as cheap as possible, but with enough group power to take on and destroy large ships
-If you have one or two swarm ships, you can’t do much at all. Maybe take on some defenseless drones. You needa swarm to do good work with them.
1.1 Building swarm ships
Building swarm ships is harder than it may seem. It is essentially a guess and check as to how the ship can be cheap but also have enough HP and DPS to do what you need to do. Then, there is the decision as to the range, and do you give it lightweight armor at extra expense, and otyher questions. I have included some of my designs, giving the approximate minimum and maximum that a swarm ship can have.
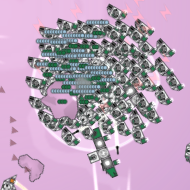
fig 1:
fig 2:
In fig 1, you can probably see a balanced swarm ship, with enough Hp to take a few hits, enough range to avoid extreme close range fighting, and still cheap enough that you can comfortably make 2 every 5 seconds and still rack a profit(if you have enough cap points) This is my main swarm ship.
In fig 2, there is an example of a quick, close range unit. This type can be used in high quantities to fight against other close range ships, but I would not reccomend using them for too much as they are kind of expensive, which, for a swarm ship, is not much of a good thing. The max price of a swarm ship ought to be about 110-115$.


fig 3:
The final design you will need for swarm ships is the power transfer ship. In the interest of expense, many swarm ships will run on batteries, which can run out quickly if you dont watch out. This is where power transfer ships come in. WIth enough of these, you do not need to destroy ships that are out of power, allowing for extra use of battery ships. Though it takes a while to charge a lot of swarm ships with one charger, it is useful to make multiple, or make one huge expensive one that can power a ton of them. My main design for one is shown in fig 3. You do not neessarily need the missile defence, but as these are generally weak, it is handy to have a low-cost weapon.

1.2 Using a Swarm(to greater or lesser effect)
When you use a swarm, you can use many tactics. My suggestion is to group the entire ship type into a hotkey, which can be accomplished by double clicking one of the ships and pressing 1, 2, 3, 4, 5, etc… This binds the type of ship into one key, allowing for quick selection and movement.
You can do many things with swarms, as previously mentioned. Lets take a look at a few.
Control point defense:
this is when you group a huge swarm of ships onto one point for a high-powered defense. I would use longer-range ships for this, but some close range ships for a protective ring around them.
Power transfer ships should go towards the missle of the swarm, for protection and reach.
The Wall.
Self explanatory, this is when you secondary-click and drag the mouse along an area, which has the ships create a sort of wall. Very handy when you have a large number of ships that you can densely pack along such a line. Place some power supply ships along the wall, but behind most of the ships.
The Last Resort
Maybe you are preparing for a final defense, maybe you are desperate, there are many ways to prep for this. Use long-med range ships to simply defend the nerest point. A few power supply shiops are not amiss, but use a lot of normal swarmers. Should the time come, this can also be used a final push, which can be tide turning or disastrous.
The Final Push
This is when you are cornered and you know it. You are doomed to the last point stalemate. Neither side has an advantage yet. You might have enough power to perform a Final Push. If you are surrounded by enemy close range ships, which stay out of range of yours, use the wall technique to expand the circle of defense you have, thus keeping your ships out of their range, but their ships in yours. If you are surrounded by long range ships that have you in range and are constantly ttacking you, make some point defense ships or extra cheap ships to take the fire while your ships attack.
If you are holding a final point and are dominated elsewhere, try sending a small squadron of ships far out of reach of their ships and take a long circle around to attack from behind ehile you send the main force up to blast through them.
In the event of disaster afetr one of these, you have lost. You can’t beat them now.
However, if you have broken through, you can easily win, separate battery shops from power supply ships, and wait for them to run out of battery. Blast them hard.
The final type of swarm fighting is swarm vrs swarm.
SvS:
When fighting anpother swarm, try and take out their power supply, and use long range swarm ships to take them out at long range. Consider using high HP tank ships to draw fire while performing hit-and-run ops with small squads. Have a main ‘base’ area with some power supply ships nearby, you’ll need it.
More to come!
Comment, let me know what you think should be added, and I will try to add it!