
Overview
Maps and strategies for missions in the final location in the game, the Darkest Dungeon itself!
Intro & Summary
Welcome to the Darkest Dungeon, and I do mean the Darkest Dungeon itself, not the game. Hopefully you’ve taken a look at this guide BEFORE you started planning your roster of heroes, as the main purpose of your entire campaign is to develope teams of heroes to conquer the dungeon itself. 4 teams, to be exact, but the last team is pretty flexible. (I’ll just call the final dungeon the Darkest Dungeon from now on)
First, there are a few gameplay mechanics unique to the Darkest Dungeon that you should know about that do not exist in other raid locations.
1. Never Again
Every hero who is part of a successful raid in the Darkest Dungeon will not enter the Darkest Dungeon again. They WILL enter other locations (Ruins, Cove, etc.). These heroes will not count towards the roster size, hence you can hire more heroes immediately upon a successful mission.
2. Abandon = Random death
If you choose to abandon a raid in the Darkest dungeon partway, you will suffer a random hero death. Any trinkets equipped by that hero is lost forever but trinkets in your bags are kept: so unequip all your heroes’ trinkets before abandoning.
3. No scouting, no surprises, no obstacles, no “Cleansing” curio interactions
-Scouting is meaningless in the final dungeon: when you enter a room, paths which lead to new rooms will be revealed. There are no traps. Also no secret rooms, AFAIK.
-You cannot surpise the enemy. Likewise, the enemy cannot surprise you. Not 100% sure about nighttime ambush after camping, but it seems like it cannot happen.
-There are no obstacles. Do not buy any shovels.
-There are no “cleansing” curio interactions. There are one or two curios per mission (see maps in the respective sections), but these do not require a provision item to make use of.
4. Failure = x2 XP boost
If you fail a raid in the Darkest Dungeon, all heroes gain a x2 XP Boost in the next raid. This next raid does not have to be in the Darkest Dungeon to enjoy the bonus.
5. Victory = Remove all stress
A victorious mission in the Darkest Dungeon will remove all stress from all heroes in the estate. Yes, even the “Never again” heroes. Of course, you also unlock the next raid in sequence.
That’s it for unique mechanics.
I’d like to emphasize this advice: Start planning which heroes want to bring to the various raids in the Darkest Dungeon as soon as your roster starts filling out. You need at least 4 full teams. Also train a few replacements in case some of them die along the way.
Personally, I’d send in the my team of fully developed heroes ASAP into the Darkest Dungeon so as to free up the roster space when these heroes get the Never Again status (or die).
There are 4 Raids for the Darkest Dungeon, which must be completed in sequence:
1. We are the Flame
2. Lighting the Way
3. Belly of the Beast
4. Hell is in the Heart
We are the Flame
In a nutshell:
Lots of STRESS
Boss SHUFFLES party like crazy
Lots of BLEED.
Highly Recommended Heroes: Crusader, Jester
Highly Not Recommended Heroes: Leper
I beat it with: Grave Robber/Occultist/Jester/Crusader
Key tip: There is no stall penalty against 2 or more living enemys. Abuse this on encounters with two Rapturous Cultists by leaving the 2 Rapturous cultists for last. (credits to Alexeiy from the forums for pointing this out)
Alert: The way stall penalty works has been changed since the Color of Madness. Stall penalty now works as such:
– At the end of two full rounds after there is 2 or fewer enemies remaining.
– When a player uses 2 or more stalling moves when there are 2 or fewer enemies remaining.
– Stalling is now also defined by whether the player uses too many stalling skills per round
(see [link] for full patch notes).
So how does this knowledge help me?
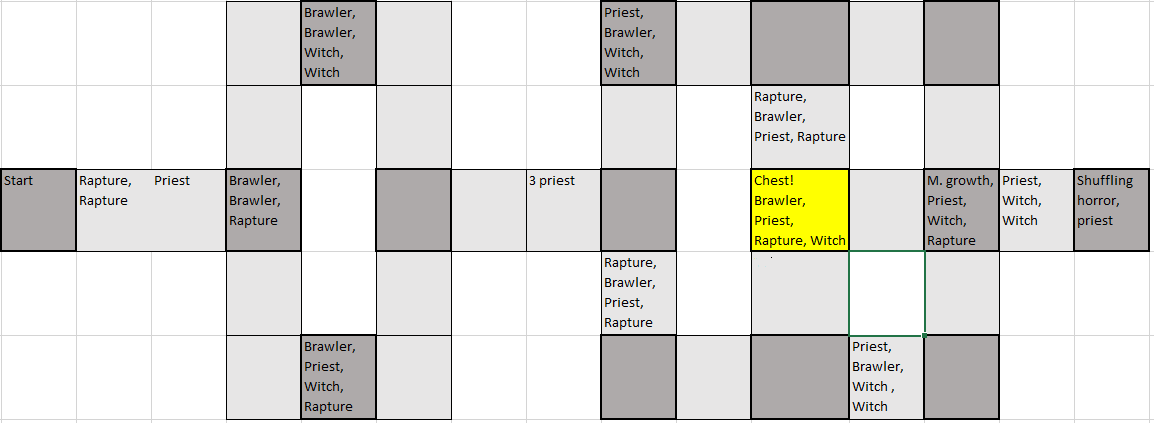
Look at the map. See the encounters which include 2 “Rapture” enemies? Those are Rapturuos Cultists which cannot harm your heroes. You can no longer completely heal forever, but you still should leave them for last so you can heal a *bit*.
Take note that Rapturous Cultists will GUARD other enemies who CAN hurt you. You should disable the GUARD with a stun in order to kill priority targets.
Recommended Provisions
All Food, all Bandages, all Holy Water, all Herbs, 16+ Torches.
Enemies
I won’t go into full detail of each individual enemy here (check the wiki page for that), but I will list the enemies to help you search:
Ascended Brawler, Ascended Witch, Rapturous Cultist, Cultish Priest, Defensive Growth (summon of Boss)
Of these enemies, the Cultish Priest and Ascended Witches are your main priorities. Both of these enemies stress out your heroes like *crazy* and do high damage. Take them out ASAP!
Generally, bleed and blight resistance is fair. The BOSS however has high Blight resistance but mediocre bleed resistance.
Boss
The Shuffling Horror has two actions a turn. His moveset includes a party shuffle, strong bleed damage, and slight stress damage/summoning. His direct damage potential is fairly low.
The boss takes up 3 spaces, and is accompanied by a Cultist Priest behind him. If the Priest is killed, the boss will likely summon a Defensive Growth. Repeatedly.
The Defensive Growth will GUARD and heal the boss, & is resistant to stun. IMO, it is much worse than the priest unless you prepped to deal with it (stun or Riposte).
Heroes
Don’t forget to consider other raids when you decide which heroes to send this raid! Remember, NEVER AGAIN.
Great: Jester, Crusader
– Jester: This whole raid feels like it is designed for the Jester. Of the four raids, this raid has the most focus on high stress. And there is no hero as good as removing stress as the Jester, hands down. The Jester has team anti-stress camp buffs. The boss is vulnerable to bleeds. The boss shuffles, and the Jester is mobile. Trust me, this is the raid you bring your Jester (if any).
– Crusader: The crusader is the only “tank” who can attack from position 4 with “Holy Lance”. The boss is size three, so the Holy Lance skill can always target the boss. He has team anti-stress camp buffs. He has a stun (good for removing guard encounters). He can remove stress. He can heal. Yeah, the crusader really rocks in this fight.
Good: Grave Robber, Highwayman, Man-at-arms, Occultist, Hound Master, Bounty Hunter
– Grave Robber: Effective from any position and good at repositioning to help other heroes. Nuff said.
– Highwayman: Effective from any position and good at repositioning to help other heroes. Nuff said.
– Man-at-arms: Effective from position 1-3. Riposte is an important solution if you killed the Priest and got the Guarding mob for the boss. Has good team camp buffs, but I’d favour anti-stress camp buffs for this fight. However, note that the Man-at-arms is VERY highly recommended for the next raid and you may want to save him for that raid.
– Occultist: Not for his heal, but for his damage debuff and extra damage to everything on the raid. If you fully trained an Occultist for the Weald (you should), I believe you should use him in either this raid or the last raid.
– Houndmaster: Effective from positions 2-4, arguably position 1 as well. A source of stun to remove guard. Can remove team stress in combat, and has good team anti-stress camp buff. 2-action boss means debuffs & marks fall off quickly. So don’t bother marking the boss.
– Bounty hunter: Interestingly, there are a lot of humans on this raid and this raid only. Since the boss is size 3, the Bounty Hutner’s camp buff may be helpful. Don’t bother marking the boss.
Okay: Vestal, Hellion
– Vestal: Constant healing is going to be tricky here as you keep getting reshuffled by the boss. Consider hitting the boss with that mace when shuffled to position 1&2. She is still a solid choice overall, but I’d save her for other raids.
-Hellion: Good bleeds and effective from positions 1-3 … but she REALLY wants position 1 all to herself. I’d use save the Hellion for another raid, but it’s up to you. Somewhat useless on position 4. At least she removes Bleed all by herself.
Poor: Arbalest, Plague Doctor, Abomination
– Arbalest: Generally wants to be in position 3 and 4. She CAN use Blindfire from any position, but her best attack requires 3&4. She can work, but other heroes are generally better.
– Plague Doctor: Generally wants to be in position 3 and 4. She can take actions in other positions… but those are generally suboptimal actions for her. At least she stuns to remove guard.
– Abomination: Wants position 1-2, can sort of act in position 3, can’t do anything at all in position 4. The map has high stress issues. The Crusader hates him. Some folks have used him well, but I’d not advise it unless you know what you are doing.
Horrible: Leper
Poor movement (1 space at a time), zero effectiveness in positions 3 and 4, and poor bleed resists… this place really really hates the Leper. Please, leave the Leper in the estate.
How did you beat this raid, MrBunnyBan?
Personally, I used Grave Robber-Occultist-Jester-Crusader. Non-boss encounters, I used the Grave Robber’s Lunge as a finishing move so my Jester can start healing stress once there were only Rapturous Cultists left. So I had fresh heroes most encounters and saved my campfire for pre-boss campfire buffs.
I used both the Jester and Crusader’s team anti-stress camp buff, thus rendering stress issues with the boss moot.
The Occultist debuffed the Cultist Priest accompanying the boss with Weakening Curse, thus allowing my party to ignore his damage. Holy water ensured bleeding wasn’t a significant issue as well.
The ability to act from any position of this team rendered the boss’s shuffling of my party moot, even advantageous for GR’s Lunge.
In the end, I did not heal with the Occultist at all and just kept burning the boss down.
Trinkets
HP/Dodge trinkets on the low base HP heroes, anti-stress and anti-bleed all work well. Don’t worry too much about damage trinkets: this isn’t really a DPS race boss IMO.
Help, I killed the Boss’s Priest
And now the boss keeps summoning Defensive Growths that Guard instead? There are only two good solutions: Ultra high stun (need stun trinkets) and Riposte.
Wait, what is that chest in the map?
That is a curio which contains an Ancestor’s trinket (if you do not already have them all). Do not need to use a provision.
Lighting the Way
In a nutshell:
One hero is VERY vulnerable to boss.
Bosses cause Blight, regular enemies cause Bleed.
Bosses have VERY HIGH DAMAGE OUTPUT, especially double-boss pack.
Highly Recommended Heroes: Man-at-arms, Hound master
Not Recommended Heroes: Leper
I beat it with: Arbalest/ Vestal/ Hound master/ Man-at-arms
Even better: Vestal/ Hound master/ Man-at-arms/ Man-at-arms
Key tip 1: Unless you really know what you are doing, bring at least one Man-at-Arms.
Key tip 2: Again, there are encounters with two Rapturous cultists who can be used to fully heal/stress heal
Recommended Provisions
All Food, 6+ Bandages, 6+ Antivenom, 12 Holy Water, 6-12 Herbs, 16+ Torches.
Be sure to equip the three Talisman of the Flame trinkets you got as rewards from the last raid.
Enemies
I won’t go into full detail of each individual enemy here (check the wiki page for that), but I will list the enemies to help you search:
Rapturous Cultist, Cultish Priest, Malignant Growth, Defensive Growth, Flesh Hound (accompanies boss), Polyp (accompanies boss)
Again, the Cultish Priest is your main priorities. The Cultish Priests is HIGH damage/high stress/high bleed. You should also watch out for Malignant Growths – though not NEARLY as dangerous, they can still hurt a fair bit.
The Growths are vulnerable to Blight but resist Bleed. The Bosses are the opposite.
Bosses
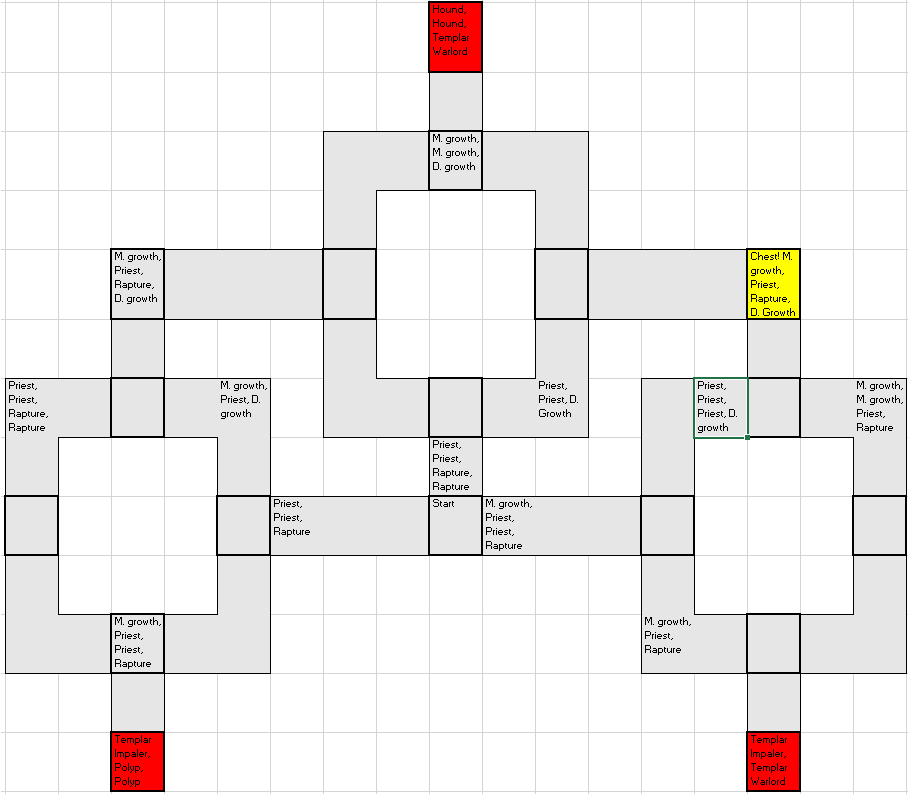
Yes, bosses. Templar Impaler and Templar Warlord specifically (not Gladiator and Sniper). Both have 2 actions per round, so marking and debuffs aren’t effective. They are absolutely deadly to positions 1 & 2, have one/two attacks which also attacks position 3, and do not hurt position 4 nearly as much.
Fortunately, the bosses will usually use one of their two actions to use the Revelation skill, a single-target attack against any position which does nearly nothing to the three heroes wearing the Talisman of the Flame trinket, but humongous damage/stress damage to the hero without it.
Generally, folks consider this raid the hardest because these bosses have extremely high damage output.
Look at the red Boss encounters in the Map. Those are your quest locations btw. The Polyps and Flesh Hounds have knockback and pull skills respectively which disrupt your party line-up: Kill them quickly to stop that nonsense. The Flesh hounds also stun. Both have high dodge and speed.
But the boss fight that really get’s everyone’s goat is when you fight both a Templar Warlord and Templar Impaler. Yes, both. They both have 2 actions a round. Did I mention high boss damage output?
Heroes
Great: Man-at-arms, Hound master
– Man-at-arms: It isn’t just his ability to Guard the vulnerable Talsiman-less hero, and that alone is enough to justify why he is practically mandatory for this raid. The Man-at-arms also gains +45% protection when guarding – and that is key to managing the extremely high damage output of the Templars. Riposte is very effective on these double action, high AoE bosses too.
– Hound Master: Take note that the Hound Master’s guard only lasts one round, unlike the Man-at-arms. Still, consider using his Guard on the Talisman-less hero if the Man-at-arms is stunned. The boss packs on this raid are eldritch/beast. So the Hound master has good damage as well as fair tanking ability, and dog cookies to help burn 2 out of the 3 bosses. Besides, I need a stress healer.
Good: Vestal
– Vestal: Out of the available healers, Vestals get my vote for this fight. You need a reliable healer who can top up heroes when needed due to the damage output of the Templars. Since you’re going to guard the Vestal, she can equip both healing trinkets.
Okay: Bounty Hunter, Crusader, Hellion
They are all okay – not much to say here.
Poor: Grave Robber, Highwayman, Occultist, Jester, Plague Doctor, Abomination
– GR, H, J, PD: Risky, mostly because their health is too low, and the bosses have high damage output. So they are a crit away from Death’s Door. It’s okay to bring ONE of these, but then this should be the hero which you Guard with the Man-at-arms. But then you’d be denying the Vestal use of both healing trinkets. Unless you bring two Man-at-arms…
– Occultist: Do you like to gamble? This may not be a good time for it. Rolling zero on heals can really hurt for this raid. Also, his health is pretty low.
– Abomination: Mostly because he can’t be used as the same time as the Vestal.
Bad: Leper
Not NEARLY as bad as against the Shuffling Horror, as the only monsters which try to move him and party members around are the Polyp and the Flesh Hounds. But those monsters accompany the bosses, and the bosses are considered the hardest encounters in the game. Why would you risk it?
How did you beat this raid?
I rocked with Arbalest/ Vestal/ Hound master/ Man-at-arms.
Given the choice, I may have brought used Hound master/ Vestal/ Man-at-arms/ Man-at-arms
On NG+, I rocked with Hound master/ Vestal/ Man-at-arms/ Man-at-arms
Good grief, this combination works even better than my original combo by a big margin. The deadly Templar damage on NG+ was seriously undone by double man-at-arms using Guard in the front lines. I made sure to alternate between Guard and Retribution, occassionally repositioning between guards when knocked back. Who said Riposte is weak?
But Vestal/ Hound master/ Man-at-arms/ Man-at-arms would have been better.
The Man-at-arms camp buffs really shine here. I really wouldn’t mind using two Man-at-arms for that reason as well. If there are two Man-at-arms, I’d use Tactics twice, and maybe Weapons Practice once.
Filthy Robot used: Vestal/ Grave Robber/ Crusader/ Crusader
His tactic was to stack dodges on the Grave Robber who doesn’t have the Talisman, and used Crusaders to stress heal. He was cursing the whole raid from failed dodges, but generally the tactic worked. Here’s a fair example of someone doing it another way from my recommendation. You know there are other ways to do it from my recommendation, right?
Trinkets
Consider an anti-stun trinket on the MaA. Wilbur’s flag is ideal.
If you have 2 MaAs… I’m not totally sure what to put on the second. Maybe the Crew’s Bell? Cleansing Crystal?
If you have a Hound Master in position 2, do place a HP/Dodge trinket on him. Overture box is ideal.
Double heal trinkets of your choice on the Vestal (Probably okay to reduce her HP since MaA is Guarding her a lot).
Crap, the MaA got Body Slammed into the back positions! I’m doomed!
Yes, this sometimes happens. The MaA shouldn’t be stunned if you have the anti-stun trinket on (otherwise, you’re doomed). In any case, prioritise Guarding: you can Guard from any position. In between using GUARD, slowly move and Rampart your way forwards back to the front. If you had a Hound Master in position 2, Guard with the HoundM until the MaA arrives.
Any other ideas?
Arbalest/ Grave Robber/ HoundM/ HoundM
The Hound masters guard EVERY ROUND. This pretty much renders them immune to any hit that’s not a crit. The Arbalest uses her debuff attack (Suppressing Fire), thus rendering all enemies unable to crit. …yeah, I’m not really sold on this idea either. Just putting options out there.
Belly of the Beast
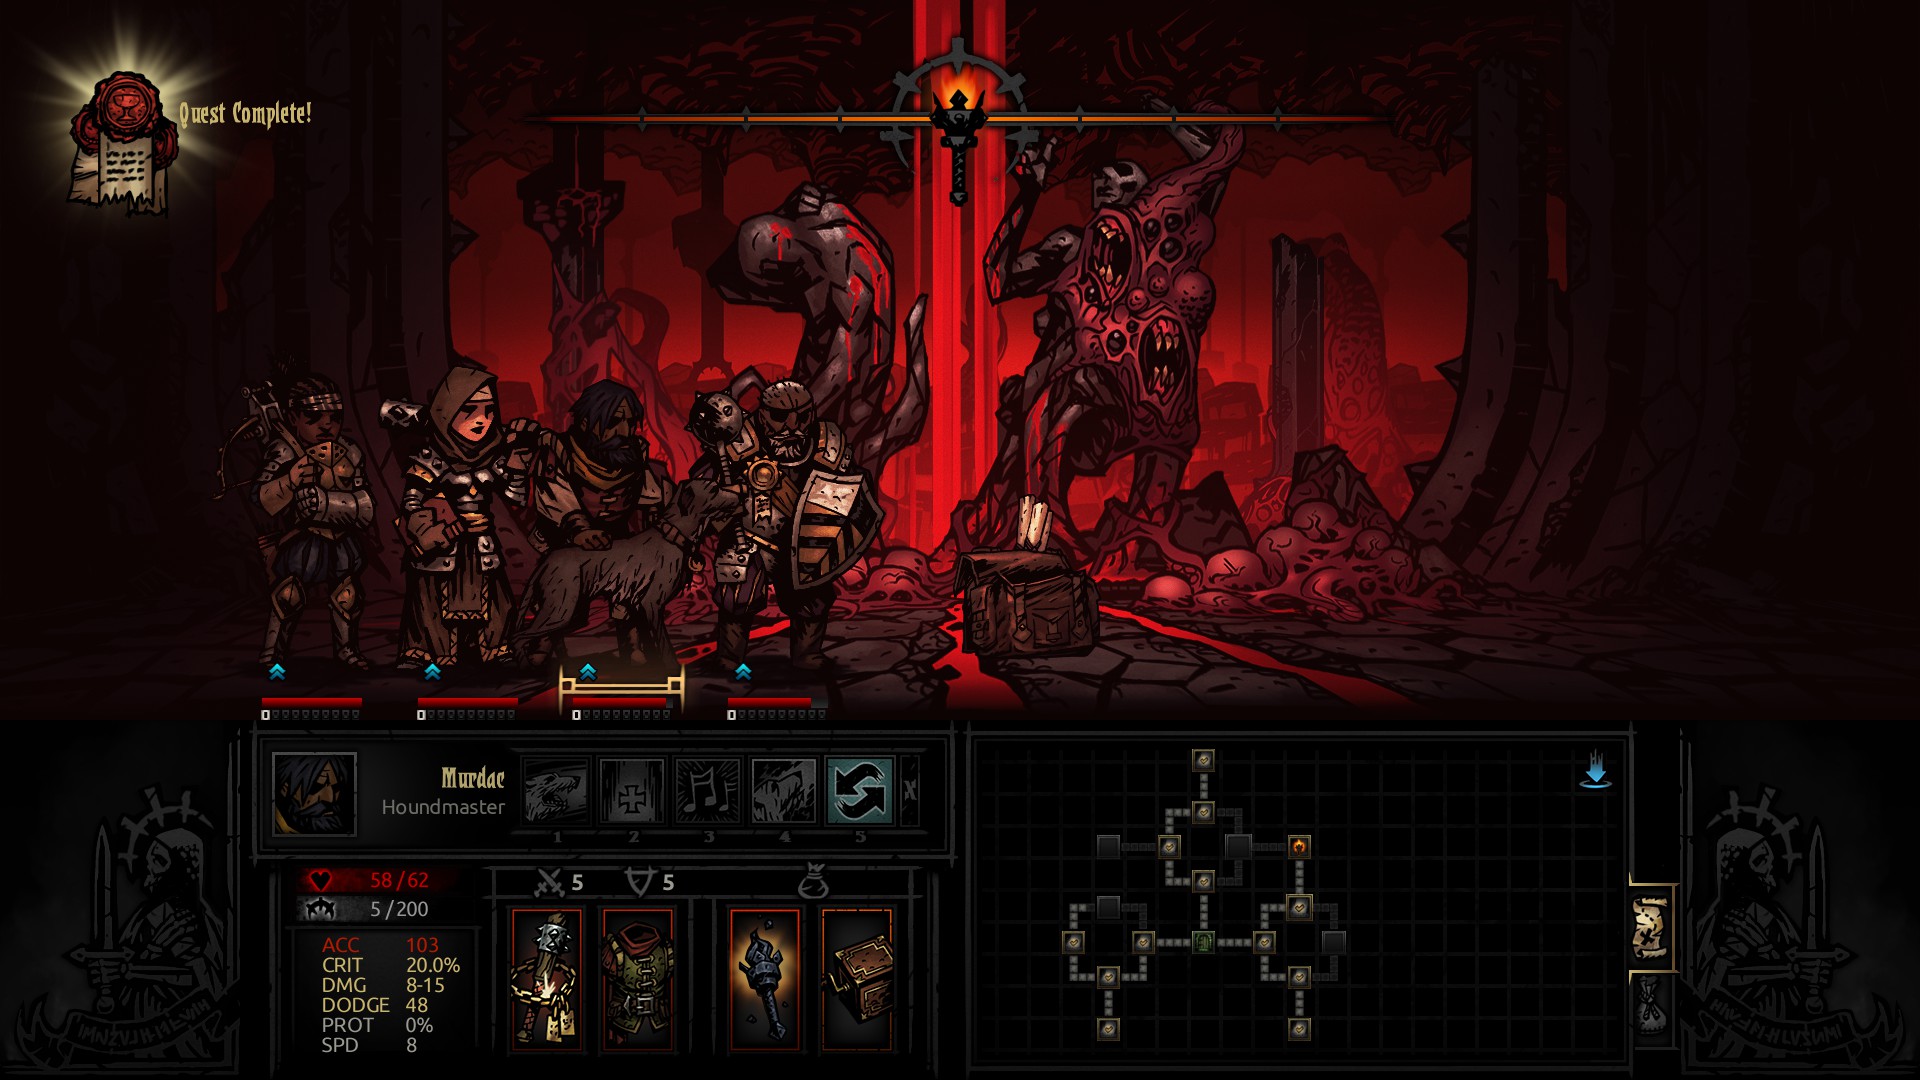
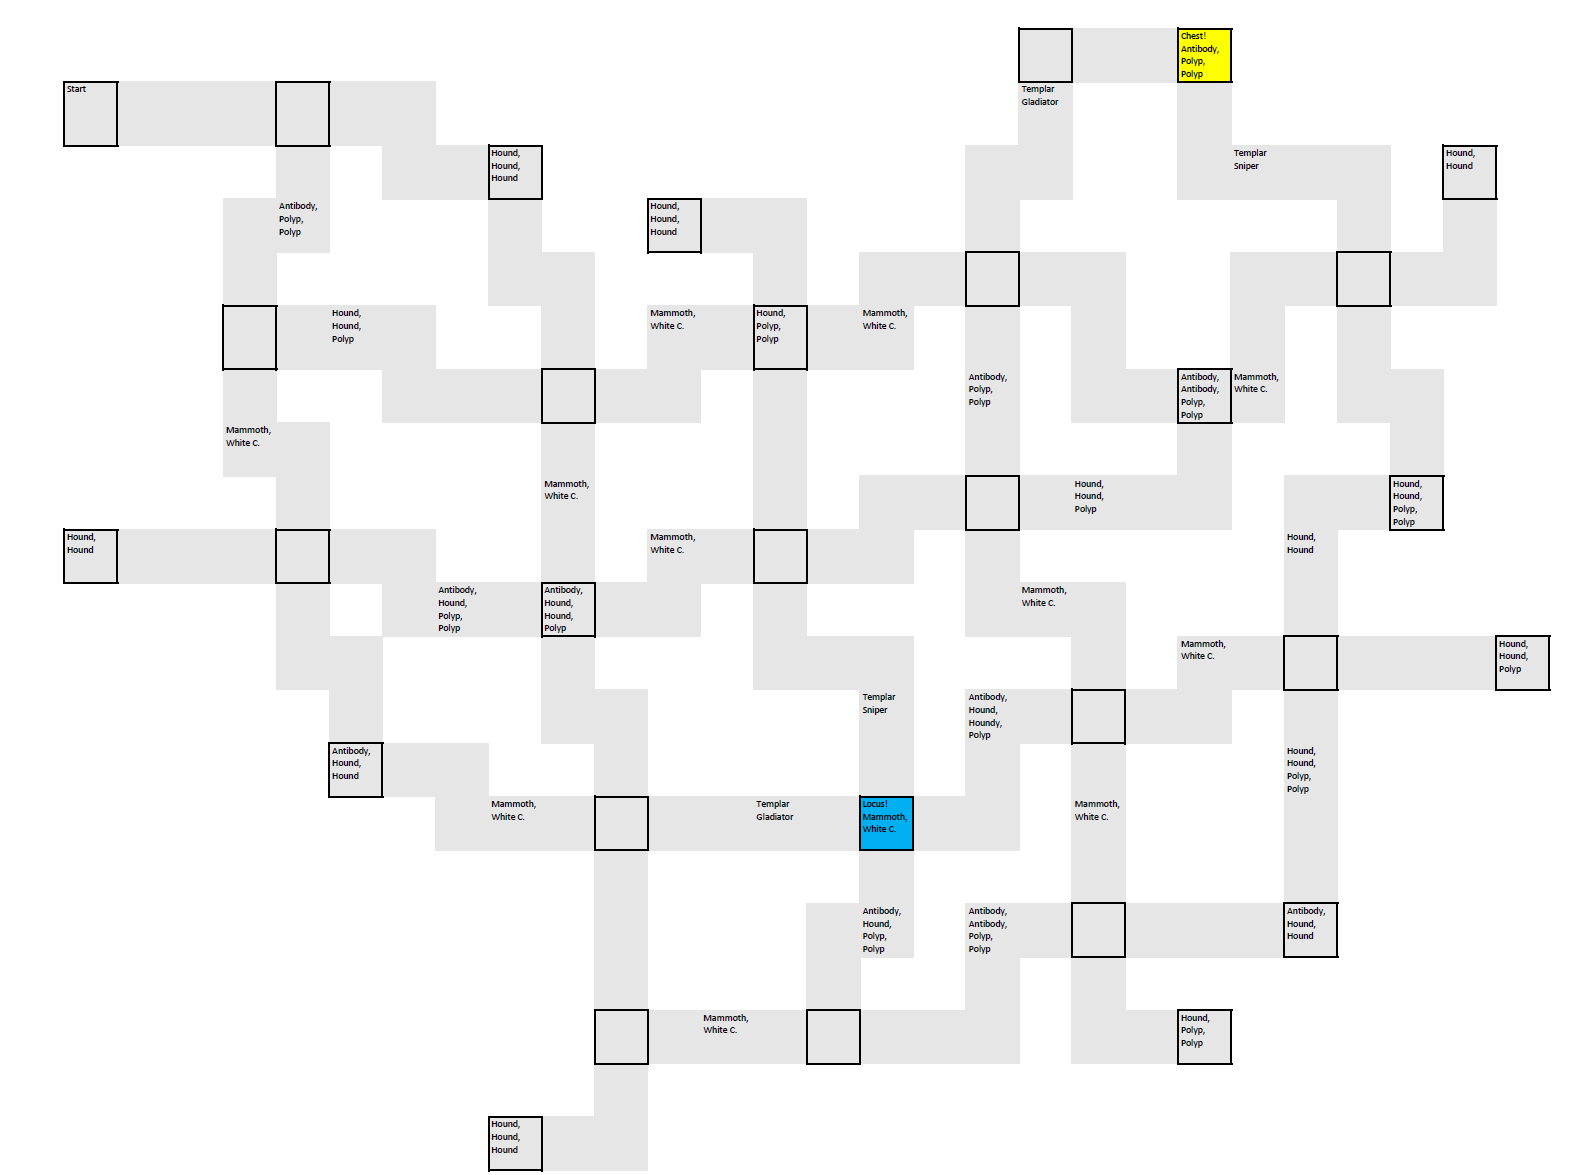
This is MY map. I’ve also uploaded this map to the wiki.. Click to enlarge. An even bigger version is available here: [link]
In a nutshell:
Lots of Marking and bonus damage vs Marked targets
Lots of Blight
Lots of Knockback and Pull
Lots of Dodge (sorry)
Quite a bit of Stun.
Highly Recommended Heroes: Plague Doctor, Hound Master/Graver Robber
Not Recommended Heroes: Leper
I beat it with: Plague Doctor/ Vestal/ Hound master/ Hellion
Key tip 1: It’s possible to permastsun the mini-bosses
Key tip 2: Double Polyp is pretty good replacement for double Rapturous cultists to fully heal/stress heal
Key tip 3: Map awareness is key. Keep referring to the map.
Recommended Provisions
All Food, 6+ Antivenom, 6+ Holy Water, 6+ Herbs, 16+ Torches.
Enemies
I won’t go into full detail of each individual enemy here (check the wiki page for that), but I will list the enemies to help you search:
Malignant Growth, Defensive Growth, Flesh Hound, Polyp, Antibody, White Cell Stalk (accompanies mini boss), Templar Sniper/Gladiator (key choke points)
Probably the most dangerous thing in this map are the Hound/Polyp groups. Polyps mark positions 2,3 and 4, then the hounds focus fire the marked hero for +50% damage. Anyone who has lost a hero to puny spiders should know what I’m talking about. Having a Guard skill is the best counter for this.
Blight/Bleed resistances is really mixed. Way too much knockback, pull and stuns for my liking. Focus on blight is easy to counter with antivenom. But the enemy packs are nowhere as dangerous as Cultist Priests; they’re meant to wear out players who get lost from all the teleporting. Just be sure to Guard the hero is Marked.
Of big significance is the smaller cousins of earlier bosses, the Templar Gladiators and Templar Sniper. They’re about the same as their boss equivalents, except each one is alone, has only 1 action a round, and does not have the Revelation attack. Pretty easy, all told.
Mini-Bosses
Mammoth Cyst
2 actions per round- one action is dedicated to resummoing a White Cell Stalk if the White Cell Stalk is killed.
Not actually all that dangerous, but keeps summoning White Cell Stalks which will eventually teleport you across the map. After being teleported, the Mammoth Cyst retains the damage you dealt too it earlier if you find it again.
The mini-boss can blight as well as debuffs your damage – get rid of the debuff with Herbs.
I recommend perma-stunning the boss and White Cell stalk with a Plague Doctor. True, the boss has two actions, but one of those actions is dedicated to summoning the cell stalk. It isn’t difficult to heal of the occasional hit you take from the boss if the White Cell is still alive on the boss’s turn as long as you keep killing the White Cell Stalk, while occassionally healing of the damage from the mini-boss. I find I fully stress heal on the mini-bosses from all the crits I cause.
All in all, this raid isn’t too difficult if you have the map I have provided. It’s meant to be a test of stamina, but the map and perma-stun tactics circumvents this.
Heroes
Great: Plague Doctor, Hound Master/Grave Robber
– Plague Doctor: I’ve already explained why.
– Grave Rober: High accuracy and buffs her own accuracy is a good counter vs all those Dodgy beasts. Also she is one of the few heroes who hits position 4 (enemy side) from position 2 effectively. Kill that White Cell Stalk!
– Hound master: EVERYTHING is Eldritch Beast. The Hound master is the only other hero who hits position 4 (enemy side) from position 2 effectively. Also, he can stress heal, so that’s one up over the GR. Lsatly, the Guard skill is VERY useful as a counter to Marking. Marking is very viscious.
Good: Bounty Hunter, Hellion
-Hellion: The only hero who hits position 4 (enemy side) effectively from position 1. Kill that White Cell Stalk!
-Bounty Hunter: Combos well with Plage Doctor. Not nearly as good as hitting position 4 as the Hound master.
Fair: Everyone else except…
Bad: Leper
Did I mention this place is full of Knockback and pulls? The Leper hates this place as well.
How did you beat this raid?
Vestal/ Plague Doctor/ Hound master/ Hellion
For that Hellplague sandwich combo variation, haha. I brought extra herb for the Hellion.
But really, once you have a Plague Doctor and a map, the raid becomes quite easy. The encounters are not difficult, but get into too many encounters and you may find your heroes running out of stamina.
Trinkets
I put both PD stun trinkets on the PD… but that may have been excessive. The mini-boss takes two turns, the boss will very quickly lose the stun resist buff anyway. 80% stun on the mini-boss and 107% on the White cell stalk that’ll die soon anyway may be enough. It’s up to you – another stun trinket means the the boss will 110% be stunned and you can stun the White Cell stalk twice in a row (as well as other monsters you encounter).
I’d prioritise Accuracy and Blight resistance this map. As usual, buff up the HP of low HP characters. Squerc recommends the Crew’s Bell on the Hellion since there’s so much knockback and pulls going on.
Hell is in the heart
No map needed, there is only a single boss fight. There are 4 stages to the boss fight.
In a nutshell:
Balanced Bleed/Blight/Stress. Little bit of stun.
Able to attack any enemy position helps
Easy-peasy, but you don’t want to mess up now, right?
Somewhat Recommended Heroes: Hellion, Hound Master, Grave Robber
Not Recommended Heroes: None, it’s all good.
(Basically, use whatever heroes you have left over.)
Recommended Provisions
NO FOOD, NO TORCHES, all Holy Water, all Bandages, all anti-venom, all Herbs
Stage 1
Make sure you kill at least one Reflection every round, especially Imperfect Reflections. That’s it to tactics. Ignore the Ancestor himself. Easy right?
Stage 2
Ignore the “Absolute Nothingness”, hit the Ancestor. He will shift from position to position every turn.
Stage 3
Hitting the Heart heals heroes but inflicts blight. Whatever damage you do carries over to the final form on stage 4. Reducing the Gestating heart to zero HP triggers the final form.
Wait too long however, and it’ll move to the final form on its own. So you could consider spending the turns healing and buffing instead of hitting the Heart, but I’d hit it anyway with Holy Water activated.
Note that effects inflicted on the Gestating Heart carry over to the final form.
Stage 4
Here is the real bossfight, but it’s not too tough.
Come Unto Thy Maker
You’ve probably heard how the boss autokills two heroes with this skill, right? To be more precise, the boss will reduce your party size to 3 once it is down to 2/3rds health. It will then reduce your party size to 2 at 1/3rd life. So it will not activate if your party size is already down due to deathblows.
The good thing is, the game will ask you who to sacrifice. This should probably be the hero at highest stress or closest to death. So plan your party and skills in such a way that everyone can attack even if there are only 2 heroes left.
Interestingly enough, if you have only 1 hero left, the Highwayman becomes a god of Death. (Pointblank shot) A jester also works to a lesser extent (use Herbs).
WilliamDrens shares that TWO Highwaymen left become even more ridiculous, haha.
Other than that, the boss will stress the highest stress hero, use a Bleed attack on heroes with low bleed resist, and use a combination Blight AND Stun attack heroes with lowt Blight/Stun reist. There’s actually reason to keep Bleed resist low! (*peers at Leper*)
Heroes
Good: Hound master, Hellion, Grave Robber
– Hellion: The only hero who can hit any enemy from position 1.
– Hound master: One of the only heroes who can hit any enemy from position 2.
– Grave Robber: The other hero who can hit any enemy from position 2.
Fair: Everyone else
Bad: None?
– Jimbly notes that if you have an abomination whose stresses out, he’ll stay in human form and cannot turn back due to all 4 stages of the boss battle being considered only 1 long fight.
How did you beat this raid?
I used whatever heroes I had left over (*cough* Leper *cough*):
Highwayman/ Occultist/ Leper/ Hellion
What works best?
Grave Robber/ Vestal/ Hound master/ Hellion… I think
What if I want to use a Crusader and a Highwayman?
Highwayman/ Occultist/ Crusader/ Hellion is good. But you’ll probably win whatever you throw in.