
Overview
This is my own personal build for Nisha, it focuses on high Ricochet shots and Critical Damage. This build is quite different to those posted up as this doesn’t really rely on showdown (Only for when you ‘really’ need to deal some hurt). I don’t use showdown as much, only to regain some shields if I’m in a pinch or take out something big (which is rare). This build won’t need the Legendary class mods or Oz kits to work as specialist class mods make this build shine due to its different approach.*new* Level 70 updated with skill breakdown, builds and gear notes.
Introduction
The idea of this build is to shoot and hit any enemy with barely any effort in aiming while not in showdown, even behind cover. If a Scav is behind cover on a roof of a building, aim at the cliff nearby or another building and the shots will hit him for critical damage – a straight up kill. Scav using a jetpack? Shoot the ground in front.
The downside to this build is the need to stay in a ‘kill skill’ mode, which isn’t hard during the moment, only when your in fight for life or a first confrontation with a group. To remedy this is to aim at the weakest of the group (smallest kraggon, tork, normal scav etc) then you have the snowball rolling.
Fun upsides would be able to kill enemies not even within Line of Sight or from distances that would deem too far to accurately shoot with a weapon. Right-angled shots are always fun, speedruns to farm bosses are much easier/
The Skills and Gear I’ve chosen all compliment each other and I’ll best describe how I find they work together. And here we go…
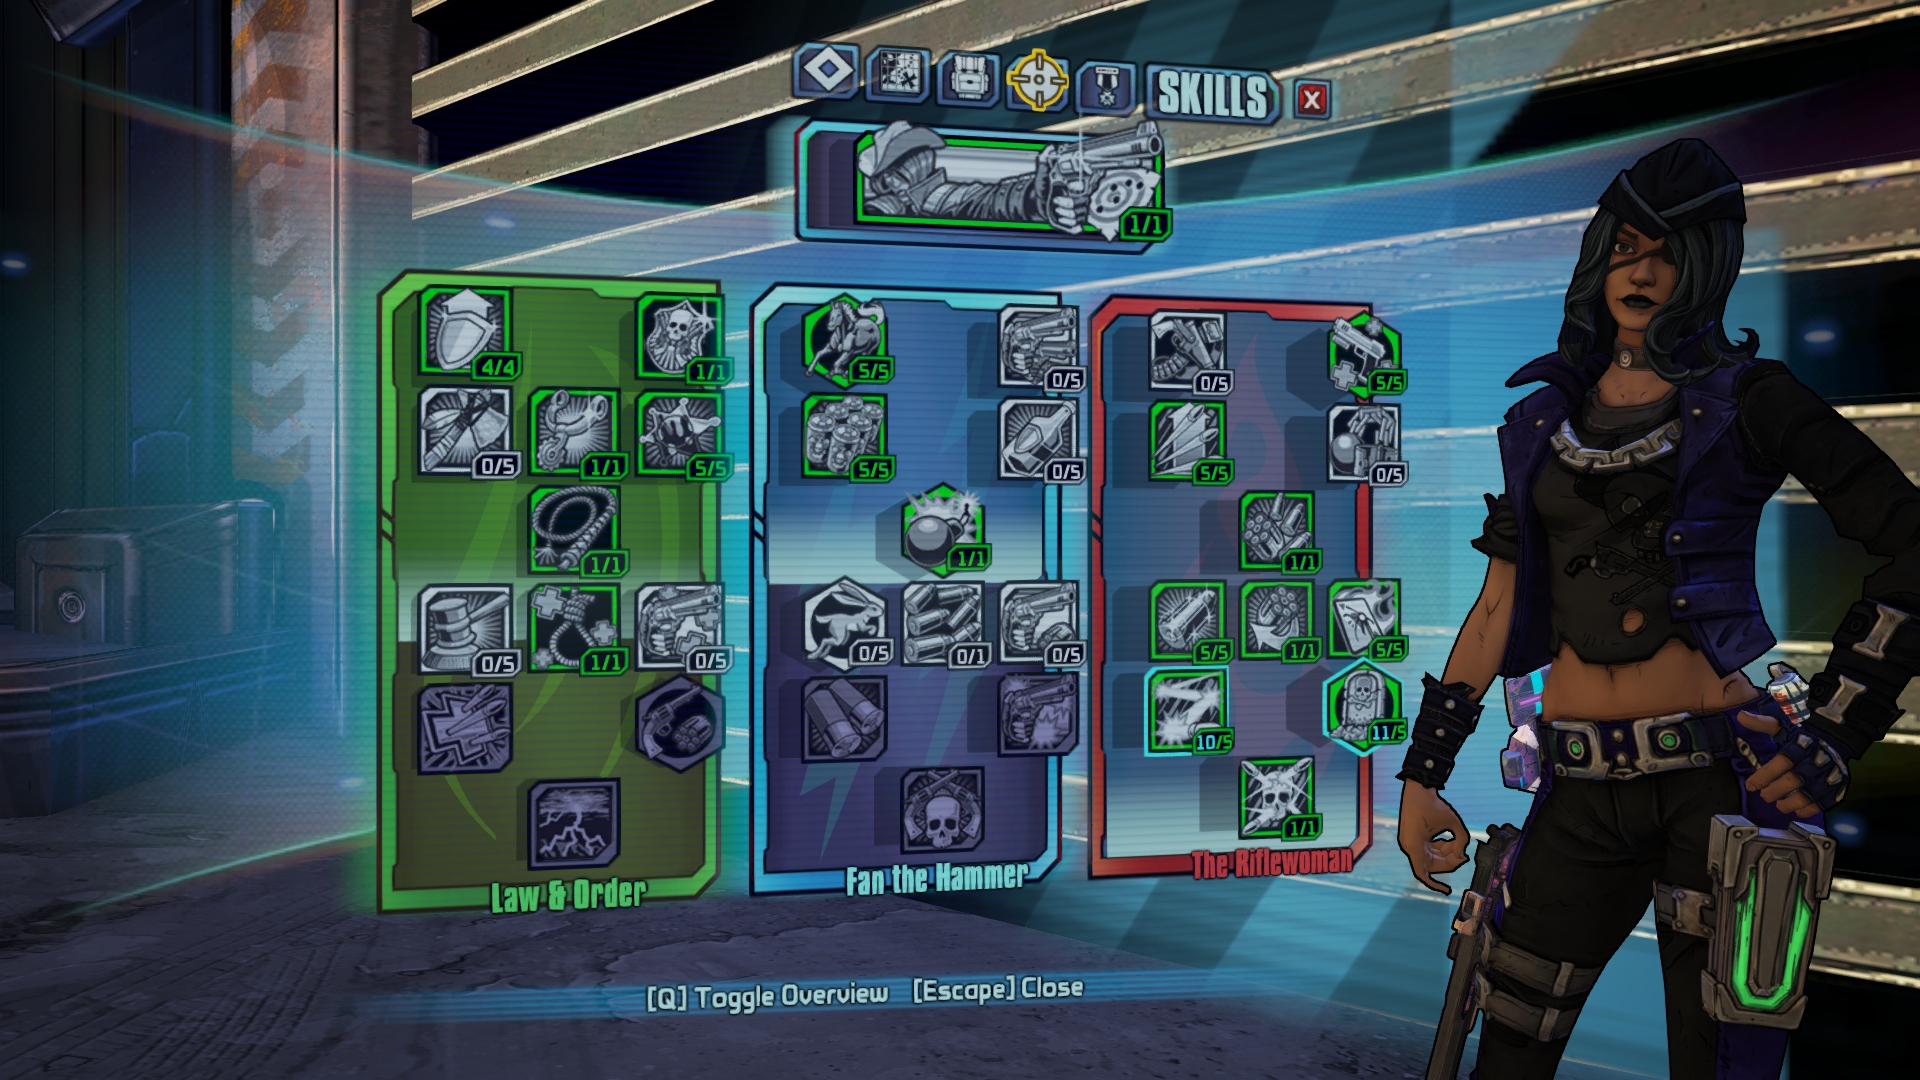
Skill Tree and Breakdown
The main tree to start off with would be The Riflewoman to be able to start Richocheting.
This is the Level 50 original build.

I’ll detail the Skills I’ve chosen and how they respond with the build and gear. I’ll also detail the Skills that didn’t make the list and as to why I didnt choose them.
The skills I detail will reference Jakobs weapons, which are ideal for this build and be detailed further.
This is the Level 50 Revise to continue onto the Level 60 Build. (Best to use all of Law & Order or none as it may detract from either damage or survivability)

Bona Fide Grit
Kill Skill. Killing an enemy grants you bonus Critical Hit Damage and Health Regeneration for a short duration.
The Critical Damage and Health Regen speak for themselves for this setup.
Quick Shot
After Reloading, for a short duration, you gain increased Gun Damange and Fire Rate when shooting from the hip.
The Gun Damage is what you aim for. Fire Rate is just wasted when using Jakobs weaponry, but helpful for Jakob snipers though.
Fistful of Bullets
Increases your Magazine Size with all gun types by 3.
This skill makes the Legendary Shotgun Striker much more appealing, increasing its shot count to 5-6.
Impatience
Killing an enemy grants you a stack of Impatience, increasing your Reload Speed by 20% for each stack. All stacks are lost after reloading. Stacks up to 21 times.
By the end of the build I was able to 1-2 shot basically any non-boss mob, including Super Badass mobs. Using a Skullsmasher with a 14 clip size, its not uncommon to have more then 10 kills which equates to a reload speed of 200% or so.
Hot Lead
Your Critical Hits with non-elemental guns deal additional fire damage with a high chance of igniting enemies. The damage of the fire and ignite damage is based on your gun’s damage.
At level 5, this adds 25% of your weapon damage as fire. Since you will be dealing criticals on a regular basis, this just adds on more gun damage which means higher critical damage. Also the DoT effect works in vacuum it seems, even tho its not visible. The DoT of Hot Lead still activates Crack Shot if its the first shot.
Crack Shot
The first shot fired from a fully loaded magazine causes Bonus Damage. If you kill an enemy with this shot, they explode dealing damage to all nearby enemies.
The 50% bonus to gun damage, especially from Jakobs weapons make this shot the ‘1 shot kill’, making it easier to get the build rolling. Works well with Hot Lead as the DoT still counts towards the first shot.
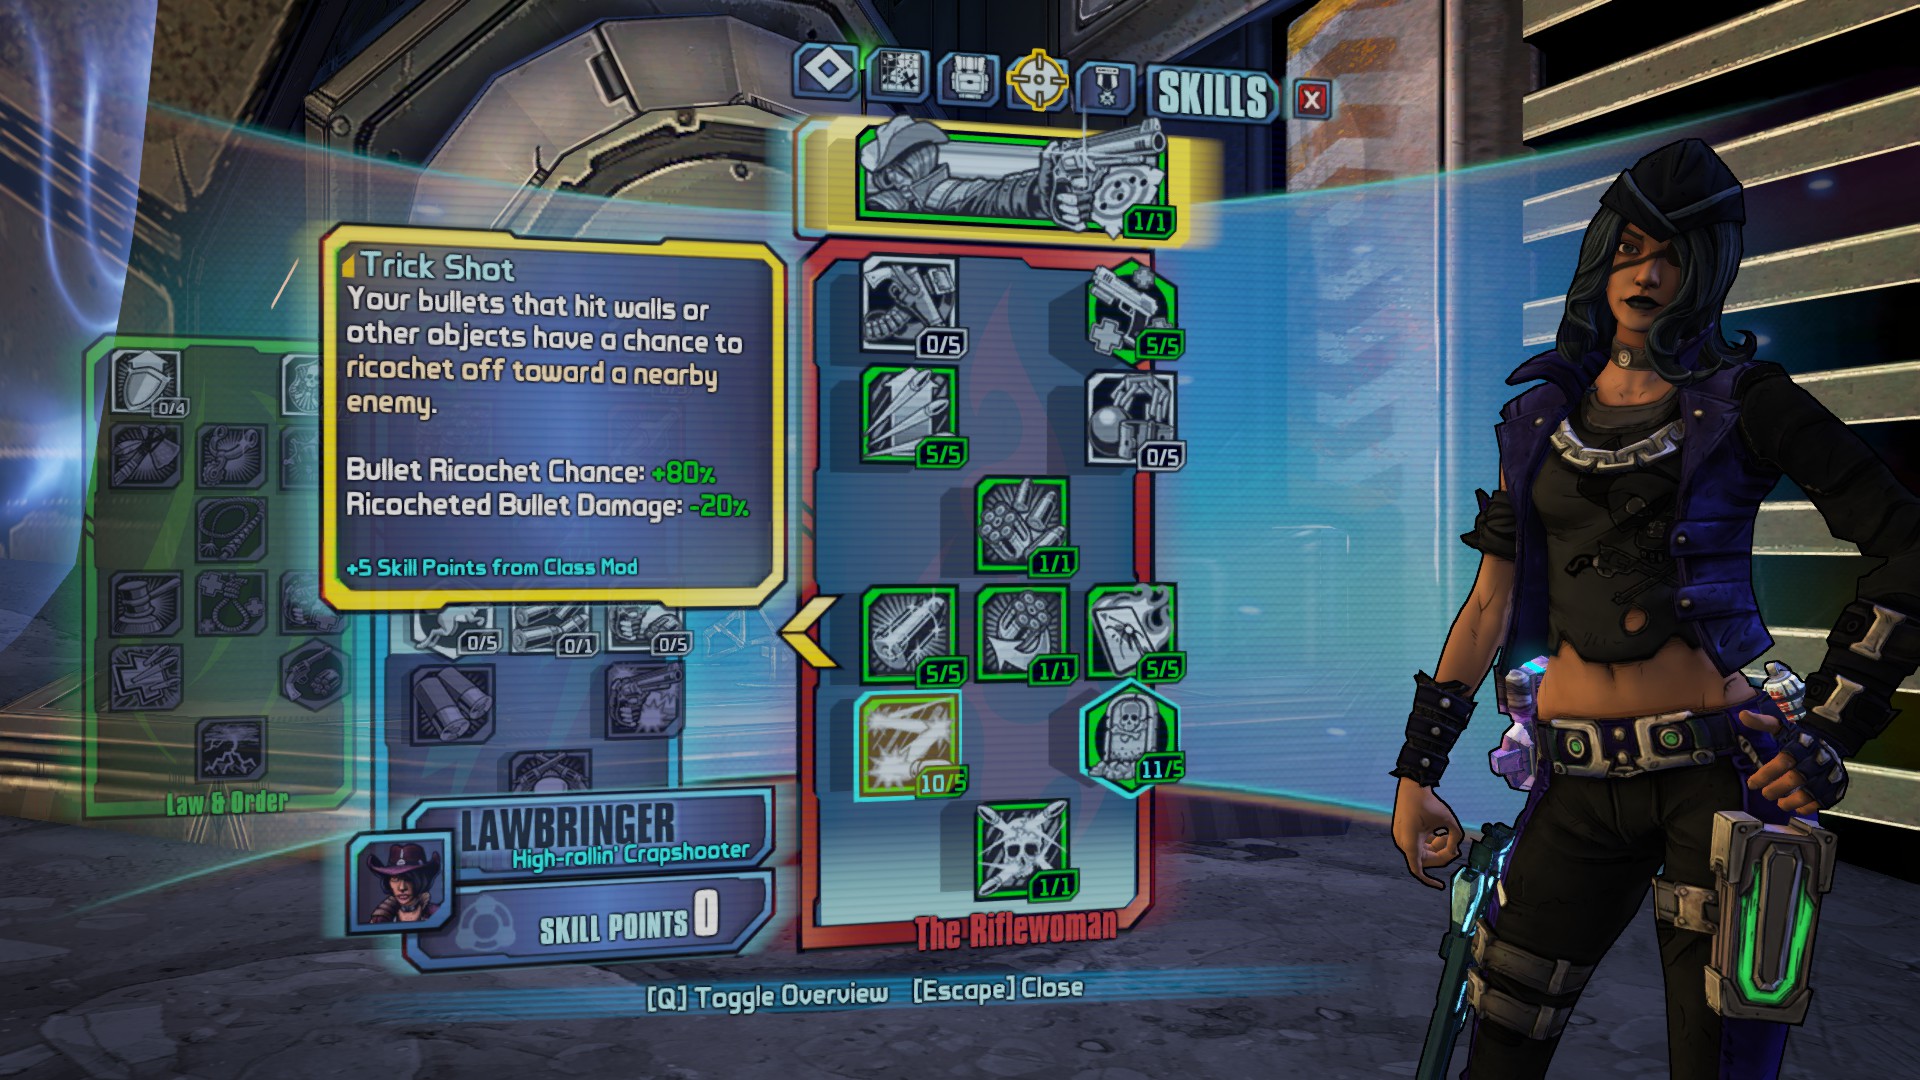
Trick Shot
Your bullets that hit walls or other objects have a chance to ricochet off toward a nearby enemy.
Core skill – With the help of the class mod which adds +5 (total of 10), 80% of your shots will ricochet. When using a gun which shoots multiple bullets (6+ shots), 80% of each shot would be close to a near guarenteed ricochet shot will land on a target.
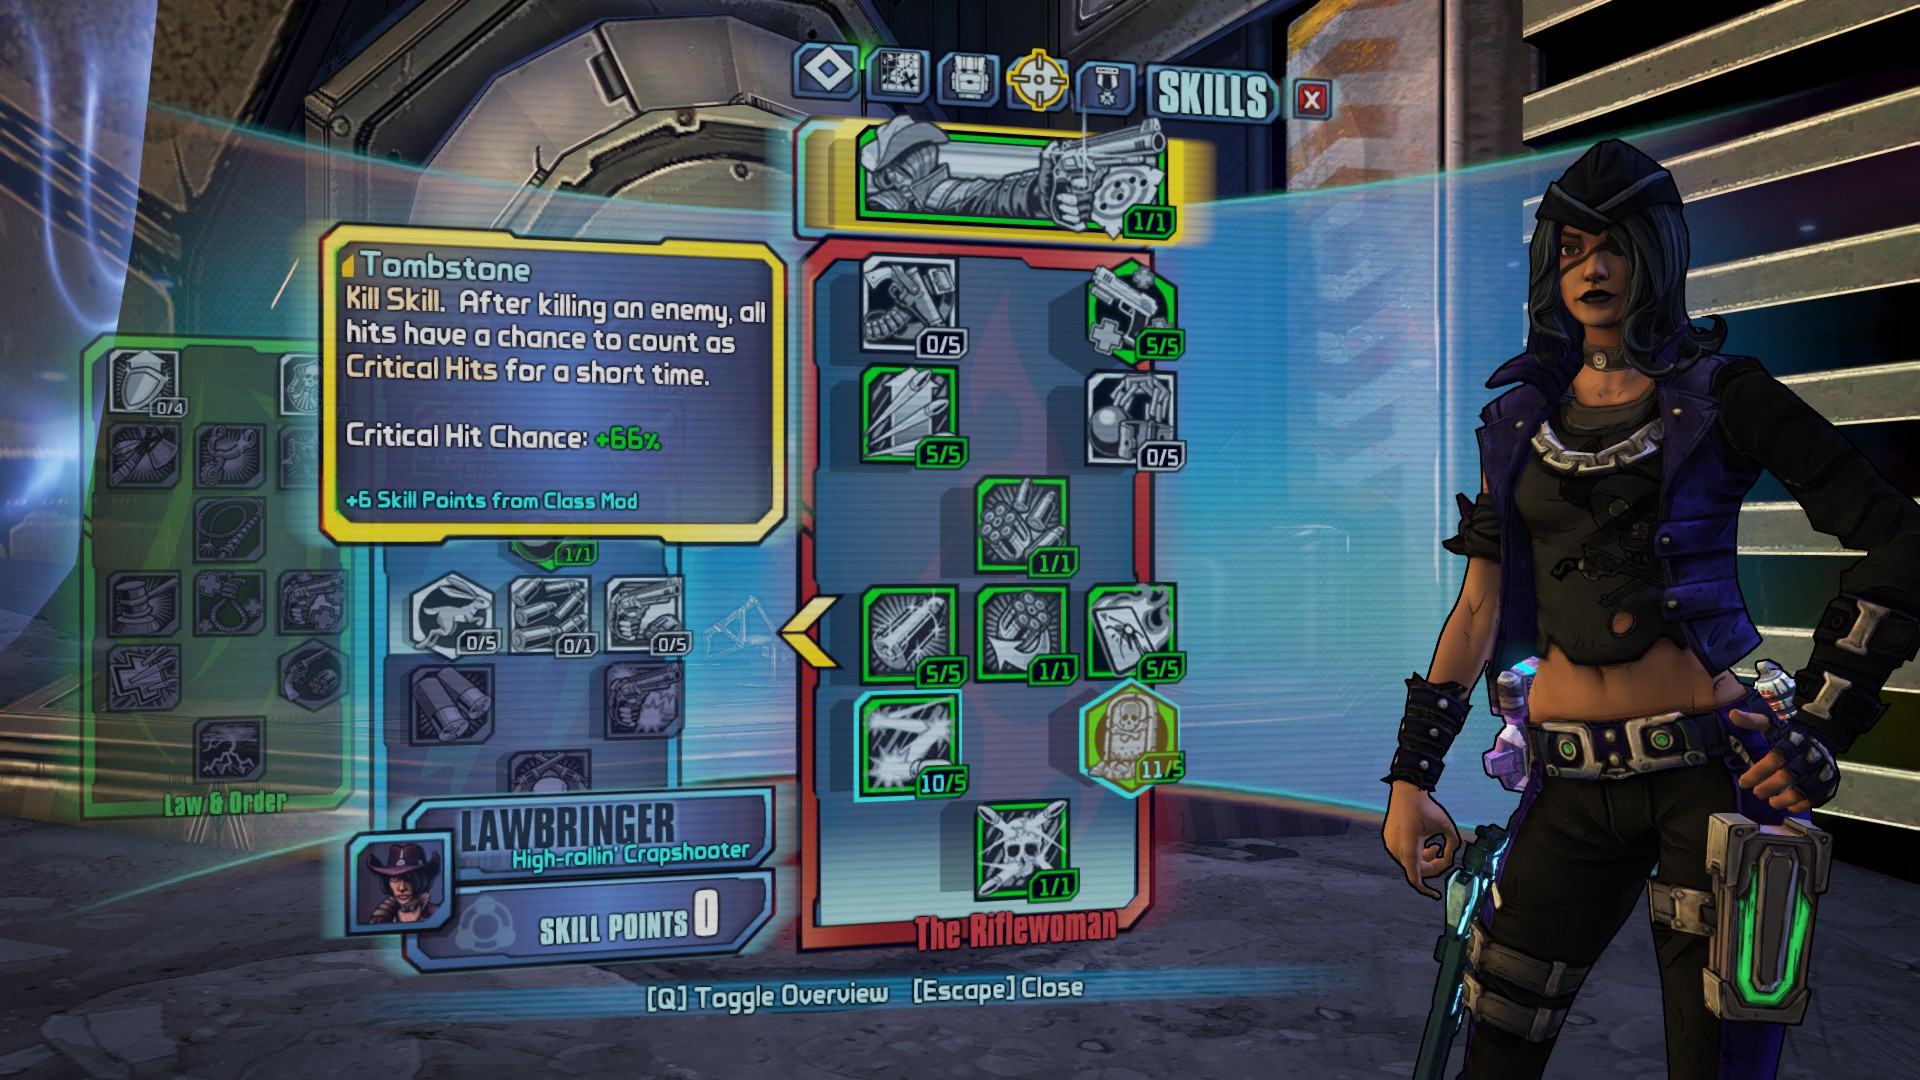
Tombstone
Kill Skill. After killing an enemy, all hits have a chance to count as Critical Hits.
Core Skill – With the help of the class mod which adds +6 (total of 11), 66% of all shots count as critical. With the high rate of ricochet from multiple bullets, gun damage and critical damage bonuses from class mod and oz kit (and gun bonuses from Jakobs), it all comes together.
The Unforgiven
During Showdown all shots that hit enemies ricochet towards other nearby enemies, dealing 10% weapon damage per hit. Also, Showdown ending triggers an Explosive Nova on all enemies who have been shot by you.
Even though I don’t use showdown unless in a pinch, this just tops off the tree.
Saddle Up
Kill Skill. Killing an enemy grants you increased Movement Speed and Gun Damage for a short time.
The gun damage helps with increasing the crit damage and movement speed helps moving to the next group of mobs. You won’t be stationary at all with this build.
Magnificent Six
The last 6 bullets in Non Elemental Weapon clips deal extra Damage.
Using Jakobs weapons make the most of this skill. The Striker will have all its shots gain the bonus 30% damage, with the combo of the guns unique +72% crit (+130% with Doc Prefix) it makes the Striker devastating. Most Jakobs Pistols/Snipers will make somewhere around half the clip take advantage of extra damage.
Short Fused
Kill Skill. After killing an enemy, all your shots deal bonus Explosive Damage.
Increased damage overall after a kill.
Bottled Courage
When Showdown begins, a portion of your Shield is instantly restored. Also while Showdown is Cooling Down, you gain imporved Shield Recharge Rate and Shield Recharge Delay.
I’ve used my last 3 skill points into this, as I don’t use showdown as a regular killing device, its my last clutch of survival with the small gain of shields.
Notes: Whenever I do use Showdown, a huge amount of damage is dealt. But the only time I use it is when versing the Invincible Sentinal or just want to clear an area faster.
Snap Shot
When firing from the hip, you gain dramatically increased Accuracy and Recoil Reduction.
With the aid of the Precision Oz Kit, shooting from the air is quite accurate. But as 80% of my shots ricochet, accuracy isnt exactly needed, just a general area.
Unchained
Shooting an enemy grants you increased Fire Rate with all gun types. A stack of Unchained can only be gained once per second. All stacks are lost if you don’t shoot any enemies for 10 seconds.
While I use Jakobs weaponry as a base, this skill wasnt needed.
Ruthless
Kills made during Showdown extend its duration.
As I previously noted about not using showdown often, this would be wasted.
One For Each of Ya
When using a Pistol, you get an exact copy of that gun in your offhand. While using Ironsights, you shoot with your main hand only.
I had a build which used this, but the gap to reach it made me invest points into other skills which wouldn’t help as much.
Notes: Skills after Short Fuse don’t benefit the build as much. Gunslinger and High Noon are showdown related skills which would be wasted. Faster ‘n You would only be useful for reload and weapon swap as Jakobs rate of fire is to the user firing speed. Hell’s Comin’ With Me! was helpful but not as much due to Jakobs ability to fire with each click. Saw better investment in other tree.
Class Mod, Oz Kit, Shield and Grenade
I find using a Specialist Class Mod can show to be more effective in specific builds, instead of using the Legendary Class mod which shares goodness through all Tree’s. It also may be easier to find specialist class mods over finding Legendary class mods as all bosses would drop them. Iwajira would be the best to find class mods of Blue/Purple variety.
Also a note on using Blue class mods over Purple. Blue class mods are the only mods which have a +6 to a skill and +5 to another. Purple have +5/+4/+4.
High-Rollin’ Crapshooter
The Purple variant has Unchained as the 3rd skill, which I dont even use. So the Blue variant is actually much stronger with its extra +1 to both of the core skills I use.

I can’t offer any alternatives as this would be the Core of my build. Without it, wouldn’t be effective.
The Precision Strike Oz Kit is my prefered for this build due to its Accuracy/Critical Bonus while airborne. I tend to look for a high Critical stat before others as it would benefit overall setup. As this build requires alot of movement, being in the air is natural most of the time.
Oz Kits drop from all Bosses, Iwajira drops a good selection.
Alternatives would be EDD1.E if you want more survivability but will see a decrease in damage.


I don’t have a prefered shield for this build. So any shield you find thats suits you is fine. I use an Adaptive Shield to help my survival in general. I also don’t have a Reogenator to try out.
Again, Shields drop from anyone and vending machines.

Any grenade you prefer. But I recommend the Storm Front. The continuous shock damage actually counts as ‘shots’ for this build. So you will experience very high critical damage from the shock when you get a kill skill.
Storm Front doesn’t have a specific drop, so loot sources or vending machines are best bet.

Weapons
Maggie
This gun would have to be the Heart of this build. Each shot fires 6 bullets at the cost of 1. I would recommend trying to get the Dastardly Prefix as it increases weapon damage, which in turn raises the critical damage. Jakob Pistols have a bonus critical multiplier of x2.5 over other brand pistols of x2.0.
Having 6 shots with the 80% chance to ricochet, makes this amazing. Half the clip would make use of Magnificent Six and make full use of Hot Lead. Instead of relying on a single high powered shot that has 80% to ricochet, but wouldnt be bad either if it does land.
I’ve tested out the Two Fer Prefix which fires 10 bullets at the cost of 2. Since the overall weapon damage was lower (around 1150) the critical damage wasnt as high but since there was more shots to ricochet it may even out. Lower accuracy of the Two Fer may make further trick shots a bit harder to set up.
To find Maggie, best bet is to use the Grinder/Vending machine.

Striker
This shotgun would be the Soul of this build. Each shot fires 7 Pellets at the cost of 1 ammo (9 Pellets if using Rustler’s Prefix). With a base clip size of 2/3 the skill Fistful of Bullets greatly enhances the damage possibility of a clip of 5/6. Every shot would take on the 30% Bonus of Magnificent Six and works well with Hot Lead. The Striker’s natural +72% critical damage bonus increases the potential damage, moreso when using the Doc Prefix which adds the ‘rough 50%’ bonus on top to make the Striker a total of +130%. Jakob shotguns also have bonus critical multiplier of x2.3 over other brand shotguns of x2.0. Again having 7 pellets with 80% chance to ricochet each shot with the extra 130% crit damage, makes this shotgun a must have.
The Striker drop from Belly in Crisis Scar. Also from Grinder/Vending machines.
For a non-Legendary alternative the Longrider line of Jakob shotguns would be similar, just without the crit bonuses.
You can use other high damage, large pellet count but you won’t make the most use of the skill Magnificent Six.


Skullsmasher
This Jakobs Sniper Rifle is following the same trend as the Striker and Maggie. Multiple shot for the cost of 1 ammo. Makes use of the skills Hot Lead and half the clip would use Magnificent Six.
All Sniper Rifles hold a x2 critical multiplier but unlike other gun types sniper rifles have a Base Bonus to critical damage. All snipers hold the hidden statistic of +100% to critical damage but Jakobs are +160% to critical damage. When a sniper gets the TumTum Prefix which increases the critical damage, it’s only a 20% bonus. So now the hidden statistic is revealed as +180% critical damage. Its a total, not an addon. I found that a higher overall base damage Skullsmasher would do better then the TumTum variant. Haven’t found a Skookum Prefix which increases damage to test out. But the shown Skullsmasher did higher crit damage then same level TumTum Skullsmasher which was 300 base damage less.
Skullsmasher is dropped by Nel in Regolith Range. Also Grinder/Vending Machines.

Alternatives would be a Jakobs high damage sniper rifle.

I tend to leave this spot open for any gun of choice. But my swaps are:
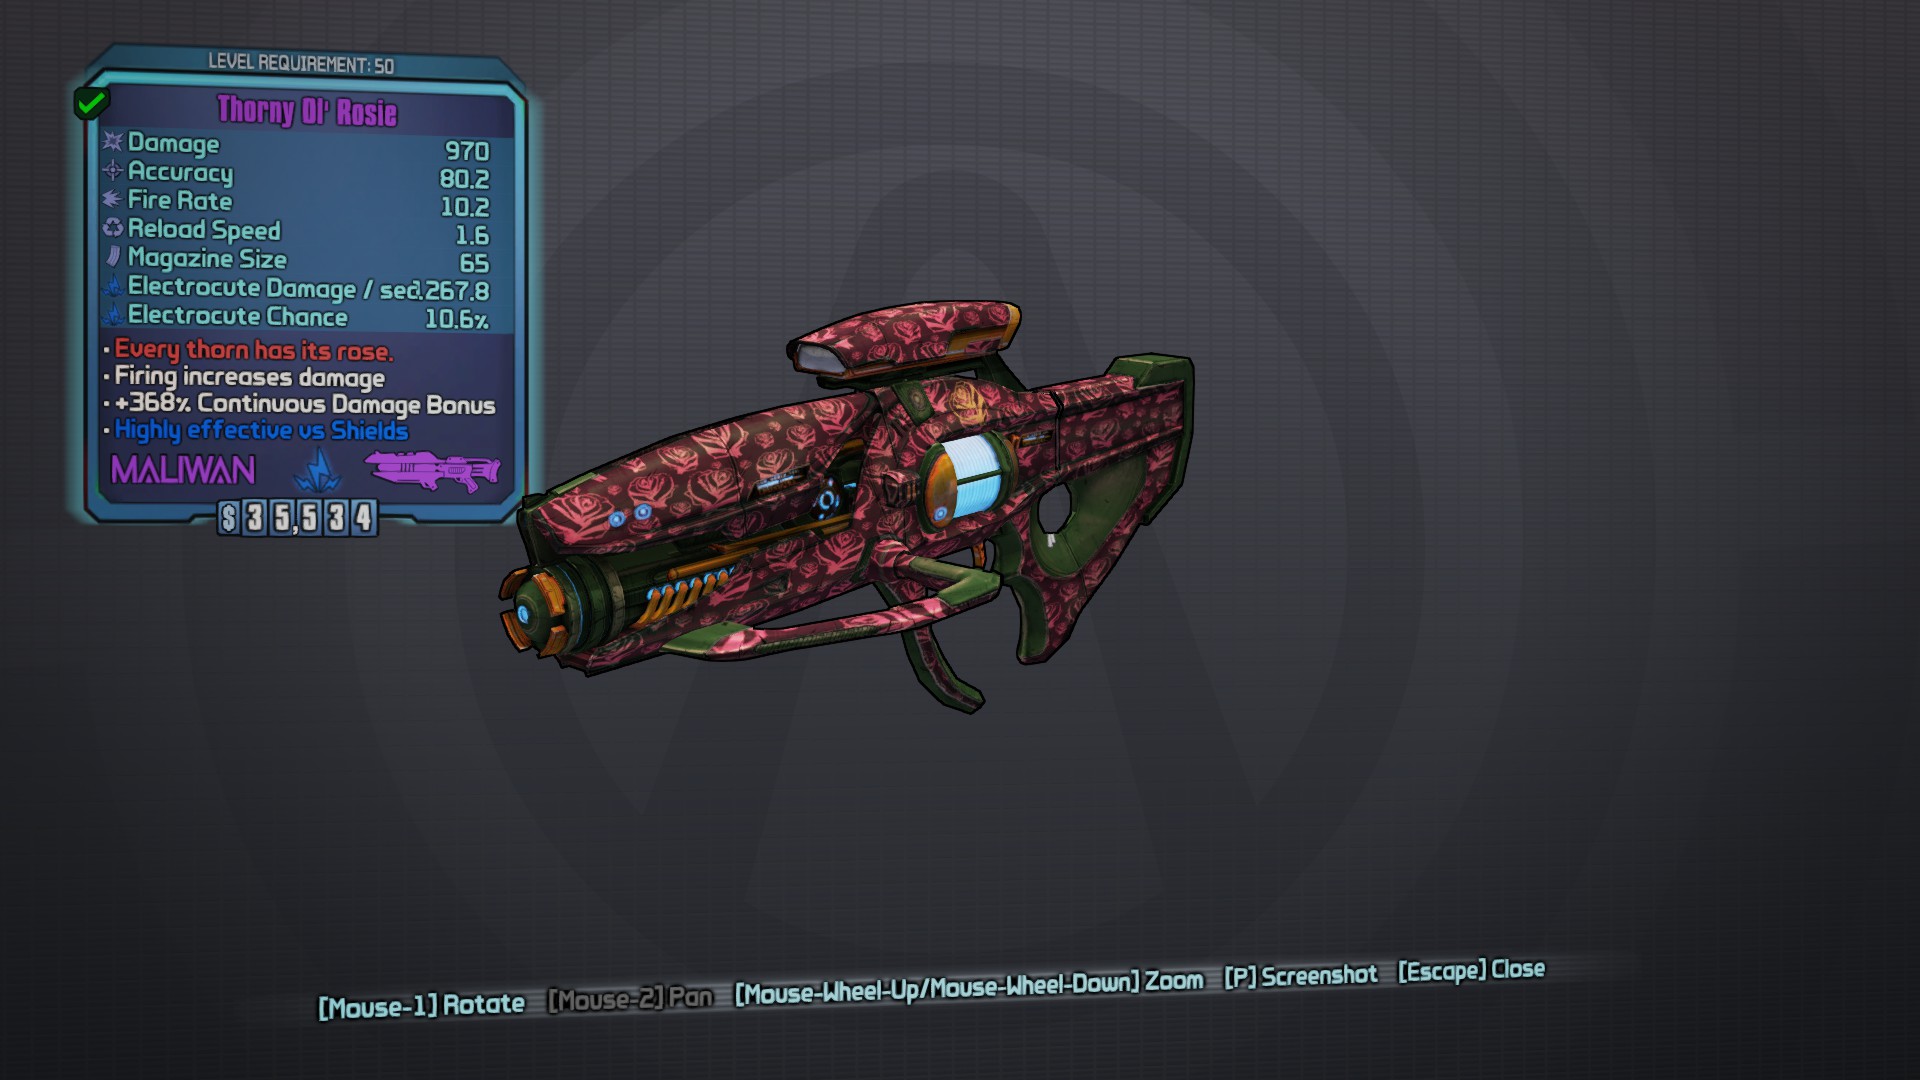
Thorny Ol Rosie – It’s amazingly high continuous damage (+518% now +368%) and great for Nisha in Showdown. The amount of Critical damage this can dish out is crazy.
Obtained as a reward for finishing TVHM.
Moxxi’s Probe – For health regain.
Obtained as a mission weapon from Torgue-O Torgue-O as long its not completed.

Casual Flakker – Casual Prefix increase projectile count. This gun is great for just crowd control over a large area in front of you. Especially when you swap to it from a kill skill. A single shot in the right spot is enough to take out a Rampant Felicity. Overall its just a ‘fun’ weapon.
Flakker can be obtained from the Even-More-Disgusting-Tork fought during the mission All the Little Creatures or Grinder/Vending.

Intense 88 Fragnum – The Intense Prefix increases rate of fire, but the guns natural +25% to critical damage makes it another fun weapon to try. The Luneshine Crit Bonus was just a nice touch.
Best bet to obtain is Grinder/Vending Machine.

Cyber Eagle – This Gun was the first level 50 I obtained and helped me obtain the rest. It’s 100% accuracy helps in all situations, shock is good element to take down heavy shields. It doesn’t gain any advantages like the other Jakobs pistols as it has an element which cancels Hot Lead and Magnificent Six.
The Cyber Eagle can be obtained during the mission The Secret Chamber.

Excalib4stard – This lasers +110% crit bonus makes it work for this build, but sadly only 1 shot. The freezing ability helps make up for the lack of additional shots and the low rate of fire (which this build doesnt have much of).
Excalib4stard is found at Stanton’s Liver.

Level 60 Additions, Skills, Breakdown & Alternative
There are 10 extra points to add onto this build now, which I find helps the survivability as I venture down the Law & Order Tree.
The Law & Order Tree only requires 13 skill points, so if I remove the 3 points I shoved into Bottled Courage its the exact amount I need to pull off this build.
Order
Everytime you take 15% of your maximum health in damage you gain a stack of Order. Based on your number of Order stacks, you have a chance to instantly heal double the damage taken. Order stacks are quickly lost when outside combat.
This will be the sole provider of survival now as Showdown won’t recover shields anymore. Currently 10 stacks = 12% chance to recover health.
Law
Increases your Shield Capacity and Melee Damage.
The increase in shields is a nice touch.. and the perk is required to continue further.
Rough Rider
Slam Augment. Your Slam attack’s damage is increased by 25%. Dealing damage with Slam grants you 2 Order stacks per enemy damaged. This skill also raises your Order Stack Cap by 5.
You generally won’t be slamming to gain stacks, but the increase Stack Cap is greatly appreciated. Currently 15 stacks = 18% chance to recover health.
Wanted
When an enemy would cause you to gain an Order stack, he gains a Wanted stack. Damaging that target consumes all Wanted stacks and deals Bonus Damage based on the number of stacks consumed and your level. The maximum number of Wanted stacks is 5 and enemies still gain Wanted stacks even if you are at your maximum Order stacks.
This is a nice kick in the teeth for any enemy hurting you, any increased damage is welcomed as it raises Crit damage.
Discipline
Upon receiving 10 Order stacks, your Shields are restored to full. Also, while at 10 or more Order stacks you gain improved Melee Damage, Gun Damage, and Shield Recovery Delay for each Order stack. This skill also raises your Order Stack Cap by 5.
Many great features with this perk. Increase of gun damage increases Crit bonuses, shields recover after 10 kills (gaining 10 stacks), shield delay lowered and an increase of Order stacks. Currently 20 stacks = 24% chance to recover health.
Blood of the Guilty
When you or an ally kills an enemy, you gain a stack of Order and have 5% of your health restored. This skill also raises your Order Stack Cap by 5.
This is a big hitter perk for one 1 point, adds alot of survivability alone. Any kill grants an Order stack (which will be frequently) and gain 5% health for every kill (also frequently). The increase of Order Stacks rounds it out to 25. 25 Order stacks = 30% chance to recover health.
With these Perk chosen I have found it much easier to survive now while dealing large amounts of damage. Showdown is great to start off a fight just to grab the skill kills or just to take down an Ultimate Badass.
I actually started off this way in UVHM as I knew I had 10 (well 13 if using previous left over from Bottled Courage) and it worked out rather well. You’ll still do alot of damage while having the full protection of the Law & Order Tree.
I still prefer using perks from 3 Tree’s but the perk Rarin’ To Go got me interested. This Alternate build incorporates melee but as the original build is more of a medium/long range type, this was just an experiment.

Overall using this Alternative you reach a total of 30 Order stacks (36% chance to recover Health) which in turn makes the perk Rarin’ To Go pretty awesome.
After removing all the Fan the Hammer Skills and the 5 points into Crack Shot, you should have enough to work a melee strategy further into the Law & Order tree. (*Further debate about the 5 points in Crack Shot further down*)
The Third Degree
When Showdown ends or upon killing an enemy, you gain increased Damage with your next Melee Attack. This effect can stack up to 5 times.
This allows a 500% damage Melee attack. It’s a great way to start off a fight with a new group of enemies as the stacks don’t decay, even if you accidentally melee ‘nothing’ they won’t go away. It’s not very hard to gain stacks either, only after 5 Crit kills.
Rarin’ To Go
Kill Skill. Killing an enemy graints you bonus Reload Speed and Gun Damage based on the number of Order stacks you currently have.
This is amazing when combined with 30 Order Stacks. A total of 60% Weapon Damage (nice boost to Crit damage) and 60% to reload which this build doesn’t have too much on. Adding on the highest survivability chance it’s a nice bonus.
Thunder Crackdown
Melee Override. Your Melee Attack causes a large cone-shaped Shock burst dealing increased damage for each Order stack. This skill also increased your Order Stack Cap by 5.
Adds a total of 30 Order stacks and with the bonus damage of shock of +25% per stack to melee, adds a nice bit of shield depletion which your Hot Lead can now have a field day.
After choosing the above skills you will have 5 Points remaining if you have removed Crack Shot.
Due Process
After hitting an enemy with a Melee Attack, you deal increased Gun Damage with all gun types for a few seconds.
This fits in best with the Melee Alternative Build. But I found with my playstyle I didn’t punch things as much to get the bonus +25% gun damage during a firefight. Was good at the start of a fight with the 500% melee damage, but after that it became wasted.
Crack Shot
The first shot fired from a fully loaded magazine causes Bonus Damage. If you kill an enemy with this shot, they explode dealing damage to all nearby enemies.
Still works great if you start off with a shot instead of melee but it works throughout the gunfight.
Saddle Up – Fan the Hammer Tree
Kill Skill. Killing an enemy grants you increased Movement Speed and Gun Damage for a short time.
This still gains the 25% bonus to guns like Due Process and will be in constant use with continued kills but has to be activated with a kill, which Crack Shot has an upper hand without requiring a kill to use.

Again I still prefer my choices of perks within 3 Trees as I find that each perk works its purpose for this Build. I have enjoyed this build moreso now as I have been able to survive more confrontations with relative ease now.
Level 70 Additions, Skills, Breakdown, Alt. & Gear
Now there are another 10 points to play with. First off I’ll list the skills I’ll be delving into and 4 possibilities of a final build, depending on what game style your looking for.
Bottled Courage
When Showdown begins, a portion of your Shield is instantly restored. Also while Showdown is Cooling Down, you gain imporved Shield Recharge Rate and Shield Recharge Delay.
This skill makes another appearance again just as a fail-safe when your in a pinch and need to go into showdown to help survive an ordeal.
Faster ‘n You
Kill Skill. Killing an enemy greatly improves your Reload Speed, Weapon Swap speed, and Fire Rate for a short duration.
This is not as essential for the main guns other then the Skullsmasher, but it will help any other gun you choose for the 4th slot if Rate of Fire is needed.
Hell’s Comin’ With Me!
After reloading or reaching your maximum clip via Pickpocket, for a short duration your gun has a chance to fire twice.
This skill just increases the damage overall just by adding that 45% extra shot chance, or just helps the life expectancy of you mouse with less frantic clicking 🙂
One For Each of Ya
When using a Pistol, you get an exact copy of that gun in your offhand. While using Ironsights, you shoot with your main hand only.
This perk alone doubles damage with pistols and finally able to attain it with this lvl 70 build with the survivability needed to back it up.
Jurisdiction
During Showdown you Regenerate Health and gain bonus Movement Speed.
This skill gets chosen for the showdown effect, healing whilst in showdown is a great fail-safe when things get much more hectic. Combo with Bottled Courage and it’s a great way to get out of a situation alive.
Rarin’ To Go
Kill Skill. Killing an enemy graints you bonus Reload Speed and Gun Damage based on the number of Order stacks you currently have.
This skill can result in some amazing damage and reload output. Granting the user a 2.0% damage increase per stack and the 25 stack possibility of this build, it would deliver a massive 50% damage output over all weaponry. With a great 50% bonus also to reloading. While you have 25 stacks and this skill maxed out, it’s just like having Crack Shot for every shot fired (except an even nicer ‘boom’ with the first shot).
This offensive build just goes all out and leaving the survivability as it stands. Adding in Faster ‘n You and Hell’s Comin’ With Me! for the 10 extra points, But removing 1 point from Crack Shot just so we can add in the amazing One For Each of Ya.
Reasoning taking out the 1 point from Crack Shot instead of Hot Lead was that its only a 10% decrease, down to 40% (which is still a good amount) for only 1 Shot. Hot Lead’s 5% decrease to 20% would make more impact as every shot is affected, not just the first shot from Crack Shot.

This defensive build would suit those who don’t really care for a 2nd Pistol and would rather a better outcome for survival. Adding Jurisdiction and Bottled Courage fills up the additional 10 points. Crack Shot won’t have to be deducted a point since we’re not aiming for that 2nd Pistol. The healing from Jurisdiction while in showdown generally helps the user and having Bottled Courage as a bullet buffer means that you will be able to heal before you start taking health damage again.
Adding in EDD1.E as told before increases survivability but lowers a bit of damage. This would be the ultimate way to survive with this build, without decreasing too much damage capabilities.

This build exchanges Faster ‘n You with Bottled Courage, adds in One For Each of Ya with a point drop to Crack Shot (reasoning in offensive build). The instant refill of your shields may be more beneficial then perks that are gained through a kill skill. Relying too much on a kill skill is a double edged sword as you might find yourself in a tough spot. But that’s the fun 😛
I guess this would be the more ‘defensive’ build with the 2nd Pistol.

This build uses Jurisdiction and Rarin’ To Go and no point loss to Crack Shot. The possible output damage is huge when using Rarin’ To Go, with a total of +50% extra damage with 25 stacks active can scale critical damage to some nice numbers. The added Jurisdiction can help in the moments after a fight where you could be ‘on fire’ or ‘electified’ and have a steady loss of health and the possibility of going down with no one to shoot, just healing over the ‘Damage over Time’ has made it much easier dealing with frustration.
This would be the more offensive build without the 2nd Pistol. But I even think it could out damage the ‘Offensive Build’ given the right circumstances with every weapon other then pistols.

(may update with more gear photos later)
All mentioned gear is still rather the same, just keep hunting for the same gear but with better stats. Oz Kits and Class Mod would fall under this.
The Shield I use is still an Adaptive Shield but I have been swapping them every now and then for a change. I’ve tried the Shield of Ages which is a unique shield from the Claptastic DLC, it seemed to fair well as it has an extremely high capacity. Overall still comes down to personal preference here.
Grenade mods are still a personal preference but the Storm Front is still the most recommended as it has the largest area of effect to inflict critical damage while the build is on a roll. As I have not come across a high level variant, I have been using Four Seasons which oddly enough I’ve encountered 3 drops on my final few levels. It’s a good substitute as it still inflicts a DoT which the build runs off with the effects of all different elements with each grenade tossed.
Weapons are generally still the same. Slots 1 to 3, I still recommend the Maggie, Skullsmasher and Striker.
With Slot 4 I’ve started trying out other various Hyperion Shotguns with fast Rate of Fire, High Clip and Low Reload. You go thru ammo much quicker but in a Fight For Life state, it can really dish out some damage as no kill skill effects are active in FFYL.
The weapon Cheat Code from the Claptastic DLC seems to fit in rather well into this build as it has bonuses to critical damage and is great in FFYL with less ammo consumption.
Another gun I’d like to try out is the Luck Cannon. Very high damage (some really nice crit damage) but only a single shot. This gun synergises well with Nisha as her Fistful of Bullets perk adds in 3 additional bullets for a total of 4 shots, all which would work with Magnificent Six and as the gun is still non-elemental (even with it having some explosive properties), would work well with Hot Lead too. I’ll try and get it with the Two-Fer prefix to see if it’s still viable to work well with this crit build.
Additional Notes – Revised / Lvl 70 Revisit.
After finding a good use of skills in the Law & Order tree I have become a fan, the additional 10 skill points opens up better odds of survival while retaining the high amount of damage (moreso now with Wanted and Discipline).
I have aquired a lvl 50 Celestial Class Mod which I was able to even use all 6 +5’s with a showdown build setup. I found it did alot of Damage without requiring to do too much regarding kills, had higher surviving due to showdown related perks and the class mod health recovery. But in the cooldown time I still did a fair bit of damage but I had to ‘Aim’ a bit more (I found its very fun not aiming hehe). Overall I still think the damage output is lower then the Crit build.
I tested this in UVHM at the Titan Robot Production Plant during the mission where you have to recalibrate the lasers that shoot at the waves scavs. I was using only the gun Maggie and was able to kill all Scavs at the doorway they come through and were never able to get any further – This was using the Rico/Crit Build. The Showdown build held them at the doorway when Showdown was in use, but during the cooldown they managed to break through as not enough damage/ricochets were hitting them. Just my thoughts and opinions.
I dropped the idea of using 2 Pistols mainly due to using up 10 other skill points that I didnt feel worked just to reach that 1 point, also pistols aren’t necessarily the central weapon in this build and only 1 of 4 slots (or 2 of 4 if using Moxxi/Cyber Eagle) could gain the extra gun.
These 10 extra Points finally made this build possible to use that 2nd Pistol viable. I am currently using Build 4 (without 2nd Pistol), it’s still quite risky as it needs kills to run, but thats what I find enjoyable. I like swapping between weapons for variety, but it’s hard to ignore that the Pistol (mainly Maggie) does so much damage, has a large clip size and a fast reload (not forgetting firing as fast as you can click) while comparing other Legendary weapons. The added Glitch weapons will offer some more interesting outcomes as the effects on them are random and powerful.
If you read this far I hope you find this build interesting enough to try, something different then a Showdown Build. I may upload a video later if anyone is interested. Or use steam broadcast when I’m online.